
Google Photos upgrades its image-to-video feature with Veo 3
Google Photos upgrades its ima...

Google Photos upgrades its image-to-video feature with Veo 3 | TechCrunch
Google Photos already offers video generation through its "Photo to video" feature, but the company says the addition of Veo 3 enhances that functionality with higher-quality video.Sarah Perez (TechCrunch)

Even if photography is just your hobby, why leave your images on a hard drive doing nothing?
Posted into The Profitable Photographer @the-profitable-photographer-msecchi

Why Alamy Still Matters: Stock Photography Tips for Beginners and Pros
Discover why Alamy remains one of the best stock photography platforms. Learn what to shoot, how to pass QC, and the strategies Marco Secchi used to license over £100,000 worth of images.Marco Secchi (Through the Lens 📷)
reshared this
 - Collegamento all'originale")
Designing an Open Source Micro-Manipulator

When you think about highly-precise actuators, stepper motors probably aren’t the first device that comes to mind. However, as [Diffraction Limited]’s sub-micron capable micro-manipulator shows, they can reach extremely fine precision when paired with external feedback.
The micro-manipulator is made of a mobile platform supported by three pairs of parallel linkages, each linkage actuated by a crank mounted on a stepper motor. Rather than attaching to the structure with the more common flexures, these linkages swivel on ball joints. To minimize the effects of friction, the linkage bars are very long compared to the balls, and the wide range of allowed angles lets the manipulator’s stage move 23 mm in each direction.
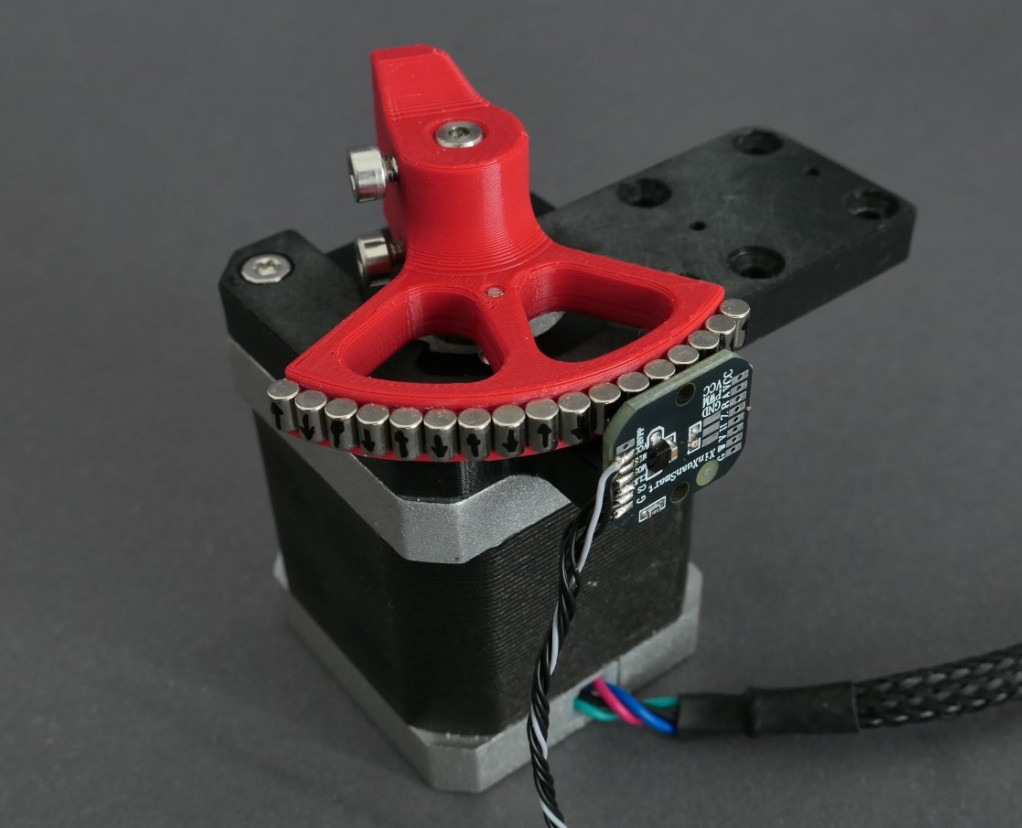
A Raspberry Pi Pico 2 and three motor drivers control this creation; even here, the attention to detail is impressive. The motor drivers couldn’t have internal charge pumps or clocked logic units, since these introduce tiny timing errors and motion jitter. The carrier circuit board is double-sided and uses through-hole components for ease of replication; in a nice touch, the lower silkscreen displays pin numbers.
To test the manipulator’s capabilities, [Diffraction Limited] used it to position a chip die under a microscope. To test its accuracy and repeatability, he traced the path a slicer generated for the first layer of a Benchy, vastly scaled-down, with the manipulator. When run slowly to reduce thermal drift, it could trace a Benchy within a 20-micrometer square, and had a resolution of about 50 nanometers.
He’s already used the micro-manipulator to couple an optical fiber with a laser, but [Diffraction Limited] has some other uses in mind, including maskless lithography (perhaps putting the stepper in “wafer stepper”), electrochemical 3D printing, focus stacking, and micromachining. For another promising take on small-scale manufacturing, check out the RepRapMicron.
youtube.com/embed/MgQbPdiuUTw?…
Thanks to [Nik282000] for the tip!


Porsche-Chef Blume strebt Rückkehr in den Dax an
Porsche muss den Dax verlassen, will aber schnell zurückkehren. Was Chef Oliver Blume zur Zukunft und den technischen Hintergründen des Börsenabstiegs sagt.

Comunità Iraniana di Parma e Associazione Italo-Persiana in piazza insieme il 13 settembre
Ammesse soltanto bandiere iraniane con il Leone e Sole, bandiere italiane e di partito [....]
parmanotizie.gaiaitalia.com/co…

Comunità Iraniana di Parma e Associazione Italo-Persiana in piazza insieme il 13 settembre
Ammesse soltanto bandiere iraniane con il Leone e Sole, bandiere italiane e di partito [….]Gaiaitalia.com Notizie Parma
Returning To An Obsolete Home Movie Format

A few years ago, I bought an 8 mm home movie camera in a second hand store. I did a teardown on it here and pulled out for your pleasure those parts of it which I considered interesting. My vague plan was to put a Raspberry Pi in it, but instead it provided a gateway into the world of 8mm film technology. Since then I’ve recreated its Single 8 cartridge as a 3D printable model, produced a digital Super 8 cartridge, and had a movie camera with me at summer hacker camps.
When I tore down that Single 8 camera though, I don’t feel I did the subject justice. I concentrated on the lens, light metering, and viewfinder parts of the system, and didn’t bring you the shutter and film advance mechanism. That camera also lacked a couple of common 8 mm camera features; its light metering wasn’t through the lens, and its zoom lens was entirely manual. It’s time to dig out another 8 mm camera for a further teardown.
A Different Camera To Tear Down

My test camera is a battered and scuffed Minolta XL-250 that I found in a second hand store for not a lot. It takes Super 8 cartridges, of which I have an expired Kodachrome example for the pictures, and it has the advantage of an extremely well-thought-out design that makes dismantling it very easy. So out it comes to be laid bare for Hackaday.
Once the sides have come off the camera, immediately you can see a set of very early-70s-analogue PCBs containing the light metering circuitry. Typically this would involve a CdS cell and a simple transistor circuit, and the aperture is controlled via a moving coil meter mechanism. This camera also has a large mostly-unpopulated PCB, giving a clue to some of the higher-end features found on its more expensive sibling.


Turning our attention inside the camera to the film gate, we can see the casting the film cartridge engages with, and the frame opening for the shutter To the left of that opening is a metal claw that engages with the sprocket holes in the film, thus providing the primary film advancement. The metal claw is attached to a slider on the back of the film gate, which in turn is operated by the rotation of the shutter, which is the next object of our attention.


The shutter is a disc that spins at the frame rate, in this case 18 frames per second. It sits in the light path between the back of the lens system and the film gate. It has a segment cut out of the disc to let light through for part of the rotation, this is how it operates as a shutter. On its reverse is the cam which operates the slider for the film advancement claw, while its front is mirrored. This forms part of the through-the-lens light metering system which we’ll come to next.


The mirror on the front of the shutter is angled, which means that when the shutter is closed, the light is instead reflected upwards at right angles into a prism, which in turn directs the light to the light meter cell. The PCB on the other side must have a charge pump which takes this 18 Hz interrupted analogue signal and turns it into a DC to drive the moving coil mechanism. There’s a 10 uF capacitor which may be part of this circuit.


Finally, we come to the powered zoom feature that was missing from the previous camera. On the top of the camera is a W/T rocker, for Wide/Telephoto. that operates the zoom. It is connected to a set of levers inside the case, which emerge as a pin at the front of the camera below the lens. This engages with a small gearbox that drives a knurled ring on the lens body, and selects forward and reverse to turn the ring. It’s driven by the same motor as the shutter, so it only works when the camera is operating.
I hope this look at my Minolta has filled in some of the gaps left by the previous article, and maybe revealed that there’s more than meets the eye when it comes to 8 mm movies. Careful though. If you dip a toe into this particular puddle it may suck you in head first!
Reposts of strips from my first-term collection, TRUMPBERT: OUR LONG NATIONAL NIGHTMARE (Trumpbert.com) most weekdays. New strips every Sunday.
What we can do: AuthorFreeman.com/what-we-can-…
#dilbert #parody #trump #satire #comic #webcomic #election #KamalaHarris

What We Can Do - Author Freeman Ng
My recommendations for the most effective and efficient organizations we can support for winning future elections.Freeman Ng (Author Freeman Ng)
Bees Manage to Build the Best Honeycombs, Even on Imperfect Foundations
https://www.smithsonianmag.com/smart-news/bees-manage-to-build-the-best-honeycombs-even-on-imperfect-foundations-180987272/?utm_source=flipboard&utm_medium=activitypub
Posted into Smartnews @smartnews-Smithsonianmag
🤖 Tracking strings detected and removed!
🔗 Clean URL(s):
music.youtube.com/watch?v=CL5m…
❌ Removed parts:
&si=nMKUxbQLBa8Gbjg2
🤖 Tracking strings detected and removed!
🔗 Clean URL(s):
youtu.be/H8XPg7qqYIg
❌ Removed parts:
?si=kHVVEJ84UExRSGMn


ASTRO FORECAST: SEPTEMBER 4th—14th, 2025
A ntinous is a Moon God. He is, of course, many other things and he wears many hats. But one of the ways he was worshiped in Antiquity w...antinousstars.blogspot.com
Rodents’ secret weapon? Thumbnails.
https://www.popsci.com/environment/squirrel-thumbnails/?utm_source=flipboard&utm_medium=activitypub
Posted into Evolutionary Discoveries @evolutionary-discoveries-PopularScience

Rodents’ secret weapon? Thumbnails.
Those tiny nails helped rats, squirrels, and more take over the world.Laura Baisas (Popular Science)
Venezia 82, in concorso 'Elisa' di Leonardo di Costanzo
https://tg24.sky.it/spettacolo/video/2025/09/04/venezia-82-in-concorso-elisa-di-leonardo-di-costanzo-1033669?utm_source=flipboard&utm_medium=activitypub
Pubblicato su Spettacolo @spettacolo-SkyTG24

Venezia 82, in concorso "Elisa" di Leonardo di Costanzo
Leggi su Sky TG24 l'articolo Venezia 82, in concorso 'Elisa' di Leonardo di CostanzoRedazione Sky TG24 (Sky TG24)
Elisa, tra colpa e perdono. Recensione del film in gara a Venezia 82
https://tg24.sky.it/spettacolo/cinema/2025/09/04/elisa-film-recensione?utm_source=flipboard&utm_medium=activitypub
Pubblicato su Spettacolo @spettacolo-SkyTG24

Elisa, tra colpa, perdono, delitto, castigo. Recensione del film di Leonardo Di Costanzo
Leggi su Sky TG24 l'articolo Elisa, tra colpa, perdono, delitto, castigo. Recensione del film di Leonardo Di CostanzoPaolo Nizza (Sky TG24)
Optimizing VLF Antennas

Using digital techniques has caused a resurgence of interest in VLF — very low frequency — radio. Thanks to software-defined radio, you no longer need huge coils. However, you still need a suitable antenna. [Electronics Unmessed] has been experimenting and asks the question: What really matters when it comes to VLF loops? The answer he found is in the video below.
This isn’t the first video about the topic he’s made, but it covers new ground about what changes make the most impact on received signals. You can see via graphs how everything changes performance. There are several parameters varied, including different types of ferrite, various numbers of loops in the antenna, and wire diameter. Don’t miss the comment section, either, where some viewers have suggested other parameters that might warrant experimentation.
Don’t miss the 9-foot square antenna loop in the video. We’d like to see it suspended in the air. Probably not a good way to ingratiate yourself with your neighbors, though.
Between software-defined radio and robust computer simulation, there’s never been a better time to experiment with antennas and radios. We first saw these antennas in an earlier post. VLF sure is easier than it used to be.
youtube.com/embed/S7nQ2fnaA3Y?…
Venezia 82, in concorso 'Elisa' con Barbara Ronchi
https://tg24.sky.it/spettacolo/video/2025/09/04/venezia-82-in-concorso-elisa-con-barbara-ronchi-1033670?utm_source=flipboard&utm_medium=activitypub
Pubblicato su Spettacolo @spettacolo-SkyTG24

Venezia 82, in concorso "Elisa" con Barbara Ronchi
Leggi su Sky TG24 l'articolo Venezia 82, in concorso 'Elisa' con Barbara RonchiRedazione Sky TG24 (Sky TG24)
Dartmouth's AD Says Everyone Learned From Union Push
https://www.bloomberg.com/news/videos/2025-09-04/dartmouth-s-ad-says-everyone-learned-from-union-push-video?utm_source=flipboard&utm_medium=activitypub
Posted into Bloomberg Television @bloomberg-television-bloomberg
Grande gatta, la Micia.
L'avevano abbandonata, non sterilizzata, davanti al nostro negozio, un agosto.
reshared this
House of Gucci Author Talks Giorgio Armani's Passing
https://www.bloomberg.com/news/videos/2025-09-04/house-of-gucci-author-talks-giorgio-armani-s-passing-video?utm_source=flipboard&utm_medium=activitypub
Posted into Bloomberg Television @bloomberg-television-bloomberg
Bootstrapping Android Development: a Survival Guide

Developing Android applications seems like it should be fairly straightforward if you believe the glossy marketing by Google and others. It’s certainly possible to just follow the well-trodden path, use existing templates and example code – or even use one of those WYSIWYG app generators – to create something passable that should work okay for a range of common applications. That’s a far cry from learning general Android development, of course.
The process has changed somewhat over the years, especially with the big move from the Eclipse-based IDE with the Android Development Tools (ADT) plugin, to today’s Jetbrains IntelliJ IDEA-based Android Studio. It’s fortunately still possible to download just the command-line tools to obtain the SDK components without needing the Google-blessed IDE. Using the CLI tools it’s not only possible to use your preferred code editor, but also integrate with IDEs that provide an alternate Android development path, such as Qt with its Qt Creator IDE.
Picking Poison
Both Qt Creator and ADT/Android Studio offer a WYSIWYG experience for GUI design, though the former’s design tools are incomparably better. Much of this appears to be due to how Qt Creator’s GUI design tools follow the standard desktop GUI paradigms, with standard elements and constraint patterns. After over a decade of having wrangled the – also XML-based – UI files and WYSIWYG design tools in ADT/Android Studio, it never ceases to amaze how simple things like placing UI elements and adding constraints love to explode on you.

Somewhat recently the original Android API layouts also got ditched in favor of the ‘refactored’ AndroidX API layouts, with apparently now this Jetpack Compose being the (high-level) way to use. Over the years of me having developed for Android, many APIs and tools have been introduced, deprecated and removed at an increasingly rapid pace, to the point where having Android Studio or the CLI tools not freak out when confronted with a one year old project is a pleasant surprise.

Although Qt isn’t the only alternative to the Android Studio experience, it serves to highlight the major differences encountered when approaching Android development. In fact, Qt for Android offers a few options, including building a desktop Qt application for Android, which can also use the Qt Quick elements, or including Qt Quick within your existing Android application. For Qt Quick you want to either create the UIs by hand, or using Qt Quick Designer, though I have so far mostly just stuck to using Qt Creator and liberally applied stylesheets to make the UI fit the target Android UI.
Whichever way you choose, it’s important to know your requirements and take some time to work through a few test projects before investing a lot of time in a single approach.
The Build System
No matter what approach you choose, the build system for Android is based on what is objectively one of the worst build automation tools conceivable, in the form of Gradle. Not only does it take ages to even start doing anything, it’s also agonizingly slow, insists on repeating tasks that should already have been completed previously, provides few ways to interact or get more information without getting absolutely swamped in useless verbosity, and loves to fail silently if you get just the wrong Gradle version installed in your Android project.
Did I mention yet that the entire Gradle tool is a permanent fixture of your Android project? Android Studio will want to upgrade it almost every time you open the project, and if you don’t use an IDE like it which automates Gradle upgrades, you better learn how to do it manually. Don’t forget to install the right Java Development Kit (JDK) either, or Android Studio, Gradle or both will get very upset.
If your IDE doesn’t pave over many of these inane issues, then getting familiar with the Gradle wrapper CLI commands is right on the top of your list, as you will need them. Fortunately sticking to an IDE here tends to avoid the biggest pitfalls, except for having enough time with each build session to fetch a coffee and go on a brisk walk before returning to address the next build failure.
There are no real solutions here, just a call for perseverance and documenting solutions that worked previously, because you will always encounter the same errors again some day.
Test, Debug And Deploy

Even if you have built that shiny APK or app bundle, there’s a very high likelihood that there will be issues while running it. Fortunately the one advantage of JVM-based environments is that you get blasted with details when something violently explodes. Of course, that is unless someone screwed up exception handling in the code and your backtrace explodes somewhere in thin air instead. For the same reason using a debugger is pretty easy too, especially if you are using an IDE like Android Studio or Qt Creator that provides easy debugger access.
Logging in Android tends to be rather verbose, with the LogCat functionality providing you with a veritable flood of logging messages, most of which you want to filter out. Using the filter function of your IDE of choice is basically essential here. Usually when I do Android application debugging, I am either already running Qt Creator where I can start up a debug session, or I can fire up Android Studio and do the same here as at its core it’s the same Gradle-based project.

Of course, in order to have something catch on fire you first need to run the application, which is where you get two options: run on real hardware or use an emulator. Real hardware is easier in some ways, as unlike an emulated Android Virtual Device (AVD) your application can directly access the network and internet, whereas an AVD instance requires you to wrangle with network redirects each session.
On the other hand, using an AVD can be handy as it allows you to create devices with a wide range of screen resolutions, so it can be quite nifty to test applications that do not require you to connect to externally via the network. If you want to know for example how well your UI scales across screen sizes, and how it looks on something like a tablet, then using an AVD is a pretty good option.
Some hardware devices are also quite annoyingly locked-down, such as Xiaomi phones that at least for a while have refused to allow you to toggle on remote debugging via USB unless you install a SIM card. Fortunately this could be circumvented by clicking through an alternate path that the Xiaomi developers had not locked down, but these are just some of the obnoxious hurdles that you may encounter with real hardware.
With that out of the way, deploying to an AVD or real device is basically the same, either by using the ‘Start’ or similar function in your IDE of choice with the target device selected, or by doing so via the command-line, either with ADB, or via the Gradle wrapper with ./gradlew InstallDebug or equivalent.
This will of course be a debug build, with creating a release build also being an option, but this will not be signed by default. Signing an APK requires a whole other procedure, and is honestly something that’s best done via the friendly-ish dialogs in an IDE, rather than by burning a lot of time and sanity on the command-line. Whether you want to sign the APK or app bundle depends mostly on your needs/wants and what a potential app store demands.
Ever since Google began to demand that all developers – including Open Source hobbyists – send in a scan of their government ID and full address, I have resorted to just distributing the Android builds of my NymphCast player and server via GitHub, from where they can be sideloaded.
This NymphCast server is incidentally the topic of the next installment in this mini-series, in which we will be doing a deep dive into native Android development using the NDK.
Shoppers Trading Down, Says Ollie’s CEO
https://www.bloomberg.com/news/videos/2025-09-04/shoppers-trading-down-says-ollie-s-ceo-video?utm_source=flipboard&utm_medium=activitypub
Posted into Bloomberg Television @bloomberg-television-bloomberg


The image displays a table from the NetHogs version 0.8.8 software, which is used to monitor network bandwidth usage. The table is structured with columns labeled "PID," "USER," "PROGRAM," "DEV," "SENT," and "RECEIVED." The first row shows a row of headers, while the second row contains data. The "PID" column shows a question mark, indicating an unknown process ID. The "USER" column shows "root," indicating the process is running as the root user. The "PROGRAM" column shows "unknown TCP," suggesting the program is using TCP but its name is not known. The "DEV" column shows "eth0," indicating the network device being monitored. The "SENT" column shows "102.808," representing the amount of data sent in kilobytes per second. The "RECEIVED" column shows "16074.081 KB/s," indicating the amount of data received in kilobytes per second. The overall layout is simple and straightforward, with a black background and white text for readability.
Provided by @altbot, generated privately and locally using Ovis2-8B
🌱 Energy used: 0.215 Wh
Artist unknown. Attributed to Chris Bell, but no reliable sources.
#art #photography #contemporaryart #fetishphotography #fashion #fashionphotography #heels #latex #spikes

Renato Stanziola Vieira: Discussão sobre anistia de blsnr é um escândalo e mostra gravidade do caso que STF tenta julgar.
youtube.com/watch?v=gtRXFrk-q_…
- YouTube
Profitez des vidéos et de la musique que vous aimez, mettez en ligne des contenus originaux, et partagez-les avec vos amis, vos proches et le monde entier.www.youtube.com


Duffy Tells NASA ‘I’ll Be Damned’ If China Beats US to Moon
https://www.bloomberg.com/news/articles/2025-09-04/duffy-tells-nasa-i-ll-be-damned-if-china-beats-us-to-moon?utm_source=flipboard&utm_medium=activitypub
Posted into Bloomberg Asia @bloomberg-asia-bloomberg
Dal Commodore 64 a GitHub! Il BASIC di Gates e Allen diventa open source dopo 48 anni
Microsoft ha ufficialmente reso pubblico il codice sorgente della sua prima versione di BASIC per il processore MOS 6502, che per decenni è esistito solo sotto forma di fughe di notizie, copie da museo e build non ufficiali. Ora, per la prima volta, è pubblicato con licenza libera e disponibile per studio e modifica.
La prima versione del BASIC di Microsoft apparve nel 1975 per il microcomputer Altair 8800 basato sul processore Intel 8080. Fu scritta dai fondatori dell’azienda, Bill Gates e Paul Allen. Un anno dopo, Gates, insieme al secondo dipendente Microsoft, Rick Weiland, portò il BASIC sul processore MOS 6502. Nel 1977, Commodore acquistò la licenza per 25.000 dollari e la integrò nei suoi sistemi PET, VIC-20 e Commodore 64.
Gli ultimi due computer vendettero milioni di copie e divennero uno dei fattori determinanti nella diffusione di massa della tecnologia informatica.
La versione 1.1 è stata resa pubblica, tenendo conto dei miglioramenti al garbage collector proposti dall’ingegnere Commodore John Feagans e dallo stesso Gates nel 1978. Nei dispositivi PET, questa versione era nota come BASIC V2. Il codice contiene 6.955 righe di assembler è pubblicato su GitHub con licenza MIT, che ne consente l’uso e la rivendita senza restrizioni.

Microsoft ha fornito al repository note storiche e commit eseguiti con timestamp di “48 anni fa”. Il codice sorgente implementa la compilazione condizionale per diverse piattaforme dell’epoca: Apple II, Commodore PET, Ohio Scientific e KIM-1.
Le funzionalità includono un set completo di operatori BASIC, supporto per array, gestione delle stringhe, aritmetica in virgola mobile, I/O, garbage collection delle stringhe e archiviazione dinamica delle variabili.

Particolare enfasi è posta sull’uso efficiente della memoria, fondamentale per i sistemi a 8 bit. Il codice contiene anche gli Easter egg di Bill Gates, nascosti nelle etichette STORDO e STORD0, confermati dallo stesso Gates nel 2010.
Il MOS 6502, per il quale fu creato l’interprete, divenne una leggenda del settore.

Fu la base dell’Apple II, delle console di gioco Atari 2600 e NES e di un’intera linea di home computer Commodore. La semplicità e l’efficienza dell’architettura lo resero popolare tra i produttori e influenzarono la formazione del mercato dei personal computer. Oggi, l’interesse per il 6502 non accenna a diminuire: gli appassionati creano repliche FPGA, sviluppano emulatori e persino preparano una nuova riedizione “ufficiale” del Commodore 64 basata su logica programmabile.
Microsoft sottolinea che è stato il BASIC a rendere l’azienda un attore significativo sul mercato, molto prima della comparsa di MS-DOS e Windows. La concessione in licenza di massa di questo interprete da parte di vari produttori è diventata il fondamento del modello di business di Microsoft nei suoi primi anni.
Dal 1977 a oggi, il BASIC continua a vivere: dal cursore lampeggiante sullo schermo del Commodore alle versioni FPGA del 2025. Oggi, il codice storico non solo viene preservato, ma anche trasferito nelle mani della comunità, per studio, adattamento e nuovi esperimenti gratuiti.
L'articolo Dal Commodore 64 a GitHub! Il BASIC di Gates e Allen diventa open source dopo 48 anni proviene da il blog della sicurezza informatica.
reshared this

")
Devant le concert du #Zevent2025 
C'est la musique du jeu Clair Obscur Expedition33 par l'orchestre Curieux, trop classe!

ZEVENT - Twitch
CONCERT ZEVENT 2025 - IAM, Alonzo, Carbonne, Orchestre Curieux x Expédition 33 x Marianne & PV Nova (4 septembre 2025)Twitch

James Dyson, ‘Sir aspirapolvere’: “Chi ci copia le invenzioni fa male alla concorrenza”
https://www.lastampa.it/tecnologia/2025/09/04/news/james_dyson_aspirapolvere_sottile_pencilvac_ifa-424826913/?utm_source=flipboard&utm_medium=activitypub
Pubblicato su La Stampa Tecnologia @la-stampa-tecnologia-LaStampa

James Dyson, ‘Sir aspirapolvere’: “Chi ci copia le invenzioni fa male alla concorrenza”
A Berlino il gruppo ha presentato novità e aggiornamenti dei prodotti più venduti, dal sottilissimo PencilVac con un diametro di 30 millimetri al robot Dyson S…Simone Cosimi (La Stampa)
Nuova ondata di attacchi di Quishing: Le tattiche innovative dai criminali informatici
Negli ultimi anni si è diffusa una forma di phishing particolarmente insidiosa: il Quishing o QRishing, una strategia basata sull’utilizzo di codici QR contenenti link malevoli che, una volta scansionati, reindirizzano le vittime su siti web falsi, creati appositamente per rubare le loro credenziali o informazioni sensibili.
Gli esperti di Barracuda Networks, principale fornitore di soluzioni di cybersecurity che offre una protezione completa dalle minacce complesse per aziende di ogni dimensione, hanno scoperto due tecniche innovative utilizzate dai criminali informatici per consentire ai codici QR malevoli di aggirare i sistemi di sicurezza negli attacchi di phishing. Queste tattiche, descritte in dettaglio in un nuovo report, prevedono la suddivisione in due parti di un codice QR per confondere i sistemi di scansione tradizionali, oppure l’inserimento di un codice QR dannoso all’interno o accanto a un secondo codice QR legittimo.
In particolare, gli analisti di Barracuda hanno riscontrato l’impiego di queste tecniche di suddivisione e accorpamento (o, secondo la definizione tecnica, “annidamento”) in attacchi condotti tramite alcuni dei principali kit di Phishing-as-a-Service (PhaaS), quali Tycoon e Gabagool.
Codici QR divisi in due
Gli hacker che hanno utilizzato Gabagool si sono serviti di codici QR splittati in una truffa che simula una richiesta di reset della password da parte di Microsoft. La loro strategia consiste nel dividere il codice QR in due immagini separate e inserirle molto vicine tra loro in un’e-mail di phishing.
In questo modo, all’occhio umano l’immagine appare come un unico codice. Tuttavia, quando i sistemi di sicurezza tradizionali analizzano il messaggio, rilevano due immagini distinte dall’aspetto innocuo, anziché un QR code completo. Ma se il destinatario scansiona l’immagine, viene reindirizzato su un sito di phishing creato doloso appositamente per rubare le sue credenziali.
Codici QR accorpati
Il kit PhaaS Tycoon, invece, utilizza la tecnica dell’annidamento per circondare un codice QR legittimo con uno dannoso: il codice QR esterno reindirizza a un URL doloso, mentre il codice QR interno rimanda a Google. Una tecnica ideata con buona probabilità per rendere più difficile l’individuazione della minaccia da parte degli scanner, poiché i risultati appaiono ambigui.
“I codici QR malevoli sono molto usati dai criminali informatici perché hanno un aspetto legittimo e possono aggirare le misure di sicurezza tradizionali, come i filtri e-mail e gli scanner URL”, dichiara Saravanan Mohankumar, manager, threat analysis team di Barracuda.
“Poiché per scansionare il codice i destinatari devono spesso utilizzare un dispositivo mobile, si finisce per operare al di fuori del perimetro di sicurezza dei computer e, di conseguenza, dalle relative protezioni. I cybercriminali continuano a sperimentare nuove tecniche per restare sempre un passo avanti rispetto alle misure di difesa. Per questo, una protezione integrata e potenziata dall’intelligenza artificiale può davvero fare la differenza”.
Codici QR in continua evoluzione: come difendersi
Oltre all’adozione di pratiche di base fondamentali come attività di formazione e sensibilizzazione sulla sicurezza informatica, autenticazione a più fattori e solidi filtri anti-spam e per le e-mail, è importante valutare l’introduzione di una protezione e-mail multilivello che includa capacità di AI multimodale per rilevare le minacce in continua evoluzione. Infatti, l’intelligenza artificiale multimodale rafforza la protezione identificando, decodificando e ispezionando il codice QR senza la necessità di estrarne il contenuto incorporato.
L'articolo Nuova ondata di attacchi di Quishing: Le tattiche innovative dai criminali informatici proviene da il blog della sicurezza informatica.
It's been just over a year since Dahlia and Gussie moved in.
#Shetland #ShetlandIslands #MyShetland #IcelandicHorse #ShetlandPonies #family #rescue #RescueAnimals #photography #PatterdaleTerrier #sheep #ponies #horses #DailyBlog #MyLife #Scotland #thordale #whitecat

Sheeps
Do you know it’s been just over one year since Dahlia and Gussie came into my life? And I’m very pleased they are here. Both have taken easily to their new life here. Gussie is a big b…My Shetland
Macro Matters: Yield Curve Steepening with Mizuho's Konstam
https://www.bloomberg.com/news/audio/2025-09-04/macro-matters-yield-curve-steepening-with-mizuho-s-konstam?utm_source=flipboard&utm_medium=activitypub
Posted into Podcasts @podcasts-bloomberg

We just fixed an issue that affected only Write.as blogs, hosted on a custom domain, with a custom fediverse handle -- now readers shouldn't have any issues getting your posts in the fediverse!
This was a weird issue that had to do with the server-side caching we use for custom domains. Should all be fixed now, but please let me know if you still notice any issues!
On #Mastodon there are now
412 verified accounts from #news organizations in
21 languages and on
122 instances.
264 were active today.
Some accounts, that were active today are
@SwanseaBayNews (ENG)
@escitalia (ITA)
@WesternWayneNews (ENG)
@DeGroene (NLD)
@oinatigoiena (BAQ)
Find the whole list on:
➡️ fingolas.eu/fediverse/overview…
Built by @mho
#MastodonMigration #SocialMedia #Fediverse #Media #Press #Newspaper #TwitterMigration #Newstodon

jfml - Jonas Laugs
in reply to Robert Reich • • •Dec [{()}]
in reply to jfml - Jonas Laugs • • •@jfml @altbot
That account doesn't interact here. It should be flagged as a bot.
I usually scroll past posts with no alt text, but this account really takes the biscuit.
It's almost like an intern (or a bot) is Getting It Wrong On Purpose.
Pasting the same text from the bsky post (instead of making a screenshot and posting the image) would be so much easier.