 - Collegamento all'originale")
Testing Laughing Gas for Rocket Propellant

Nitrous oxide’s high-speed abilities don’t end with racing cars, as it’s a powerful enough oxidizer to be a practical component of rocket propellant. Since [Markus Bindhammer] is building a hybrid rocket engine, in his most recent video he built and tested a convenient nitrous oxide dispenser.
The most commercially available form of nitrous oxide is as a propellant for whipped cream, for which it is sold as “cream chargers,” basically small cartridges of nitrous oxide which fit into cream dispensers. Each cartridge holds about eight grams of gas, or four liters at standard temperature and pressure. To use these, [Markus] bought a cream dispenser and disassembled it for the cartridge fittings, made an aluminium adapter from those fittings to a quarter-inch pipe, and installed a valve. As a quick test, he fitted a canister in, attached it to a hose, lit some paraffin firelighter, and directed a stream of nitrous oxide at it, upon which it burned much more brightly and aggressively.
It’s not its most well-known attribute in popular culture, but nitrous oxide’s oxidizing potential is behind most of its use by hackers, whether in racing or in rocketry. [Markus] is no stranger to working with nitrogen oxides, including the much more aggressively oxidizing nitrogen dioxide.
youtube.com/embed/x2kbrF5kHxI?…

How Do PAL and NTSC Really Work?

Many projects on these pages do clever things with video. Whether it’s digital or analogue, it’s certain our community can push a humble microcontroller to the limit of its capability. But sometimes the terminology is a little casually applied, and in particular with video there’s an obvious example. We say “PAL”, or “NTSC” to refer to any composite video signal, and perhaps it’s time to delve beyond that into the colour systems those letters convey.
Know Your Sub-carriers From Your Sync Pulses

A video system of the type we’re used to is dot-sequential. It splits an image into pixels and transmits them sequentially, pixel by pixel and line by line. This is the same for an analogue video system as it is for many digital bitmap formats. In the case of a fully analogue TV system there is no individual pixel counting, instead the camera scans across each line in a continuous movement to generate an analogue waveform representing the intensity of light. If you add in a synchronisation pulse at the end of each line and another at the end of each frame you have a video signal.
But crucially it’s not a composite video signal, because it contains only luminance information. It’s a black-and-white image. The first broadcast TV systems as for example the British 405 line and American 525 line systems worked in exactly this way, with the addition of a separate carrier for their accompanying sound.
The story of the NTSC colour TV standard’s gestation in the late 1940s is well known, and the scale of their achievement remains impressive today. NTSC, and PAL after it, are both compatible standards, which means they transmit the colour information alongside that black-and-white video, such that it doesn’t interfere with the experience of a viewer watching on a black-and-white receiver. They do this by adding a sub-carrier modulated with the colour information, at a frequency high enough to minimise its visibility on-screen. for NTSC this is 3.578MHz, while for PAL it’s 4.433MHz. These frequencies are chosen to fall between harmonics of the line frequency. It’s this combined signal which can justifiably be called composite video, and in the past we’ve descended into some of the complexities of its waveform.
It’s Your SDR’s I and Q, But Sixty Years Earlier

An analogue colour TV camera produces three video signals, one for each of the red, green, and blue components of the picture. Should you combine all three you arrive at that black-and-white video waveform, referred to as the luminance, or as Y. The colour information is then reduced to two further signals by computing the difference between the red and the luminance, or R-Y, and the blue and the luminance, or B-Y. These are then phase modulated as I-Q vectors onto the colour sub-carrier in the same way as happens in a software-defined radio.
At the receiver end, the decoder isolates the sub-carrier, I-Q demodulates it, and then rebuilds the R, G, and B, with a summing matrix. To successfully I-Q demodulate the sub-carrier it’s necessary to have a phase synchronised crystal oscillator, this synchronisation is achieved by sending out a short burst of the colour sub-carrier on its own at the start of the line. The decoder has a phase-locked-loop in order to perform the synchronisation.
So, Why The PAL Delay Line?

There in a few paragraphs, is the essence of NTSC colour television. How is PAL different? In essence, PAL is NTSC, with some improvements to correct phase errors in the resulting picture. PAL stands for Phase Alternate Line, and means that the phase of those I and Q modulated signals swaps every line. The decoder is similar to an NTSC one and indeed an NTSC decoder set to that 4.433MHz sub-carrier could do a job of decoding it, but a fully-kitted out PAL decoder includes a one-line delay line to cancel out phase differences between adjacent lines. Nowadays the whole thing is done in the digital domain in an integrated circuit that probably also decodes other standards such as the French SECAM, but back in the day a PAL decoder was a foot-square analogue board covered in juicy parts highly prized by the teenage me. Since it was under a Telefunken patent there were manufacturers, in particular those from Japan, who would try to make decoders that didn’t infringe on that IP. Their usual approach was to create two NTSC decoders, one for each phase-swapped line.
So if you use “NTSC” to mean “525-line” and “PAL” to mean “625-line”, then everyone will understand what you mean. But make sure you’re including that colour sub-carrier, or you might be misleading someone.
Build a 2K Resolution MSLA 3D Resin Printer for Cheap

Have an old Android device collecting dust somewhere that you’d like to put to better use? [Electronoobs] shows us how to make a Masked Stereolithography Apparatus (MSLA) printer for cheap using screens salvaged from old Android phones or tablets.
[Electronoobs] wanted to revisit his earlier printer with all the benefits of hindsight, and this is the result. The tricky bit, which is covered in depth in the video below the break, is slicing up the model into graphics for each layer, so that these layers can be rendered by the LCD for each layer during the print.
The next tricky bit, once your layer graphics are in hand, is getting them to the device. This build does that by installing a custom Android app which connects to a web app hosted on the ESP32 microcontroller controlling the print, and the app has a backchannel via a USB OTG adapter installed in the device. [Electronoobs] notes that there are different and potentially better ways by which this full-duplex communication can be achieved, but he is happy to have something that works.
If you’re interested in resin printer tech, be sure to check out Continuous Printing On LCD Resin Printer: No More Wasted Time On Peeling? Is It Possible? and Resin Printer Temperature Mods And Continuous IPA Filtration.
youtube.com/embed/fu2NBy5zDxI?…
The Rise and Fall of The In-Car Fax Machines

Once upon a time, a car phone was a great way to signal to the world that you were better than everybody else. It was a clear sign that you had money to burn, and implied that other people might actually consider it valuable to talk to you from time to time.
There was, however, a way to look even more important than the boastful car phone user. You just had to rock up to the parking lot with your very own in-car fax machine.
Dial It Up
Today, the fax machine is an arcane thing only popular in backwards doctor’s offices and much of Japan. We rely on email for sending documents from person A to person B, or fill out forms via dedicated online submission systems that put our details directly in to the necessary databases automatically. The idea of printing out a document, feeding it into a fax machine, and then having it replicated as a paper version at some remote location? It’s positively anachronistic, and far more work than simply using modern digital methods instead.

Back in the early 90s though, the communications landscape looked very different. If you had a company executive out on the road, the one way you might reach them would be via their cell or car phone. That was all well and good if you wanted to talk, but if you needed some documents looked over or signed, you were out of luck.
Even if your company had jumped on the e-mail bandwagon, they weren’t going to be able to get online from a random truck stop carpark for another 20 years or so. Unless… they had a fax in the car! Then, you could simply send them a document via the regular old cellular phone network, their in-car fax would spit it out, and they could go over it and get it back to you as needed.
Of course, such a communications setup was considered pretty high end, with a price tag to match. You could get car phones on a wide range of models from the 1980s onwards, but faxes came along a little later, and were reserved for the very top-of-the-line machines.


Mercedes-Benz was one of the first automakers to offer a remote fax option in 1990, but you needed to be able to afford an S-Class to get it. With that said, you got quite the setup if you invested in the Büro-Kommunikationssystem package. It worked via Germany’s C-Netz analog cellular system, and combined both a car phone and an AEG Roadfax fax machine. The phone was installed in the backrest of one of the front seats, while the fax sat in the fold-down armrest in the rear. The assumption was that if you were important enough to have a fax in the car, you were also important enough to have someone else driving for you. You also got an AEG Olyport 40/20 laptop integrated into the back of the front seats, and it could even print to the fax machine or send data via the C-Netz connection.

Not to be left out, BMW would also offer fax machines on certain premium 7 Series and L7 limousine models, though availability was very market-dependent. Some would stash a fax machine in the glove box, others would integrate it into the back rest of one of the front seats. Toyota was also keen to offer such facilities in its high-end models for the Japanese market. In the mid-90s, you could purchase a Toyota Celsior or Century with a fax machine secreted in the glove box. It even came with Toyota branding!
Ultimately, the in-car fax would be a relatively short-lived option in the luxury vehicle space, for several reasons. For one thing, it only became practical to offer an in-car fax in the mid-80s, when cellular networks started rolling out across major cities around the world.
By the mid-2000s, digital cell networks were taking over, and by the end of that decade, mobile internet access was trivial. It would thus become far more practical to use e-mail rather than a paper-based fax machine jammed into a car. Beyond the march of technology, the in-car fax was never going to be a particularly common selection on the options list. Only a handful of people ever really had a real need to fax documents on the go. Compared to the car phone, which was widely useful to almost anyone, it had a much smaller install base. Fax options were never widely taken up by the market, and had all but disappeared by 2010.
youtube.com/embed/0vbvu7EiWNA?…
The Toyota Celsior offered a nice healthy-sized fax machine in the 1990s, but it did take up the entire glove box.
These days, you could easily recreate a car-based fax-type experience. All you’d need would be a small printer and scanner, ideally combined into a single device, and a single-board computer with a cellular data connection. This would allow you to send and receive paper documents to just about anyone with an Internet connection. However, we’ve never seen such a build in the wild, because the world simply doesn’t run on paper anymore. The in-car fax was thus a technological curio, destined only to survive for maybe a decade or so in which it had any real utility whatsoever. Such is life!
An RP2040 Powered ADS-B Receiver

If you’ve ever heard the sound of an aircraft passing overhead and looked at an online plane tracker to try and figure out what it was, then you’ve interacted with ADS-B. It’s a protocol designed to enable easier aircraft monitoring, and it just so happens you can decode it yourself with the right hardware and software — which is how [John McNelly] came to develop ADSBee, an open source ADS-B receiver based around an RP2040.
ADS-B uses on–off keying (OOK) at 1 Mbps, and operates at 1090 MHz. This might seem like a rather difficult protocol to decode on a microcontroller, but the RP2040’s PIO is up to the task. All it takes is a bit of optimization, and a some basic RF components to amplify and digitize the signals.

What’s quite impressive is the various form factors the module is available in. Ranging from small solder-down modules to weatherproof outdoor base stations, nearly every potential need for an ADS-B receiver is covered. With POE or ESP32 S3 options available, there is no shortage of networking options either!
ADSBees have been placed in numerous locations, ranging from base stations to drones. One user even built out a tiny flight display cluster complete with traffic indicators into an FPV drone.
This isn’t the first time we have seen ADS-B receivers used by drone enthusiasts, but this is certainly the most feature rich and complete receiver we have come across.
What will happen in tech policy during 2026?
WELCOME BACK TO THE MONTHLY free editionof Digital Politics.I'm Mark Scott, and Happy New Year!

As I plan for the year ahead, I'm looking to arrange more in-person events — mostly because it's great to connect with people in real life. If that sounds something you'd be interested in, please fill out this survey to help my planning.
Just as the last newsletterlooked back over what happened in 2025, this first edition of the new year focuses on how global tech policy will evolve over the next 12 months. I've skipped the clichés — 'AI will consume everything,' 'Washington and Brussels won't get along' — to highlight macro trends that, imo, will underpin what will likely be a bumpy road ahead.
Some of my predictions will be wrong. That's OK — no one's perfect.
What follows is my best guess at the topics which will dominate 2026 at a time when geopolitics, technology and economic competitiveness have become intertwined like never before.
Let's get started:
The end of US digital leadership?
AS THE LAST WEEK HAS SHOWN, we're living through a very different reality for the United States' standing in the world compared to any time since the 19th century. Donald Trump's administration has blown hot and cold on digital policy, often preferring the analogue geopolitics of traditional Great Powers over the wonkery associated with artificial intelligence governance and digital public infrastructure.
Yet Washington will assert itself in global digital policymaking circles in three ways during 2026. How the rest of the (democratic) world responds will determine if the US can still hold onto the claim of leading the free world. Or, in a once-in-a–generation shift, will other countries will start to form different, non-US alliances that will increasingly sideline the Trump administration and other US lawmakers/officials?
I'm still not sure how this will play out. But I'm increasingly coming to terms that as much as non-US officials/politicians want to maintain close ties with the world's largest economy, the last 12 months has cemented many people's view that the US no longer holds a leadership position on tech policy (if, frankly, it ever did.)
But I'm skipping steps.
Thanks for reading the free monthly version of Digital Politics. Paid subscribers receive at least one newsletter a week. If that sounds like your jam, please sign up here.
Here's what paid subscribers read in December:
— How the child online safety battle is a proxy for a wider battle around digital platforms; The European Union is not shifting its stance on tech because of the United States; Here's the price of what your personal data is worth. More here.
— Exclusive polling from YouGov on what Europeans think about tech policy; What the White House's National Security Strategy means for US tech policy; How Washington linked digital to a spate of new trade/tariff deals. More here.
— How Australia's social media ban is a response to policymakers' lack of understanding about how social media works; The international implications of the White House's proposed moratorium on AI oversight; The latest rankings of AI models, based on transparency indicators. More here.
— The five lessons about global digital policymaking that I learned in 2025. More here.
First, Washington will likely take a vocal position in promoting the US "AI Stack" to the rest of the world. That includes connecting future tariff/trade deals with pledges from third-party countries to not pass comprehensive (or any?) AI regulation or legislation. It will also see US industry work hand-in-glove with the Trump administration, via the US Commerce Department, to offer financing support so that other governments can buy the latest wares from Nvidia, Microsoft and OpenAI. Those companies don't exactly need state-backed financing to make such deals.
This combination will stand in stark contrast to what Europe and China are similarly doing to promote their own AI stacks, at home and abroad. It will also likely force countries to pick a side — either accept the current US approach of no regulation and US infrastructure, or be perceived as a potential enemy to American "AI dominance."
Second, expect a more vocal pushback against non-US competition rules (aka: the European Union's Digital Markets Act) and any form of online safety legislation (aka: the United Kingdom's Online Safety Act.)
As I explained in the last newsletter, non-US digital antitrust enforcement is a bigger issue than the "Culture Wars" dog whistling associated with unproven claims that online safety rules are akin to free speech censorship. But as other countries like Brazil and Australia push aggressively ahead with checks on social media's power, as well as the ongoing enforcement of the EU's DMA and the UK's Digital Markets, Competition and Consumers Act, Washington will likely call out these countries in ways that force local officials to choose a side.
Many will not want to be put in that position. But just as we saw with US officials' sabre-rattling when the EU fined X $130 million under its Digital Services Act, upcoming enforcement actions (via online safety and digital competition legislation) will lead to similarly vocal rebuttals from Washington. At that point, non-US policymakers need to make a choice: either implement local laws or kow-tow to Washington's demands.
Third, the US will almost certainly connect the EU's digital rulebook, including the soon to be pared-back AI Act, with the simmering transatlanic trade war. It's hard to see how that makes much sense, given the US' trade surplus, in services, with the 27-country bloc. But Washington has already voiced concerns that the EU's digital legislation equates to so-called non-tariff trade measures. This year will see such talk turn into action, potentially via increased tariffs on Europe's non-digital goods (where the bloc runs a trade surplus with the US).
If/when that happens, EU officials will again be put in a tough spot. They will have to choose to shift gears on digital rulemaking — all in the name of saving French cheese makers or German auto parts manufacturers from hefty tariff hikes — or live with the consequences of bringing the so-called "Brussels Effect" into reality.
The rise of China as the internet governor
I WILL ADMIT I'M NO CHINA EXPERT. But even with my non-China focus, it's hard not to see Beijing taking an ever increasing leadership position on internet governance in 2026.
Even for me, this may sound geeky. Bear with me.
Internet governance (and all the global standards that come with it) is the backbone of how the current digital world works. For decades, it was the US that led, globally, to shape those conversations around an open, interoperable internet which has become the game-changing technology that we all know and love.
Yet over the last decade, China has positioned itself as an increasingly important player. It has reshaped the conversation so that governments — and not other stakeholders like industry and civil society — are the key decisionmakers in how the next stage of internet governance protocols are negotiated.
This year will be when Beijing's steady rise as the go-to internet standards provider comes into its own.
In part, that's down to the significant pullback from Washington and a failure by other democratic countries to fill the breach left by the Trump administration's decision to turn its back on such multistakeholder negotiations. It also has a lot to do with China's clever diplomacy which has seen the world's second largest economy align itself with many Global Majority countries to create a coalition of the willing behind Beijing's authoritarian approach to internet governance.
Much of this year will be about framing China's state-first approach ahead of the upcoming World Radiocommunication Conference next year in Shanghai. This four-year event is about finalizing an international treaty for how global radio airwaves (central to mobile telecommunication) are divvied up between countries. For a much more in-depth understanding of why this matters, read this.
That set-piece event will be preceded, in 2026, with a full-court press from Beijing — especially within United Nations agencies where tech policy has taken on increased importance — to cement a state-first approach to internet governance. Without Washington to hold the line (and other democratic countries stepping into that position), Beijing will have much of the chessboard to itself.
This closed-doors diplomacy will define how much of the internet over the next decade will be created. Mostly in China's image.
The AI slop cometh for elections
TWO YEARS AGO, I WROTE A SERIES OF STORIESthat asked everyone to calm down about the impact of artificial intelligence on the election-palazoo that was 2024.
Now I come with a different rallying cry: it's time to freak out.
I still find it hard to suggest AI will unfairly skew the outcome of any election this year. That doesn't give people enough credit for the complex decisions that we all go through in deciding who to vote for. Just because you see some form of election-related AI slop on social media doesn't mean, in general, that you'll change the way that you'll vote for a candidate.
Where I am concerned, however, is the level of sophistication that such AI-generated now represents. It's not just the fact people can upload their images to OpenAI's Sora 2 and go crazy. It's also that digital tricksters (or opposing candidates) can bombard social media with such convincing fakery that some voters will start to question everything that they read/see/listen to online.
Here's a stat for you. In 2025, more than 150 YouTube channels accumulated 5.3 million followers and created roughly 56,000 videos, with combined total views of almost 1.2 billion, that attacked British prime minister Keir Starmer with AI-generated fakery, according to a report from Reset Tech, an advocacy group. That, unfortunately, is not a unique event after politicians from Ireland to the Netherlands to the US and Pakistan also were targeted via AI slop to undermine their campaigns.
Fast-forward to later this year, and the 2026 US mid-terms look set to be defined as the AI slop election cycle, mostly due to the lack of legal checks on how such AI fakery can spread across social media within the US (despite a series of voluntary corporate pledges to combat this threat.)
Many of these posts will be so outlandish as to be called out, almost immediately. But it's the slow drip of AI slop into our collective election mindset that worries me. As with all types of disinformation, it's not a singular piece of content that you need to debunk. It's the cavalcade of ongoing and repeated attempts to undermine people's trust in electoral processes — this time, via AI slop — that has me freaking out.
One AI-generated falsehood about a candidate is one thing. But if you do that at scale (and now, almost at zero cost), as well as use AI tools to generate legitimate electoral material, then the dividing line between real and fake becomes so blurry as to not matter anymore.
Unfortunately, this year will be the turning point into such mass election-related AI slop.
The protection of kids online get real
WE'RE LESS THAN A MONTH INTO Australia's effort to keep anyone under 16 years of age off (most) social media. It's still too early to gauge the impact. But from such bans popping up from Virginia to Malaysia to countries enacting separate legislation to determine the age of people accessing some online services, 2026 marks when policymakers' attempts to keep kids safe online become real.
Personally, I would prefer to embed 'safety by design' principles across all of these services so that everyone, and not just children, are protected online.
But officials and lawmakers have decided that kids should receive enhanced protection, and that will have both positive and negative consequences over the next 12 months. Either way, those who have promoted such checks will have to grapple with such policymaking efforts that will inevitably lead to unexpected outcomes.
One thing is clear: the age of anonymity online is over.
Sign up for Digital Politics
Thanks for getting this far. Enjoyed what you've read? Why not receive weekly updates on how the worlds of technology and politics are colliding like never before. The first two weeks of any paid subscription are free.
Subscribe
Email sent! Check your inbox to complete your signup.
No spam. Unsubscribe anytime.
Expect to be asked, repeatedly, to prove your age when attempting to sign into popular digital services (if you haven't already done so.) Many of these requests will come via privacy-conscious mechanisms that will involve you providing some form of ID — or allowing your device to take a photo of your image — that will be quickly deleted once it has been verified by a third-party provider.
That, in theory, is how it is supposed to work. But technology has a sneaky way of not working how it is supposed to. And when it comes to people's personal data, such sensitive information is likely to be misused/mishandled in ways that endangers people's privacy online. I don't know exactly how that will play out. But if history has taught us anything, it's that sensitive data has a tendency of leaking out in ways that people don't expect. The quick rush to prove people's age online is unlikely to be any different.
That's the downside. Now the upside.
By narrowing the scope of online safety protections, lawmakers worldwide are about to provide us a live testbed to determine which privacy-by-design principles work — and which ones don't.
Does the banning of teenagers' data from serving up targeted ads make a difference? We're going to find out. Does it make sense to keep teenagers off TikTok until they can drive (in the US, at least)? Countries will give us that answer. Do facial recognition technologies provide accuracy when determining someone's age? We'll know pretty soon.
I still remain massively skeptical that such kid-focused online safety efforts will make the overall internet a better place to be. Nor do I think children will overly benefit from such well-meaning policymaking. But by throwing the kitchen sink at the problem in 2026, at least policymakers will provide some level of quantifiable evidence to hopefully tweak existing, and future, rules aimed at protecting children from the worst abuse online.
What I'm reading
— Several US tech giants altered their terms of service over the holiday period in ways that potentially cemented their power over the digital world, argues Dion Wiggins.
— So-called 'data poisoning', or where large language model's training data is manipulated to affect its behavior, is becoming an increasing risk, based on a report from The Alan Turing Institute.
— After the US administration imposes visa restrictions on 5 European researchers and ex-officials, one of those individuals, Imran Ahmed, sued to stay in the country. This is his legal appeal.
— AI systems ability to accurately fact-check live events remains poor and can lead to harmful outcomes, according to this first-person account from a US official.
— Europe must pursue a dual strategy of promoting local technology providers while also maintaining close ties to non-EU tech companies are part of its digital sovereignty agenda, claim two German national security officials in Atlantik-Brücke
Repairing a Self-Destructing SRS DG535 Digital Delay Generator

There’s a lot of laboratory equipment out there that the casual hobbyist will never need to use, but that doesn’t mean you wouldn’t snap it up if the price is right. That’s what happened when [Tom Verbeure] saw a 1980s digital delay generator at a flea market for $40. Not only is it an excellent way to learn something about these devices, but it also provides a fascinating opportunity to troubleshoot and hopefully fix it. Such was also the case with this Stanford Research Systems (SRS) DG535 that turned out to be not only broken, but even features an apparently previously triggered self-destruct feature.
These devices are pretty basic, with this specimen incorporating a Z80 MPU in addition to digital and analog components to provide a programmable delay with 12.5 nanosecond resolution on its output channels after the input trigger is sensed. For that reason it was little surprise that the problem with the device was with its supply rails, of which a few were dead or out of spec, along with a burned-out trace.

Unsurprisingly, this issue caused the same charred trace to reignite during [Tom]’s first repair attempt, but after working up the courage over the subsequent 18 months the second repair attempt went much better, also helped by the presence of the mostly correct original board schematics.
Ultimately the fixes were relatively modest, involving replacing a discrete diode bridge with an integrated one, fixing the -9 V rail with a bodge wire, and replacing the LCD with its busted AC-powered backlight with a modern one with a LED backlight. Fortunately running the 5 V rail at 7 V for a while seemed to have caused no readily observable damage, nor did flipping connectors because of SRS’ inconsistent ‘standards’ for its connector orientations.
Sadly, when [Tom] emailed SRS to inquire about obtaining an updated schematic for this unit — which is currently still being sold new for $4,495 — he merely got told to send his unit in for repair.
This 8-Bit Commodore PET Was Hard to Fix

Over on [Ken Shirriff]’s blog is a tricky Commodore PET repair: tracking down 6 1/2 bad chips. WARNING: contains 8-bit assembly code.
The Trinity of 1977 which started the personal computer revolution were the Apple II, the Commodore PET, and the TRS-80. In this project it’s a failing Commodore PET which is being restored.
In the video below the break you can see [Ken Shirriff] and [CuriousMarc] team up to crack this tough nut. Resolving the various issues required a whole heap of software and equipment. Most notably a Keysight DSOX3104T oscilloscope, a Retro Chip Tester Pro, an old Agilent 1670G logic analyzer (this thing is rocking a 3.5″ floppy disk drive!), an old Agilent 54622A oscilloscope (also rocking a floppy drive!), a Data I/O 29B Universal Programmer With UniPak 2 insert, and the disassembly software Ghidra.
In the end there were 6 (and a half) bad chips which needed to be discovered and then replaced. This project is a reminder that it’s nice to have the right tools for the job!
If you’re interested in the Commodore PET you might like to read A Tricky Commodore PET Repair And A Lesson About Assumptions or Tracking Satellites With A Commodore PET.
youtube.com/embed/nxilekpLp6g?…
The Many Questions and Challenges with DIY Hydroelectric Generators

The concept of building your own hydroelectric generator seems simple at face value: use gravity to impart as much force as possible onto a turbine, which spins a generator, thus generating electricity. If you’re like the bloke over at [FarmCraft101] trying to DIY this with your farm pond and a lot of PVC pipes, you may have some significantly more in-depth questions, especially pertaining to what kind of generator to use. This and other questions, some of which were raised after the previous video in which the first prototype generator was assembled, are answered in this follow-up video.
When you DIY such a hydroelectric system, you have a number of options when it comes to just the turbine design alone, with the Kaplan-style turbine being one of the most straightforward ones – especially if you use a fixed pitch instead of adjustable – but you can go pretty far in the weeds with alternatives. As for the sharp drop-off after the turbine in the used design, the technical term is a draft tube, which is actually more efficient in this kind of low head, high flow hydroelectric dam situation.
After getting his money back for the unusable ‘3 kW’ generator, there were three options left: try an EBay special, get a purpose-built one from a US company, or rewind an alternator stator for higher voltage output than the standard 12/24V. Ultimately option four was chosen, as in ‘all of the above’, so that comparison is coming up in a future video.
There were also questions from viewers about why he opted to rectify the AC power from the generator and use DC transmission to the nearest farm building. The main reason is efficiency, as DC transmission lines lack the skin effect losses. The other is that the grid-tie inverter that he plans to use needs DC input anyway. Not having to deal with AC transmission issues like losses and reactive power shenanigans is a major plus here.
Once the three new generator versions are being tested it will be interesting to see how they perform. One thing with the Kaplan-style turbine is that too fast RPM induces cavitation, which will erode the propeller pretty quickly. Generally car alternators require a pretty fast RPM, so that may not work out too well. There is also the question of the DC voltage generated, as for DC transmission you want to have as high a voltage as possible to reduce the current.
The purpose-built generator he purchased tops out at 48V, which is quite low. The goal is to have at least 230 VAC before rectification, so a step-up transformer may be needed. Unfortunately three-phase transformers are pretty pricy again, making the rewound alternator seem less crazy. The wild card here is perhaps whether the EBay-purchased generator is a diamond in the rough and works out of the box as hoped.
youtube.com/embed/45DNG8eUhwY?…
Tired of Burnt Fingers? Try PID Tuning the Hot Glue Gun

Hot glue guns are pretty simple beasts: there’s an on/off switch, a heating element, and a source of current, be it battery or wired. You turn it on, and the heater starts warming up; eventually you can start extruding the thermoplastic sticks we call “hot glue”. Since there’s no temperature control, the longer you run the gun, the warmer it gets until it is inevitably hotter than you actually want– either burning you or oozing thermoplastic out the tip. [Mellow_Labs] was sick of that after a marathon hot-glue session, and decided to improve on his hot glue gun with PID tuning in the video embedded below.
PID tuning is probably a familiar concept to most of you, particularly those who have 3D printers, where it’s used in exactly the same way [Mellow_Labs] puts it to work in the hot glue gun. By varying the input (in this case the power to the heater) proportional both to the Parameter (in this case, temperature) as well as the Integral and Derivative of that value, you can have a much steadier control than more naive algorithms, like the simple “on/off” thermostat that leads to large temperature swings.
In this case [Mellow_Labs] is implementing the PID control using a thermistor that looks like it came from a 3D printer, and a MOSFET driven by an RP2040. Microcontroller gets its power via the hot glue gun’s battery fed through a buck converter. Since he has them, a small OLED screen displays temperature, which is set with a pair of push-buttons. Thus, one can set a temperature hot enough to melt the glue, but low enough to avoid oozing or third degree burns.
He does not share the code he’s running on the RP2040, but if you are inspired to replicate this project and don’t want to roll your own, there are plenty of example PID scripts out there, like the one in this lovely robot. No, PID isn’t reserved for thermostats– but if you are controlling heat, it’s not reserved for electric, either. Some intrepid soul put built a PID controller for a charcoal BBQ once.
youtube.com/embed/DKgOyBBh7eE?…
PiStorm68K Offers Supercharged Retro Amiga Experience

[AmiCube] has announced their new PiStorm68K special edition MiniMig accelerator board. This board was developed to replace the 68000 CPU in a MiniMig — a recreation of the original Amiga chipset in an FPGA allowing a real genuine 68000 CPU to operate.
The PiStorm68K itself can host a real genuine 68000 CPU but it can also host various Raspberry Pi models which can do emulation of a 68000. So if you combine a PiStorm68K with a MiniMig you can, at your option, boot into an emulated environment with massively increased performance, or you can boot into an original environment, with its reliable and charming sluggishness.
In the introduction video below, [AmiCube] uses the SYSINFO utility software to compare the CPU speed when using emulation (1531 MIPS) versus the original (4.47 MIPS), where MIPS means Millions of Instructions Per Second. As you can see the 68000 emulated by the Raspberry Pi is way faster than the original. The Raspberry Pi also emulates a floating-point unit (FPU) which the original doesn’t include and a memory management unit (MMU) which isn’t used.
If you’re interested in old Amiga tech you might also like to read about Chip Swap Fixes A Dead Amiga 600 or The Many-Sprites Interpretation Of Amiga Mechanics.
youtube.com/embed/6b-HfLYA1E8?…
Linux Fu: Yet Another Shell Script Trick

I’m going to go ahead and admit it: I really have too many tray icons. You know the ones. They sit on your taskbar, perhaps doing something in the background or, at least, giving you fingertip access to some service. You’d think that creating a custom tray icon would be hard, but on Linux, it can be surprisingly simple. Part of the reason is that the Freedesktop people created standards, so you don’t typically have to worry about how it works on KDE vs. GNOME or any of the other desktop environments. That’s a big win.
In fact, it is simple enough that you can even make your own tray icons with a lowly shell script. Well, of course, like most interesting shell scripts, you need some helper programs and, in this case, we’ll use YAD — which is “yet another dialog,” a derivative of Zenity. It’s a GTK program that may cause minor issues if you primarily use KDE, but they are nothing insurmountable.
The program is somewhat of a Swiss army knife. You can use it to make dialogs, file pickers, color selectors, printer dialogs, and even — in some versions — simple web browsers. We’ve seen plenty of tools to make pretty scripts, of course. However, the ability to quickly make good-looking taskbar icons is a big win compared to many other tools.
Docs
Depending on what you want to do, YAD will read things from a command line, a file, or standard input. There are dozens of options, and it is, honestly, fairly confusing. Luckily, [Ingemar Karlsson] wrote the Yad Guide, which is very digestible and full of examples.
Exactly what you need will depend on what you want to do. In my case, I want a tray icon that picks up the latest posts from my favorite website. You know. Hackaday?
The Web Connection
YAD can render HTML using WebKit. However, I ran into immediate problems. The version in the repos for the Linux I use was too old to include the HTML option. I found a supposedly statically linked version, but it was missing dependencies. Even after I fixed that, the program still reported errors related to the NVIDIA OpenGL stack.
I quickly abandoned the idea of using a web browser. I turned to two other YAD features. First, the basic dialog can hold text and, in most cases, renders quasi-HTML because it uses the Pango library. However, there is also a text-info dialog built in. Unlike most other YAD features, the text-info dialog reads its input from standard input. However, it doesn’t render markup.
In the end, I decided to try them both. Why not? It is simple enough. But first, I needed a tray icon.
The Tray
YAD can provide a “notification,” which is what it calls a tray icon. You can specify an icon, some text, and a right-click context menu. In addition, it can react when someone clicks on the icon.
I decided to write a script with multiple personalities. If you run it with no arguments, it sets up the tray icon. If you pass anything to it, it will show a dialog with the latest Hackaday articles from the RSS feed. I wanted to make those links clickable, and that turned out to be a bit of a wrinkle. Both versions will do the job, but they each need a different approach, as you will see.
Here’s the tray code:
yad --notification --image="$0.icon.png" --text="Hackaday Now" \
--menu="Quit!quit!gtk-quit" --command="$0 show" --no-middle
You can probably guess at most of this without the manual. The image is stored in a file with the same name as the script, but with .icon.png at the end. That’s the icon in the tray. The simple menu provides an option to exit the program. If you click the icon, it calls the same script again, but with the “show” argument. The script doesn’t care what the argument is, but maybe one day it will.
So that part of the project was extremely simple. The next job is making the dialog appear.
Text Info
Grabbing the RSS feed with wget is trivial. You could use grep, sed, and bash pattern replacement to extract the titles and URLs, but I opted for awk and a brute-force parsing approach.
The standard output of awk pipes into YAD, but you can’t readily apply formatting or hyperlinks. You can use formatting in regular dialog text, which will appear before the other output. That’s where the yellow “Hackaday Today!” title in the adjacent screenshot gets set. In addition, you can automatically detect URLs and make them clickable using the --show-uri option.
Here’s the relevant command:
yad --text-info \
--text "<span foreground='$TITLECOLOR'><b><big><big>Hackaday Today!</big></big></b></span>" \
--show-uri --window-icon="$0.icon.png" \
--uri-color=$LINKCOLOR --width=$WIDTH --height=$HEIGHT \
--Title "Hackaday Posts" --button="Close!gtk-ok" \
--buttons-layout=center --escape-ok 2>/dev/null
You’ll notice that the –text option does take Pango formatting and the --show-uri option makes the links clickable. By default, dialogs have an Open and Cancel button, but I forced this one to have a single close button, accept escape, and I wanted the button centered.
As you can see in the screenshot, the result isn’t bad, but it does require having the title followed by a long URL that you can click on and that’s a little ugly.
Stock Dialog

Since the –text option works with any dialog and handles formatting, I decided to try that. The awk code was nearly the same, except for the output formatting. In addition, the output now needs to go on the command line instead of through a pipe.
This does make the script a bit more unwieldy. The awk script sets a variable, since jamming the command into the already busy YAD command line would make the script more complicated to read and work with.
The YAD command is still simple, though:
yad \
--text="$DATA" \
--window-icon="$0.icon.png" \
--width=$WIDTH --height=$HEIGHT \
--Title "Hackaday Posts" --button="Close!gtk-ok" \
--buttons-layout=center --escape-ok
The DATA variable has the formatted output text. The result looks better, as you can see in the screenshot. In either version, if you click an underlined link, your default browser should open the relevant post.
Other Choices
If you want to install either script, you can get it from GitHub. Of course, you could do this in Python or any other conventional language. There are also programs for “minimizing” another program to the tray, like AllTray or KDocker, although some of these may only work with X11 and not Wayland.
It would have been nice to have an integrated browser, although, thanks again to FreeDesktop, it is simple enough to open a URL and launch the system’s default browser.
Prefer your Hackaday feed on the command line? Check out the comments for this post. Meanwhile, send us a tip (you know, a link to your project, not a gratuity) and maybe you’ll see your own project show up on the feed.
The use of Ultrasound to take on Cancerous Tumors

As areas of uncontrolled cell growth, cancerous growth form a major problem for a multi-celled organism like us humans. Thus before they can begin to affect our long-term prospects of a continued existence, eradicating these cells-gone-wrong is essential. Unfortunately, doing so without affecting healthy cells significantly is tough. Treatments such as chemotherapy are correspondingly rough on the body, while radiation therapy is a lot more directed. Perhaps one of the more fascinating treatments involves ultrasound, with the IEEE Spectrum magazine recently covering one company providing histotripsy equipment.")
Ultrasound has found many applications in the medical field far beyond imaging, with therapeutic ultrasound by itself covering a variety of methods to perform actions within the body without breaking the skin. By using high-energy ultrasound, everything from kidney stones to fat cells and cancerous cells can be accurately targeted and destroyed. For liver tumors the application of so-called histotropsy has become quite common, allowing certain types of tumors to be ablated non-invasively after which the body can handle the clean-up.
Histotropsy is a form of high-intensify focused ultrasound (HIFU) that uses either continuous or pulsed waves to achieve the desired effect, with the HIFU transducer equipped with an acoustic lens to establish a focal point. In the case of histotripsy cavitation is induced at this focal point that ends up destroying the local tissue. Beyond liver tumors the expectation is that other tumors will soon be treated in a similar manner, which could be good news for especially solid tumors.
Along with new approaches like CAR T cell immunotherapy, the prospects for cancer becoming a very treatable set of diseases would seem to be brighter than ever.
How Advanced Autopilots Make Airplanes Safer When Humans go AWOL

It’s a cliché in movies that whenever an airplane’s pilots are incapacitated, some distraught crew member queries the self-loading freight if any of them know how to fly a plane. For small airplanes we picture a hapless passenger taking over the controls so that a heroic traffic controller can talk them through the landing procedure and save the day.
Back in reality, there have been zero cases of large airliners being controlled by passengers in this fashion, while it has happened a few times in small craft, but with variable results. And in each of these cases, another person in the two- to six-seater aircraft was present to take over from the pilot, which may not always be the case.
To provide a more reliable backup, a range of automated systems have been proposed and implemented. Recently, the Garmin Emergency Autoland system got its first real use: the Beechcraft B200 Super King Air landed safely with two conscious pilots on board, but they let the Autoland do it’s thing due to the “complexity” of the situation.
Human In The Loop
Throughout the history of aviation, a human pilot has been a crucial component for the longest time for fairly obvious reasons, such as not flying past the destination airport or casually into terrain or rough weather. This changed a few decades ago with the advent of more advanced sensors, fast computing systems and landing assistance systems such as the ILS radio navigation system. It’s now become easier than ever to automate things like take-off and landing, which are generally considered to be the hardest part of any flight.
Meanwhile, the use of an autopilot of some description has become indispensable since the first long-distance flights became a thing by around the 1930s. This was followed by a surge in long-distance aviation and precise bombing runs during World War II, which in turn resulted in a massive boost in R&D on airplane automation.")
While the the early gyroscopic autopilots provided basic controls that kept the airplane level and roughly on course, the push remained to increase the level of automation. This resulted in the first fully automatic take-off, flight and landing being performed on September 22, 1947 involving a USAF C-54 Skymaster. As the military version of the venerable DC-4 commercial airplane its main adaptations included extended fuel capacity, which allowed it to safely perform this autonomous flight from Newfoundland to the UK.
In the absence of GNSS satellites, two ships were located along the flight path to relay bearings to the airplane’s board computer via radio communication. As the C-54 approached the airfield at Brise Norton, a radio beacon provided the glide slope and other information necessary for a safe landing. The fact that this feat was performed just over twenty-eight years after the non-stop Atlantic crossing of Alcock and Brown in their Vickers Vimy airplane shows just how fast technology progressed at the time.
Nearly eighty years later, it bears asking the question why we still need human pilots, especially in this age of GNSS navigation, machine vision, and ILS beacons at any decently sized airfield. The other question that comes to mind is why we accept that airplanes effectively fall out of the sky the moment that they run out of functioning human pilots to push buttons, twist dials, and fiddle with sticks.
State of the Art
In the world of aviation, increased automation has become the norm, with Airbus in particular taking the lead. This means that Airbus has also taken the lead in spectacular automation-related mishaps: Flight 296Q in 1988 and Air France Flight 447 in 2009. While some have blamed the 296Q accident on the automation interfering with the pilot’s attempt to increase thrust for a go-around, the official explanation is that the pilots simply failed to notice that they were flying too low and thus tried to blame the automation.")
For the AF447 crash the cause was less ambiguous, even if took a few years to recover the flight recorders from the seafloor. Based on the available evidence it was clear by then that the automation had functioned as designed, with the autopilot disengaging at some point due to the unheated pitot tubes freezing up, resulting in inconsistent airspeed readings. Suddenly handed the reins, the pilots took over and reacted incorrectly to the airspeed information, stalled the plane, and crashed into the ocean.
One could perhaps say that AF447 shows that there ought to be either more automation, or better pilot training so that the human element can fly an airplane unassisted by an autopilot. When we then consider the tragic case of Helios Airways Flight 522, the ‘ghost flight’ that flew on autopilot with no conscious souls on board due to hypoxia, we can imagine a dead-man switch that auto-lands the airplane instead of leaving onlookers powerless to do anything but watch the airplane run out of fuel and crash.
Be Reasonable
Although there are still a significant number of people who would not dare to step a foot on an airliner that doesn’t have at least two full-blooded, breathing human pilots on board, there is definitely a solid case to be made for emergency landing systems to become a feature on airplanes, starting small. Much like the Cirrus Airframe Parachute System (CAPS) – a whole-airplane parachute system that has saved many lives as well as airframes – the Garmin Autoland feature targets smaller airplanes.")
After a recent successful test with a HondaJet, this recent unscheduled event with the Beechcraft B200 Super King Air twin-prop airplane turned out to be effectively another test. As the two pilots in this airplane were flying between airports for a repositioning flight, the cabin suddenly lost pressurization. Although both pilots were able to don their oxygen masks, the Autoland system engaged due to the dangerous cabin conditions. They then did not disengage the system as they didn’t know the full extent of the situation.
This effectively kept both pilots ready to take full control of the airplane should the need have arisen to interfere, but with the automated system making a textbook descent, approach and landing, it’s clear that even if their airplane had turned into another ghost flight, they would have woken up groggy but whole on the airstrip, surrounded by emergency personnel.
Considering how many small airplanes fly each year in the US alone, systems like CAPS and Autoland stand to save many lives both in the air and on the ground the coming years. Combine this with increased ATC automation at towers and elsewhere such as the FAA’s STARS and Saab’s I-ATS, and a picture begins to form of increased automation that takes the human element out of the loop as much as possible.
Although we’re still a long way off from the world imagined in 1947 where ‘electronic brains’ would unerringly fly all airplanes and more for us, it’s clear that we are moving in that direction, with such technology even within the reach of the average owner of an airplane of some description.
Super Mario 64, Now With Microtransactions

Besides being a fun way to pass time, video gaming is a surprisingly affordable hobby per unit time. A console or budget PC might only cost a few hundred dollars, and modern games like Hollowknight: Silksong can provide 40-60 hours of experience for only around $20 USD. This value proposition wasn’t really there in the 80s, where arcade cabinets like Gauntlet might have cost an inflation-adjusted $8 per hour in quarters. This paradigm shift is great for gamers, but hasn’t been great for arcade owners. [PrintAndPanic] wanted to bring some of that old coin munching vibe into console gaming, and so added a credit system to Super Mario 64.
The project is a fork of a decompilation of Super Mario 64, which converts the original machine code into a human-friendly format so bugs can be fixed and other modern features added. With the code available, essentially anyone can add features into the game that weren’t there already. In this case, [PrintAndPanic] is using a Raspberry Pi connected to a coin slot, so when coins are put into the game like an old arcade machine, the Raspberry Pi can tell the modified version of Super Mario 64 to add credits. These credits allow the player to run and jump, and when the credits run out Mario becomes extremely limited and barely able to outrun even the slowest Bombombs and Goombas.
With some debugging out of the way and the custom game working, [PrintAndPanic] built a custom enclosure for the game and the coin slot to turn it into a more self-contained arcade-style machine. The modified code for this project is available on the project’s GitHub page for those who want to play a tedious version of a favorite video game that costs more money than it should.
There are plenty of other modifications for this classic as well, most of which involve improving the game instead of adding a modern microtransaction-based system.
youtube.com/embed/Z_uFcPic5kE?…
Tying up Loose Ends on a Rope-based Robot Actuator

One of the perennial challenges of building robots is minimizing the size and weight of drive systems while preserving power. One established way to do this, at least on robots with joints, is to fit each joint with a quasi-direct-drive motor integrating a brushless motor and gearbox in one device. [The 5439 Workshop] wanted to take this approach with his own robot project, but since commercial drives were beyond his budget, he designed his own powerful, printable actuator.
The motor reducing mechanism was the biggest challenge: most quasi-direct drives use a planetary gearbox, but this would have been difficult to 3D-print without either serious backlash or limited torque. A cycloidal drive was an option, but previous printable cycloidal drives seemed to have low efficiency, and they didn’t want to work with a strain-wave gearing. Instead, he decided to use a rope drive (this seems to be another name for a kind of Capstan drive), which doesn’t require particularly strong materials or high precision. These normally use a rope wound around two side-by-side drums, which are difficult to integrate into a compact actuator, but he solved the issue by putting the drums in-line with the motor, with two pairs of pulleys guiding the rope between them in a “C” shaped path.
To build the actual motor, they used a hand-wound stator inside a 3D-printed rotor with magnets epoxied into it, and used Dyneema rope in the reducer for its high strength. The printed rotor proved problematic when the attraction between the rotor and magnets caused it to flex and scrape against the housing, and it eventually had to be reinforced with some thin metal sheets. After fixing this, it reached five Newton-meters of torque at one amp and nine Newton-meters at five amps. The diminishing returns seem to be because the 3D-printed pulley wheels broke under higher torque, which should be easy to fix in the future.
This looks like a promising design, but if you don’t need the output shaft inline with the motors, it’s probably easier to build a simple Capstan drive, the mathematics of which we’ve covered before. Both makers we’ve previously seen build Capstan drives used them to make robot dogs, which says something for their speed and responsiveness.
youtube.com/embed/02vmEU2-5d4?…
Putting the M in a UNI-T MSO

[Kerry Wong] points out that the Uni-T MSO oscilloscopes have a logic analyzer built in — that’s the MSO, or Mixed Signal Oscilloscope, part — but you have to add the probes. He shows you how it works in a recent video below.
He’s looked at the scope’s analog capabilities before and was not unimpressed. The probes aren’t inexpensive, but they do unlock the mixed signal capabilities of the instrument.
Although simple logic analyzers are very affordable today, having the capability integrated with your scope has several advantages, including integrated triggering and the simple convenience of being able to switch measurement modes with no problem.
In many cases, being able to do things like decode UART signals without dragging out a laptop and firing up software is a nice feature. If all you’ve used are the super-cheap USB logic analyzers, you may find some of the features of a more serious instrument surprising.
Is it worth the extra expense? That depends on you and what you are doing. But if you ever wondered if it was worth splurging on digital probes for a UNI-T scope, [Kerry] can help you decide.
Not that simple logic analyzers aren’t useful, and they certainly cost less. Some of them will even work as a scope, too.
youtube.com/embed/ceYI-TNx2gA?…
Commodore Disk Drive Becomes General Purpose Computer

The Commodore 1541 was built to do one job—to save and load data from 5.25″ diskettes. [Commodore History] decided to see whether the drive could be put to other purposes, though. Namely, operating as a standalone computer in its own right!
It might sound silly, but there’s a very obvious inspiration behind this hack. It’s all because the Commodore 1541 disk drive contains a MOS 6502 CPU, along with some RAM, ROM, and other necessary supporting hardware. As you might remember, that’s the very same CPU that powers the Commodore 64 itself, along with a wide range of other 1980s machines. With a bit of work, that CPU can indeed be made to act like a general purpose computer instead of a single-purpose disk controller.
[Commodore History] compares the 1541 to the Commodore VIC-20, noting that the disk drive has a very similar configuration, but less than half the RAM. The video then explains how the drive can be reconfigured to run like the even-simpler MOS Technology KIM-1 — a very primitive but well-known 8-bit machine. What’s wild is that this can be achieved with no hardware modifications. It’s not just a thought exercise, either. We get a full “Hello World!” example running in both BASIC and machine code to demonstrate that it really works.
Code is on GitHub for the curious. We’ve featured hacks with the chunky Commodore 1541 before, too.
youtube.com/embed/6loDwvG4CP8?…
Thanks to [Bruce] and [Stephen] for the tip!
Hands On WIth The Raspberry Pi Compute Module Zero

We are all familiar enough by now with the succession of boards that have come from Raspberry Pi in Cambridge over the years, and when a new one comes out we’ve got a pretty good idea what to expect. The “classic” Pi model B+ form factor has been copied widely by other manufacturers as has their current Compute Module. If you buy the real Raspberry Pi you know you’ll get a solid board with exceptionally good software support.
Every now and then though, they surprise us, with a board that follows a completely different path, which brings us to the one on our bench today. The Compute Module Zero packs the same quad-core RP3 system-on-chip (SoC) and Wi-Fi module as the Pi Zero 2 W with 512 MB of SDRAM onto a tiny 39 mm by 33 mm postage-stamp module. It’s a Pi, but not as you know it, so what is it useful for?
A Pi Zero 2 As You Haven’t Seen It Before

The first clue as to where this module sits in the Pi range comes from how it came to me. I have a bare module and the dev kit on loan from a friend who’s evaluating them with the idea of incorporating into a product. Instead of buying it from a store here in Europe he had to have it shipped from LCSC in China. It’s Chinese-made and distributed, and it’s not a consumer part in the way your Pi 5 is. Instead it’s an OEM part, and one which appears from where we’re sitting to be tailored specifically to the needs of OEMs manufacturing in China. Would you like a Linux computer with useful software updates and support built into your product? Look no further.
I put up a quick video showing it in detail which you can see at the bottom of the page. Physically it appears to carry the same parts we’re used to from the Zero 2, with the addition of an eMMC storage chip and with an antenna socket in place of the PCB antenna on the Zero. All the available interfaces are brought out to the edge of the board including some not seen on the Zero. The module is available with a variety of different storage options, including the version with no eMMC which my friend has. He’s also bought one with the storage on the dev board, so you can see both types.

The dev board is similar to a Pi model A+ in size, with a bit of extra PCB at the bottom for the USB and HDMI connectors. Like the Zero it has Micro-USB connectors for power and USB, but it carries a full-size HDMI socket. There are connectors for an LCD display, a camera, a micro SD card if you’re using the version without eMMC, and 40-pin GPIO header.
In addition, there’s an extrnal stick-on antenna in the box. Electrically it’s nothing you won’t have seen before, after all it’s little more than a Pi Zero 2 on a different board, and with less memory. This one is fresh from the box and doesn’t have an OS installed, but since we all already know how well a Pi Zero 2 runs and the likely implications of 512 MB of memory I’ve left it that way for my friend.
What Can This Board Do For Us?
The idea of a bottom-end Raspberry Pi as a component module for your Chinese assembly house is a good one. It has to be the RP3 on board, because as we’ve noted, the earlier Pi architecture is heading into the sunset and that is now their lowest-power 64-bit silicon. It could use more memory, but 512 MB is enough for many undemanding Linux applications and more than appears on many SoCs.
For tiny little computer applications, it’s an attractive component, but it’s a little bit expensive. Depending on the version, and whether it comes with the dev board, it ranges from about $25 to $38, and we can imagine that even with a quantity price break that may be too much for many manufacturers. A Chinese SoC, albeit with worse long-term Linux support, can be had for much less. If this SBC form factor catches on, we’d expect to see knockoff boards appear for a more reasonable price in due course.
Perhaps as the price of memory eventually comes down they will increase the spec a little, but we’d hazard a guess that a lower price would mean more success. A low power, plug-innable computer for $20 would be interesting for a number of projects where size really matters. Only time will tell, but meanwhile if you’re designing a product you have a new Linux option for it, and for the rest of us it’s time to look out for these modules appearing in things we buy.
Would you use one of these, and for what?
youtube.com/embed/jtdAFIAMueM?…
Popular Science Experiments in Sound During the 19th-Century
")
Check one, two; check one, two; is this thing on? Over on The Public Domain Review [Lucas Thompson] takes us for a spin through sound, as it was in Britain around and through the 1800s.
The article begins by introducing the Father of Acoustics, German physicist Ernst Chladni. After placing grains of sand on a thin metal plate and drawing a violin bow along one edge Chladni figures appear, making manifest that which previously could only be heard, that is, sound waves.
It’s fun to think that it wasn’t so long ago that the physics of sound was avant-garde. Middle class Victorian society was encouraged to reproduce cutting edge experiments with equipment in their own homes, participating in a popular science which was at the same time part entertainment and part instruction, for young and old alike. Throughout the rest of his article [Lucas] lists a number of popular science books from the period and talks a little about what was to be found within.
See the video below the break for a demonstration of Chladni figures from The Royal Institution. Of course the present state of the art regarding sonics is well advanced as compared with that of the 19th century. If you’re interested to know more check out Building A Wall-Mounted Sound Visualizer and Seeing Sound For Under $200.
youtube.com/embed/OLNFrxgMJ6E?…
2025: As The Hardware World Turns

If you’re reading this, that means you’ve successfully made it through 2025! Allow us to be the first to congratulate you — that’s another twelve months of skills learned, projects started, and hacks….hacked. The average Hackaday reader has a thirst for knowledge and an insatiable appetite for new challenges, so we know you’re already eager to take on everything 2026 has to offer.
But before we step too far into the unknown, we’ve found that it helps to take a moment and reflect on where we’ve been. You know how the saying goes: those that don’t learn from history are doomed to repeat it. That whole impending doom bit obviously has a negative connotation, but we like to think the axiom applies for both the lows and highs in life. Sure you should avoid making the same mistake twice, but why not have another go at the stuff that worked? In fact, why not try to make it even better this time?
As such, it’s become a Hackaday tradition to rewind the clock and take a look at some of the most noteworthy stories and trends of the previous year, as seen from our rather unique viewpoint in the maker and hacker world. With a little luck, reviewing the lessons of 2025 can help us prosper in 2026 and beyond.
Love it or Hate it, AI is Here
While artificial intelligence software — or at least, what passes for it by current standards — has been part of the technical zeitgeist for a few years, 2026 was definitely the year that AI seemed to be everywhere. So much so that the folks at Merriam-Webster decided to make “slop”, as in computer-generated garbage content, their Word of the Year. They also gave honorable mention to “touch grass”, which they describe as a phrase that’s “often aimed at people who spend so much time online that they become disconnected from reality.” But we’re going to ignore that one for personal reasons.
At Hackaday, we’ve obviously got some strong feelings on AI. For those who earn a living by beating the written word into submission seven days a week, the rise of AI is nothing less than an existential crisis. The only thing we have going for us is the fact that the average Hackaday reader is sharp enough to recognize the danger posed by a future in which all of our media is produced by a Python script running on somebody’s graphics card and will continue to support us, warts and all.

But while most of us are on the same page about AI in regards to things like written articles or pieces of art, it’s not so clear cut when it comes to more utilitarian endeavours. There’s a not insignificant part of our community that’s very interested in having AI help out with tedious tasks such as writing code, or designing PCBs; and while the technology is still in its infancy, there’s no question the state of the art is evolving rapidly.
For a practical example we can take a look at the personal projects of two of our own writers. Back in 2023. Dan Maloney had a hell of a time getting ChatGPT to help him design a latch in OpenSCAD. Fast forward to earlier this month, and Kristina Panos convinced it to put together a customized personal library management system with minimal supervision.
We’ve also seen a uptick in submitted projects that utilized AI in some way. Kelsi Davis used a large language model (LLM) to help get Macintosh System 7 running on x86 in just three days, Stable Diffusion provided the imagery for a unique pizza-themed timepiece, Parth Parikh used OpenAI’s Speech API to bring play-by-play commentary to PONG, and Nick Bild used Google Gemini to help turn physical tomes into DIY audio books.
Make no mistake, an over-reliance on AI tools can be dangerous. In the best case, the user is deprived of the opportunity to actually learn the material at hand. In the worst case, you make an LLM-enhanced blunder that costs you time and money. But when used properly, the takeaway seems to be that a competent maker or hacker can leverage these new AI tools to help bring more of their projects across the finish line — and that’s something we’ve got a hard time being against.
Meshtastic Goes Mainstream
Another tech that gained steam this year is Meshtastic. This open source project aims to allow anyone to create an off-grid, decentralized, mesh network with low cost microcontrollers and radio modules. We fell in love with the idea as soon as we heard about it, as did many a hacker. But the project has reached a level of maturity that it’s starting to overflow into other communities, with the end result being a larger and more capable mesh that benefits everyone.
Part of the appeal is really how ridiculously cheap and easy it is to get started. If you’re starting from absolutely zero, connecting up to an existing mesh network — or creating your own — can cost you as little as $10 USD. But if you’re reading Hackaday, there’s a good chance you’ve already got a supported microcontroller (or 10) laying around, in which case you may just need to spring for the LoRa radio module and wire it up. Add a 3D printed case, and you’re meshin’ with the best of them.

If you’re OK with trading some money for time, there’s a whole world of ready to go Meshtastic devices available online from places like Amazon, AliExpress, and even Etsy for that personal touch. Fans of the retro aesthetic would be hard pressed to find a more stylish way to get on the grid than the Hacker Pager, and if you joined us in Pasadena this year for Hackaday Supercon, you even got to take home a capable Meshtastic device in the form of the Communicator Badge.
Whether you’re looking for a backup communication network in the event of a natural disaster, want to chat with neighbors without a megacorp snooping on your discussion, or are simply curious about radio communications, Meshtastic is a fantastic project to get involved with. If you haven’t taken the plunge already, point your antenna to the sky and see who’s out there, you might be surprised at what you find.
Arduino’s New Overlord
In terms of headlines, the acquisition of Arduino by Qualcomm was a pretty big one for our community. Many a breathless article was written about what this meant for the future of the company. And things only got more frantic a month later, when the new Arduino lawyers updated the website’s Terms and Conditions.
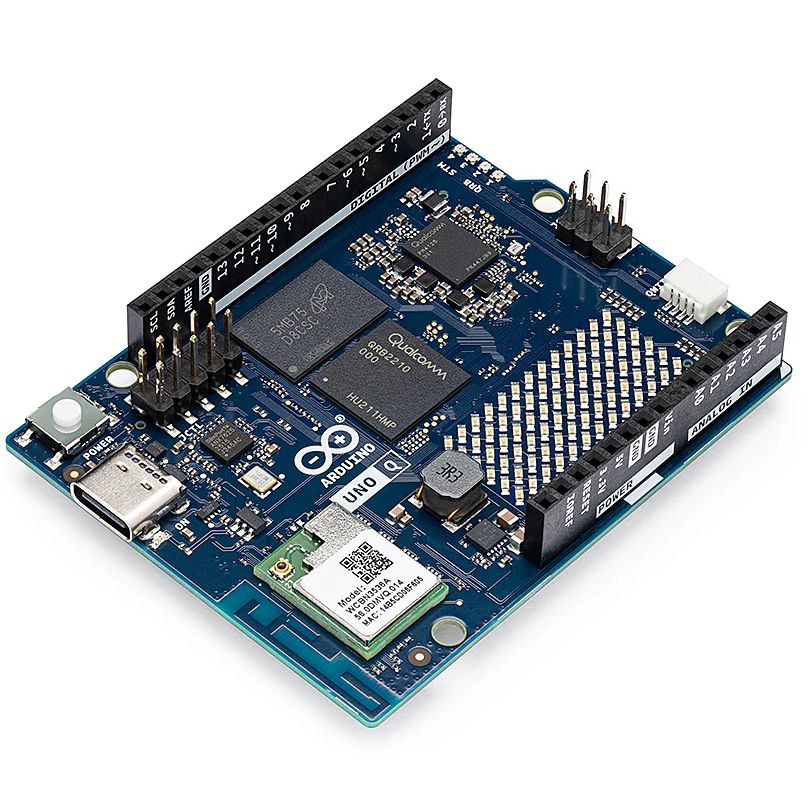
But you didn’t see any articles about that here on Hackaday. The most interesting part of the whole thing to us was the new Arduino Uno Q: an under $50 USD single-board computer that can run Linux while retaining the classic Uno layout. With the cost of Raspberry Pi hardware steadily increasing over the years, some competition on the lower end of the price spectrum is good for everyone.
As for the Qualcomm situation — we’re hackers, not lawyers. Our immediate impression of the new ToS changes was that they only applied to the company’s web services — “The Platform” in the contract — and had no bearing on the core Arduino software and hardware offerings that we’re all familiar with. The company eventually released a blog post explaining more or less the same thing, explaining that evolving privacy requirements for online services meant they had to codify certain best practices, and that their commitment to open source is unwavering.
For now, that’s good enough for us. But the whole debacle does bring to mind a question: if future Arduino software development went closed-source tomorrow, how much of an impact would it really have on the community at this point? Today when somebody talks about doing something with Arduino they are more likely to be talking about the IDE and development environment than one of the company’s microcontroller boards — the licenses for which mean the versions we have now will remain open in perpetuity. The old AVR Arduino code is GPLed, after all, as are the newer cores for microcontrollers like the ESP32 and RP2040, which weren’t written by Arduino anyway. On the software side, we believe that we have nothing to lose.
But Arduino products have also always been open hardware, and we’ve all gained a lot from that. This is where Qualcomm could still upset the applecart, but we don’t see why they would, and they say they won’t. We’ll see in 2026.
The Year of Not-Windows on the Desktop?
The “Year of Linux on the Desktop” is a bit like fusion power, in that no matter how many technical hurdles are cleared, it seems to be perennially just over the horizon. At this point it’s become a meme, so we won’t do the cliché thing and claim that 2025 (or even 2026) is going to finally be the year when Linux breaks out of the server room and becomes a mainstream desktop operating system. But it does seem like something is starting to shift.
That’s due, at least in part, to Microsoft managing to bungle the job so badly with their Windows 11 strategy. In spite of considerable push-back in the tech community over various aspects of the operating system, the Redmond software giant seems hell-bent on getting users upgraded. At the same time, making it a hard requirement that all Windows 11 machines have a Trusted Platform Module means that millions of otherwise perfectly usable computers are left out in the cold.

Does that mean everyone is switching over to Linux? Well, no. Certainly Linux is seeing an influx of new users, but for the average person, it’s more likely they’d switch to Mac or pick up a cheap Chromebook if all they want to do is surf the web and use social media.
Of course, there’s an argument to be made that Chromebook users are technically Linux users, even if they don’t know it. But for that matter, you could say anyone running macOS is a BSD user. In that case, perhaps the “Year of *nix” might actually be nigh.
Grandma is 3D Printing in Color
There was a time when desktop 3D printers were made of laser-cut wood, used literal strings instead of belts, and more often then not, came as a kit you had to assemble with whatever assistance you could scrounge up from message boards and IRC channels — and we liked it that way. A few years later, printers were made out of metal and became more reliable, and within a decade or so you could get something like an Ender 3 for a couple hundred bucks on Amazon that more or less worked out of the box. We figured that was as mainstream as 3D printing was likely to get…but we were very wrong.
Today 3D printing is approaching a point where the act of downloading a model, slicing it, and manifesting it into physical form has become, dare we say it, mundane. While we’re not always thrilled with the companies that make them and their approach to things that are important to us like repairability, open development, and privacy, we have to admit that the new breed of printers on the market today are damn good at what they do. Features like automatic calibration and filament run-out sensors, once the sort of capabilities you’d only see on eye-wateringly expensive prosumer machines, have became standard equipment.
While it’s not quite at the point where it’s an expected feature, the ability to print in multiple materials and colors is becoming far more common. Pretty much every printer manufacturer has their own approach, and the prices on compatible machines are falling rapidly. We’re even starting to see printers capable of laying down more exotic materials such as silicone.
Desktop 3D printing still hasn’t reached the sort of widespread adoption that all those early investors would have had us believe in the 2000s, where every home would one day have their own Star Trek style personal replicator. But they are arguably approaching the commonality of something like a table saw or drill press — specialized but affordable and reliable tools that act as a force multiplier rather than a tinkerer’s time sink.
Tariffs Take Their Toll
Finally, we couldn’t end an overview of 2025 without at least mentioning the ongoing tariff situation in the United States. While it hasn’t ground DIY electronics to a halt as some might have feared, it’s certainly had an impact.
A tax on imported components is nothing new. We first ran into that back in 2018, and though it was an annoyance, it didn’t have too much of an impact at the hobbyist scale. When an LED costs 20 cents, even a 100% tariff wouldn’t be much of a hit to the wallet at the scale most of us are operating at. Plus there are domestic, or at least non-Chinese, options for some jellybean components. The surplus market can also help here — you can often find great deals on things like partial reels of SMD capacitors and resistors on eBay if you keep an eye out for them.
We’ve heard more complaints about PCB production than anything. After years of being able to get boards made overseas for literal pennies, seeing a import tax that added at checkout can be quite a shock. But just like the added tax on components, while annoying, it’s not enough to actually keep folks from ordering. Even with the tariffs, the cost of getting a PCB made at OSH Park is going to be much higher than any Chinese board house.
Truth be told, if an import tax on Chinese-made PCBs and components resulted in a boom of affordable domestic alternatives, we’d be all over it. The idea that our little hobby boards needed to cross an ocean just to get to us always seemed unsustainable anyway. It wouldn’t even have to be domestic, there’s an opportunity for countries with a lower import tariff to step in. Instead of having our boards made in China, why not India or Mexico?
But unfortunately, the real-world is more complex than that. Building up those capabilities, either at home or abroad, takes time and money. So while we’d love to see this situation lead to greater competition, we’ve got a feeling that the end result is just more money out of our pockets.
Thanks for Another Year of Hacks
One thing that absolutely didn’t change in 2025 was you — thanks to everyone that makes Hackaday part of their daily routine, we’ve been able to keep the lights on for another year. Everyone here knows how incredibly fortunate we are to have this opportunity, and your ongoing support is never taken for granted.
We’d love to hear what you thought the biggest stories or trends of 2025 were, good and bad. Let us know what lessons you’ll be taking with you into 2026 down below in the comments.
hackaday.com/2026/01/05/2025-a…
Moving From Windows To FreeBSD As The Linux Chaos Alternative
Back in the innocent days of Windows 98 SE, I nearly switched to Linux on account of how satisfied I was with my Windows experience. This started with the Year of the Linux Desktop in 1999 that sta…Hackaday
What will happen in tech policy during 2026?
IT'S MONDAY, AND THIS IS DIGITAL POLITICS. I'm Mark Scott, and Happy New Year!

As I plan for the year ahead, I'm looking to arrange more in-person events — mostly because it's great to connect with people in real life. If that sounds something you'd be interested in, please fill out this survey to help my planning.
Just as the last newsletterlooked back over what happened in 2025, this first edition of the new year focuses on how global tech policy will evolve over the next 12 months. I've skipped the clichés — 'AI will consume everything,' 'Washington and Brussels won't get along' — to highlight macro trends that, imo, will underpin what will likely be a bumpy road ahead.
Some of my predictions will be wrong. That's OK — no one's perfect.
What follows is my best guess at the topics which will dominate 2026 at a time when geopolitics, technology and economic competitiveness have become intertwined like never before.
Let's get started:
GitHub Disables Rockchip’s Linux MPP Repository After DMCA Request

Recently GitHub disabled the Rockchip Linux MPP repository, following a DMCA takedown request from the FFmpeg team. As of writing the affected repository remains unavailable. At the core of this issue is the Rockchip MPP framework, which provides hardware-accelerated video operations on Rockchip SoCs. Much of the code for this was lifted verbatim from FFmpeg, with the allegation being that this occurred with the removal of the original copyright notices and authors. The Rockchip MPP framework was further re-licensed from LGPL 2.1 to the Apache license.
Most egregious of all is perhaps that the FFmpeg team privately contacted Rockchip about this nearly two years ago, with clearly no action taken since. Thus FFmpeg demands that Rockchip either undoes these actions that violate the LGPL, or remove all infringing files.
This news and further context is also covered by [Brodie Robertson] in a video. What’s interesting is that Rockchip in public communications and in GitHub issues are clearly aware of this license issue, but seem to defer dealing with it until some undefined point in the future. Clearly that was the wrong choice by Rockchip, though it remains a major question what will happen next. [Brodie] speculates that Rockchip will keep ignoring the issue, but is hopeful that he’ll be proven wrong.
Unfortunately, these sort of long-standing license violations aren’t uncommon in the open source world.
youtube.com/embed/cYvvYPth1fo?…
Bicycle Tows 15,000 Pounds

An old joke in physics is that of the “spherical cow”, poking fun at some of the assumptions physicists make when tackling a new problem. Making the problem simple like this can help make its fundamentals easier to understand, but when applying these assumptions to real-world problems these assumptions are quickly challenged. Which is what happened when [Seth] from Berm Peak attempted to tow a huge trailer with a bicycle — while in theory the bike just needs a big enough gear ratio he quickly found other problems with this setup that had to be solved.
[Seth] decided on a tandem bike for this build. Not only does the second rider add power, but the longer wheelbase makes it less likely that the tongue weight of the trailer will lift the front wheel off the ground. It was modified with a Class 3 trailer hitch, as well as a battery to activate the electric trailer brakes in case of an emergency. But after hooking the trailer up the first time the problems started cropping up. At such a high gear ratio the bike is very slow and hard to keep on a straight line. Some large, custom training wheels were added between the riders to keep it stable, but even then the huge weight still caused problems with the chain and even damaged the bike’s freehub at one point.
Eventually, though, [Berm Peak] was able to flat tow a Ford F-150 Lightning pulling a trailer a few yards up a hill, at least demonstrating this proof of concept. It might be the absolute most a bicycle can tow without help from an electric motor, although real-world applications for something like this are likely a bit limited. He’s been doing some other bicycle-based projects with more utility lately, including a few where he brings abandoned rental e-bikes back to life by removing proprietary components.
youtube.com/embed/8hDQXP3xSj4?…
Print Pixel Art to a Floppy Disk

Here at Hackaday we love floppy disks. While they are by no means a practical or useful means of storing data in the age of solid state storage, there is something special about the little floppy disc of magnetic film inside that iconic plastic case. That’s why we were so excited to see the tool [dbalsom] developed for printing pixel art in a floppy’s track timing diagrams!
Floppy timing diagrams are usually used to analyze the quality of an individual disk. It represents flux transitions within the a single floppy tack as a 2D graph. But it’s also perfectly possible to “paint” images on a floppy this way. Granted, you can’t see these images without printing out a timing diagram, but if your painting images onto a floppy, that’s probably the point.
This is where pbm2track tool comes in handy! It takes bitmap images and encodes them onto floppy emulators, or actual floppies. The results are quite excellent, with near-perfect recreation in floppy graphical views. The results on real floppies are also recognizable as the original image. The concept is similar to a previous tool [dbalsom] created, PNG2disk
If you too love the nearly forgotten physical likeness of the save button, make sure to check out this modern Linux on a floppy hack next!
Thanks [gloriouscow] for the tip!
Modifying a QingPing Air Quality Monitor for Local MQTT Access

The QingPing Air Quality Monitor 2 is an Android-based device that not only features a touch screen with the current air quality statistics of the room, but also includes an MQTT interface that normally is used in combination with the QingPing mobile app and the Xiaomi IoT ecosystem. Changing it to report to a local MQTT server instead for integration with e.g. Home Assistant can be done in an official way that still requires creating a cloud account, or you can just do it yourself via an ADB shell and some file modifications as [ea] has done.
By default these devices do not enumerate when you connect a computer to their USB-C port, but that’s easily resolved by enabling Android’s developer mode. This involves seven taps on the Device Name line in the About section of settings. After this you can enter Developer Options to toggle on Debug Mode and Adbd Debugging, which creates the option to connect to the device via USB with ADB and open up a shell with adb shell.
From there you can shoot off the QingSnow2 app and the watchdog.sh that’s running in the background, disable IPv6 and edit /etc/host to redirect all the standard cloud server calls to a local server. Apparently there is even SSH access at this point, with root access and password rockchip. The MQTT configuration is found under /data/etc/ in settings.ini, which is used by the QingPing app, so editing redirects all that.
Of course, the device also queries a remote server for weather data for your location, so if you modify this you have to provide a proxy, which [ea] did with a simple MQTT server that’s found along with other files on the GitHub project page.
Sleeping Rough in Alaska with a USPS Cargo Bike

Out of all 49 beautiful US states (plus New Jersey), the one you’d probably least want to camp outside in during the winter is arguably Alaska. If you were to spend a night camping out in the Alaskan winter, your first choice of shelter almost certainly wouldn’t be a USPS electric cargo trike, but over on YouTube [Matt Spears] shows that it’s not that hard to make a lovely little camper out of the mail bike.
We’re not sure how much use these sorts of cargo trikes get in Alaska, but [Matt] seems to have acquired this one surplus after an entirely-predictable crash took one of the mirrors off. A delta configuration trike — single wheel in front — is tippy at the best of times, but the high center of gravity you’d get from a loading the rear with mail just makes it worse. That evidently did not deter the United States Postal Service, and it didn’t deter [Matt] either.
His conversion is rather minimal: to turn the cargo compartment into a camper, he only adds a few lights, a latch on the inside of the rear door, and a wood-burning stove for heat. Rather than have heavy insulation shrink the already-small cargo compartment, [Matt] opts to insulate himself with a pile of warm sleeping bags. Some zip-tie tire chains even let him get the bike moving (slowly) in a winter storm that he claims got his truck stuck.
While it might not be a practical winter vehicle, at least on un-plowed mountain roads, starting with an electric-assist cargo trike Uncle Sam already paid for represented a huge cost and time savings vs starting from scratch like this teardrop bike camper we featured a while back. While not as luxurious, it seems more practical for off-roading than another electric RV we’ve seen.
youtube.com/embed/s9MqbLbFRDQ?…
Ray Marching in Excel

3D graphics are made up of little more then very complicated math. With enough time, you could probably compute a ray marching by hand. Or, you could set up Excel to do it for you!
Ray marching is a form of ray tracing, where a ray is stepped along based on how close it is to the nearest surface. By taking advantage of signed distance functions, such an algorithm can be quite effective, and in some instances much more efficient then traditional ray marching algorithms. But the fact that ray marching is so mathematically well defined is probably why [ExcelTABLE] used it to make a ray traced game in Excel.
Under the hood, the ray marching works by casting a ray out from the camera and measuring its distance from a set of three dimensional functions. If that distance is below a certain value, this is considered a surface hit. On surface hits, a simple normal shader computes pixel brightness. This is then rendered out by variable formatting in the cells of the spreadsheet.
For those of you following along at home, the tutorial should work just fine in any modern spreadsheet software including Google Sheets and LibreOffice Calc. It also provides a great explanation of the math and concepts of ray marching, so is worth a read regardless your opinions on Excel’s status as a so-called “programming language.”
This is not the first time we have come across a ray tracing tutorial. If computer graphics are your thing, make sure to check out this ray tracing in a weekend tutorial next!
Thanks [Niklas] for the tip!
Exploring Nintendo 64DD Code Remnants in Ocarina of Time

What if you took a Nintendo 64 cartridge-based game and allowed it to also use a large capacity magnetic disc format alongside it? This was the premise of the Nintendo 64DD peripheral, and the topic of a recent video by [Skawo] in which an archaeological code dig is performed to see what traces of the abandoned product may remain.
The 64DD slots into the bottom of the console where the peripheral connector is located, following which the console can read and write the magnetic discs of the 64DD. At 64 MB it matched the cartridge in storage capacity, while also being writable unlike cartridges or CDs. It followed on previous formats like the Famicom Disk System.
For 1998’s Game of the Year title The Legend of Zelda: Ocarina of Time such a 64DD-based expansion was worked on for a while before being cancelled along with the 64DD. With this Zelda game now decompiled, its source code has shown to be still full of 64DD-related code that [Skawo] takes us through in the video.
")
As is typical for CD- and magnetic storage formats like these 64DD discs, their access times and transfer speeds are atrociously slow next to a cartridge’s mask ROM, which clearly left the developers scrambling to find some way to use the 64DD as an actual enhancement. Considering that the 64DD never was released outside of Japan and had a very short life, it would seem apparent that, barring PlayStation-level compromises, disc formats just weren’t a good match for the console.
The interface with the 64DD in the game’s code gives some idea of what the developers had in mind, which mostly consisted out of swapping on-cartridge resources like dungeon maps with different ones. Ultimately this content did make its way into a commercial release, in the form of the Master Quest option on the game’s re-release on the GameCube.
Although this doesn’t enable features once envisioned, such as tracking the player’s entire route and storing permanent map changes during gameplay, it at least gives us a glimpse of what the expansion game on the 64DD could have looked like.
youtube.com/embed/2xyk-EozojY?…
Top image: N64 with stacked 64DD, credit: Evan-Amos
Are We Ready for AR Smart Glasses Yet?

In a recent article from IEEE Spectrum, [Alfred Poor] asks the question what do consumers really want in smart glasses? And are you finally ready to hang a computer screen on your face?
[Alfred] says that since Google Glass was introduced in 2012, smart glasses haven’t yet found their compelling use-case. Apparently it looks like while virtual reality (VR) might be out, augmented reality (AR) might be in. And of course now we have higher levels of “AI” in the mix, whatever that means.
According to the article in the present day there are two competing visions of what smart glasses might be: we have One Pro from Xreal in Beijing, and AI Glasses from Halliday in Singapore, each representing different design concepts evolving in today’s market. The article goes into further detail. The video below the break is promotional material from Halliday showing people’s reactions to their AI Glasses product.
[Alfred] talks with Louis Rosenberg, CEO and chief scientist of Unanimous AI, who says he believes “that within five years, immersive AI-powered glasses will replace the smartphone as the primary mobile device in our digital lives.” Predicting the future is hard, but what do you think? Sound off in the comments!
All in all smart glasses remain a hot topic. If you’d like to read more check out our recent articles Making Glasses That Detect Smartglasses and Mentra Brings Open Smart Glasses OS With Cross-Compat.
youtube.com/embed/C0Iwq2auR_g?…
Quote Printer Keeps Receipts

In the world of social media, “keeping receipts” refers to the practice of storing evidence that may come in handy for a callout post at a later date. For [Teddy Warner], though, it’s more applicable to a little printer he whipped up to record the very best banter from his cadre of friends.
[Teddy’s] idea was simple. He hoped to capture amusing or interesting quotes his friends made in his apartment, and store them in a more permanent form. He also wanted to allow his friends to do the same. To that end, he whipped up a small locally-hosted web interface which his friends could use to record quotes, along with proper attribution. Hosted on a Raspberry Pi 5, the web interface can then truck those quotes out to an 80 mm thermal receipt printer. The anecdote, epithet, or witticism is then spat out with a timestamp in a format roughly approximating a receipt you might get from your local gas station. What’s neat is that [Teddy] was also able to install the entire system within the housing of the Miemieyo receipt printer, by 3D printing a custom base that could house the Pi and a suitable power supply.
Beyond being fun, this system also serves a critical purpose. It creates a paper trail, such that in-jokes, rumors, and insults alike can be traced back to their originating source. No more can Crazy Terry claim to have invented “the Malaga bit,” because the server and the receipt clearly log that Gerald dropped it first at the Boxing Day do.
We’ve seen similar projects before, too. There’s just something neat about holding a bit of paper in your hand.
youtube.com/embed/F5_00bj8dHo?…
FPGA Dev Kit Unofficially Brings MSX Standard Back

In the 1980s there were an incredible number of personal computers of all shapes, sizes, and operating system types, and there was very little interoperability. Unlike today’s Windows-Mac duopoly, this era was much more of a free-for-all but that didn’t mean companies like Microsoft weren’t trying to clean up all of this mess. In 1983 they introduced the MSX standard for computers, hoping to coalesce users around a single design. Eventually it became very successful in Japan and saw some use in a few other places but is now relegated to the dustbin of history, but a new FPGA kit unofficially supports this standard.
The kit is called the OneChip Book and, unlike most FPGA kits, includes essentially everything needed to get it up and running including screen, keyboard, and I/O all in a pre-built laptop case. At its core it’s just that: and FPGA kit. But its original intent was to recreate this old 80s computer standard with modern hardware. The only problem is they never asked for permission, and their plans were quickly quashed. The development kit is still available, though, and [electricadventures] goes through the steps to get this computer set up to emulate this unofficially-supported retro spec. He’s also able to get original MSX cartridges running on it when everything is said and done.
Although MSX is relatively unknown in North America and Western Europe, it remains a fairly popular platform for retro computing enthusiasts in much of the rest of the world. We’ve seen a few similar projects related to this computer standard like this MSX-inspired cyberdeck design, but also others that bring new hardware to this old platform.
youtube.com/embed/Iy7R29bjuJ8?…
Apollo Lunar Module Thrust Meter Lives Again

[Mike Stewart] powers up a thrust meter from an Apollo lunar module. This bit of kit passed inspection on September 25, 1969. Fortunately [Mike] was able to dig up some old documentation which included the pin numbers. Score! It’s fun to see the various revisions this humble meter went through. Some of the latest revisions are there to address an issue where there was no indication upon failure, so they wired in a relay which could flip a lamp indicator if the device lost power.
This particular examination of this lunar thrust module is a good example of how a system’s complexity can quickly get out of hand. Rather than one pin there are two pins to indicate auto or manual thrust, each working with different voltage levels; the manual thrust is as given but the auto thrust is only the part of the thrust that gets added to a baseline thrust, so they need to be handled differently, requiring extra logic and wiring for biasing the thrust meter when appropriate. The video goes into further detail. Toward the end of the video [Mike] shows us what the meter’s backlights look like when powered.
If you’re interested in Apollo mission technology be sure to check out Don Eyles Walks Us Through The Lunar Module Source Code.
youtube.com/embed/H3bxe7gynQk?…
Teardown of Boeing 777 Cabin Pressure Control System

Modern passenger airliners are essentially tubes-with-wings, they just happen to be tubes that are stuffed full with fancy electronics. Some of the most important of these are related to keeping the bits of the tube with humans inside it at temperatures and pressures that keeps them alive and happy. Case in point the Boeing 777, of which [Michel] of Le Labo de Michel on YouTube recently obtained the Cabin Pressure Control System (CPCS) for a teardown.
The crucial parts on the system are the two Nord-Micro C0002 piezo resistive pressure transducers, which measure the pressure inside the aircraft. These sensors, one of which is marked as ‘backup’, are read out by multiple ADCs connected to a couple of FPGAs. The system further has an ARINC 429 transceiver, for communicating with the other avionics components. Naturally the multiple PCBs are conformally coated and with vibration-proof interconnects.
Although it may seem like a lot of hardware just to measure air pressure with, this kind of hardware is meant to work without errors over the span of years, meaning significant amounts of redundancy and error checking has to be built-in. Tragic accidents such as Helios Airways Flight 522 involving a 737-300 highlight the importance of these systems. Although in that case human error had disabled the cabin pressurization, it shows just how hard it can be to detect hypoxia before it is too late.
youtube.com/embed/rsCxEcR-AYE?…
The Setun Was a Ternary Computer from the USSR in 1958

[Codeolences] tells us about the FORBIDDEN Soviet Computer That Defied Binary Logic. The Setun, the world’s first ternary computer, was developed at Moscow State University in 1958. Its troubled and short-lived history is covered in the video. The machine itself uses “trits” (ternary digits) instead of “bits” (binary digits).
When your digits have three discrete values there are a multiplicity of ways of assigning meaning to each state, and the Setun uses a system known as balanced ternary where each digit can be either -1, 0, or 1 and otherwise uses a place-value system in the normal way.
An interesting factoid that comes up in the video is that base-3 (also known as radix-3) is the maximally efficient way to represent numbers because three is the closest integer to the natural growth constant, the base of the natural logarithm, e, which is approximately 2.718 ≈ 3.
If you’re interested to know more about ternary computing check out There Are 10 Kinds Of Computers In The World and Building The First Ternary Microprocessor.
youtube.com/embed/4vwOJE0Dq38?…
Pickle Diodes, Asymmetric Jacobs Ladders, and Other AC Surprises

While we’re 100 years past Edison’s fear, uncertainty, and doubt campaign, the fact of the matter is that DC is a bit easier to wrap one’s head around. It’s just so honest in its directness. AC, though? It can be a little shifty, and that results in some unexpected behaviors, as seen in this video from [The Action Lab].
He starts off with a very relatable observation: have you ever noticed that when you plug in a pickle, only half of it lights up? What’s up with that? Well, it’s related to the asymmetry he sees on his Jacobs ladder that has one side grow hotter than the other. In fact, it goes back to something welders who use DC know about well: the Debye sheath.
The arc of a welder, or a Jacobs ladder, or a pickle lamp is a plasma: ions and free electrons. Whichever electrode has negative is going to repel the plasma’s electrons, resulting in a sheath of positive charge around it. This positively-charged ions in the Debye sheath are going to accelerate into the anode, and voila! Heating. That’s why it matters which way the current goes when you’re welding.
With DC, that makes sense. In AC, well — one side starts as negatively charged, and that’s all it takes. It heats preferentially by creating a temporary Debye sheath. The hotter electrode is going to preferentially give off electrons compared to its colder twin — which amplifies the effect every time it swings back to negative. It seems like there’s no way to get a pure AC waveform across a plasma; there’s a positive feedback loop at whatever electrode starts negative that wants to introduce a DC bias. That’s most dramatically demonstrated with a pickle: it lights up on the preferentially heated side, showing the DC bias. Technically, that makes the infamous electric pickle a diode. We suspect the same thing would happen in a hot dog, which gives us the idea for the tastiest bridge rectifier. Nobody tell OSHA.
[The Action Lab] explains in more detail in his video, and demonstrates with ring-shaped electrode how geometry can introduce its own bias. For those of us who spend most of our time slinging solder in low-voltage DC applications, this sort of thing is fascinating. It might be old hat to others here; if the science of a plain Jacobs ladder no longer excites you, maybe you’d find it more electrifying built into a blade.
youtube.com/embed/_59b75Vql38?…
Printing in Metal with DIY SLM

An accessible 3D printer for metals has been the holy grail of amateur printer builders since at least the beginning of the RepRap project, but as tends to be the case with holy grails, it’s proven stubbornly elusive. If you have the resources to build it, though, it’s possible to replicate the professional approach with a selective laser melting (SLM) printer, such as the one [Travis Mitchell] built (this is a playlist of nine videos, but if you want to see the final results, the last video is embedded below).
Most of the playlist shows the process of physically constructing the machine, with only the last two videos getting into testing. The heart of the printer is a 500 Watt fiber laser and a galvo scan head, which account for most of the cost of the final machine. The print chamber has to be purged of oxygen with shielding gas, so [Travis] minimized the volume to reduce the amount of argon needed. The scan head therefore isn’t located in the chamber, but shines down into it through a window in the chamber’s roof. A set of repurposed industrial servo motors raises and lowers the two pistons which form the build plate and powder dispenser, and another servo drives the recoater blade which smooths on another layer of metal powder after each layer.
As with any 3D printer, getting good first-layer adhesion proved troublesome, since too much power caused the powder to melt and clump together, and too little could result in incomplete fusion. Making sure the laser was in focus improved things significantly, though heat management and consequent warping remained a challenge. The recoater blade was originally made out of printed plastic, with a silicone cord along the edge. Scraping along hot fused metal in the early tests damaged it, so [Travis] replaced it with a stainless steel blade, which gave much more consistent performance. The final results looked extremely promising, though [Travis] notes that there is still room for redesign and improvement.
This printer joins the very few other DIY SLM machines we’ve seen, though there is an amazingly broad range of other creative ideas for homemade metal printers, from electrochemical printers to those that use precise powder placement.
youtube.com/embed/MPXp3hpsdjA?…
Zork Running on 4-Bit Intel Computer

Before DOOM would run on any computing system ever produced, and indeed before it even ran on its first computer, the game that would run on any computer of the pre-DOOM era was Zork. This was a text-based adventure game first published in the late 70s that could run on a number of platforms thanks to a virtual machine that interpreted the game code. This let the programmers write a new VM for each platform rather than porting the game every time. [smbakeryt] wanted to see how far he could push this design and got the classic game running on one of the oldest computers ever produced.
The computer in question is the ubiquitous Intel 4004 processor, the first commercially available general-purpose microprocessor produced. This was a four-bit machine and predates the release of Zork by about eight years. As discussed earlier, though, the only thing needed to get Zork to run on any machine is the Z-machine for that platform, so [smbakeryt] got to work. He’s working on a Heathkit H9 terminal, and the main limitation here is the amount of RAM needed to run the game. He was able to extended the address bus to increase the available memory in hardware, but getting the Z-machine running in software took some effort as well. There’s a number of layers of software abstraction here that’s a bit surprising for 70s-era computing but which make it an extremely interesting challenge and project.
As far as [smbakeryt]’s goal of finding the “least amount of computer” that would play Zork, we’d have a hard time thinking of anything predating the 4004 that would have any reasonable user experience, but we’d always encourage others to challenge this thought and [smbakeryt]’s milestone. Similarly, DOOM has a history of running on machines far below the original recommended minimum system requirements, and one of our favorites was getting it to run on the NES.
youtube.com/embed/VcTQyA80Apg?…
Benchmarking Windows Against Itself, from Windows XP to Windows 11

Despite faster CPUs, RAM and storage, today’s Windows experience doesn’t feel noticeably different from back in the 2000s when XP and later Windows 7 ruled the roost. To quantify this feeling, [TrigrZolt] decided to run a series of benchmarks on a range of Windows versions.
Covering Windows XP, Vista, 7, 8.1, 10 and 11, the Pro version of each with the latest service packs and updates was installed on the same laptop: a Lenovo ThinkPad X220. It features an Intel i5 2520M CPU, 8 GB of RAM, built-in Intel HD Graphics 3000 and a 256 GB HDD.
For start-up, Windows 8.1 won the race, probably due to having the Fast Boot feature, while Windows 11 came in dead last as it showed the desktop, but struggled to show the task bar. Windows XP’s install size was the smallest and also had the lowest RAM usage with nothing loaded at 800 MB versus 3.3 GB for Windows 11 in last place.
Using the Chrome-based Supermium browser, memory management was tested, with XP performing as poorly as Windows 11, while Windows 7 and 8.1 took home the gold at over two-hundred tabs open before hitting the total RAM usage limit of 5 GB. That XP performed so poorly was however due to an issue with virtual memory and not hitting the RAM limit, which means that Windows 11 is the real dunce here.
This is a pattern that keeps repeating: Windows 11 was last in the battery test, took longer to render a video project in OpenShot, took its sweet time opening the File Explorer window, and opening built-in applications like MS Paint left enough time to fetch a fresh cup of coffee. Not to mention Windows 11 taking the longest to open websites and scoring worst of all in single-threaded CPU-Z.
Much seems to be due to the new code in Windows 11, as Microsoft has opted to start doing major rewrites since Windows 7, hitting a crescendo with Windows 11. Although there’s the unhelpful fact that Windows 11 by default encrypts the storage with the very slow software-based BitLocker, its massive RAM usage and general sluggishness are such a big deal that even Microsoft has acknowledged this and added workarounds for the slow File Explorer in Windows 11 by preloading components into RAM.
All of this appears to be part of the same trend in software development, where more resources are pointlessly used due to developing for the hardware, and performance increasingly takes a backseat to abstractions and indirections that effectively add bloat and latency.
youtube.com/embed/7VZJO-hOT4c?…
A Steam Machine Clone For An Indeterminate but Possibly Low Cost

For various reasons, crypto mining has fallen to the wayside in recent years. Partially because it was never useful other than as a speculative investment and partially because other speculative investments have been more popular lately, there are all kinds of old mining hardware available at bargain prices. One of those is the Asrock AMD BC250, which is essentially a cut down Playstation 5 but which has almost everything built into it that a gaming PC would need to run Steam, and [ETA PRIME] shows us how to get this system set up.
The first steps are to provide the computer with power, an SSD, and a fan for cooling. It’s meant to be in a server rack so this part at least is pretty straightforward. After getting it powered up there are a few changes to make in the BIOS, mostly related to memory management. [ETA PRIME] is uzing Bazzite as an operating system which helps to get games up and running easily. It plays modern games and even AAA titles at respectable resolutions and framerates almost out-of-the-box, which perhaps shouldn’t be surprising since this APU has a six-core Zen 2 processor with a fairly powerful RDNA2 graphics card, all on one board.
It’s worth noting that this build is a few weeks old now, and the video has gotten popular enough that the BC250 cards that [ETA PRIME] was able to find for $100 are reported to be much more expensive now. Still, though, even at double or triple the price this might still be an attractive price point for a self-contained, fun, small computer that lets you game relatively easily and resembles the Steam Machine in concept. There are plenty of other builds based on old mining hardware as well, so don’t limit yourself to this one popular piece of hardware. This old mining rig, for example, made an excellent media server.
youtube.com/embed/q_CxcbS5HI8?…