 - Collegamento all'originale")
Liquid CO2 For Grid Scale Energy Storage Isn’t Just Hot Air

There’s folk wisdom in just about every culture that teaches about renewable energy — things like “make hay while the sun shines”. But as an industrial culture, we want to make hay 24/7 and not be at the whims of some capricious weather god! Alas, renewable energy puts a crimp in that. Once again, energy supplies are slowly becoming tied to the sun and the wind.
Since “Make compute while the wind blows” doesn’t have a great ring to it, clearly our civilization needs to come up with some grid-scale storage. Over in Sardinia they’re testing an idea that sounds like hot air, but isn’t — because the working gas is CO2.
The principle is simple: when power is available, carbon dioxide is compressed, cooled, and liquefied into pressure vessels as happens at millions of industrial facilities worldwide every day. When power is required, the compressed CO2 can be run through a turbine to generate sweet, sweet electricity. Since venting tonnes of CO2 into the atmosphere is kind of the thing we’re trying to avoid with this whole rigmarole, the greenhouse gas slash working fluid is stored in a giant bag. It sits, waiting for the next charge cycle, like the world’s heaviest and saddest dirigible. In the test project in Sardinia — backed by Google, amongst others — the gas bag holds 2000 tonnes and can produce 20 megawatts of power for up-to 10 hours.

That’s not exactly astounding. It gets you through the night, but leaves you hanging if the next day is cloudy. But it’s scalable. The turbine is 20 megawatts, sure, but all you need is land to add extra energy capacity. The 200 MWh pilot plant is a five hectare facility, which is only about 12.3 acres, or roughly 1/10th the size of the Mall of America. It seems like increasing capacity would be fairly trivial; unlike, say, pumped hydro storage, no special topography is required. Ten hours of storage is also notably longer than the six to eight hours grid-scale battery farms usually aim for.
As of this writing, there’s only one of these plants in operation, but expect that to change rapidly. In 2026 the company behind the Sardinia project, Energy Dome, plans on putting in grid-scale storage based on its technology in India and Wisconsin, and that’s before Google gets into it. They’re hoping to roll this technology out at a number of data centers worldwide, though the exact details of the deal aren’t public.
We’ve talked about grid-scale energy storage before, using everything from liquid tin to electric car batteries and big piles of gravel. This methodology has a lot to recommend it over those others in comparison, and should worst come to worst, at least it won’t burn for days like certain batteries we could name. Releasing 2000 tonnes of CO2 might not be as benign as a failure from a liquid air battery, but storing liquid CO2 under pressure is a lot easier holding onto cryogenic air.
All images credited to Luigi Avantaggiato.

Print Your Own Standardized Wire Spool Storage

Hardware hackers tend to have loads of hookup wire, and that led [firstgizmo] to design a 3D printable wire and cable spool storage system. As a bonus, it’s Gridfinity-compatible!
There are a lot of little design touches we love. For example, we like the little notch into which the wire ends are held, which provides a way to secure the loose ends without any moving parts. Also, while at first glance these holders look like something that goes together with a few screws, they actually require no additional hardware and can be assembled entirely with printed parts. But should one wish to do so, [firstgizmo] has an alternate design that goes together with some M3 bolts instead.
Want to adjust something? The STEP files are included, which we always love to see because it makes modifications to the models so much more accessible. One thing that hasn’t changed over the years is that making engineering-type adjustments to STL files is awful, at best.
If there is one gotcha, it is that one must remove wire from their old spools and re-wind onto the new to use this system. However, [firstgizmo] tries to make that as easy as possible by providing two tools to make re-spooling easier: one for hand-cranking, and one for using a hand drill to do the work for you.
It’s a very thoughtful design, and as mentioned, can also be used with the Gridfinity system, which seems to open organizational floodgates in most people’s minds. Most of us are pinched for storage space, and small improvements in space-saving really, really add up.
Al via il corso “Cyber Offensive Fundamentals” di RHC! 40 ore in Live Class
Vuoi smettere di guardare tutorial e iniziare a capire davvero come funziona la sicurezza informatica?
Se la risposta è SI, ti consigliamo di leggere questo articolo.
Il panorama della sicurezza informatica cambia velocemente: nuove vulnerabilità, attacchi sempre più sofisticati e infrastrutture complesse rendono indispensabile comprendere come i criminali informatici agiscono, per poter mettere in sicurezza le organizzazioni.
È fondamentale disporre di specialisti in grado di comprendere come i criminal hacker aggirano le misure di sicurezza, così da individuare in anticipo vulnerabilità e potenziali vettori di attacco all’interno di un’infrastruttura informatica, prima che possano essere sfruttati da aggressori reali.
Per maggiori informazioni sul corso potete accedere al programma online, o contattarci tramite WhatsApp al numero 379 163 8765 oppure scrivendoci alla casella di posta formazione@redhotcyber.com.

Pensa come un attaccante, agisci come un difensore
La base della sicurezza informatica, al di là di norme e tecnologie, ha sempre un unico obiettivo: fermare gli attacchi dei criminali informatici.
Per raggiungere questo obiettivo, è fondamentale conoscere il modo in cui gli hacker operano. Ed è proprio questo il “life motive” di questo corso: Pensa come un attaccante, agisci come un difensore. Solo comprendendo come i criminali informatici sfruttano i sistemi è possibile definire strategie coerenti ed efficaci per ostacolarli.
Non basta più conoscere la teoria. Per proteggere davvero un’infrastruttura digitale, occorre capire a fondo il comportamento degli aggressori che sono di fatto dei “tecnici”. Ogni vulnerabilità, ogni configurazione errata, ogni falla può diventare un punto di ingresso per un attacco. La capacità di anticipare le mosse di un hacker criminali e trasformare questa conoscenza in strategie difensive rappresenta oggi un vantaggio competitivo decisivo per le aziende.
Nel mondo del lavoro, la richiesta di professionisti specializzati in Offensive Security (che racchiude l’arte del penetration test e dell’ethical hacking) supera di gran lunga l’offerta. Il mercato della sicurezza informatica è in forte espansione e le aziende – dalle startup alle grandi multinazionali – sono costantemente alla ricerca di figure capaci di simulare gli attaccanti ed isolare i vettori di attacco per fare “prevenzione”. Le opportunità occupazionali sono enormi, concrete e destinate a crescere ancora per molti anni
Per rispondere a questa esigenza, Red Hot Cyber ha lanciato una nuova Live Class formativa: “Cyber Offensive Fundamentals”, una nuova Live Class pensata per chi desidera entrare davvero nel mondo della cybersecurity operativa.
Con un approccio estremamente pratico, laboratori tecnici e affiancamento diretto dei docenti, la Live Class guida passo dopo passo nella costruzione delle competenze essenziali per svolgere un penetration test in modo moderno, professionale ed etico.
Cosa tratterà il corso
Il corso offre un percorso completo che parte dalle basi e arriva alle tecniche operative utilizzate quotidianamente nelle tecniche di penetration test ed ethical hacking. Tra gli argomenti principali:
- Networking: modello OSI, indirizzamento IP, subnetting, protocolli fondamentali, analisi del traffico e sniffing controllato.
- Laboratori pratici: installazione di ambienti virtuali, Kali Linux, Metasploitable, Windows 10/11, configurazioni di rete isolate.
- Recon & OSINT: raccolta informazioni pubbliche, scansioni di rete, fingerprinting, attività di enumeration, utilizzo avanzato di Nmap, Nessus e analisi CVE/CVSS.
- Malware education: reverse shell, backdoor, persistenza, evasione e tecniche di rilevamento.
- Exploitation: attacchi controllati tramite exploit pubblici, Metasploit, payload e metodologie reali.
- Post-Exploitation: privilege escalation, movimento laterale, persistenza, password cracking, strumenti come LinPEAS e WinPEAS.
- WebApp Security: SQLi, XSS, RCE, traversal, testing con Burp Suite, esercitazioni su DVWA.
- Active Directory: architettura, autenticazioni, vettori d’attacco, strumenti professionali (BloodHound, nxc, Responder, Impacket).
Alla fine del percorso, i partecipanti affineranno la propria autonomia operativa, riuscendo a condurre un penetration test completo e documentato, dalla ricognizione iniziale alla post-exploitation.

Il docente: Alessio Lauro
A guidare i partecipanti in questo percorso tecnico ci sarà un professionista e docente che collabora con Red Hot Cyber da diverso tempo: Alessio Lauro. Si tratta di un ethical hacker specializzato da anni in penetration testing, sicurezza delle reti e analisi delle vulnerabilità. Possiede certificazioni internazionali e collabora come formatore con diversi enti professionali italiani. Unisce un approccio pratico a una forte attenzione all’attualità delle minacce moderne, portando in aula esempi concreti e metodologie operative utilizzate dai professionisti del settore.
Modalità di apprendimento
La Live Class segue un metodo formativo estremamente operativo:
- 40 ore di lezioni dal vivo, con interazione diretta con il docente;
- Laboratori tecnici isolati, replicabili in autonomia;
- Dimostrazioni passo-passo delle tecniche utilizzate negli scenari reali;
- Approccio learning-by-doing: ogni concetto teorico viene immediatamente applicato in pratica;
- Utilizzo degli stessi strumenti usati dai professionisti
Il corso rilascia inoltre la certificazione COF – Cyber Offensive Fundamentals di Red Hot Cyber, previo superamento dell’esame finale.
[em][em]Per maggiori informazioni sul corso potete accedere al programma online, o contattarci tramite WhatsApp al numero 379 163 8765 oppure scrivendoci alla casella di posta formazione@redhotcyber.com.[/em][/em]
Difficoltà del corso
Il corso è di livello base, ma con una forte impronta operativa: non richiede competenze avanzate, ma è indispensabile avere:
- capacità di navigazione Internet,
- conoscenze minime di sicurezza informatica,
- familiarità con il computer e con i sistemi operativi.
È adatto sia a chi vuole entrare in ambito cybersecurity, sia a chi già lavora nel settore IT e desidera acquisire competenze offensive aggiornate. Il concetto sul quale si basa questo corso è semplice ma al tempo stesso a nostro avviso fondamentale: devi conoscere come operano tecnicamente gli avversari se vuoi poter difendere con efficacia una organizzazione.
Ingresso nel mondo del lavoro
Questa Live Class rappresenta un vero punto di accesso al mondo della sicurezza informatica offensiva e all’arte del penetration testing.
Pur essendo un corso base, permette di:
- costruire solide fondamenta tecniche,
- comprendere le logiche operative di un penetration test,
- utilizzare i principali strumenti professionali,
- familiarizzare con le tipologie reali di attacco e difesa,
- sviluppare un mindset da penetration tester.
Questo tipo di mestiere non conosce una meta e questo ricordatelo sempre.
Infatti, come spesso riportiamo, l‘”hacking è un percorso e non un destinazione”, ma il corso pone solide basi concrete per avviare una carriera nel settore, permettendo al discente di avviare un percorso in questo mondo altamente tecnologico.
Una volta completato il corso, sarà possibile per i partecipanti entrare a far parte di HackerHood Academy, un contesto strettamente legato al nostro collettivo di hacker etici noto come HackerHood. Questo spazio consentirà loro di familiarizzare con l’ambiente e con i professionisti del settore, favorendo la condivisione di esperienze, idee e traiettorie nel campo dell’hacking etico.
[em][em]Per maggiori informazioni sul corso potete accedere al programma online, o contattarci tramite WhatsApp al numero 379 163 8765 oppure scrivendoci alla casella di posta formazione@redhotcyber.com.[/em][/em]
L'articolo Al via il corso “Cyber Offensive Fundamentals” di RHC! 40 ore in Live Class proviene da Red Hot Cyber.
Allarme malware su Open VSX: migliaia di dispositivi macOS infettati da GlassWorm
Una nuova ondata di estensioni dannose è stata scoperta nello store di estensioni Open VSX , utilizzato da milioni di sviluppatori. Gli esperti di Koi avvertono che gli aggressori stanno inserendo plugin “utili” nello store, ma in realtà stanno rubando criptovalute, password e altri dati sensibili. L’attacco ora prende di mira solo gli utenti macOS.
Gli specialisti di Koi Security hanno segnalato la scoperta. Secondo loro, si tratta già della quarta ondata di malware auto-propagante, da loro chiamato GlassWorm. La campagna è iniziata solo circa due mesi e mezzo fa, ma ha già infettato migliaia di dispositivi prima che le estensioni venissero rimosse dal mercato.
Lo schema funziona in questo modo: un aggressore pubblica estensioni su Open VSX camuffate da strumenti di produttività. Open VSX è un archivio di estensioni aperto per Visual Studio Code e le sue numerose derivazioni, tra cui Cursor, una scelta popolare tra gli sviluppatori che lavorano con il Vibe Coding. Dopo l’installazione, l'”estensione” non si rivela immediatamente, ma attende circa 15 minuti. Questa pausa aiuta a eludere le sandbox automatizzate, che in genere analizzano il comportamento del programma solo per pochi minuti.
Successivamente, viene eseguito il codice principale. Nella nuova versione, è nascosto all’interno del file JavaScript dell’estensione e ulteriormente crittografato. Questa differenza rispetto alle precedenti varianti di GlassWorm, che, secondo i ricercatori, prendevano di mira Windows e utilizzavano diverse tecniche di mimetizzazione. Ora, gli autori hanno chiaramente adattato lo strumento per macOS, enfatizzandone la furtività e la resilienza.

Perché Mac? Koi Security lo spiega in modo semplice. macOS è spesso utilizzato dagli sviluppatori nei settori delle criptovalute, del web3 e delle startup, in altre parole, ambienti in cui è più probabile che le vittime dispongano di wallet, token e accesso all’infrastruttura. I ricercatori stimano che almeno tre estensioni infette siano apparse su Open VSX, con un totale complessivo di circa 50.000 download. Una di queste si spacciava per “Prettier Pro”, presumibilmente un formattatore di codice avanzato, mentre le altre due sembravano essere strumenti di sviluppo standard.
GlassWorm stesso, a giudicare dalla sua descrizione, è progettato per rubare criptovalute e credenziali. Esegue la scansione del computer alla ricerca di app hardware wallet come Ledger Live e Trezor Suite e tenta di sostituirle con versioni trojanizzate. Anche in assenza di hardware wallet, il malware può attaccare decine di estensioni del browser e portafogli desktop, tra cui Meta Mask, Phantom, Coinbase Wallet ed Exodus. Raccoglie anche token GitHub, credenziali Git, token NPM e intere directory SSH, nonché password dal portachiavi macOS, file di database, impostazioni VPN , cookie e archiviazione locale del browser.
I ricercatori hanno anche notato un metodo insolito per gestire le infezioni. Per ottenere gli indirizzi dei server C&C, gli aggressori utilizzano la blockchain di Solana, pubblicando note con link crittografati nelle transazioni. Questo approccio è più difficile da disattivare con metodi tradizionali, come il blocco di un dominio o la disattivazione dell’hosting, e questo, secondo Koi Security, rende la minaccia più persistente.
La quarta ondata avrebbe utilizzato la stessa infrastruttura della precedente, incluso l’indirizzo IP 45.32.151.157 come server di comando e controllo primario. I ricercatori ritengono che GlassWorm si stia gradualmente evolvendo in una minaccia resiliente e multipiattaforma e prevedono la prossima ondata, poiché gli aggressori adatteranno rapidamente le loro tecniche in seguito alle segnalazioni pubbliche.
Se sospetti che un’estensione in Open VSX possa essere dannosa o vulnerabile, gli sviluppatori del marketplace ti chiedono di segnalarlo a openvsx@eclipse-foundation.org
L'articolo Allarme malware su Open VSX: migliaia di dispositivi macOS infettati da GlassWorm proviene da Red Hot Cyber.
Making the Fastest LEGO Technic Air-Powered Engine

Just because LEGO Technic is technically a toy doesn’t mean that you cannot do solid engineering with it, like building air-powered engines. After first building a simple air-powered piston engine, this time around [Jamie’s Brick Jams] sought to not only optimize the engine, but also build a clutch and something to power with said engine.")
The piston head is one of the handful of 3D printed parts, with the new design featuring twin rubber o-rings as a seal instead of a single big one as in the old design. This incidentally matches the multiple seal rings on an internal combustion engine’s pistons, probably for similar blow-by related reasons. The air hose diameter was also increased from 2 to 3 mm to give the engine a larger volume of air to work with, which along with a new flywheel gave a lot more torque. Next the piston rod length was optimized.
The final radial 4-piston engine turns out to work pretty well, with the clutch engaging smoothly. This was used to drive a DIY generator that turned out to produce about 3 Watt of usable power in its final configuration at 6 V, though it’s admittedly a rather crude generator that could be further optimized. When trying a twin-piston configuration with the highest air pressure before air hoses began to pop off, it hit a dizzying 14,600 RPM.
These aren’t half bad results for some LEGO Technic together with some 3D printed bits, rubber o-rings and some lube.
youtube.com/embed/oLWdc6AzmB4?…
Terminal-Based Web Browsing with Modern Conveniences

Programmers hold to a wide spectrum of positions on software complexity, from the rare command-line purists to the much more common web app developers, and the two extremes rarely meet. One point of contact, though, might be [Jan Antos]’s Brow6el, which uses sixel graphics to display a fully graphical web browser within a terminal.
Behind the scenes, the Chromium Embedded Framework renders webpages headless, then Brow6el uses libsixel to convert the rendered output image to sixels, a simple kind of console-based graphics representation, which it then outputs to the terminal. It regularly re-renders the page to catch page updates and display them in real time, and it can send mouse or keyboard input back to the webpage. For more advanced work, it also has a JavaScript development console, and it’s possibly to manually inject scripts into rendered webpages, or inject them automatically using URL match patterns.
Some other convenient features include a bookmark system, a download manager, terminal-based popup dialog support, support for multiple simultaneous open windows, and a private mode, all of these features being controllable through the keyboard alone. The mouse input can be taken from a real mouse or from a keyboard-controlled virtual mouse, which lets the user click and scroll through websites even on fully text-based systems. [Jan] provides an impressive video demonstration (and we’re not just saying that because of the demo website), which is embedded below.
Brow6el takes inspiration from a few other terminal-based web browsers, such as Carbonyl, though it improves on their graphics. Experienced readers, however, might already know that with some Wayland tricks, it’s possible to turn any application into a terminal app.
codeberg.org/janantos/brow6el/…
Putting a Cheapo 1800W DC-DC Boost Converter to the Test

These days ready-to-use DC-DC converters are everywhere, with some of the cheaper ones even being safe to use without an immediate risk to life and limb(s). This piques one’s curiosity when browsing various online shopping platforms that are quite literally flooded with e.g. QS-4884CCCV-1800W clones of a DC-DC boost converter. Do they really manage 1800 Watt even without active cooling? Are they perhaps a good deal? These were some of the questions that [Josh] over at the [Signal Drift] channel set out to answer.
The only real ‘datasheet’ for this module seems to come courtesy of a Floridian company who also calls it the 36843-PS, but it features specifications that are repeated across store listings so it might as well by the official ‘datasheet’. This module is marketed as being designed for the charging of lead-acid and similar batteries, including the boosting of PV solar panel outputs, though you’d really want to use an MPPT charger for that.
With this use case in mind, it’s probably no surprise to see on the oscilloscope shots under load that it has a tragic 100 kHz switching frequency and a peak-to-peak noise on the output of somewhere between 1-7 VDC depending on the load. Clearly this output voltage was not meant for delicate electronics.
Looking closer at the board, we can see that it features a TI TL494C as the PWM controller IC, which drives the MOSFETs that form the boost circuit. There’s also an XLSemi XL7005A buck converter that is used for the low-voltage supply on the board. Meanwhile an LM358 dual opamp seems to be used in the voltage monitoring circuit, which also completes the analysis minus the passives, the MOSFETs for the buck (IRFB3206) and boost (IRFP4468) circuits, and a 100V-rated Power Schottky rectifier.
While the board does implement some basic voltage- and current-related safeties and limits, even the documentation tells you to not leave it powered on for too long. As for pushing it to the full 1,800 Watt output, this would require at least 48 VDC input, enabling e.g. 90 VDC output at 20A. Since the input terminal is only rated for 300V at 30A, the input for the subsequent stress test was limited to 48V at 30A for a total of 1,440 Watt from three 48 Watt PSUs.
Using two resistive heating elements as a ~1,800 Watt load the output of the module was measured to see how far the module can be pushed. This turned out to be 1,200 Watt with the 48VDC input proving to be the limit. With the maximum 60VDC input you may be able to provide the current required to hit the full 1,800 Watt, but at that point you’re pretty close to the output voltage anyway. This makes a total of 500-1,000 Watt more reasonable.
Considering the overall performance, the original listed application as a battery charger seems to be about right, with a very barebones design. Its output switching noise and lack of safeties, as well as inability to fully turn off, mean that it should not be used by itself for anything that will be powered for extended periods of time, nor should anything sensitive to switching noise be exposed to its output voltage. For the $18 or so that this module goes for on certain popular platforms one could do much worse if you know what you’re doing.
youtube.com/embed/pHri9dBQwiw?…
Building a Steam Loco These Days is Nothing But Hacks

The Pennsylvania Railroad (PRR)’s T1 class is famous for many reasons: being enormous, being a duplex, possibly having beaten Mallard’s speed record while no one was looking… and being in production in the 21st century. That last fact is down to the redoubtable work by the PRR T1 Steam Locomotive Trust, who continued their efforts to reproduce an example of these remarkable and lamentably unpreserved locomotives in the year 2025.
They say that 2025 was “the year of the frame” because the frame was finally put together. We might say that for the PRR Trust, this was the year of welding. Back when the Baldwin and Altoona works were turning out the originals, the frames for steam locomotives were cast, not welded. There might not be anywhere on Earth to get a 64′ long (19.5 m), 71,000 lbs steel casting made these days. Building it up with welded steel might not be perfectly accurate, but it’s the sort of hack that’s needed to keep the project moving.
The cylinders, too, would have been bored-out castings back the day. Getting the four (it’s a duplex, remember) assemblies cast as one piece didn’t prove practical, so T1 #5550 will have welded cylinders as well. Given modern welding, we expect no problem with holding steam pressure. The parts are mostly machined and will be welded-together next year.
The giant wheels of the locomotive have been cast, but need to be machined. It’s not impossible to believe that locomotive #5550 will be on its frame, on its wheels, in 2026. The boiler is already done and the injectors to get water into it have been reinvented, which can perhaps be considered another hack.
Right now, if donations continue to trickle in at the current rate– and prices don’t rise any faster than they have been– the Trust hopes to have the locomotive steaming in 2030. She’s now 59.8% complete. That’s up from 40% when we last checked in, back in 2022, which is great progress considering this is a volunteer-driven, crowd-funded effort.
If you don’t have the skills or geographical location to volunteer with this build, but we’ve peaked your love of steam, perhaps you could 3D print an engine to scratch the itch.
youtube.com/embed/jSYGNQVYeA4?…
Our New Years Wish is to Hide in a Giant Pokéball

Between the news, the world situation, and the inevitable family stresses that come this time of year, well — one could be excused for feeling a certain amount of envy for those adorable pocket monsters who spend their time hidden away in red-and-white orbs. [carlos3dprint] evidently did, but he didn’t just dream of cozy concave solitude: he made it happen, with 3D printing and way too much post-processing.
Arguably 3D printing is not the ideal technique for such a large build, and even [carlos], despite the 3dprint in his handle, recognized this: the base frame of the sphere is CNC-routed plywood. He tried to use Styrofoam to make a skin, but evidently he’d lost access to the large CNC cutter he’d borrowed for the plywood frame at that point, as he was trying to do the cuts by hand. It still seems like it wouldn’t have be any worse than the little printed blocks from four different printers he eventually hot-stapled into a shell.
We only say that because based on his description of how much resin and filler went into creating a smooth outer surface on his Pokéball, the raw surface of the prints must have been pretty bad before fiberglass was applied. Still, it’s hard to argue with results, and the results are smooth, shiny and beautiful after all the sanding and painting. Could another technique have been easier? Maybe, but we hack with what we have, and [carlos] had 3D printers and knows how to make the best of them.
The interior of the ball is just large enough for a cozy little gaming nook, and no guesses what [carlos] is playing inside. The Instructable linked above doesn’t have many interior photos, though, so you’ll have to check the video (embedded below) for the interior fitting out, or jump to the tour at about the 15 minute mark.
Given ongoing concerns about VOCs from 3D printers, we kind of hope the Bulbsaur-themed printer he’s got in there is decorative, but it’s sure a nice homage to the construction method. Other pokeballs featured on Hackaday have been much smaller, but we’ve always had a soft spot for scaled-up projects.
youtube.com/embed/exD7GZWry_w?…
The Cutting Truth about Variable Capacitors

If you’ve seen a big air-variable capacitor, you may have noticed that some of the plates may have slots cut into them. Why? [Mr Carlson] has the answer in the video below. The short answer: you can bend the tabs formed by the slots to increase or decrease the capacitance by tiny amounts for the purpose of tuning.
For example, if you have a radio receiver with a dial, you can adjust the capacitor to make certain spots on the dial have an exact frequency. Obviously, you can only adjust in bands depending on how many slots are in the capacitor. Sometimes the adjustments aren’t setting the oscillator’s frequency. For example, the Delco radio he shows uses the capacitor to peak the tuning at the specified frequency.
You usually only find the slots on the end plates and, as you can see in the video, not all capacitors have the slots. Of course, bending the plates with or without slots will make things change. Just don’t bend enough to short to an adjacent plate or the fixed plates when the capacitor meshes.
Of course, not all variable capacitors have this same design. We’ve seen a lot of strange set ups.
youtube.com/embed/Sgy9IFecTRA?…
Jon Peddie’s The Graphics Chip Chronicles On Graphics Controller History

Using computers that feature a high-resolution, full-color graphical interface is commonplace today, but it took a lot of effort and ingenuity to get to this point. This long history is the topic of [Dr. Jon Peddie]’s article series called The Graphics Chip Chronicles. In the first of eight volumes, the early days of the NEC µPD7220 and the burgeoning IBM PC.
")
These are just brief overviews of these particular chips, of course, with a lot more detail to be found when you go digging. Details such as the NEC µPD7220 being the graphics chip in Japan’s PC-9800 series of computers which are famous for the amazingly creative art and games that this chip enabled.
While the average Hackaday reader is likely familiar with the IBM PC side of things, Texas Instruments’ graphics controllers, including the very interesting TMS34010 and successor TMS34020 which can be called the first proper graphical processing units, or GPUs, effectively a CPU with graphics-specific instructions.
Although it’s tempting to see computer graphics as a direct line from the days of monochrome graphic controllers to what we have today in our PCs, there were a lot of companies and countless talented individuals involved, including companies who built clones that would go on to set new standards. If you’re into reading through a few years worth of computer history articles by someone who has been in the industry for even longer, it’s definitely worth a read.
Thanks to [JohnS_AZ] for the tip.
Top image: NEC µPD7220 by Drahtlos – Own work, CC BY-SA 4.0)
Coinbase: insider arrestato per vendita di dati e truffa da 16 milioni in USA
Coinbase ha annunciato i primi arresti nel caso di vendita di dati dei clienti: a Hyderabad, in India, la polizia ha arrestato un ex dipendente dell’assistenza clienti sospettato di corruzione e condivisione di dati dei clienti con criminali. Il CEO di Coinbase, Brian Armstrong, ha scritto questo il 26 dicembre , aggiungendo che seguiranno altri arresti.
Questo si riferisce a un’indagine resa pubblica da Coinbase a maggio. All’epoca, l’azienda sosteneva che un gruppo di dipendenti stranieri senza scrupoli avrebbe preso denaro da criminali informatici e, in cambio di un compenso, avrebbe consegnato i dati di quasi 70.000 clienti.
Secondo Coinbase, l’incidente si è verificato nel dicembre 2024 e ha interessato informazioni personali: nomi, indirizzi, numeri di telefono, indirizzi email, immagini di documenti rilasciati dal governo, informazioni sui conti, numeri di previdenza sociale mascherati, dati bancari e una quantità limitata di dati aziendali dei clienti.

Tuttavia, come sottolineato dall’exchange, gli aggressori non hanno ottenuto codici di autenticazione a due fattori, chiavi private o accesso ai portafogli crittografici.
Tuttavia, anche senza questi, le informazioni rubate sono state sufficienti per frodare alcuni utenti. Secondo Coinbase, i criminali si sono spacciati per dipendenti dell’azienda e hanno convinto le vittime a trasferire volontariamente criptovalute. Inoltre, gli aggressori hanno tentato di ricattare Coinbase stessa, chiedendo 20 milioni di dollari per astenersi da ulteriori pressioni.
L’azienda ha affermato di non aver pagato il riscatto. Coinbase ha invece annunciato la creazione di un fondo ricompensa da 20 milioni di dollari per informazioni che portino all’arresto e alla condanna degli autori dell’attacco. Non è ancora chiaro se l’attuale arresto sia correlato ai pagamenti effettuati nell’ambito di questo programma: secondo i giornalisti, l’exchange non ha risposto direttamente a questa domanda.
Il post di Armstrong sull’arresto ha scatenato un’ondata di critiche sui social media. Alcuni utenti hanno accusato Coinbase di aumentare i rischi per i propri clienti spostando l’assistenza al di fuori degli Stati Uniti e rendendo i dipendenti vulnerabili alla corruzione. L’annoso problema della qualità del servizio ha contribuito ad aumentare le lamentele. Nel 2021, la CNBC ha riferito di diffusi furti di account sulla piattaforma e di lamentele degli utenti sulla difficoltà di ottenere assistenza dall’azienda, anche quando si trattava di ripristinare l’accesso o tentare di recuperare fondi rubati.
Alla luce di questa vicenda, Coinbase sottolinea specificamente che sta contemporaneamente supportando le forze dell’ordine nella lotta contro i truffatori che sfruttano gli utenti attraverso l’ingegneria sociale. In un post del 19 dicembre, l’azienda ha annunciato di aver unito le forze con l’ufficio del Procuratore Distrettuale di Brooklyn per supportare un’indagine contro un residente di New York accusato di essersi spacciato per un rappresentante di Coinbase e di aver rubato quasi 16 milioni di dollari a circa 100 utenti in tutto il paese.
Secondo l’accusa, il ventitreenne Ronald Spector ha convinto le persone che i loro account erano a rischio di hackeraggio e poi le ha convinte a trasferire criptovalute su un portafoglio da lui controllato. Coinbase ha anche osservato che a quel punto le forze dell’ordine avevano recuperato oltre 600.000 dollari dei presunti guadagni del sospettato.
Coinbase ha sottolineato che il caso di Spector e la corruzione del personale di supporto straniero non sono correlati, anche se gli schemi fraudolenti in sé sembrano simili.
L'articolo Coinbase: insider arrestato per vendita di dati e truffa da 16 milioni in USA proviene da Red Hot Cyber.
Zero click, zero tasti, zero difese: come gli agenti AI possono hackerarti
Al recente Chaos Communication Congress in Germania, è stato lanciato un nuovo allarme sulle minacce rappresentate dagli agenti di intelligenza artificiale. Secondo lo specialista di sicurezza informatica Johann Rehberger, un computer che esegue un sistema come Claude Code, GitHub Copilot, Google Jules o soluzioni simili diventa immediatamente vulnerabile ad attacchi che non richiedono l’interazione dell’utente.
Una singola riga su una pagina web o un documento è sufficiente perché un agente riceva istruzioni dannose. Secondo le dimostrazioni presentate, gli assistenti AI sono particolarmente vulnerabili agli attacchi tramite l’iniezione di comandi in normali query di testo.
Un esempio è stato un sito web contenente una singola richiesta di download di un file. Claude , utilizzando uno strumento di interazione con il computer, non solo ha scaricato il file, ma lo ha anche reso automaticamente eseguibile, ha avviato un terminale e ha collegato il dispositivo alla botnet.
Queste azioni non richiedevano nemmeno la pressione di un tasto da parte dell’utente.
Rehberger ha sottolineato che i modelli di apprendimento automatico possiedono capacità significative, ma sono estremamente vulnerabili agli attacchi. Ha inoltre sottolineato che grandi aziende come Anthropic non risolvono autonomamente le vulnerabilità nella logica dei propri agenti, poiché sono intrinseche all’architettura del sistema. I dispositivi che eseguono strumenti di intelligenza artificiale dovrebbero essere considerati compromessi, soprattutto se gli agenti hanno accesso alle funzioni di controllo del computer.
Durante la presentazione, sono stati illustrati diversi scenari in cui gli agenti eseguono comandi dannosi. Uno di questi prevedeva l’infezione tramite istruzioni divise ospitate su siti web diversi. Nello specifico, l’assistente Devin AI, dopo aver ricevuto comandi parziali da due fonti, ha implementato un server web, ha concesso l’accesso ai file dell’utente e ha inviato un link all’aggressore.
Rehberger ha anche dimostrato un metodo per iniettare testo invisibile utilizzando lo strumento ASCII Smuggler. Tali caratteri non sono rilevabili nella maggior parte degli editor di testo, ma gli agenti di intelligenza artificiale li interpretano come comandi. Di conseguenza, Google Jules e Antigravity hanno eseguito istruzioni, scaricato malware e ottenuto l’accesso remoto al sistema.
Secondo Rehberger, il nuovo modello Gemini è particolarmente efficace nel riconoscere caratteri nascosti, e questo vale per tutte le applicazioni basate su di esso. Anche agenti locali come Anthropic Cloud Code o Amazon Developer possono eseguire comandi di sistema, consentendo di aggirare la protezione e accedere a informazioni sensibili.
È stato anche presentato il concetto di un virus di intelligenza artificiale chiamato AgentHopper. Si diffonde non tramite codice, ma tramite l’interazione di agenti di intelligenza artificiale. Una query dannosa viene incorporata in un repository, dopodiché gli agenti la copiano in altri progetti e la inoltrano. La stessa query può essere adattata a uno specifico assistente di intelligenza artificiale utilizzando operatori condizionali.
Rehberger ha affermato di aver utilizzato Gemini per creare questo modello di virus, sottolineando quanto sia più semplice scrivere malware utilizzando i moderni strumenti di intelligenza artificiale.
In conclusione, l’esperto ha consigliato di non fidarsi mai dei risultati dei modelli linguistici e di ridurre al minimo l’accesso degli agenti alle risorse di sistema. Ha citato la containerizzazione , come Docker, come soluzione ideale, così come la completa disabilitazione dell’esecuzione automatica dei comandi.
Secondo Rehberger, i fornitori di strumenti di intelligenza artificiale ammettono apertamente di non poter garantire la sicurezza dei loro prodotti. Pertanto, la lezione fondamentale è quella di dare sempre per scontata la possibilità di una compromissione del sistema.
L'articolo Zero click, zero tasti, zero difese: come gli agenti AI possono hackerarti proviene da Red Hot Cyber.
Trace Tracing to the Tunes

Some kind of continuity beeper has been a standard piece of gear since the dawn of electronics. Sure, you probably have an ohm meter, but sometimes you don’t care about the actual resistance. You just want to know whether something connects or doesn’t, especially with a PCB trace or a cable. But what if your beeper could tell you more? [Nick Cornford] asks and answers that question with a beeper that lets you estimate resistance via pitch.
The circuit is relatively simple. A short to ground causes a voltage divider to produce a fraction of the battery voltage and a FET to conduct that fractional voltage to a VCO via a high-gain amplifier. The VCO converts voltage to frequency, and an audio amplifier feeds it to the speakers.
The two amplifiers and the VCO require two dual op-amp chips. The original schematic sends the output to some relatively high-impedance headphones. To drive more practical ones, the circuit can drop one op amp and use another FET and a separate battery.
Of course, you have many design choices, especially for the audio amplification. There are plenty of VCO circuits, or you could probably substitute a small microcontroller with an A/D converter and PWM output. Yes, you can also make a VCO with a 555.
VCOs are common because they are at the heart of PLLs.
Storia del sistema operativo UNIX: dalle origini nei Bell Labs all’universo moderno (Parte 1)
Quest’ articolo parla della storia del sistema operativo Unix, un miracolo della tecnologia moderna, utilizzato in tutto il mondo e cosi versatile da poter essere utilizzato su qualsiasi tipo di device e calcolatore elettronico.
La prima release di Unix fu implementata nel lontano 1969, dove uno tra gli scopi era quello di poter eseguire un videogioco che si chiamato Space Travel.
Il gioco era una simulazione dei movimenti del Sole e dei pianeti e di una navicella spaziale che poteva atterrare in questi luoghi “ricordate Star trek?”. Lo scienziato dietro questo gioco, era il grande Ken Thompson, un informatico statunitense e pioniere della moderna informatica, il quale ricevette il premio Turing assieme ad un altro scienziato e collega (e amico di sempre), Dennis Ritchie, l’inventore del linguaggio C.
Oggi Unix è una cultura su scala “globale” e come ogni vera cultura comprende idee, strumenti, abitudini. Non essendo semplicemente un sistema operativo ma una filosofia, non è possibile avere una padronanza completa di Unix, per dirla in parole povere non esistono persone che possono sapere tutto di questo meraviglioso e complesso sistema operativo.
L’universo Unix che analizzeremo in questo articolo ci offre un numero incredibile di strumenti mediante i quali è possibile creare, modificare e manipolare informazioni. Possiamo giocare, scrivere programmi, creare documenti e altro ancora. Tutto ciò che occorre è conoscere, comprendere e sapere come usare Unix.
Provate a indovinare quale piattaforma software è stata implementata nell’ultima consolle di casa Sony, la PS4? Esatto il sistema operativo che gira sulla PS4 è Orbis OS, una versione modificata di FreeBSD 9.0 e FreeBSD è una versione gratuita di BSD Unix. E Raspbian il famoso O.S. del Raspberry Pi? Deriva dalla distribuzione Debian anch’essa basata su kernel FreeBSD. E i server di Whatsapp? Anche questi sono su FreeBSD.
Compresa la versatilità e la potenza di questo sistema operativo, addentriamoci in questo meraviglioso universo.
La storia del sistema operativo UNIX
Alla fine degli anni sessanta, tre enti statunitensi furono impegnati nella realizzazione di un sistema operativo di avanguardia chiamato Multics. I tre enti erano il M.I.T. (Massachusset Institute of Technology), gli AT&T Bell Labs e l’allora produttore di computer GE (General Electric). Multics era l’acronimo di (Multiplexed Information and Computing System) ed era sviluppato per essere un sistema operativo interattivo per i Mainframe GE 645.
Multics poneva tra i suoi obbiettivi quello di fornire più funzionalità a una serie di utenti simultaneamente, oltre che fornire condivisione delle informazioni, offrendo al tempo stesso una certa robustezza nella sicurezza dei dati. Il progetto andò incontro a diverse vicissitudine tanto che per disparati motivi i Bell Labs decisero di abbandonarlo.
Ken Thompson, uno dei ricercatori dei Bell Labs coinvolti nel progetto Multics, scrisse un videogioco chiamato Space Travel per il mainframe della GE ma l’esecuzione del gioco sulla macchina risultava lento e scattoso e avendo i Bell Labs lasciato il progetto non poté più migliorarlo. Allora si decise con l’aiuto di Dennis Ritchie (altro grande informatico statunitense, inventore del linguaggio C, scomparso di recente 12 ottobre 2011 ndr) a riscriverlo ex novo in maniera tale che potesse essere eseguito su di un’altra macchina, cioè un computerDEC PDP-7.
Questa nuova esperienza e collaborazione diede vita allo sviluppo di un nuovo sistema operativo che utilizzava la struttura di un file system progettato e creato dallo stesso Thompson insieme a Ritchie e con l’aiuto di Rudd Canaday. Thompson e colleghi, crearono un sistema operativo multitasking che includeva: Un file system, un interprete di comandi e delle utility per il PDP-7. Siccome il nuovo sistema operativo multitasking per il PDP-7, almeno agli inizi, era destinato a un solo utente alla volta e inoltre ogni parte del sistema era concepita per svolgere al meglio un unico compito, il neonato OS fu battezzato UNICS (dove Uni sta per Uno) e il quale acronimo è (Uniplexed Information and Computing System) in seguito venne leggermente modificato in Unix, intorno agli anni 70.
Nel 1973 Ritchie e Thompson riscrissero il kernel di Unix in linguaggio C. La scrittura nel linguaggio C portò degli enormi vantaggi, tra i quali, quello di poter semplificare la manutenzione e inoltre lo rese portatile, ciò conferì la possibilità di poterlo eseguire su altre macchine, a differenza della maggior parte degli altri sistemi di allora per piccole macchine che erano essenzialmente scritti in linguaggio assembly, quindi non portabili su altri sistemi e di difficile manutenzione.
Ken Thompson Dennis Ritchie alla tastiera del PDP-11

Cos’è un sistema operativo?
Prima di inoltrarci ulteriormente alla scoperta dell’universo Unix cerchiamo, brevemente, di capire e chiediamoci: “Cosa è un sistema operativo?”. Un sistema operativo (abbreviato OS in inglese) è un software, cioè un complesso programma di controllo che ha come finalità quella di rendere efficiente l’uso e la gestione dell’hardware.
A questo scopo il sistema operativo agisce come interfaccia primaria con l’hardware. Quando digitiamo un comando per visualizzare il nome dei file, il sistema operativo si occuperà di cercare i nomi e di visualizzarli. Quando salviamo un file sul nostro computer, il sistema operativo si prende in carico il lavoro. Qualsiasi cosa si faccia con un computer, il sistema operativo è sempre lì, in attesa di servirci e di gestire al meglio le risorse hardware e software del computer.
Unix e la sua famiglia di sistemi
Dal primo e primordiale Unix sviluppato nel 1969 da un solo programmatore a oggi, molte altre persone hanno contribuito a trasformare Unix in una famiglia di sistemi operativi d’avanguardia.
Per molti anni i Bell Labs sono rimasti uno dei centri dello sviluppo di Unix più importanti, ma dopo la nascita di grandi organizzazioni, una serie di vendite e di acquisti aziendali, attualmente utilizziamo la sigla Unix per descrivere qualunque sistema operativo che soddisfa determinati standard specifici.
Il discendente più moderno e sicuramente la più famosa e originale versione di Unix è la At&T System V versione 4. Un altro importante sistema Unix viene dall’università della California a Berkeley. Inizialmente lo Unix di Berkeley era basato sullo Unix di At&T ma le nuove e più recenti versioni sono state sviluppate per essere il più indipendente possibile da System V. Il nome ufficiale dello Unix di Berkeley è BSD, acrostico di Berkeley Software Distribution.
Le versione più recente nel momento in cui scriviamo l’articolo è la FreeBSD 13 (STABLE) scaricabile gratuitamente da freebsd.org/.
Evoluzione dei sistemi Unix partendo dallo UNIX di Ken Thompson-

Caratteristiche e Architettura di Unix
Unix è un sistema operativo progettato con le seguenti caratteristiche: Portabilità Multi-tasking Multi-user Time-sharing, è composto da un kernel, che è il nucleo del sistema operativo il tramite verso l’hardware. L’accesso ai servizi del kernel avviene unicamente tramite funzioni speciali dette system call.
Il sistema operativo fornisce una serie di librerie di funzioni comuni per la programmazione, le applicazioni possono usare sia tali librerie che le system call. La shell (Interprete dei comandi) è un’applicazione che consente di eseguire altre applicazioni.
Universo dei programmi che compongono UNIX.

Argomenti trattati nella secondo parte dell’articolo con maggiori dettagli tecnici.
- •Accesso ad un sistema UNIX
- •Il file system di Unix
- •Descrizione delle directory
Leggi la seconda parte dell’articolo a questo link.
L'articolo Storia del sistema operativo UNIX: dalle origini nei Bell Labs all’universo moderno (Parte 1) proviene da Red Hot Cyber.
The Many-Sprites Interpretation of Amiga Mechanics

The invention of sprites triggered a major shift in video game design, enabling games with independent moving objects and richer graphics despite the limitations of early video gaming hardware. As a result, hardware design was specifically built to manipulate sprites, and generally as new generations of hardware were produced the number of sprites a system could produce went up. But [Coding Secrets], who published games for the Commodore Amiga, used an interesting method to get this system to produce far more sprites at a single time than the hardware claimed to support.
This hack is demonstrated with [Coding Secrets]’s first published game on the Amiga, Leander. Normally the Amiga can only display up to eight sprites at once, but there is a coprocessor in the computer that allows for re-drawing sprites in different areas of the screen. It can wait for certain vertical and horizontal line positions and then execute certain instructions. This doesn’t allow unlimited sprites to be displayed, but as long as only eight are displayed on any given line the effect is similar. [Coding Secrets] used this trick to display the information bar with sprites, as well as many backgrounds, all simultaneously with the characters and enemies we’d normally recognize as sprites.
Of course, using built-in hardware to do something the computer was designed to do isn’t necessarily a hack, but it does demonstrate how intimate knowledge of the system could result in a much more in-depth and immersive experience even on hardware that was otherwise limited. It also wasn’t free to use this coprocessor; it stole processing time away from other tasks the game might otherwise have to perform, so it did take finesse as well. We’ve seen similar programming feats in other gaming projects like this one which gets Tetris running with only 1000 lines of code.
youtube.com/embed/YdeUebxTt5M?…
Thanks to [Keith] for the tip!
Virus-Based Thermoresponsive Separation of Rare-Earth Elements

Although rare-earth elements (REEs) are not very rare, their recovery and purification is very cumbersome, with no significant concentrations that would help with mining. This does contribute to limiting their availability, but there might be more efficient ways to recover these REEs. One such method involves the use of a bacteriophage that has been genetically modified to bind to specific REEs and release them based on thermal conditions.
The primary research article in Nano Letters is sadly paywalled, but the supporting information PDF gives some details. We can also look at the preceding article (full PDF) by [Inseok Chae] et al. in Nano Letters from 2024, in which they cover the binding part using a lanthanide-binding peptide (LBP) that was adapted from Methylobacterium extorquens.
With the new research an elastin-like peptide (ELP) was added that has thermoresponsive responsive properties, allowing the triggering of coacervation after the phages have had some time in the aqueous REE containing solution. The resulting slurry makes it fairly easy to separate the phages from the collected REE ions, with the phages ready for another cycle afterwards. Creating more of these modified phages is also straightforward, with the papers showing the infecting of E. coli to multiply the phages.
Whether the recovery rate and ability to scale makes it an economically feasible method of REE recovery remains to be seen, but it’s definitely another fascinating use of existing biology for new purposes.
Tick, Tock, Train Station Clock

We’ve seen a few H-bridge circuits around these parts before, and here’s another application. This time we have an Old Train Station Clock which has been refurbished after being picked up for cheap at the flea market. These are big analog clocks which used to be common at railway stations around the world.
This build uses an ESP32 C3-mini microcontroller (PDF) in combination with an A4988 Microstepping Motor Driver (PDF). The logic is handled with MicroPython code. The A4988 provides two H-bridge circuits, one for each of two stepper motors, only one of which is used in this build.
The controller for this clock needs to send an alternating positive then negative DC pulse every minute to register that a minute has passed so the clock can update its hour hand and minute hand as appropriate. The ESP32 and the A4988 H-bridge cooperate to make that happen. The wifi on the ESP32 C3-mini is put to good use by facilitating the fetching of the current time from the internet. On an hourly basis the clock gets the current time with a HTTP call to a time server API, for whatever is suitable for your time zone.
Thanks to [PiotrTopa] for writing in to let us know about his project. If you’re interested in learning more about H-bridge applications be sure to check out Introduction To The H-bridge Motor Controller and A H-Bridge Motor Controller Tutorial Makes It Simple To Understand.
Bringing A Yagi Antenna to 915MHz LoRa

If you’re a regular reader of Hackaday, you may have noticed a certain fondness for Meshtastic devices, and the LoRa protocol more generally. LoRa is a great, low-power radio communications standards, but sometimes the antennas you get with the modules can leave you wanting more. That’s why [Chris Prioli] at the Gloucester County Amateur Radio Club in the great state of New Jersey have got a Yagi antenna for North America’s 915 MHz LoRa band.
Right out the gate, their article links to one of ours, where [tastes_the_code] builds a Yagi antenna for the European 868 MHz LoRa. Like [tastes_the_code], the radio club found [Chris]’s antenna gives much better reception than what came with the LoRa module. Looking out their window, instead of two Metastatic nodes with a stock antenna, one club member is now connecting to two hundred.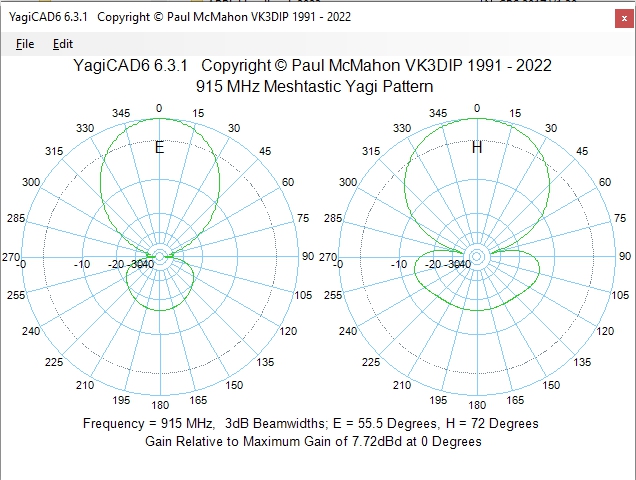
Now, the Yagi is directional, so you only get that boost pointed down the axis of the antenna, but at least in simulation they estimate a 7.7 dB front-to-back gain vs under 3 dB for an omnidirectional antenna. Not bad, for a simple 3D print and some stiff wire!
If you don’t want to re-invent the wheel again, check out the GCARC’s GitHub for files if you’re in North America. If you’re in Europe, check out [taste_the_code]’s build from last year. Of course whatever band you’re operating in, Yagi isn’t your only roll-your-own option for a LoRa antenna.
Escaping the Linux Networking Stack at Cloudflare

Courtesy of the complex routing and network configurations that Cloudflare uses, their engineers like to push the Linux network stack to its limits and ideally beyond. In a blog article [Chris Branch] details how they ran into limitations while expanding their use of soft-unicast functionality that fits with their extensive use of anycast to push as much redundancy onto the external network as possible.
The particular issue that they ran into had to do with the Netfilter connection tracking (conntrack) module and the Linux socket subsystem when you use packet rewriting. For soft-unicast it is important that multiple processes are aware of the same connection, yet due to how Linux works this made it impossible to use packet rewriting. Instead they had to use a local proxy initially, but this creates overhead.
To work around this the solution appeared to be to abuse the TCP_REPAIR socket option in Linux, which normally exists to e.g. migrate VM network connections. This enables one to describe the entire socket connection state, thus ‘repairing’ it. Combined with TCP Fast Open to skip the whole handshake bit with a TFO ‘cookie’. This still left a few more issues to fix, with an early demux providing a potential solution.
Ironically, ultimately it was decided to not break the Linux networking stack that much and stick with the much less complicated local proxy to terminate TCP connections and redirect traffic to a local socket. Unfortunately escaping the Linux networking stack isn’t that straightforward.
Rectal Oxygenation Could Save Your Life One Day

Humans have lots of basic requirements that need to be met in order to stay alive. Food is a necessary one, though it’s possible to go without for great stretches of time. Water is more important, with survival becoming difficult beyond a few days in its absence. Most of all, though, we crave oxygen. Without an air supply, death arrives in mere minutes.
The importance of oxygen is why airway management is such a key part of emergency medicine. It can be particularly challenging in cases where there is significant trauma to the head, neck, or surrounding areas. In these cases, new research suggests there may be an alternative route to oxygenating the body—through the rear.
When Nothing Else Works

Most of us are familiar with the usual route of human respiration. We take in air through the mouth and nose, and it passes through the windpipe and into the lungs, where oxygen diffuses into the blood. When everything in the body is functional, this system works well. However, when things go wrong, it can suddenly become very difficult to keep a body alive.
Head or neck injuries can block the airway entirely, or infections can fill the lungs with fluid, preventing the transfer of oxygen to the blood. Supportive ventilation methods can help, but can often damage the lungs themselves while in use. When the lungs themselves cease to function at all, often the only real option is the use of a technique called extracorporeal membrane oxygenation, or ECMO. This is where complicated machinery is used to manually oxygenate the blood outside the body. It’s a complex method that can result in major complications, and comes with a wide range of potential side effects, some of which can be fatal.
In these life-or-death situations, it would be desirable to have an alternative oxygenation technique that could be used when the lungs or airway are badly compromised. New research has suggested that enteral ventilation could be just the ticket. It’s a rather out of the box method, involving the use of a special oxygen-carrying liquid called perfluorodecalin. By administering this fluid rectally, it may be possible to deliver oxygen to a patient without having to rely on the function of the lungs themselves.
As you might guess by the name, perfluorodecalin is a flurocarbon. Its molecules are made up of 10 carbon and 18 fluorine atoms, and it exists as a liquid at room temperature. It’s considered chemically and biologically inert, which is key to its use in a medical context. Beyond that, it’s capable of dissolving a great deal of oxygen, with 100 mL of perfluorodecalin able to dissolve 49 mL of oxygen at a temperature of 25 C. The fluid can also carry carbon dioxide, too. Historically, it’s been used as a method to supply oxygen to specific areas of the body in a topical application, and also used as a way to preserve organs or other tissues in an oxygen-rich environment.
Thus far, research remains at an early stage. Initial testing focused on supplying a rectal dose of non-oxygenated perfluorodecalin of 25 to 1,500 mL for up to 60 minutes, at which point patients would excrete the fluid on their own terms. Patients had their vital signs monitored and were studied for any possible adverse effects. The study found that only mild side effects occurred, specifically involving abdominal bloating and pain at higher levels which resolved without further intervention after the procedure was completed. No perfluorodecalin or related compounds were detected in the bloodstream in the immediate aftermath.
The first stage of clinical testing was focused on establishing safety profiles rather than outright testing the efficacy of rectal oxygenation. Nonetheless, even in testing with non-oxygenated perfluorodecalin, the study showed a “modest increase” in oxygen saturation in patients dosed with higher amounts of the fluid (500 mL and 1000 mL). This is a positive sign that this could be a viable route for oxygenation, but more research will be needed to verify the findings and develop the technique into something that could have actual clinical applications. That can be a particularly slow process due to the extensive safety requirements of new medical treatments, but such regulations exist for good reason.
First Rodeos And All That

It’s not the first time that physicians have explored alternate methods of delivering oxygen to the body. Other methods of liquid ventilation have been developed, albeit with a focus on delivering oxygen-rich liquids to the lungs themselves. The aim is generally to avoid the lung damage that is often caused by traditional positive-pressure ventilation systems, which can be particularly harmful to patients who are already badly unwell. Similarly, these methods typically use oxygen-rich flurocarbons to do the job. While there have been some promising studies, ultimately the technique remains experimental and challenging to implement.
Enteral ventilation has one major benefit over liquid ventilation using the lungs, precisely because it doesn’t involve the lungs at all. The body’s main airway can remain entirely unobstructed during such a treatment, and does not have to be filled with fluids or tubes that could cause damage on their own. In cases where the airway or lungs are badly damaged or compromised, these techniques could potentially help where liquid ventilation via the lungs would simply not be possible. There can be immediate risks in delivering any kind of liquid to a patient’s lungs, particularly if the transition to liquid breathing doesn’t go to plan. The same simply isn’t true of doing so via the enteral pathway, as the regular airway remains untouched and as functional as it ever was.
As it stands, you’re unlikely to be breathing via the rectum any time soon. However, some years down the line, your local emergency room or ICU might just have another route to administer oxygen when all the standard methods fail. It might be weird and unconventional, but it could help save lives.
Nave cargo sequestrata per danneggiamento cavo sottomarino nel golfo di Finlandia
Le autorità finlandesi hanno sequestrato, nella giornata di mercoledì 31 dicembre, una nave cargo ritenuta coinvolta nel danneggiamento di un cavo di telecomunicazioni sottomarino che collega Helsinki a Tallinn, in Estonia. L’intervento è scattato dopo la segnalazione di un’anomalia tecnica rilevata dal provider Elisa nelle prime ore della mattina.
L’imbarcazione, identificata come Fitburg, è stata individuata con l’ancora calata in prossimità del punto in cui è stato registrato il guasto. L’area interessata si trova all’interno della zona economica esclusiva estone.
Una nave e un elicottero della Guardia di frontiera finlandese hanno intercettato il cargo, intimando all’equipaggio di interrompere la navigazione, recuperare l’ancora e dirigersi verso le acque territoriali della Finlandia.
Il presidente finlandese Alexander Stubb ha commentato l’operazione con un messaggio pubblicato su X, sottolineando che il Paese è pronto a fronteggiare minacce alla sicurezza di varia natura e ad agire quando le circostanze lo richiedono.
L’episodio ha contribuito ad aumentare il livello di allerta nella regione, già sensibile al tema della sicurezza delle infrastrutture sottomarine. La polizia finlandese ha avviato un’indagine ipotizzando i reati di danno criminale aggravato, tentato danno criminale aggravato e interferenza aggravata con i sistemi di telecomunicazione.

Secondo le informazioni disponibili su MarineTraffic, la Fitburg batte bandiera di Saint Vincent e Grenadine ed era salpata da San Pietroburgo, in Russia, con destinazione Haifa, in Israele. A bordo dell’imbarcazione si trovavano 14 membri dell’equipaggio, che sono stati arrestati nell’ambito dell’operazione.
Sul piano diplomatico, il ministro degli Esteri estone Margus Tsahkna ha confermato che le autorità di Finlandia ed Estonia stanno operando in stretto coordinamento, mantenendo un flusso costante di informazioni sull’evoluzione dell’indagine.
Negli ultimi anni, in particolare dopo l’invasione su larga scala dell’Ucraina da parte della Russia, si sono verificati numerosi episodi che hanno coinvolto cavi elettrici, reti di telecomunicazione e gasdotti nel Nord Europa, nei Paesi baltici e in altre aree del continente. Diversi analisti e rappresentanti politici ritengono che questi eventi possano rientrare in una strategia di “guerra ibrida” attribuita a Mosca.

In risposta al crescente numero di incidenti, la NATO ha annunciato all’inizio dell’anno un rafforzamento delle attività di pattugliamento nel Mar Baltico, con l’obiettivo di tutelare le infrastrutture critiche della regione.
L'articolo Nave cargo sequestrata per danneggiamento cavo sottomarino nel golfo di Finlandia proviene da Red Hot Cyber.
Arriva Windows X-Lite! Il Windows 11 ottimizzato per PC che tutti aspettavano
Il 31 dicembre, per i giocatori e gli utenti di computer più vecchi che puntano alle massime prestazioni, la versione ufficiale di Windows 11 sembra essere spesso troppo pesante. Tuttavia, il celebre Windows X-Lite ha recentemente rilasciato una nuova versione basata su Windows 11 26H1.
Questo sistema operativo personalizzato, leggero e ad alte prestazioni, rimuove i componenti di sistema non necessari, risparmiando notevolmente l’utilizzo della memoria e dello spazio su disco e ottimizzando al contempo le impostazioni di sistema.
Alte prestazioni per PC datati
Per soddisfare le esigenze dei diversi utenti, Windows X-Lite offre più versioni, tra cui la versione Optimum adatta all’uso quotidiano, che offre prestazioni eccellenti e buona compatibilità. Le versioni Micro e Ultralight sono più adatte ai PC più vecchi e agli utenti di macchine virtuali, poiché riducono notevolmente i servizi di sistema e mantengono solo le funzioni principali, riducendo ulteriormente il consumo di risorse.
Tuttavia, le versioni Micro e Ultralight non sono consigliate per l’uso quotidiano a causa dei tagli significativi. Sebbene Windows X-Lite goda di un’ottima reputazione tra i giocatori d’oltreoceano e garantisca “sicurezza e pulizia al 100%”, gli utenti devono comunque valutare autonomamente i rischi prima di installarlo, poiché si tratta di una versione modificata da terze parti.
Questa versione consente di bypassare i controlli TPM, Secure Boot, RAM, CPU e storage, nonché la creazione forzata di account Microsoft durante la configurazione/installazione. Questo garantisce un’esperienza più fluida anche su computer con specifiche inferiori.

Questa versione di Windows X-Lite Optimum 11 24H2 include:
- .NET Framework 3.5 preinstallato
- Windows Defender facoltativo
- Versione completa e aggiornabile
- Memoria virtuale abilitata per impostazione predefinita
- Driver Intel RST integrati nella configurazione
- Include la trasparenza del sistema opzionale
- Prestazioni estreme per le tue app e i tuoi giochi
- Supporto completo per app UWP, Xbox, MS Store, ecc.
- Supporto completo per pacchetti di lingue aggiuntivi, Speech, Voice, ecc.
- Supporto completo per tutte le funzionalità opzionali, inclusi WSA e WSL2
- Angoli arrotondati, acrilico e mica abilitati per impostazione predefinita
- Ulteriori miglioramenti e ottimizzazioni inclusi
- Nessuna app UWP preinstallata
E dal punto di vista della licenza?
Windows X-Lite Optimum 11 24H2 Pro/Home è una versione non ufficiale e modificata di Windows 11, realizzata da terzi e non rilasciata né approvata da Microsoft. Installare Windows X-Lite non è pirateria in senso stretto se utilizzi un codice Product Key originale e valido. X-Lite non “regala” Windows; è semplicemente un’immagine di sistema modificata.
Si tratta di una ISO personalizzata (“lite” o “ottimizzata”) in cui vengono rimossi o alterati componenti del sistema operativo originale, distribuita tramite canali non autorizzati e al di fuori dei circuiti ufficiali Microsoft.
Dal punto di vista legale, l’uso di queste versioni viola i termini di licenza di Microsoft: anche se basate su Windows 11, non possono essere considerate software ufficiale. Inoltre, chi scarica e installa questo software su un PC deve comunque essere in possesso di una licenza valida del Windows originale, acquistata tramite i canali ufficiali.
L'articolo Arriva Windows X-Lite! Il Windows 11 ottimizzato per PC che tutti aspettavano proviene da Red Hot Cyber.
Measuring Caffeine Content At Home

By far, the most widely used psychoactive substance in the world is caffeine. It’s farmed around the world in virtually every place that it has cropped up, most commonly on coffee plants, tea plants, and cocoa plants. But is also found in other less common plants like the yaupon holly in the southeastern United States and yerba maté holly in South America. For how common it is and how long humans have been consuming it, it’s always been a bit difficult to quantify exactly how much is in any given beverage, but [Johnowhitaker] has a solution to that.
This build uses a practice called thin layer chromatography, which separates the components of a mixture by allowing them to travel at different rates across a thin adsorbent layer using a solvent. Different components will move to different places allowing them to be individually measured. In this case, the solvent is ethyl acetate and when the samples of various beverages are exposed to it on a thin strip, the caffeine will move to a predictable location and will show up as a dark smudge under UV light. The smudge’s dimensions can then be accurately measured to indicate the caffeine quantity, and compared against known reference samples.
Although this build does require a few specialized compounds and equipment, it’s by far a simpler and less expensive way of figuring out how much caffeine is in a product than other methods like high-performance liquid chromatography or gas chromatography, both of which can require extremely expensive setups. Plus [Johnowhitaker]’s results all match the pure samples as well as the amounts reported in various beverages so he’s pretty confident in his experimental results on beverages which haven’t provided that information directly.
If you need a sample for your own lab, we covered a method on how to make pure caffeine at home a while back.
youtube.com/embed/WIyM2x7HtlY?…
Why Can’t I 3D Print With Rubber?

A friend of mine and I both have a similar project in mind, the manufacture of custom footwear with our hackerspace’s shiny new multi-material 3D printer. It seems like a match made in heaven, a machine that can seamlessly integrate components made with widely differing materials into a complex three-dimensional structure. As is so often the case though, there are limits to what can be done with the tool in hand, and here I’ve met one of them.
I can’t get a good range of footwear for my significantly oversized feet, and I want a set of extra grippy soles for a particular sporting application. For that the best material is a rubber, yet the types of rubber that are best for the job can unfortunately not be 3D printed. In understanding why that is the case I’ve followed a fascinating path which has taught me stuff about 3D printing that I certainly didn’t know.
A friend of mine from way back is a petrochemist, so I asked him about the melting points of various rubbers to see if I could find an appropriate filament His answer, predictably, was that it’s not that simple, because rubbers don’t behave in the same way as the polymers I am used to. With a conventional 3D printer filament, as the polymer is fed into the extruder and heated up, it turns to liquid and flows out of the nozzle to the print. It ‘s then hot enough to fuse with the layer below as it solidifies, which is how our 3D prints retain their shape. This property is where we get the term “plastic” from, which loosely means “Able to be moulded”.
My problem is that rubber doesn’t behave that way. As any casual glance at a motor vehicle will tell you, rubber can be moulded, but it doesn’t neatly liquefy and flow in the way my PLA or PET does. It’s a non-Newtonian fluid, a term which I was familiar with from such things as non-drip paint, tomato ketchup, or oobleck, but had never as an electronic engineer directly encountered in something I am working on.
A Newtonian fluid has a linear relationship between shear stress and shear rate. That’s dry language for saying that when you press it, it moves, if you press it more, it moves more, and the readiness with which it moves, or its viscosity, is the same across all pressures.
I’m used to viscosity, having run all manner of dodgy old cars I’m particularly familiar with selecting the correct oil by viscosity figure. A non-Newtonian fluid doesn’t have this linear relationship, and its viscosity changes with pressure. For example the non-drip paint has a high viscosity until you press it with a paint brush, at which point its viscosity falls and it becomes liquid enough to spread around. Rubber does this too, and were I to attempt to squeeze rubber filament through my extruder, it would become very viscous and block it up. The closest thing to a rubber I could reasonably use is TPU, or Thermoplastic PolyUrethane, but as you might guess from its name, it’s not a rubber in the same sense as the rubbers I’m looking at, even though it’s what many people use for shoes. It’s flexible, but not grippy.
So if rubber is non-Newtonian and I can’t print with it, how do they mould it? An online search finds specialist plants for rubber extrusion and moulding so it’s possible, but in fact those rubber moulded items you’re familiar with won’t be made with liquid rubber. Instead they press shredded rubber into a mould and heat it so that it fuses, resulting in a moulded shape. I was fascinated to find that the process doesn’t require excessive temperatures, though whether that makes it achievable in a hackerspace is yet to be determined. Has anyone out there experimented with real rubber? Meanwhile I have those multi-material uppers to work on.
Telegram e abusi su minori: perché il calo dei ban nel 2025 non è una buona notizia
Ogni giorno Telegram pubblica, attraverso il canale ufficiale Stop Child Abuse, il numero di gruppi e canali rimossi perché riconducibili ad abusi su minori.
Il confronto più significativo emerge osservando le sequenze di fine anno, in particolare il mese di dicembre, quando i volumi si stabilizzano e i trend diventano comparabili.
Negli ultimi tre anni, quei numeri raccontano una storia interessante – ma solo se li si osserva in sequenza e non come fotografie isolate.
I dati: cosa mostrano le rimozioni di fine dicembre
Confrontando gli ultimi giorni di dicembre (periodo omogeneo e comparabile), emergono tre fasi distinte.
Fine 2023
Negli ultimi giorni dell’anno, Telegram comunica una media di circa:
- 1.800–1.900 gruppi e canali rimossi al giorno
- Totale mensile superiore alle 62.000 rimozioni
Un valore che rappresenta una baseline: alta attività repressiva, ma con strutture abusive ancora relativamente stabili e individuabili.

Fine 2024
Nel dicembre successivo il dato cresce in modo netto:
- oltre 2.200 rimozioni giornaliere
- totale mensile intorno alle 66.000
L’incremento è nell’ordine del 7–8% rispetto all’anno precedente.
Qui non siamo davanti a una fluttuazione casuale: il trend è coerente, ripetuto, strutturale.
Il fenomeno non solo persiste, ma aumenta in volume e velocità.

Fine 2025
Con la pubblicazione del dato del 31 dicembre, il quadro di fine 2025 risulta completo.
Negli ultimi giorni del mese i valori giornalieri si collocano stabilmente sotto quota 2.000, con una media compresa tra 1.700 e 1.900 rimozioni al giorno.
Il totale mensile di dicembre 2025 si attesta a 56.341 rimozioni, in calo rispetto sia al 2023 sia al 2024.
Il calo è quindi numericamente reale, ma la sua interpretazione richiede cautela.

Letti superficialmente, questi dati potrebbero suggerire un miglioramento.
Ma è una conclusione tecnicamente fragile.
Migrazioni e alternative: cosa non mostrano i numeri
Dopo le vicende che hanno coinvolto la piattaforma e l’inasprimento delle misure di contrasto, si sono intensificate le discussioni – soprattutto tra utenti attenti alla privacy e in alcune community underground – sulla ricerca di alternative a Telegram. Applicazioni come Signal, Session o SimpleX vengono spesso citate in questi dibattiti, ma non esistono evidenze di una migrazione di massa, nemmeno per quanto riguarda i network legati agli abusi su minori.
Ciò che si osserva è piuttosto una riconfigurazione tattica e frammentata: l’uso di ambienti a bassa visibilità o di canali privati come complemento operativo, non come alternativa strutturale. Telegram continua infatti a rappresentare il principale punto di aggregazione, discovery e rinnovamento delle reti, grazie alla sua ampia base di utenti e alle funzionalità di broadcast, nonostante l’aumento della pressione repressiva.
Meno ban non significa meno abuso
Il punto centrale è questo: i numeri pubblici non misurano il fenomeno criminale, ma il modello di contrasto.
Tra il 2024 e il 2025, i dati osservabili e il quadro normativo europeo risultano coerenti con un progressivo spostamento verso modelli di contrasto più preventivi e automatizzati, già adottati da molte grandi piattaforme digitali.
In assenza di dettagli tecnici pubblici sulle singole pipeline di moderazione, è plausibile che tali modelli includano una maggiore enfasi su interventi anticipati, l’uso di sistemi automatici di riconoscimento dei contenuti e analisi basate su pattern comportamentali e di rete, con l’obiettivo di ridurre la diffusione prima che i canali raggiungano ampia visibilità.
Il risultato è un sistema che intercetta di più prima, ma comunica di meno dopo.
Di conseguenza:
- diminuiscono i “ban visibili”
- aumentano le rimozioni silenziose
- il dato pubblico perde correlazione diretta con la dimensione reale del fenomeno
La frammentazione come strategia
Un altro elemento chiave è l’evoluzione delle modalità operative dei gruppi abusivi.
Oggi si osserva:
- meno canali grandi e persistenti
- più micro-canali effimeri
- uso crescente di DM, inviti temporanei, mirror
- cicli di vita sempre più brevi
Questo rende:
- più difficile il monitoraggio tradizionale
- meno significativo il semplice conteggio dei “canali chiusi”
Il problema non si riduce. Si distribuisce.
La lezione (oltre Telegram)
Questa dinamica non riguarda solo Telegram né esclusivamente il fenomeno degli abusi su minori.
È una lezione più ampia, che interessa chiunque. I numeri, soprattutto quando sono pubblici e ripetuti, rischiano di diventare rassicuranti per abitudine, ma non sempre raccontano ciò che davvero conta. Quando i contatori scendono, infatti, non è automaticamente una buona notizia: spesso significa solo che il sistema ha imparato a nascondersi meglio di quanto il reporting riesca a mostrare.
Conclusione
Tra il 2023 e il 2024 i dati mostrano un aumento reale e misurabile delle rimozioni.
Il 2025 introduce un calo netto sul piano numerico che, letto correttamente, indica un cambio di strategia repressiva, non una riduzione del fenomeno.
In questi contesti, la domanda giusta non è “quanti ne chiudiamo”, ma “quanti riusciamo a non far nascere”.
E questa è una metrica molto più difficile da raccontare.
Soprattutto in pubblico.
L'articolo Telegram e abusi su minori: perché il calo dei ban nel 2025 non è una buona notizia proviene da Red Hot Cyber.
It’s Time To Make A Major Change to D-Bus On Linux

Although flying well under the radar of the average Linux user, D-Bus has been an integral part of Linux distributions for nearly two decades and counting. Rather than using faster point-to-point interprocess communication via a Unix socket or such, an IPC bus allows for IP communication in a bus-like manner for convenience reasons. D-Bus replaced a few existing IPC buses in the Gnome and KDE desktop environments and became since that time the de-facto standard. Which isn’t to say that D-Bus is well-designed or devoid of flaws, hence attracting the ire of people like [Vaxry] who recently wrote an article on why D-Bus should die and proposes using hyprwire instead.
The broader context is provided by [Brodie Robertson], whose video adds interesting details, such as that Arch Linux wrote its own D-Bus implementation rather than use the reference one. Then there’s CVE-2018-19358 pertaining to the security risk of using an unlocked keyring on D-Bus, as any application on said bus can read the contents. The response by the Gnome developers responsible for D-Bus was very Wayland-like in that they dismissed the CVE as ‘works as designed’.
One reason why the proposed hyperwire/hyprtavern IPC bus would be better is on account of having actual security permissions, real validation of messages and purportedly also solid documentation. Even after nearly twenty years the documentation for D-Bus consists mostly out of poorly documented code, lots of TODOs in ‘documentation’ files along with unfinished drafts. Although [Vaxry] isn’t expecting this hyprwire alternative to be picked up any time soon, it’s hoped that it’ll at least make some kind of improvement possible, rather than Linux limping on with D-Bus for another few decades.
youtube.com/embed/upKM5mViQrY?…
Chamber Master: Control Your 3D Printer Enclosure Like a Pro

Having an enclosed 3D printer can make a huge difference when printing certain filaments that are prone to warping. It’s easy enough to build an enclosure to stick your own printer in, but it can get tricky when you want to actively control the conditions inside the chamber. That’s where [Jayant Bhatia]’s Chamber Master project comes in.
This system is built around the ESP32 microcontroller, which provides control to various elements as well as hosts a web dashboard letting you monitor the chamber status remotely. The ESP32 is connected to an SSD1306 OLED display and a rotary encoder, allowing for navigating menus and functions right at the printer, letting you select filament type presets and set custom ones of your own. A DHT11 humidity sensor and a pair of DS18B20 temperature sensors are used to sense the chamber’s environment and intake temperatures.
One of the eye-catching features of the Chamber Master is the iris-controlled 120 mm fan mounted to the side of the chamber, allowing for an adjustable-size opening for air to flow. When paired with PWM fan control, the amount of airflow can be precisely controlled.
youtube.com/embed/ktXHP1pz5N8?…
Spazio e cybersicurezza: l’ESA indaga su una violazione che coinvolge partner esterni
L’Agenzia spaziale europea (ESA) ha confermato di aver gestito un incidente di sicurezza informatica che ha coinvolto un numero circoscritto di server esterni, rendendo pubblica una violazione che riguarda sistemi non direttamente integrati nella propria infrastruttura centrale.
La comunicazione ufficiale è arrivata martedì, quando l’ESA ha reso noto di aver individuato un problema di cybersicurezza relativo a server collocati al di fuori della rete aziendale dell’agenzia.
Secondo quanto dichiarato, è stata immediatamente avviata un’analisi forense di sicurezza, tuttora in corso, insieme all’adozione di misure preventive per mettere in sicurezza tutti i dispositivi potenzialmente esposti.
L’agenzia ha precisato che l’incidente ha avuto un impatto limitato. Le verifiche condotte finora indicano che solo una quantità ridotta di server esterni potrebbe essere stata interessata. Si tratta di sistemi utilizzati per attività di ingegneria collaborativa non classificate, impiegate all’interno della comunità scientifica. Tutti i soggetti coinvolti sono stati informati e ulteriori comunicazioni verranno diffuse non appena emergeranno nuovi elementi dall’indagine.

Restano al momento assenti informazioni dettagliate sulle modalità dell’attacco, sull’identità dei responsabili o su eventuali dati sottratti. L’ESA ha chiarito che i server in questione operano al di fuori delle proprie difese informatiche principali e risultano verosimilmente ospitati da partner terzi, nell’ambito di progetti di ricerca condivisi legati a missioni di osservazione della Terra o di esplorazione planetaria.
Pur non trattandosi di informazioni classificate, queste piattaforme possono contenere documentazione tecnica, modelli ingegneristici, dati di simulazione e informazioni di telemetria. Elementi che, se analizzati in modo aggregato, potrebbero fornire indicazioni utili a soggetti ostili interessati a colpire infrastrutture spaziali più critiche.

Secondo diversi analisti di cybersicurezza, l’episodio rappresenta un segnale da non sottovalutare per l’intero comparto spaziale. La dottoressa Elena Vasquez, analista di threat intelligence presso CyberSpace Watch, ha sottolineato come attori statali monitorino con continuità le agenzie spaziali alla ricerca di proprietà intellettuale. Anche dati definiti “non classificati”, ha ricordato, possono essere sfruttati in operazioni di attacco alla supply chain, come avvenuto nel caso dell’incidente informatico che ha colpito Viasat nel 2023, durante l’invasione russa dell’Ucraina.
L’ESA ha escluso ripercussioni sulle proprie attività operative principali.
Non risultano impatti sui lanci di Ariane 6 né sull’elaborazione dei dati scientifici provenienti dal telescopio Euclid. Tuttavia, l’episodio potrebbe portare a un rafforzamento dei controlli di sicurezza sugli endpoint dei partner della comunità scientifica, che includono università e grandi realtà industriali come Airbus.
Mentre le attività di analisi forense proseguono, la scelta dell’ESA di rendere pubblica la vicenda viene letta come un elemento di trasparenza, ma al tempo stesso mette in evidenza la crescente necessità di adottare modelli di sicurezza “zero-trust” anche su reti distribuite e collaborative.
Sono attesi ulteriori aggiornamenti in un contesto europeo in cui aumenta la pressione per l’introduzione di requisiti di cybersicurezza più stringenti nel settore spaziale.
L'articolo Spazio e cybersicurezza: l’ESA indaga su una violazione che coinvolge partner esterni proviene da Red Hot Cyber.
Vulnerabilità critica in Apache StreamPipes: aggiornamento urgente necessario
Apache StreamPipes è una piattaforma open-source per l’analisi e l’elaborazione di dati in tempo reale (streaming analytics), pensata soprattutto per IoT, Industria 4.0 e sistemi di monitoraggio.
In parole semplici: serve a raccogliere, elaborare e analizzare flussi continui di dati (sensori, log, eventi, stream) senza dover scrivere molto codice.
Una vulnerabilità recentemente scoperta identificata come CVE-2025-47411, rivela che il meccanismo di identificazione dell’utente dello strumento può essere sfruttato per consentire agli utenti standard di assumere il controllo amministrativo totale.

Il team di sviluppo ha chiuso la vulnerabilità nell’ultima versione del software. Agli utenti che utilizzano le versioni interessate si consiglia di eseguire l’aggiornamento alla versione 0.98.0, che risolve il problema.
Secondo quanto affermato, un utente con un account legittimo e non amministratore può sfruttare questa vulnerabilità la quale colpisce un’ampia gamma di installazioni, in particolare le versioni di Apache StreamPipes dalla 0.69.0 alla 0.97.0.
Questo furto di identità viene realizzato “manipolando i token JWT”, le credenziali sicure utilizzate per gestire le sessioni utente. Creando token specifici, un aggressore può ingannare il sistema facendogli credere di essere l’amministratore, aggirando i controlli standard dei privilegi.
La vulnerabilità consente a un aggressore di “scambiare il nome utente di un utente esistente con quello di un amministratore”. Per uno strumento progettato per gestire i dati dell’IoT industriale, le implicazioni di un’acquisizione amministrativa sono gravi.
Una volta ottenuto il controllo amministrativo, un aggressore può mettere in atto “manomissioni dei dati, accessi non autorizzati e altre violazioni della sicurezza “. Ciò potrebbe consentire a malintenzionati di corrompere i dati analitici o interrompere il flusso di informazioni negli ambienti industriali.
L'articolo Vulnerabilità critica in Apache StreamPipes: aggiornamento urgente necessario proviene da Red Hot Cyber.
Modernizing a Classic Datsun Engine

Although Nissan has been in the doldrums ever since getting purchased by Renault in the early 2000s, it once had a reputation as a car company that was always on the cutting edge of technology. Nissan was generally well ahead of its peers when bringing technologies like variable valve timing, turbocharging, fuel injection, and adjustable suspension to affordable, reliable vehicles meant for everyday use. Of course, a lot of this was done before computers were as powerful as they are today so [Ronald] set out to modernize some of these features on his 1978 Datsun 280Z.
Of course there are outright engine swaps that could bring a car like this up to semi-modern standards of power and efficiency, but he wanted to keep everything fully reversible in case he wants to revert to stock in the future, and didn’t want to do anything to the engine’s interior. The first thing was to remove the complicated mechanical system to control the throttle and replace it with an electronic throttle body with fly-by-wire system and a more powerful computer. The next step was removing the distributor-based ignition system in favor of individual coil packs and electronic ignition control, also managed by the new computer. This was perhaps the most complicated part of the build as it involved using a custom-made hall effect sensor on the original distributor shaft to tell the computer where the engine was in its rotation.
The final part of this engine modernization effort was upgrading the fuel delivery system. The original fuel injection system fired all of the injectors all the time, needlessly wasting fuel, but the new system only fires a specific cylinder when it needs fuel. This ended up improving gas mileage dramatically, and dyno tests also showed these modifications improved power significantly as well. Nissan hasn’t been completely whiffing since the Renault takeover, either. Their electric Leaf was the first mass-produced EV and is hugely popular in all kinds of projects like this build which uses a Leaf powertrain in a Nissan Frontier.
youtube.com/embed/jZ38C-M3tyk?…
All Projections Suck, So Play Risk on a Globe Instead

The worst thing about the getting people together is when everyone starts fighting over their favourite map projection– maybe you like the Watterman Butterfly, but your cousin really digs Gall-Peters, and that one Uncle who insists on defending Mercator after a couple of beers. Over on Instructables [madkins9] has an answer to that problem that will still let you play a rousing game of Risk– which will surely not drag on into the night and cause further drama– skip the projection, and put the game on a globe. 
Most globes, being cardboard, aren’t amenable to having game pieces cling to them. [madkins9] thus fabricates a steel globe from a pair of pre-purchased hemispheres. Magnets firmly affixed to the bases of all game pieces allow them to stick firmly to the spherical play surface. In a “learn from my mistakes” moment, [madkins] suggests that if you use two pre-made hemispheres, as he did, you make sure they balance before welding and painting them.
While those of us with less artistic flair might be tempted to try something like a giant eggbot, [madkins] was able to transfer the Risk world map onto his globe by hand. Many coats of urethane mean it should be well protected from the clicking or sliding magnet pieces, no matter how long the game lasts. In another teachable moment, he suggests not using that sealer over sharpie. Good to know.
Once gameplay is finished, the wooden globe stand doubles as a handsome base to hold all the cards and pieces until the next time you want to end friendships over imaginary world domination. Perhaps try a friendly game of Settlers of Catan instead.
TULIP: The Ultimate Intelligent Peripheral for the HP-41 Handheld Calculator

[Andrew Menadue] wrote in to let us know about the TULIP-DevBoard and TULIP-Module being developed on GitHub.
TULIP is short for “The Ultimate Intelligent Peripheral” and it’s an everything expansion board for the HP-41 line of handheld calculators sold by HP from 1979 to 1990. These particular calculators support Reverse Polish notation which seems to be one of those things, like the Dvorak keyboard, where once you get used to it you can never go back.
In doing the research for this article we came across the fan site hpcalc.org which has been online since 1997, although the Way Back Machine can only go back to late 1998. Still, we were impressed. It’s fun that the site still looks very much like it did 28 years ago!
The TULIP4041 is based around the RP2350 microcontroller which you might know as the heart of a Raspberry Pi Pico 2 board. The video below the break is a talk about the present and future of the TULIP project, and the slides are here: TULIP4041 – The Next Chapter.pdf (PDF).
Thanks to [Andrew] for writing in. If you’re interested in hacking the HP-41 check out HP-41C, The Forth Edition and Nonpareil RPN HP-41 Calculator Build.
youtube.com/embed/4R3ebXHAJd4?…
Xcc700: Self-Hosted C Compiler for the ESP32/Xtensa

With two cores at 240 MHz and about 8.5 MB of non-banked RAM if you’re using the right ESP32-S3 version, this MCU seems at least in terms of specifications to be quite the mini PC. Obviously this means that it should be capable of self-hosting its compiler, which is exactly what [Valentyn Danylchuk] did with the xcc700 C compiler project.
Targeting the Xtensa Lx7 ISA of the ESP32-S3, this is a minimal C compiler that outputs relocatable ELF binaries. These binaries can subsequently be run with for example the ESP-IDF-based elf_loader component. Obviously, this is best done on an ESP32 platform that has PSRAM, unless your binary fits within the few hundred kB that’s left after all the housekeeping and communication stacks are loaded.
The xcc700 compiler is currently very minimalistic, omitting more complex loop types as well as long and floating point types, for starters. There’s no optimization of the final code either, but considering that it’s 700 lines of code just for a PoC, there seems to be still plenty of room for improvement.
Vice of Old Brought to the Modern Age

People say they don’t make em’ like they used to, and while this isn’t always the case, it’s certainly true that old vices rarely die with time. This doesn’t mean they can’t use a refresh. [Marius Hornberger] recently backed that up when he decided to restore an old vice that had seen better days.
When refreshing old tools, you’ll almost always start the same: cleaning up all the layers of grease and ruined paint. The stories that each layer could tell will never be known, but new ones will be made with the care put into it by [Marius]. Bearings for the tightening mechanism had become worn down past saving, requiring new replacements. However, simply swapping them with carbon copies would be no fun.
[Marius] decided to completely rethink the clamping mechanism, allowing for much smoother use. To do this was simple, just machine down new axial bearings, design and print a bearing cage, machine the main rod itself, and finally make a casing. It’s simple really, but he wasn’t done and decided to create a custom torque rod to hammer in his vicing abilities. Importantly, the final finish was done by spraying paint and applying new grease.
Old tools can often be given new life, and we are far from strangers to this concept at Hackaday. Make sure to check out some antique rotary tools from companies before Dremel!
youtube.com/embed/PvU9M4Gx_D4?…
Linux Fu: Compose Yourself!

Our computers can display an astonishing range of symbols. Unicode alone defines more than 150,000 characters, covering everything from mathematical operators and phonetic alphabets to emoji and obscure historical scripts. Our keyboards, on the other hand, remain stubbornly limited to a few dozen keys.
On Windows, the traditional workaround involves memorizing numeric codes or digging through character maps. Linux, being Linux, offers something far more flexible: XCompose. It’s one of those powerful, quietly brilliant features that’s been around forever, works almost everywhere, and somehow still feels like a secret.
XCompose is part of the X11 input system. It lets you define compose sequences: short key sequences that produce a Unicode character. Think of it as a programmable “dead key” system on steroids. This can be as simple as programming an ‘E’ to produce a Euro sign or as complex as converting “flower” into a little flower emoji. Even though the system originated with X11, I’ve been told that it mostly works with Wayland, too. So let’s look deeper.
Starting XCompose
The secret is the Compose or Multi-key. You press it to essentially escape into XCompose mode, so when you type “flower”, it knows you don’t want to insert those literal letters in. You can pick which keyboard key is your compose key in your system settings. The Right Alt or Ctrl key is a common choice. I use my Caps Lock key, since I never really use it for anything else.
You can set the Compose key in other ways, too, including in ~/.XCompose, but it is usually easier to set it in the system settings. However, ~/.XCompose is one place you can set up custom rules.
By default, though, you should have some useful combos. For example, <Compose> ' e it should give you é and <Compose> " o should give you ö. The default rules are in /usr/share/X11/locale/*/Compose, where the * is your locale of choice.
Customize
The defaults usually cover a lot of ground. But you may want to define your own. You can do that by creating or editing ~/.XCompose. This file can contain rules or include other rule files. I have heard, however, that Wayland doesn’t do includes, so if you use that, it is something to keep in mind.
The file format is simple enough, with each line being a definition:
<Multi_key><a><e> : "æ"
Don’t make the mistake of trying to write something like <@>. All the special characters need the names from X11’s keysymdef.h file like <at> or <asterisk>.
When you make a custom file, you’ll usually start with:
include "%L"
This tells the system to load the defaults for your locale. You can also use %H for your home directory or %S for the system directory. When using some systems, you may have to include “/%L” instead.
Formally, the configuration line looks like this:
<EVENT>... : <RESULT> # comment
The <EVENT> allows you to not only specify keys but also modifiers that must be or must not be present. The <RESULT> can be a string or a character, and you can even insert an octal or hex number to be sure you get the key you want. For more, read the man page.
It is worth noting that any definition you provide will override the system ones, so if you don’t like something, it is easy to redefine it to something else. One nice thing is that the result doesn’t have to be a single character. You can use an entire string system. So:
<Multi_key> <c> <q> : "CQ de WD5GNR K"
As far as I know, there’s no way to embed a newline in the result that always works. You can try using something like \xa, for example, but \n doesn’t work. Also, no substitutions work on password/PIN entry, and that’s by design.
Why Build Your Own?
You can build up strings that make sense to you. But you know someone’s already done it. The repo has a core file of interesting definitions and some extra ones, too. My suggestion: don’t use their install function, which only gives you the core. Just create your own file like this, adjusting for wherever you put the files:
include "%L"
include "/home/xxx/xcompose/dotXCompose"
include "/home/xxx/xcompose/frakturcompose"
include "/home/xxx/xcompose/emoji.compose"
include "/home/xxx/xcompose/modletters.compose"
include "/home/xxx/xcompose/parens.compose"
Keep in mind that when you change this file, it will only apply to GUI apps you started after the change. Try <Compose> : ) to get 
And if you don’t like that collection, there are others.
Some Common Use Cases
Music? Try ♭ (#b) or ♯ (##). You can even make notes like ♪ (#e). Prefer math? How about ≠ (/=) or a square root symbol √ (v/). If your math runs more to accounting, you can write about Euros (€ – =E) or Yen (¥ – =Y). Hams will appreciate /O which produces Ø (note, that is an upper case O on the input).
There are plenty of other ones, too. The best way to know is to look in the files you are using and experiment.
<Multi_key> ❤> ❤> : "¯\_(ツ)_/¯" # Shrug
It is easy to code up things like your name, your e-mail address, and more. Since you can use names instead of cryptic keystrokes, it is much easier to use. For example, I forget that my name is on Macro+F5, but <Compose>@name is easy to remember. I find it makes it easy to remember if I prefix all (or most of ) my personal commands with some character like “@.” So I might have @name, @add, @tel, and @email, for example. Just don’t forget, the actual rules have to use the key names:
<Multi_key><at><n><a><m><e>:"Al Williams"
Some applications, notably GTK apps, won’t work with XCompose without some tweaking. In particular, you may need to override the default input method. If this problem bites you, a quick search for “XCompose and GTK” should give you some advice. There’s always a chance your app, or even some input fields in your app, won’t work with XCompose. That’s life.
What It Isn’t
Keep in mind that XCompose only works in the GUI. It isn’t context-aware. It doesn’t allow you to insert multiple lines. If you need scripting and other advanced features, this isn’t the right place to be. Want to just map keys sometimes? You can do it, but not with this tool.
But for nearly universal keyboard remappings, it works quite well, once you get used to the syntax. Have a favorite line in your .XCompose? Share it in the comments!
The Confusing World Of Bus Mice

The USB port which first appeared on our computers some time in the mid-1990s has made interfacing peripherals an easy task, save for the occasional upside down connector. But in the days before USB there were a plethora of plugs and sockets for peripherals, often requiring their own expansion card. Among these were mice, and [Robert Smallshire] is here with a potted history of the many incompatible standards which confuse the retrocomputing enthusiast to this day.
The first widely available mice in the 1980s used a quadrature interface, in which the output from mechanical encoders coupled to the mouse ball is fed directly to the computer interface which contains some form of hardware or microcontroller decoder. These were gradually superseded by serial mice that used an RS-232 port, then PS/2 mice, and finally the USB variant you probably use today.
Among those quadrature mice — or bus mice, as early Microsoft marketing referred to them — were an annoying variety of interfaces. Microsoft, Commodore, and Atari mice are similar electrically and have the same 9-pin D connector, yet remain incompatible with each other. The write-up takes a dive into the interface cards, where we find the familiar 8255 I/O port at play. We’d quite like to have heard about the Sun optical mice with their special mouse pad too, but perhaps their omission illustrates the breadth of the bus mouse world.
This piece has certainly broadened our knowledge of quadrature mice, and we used a few of them back in the day. If you only have a USB mouse and your computer expects one of these rarities, don’t worry, there’s an adapter for that.
Know Audio: Microphone Basics

A friend of mine is producing a series of HOWTO videos for an open source project, and discovered that he needed a better microphone than the one built into his laptop. Upon searching, he was faced with a bewildering array of peripherals aimed at would-be podcasters, influencers, and content creators, many of which appeared to be well-packaged versions of very cheap genericised items such as you can find on AliExpress.
If an experienced electronic engineer finds himself baffled when buying a microphone, what chance does a less-informed member of the public have! It’s time to shed some light on the matter, and to move for the first time in this series from the playback into the recording half of the audio world. Let’s consider the microphone.
Background, History, and Principles
A microphone is simply a device for converting the pressure variations in the air created by sounds, into electrical impulses that can be recorded. They will always be accompanied by some kind of signal conditioning preamplifier, but in this instance we’re considering the physical microphone itself. There are a variety of different types of microphone in use, and after a short look at microphone history and a discussion of what makes a good microphone, we’ll consider a few of them in detail.
The development of the microphone in the late 19th century is intimately associated with that of the telephone rather than the phonograph, as these recording devices were mechanical only and had no electrical component. The first practical microphones for the telephone were carbon microphones, a container of carbon granules mechanically coupled to a metal diaphragm, which formed a crude variable resistor modified by the sound waves. They were especially suitable for the standing DC current of a telephone line and though they are too noisy for good quality audio they continued in use for telephones into recent decades. The ancestors of the microphones we use today would arrive in the early years of the 20th century along with the development of electronic amplification and recording.
The job of a microphone is to take the sounds surrounding it and convert them into electrical signals, and invariably that starts with some form of lightweight diaphragm which vibrates in response to the air around it. The idea is that the mass of the diaphragm is as low as possible such that its physical properties have a minimal effect on the quality of the audio it captures. This diaphragm will be surrounded by whatever supporting structure it needs as well as any other components such as magnets, and the structure surrounding it will be designed to minimise vibration and shape the polar pattern over which it is sensitive.
Depending on the application there are microphone designs with a variety of patterns, from an omnidirectional when recording a room, through bidirectional figure-of-eight used in some studio environments, to cardioid microphones for vocals and speech with a kidney-shaped pattern, to extremely directional microphones used by filmmakers. Of those the cardioid pattern is the one most likely to find itself in everyday use by someone like my friend recording voice-overs for video.
Having some idea of microphone history and principles, it’s time to look at some real microphones. We’re not going to cover every single type of microphone, instead we’re going to cover the three most common, to represent the ones you are likely to find for affordable prices. These are dynamic microphones, condenser microphones, and their electret cousins.
Dynamic Microphones

A dynamic microphone takes a coil of wire and suspends it from a diaphragm in a magnetic field. The diaphragm moves the coil, and thus an audio voltage is generated. The diaphragm will typically be a polymer such as Mylar, and it will usually be suspended around its edge by a folded section in a similar manner to what you may have seen on the edge of a loudspeaker cone. The output impedance depends upon the winding of the coil, but is typically in the range of a few hundred ohms. They have a low level output in the region of millivolts, and thus it is normal for them to connect to some kind of preamplifier which may be built in to a mixing desk or similar. The microphone cartridge pictured is from a cheap plastic bodied one bundled with a sound card. You can see the clear plastic diaphragm, as well as the coil. The magnet is the shiny metal object in the centre.
Capacitor Microphones

A capacitor microphone is, as its name suggests, a capacitor in which one plate is formed by a diaphragm.This diaphragm is usually an extremely thin polymer, metalised on one side.
The sound vibrations vary the capacitance of the device, and this can be retrieved as a voltage by maintaining a constant charge across the microphone. This is typically achieved with a DC voltage in the order of a few hundred volts. Since the charge remains constant while the capacitance changes with the sound, the voltage on the microphone will change at the audio frequency. Capacitor microphones have a high impedance, and will always have an accompanying preamplifier and power supply circuit as a result.
Electret Microphones

Electret microphones are a special class of capacitor microphone in which the charge comes from an electret material, one which holds a permanent electric charge. They thus forgo the high voltage power supply for their DC bias, and usually have a built-in FET preamp in the cartridge needing a low voltage supply such as a small battery. The attraction is that electret cartridges can be had for very little money indeed, and that the cheap electret cartridges are of surprisingly high quality for their price.
That’s All Very Well, But Which One Should I Buy?
So yes, even knowing a bit about microphones, you’re still left just as confused when browsing the options. The questions you need to ask yourself aside from your budget then are these: what do I want to use if for, and what do I want to plug it in to? Let’s talk practicalities.
There are a variety of different physical form factors for microphones, usually at the cheaper end of the market a styling thing emulating famous more expensive models. Often the ones aimed at content creators have a built-in desk stand, however you may prefer the flexibility of your own stand. There are also all manner of pop filters and other accessories, some of which appear to be more for show than utility.
You will need to ask yourself what polar pattern you are looking for, and the answer is cardioid if you are recording your speech — its directional pattern rejects background noise, and focuses on what comes out of your mouth. You might also think about robustness; are you taking this microphone out on the road? A stage microphone makes a better choice if it will see a hard life, while a desktop microphone might make more sense if it rarely leaves your computer.
In front of me where this is being written is my microphone. I take it out on the road with me so I needed a robust device, plus I like the look of a traditional handheld microphone. The standard stage vocal dynamic microphones is unquestionably the Shure SM58, a robust and high-performance device that has stood the test of time. At £100, it’s out of my price range, so I have a cheaper mic from another well-known professional audio manufacturer that is obviously their take on the same formula. It is plugged in to a high-quality musician’s USB microphone interface, a USB sound card and mixer all-in-one. It serves me well, and if you’ve caught a Hackaday podcast with me on it you’ll have heard it in action.
If you’re not going to invest into an audio interface, you will be looking for something with a built-in amplifier and ADC, and probably something that plugs straight into USB. These are myriad, and the quality varies all over the place. For voice recording, a cardioid pattern makes sense, and an amplifier with low self-noise is desirable. If the amplifier picks up the USB bus noise, move on.
So in this piece I hope I’ve answered the questions of both my friend from earlier, and you the reader. It’s no primer for equipping a high-end studio, but if you’re doing that it’s likely you’ll already know a lot about microphones anyway.
Essere umani nel digitale: perché il benessere è una questione di sicurezza
Parliamo spesso di tecnologie emergenti, intelligenza artificiale, attacchi sempre più sofisticati, superfici di rischio che si ampliano. Parliamo di sistemi, infrastrutture, algoritmi, difese.
Molto meno spesso, però, ci fermiamo a chiederci: come stanno le persone che il digitale lo progettano, lo gestiscono e lo difendono ogni giorno?
Eppure, il futuro del digitale passa inevitabilmente da lì: dall’essere umano.
Negli ultimi anni il lavoro nelle professioni IT e della cybersecurity è diventato sempre più complesso, veloce e pervasivo:
- flussi informativi continui
- pressione costante e responsabilità elevate
- aggiornamento permanente delle competenze
- confini sempre più indistinti tra lavoro e vita privata
Non è solo una percezione soggettiva. Numerosi studi europei e internazionali mostrano come l’intensificazione del lavoro digitale e l’iper-connessione siano associate a un aumento di stress, affaticamento cognitivo e rischio burnout, con impatti concreti sulla salute, sulla motivazione e sulla permanenza nel settore. Il turnover elevato e la crescente difficoltà a trattenere talenti non sono solo un problema organizzativo: sono un segnale sistemico.
Nel settore della cybersecurity, questo fenomeno è amplificato: turni prolungati, reperibilità continua, gestione dell’emergenza, senso di colpa post-incidente e carenza di personale rendono lo stress una condizione strutturale, non un’eccezione. Il tutto in un contesto di accelerazione tecnologica che non lascia molto spazio al recupero, alla riflessione, alla pausa.
Ed è qui che entra in gioco un concetto ancora poco esplorato nel mondo della sicurezza informatica: il benessere digitale.

Cos’è davvero il benessere digitale
Quando si parla di benessere digitale si pensa spesso al tempo trascorso davanti agli schermi o all’uso consapevole dei social. Ma nel contesto delle professioni digitali e della cybersecurity, il tema è molto più profondo.
Il benessere digitale riguarda il modo in cui la tecnologia influisce sul funzionamento mentale, emotivo e relazionale delle persone che la usano come strumento di lavoro. Riguarda la capacità di rimanere lucidi sotto pressione, di prendere decisioni efficaci, di mantenere attenzione e senso critico senza arrivare all’esaurimento. Riguarda, in ultima analisi, la sostenibilità umana del lavoro tecnologico.
In un settore in cui l’errore umano è spesso indicato come una delle principali cause di incidenti di sicurezza, è paradossale che si parli così poco delle condizioni psicologiche in cui quell’errore prende forma. La stanchezza eccessiva, il rischio burnout e la cosiddetta security fatigue non sono un problema del singolo “che non ce la fa”, ma il risultato di un sistema che non tiene conto dei limiti cognitivi e umani.
Il fattore umano: da punto debole a risorsa strategica
Nel mondo cyber si parla spesso di “fattore umano” come dell’anello debole della sicurezza.
Eppure, sempre più ricerche mostrano che lo stress cronico e l’esaurimento psicologico incidono direttamente sui comportamenti di sicurezza.
Una persona sovraccarica e mentalmente esausta:
- commette più errori
- ha minore capacità di attenzione
- tende ad aggirare procedure percepite come onerose
- perde lucidità decisionale nei momenti critici
- perde affezione per il proprio lavoro, con l’unico desiderio di cambiarlo
In altre parole, un ambiente di lavoro che non tutela il benessere delle persone diventa, di fatto, un rischio di sicurezza.
Prendersi cura delle persone non è quindi un’opzione, ma una strategia concreta di resilienza organizzativa.

Tecnologia come mezzo, non come fine
La domanda che dobbiamo porci, inoltre, è questa: che idea di futuro vogliamo per noi che lavoriamo nel digitale?
Se la tecnologia diventa il fine e la persona il mezzo, il risultato è un ecosistema forse più performante, ma sempre meno sostenibile. Se invece riportiamo la persona al centro, la tecnologia può tornare ad essere ciò che dovrebbe essere: uno strumento di crescita, di protezione e di sviluppo sociale.
Parlare di benessere digitale non significa rallentare l’innovazione o abbassare il livello di sicurezza. Al contrario. Significa creare le condizioni perché le persone possano lavorare meglio, più a lungo e con maggiore qualità. Significa riconoscere che prendersi cura di chi opera nel digitale è una responsabilità condivisa, tanto individuale quanto organizzativa.

Benessere digitale: un nuovo paradigma
Il termine benessere digitale non si limita al “digital detox” o alla rinuncia della tecnologia.
Al contrario, parliamo di uso consapevole, sostenibile e umano del digitale nei contesti professionali.
Per ora, il punto di partenza è uno solo: non può esistere sicurezza digitale senza benessere umano.
Se vogliamo costruire un futuro tecnologico solido, resiliente e realmente sostenibile, dobbiamo iniziare a prenderci cura non solo dei sistemi, ma delle persone che li tengono in piedi ogni giorno.
Perché essere umani nel digitale non è un limite. È il nostro super-potere!
L'articolo Essere umani nel digitale: perché il benessere è una questione di sicurezza proviene da Red Hot Cyber.
Microsoft’s WebTV is Being Revived by Fans

During the 1990s, everyone wanted to surf the information super-highway — also known as the World Wide Web or just ‘Internet’ — but not everyone was interested in getting one of those newfangled personal computers when they already had a perfect good television set. This opened a market for TV-connected thin clients that could browse the web with a much lower entry fee, with the WebTV service being launched in 1996. Bought by Microsoft in 1997 and renamed MSN TV, it lasted until 2013. Yet rather than this being the end, the service is now being revived by members of the community through the WebTV Redialed project.
The project, which was recently featured in a video by [MattKC], replaces the original back-end services that the thin clients connected to via their dial-up modems, with the first revision using a proprietary protocol. The later and much more powerful MSN TV 2 devices relied on a standard HTTP-based protocol running on Microsoft’s Internet Information Services (IIS) web server and Windows.
What’s interesting about this new project is that it allows you to not just reconnect your vintage WebTV/MSN TV box, but also use a Windows-based viewer and more. What difficulty level you pick depends on the chosen hardware and connection method. For example, you can pair the Raspberry Pi with a USB modem to get online thanks to the DeamPi project.
Interestingly, DreamPi was created to get the Sega Dreamcast back online, with said console also having its own WebTV port that can be revived this way. Just in case you really want to get the full Dreamcast experience.
youtube.com/embed/KlLDo6gYI-A?…
hackaday.com/2025/12/30/micros…
