 - Collegamento all'originale")
Kimwolf, la botnet che ha trasformato smart TV e decoder in un’arma globale
Un nuovo e formidabile nemico è emerso nel panorama delle minacce informatiche: Kimwolf, una temibile botnet DDoS, sta avendo un impatto devastante sui dispositivi a livello mondiale. Le conseguenze di questa minaccia possono essere estremamente gravi e la sua portata è in costante aumento.
Per capire la reale entità di questo problema, è essenziale considerare che Kimwolf è una rete di dispositivi contaminati da malware, i quali possono essere controllati a distanza dagli aggressori. L’obiettivo principale di Kimwolf è quello di condurre attacchi DDoS, mirati a sovraccaricare e rendere inaccessibili sistemi o reti.
Secondo l’azienda cinese QiAnXin, Kimwolf è riuscita a compromettere almeno 1,8 milioni di dispositivi eterogenei, tra cui smart TV, decoder e tablet basati su Android. Questo numero è davvero impressionante e la varietà dei dispositivi colpiti rende la situazione ancora più preoccupante.
In definitiva, Kimwolf incarna un problema che non può essere ignorato. La sua capacità di propagarsi velocemente su dispositivi diversi e di effettuare attacchi DDoS. Considerando il numero elevato di dispositivi già coinvolti, Kimwolf rappresenta una minaccia significativa che richiede attenzione e azione.
Kimwolf è compilato utilizzando il Native Development Kit (NDK) e va oltre le funzionalità DDoS convenzionali. Oltre a lanciare attacchi denial-of-service su larga scala, integra funzionalità di proxy forwarding, reverse shell access e gestione dei file. Di conseguenza, gli aggressori possono non solo arruolare dispositivi come bot, ma anche sfruttarli per operazioni offensive più ampie.
Secondo le stime di QiAnXin, la botnet ha generato un totale di 1,7 miliardi di attacchi DDoS tra il 19 e il 22 novembre 2025. A causa dell’elevato volume di attività, il suo dominio di comando e controllo, 14emeliaterracewestroxburyma02132[.]su, si è posizionato al vertice della classifica DNS di Cloudflare.
I bersagli principali di questa botnet sono modelli come TV BOX, SuperBOX, HiDPTAndroid, P200, X96Q, XBOX, SmartTB, MX10 e vari altri. Sono state osservate infezioni in tutto il mondo, con concentrazioni particolarmente elevate in Brasile, India, Stati Uniti, Argentina, Sudafrica e Filippine. QiAnXin non ha ancora determinato come il malware iniziale sia stato distribuito a questi dispositivi.

In particolare, i domini di comando e controllo di Kimwolf sono stati disattivati con successo almeno tre volte a dicembre da soggetti non identificati, probabilmente attori rivali o ricercatori di sicurezza indipendenti . Questa interruzione ha costretto gli operatori della botnet a cambiare strategia e ad adottare l’Ethereum Name Service (ENS) per rafforzare la propria infrastruttura contro ulteriori rimozioni.
La botnet Kimwolf è anche collegata alla famigerata botnet AISURU. Gli investigatori hanno scoperto che gli aggressori hanno riutilizzato il codice di AISURU durante le prime fasi di sviluppo, prima di creare Kimwolf come successore più evasivo. QiAnXin sospetta che alcune campagne DDoS precedentemente attribuite ad AISURU possano aver coinvolto Kimwolf, o addirittura essere state orchestrate principalmente da quest’ultimo.
Si consiglia agli utenti di smart TV e decoder Android di verificare se i propri dispositivi utilizzano ancora le password predefinite e, in tal caso, di modificarle immediatamente. Se viene rilevato un comportamento anomalo, potrebbe essere necessario un ripristino completo del dispositivo.
Gli aggiornamenti del firmware o del sistema dovrebbero essere applicati tempestivamente non appena disponibili. Tuttavia, molti di questi dispositivi ricevono scarso o nessun supporto per gli aggiornamenti dopo il rilascio, rendendo difficile la correzione a lungo termine anche quando vengono identificate vulnerabilità .
L'articolo Kimwolf, la botnet che ha trasformato smart TV e decoder in un’arma globale proviene da Red Hot Cyber.

Linux On A Floppy: Still (Just About) Possible

Back in the early days of Linux, there were multiple floppy disk distributions. They made handy rescue or tinkering environments, and they packed in a surprising amount of useful stuff. But a version 1.x kernel was not large in today’s context, so how does a floppy Linux fare in 2025? [Action Retro] is here to find out.
Following a guide from GitHub in the video below the break, he’s able to get a modern version 6.14 kernel compiled with minimal options, as well as just enough BusyBox to be useful. It boots on a gloriously minimalist 486 setup, and he spends a while trying to refine and add to it, but it’s evident from the errors he finds along the way that managing dependencies in such a small space is challenging. Even the floppy itself is problematic, as both the drive and the media are now long in the tooth; it takes him a while to find one that works. He promises us more in a future episode, but it’s clear this is more of an exercise in pushing the envelope than it is in making a useful distro. Floppy Linux was fun back in 1997, but we can tell it’s more of a curiosity in 2025.
Linux on a floppy has made it to these pages every few years during most of Hackaday’s existence, but perhaps instead of pointing you in that direction, it’s time to toss a wreath into the sea of abandonware with a reminder that the floppy drivers in Linux are now orphaned.
youtube.com/embed/SiHZbnFrHOY?…
35 anni fa nasceva il World Wide Web: il primo sito web della storia
Ecco! Il 20 dicembre 1990, qualcosa di epocale successe al CERN di Ginevra.
Tim Berners-Lee, un genio dell’informatica britannico, diede vita al primo sito web della storia. Si tratta di info.cern.ch, creato con l’obiettivo di aiutare gli scienziati a condividere informazioni.
Era un progetto ambizioso, nato per facilitare la vita a ricercatori di tutto il mondo. Il suo obiettivo? Far dialogare scienziati e studiosi di paesi e istituzioni diverse. Inizialmente, solo gli addetti ai lavori del CERN potevano accedervi per poi aprire le porte al grande pubblico il successivo 6 agosto 1991.
Era un momento storico anche se molti all’interno del CERN non comprendevano fino a fondo tale innovazione!
Quel sito era essenzialmente una guida su come utilizzare il World Wide Web. In pratica, spiegava come consultare documenti remoti e configurare nuovi server. Una roba da nerd, ma che fece la storia! Oggi, quel sito e quella macchina sono pezzi da collezione, un vero e proprio tesoro del web. E pensare che tutto iniziò con una semplice idea: condividere informazioni. Che potenza non è vero?
L’aspetto grafico rifletteva la filosofia che guidava il progetto. Sfondo chiaro, testo scuro e collegamenti ipertestuali essenziali: nessun elemento decorativo, nessuna immagine. Nella proposta originaria del World Wide Web, Berners-Lee aveva chiarito che la priorità non era la grafica, ma la leggibilità universale del testo, ritenuta fondamentale per garantire l’accesso al maggior numero possibile di utenti.
Un contesto tecnologico frammentato e lo standard
Alla fine degli anni Ottanta, Internet esisteva già, ma era uno strumento riservato quasi esclusivamente a contesti accademici, militari e scientifici.
Le informazioni erano distribuite su sistemi eterogenei e spesso incompatibili tra loro: mainframe, computer personali e reti proprietarie. Tutto questo era complesso! Non essendo presente uno standard, questo non consentiva uno scambio dei dati fluido e flessibile.
Al CERN questo problema era particolarmente evidente.
Migliaia di ricercatori producevano e consultavano documentazione tecnica, ma i contenuti restavano spesso confinati su macchine specifiche o richiedevano software dedicati per essere letti. Esistevano soluzioni parziali, come ARPANET o Usenet, e sistemi di navigazione strutturata come Gopher, sviluppato dall’Università del Minnesota, ma mancava ancora un modello realmente universale per l’accesso ai documenti.

Le tre tecnologie alla base del Web
La proposta presentata da Berners-Lee nel 1989, intitolata “Information Management”, partiva da un’idea semplice: collegare documenti distribuiti su computer diversi attraverso una rete di rimandi ipertestuali. Tra il 1990 e la fine di quell’anno, questa visione prese forma concreta grazie allo sviluppo di tre elementi fondamentali.

Erano tre le soluzioni proposte da Berners Lee:
- La prima era l’HTML, un linguaggio di markup pensato per strutturare i contenuti testuali tramite elementi semplici come titoli, paragrafi e link.
- La seconda era l’URL, un sistema di indirizzamento univoco che permetteva di identificare in modo coerente ogni risorsa disponibile sul Web.
- La terza era il protocollo HTTP, incaricato di gestire lo scambio di informazioni tra il computer dell’utente e il server che ospitava i contenuti.

Queste tecnologie, ancora oggi risultano alla base della navigazione online, vennero sviluppate su un computer NeXT, una workstation prodotta dall’azienda fondata da Steve Jobs dopo l’uscita da Apple. Su quella macchina Berners-Lee realizzò anche il primo browser della storia, inizialmente chiamato WorldWideWeb e successivamente rinominato Nexus.

Il primo browser e il primo server
Il browser originario aveva una caratteristica oggi quasi scomparsa: non serviva solo a visualizzare le pagine, ma consentiva anche di modificarle e crearne di nuove.
Il concetto di Web che si delineava era quello di un ambiente interattivo, dove gli utenti avevano la possibilità di partecipare attivamente alla creazione dei contenuti. Tuttavia, con l’avvento degli interessi commerciali, questa visione iniziale del web venne gradualmente accantonata, man mano che il business prese il sopravvento.
Lo stesso computer NeXT svolgeva anche il ruolo di primo server web al mondo. Per evitare spegnimenti accidentali, sulla macchina era stato apposto un avviso scritto a mano che invitava esplicitamente a non interromperne l’alimentazione, poiché farlo avrebbe significato rendere irraggiungibile l’intero World Wide Web.

Dal CERN al pubblico globale
Per alcuni anni il Web rimase uno strumento utilizzato prevalentemente da fisici e ricercatori.
La svolta arrivò il 30 aprile 1993, quando il CERN decise di rendere il World Wide Web una tecnologia di pubblico dominio, rinunciando a qualsiasi diritto di sfruttamento commerciale. Questa scelta impedì la nascita di monopoli e favorì la diffusione libera degli standard.
Nello stesso periodo comparvero i primi browser grafici destinati a un pubblico più ampio. Tra questi, Mosaic, sviluppato nel 1993 dal National Center for Supercomputing Applications dell’Università dell’Illinois, introdusse la possibilità di visualizzare immagini integrate nel testo, trasformando il Web in un ambiente più accessibile e visivamente coinvolgente.

Dalle prime pagine al Web moderno
Oggi il Web conta miliardi di pagine e centinaia di milioni di domini, ma le sue origini restano legate a quell’insieme di documenti essenziali pubblicati al CERN, oltre che a delle intuizioni che veniva qualche anno prima dal prodigio della tecnologia di Douglas Engelbart (inventore appunto dell’ipertesto e del mouse).
Nel corso degli anni Novanta la tecnologia era pronta per tutto questo, e iniziarono ad apparire i primi servizi e siti di rilievo: nel 1993 nacque Aliweb, considerato il primo motore di ricerca, mentre nel 1994 organizzazioni come Amnesty International e aziende come Pizza Hut avviarono le loro prime presenze online.
Nel 2013 il CERN ha ripristinato l’indirizzo originale del primo sito web, rendendolo nuovamente accessibile in una versione semplificata. Un archivio che non rappresenta solo un documento storico, ma la testimonianza concreta dell’inizio di una trasformazione tecnologica che ha ridefinito il modo in cui l’umanità produce, condivide e accede alle informazioni.
Tutto nasce dalla “Mothers Of All Demos”
Le fondamenta concettuali del World Wide Web affondano le radici ben prima del lavoro di Tim Berners-Lee al CERN. Un passaggio chiave risale al 9 dicembre 1968, quando Douglas Engelbart presentò a San Francisco la celebre “Mother of All Demos”. In quella dimostrazione pubblica, Engelbart mostrò una visione dell’informatica radicalmente nuova, incentrata sull’interazione uomo-macchina e sulla possibilità di usare i computer come strumenti per amplificare l’intelligenza collettiva.

Durante quella dimostrazione, Engelbart introdusse il suo oN-Line System (NLS), un ambiente di lavoro che integrava funzioni allora rivoluzionarie: collegamenti ipertestuali tra documenti, editing collaborativo in tempo reale, navigazione non lineare delle informazioni, finestre su schermo e comunicazione a distanza. Concetti che oggi appaiono scontati vennero presentati quando i computer erano ancora strumenti chiusi, utilizzati principalmente per il calcolo e riservati a pochi specialisti.

Il genio di Engelbart non si limitò all’intuizione tecnica. La sua forza fu soprattutto la capacità di immaginare un sistema complesso, aperto e interconnesso, che richiedeva necessariamente il contributo di una comunità di ingegneri, ricercatori e sviluppatori per diventare realtà. Le idee mostrate nella Mother of All Demos non erano prodotti finiti, ma visioni operative che aprirono la strada a decenni di lavoro collettivo per essere tradotte in tecnologie concrete, scalabili e utilizzabili su larga scala.
In questa prospettiva si inserisce il contributo di Tim Berners-Lee, che tra la fine degli anni Ottanta e l’inizio dei Novanta riuscì a portare “a terra” molte di quelle intuizioni, adattandole a una rete globale come Internet. Il World Wide Web può essere letto come la sintesi pragmatica di quelle idee pionieristiche: l’ipertesto, la navigazione associativa e l’accesso distribuito all’informazione, trasformati in standard semplici, aperti e universali. Una continuità storica che collega direttamente la visione di Engelbart al Web che conosciamo oggi.

L'articolo 35 anni fa nasceva il World Wide Web: il primo sito web della storia proviene da Red Hot Cyber.
Reverse-Engineering the Intel 8087 Stack Circuitry

Although something that’s taken for granted these days, the ability to perform floating-point operations in hardware was, for the longest time, something reserved for people with big wallets. This began to change around the time that Intel released the 8087 FPU coprocessor in 1980, featuring hardware support for floating-point arithmetic at a blistering 50 KFLOPS. Notably, the 8087 uses a stack-based architecture, a major departure from existing FPUs. Recently [Ken Shirriff] took a literal closer look at this stack circuitry to see what it looks like and how it works.
Nearly half of the 8087’s die is taken up by the microcode frontend and bus controller, with a block containing constants like π alongside the FP calculation-processing datapath section taking up much of the rest. Nestled along the side are the eight registers and the stack controller. At 80 bits per FP number, the required registers and related were pretty sizeable for the era, especially when you consider that the roughly 60,000 transistors in the 8087 were paired alongside the 29,000 transistors in the 16-bit 8086.
Each of the 8087’s registers is selected by the decoded instructions via a lot of wiring that can still be fairly easily traced despite the FPU’s die being larger than the CPU it accompanied. As for the unique stack-based register approach, this turned out to be mostly a hindrance, and the reason why the x87 FP instructions in the x86 ISA are still quite maligned today. Yet with careful use, providing a big boost over traditional code, this made it a success by that benchmark, even if MMX, SSE, and others reverted to a stackless design.
Improving the Cloud Chamber

Want to visualize radioactive particles? You don’t need a boatload of lab equipment. Just a cloud chamber. And [Curious Scientist] is showing off an improved miniature cloud chamber that is easy to replicate using a 3D printer and common components.
The build uses a Peltier module, a CPU cooler, an aluminum plate, thermal paste, and headlight film. The high voltage comes from a sacrificed mosquito swatter. The power input for the whole system is any 12V supply.
The cloud chamber was high tech back in 1911 when physicist Charles T. R. Wilson made ionizing radiation visible by creating trails of tiny liquid droplets in a supersaturated vapor of alcohol or water. Charged particles pass through, leaving visible condensation trails.
According to the post, the cost of everything is under $100. He hasn’t made the 3D printed parts freely available, but there are enough pictures that you can probably work it out yourself. Besides, you’d almost certainly have to rework it for your particular jar, anyway.
After all, a cloud chamber’s construction isn’t a state secret. We’ve seen some fancy Peltier-based designs. If you manage your expectations, you can build one for even less using a plastic bottle and ingenuity.
915 MHz Forecast: Rolling Your Own Offline Weather Station

There are a lot of options for local weather stations; most of them, however, are sensors tied to a base station, often requiring an internet connection to access all features. [Vinnie] over at vinthewrench has published his exploration into an off-grid weather station revolving around a Raspberry Pi and an RTL-SDR for communications.
The weather station has several aspects to it. The main sensor package [Vinnie] settled on was the Ecowitt WS90, capable of measuring wind speed, wind direction, temperature, humidity, light, UVI, and rain amount. The WS90 communicates at 915 MHz, which can be read using the rtl_433 project. The WS90 is also available for purchase as a standalone sensor, allowing [Vinnie] to implement his own base station.
For the base station, [Vinnie] uses a weatherproof enclosure that houses a 12V battery with charger to act as a local UPS. This powers the brains of the operation: a Raspberry Pi. Hooked to the Pi is an RTL-SDR with a 915 MHz antenna. The Pi receives an update from the WS90 roughly every 5 seconds, which it can decode using the rtl_433 library. The Pi then turns that packet into structured JSON.
The JSON is fed into a weather model backend that handles keeping track of trends in the sensor data, as well as the health of the sensor station. The backend has an API that allows for a dashboard weather site for [Vinnie], no internet required.
Thanks, [Vinnie], for sending in your off-grid weather station project. Check out his site to read more about his process, and head over to the GitHub page to check out the technical details of his implementation. This is a great addition to some of the other DIY weather stations we’ve featured here.
Cheap 3D Printer Becomes CNC Wood Engraver

3D printers are built for additive manufacturing. However, at heart, they are really just simple CNC motion platforms, and can be readily repurposed to other tasks. As [Arseniy] demonstrates, it’s not that hard to take a cheap 3D printer and turn it into a viable wood engraver.
The first attempt involved a simple experiment—heating the 3D printer nozzle, and moving it into contact with a piece of wood to see if it could successfully leave a mark. This worked well, producing results very similar to a cheap laser engraving machine. From there, [Arseniy] set about fixing the wood with some simple 3D-printed clamps so it wouldn’t move during more complex burning/engraving tasks. He also figured out a neat trick to simply calibrate the right Z height for wood burning by using the built in calibration routines. Further experiments involved developing a tool for creating quality G-Code for these engraving tasks, and even using the same techniques on leather with great success.
If you need to mark some patterns on wood and you already have a 3D printer, this could be a great way to go. [Arseniy] used it to great effect in the production of a plywood dance pad. We’ve featured some other great engraver builds over the years, too, including this innovative laser-based project. Video after the break.
youtube.com/embed/WcHOnkO5-Sg?…
Decapsulating a PIC12F683 to Examine Its CMOS Implementation

In a recent video, [Andrew Zonenberg] takes us through the process of decapsulating a PIC12F683 to take a peak at its CMOS implementation.
This is a multipart series with five parts done and more to come. The PIC12F683 is an 8-pin flash-based, 8-bit microcontroller from Microchip. [Andrew] picked the PIC12F683 for decapsulation because back in 2011 it was the first microcontroller he broke read-protection on and he wanted to go back and revisit this chip, given particularly that his resources and skills had advanced in the intervening period.
The five videos are a tour de force. He begins by taking a package cross section, then decapsulating and delayering. He collects high-resolution photos as he goes along. In the process, he takes some time to explain the dangers of working with acid and the risk mitigations he has in place. Then he does what he calls a “floorplan analysis” which takes stock of the entire chip before taking a close look at the SRAM implementation.
If you’re interested in decapsulating integrated circuits you might want to take a look at Laser Fault Injection, Now With Optional Decapping, A Particularly Festive Chip Decapping, or even read through the transcript of the Decapping Components Hack Chat With John McMaster.
youtube.com/embed/videoseries?…
Thanks to [Peter Monta] for the tip.
Hackaday Podcast Episode 350: Damnation for Spreadsheets, Praise for Haiku, and Admiration for the Hacks In Between

This week’s Hackaday Podcast sees Elliot Williams joined by Jenny List for an all-European take on the week, and have we got some hacks for you!
In the news this week is NASA’s Maven Mars Orbiter, which may sadly have been lost. A sad day for study of the red planet, but at the same time a chance to look back at what has been a long and successful mission.
In the hacks of the week, we have a lo-fi camera, a very refined Commodore 64 laptop, and a MIDI slapophone to entertain you, as well as taking a detailed look at neutrino detectors. Then CYMK printing with laser cut stencils draws our attention, as well as the arrival of stable GPIB support for Linux. Finally both staffers let loose; Elliot with an epic rant about spreadsheets, and Jenny enthusiastically describing the Haiku operating system.
Check out the links below if you want to follow along, and as always, tell us what you think about this episode in the comments!
html5-player.libsyn.com/embed/…
It’s dangerous to go alone. Here, take this MP3.
Where to Follow Hackaday Podcast
Places to follow Hackaday podcasts:
Episode 349 Show Notes:
News:
What’s that Sound?
- Congratulations to [kenbob] for guessing the spinning down washing machine. Everyone else tune in next year for your shot at the first sound of 2026.
Interesting Hacks of the Week:
- Liberating AirPods With Bluetooth Spoofing
- GitHub – tyalie/AAP-Protocol-Defintion: Decoding the Apple Accessory Protocol
- Bypassing Airpods Hearing Aid Georestriction With A Faraday Cage
- Nostalgic Camera Is A Mashup Of Analog Video Gear
- Neutrino Transmutation Observed For The First Time
- Detecting Anti-Neutrinos From Distant Fission Reactors Using Pure Water At SNO+
- Engineering Lessons From The Super-Kamiokande Neutrino Observatory Failure
- Detecting Neutrinos, The Slippery Ghost Particles That Don’t Want To Interact
- Building A Commodore 64 Laptop
- Taking Electronics To A Different Level
- Taking It To Another Level: Making 3.3V Speak With 5V
- Philips application note 97055, Bi-directional level shifter for I²C-bus and other systems.
- Finally, A Pipe Slapophone With MIDI
Quick Hacks:
- Elliot’s Picks:
- WiFi Menorah For Eight Nights Of Bandwidth
- Laser Cutter Plus CYMK Spraypaint Equals Full-Color Prints
- Why Push A Button When A Machine Can Do It For You
- Jenny’s Picks:
- After Decades, Linux Finally Gains Stable GPIB Support
- 3D Printing And Metal Casting Are A Great Match
- The Lethal Danger Of Combining Welding And Brake Cleaner
Can’t Miss Articles:
hackaday.com/2025/12/19/hackad…
Attach a Full Size Lens to a Tiny Camera

The Kodak Charmera is a tiny keychain camera produced by licencing out the name of the famous film manufacturer, and it’s the current must-have cool trinket among photo nerds. Inside is a tiny sensor and a fixed-focus M7 lens, and unlike many toy cameras it has better quality than its tiny package might lead you to expect. There will always be those who wish to push the envelope though, and [微攝 Macrodeon] is here to fit a lens mount for full-size lenses (Chinese language, subtitle translation available).
The hack involves cracking the camera open and separating the lens mount from the sensor. This is something we’re familiar with from other cameras, and it’s a fiddly process which requires a lot of care. A C-mount is then glued to the front, from which all manner of other lenses can be attached using a range of adapters. The focus requires a bit of effort to set up and we’re guessing that every lens becomes extreme telephoto due to the tiny sensor, but we’re sure hours of fun could be had.
The Charmera is almost constantly sold out, but you should be able to place a preorder for about $30 USD if you want one. If waiting months for delivery isn’t your bag, there are other cameras you can upgrade to C-mount.
youtube.com/embed/FMZ74QCaLdw?…
This Week in Security: PostHog, Project Zero Refresh, and Thanks For All the Fish

There’s something immensely satisfying about taking a series of low impact CVEs, and stringing them together into a full exploit. That’s the story we have from [Mehmet Ince] of Prodraft, who found a handful of issues in the default PostHog install instructions, and managed to turn it into a full RCE, though only accessible as a user with some configuration permissions.
As one might expect, it all starts with a Server Side Request Forgery (SSRF). That’s a flaw where sending traffic to a server can manipulate something on the server side to send a request somewhere else. The trick here is that a webhook worker can be primed to point at localhost by sending a request directly to a system API.
One of the systems that powers a PostHog install is the Clickhouse database server. This project had a problem in how it sanitized SQL requests, namely attempting to escape a single quote via a backslash symbol. In many SQL servers, a backslash would properly escape a single quote, but Clickhouse and other Postgresql servers don’t support that, and treat a backslash as a regular character. And with this, a read-only SQL API is vulnerable to SQL injection.
These vulnerabilities together just allow for injecting an SQL string to create and run a shell command from within the database, giving an RCE and remote shell. The vulnerabilities were reported through ZDI, and things were fixed earlier this year.
FreePBX
Speaking of SQL injections, FreePBX recently fixed a handful of SQL injections and an authentication bypass, and researchers at horizon3.ai have the scoop. None of these particular issues are vulnerable without either questionable configuration changes, or access to a valid PHP session ID token. The weakness here seems to be a very similar single quote injection.
Another fun SQL injection in FreePBX requires the authorization type swapped to webserver. But with that setting in place, an injected authentication header with only a valid user name is enough to pull off an SQL injection. The attack chosen for demonstration was to add a new user to the users table. This same authentication header spoof can be used to upload arbitrary files to the system, leading to an easy webshell.
Google Project Zero’s Refresh
We’ve often covered Google’s Project Zero on this column, as their work is usually quite impressive. As their blog now points out, the homepage design left something to be desired. That’s changed now, with a sleek and modern new look! And no, that’s not actually newsworthy here; stop typing those angry comments. The real news is the trio of new posts that came with the refresh.
The most recent is coverage of a VirtualBox VM excape via the NAT network driver. It’s covering a 2017 vulnerability, so not precisely still relevant, but still worth a look. The key here is a bit of code that changes the length of the data structure based on the length of the IP header. Memory manipulation from an untrusted value. The key to exploitation is to manipulate memory to control some of the memory where packets are stored. Then use IP fragmentation packets to interleave that malicious data together and trigger the memory management flaw.
The second post is on Windows exploitation through race conditions and path lookups. This one isn’t an exploit, but an examination of techniques that you could use to slow the Windows kernel down, when doing a path lookup, to exploit a race condition. The winner seems to be a combination of nested directories, with shadow directories and symbolic links. This combination can cost the kernel a whopping three minutes just to parse a path. Probably enough time.
The third entry is on an image-based malware campaign against Samsung Android phones. Malicious DNG files get processed by the Quram image processing library on Samsung devices. DNG images are a non-proprietary replacement for .raw image files, and the DNG format even includes features like embedding lens correction code right in the file format. This correction code is in the form of opcodes, that are handled very much like a script or small program on the host device. The Quram library didn’t handle those programs safely, allowing them to write outside of the allocated memory for the image.
Bits and Bytes
The E-note domain and servers have been seized by law enforcement. It’s believed that $70 million worth of ransomware and cryptocurrency theft has passed through this exchange service, as part of a money laundering operation. A Russian national has been named as the man behind the service, and an indictment has been made, but it seems that no actual arrests have been made.
Dropbear 2025.89 has been released, fixing a vulnerability where a user with SSH access could connect to any unix socket as root. This mishandling of socket permissions can lead to escalation of privilege in a multitude of ways.
React2shell was exploited in the wild almost as soon as it was announced. We covered the vulnerability as it was happening a couple weeks ago, and now it’s clear that ransomware campaigns were launched right away to take advantage of the exploit. It’s also reported that it was used in Advanced Persistent Threat (APT) campaigns right away as well. Real Proof of Concept code is also now available.
Thanks for All the Fish!
And lastly, on a personal note: Thank you to all the readers of this column over the last six years, and to the Hackaday editors for making it happen. I’ve found myself in the position of having four active careers at once, and with the birth of my son in November, I have four children as well. Something has to give, and it’s not going to be any of the kids, so it’s time for me to move on from a couple of those careers. This Week in Security has been a blast, ever since the first installment back in May of 2019. With any luck, another writer will pick up the mantle early next year. (Editor’s note: We’re working on it, but we’ll miss you!)
And if you’re a fan of FLOSS Weekly, the other thing I do around here, don’t worry, as it’s not going anywhere. Hope to see you all there!
Surplus Industrial Robot Becomes two-ton 3D Printer

As the saying goes — when life gives you lemons, you make lemonade. When life gives you a two-ton surplus industrial robot arm, if you’re [Brian Brocken], you apparently make a massive 3D printer.
The arm in question is an ABB IRB6400, a serious machine that can sling 100 to 200 kilograms depending on configuration. Compared to that, the beefiest 3D printhead is effectively weightless, and the Creality Sprite unit he’s using isn’t all that beefy. Getting the new hardware attached uses (ironically) a 3D printed mount, which is an easy enough hack. The hard work, as you might imagine, is in software.
As it turns out, there’s no profile in Klipper for this bad boy. It’s 26-year-old controller doesn’t even speak G-code, requiring [Brian] to feed the arm controller the “ABB RAPID” dialect it expects line-by-line, while simultaneously feeding G-code to the RAMPS board controlling the extruder. If you happen to have the same arm, he’s selling the software that does this. Getting that synchronized reliably was the biggest challenge [Brian] faced. Unfortunately that means things are slowed down compared to what the arm would otherwise be able to do, with a lot of stop-and-start on complex models, which compromises print quality. Check the build page above for more pictures, or the video embedded below.
[Brian] hopes to fix that by making better use of the ABB arm’s controller, since it does have enough memory for a small buffer, if not a full print. Still, even if it’s rough right now, it does print, which is not something the engineers at ABB probably ever planned for back before Y2K. [Brian]’s last use of the arm, carving a DeLorean out of styrofoam, might be closer to the original design brief.
Usually we see people using 3D printers to build robot arms, so this is a nice inversion, though not the first.
youtube.com/embed/peY_KK_nGc8?…
Cloud Atlas activity in the first half of 2025: what changed

Known since 2014, the Cloud Atlas group targets countries in Eastern Europe and Central Asia. Infections occur via phishing emails containing a malicious document that exploits an old vulnerability in the Microsoft Office Equation Editor process (CVE-2018-0802) to download and execute malicious code. In this report, we describe the infection chain and tools that the group used in the first half of 2025, with particular focus on previously undescribed implants.
Additional information about this threat, including indicators of compromise, is available to customers of the Kaspersky Intelligence Reporting Service. Contact: intelreports@kaspersky.com.
Technical details
Initial infection
The starting point is typically a phishing email with a malicious DOC(X) attachment. When the document is opened, a malicious template is downloaded from a remote server. The document has the form of an RTF file containing an exploit for the formula editor, which downloads and executes an HTML Application (HTA) file.
Fpaylo
Malicious template with the exploit loaded by Word when opening the document

We were unable to obtain the actual RTF template with the exploit. We assume that after a successful infection of the victim, the link to this file becomes inaccessible. In the given example, the malicious RTF file containing the exploit was downloaded from the URL hxxps://securemodem[.]com?tzak.html_anacid.
Template files, like HTA files, are located on servers controlled by the group, and their downloading is limited both in time and by the IP addresses of the victims. The malicious HTA file extracts and creates several VBS files on disk that are parts of the VBShower backdoor. VBShower then downloads and installs other backdoors: PowerShower, VBCloud, and CloudAtlas.
This infection chain largely follows the one previously seen in Cloud Atlas’ 2024 attacks. The currently employed chain is presented below:
Malware execution flow

Several implants remain the same, with insignificant changes in file names, and so on. You can find more details in our previous article on the following implants:
In this research, we’ll focus on new and updated components.
VBShower
VBShower::Backdoor
Compared to the previous version, the backdoor runs additional downloaded VB scripts in the current context, regardless of the size. A previous modification of this script checked the size of the payload, and if it exceeded 1 MB, instead of executing it in the current context, the backdoor wrote it to disk and used the wscript utility to launch it.
VBShower::Payload (1)
The script collects information about running processes, including their creation time, caption, and command line. The collected information is encrypted and sent to the C2 server by the parent script (VBShower::Backdoor) via the v_buff variable.
VBShower::Payload (1)
")
VBShower::Payload (2)
The script is used to install the VBCloud implant. First, it downloads a ZIP archive from the hardcoded URL and unpacks it into the %Public% directory. Then, it creates a scheduler task named “MicrosoftEdgeUpdateTask” to run the following command line:
wscript.exe /B %Public%\Libraries\MicrosoftEdgeUpdate.vbs
It renames the unzipped file %Public%\Libraries\v.log to %Public%\Libraries\MicrosoftEdgeUpdate.vbs, iterates through the files in the %Public%\Libraries directory, and collects information about the filenames and sizes. The data, in the form of a buffer, is collected in the v_buff variable. The malware gets information about the task by executing the following command line:
cmd.exe /c schtasks /query /v /fo CSV /tn MicrosoftEdgeUpdateTask
The specified command line is executed, with the output redirected to the TMP file. Both the TMP file and the content of the v_buff variable will be sent to the C2 server by the parent script (VBShower::Backdoor).
Here is an example of the information present in the v_buff variable:
Libraries:
desktop.ini-175|
MicrosoftEdgeUpdate.vbs-2299|
RecordedTV.library-ms-999|
upgrade.mds-32840|
v.log-2299|
The file MicrosoftEdgeUpdate.vbs is a launcher for VBCloud, which reads the encrypted body of the backdoor from the file upgrade.mds, decrypts it, and executes it.
VBShower::Payload (2) used to install VBCloud
 used to install VBCloud")
Almost the same script is used to install the CloudAtlas backdoor on an infected system. The script only downloads and unpacks the ZIP archive to "%LOCALAPPDATA%", and sends information about the contents of the directories "%LOCALAPPDATA%\vlc\plugins\access" and "%LOCALAPPDATA%\vlc" as output.
In this case, the file renaming operation is not applied, and there is no code for creating a scheduler task.
Here is an example of information to be sent to the C2 server:
vlc:
a.xml-969608|
b.xml-592960|
d.xml-2680200|
e.xml-185224||
access:
c.xml-5951488|
In fact, a.xml, d.xml, and e.xml are the executable file and libraries, respectively, of VLC Media Player. The c.xml file is a malicious library used in a DLL hijacking attack, where VLC acts as a loader, and the b.xml file is an encrypted body of the CloudAtlas backdoor, read from disk by the malicious library, decrypted, and executed.
VBShower::Payload (2) used to install CloudAtlas
 used to install CloudAtlas")
VBShower::Payload (3)
This script is the next component for installing CloudAtlas. It is downloaded by VBShower from the C2 server as a separate file and executed after the VBShower::Payload (2) script. The script renames the XML files unpacked by VBShower::Payload (2) from the archive to the corresponding executables and libraries, and also renames the file containing the encrypted backdoor body.
These files are copied by VBShower::Payload (3) to the following paths:
| File | Path |
| a.xml | %LOCALAPPDATA%\vlc\vlc.exe |
| b.xml | %LOCALAPPDATA%\vlc\chambranle |
| c.xml | %LOCALAPPDATA%\vlc\plugins\access\libvlc_plugin.dll |
| d.xml | %LOCALAPPDATA%\vlc\libvlccore.dll |
| e.xml | %LOCALAPPDATA%\vlc\libvlc.dll |
Additionally, VBShower::Payload (3) creates a scheduler task to execute the command line: "%LOCALAPPDATA%\vlc\vlc.exe". The script then iterates through the files in the "%LOCALAPPDATA%\vlc" and "%LOCALAPPDATA%\vlc\plugins\access" directories, collecting information about filenames and sizes. The data, in the form of a buffer, is collected in the v_buff variable. The script also retrieves information about the task by executing the following command line, with the output redirected to a TMP file:
cmd.exe /c schtasks /query /v /fo CSV /tn MicrosoftVLCTaskMachine
Both the TMP file and the content of the v_buff variable will be sent to the C2 server by the parent script (VBShower::Backdoor).
VBShower::Payload (3) used to install CloudAtlas
 used to install CloudAtlas")
VBShower::Payload (4)
This script was previously described as VBShower::Payload (1).
VBShower::Payload (5)
This script is used to check access to various cloud services and executed before installing VBCloud or CloudAtlas. It consistently accesses the URLs of cloud services, and the received HTTP responses are saved to the v_buff variable for subsequent sending to the C2 server. A truncated example of the information sent to the C2 server:
GET-webdav.yandex.ru|
200|
<!DOCTYPE html><html lang="ru" dir="ltr" class="desktop"><head><base href="...
VBShower::Payload (5)
")
VBShower::Payload (6)
This script was previously described as VBShower::Payload (2).
VBShower::Payload (7)
This is a small script for checking the accessibility of PowerShower’s C2 from an infected system.
VBShower::Payload (7)
")
VBShower::Payload (8)
This script is used to install PowerShower, another backdoor known to be employed by Cloud Atlas. The script does so by performing the following steps in sequence:
- Creates registry keys to make the console window appear off-screen, effectively hiding it:
"HKCU\Console\%SystemRoot%_System32_WindowsPowerShell_v1.0_powershell.exe"::"WindowPosition"::5122
"HKCU\UConsole\taskeng.exe"::"WindowPosition"::538126692 - Creates a “MicrosoftAdobeUpdateTaskMachine” scheduler task to execute the command line:
powershell.exe -ep bypass -w 01 %APPDATA%\Adobe\AdobeMon.ps1 - Decrypts the contents of the embedded data block with XOR and saves the resulting script to the file
"%APPDATA%\Adobe\p.txt". Then, renames the file"p.txt"to"AdobeMon.ps1". - Collects information about file names and sizes in the path
"%APPDATA%\Adobe". Gets information about the task by executing the following command line, with the output redirected to a TMP file:
cmd.exe /c schtasks /query /v /fo LIST /tn MicrosoftAdobeUpdateTaskMachine
VBShower::Payload (8) used to install PowerShower
 used to install PowerShower")
The decrypted PowerShell script is disguised as one of the standard modules, but at the end of the script, there is a command to launch the PowerShell interpreter with another script encoded in Base64.
Content of AdobeMon.ps1 (PowerShower)
")
VBShower::Payload (9)
This is a small script for collecting information about the system proxy settings.
VBShower::Payload (9)
")
VBCloud
On an infected system, VBCloud is represented by two files: a VB script (VBCloud::Launcher) and an encrypted main body (VBCloud::Backdoor). In the described case, the launcher is located in the file MicrosoftEdgeUpdate.vbs, and the payload — in upgrade.mds.
VBCloud::Launcher
The launcher script reads the contents of the upgrade.mds file, decodes characters delimited with “%H”, uses the RC4 stream encryption algorithm with a key built into the script to decrypt it, and transfers control to the decrypted content. It is worth noting that the implementation of RC4 uses PRGA (pseudo-random generation algorithm), which is quite rare, since most malware implementations of this algorithm skip this step.
VBCloud::Launcher

VBCloud::Backdoor
The backdoor performs several actions in a loop to eventually download and execute additional malicious scripts, as described in the previous research.
VBCloud::Payload (FileGrabber)
Unlike VBShower, which uses a global variable to save its output or a temporary file to be sent to the C2 server, each VBCloud payload communicates with the C2 server independently. One of the most commonly used payloads for the VBCloud backdoor is FileGrabber. The script exfiltrates files and documents from the target system as described before.
The FileGrabber payload has the following limitations when scanning for files:
- It ignores the following paths:
- Program Files
- Program Files (x86)
- %SystemRoot%
- The file size for archiving must be between 1,000 and 3,000,000 bytes.
- The file’s last modification date must be less than 30 days before the start of the scan.
- Files containing the following strings in their names are ignored:
- “intermediate.txt”
- “FlightingLogging.txt”
- “log.txt”
- “thirdpartynotices”
- “ThirdPartyNotices”
- “easylist.txt”
- “acroNGLLog.txt”
- “LICENSE.txt”
- “signature.txt”
- “AlternateServices.txt”
- “scanwia.txt”
- “scantwain.txt”
- “SiteSecurityServiceState.txt”
- “serviceworker.txt”
- “SettingsCache.txt”
- “NisLog.txt”
- “AppCache”
- “backupTest”
Part of VBCloud::Payload (FileGrabber)
")
PowerShower
As mentioned above, PowerShower is installed via one of the VBShower payloads. This script launches the PowerShell interpreter with another script encoded in Base64. Running in an infinite loop, it attempts to access the C2 server to retrieve an additional payload, which is a PowerShell script twice encoded with Base64. This payload is executed in the context of the backdoor, and the execution result is sent to the C2 server via an HTTP POST request.
Decoded PowerShower script

In previous versions of PowerShower, the payload created a sapp.xtx temporary file to save its output, which was sent to the C2 server by the main body of the backdoor. No intermediate files are created anymore, and the result of execution is returned to the backdoor by a normal call to the "return" operator.
PowerShower::Payload (1)
This script was previously described as PowerShower::Payload (2). This payload is unique to each victim.
PowerShower::Payload (2)
This script is used for grabbing files with metadata from a network share.
PowerShower::Payload (2)
")
CloudAtlas
As described above, the CloudAtlas backdoor is installed via VBShower from a downloaded archive delivered through a DLL hijacking attack. The legitimate VLC application acts as a loader, accompanied by a malicious library that reads the encrypted payload from the file and transfers control to it. The malicious DLL is located at "%LOCALAPPDATA%\vlc\plugins\access", while the file with the encrypted payload is located at "%LOCALAPPDATA%\vlc\".
When the malicious DLL gains control, it first extracts another DLL from itself, places it in the memory of the current process, and transfers control to it. The unpacked DLL uses a byte-by-byte XOR operation to decrypt the block with the loader configuration. The encrypted config immediately follows the key. The config specifies the name of the event that is created to prevent a duplicate payload launch. The config also contains the name of the file where the encrypted payload is located — "chambranle" in this case — and the decryption key itself.
Encrypted and decrypted loader configuration

The library reads the contents of the "chambranle" file with the payload, uses the key from the decrypted config and the IV located at the very end of the "chambranle" file to decrypt it with AES-256-CBC. The decrypted file is another DLL with its size and SHA-1 hash embedded at the end, added to verify that the DLL is decrypted correctly. The DLL decrypted from "chambranle" is the main body of the CloudAtlas backdoor, and control is transferred to it via one of the exported functions, specifically the one with ordinal 2.
Main routine that processes the payload file

When the main body of the backdoor gains control, the first thing it does is decrypt its own configuration. Decryption is done in a similar way, using AES-256-CBC. The key for AES-256 is located before the configuration, and the IV is located right after it. The most useful information in the configuration file includes the URL of the cloud service, paths to directories for receiving payloads and unloading results, and credentials for the cloud service.
Encrypted and decrypted CloudAtlas backdoor config

Immediately after decrypting the configuration, the backdoor starts interacting with the C2 server, which is a cloud service, via WebDAV. First, the backdoor uses the MKCOL HTTP method to create two directories: one ("/guessed/intershop/Euskalduns/") will regularly receive a beacon in the form of an encrypted file containing information about the system, time, user name, current command line, and volume information. The other directory ("/cancrenate/speciesists/") is used to retrieve payloads. The beacon file and payload files are AES-256-CBC encrypted with the key that was used for backdoor configuration decryption.
HTTP requests of the CloudAtlas backdoor

The backdoor uses the HTTP PROPFIND method to retrieve the list of files. Each of these files will be subsequently downloaded, deleted from the cloud service, decrypted, and executed.
HTTP requests from the CloudAtlas backdoor

The payload consists of data with a binary block containing a command number and arguments at the beginning, followed by an executable plugin in the form of a DLL. The structure of the arguments depends on the type of command. After the plugin is loaded into memory and configured, the backdoor calls the exported function with ordinal 1, passing several arguments: a pointer to the backdoor function that implements sending files to the cloud service, a pointer to the decrypted backdoor configuration, and a pointer to the binary block with the command and arguments from the beginning of the payload.
Plugin setup and execution routine

Before calling the plugin function, the backdoor saves the path to the current directory and restores it after the function is executed. Additionally, after execution, the plugin is removed from memory.
CloudAtlas::Plugin (FileGrabber)
FileGrabber is the most commonly used plugin. As the name suggests, it is designed to steal files from an infected system. Depending on the command block transmitted, it is capable of:
- Stealing files from all local disks
- Stealing files from the specified removable media
- Stealing files from specified folders
- Using the selected username and password from the command block to mount network resources and then steal files from them
For each detected file, a series of rules are generated based on the conditions passed within the command block, including:
- Checking for minimum and maximum file size
- Checking the file’s last modification time
- Checking the file path for pattern exclusions. If a string pattern is found in the full path to a file, the file is ignored
- Checking the file name or extension against a list of patterns
Resource scanning

If all conditions match, the file is sent to the C2 server, along with its metadata, including attributes, creation time, last access time, last modification time, size, full path to the file, and SHA-1 of the file contents. Additionally, if a special flag is set in one of the rule fields, the file will be deleted after a copy is sent to the C2 server. There is also a limit on the total amount of data sent, and if this limit is exceeded, scanning of the resource stops.
Generating data for sending to C2

CloudAtlas::Plugin (Common)
This is a general-purpose plugin, which parses the transferred block, splits it into commands, and executes them. Each command has its own ID, ranging from 0 to 6. The list of commands is presented below.
- Command ID 0: Creates, sets and closes named events.
- Command ID 1: Deletes the selected list of files.
- Command ID 2: Drops a file on disk with content and a path selected in the command block arguments.
- Command ID 3: Capable of performing several operations together or independently, including:
- Dropping several files on disk with content and paths selected in the command block arguments
- Dropping and executing a file at a specified path with selected parameters. This operation supports three types of launch:
- Using the WinExec function
- Using the ShellExecuteW function
- Using the CreateProcessWithLogonW function, which requires that the user’s credentials be passed within the command block to launch the process on their behalf
- Command ID 4: Uses the StdRegProv COM interface to perform registry manipulations, supporting key creation, value deletion, and value setting (both DWORD and string values).
- Command ID 5: Calls the ExitProcess function.
- Command ID 6: Uses the credentials passed within the command block to connect a network resource, drops a file to the remote resource under the name specified within the command block, creates and runs a VB script on the local system to execute the dropped file on the remote system. The VB script is created at
"%APPDATA%\ntsystmp.vbs". The path to launch the file dropped on the remote system is passed to the launched VB script as an argument.
Content of the dropped VBS

CloudAtlas::Plugin (PasswordStealer)
This plugin is used to steal cookies and credentials from browsers. This is an extended version of the Common Plugin, which is used for more specific purposes. It can also drop, launch, and delete files, but its primary function is to drop files belonging to the “Chrome App-Bound Encryption Decryption” open-source project onto the disk, and run the utility to steal cookies and passwords from Chromium-based browsers. After launching the utility, several files ("cookies.txt" and "passwords.txt") containing the extracted browser data are created on disk. The plugin then reads JSON data from the selected files, parses the data, and sends the extracted information to the C2 server.
Part of the function for parsing JSON and sending the extracted data to C2

CloudAtlas::Plugin (InfoCollector)
This plugin is used to collect information about the infected system. The list of commands is presented below.
- Command ID 0xFFFFFFF0: Collects the computer’s NetBIOS name and domain information.
- Command ID 0xFFFFFFF1: Gets a list of processes, including full paths to executable files of processes, and a list of modules (DLLs) loaded into each process.
- Command ID 0xFFFFFFF2: Collects information about installed products.
- Command ID 0xFFFFFFF3: Collects device information.
- Command ID 0xFFFFFFF4: Collects information about logical drives.
- Command ID 0xFFFFFFF5: Executes the command with input/output redirection, and sends the output to the C2 server. If the command line for execution is not specified, it sequentially launches the following utilities and sends their output to the C2 server:
net group "Exchange servers" /domain
Ipconfig
arp -a
Python script
As mentioned in one of our previous reports, Cloud Atlas uses a custom Python script named get_browser_pass.py to extract saved credentials from browsers on infected systems. If the Python interpreter is not present on the victim’s machine, the group delivers an archive that includes both the script and a bundled Python interpreter to ensure execution.
During one of the latest incidents we investigated, we once again observed traces of this tool in action, specifically the presence of the file "C:\ProgramData\py\pytest.dll".
The pytest.dll library is called from within get_browser_pass.py and used to extract credentials from Yandex Browser. The data is then saved locally to a file named y3.txt.
Victims
According to our telemetry, the identified targets of the malicious activities described here are located in Russia and Belarus, with observed activity dating back to the beginning of 2025. The industries being targeted are diverse, encompassing organizations in the telecommunications sector, construction, government entities, and plants.
Conclusion
For more than ten years, the group has carried on its activities and expanded its arsenal. Now the attackers have four implants at their disposal (PowerShower, VBShower, VBCloud, CloudAtlas), each of them a full-fledged backdoor. Most of the functionality in the backdoors is duplicated, but some payloads provide various exclusive capabilities. The use of cloud services to manage backdoors is a distinctive feature of the group, and it has proven itself in various attacks.
Indicators of compromise
Note: The indicators in this section are valid at the time of publication.
File hashes
0D309C25A835BAF3B0C392AC87504D9E протокол (08.05.2025).doc
D34AAEB811787B52EC45122EC10AEB08 HTA
4F7C5088BCDF388C49F9CAAD2CCCDCC5 StandaloneUpdate_2020-04-13_090638_8815-145.log:StandaloneUpdate_2020-04-13_090638_8815-145cfcf.vbs
24BFDFFA096D3938AB6E626E418572B1 StandaloneUpdate_2020-04-13_090638_8815-145.log:StandaloneUpdate_2020-04-13_090638_8815-145.vbs
5C93AF19EF930352A251B5E1B2AC2519 StandaloneUpdate_2020-04-13_090638_8815-145.log:StandaloneUpdate_2020-04-13_090638_8815-145.dat (encrypted)
0E13FA3F06607B1392A3C3CAA8092C98 VBShower::Payload(1)
BC80C582D21AC9E98CBCA2F0637D8993 VBShower::Payload(2)
EBD6DA3B4D452BD146500EBC6FC49AAE VBShower::Payload(2)
12F1F060DF0C1916E6D5D154AF925426 VBShower::Payload(3)
E8C21CA9A5B721F5B0AB7C87294A2D72 VBShower::Payload(4)
2D03F1646971FB7921E31B647586D3FB VBShower::Payload(5)
7A85873661B50EA914E12F0523527CFA VBShower::Payload(6)
F31CE101CBE25ACDE328A8C326B9444A VBShower::Payload(7)
E2F3E5BF7EFBA58A9C371E2064DFD0BB VBShower::Payload(8)
67156D9D0784245AF0CAE297FC458AAC VBShower::Payload(9)
116E5132E30273DA7108F23A622646FE VBCloud::Launcher
1C7387D957C5381E11D1E6EDC0F3F353 upgrade.mds
E9F60941A7CED1A91643AF9D8B92A36D VBCloud::Payload(FileGrabber)
718B9E688AF49C2E1984CF6472B23805 PowerShower
A913EF515F5DC8224FCFFA33027EB0DD PowerShower::Payload(2)
F56DAD18A308B64247D0C3360DDB1727 PowerShower::Payload(2)
62170C67523C8F5009E3658F5858E8BF libvnc_plugin.dll
BAA59BB050A12DBDF981193D88079232 chambranle (encrypted)
097D18D92C2167D2F4E94F04C5A12D33 system.dll
B0100C43BD9B024C6367B38ABDF5C0D2 system_check.exe
7727AAE4A0840C7DC037634BED6A6D74 pytest.dll
Domains and IPs
billet-ru[.]net
mskreg[.]net
flashsupport[.]org
solid-logit[.]com
cityru-travel[.]org
transferpolicy[.]org
information-model[.]net
securemodem[.]com
roskomnadz[.]com
processmanagerpro[.]net
luxoftinfo[.]com
marketru[.]net
rzhd[.]org
gimnazija[.]org
technoguides[.]org
multipackage[.]net
rostvgroup[.]com
russiatimes[.]info
updatechecker[.]org
rosatomgroup[.]com
telehraf[.]com
statusupport[.]org
perfectfinder[.]net
Windmill Desk Lamp Is Beautifully Soothing

Typically, lamps provide a stationary source of light to illuminate a given area and help us see what we’re doing. However, they can also be a little more artistic and eye-catching, like this windmill lamp from [Huy Vector].
It’s somewhat of a charming desk toy, constructed out of copper wire soldered into the form of a traditional windmill. At its base, lives a simple motor speed controller, while up top, a brushed DC gearmotor is responsible for turning the blades. As you might imagine, it’s a little tricky to get power to flow to the LED filaments installed on those blades while they happen to be rotating. That’s where the build gets tricky, using the output shaft of the motor’s gear drive and a custom slip ring to pass power to the LEDs. That power comes courtesy of a pair of 16340 lithium-ion cells, which can be juiced up with the aid of a USB-C charger board.
It’s an elegant build, and rather charming to watch in motion to boot. We love a good lamp build here at Hackaday, particularly when they’re aesthetically beautiful.
youtube.com/embed/NdYTs1NasPw?…
Yet another DCOM object for lateral movement

Introduction
If you’re a penetration tester, you know that lateral movement is becoming increasingly difficult, especially in well-defended environments. One common technique for remote command execution has been the use of DCOM objects.
Over the years, many different DCOM objects have been discovered. Some rely on native Windows components, others depend on third-party software such as Microsoft Office, and some are undocumented objects found through reverse engineering. While certain objects still work, others no longer function in newer versions of Windows.
This research presents a previously undescribed DCOM object that can be used for both command execution and potential persistence. This new technique abuses older initial access and persistence methods through Control Panel items.
First, we will discuss COM technology. After that, we will review the current state of the Impacket dcomexec script, focusing on objects that still function, and discuss potential fixes and improvements, then move on to techniques for enumerating objects on the system. Next, we will examine Control Panel items, how adversaries have used them for initial access and persistence, and how these items can be leveraged through a DCOM object to achieve command execution.
Finally, we will cover detection strategies to identify and respond to this type of activity.
COM/DCOM technology
What is COM?
COM stands for Component Object Model, a Microsoft technology that defines a binary standard for interoperability. It enables the creation of reusable software components that can interact at runtime without the need to compile COM libraries directly into an application.
These software components operate in a client–server model. A COM object exposes its functionality through one or more interfaces. An interface is essentially a collection of related member functions (methods).
COM also enables communication between processes running on the same machine by using local RPC (Remote Procedure Call) to handle cross-process communication.
Terms
To ensure a better understanding of its structure and functionality, let’s revise COM-related terminology.
- COM interface
A COM interface defines the functionality that a COM object exposes. Each COM interface is identified by a unique GUID known as the IID (Interface ID). All COM interfaces can be found in the Windows Registry under HKEY_CLASSES_ROOT\Interface, where they are organized by GUID. - COM class (COM CoClass)
A COM class is the actual implementation of one or more COM interfaces. Like COM interfaces, classes are identified by unique GUIDs, but in this case the GUID is called the CLSID (Class ID). This GUID is used to locate the COM server and activate the corresponding COM class.All COM classes must be registered in the registry under HKEY_CLASSES_ROOT\CLSID, where each class’s GUID is stored. Under each GUID, you may find multiple subkeys that serve different purposes, such as:- InprocServer32/LocalServer32: Specifies the system path of the COM server where the class is defined. InprocServer32 is used for in-process servers (DLLs), while LocalServer32 is used for out-of-process servers (EXEs). We’ll describe this in more detail later.
- ProgID: A human-readable name assigned to the COM class.
- TypeLib: A binary description of the COM class (essentially documentation for the class).
- AppID: Used to describe security configuration for the class.
- COM server
A COM is the module where a COM class is defined. The server can be implemented as an EXE, in which case it is called an out-of-process server, or as a DLL, in which case it is called an in-process server. Each COM server has a unique file path or location in the system. Information about COM servers is stored in the Windows Registry. The COM runtime uses the registry to locate the server and perform further actions. Registry entries for COM servers are located under the HKEY_CLASSES_ROOT root key for both 32- and 64-bit servers.
Component Object Model implementation

Client–server model
- In-process server
In the case of an in-process server, the server is implemented as a DLL. The client loads this DLL into its own address space and directly executes functions exposed by the COM object. This approach is efficient since both client and server run within the same process.
In-process COM server - Out-of-process server
Here, the server is implemented and compiled as an executable (EXE). Since the client cannot load an EXE into its address space, the server runs in its own process, separate from the client. Communication between the two processes is handled via ALPC (Advanced Local Procedure Call) ports, which serve as the RPC transport layer for COM.

Out-of-process COM server

What is DCOM?
DCOM is an extension of COM where the D stands for Distributed. It enables the client and server to reside on different machines. From the user’s perspective, there is no difference: DCOM provides an abstraction layer that makes both the client and the server appear as if they are on the same machine.
Under the hood, however, COM uses TCP as the RPC transport layer to enable communication across machines.
Distributed COM implementation

Certain requirements must be met to extend a COM object into a DCOM object. The most important one for our research is the presence of the AppID subkey in the registry, located under the COM CLSID entry.
The AppID value contains a GUID that maps to a corresponding key under HKEY_CLASSES_ROOT\AppID. Several subkeys may exist under this GUID. Two critical ones are:
- AccessPermission: controls access permissions.
- LaunchPermission: controls activation permissions.
These registry settings grant remote clients permissions to activate and interact with DCOM objects.
Lateral movement via DCOM
After attackers compromise a host, their next objective is often to compromise additional machines. This is what we call lateral movement. One common lateral movement technique is to achieve remote command execution on a target machine. There are many ways to do this, one of which involves abusing DCOM objects.
In recent years, many DCOM objects have been discovered. This research focuses on the objects exposed by the Impacket script dcomexec.py that can be used for command execution. More specifically, three exposed objects are used: ShellWindows, ShellBrowserWindow and MMC20.
- ShellWindows
ShellWindows was one of the first DCOM objects to be identified. It represents a collection of open shell windows and is hosted by explorer.exe, meaning any COM client communicates with that process.
In Impacket’s dcomexec.py, once an instance of this COM object is created on a remote machine, the script provides a semi-interactive shell.Each time a user enters a command, the function exposed by the COM object is called. The command output is redirected to a file, which the script retrieves via SMB and displays back to simulate a regular shell.
Internally, the script runs this command when connecting:
cmd.exe /Q /c cd \ 1> \\127.0.0.1\ADMIN$\__17602 2>&1This sets the working directory to C:\ and redirects the output to the ADMIN$ share under the filename
__17602. After that, the script checks whether the file exists; if it does, execution is considered successful and the output appears as if in a shell.When running dcomexec.py against Windows 10 and 11 using the ShellWindows object, the script hangs after confirming SMB connection initialization and printing the SMB banner. As I mentioned in my personal blog post, it appears that this DCOM object no longer has permission to write to the ADMIN$ share. A simple fix is to redirect the output to a directory the DCOM object can write to, such as the Temp folder. The Temp folder can then be accessed under the same ADMIN$ share. A small change in the code resolves the issue. For example:
OUTPUT_FILENAME = 'Temp\\__' + str(time.time())[:5] - ShellBrowserWindow
The ShellBrowserWindow object behaves almost identically to ShellWindows and exhibits the same behavior on Windows 10. The same workaround that we used for ShellWindows applies in this case. However, on Windows 11, this object no longer works for command execution. - MMC20
The MMC20.Application COM object is the automation interface for Microsoft Management Console (MMC). It exposes methods and properties that allow MMC snap-ins to be automated.
This object has historically worked across all Windows versions. Starting with Windows Server 2025, however, attempting to use it triggers a Defender alert, and execution is blocked.As shown in earlier examples, the dcomexec.py script writes the command output to a file under ADMIN$, with a filename that begins with
__:OUTPUT_FILENAME = '__' + str(time.time())[:5]Defender appears to check for files written under ADMIN$ that start with
__, and when it detects one, it blocks the process and alerts the user. A quick fix is to simply remove the double underscores from the output filename.Another way to bypass this issue is to use the same workaround used for ShellWindows – redirecting the output to the Temp folder. The table below outlines the status of these objects across different Windows versions.
Windows Server 2025 Windows Server 2022 Windows 11 Windows 10 ShellWindows Doesn’t work Doesn’t work Works but needs a fix Works but needs a fix ShellBrowserWindow Doesn’t work Doesn’t work Doesn’t work Works but needs a fix MMC20 Detected by Defender Works Works Works
Enumerating COM/DCOM objects
The first step to identifying which DCOM objects could be used for lateral movement is to enumerate them. By enumerating, I don’t just mean listing the objects. Enumeration involves:
- Finding objects and filtering specifically for DCOM objects.
- Identifying their interfaces.
- Inspecting the exposed functions.
Automating enumeration is difficult because most COM objects lack a type library (TypeLib). A TypeLib acts as documentation for an object: which interfaces it supports, which functions are exposed, and the definitions of those functions. Even when TypeLibs are available, manual inspection is often still required, as we will explain later.
There are several approaches to enumerating COM objects depending on their use cases. Next, we’ll describe the methods I used while conducting this research, taking into account both automated and manual methods.
- Automation using PowerShell
In PowerShell, you can use .NET to create and interact with DCOM objects. Objects can be created using either their ProgID or CLSID, after which you can call their functions (as shown in the figure below).
Shell.Application COM object function list in PowerShellUnder the hood, PowerShell checks whether the COM object has a TypeLib and implements the IDispatch interface. IDispatch enables late binding, which allows runtime dynamic object creation and function invocation. With these two conditions met, PowerShell can dynamically interact with COM objects at runtime.
Our strategy looks like this:
As you can see in the last box, we perform manual inspection to look for functions with names that could be of interest, such as Execute, Exec, Shell, etc. These names often indicate potential command execution capabilities.
However, this approach has several limitations:
- TypeLib requirement: Not all COM objects have a TypeLib, so many objects cannot be enumerated this way.
- IDispatch requirement: Not all COM objects implement the IDispatch interface, which is required for PowerShell interaction.
- Interface control: When you instantiate an object in PowerShell, you cannot choose which interface the instance will be tied to. If a COM class implements multiple interfaces, PowerShell will automatically select the one marked as [default] in the TypeLib. This means that other non-default interfaces, which may contain additional relevant functionality, such as command execution, could be overlooked.
- Automation using C++
As you might expect, C++ is one of the languages that natively supports COM clients. Using C++, you can create instances of COM objects and call their functions via header files that define the interfaces.However, with this approach, we are not necessarily interested in calling functions directly. Instead, the goal is to check whether a specific COM object supports certain interfaces. The reasoning is that many interfaces have been found to contain functions that can be abused for command execution or other purposes.
This strategy primarily relies on an interface called IUnknown. All COM interfaces should inherit from this interface, and all COM classes should implement it.The IUnknown interface exposes three main functions. The most important is QueryInterface(), which is used to ask a COM object for a pointer to one of its interfaces.So, the strategy is to:- Enumerate COM classes in the system by reading CLSIDs under the HKEY_CLASSES_ROOT\CLSID key.
- Check whether they support any known valuable interfaces. If they do, those classes may be leveraged for command execution or other useful functionality.
This method has several advantages:
- No TypeLib dependency: Unlike PowerShell, this approach does not require the COM object to have a TypeLib.
- Use of IUnknown: In C++, you can use the QueryInterface function from the base IUnknown interface to check if a particular interface is supported by a COM class.
- No need for interface definitions: Even without knowing the exact interface structure, you can obtain a pointer to its virtual function table (vtable), typically cast as a void*. This is enough to confirm the existence of the interface and potentially inspect it further.
The figure below illustrates this strategy:
This approach is good in terms of automation because it eliminates the need for manual inspection. However, we are still only checking well-known interfaces commonly used for lateral movement, while potentially missing others.
- Manual inspection using open-source tools
As you can see, automation can be difficult since it requires several prerequisites and, in many cases, still ends with a manual inspection. An alternative approach is manual inspection using a tool called OleViewDotNet, developed by James Forshaw. This tool allows you to:
- List all COM classes in the system.
- Create instances of those classes.
- Check their supported interfaces.
- Call specific functions.
- Apply various filters for easier analysis.
- Perform other inspection tasks.
Open-source tool for inspecting COM interfacesOne of the most valuable features of this tool is its naming visibility. OleViewDotNet extracts the names of interfaces and classes (when available) from the Windows Registry and displays them, along with any associated type libraries.
This makes manual inspection easier, since you can analyze the names of classes, interfaces, or type libraries and correlate them with potentially interesting functionality, for example, functions that could lead to command execution or persistence techniques.


Control Panel items as attack surfaces
Control Panel items allow users to view and adjust their computer settings. These items are implemented as DLLs that export the CPlApplet function and typically have the .cpl extension. Control Panel items can also be executables, but our research will focus on DLLs only.
Control Panel items

Attackers can abuse CPL files for initial access. When a user executes a malicious .cpl file (e.g., delivered via phishing), the system may be compromised – a technique mapped to MITRE ATT&CK T1218.002.
Adversaries may also modify the extensions of malicious DLLs to .cpl and register them in the corresponding locations in the registry.
- Under HKEY_CURRENT_USER:
HKCU\Software\Microsoft\Windows\CurrentVersion\Control Panel\Cpls
- Under HKEY_LOCAL_MACHINE:
- For 64-bit DLLs:
HKLM\Software\Microsoft\Windows\CurrentVersion\Control Panel\Cpls - For 32-bit DLLs:
HKLM\Software\WOW6432Node\Microsoft\Windows\CurrentVersion\Control Panel\Cpls
- For 64-bit DLLs:
These locations are important when Control Panel DLLs need to be available to the current logged-in user or to all users on the machine. However, the “Control Panel” subkey and its “Cpls” subkey under HKCU should be created manually, unlike the “Control Panel” and “Cpls” subkeys under HKLM, which are created automatically by the operating system.
Once registered, the DLL (CPL file) will load every time the Control Panel is opened, enabling persistence on the victim’s system.
It’s worth noting that even DLLs that do not comply with the CPL specification, do not export CPlApplet, or do not have the .cpl extension can still be executed via their DllEntryPoint function if they are registered under the registry keys listed above.
There are multiple ways to execute Control Panel items:
- From cmd:
exe [filename].cpl - By double-clicking the .cpl file.
Both methods use rundll32.exe under the hood:
rundll32.exe shell32.dll,Control_RunDLL [filename].cpl
This calls the Control_RunDLL function from shell32.dll, passing the CPL file as an argument. Everything inside the CPlApplet function will then be executed.
However, if the CPL file has been registered in the registry as shown earlier, then every time the Control Panel is opened, the file is loaded into memory through the COM Surrogate process (dllhost.exe):
COM Surrogate process loading the CPL file

What happened was that a Control Panel with a COM client used a COM object to load these CPL files. We will talk about this COM object in more detail later.
The COM Surrogate process was designed to host COM server DLLs in a separate process rather than loading them directly into the client process’s address space. This isolation improves stability for the in-process server model. This hosting behavior can be configured for a COM object in the registry if you want a COM server DLL to run inside a separate process because, by default, it is loaded in the same process.
‘DCOMing’ through Control Panel items
While following the manual approach of enumerating COM/DCOM objects that could be useful for lateral movement, I came across a COM object called COpenControlPanel, which is exposed through shell32.dll and has the CLSID {06622D85-6856-4460-8DE1-A81921B41C4B}. This object exposes multiple interfaces, one of which is IOpenControlPanel with IID {D11AD862-66DE-4DF4-BF6C-1F5621996AF1}.
IOpenControlPanel interface in the OleViewDotNet output

I immediately thought of its potential to compromise Control Panel items, so I wanted to check which functions were exposed by this interface. Unfortunately, neither the interface nor the COM class has a type library.
COpenControlPanel interfaces without TypeLib

Normally, checking the interface definition would require reverse engineering, so at first, it looked like we needed to take a different research path. However, it turned out that the IOpenControlPanel interface is documented on MSDN, and according to the documentation, it exposes several functions. One of them, called Open, allows a specified Control Panel item to be opened using its name as the first argument.
Full type and function definitions are provided in the shobjidl_core.h Windows header file.
Open function exposed by IOpenControlPanel interface

It’s worth noting that in newer versions of Windows (e.g., Windows Server 2025 and Windows 11), Microsoft has removed interface names from the registry, which means they can no longer be identified through OleViewDotNet.
COpenControlPanel interfaces without names

Returning to the COpenControlPanel COM object, I found that the Open function can trigger a DLL to be loaded into memory if it has been registered in the registry. For the purposes of this research, I created a DLL that basically just spawns a message box which is defined under the DllEntryPoint function. I registered it under HKCU\Software\Microsoft\Windows\CurrentVersion\Control Panel\Cpls and then created a simple C++ COM client to call the Open function on this interface.
As expected, the DLL was loaded into memory. It was hosted in the same way that it would be if the Control Panel itself was opened: through the COM Surrogate process (dllhost.exe). Using Process Explorer, it was clear that dllhost.exe loaded my DLL while simultaneously hosting the COpenControlPanel object along with other COM objects.
COM Surrogate loading a custom DLL and hosting the COpenControlPanel object

Based on my testing, I made the following observations:
- The DLL that needs to be registered does not necessarily have to be a .cpl file; any DLL with a valid entry point will be loaded.
- The Open() function accepts the name of a Control Panel item as its first argument. However, it appears that even if a random string is supplied, it still causes all DLLs registered in the relevant registry location to be loaded into memory.
Now, what if we could trigger this COM object remotely? In other words, what if it is not just a COM object but also a DCOM object? To verify this, we checked the AppID of the COpenControlPanel object using OleViewDotNet.
COpenControlPanel object in OleViewDotNet

Both the launch and access permissions are empty, which means the object will follow the system’s default DCOM security policy. By default, members of the Administrators group are allowed to launch and access the DCOM object.
Based on this, we can build a remote strategy. First, upload the “malicious” DLL, then use the Remote Registry service to register it in the appropriate registry location. Finally, use a trigger acting as a DCOM client to remotely invoke the Open() function, causing our DLL to be loaded. The diagram below illustrates the flow of this approach.
Malicious DLL loading using DCOM

The trigger can be written in either C++ or Python, for example, using Impacket. I chose Python because of its flexibility. The trigger itself is straightforward: we define the DCOM class, the interface, and the function to call. The full code example can be found here.
Once the trigger runs, the behavior will be the same as when executing the COM client locally: our DLL will be loaded through the COM Surrogate process (dllhost.exe).
As you can see, this technique not only achieves command execution but also provides persistence. It can be triggered in two ways: when a user opens the Control Panel or remotely at any time via DCOM.
Detection
The first step in detecting such activity is to check whether any Control Panel items have been registered under the following registry paths:
- HKCU\Software\Microsoft\Windows\CurrentVersion\Control Panel\Cpls
- HKLM\Software\Microsoft\Windows\CurrentVersion\Control Panel\Cpls
- HKLM\Software\WOW6432Node\Microsoft\Windows\CurrentVersion\Control Panel\Cpls
Although commonly known best practices and research papers regarding Windows security advise monitoring only the first subkey, for thorough coverage it is important to monitor all of the above.
In addition, monitoring dllhost.exe (COM Surrogate) for unusual COM objects such as COpenControlPanel can provide indicators of malicious activity.
Finally, it is always recommended to monitor Remote Registry usage because it is commonly abused in many types of attacks, not just in this scenario.
Conclusion
In conclusion, I hope this research has clarified yet another attack vector and emphasized the importance of implementing hardening practices. Below are a few closing points for security researchers to take into account:
- As shown, DCOM represents a large attack surface. Windows exposes many DCOM classes, a significant number of which lack type libraries – meaning reverse engineering can reveal additional classes that may be abused for lateral movement.
- Changing registry values to register malicious CPLs is not good practice from a red teaming ethics perspective. Defender products tend to monitor common persistence paths, but Control Panel applets can be registered in multiple registry locations, so there is always a gap that can be exploited.
- Bitness also matters. On x64 systems, loading a 32-bit DLL will spawn a 32-bit COM Surrogate process (dllhost.exe *32). This is unusual on 64-bit hosts and therefore serves as a useful detection signal for defenders and an interesting red flag for red teamers to consider.
The Miracle of Color TV

We’ve often said that some technological advancements seemed like alien technology for their time. Sometimes we look back and think something would be easy until we realize they didn’t have the tools we have today. One of the biggest examples of this is how, in the 1950s, engineers created a color image that still plays on a black-and-white set, with the color sets also able to receive the old signals. [Electromagnetic Videos] tells the tale. The video below simulates various video artifacts, so you not only learn about the details of NTSC video, but also see some of the discussed effects in real time.
Creating a black-and-white signal was already a big deal, with the video and sync presented in an analog AM signal with the sound superimposed with FM. People had demonstrated color earlier, but it wasn’t practical for several reasons. Sending, for example, separate red, blue, and green signals would require wider channels and more complex receivers, and would be incompatible with older sets.
The trick, at least for the NTSC standard, was to add a roughly 3.58 MHz sine wave and use its phase to identify color. The amplitude of the sine wave gave the color’s brightness. The video explains why it is not exactly 3.58 MHz but 3.579545 MHz. This made it nearly invisible on older TVs, and new black-and-white sets incorporate a trap to filter that frequency out anyway. So you can identify any color by providing a phase angle and amplitude.
The final part of the puzzle is to filter the color signal, which makes it appear fuzzy, while retaining the sharp black-and-white image that your eye processes as a perfectly good image. If you can make the black-and-white signal line up with the color signal, you get a nice image. In older sets, this was done with a short delay line, although newer TVs used comb filters. Some TV systems, like PAL, relied on longer delays and had correspondingly beefier delay lines.
There are plenty of more details. Watch the video. We love how, back then, engineers worried about backward compatibility. Like stereo records, for example. Even though NTSC (sometimes jokingly called “never twice the same color”) has been dead for a while, we still like to look back at it.
youtube.com/embed/EPQq7xd3WdA?…
Automatically Remove AI Features From Windows 11

It seems like a fair assessment to state that the many ‘AI’ features that Microsoft added to Windows 11 are at least somewhat controversial. Unsurprisingly, this has led many to wonder about disabling or outright removing these features, with [zoicware]’s ‘Remove Windows AI’ project on GitHub trying to automate this process as much as reasonably possible.
All you need to use it is your Windows 11-afflicted system running at least 25H2 and the PowerShell script. The script is naturally run with Administrator privileges as it has to do some manipulating of the Windows Registry and prevent Windows Update from undoing many of the changes. There is also a GUI for those who prefer to just flick a few switches in a UI instead of running console commands.
Among the things that can be disabled automatically are the disabling of Copilot, Recall, AI Actions, and other integrations in applications like Edge, Paint, etc. The reinstallation of removed packages is inhibited by a custom package. For the ‘features’ that cannot be disabled automatically, there is a list of where to toggle those to ‘off’.
Naturally, since Windows 11 is a moving target, it can be rough to keep a script like this up to date, but it seems to be a good start at least for anyone who finds themselves stuck on Windows 11 with no love for Microsoft’s ‘AI’ adventures. For the other features, there are also Winaero Tweaker and Open-Shell, with the latter in particular bringing back the much more usable Windows 2000-style start menu, free of ads and other nonsense.
Building And Testing A Turbine Driven Hydro Generator

The theory behind hydropower is very simple: water obeys gravity and imparts the gained kinetic energy onto a turbine, which subsequently drives a generator. The devil here is, of course, in all the details, as [FarmCraft101] on YouTube is in the process of finding out as he adds a small hydro plant to his farm dam. After previously doing all the digging and laying of pipe, in this installment, the goal is to build and test the turbine and generator section so that it can be installed.
The turbine section is 3D-printed and slides onto the metal shaft, which then protrudes from the back where it connects to a 230VAC, three-phase generator. This keeps it quite modular and easy to maintain, which, as it turns out, is a very good idea. After a lot of time spent on the lathe, cutting metal, and tapping threads, the assembled bulk of the system is finally installed for its first test run.
After all that work, the good news is that the 3D-printed turbine seems to work fine and holds up, producing a solid 440 RPM. This put it over the predicted 300 RPM, but that’s where the good news ends. Although the generator produces 28 watts, it’s officially rated for 3 kW at 300 RPM. Obviously, with the small size of this AliExpress-special, the expectation was closer to 750 watts, so that required a bit of investigation. As it turns out, at 300 RPM it only produces 9 watts, so obviously the generator was a dud despite cashing out $230 for it.
Hopefully, all it takes to fix this is to order a new generator to get this hydropower setup up and running. Fortunately, it seems that he’ll be getting his money back from the dud generator, so hopefully in the next video we’ll see the system cranking out something closer to a kilowatt of power.
youtube.com/embed/kJgdpUn8ItY?…
Nostalgic Camera Is A Mashup Of Analog Video Gear

These days, you get a fantastic camera with the purchase of just about any modern smartphone. [Abe] missed some of the charm of earlier, lower-quality digital cameras, though, and wanted to recreate that experience. The way forward was obvious. He built a nostalgic digital video camera from scratch!
[Abe] figured he could build the entire project around analog gear, and then simply find a way to store the video digitally, thus creating the effect he was looking for. To that end, the build is based around a small analog video camera that’s intended for use with FPV drones. It runs on 5 to 20 volts and outputs a simple composite video signal. This makes it easy to display its output on a small LCD screen, originally intended to be used with an automotive reversing camera. These were both paired with a mini video recorder module from RunCam, which can capture composite video and store it on a microSD card in 640 x 480 resolution.
These parts were quickly lashed together, with the camera sending its output to the RunCam video recorder module, which then passed it on to the screen. Everything worked as expected, so [Abe] moved on to implementing an on-screen display using the MAX7456 chip, which is built specifically for this purpose. It overlays text on the video feed to the screen as commanded by an RP2040 microcontroller. Once that was all working, [Abe] just had to provide a battery power supply and wrap everything up in a nice retro-styled case. Then, at the last minute, the separate camera and recorder modules were replaced by a TurboWing module that combined both into one.
The result is a nifty-looking camera that produces grainy, slurry, old-school digital video. If you love 640 x 480 as a resolution, you’ll dig this. It’s got strong 90s camcorder vibes, and that’s a very good thing.
We love a good custom camera around these parts, especially those that offer deliciously high resolution. If you’re building your own, be sure to let us know. Video after the break.
youtube.com/embed/_3n2b0EUI8c?…
Chip Swap Fixes a Dead Amiga 600

The Amiga 600 was in its day the machine nobody really wanted — a final attempt to flog the almost original spec 68000 platform from 1985, in 1992. Sure it had a PCMCIA slot nobody used, and an IDE interface for a laptop hard drive, but it served only to really annoy anyone who’d bought one when a few months later the higher-spec 1200 appeared. It’s had a rehabilitation in recent years though as a retrocomputer, and [LinuxJedi] has a 600 motherboard in need of some attention.
As expected for a machine of its age it can use replacement electrolytic capacitors, and its reset capacitor had bitten the dust. But there’s more to that with one of these machines, as capacitor leakage can damage the filter circuitry surrounding its video encoder chip. Since both video and audio flow through this circuit, there was no composite video to be seen.
The hack comes in removing the original chip rather than attempt the difficult task of replacing the filter, and replacing it with a different Sony chip in the same series. It’s nicely done with a connector in the original footprint, and a small daughterboard. The A600 lives again, but this time it won’t be a disappointment to anyone.
If you want to wallow in some Amiga history as well as read a rant about what went wrong, we have you covered.
Bare Metal STM32: Increasing the System Clock and Running Dhrystone

When you start an STM32 MCU with its default configuration, its CPU will tick along at a leisurely number of cycles on the order of 8 to 16 MHz, using the high-speed internal (HSI) clock source as a safe default to bootstrap from. After this phase, we are free to go wild with the system clock, as well as the various clock sources that are available beyond the HSI.
Increasing the system clock doesn’t just affect the CPU either, but also affects the MCU’s internal buses via its prescalers and with it the peripherals like timers on that bus. Hence it’s essential to understand the clock fabric of the target MCU. This article will focus on the general case of increasing the system clock on an STM32F103 MCU from the default to the maximum rated clock speed using the relevant registers, taking into account aspects like Flash wait states and the APB and AHB prescalers.
Although the Dhrystone benchmark is rather old-fashioned now, it’ll be used to demonstrate the difference that a faster CPU makes, as well as how complex accurately benchmarking is. Plus it’s just interesting to get an idea of how a lowly Cortex-M3 based MCU compares to a once top-of-the line Intel Pentium 90 CPU.
Stitching The Clock Fabric
The F103’s clock tree isn’t identical to that of other families of STM32 MCUs, but the basic concepts remain the same. See the below graphic from Reference Manual 0008 for the clock tree of STM32F10x MCUs:")
We can see the HSI clocked at 8 MHz, which feeds into the clock input switch (SW), from where it can provide the 8 MHz system clock without further fuss. Our other options are to use the HSE, which is fed in via its respective oscillator pins and from there is wired to the same switch as the HSI. If we want to get a higher clock speed than what the HSI or HSE can provide directly, we need to use the Phase Locked Loop (PLL) to generate a higher clock speed.
For this we need to first configure the PLL, enable it and select it as the input source for the clock switch. Before we can throw the switch, however, we also need to make sure that the prescalers for the buses (APB1, APB2, AHB) are set correctly. As we can see in the clock tree diagram, we have maximum speeds for each bus and fixed scaling numbers for each prescaler.
This pattern continues with individual peripherals, some of which also have their own prescaler – like USB and the ADC – but this is just something to keep in mind for when using these peripherals. If we’re just trying to crank the CPU core up to its maximum speed and still want to use the UART, all we need is to get the PLL configuration right, along with the AHB and APB prescalers so that the UART peripheral can be interacted with.
Plugging In Numbers
Before we start happily punching numbers on our keyboard to make the MCU go faster, there’s one tedious detail that we have take care of first: appeasing the Flash memory so that it can keep up. This involves configuring the right number of wait states, the use of prefetching and similar options. For this we open our copy of RM0008 to page 60 to ogle at the FLASH_ACR register and its options.
In this Flash access control register for the F103 and kin we get to enable or disable the prefetch buffer and the latency. Fortunately, for the latency the RM tells us exactly how many wait states we have to set here depending on our target system clock speed. For the 72 MHz that the F103 is rated for, we have to set two wait states.
Scrolling up a bit to page 58 and doing the unspeakable thing of reading the documentation, we can see that the prefetch buffer is turned on after reset by default and is best left enabled. As for the half cycle option, this is related to ‘power optimization’, which means that you will not touch this unless you know what you are doing and are sure that you need to change this.
Consequently we can configure our Flash as:
FLASH->ACR |= 2 << FLASH_ACR_LATENCY_Pos | FLASH_ACR_PRFTBE;
Next we wish to use the HSE via the PLL to get the most accurate and fastest system clock speed, which first requires enable the HSE and waiting for RCC_CR_HSERDY to change to 1 as indicate that it is ready for use.
RCC->CR & RCC_CR_HSEON
while ((RCC->CR & RCC_CR_HSERDY) == 0) {
// Handle time-out.
}
Up next is configuring the PLL, starting with setting the PLL source to HSE:
RCC->CFGR |= RCC_CFGR_PLLSRC;
Now we can configure the AHB and APB prescalers. These take the new system clock and divide it by the set number. For the F103, the 36 MHz-limited APB1 needs to be set to 2, while AHB and APB2 can run at the full 72 MHz, ergo 1.
RCC->CFGR |= 1 << RCC_CFGR_HPRE_Pos;
RCC->CFGR |= 2 << RCC_CFGR_PPRE1_Pos;
RCC->CFGR |= 1 << RCC_CFGR_PPRE2_Pos;
Final Steps
Continuing configuring of the PLL and assuming that it is currently disabled, we can now mash in its multiplier number. Unlike other STM32 families, the F1’s PLL is rather simple, with just a single multiplication factor. Since we’re using the HSE, we need to know the board that we are using and the speed that this HSE oscillates at. Taking the common ‘Blue Pill’ STM32F103 board as example, this features an 8 MHz HSE input, meaning that we have to multiply this by 9 to get the target of 72 MHz.
RCC->CFGR |= 7 << RCC_CFGR_PLLMULL_Pos;
The target PLLMUL register starts at 0x02 for a multiplier of x4, ergo we need to subtract two from our target multiplier. With that done we can enable the PLL and wait for it to stabilize:
RCC->CR |= RCC_CR_PLLON;
while (!(RCC->CR & RCC_CR_PLLRDY)) {
// Timeout handling.
}
Next we throw the big switch to use the PLL’s output as the system clock source and wait for the switch to complete:
RCC->CFGR &= ~(RCC_CFGR_SW);
RCC->CFGR |= RCC_CFGR_SW_PLL;
while (!(RCC->CFGR & RCC_CFGR_SWS_PLL)) { }
We should be up and running now, leaving us just to update the global CMSIS SystemCoreClock variable with the new clock speed of 72 MHz.
Benchmarking
")
Running Dhrystone on our F103 seems like a bit of a challenge as the benchmark was created for your typical desktop and server systems. To achieve this, I took the original pre-ANSI C code for Dhrystone 2.1 and adapted it to a Nodate project. The [url=https://github.com/MayaPosch/Nodate/blob/master/examples/stm32/dhrystone/src/dhrystone.cpp]dhrystone.cpp[/url] file contains the benchmark itself, with no significant modifications other than to set up the MCU and the UART as standard output target. The number of runs is also hardcoded to be 100 million so that it doesn’t have to be punched in every time.
After compiling the benchmark and flashing it to the STM32F103 board, it seemed to take a few eternities for it to complete with so many runs. When the board’s single LED finally started doing its leisurely blinking routine to indicate completion, it turned out that 347 seconds had expired, or roughly 5.78 minutes. As can be seen in the start time, this wasn’t the first attempt, after a 10 million run completed too quickly according to the benchmark’s criteria. C’est la vie.
Annoyingly, the printf-lite implementation that I use with Nodate didn’t seem to like the 32-bit float values and were absent in the final output, so I had to do the calculations for the Dhrystones Per Second (DPS) and related MIPS (DPS / 1757) myself. Since the times() implementation’s ticks equal seconds, this was at least fairly easily, giving the following numbers:
- DPS: ~288,184.438
- MIPS: ~164.021
To see whether these numbers are at all plausible, I consulted a few lists of Dhrystone benchmark results, including one for DPS and one for MIPS. Taking into account the noise created by running it on an OS versus bare metal, my use of -Og optimization level and other differences, the placement at the level of about a Pentium 100 doesn’t seem too farfetched.
There is an official ARM Dhrystone benchmarking guide (AN273), which cites a DPS of 40,600.9 for a Cortex-M MCU running at 18.5 MHz. This would be 158,014 DPS if extrapolated linearly, but obviously not the exact board, MCU or compile flags are used, so ‘rough ballpark’ seems to be the term of the day here.
Perhaps the most interesting finding is that a lowly STM32F103 MCU can keep up with a once high-end Pentium CPU of the early 1990s, at least within the limited integer-only Dhrystone benchmark. Next target will probably be to run the more modern and extensive CoreMark on the F103 and other STM32 MCUs, to give a more holistic perspective.
Interactive Hopscotch Tiles Make The Game More Exciting

Hopscotch is a game usually played with painted lines or with the aid of a bit of chalk. However, if you desire fancier equipment, you might like the interactive hopscotch setup from [epatell].
The build uses yoga mats as the raw material to create each individual square of the hopscotch board. The squares all feature simple break-beam light sensors that detect when a foot lands in the given space. These sensors are monitored by a Raspberry Pi Pico in each square. In turn, the Pico lights up addressable NeoPixel LED strips in response to the current position of the player.
It’s a simple little project which makes a classic game just a little more fun. It’s also a great learning project if you’re trying to get to grips with things like microcontrollers and addressable LEDs in an educational context. We’d love to see the project taken a step further, perhaps with wirelessly-networked squares that can communicate and track the overall game state, or enable more advanced forms of play.
Meanwhile, if you’re working on updating traditional playground games with new technology, don’t hesitate to let us know!
Turn ‘Em On: Modern Nintendo Cartridges May Have a Limited Lifespan

Cartridge-based consoles have often been celebrated for their robust and reliable media. You put a simple ROM chip in a tough plastic housing, make sure the contacts are fit for purpose, and you should have a game cart that lasts for many decades.
When it comes to the Nintendo 3DS, though, there are some concerns that its carts aren’t up to snuff. Certain engineering choices were made that could mean these carts have a very limited lifespan, which could now be causing failures in the wild. It may not be the only Nintendo console to suffer this fate, either, thanks to the way modern cart-based consoles differ from their forebearers.
Lost Memory
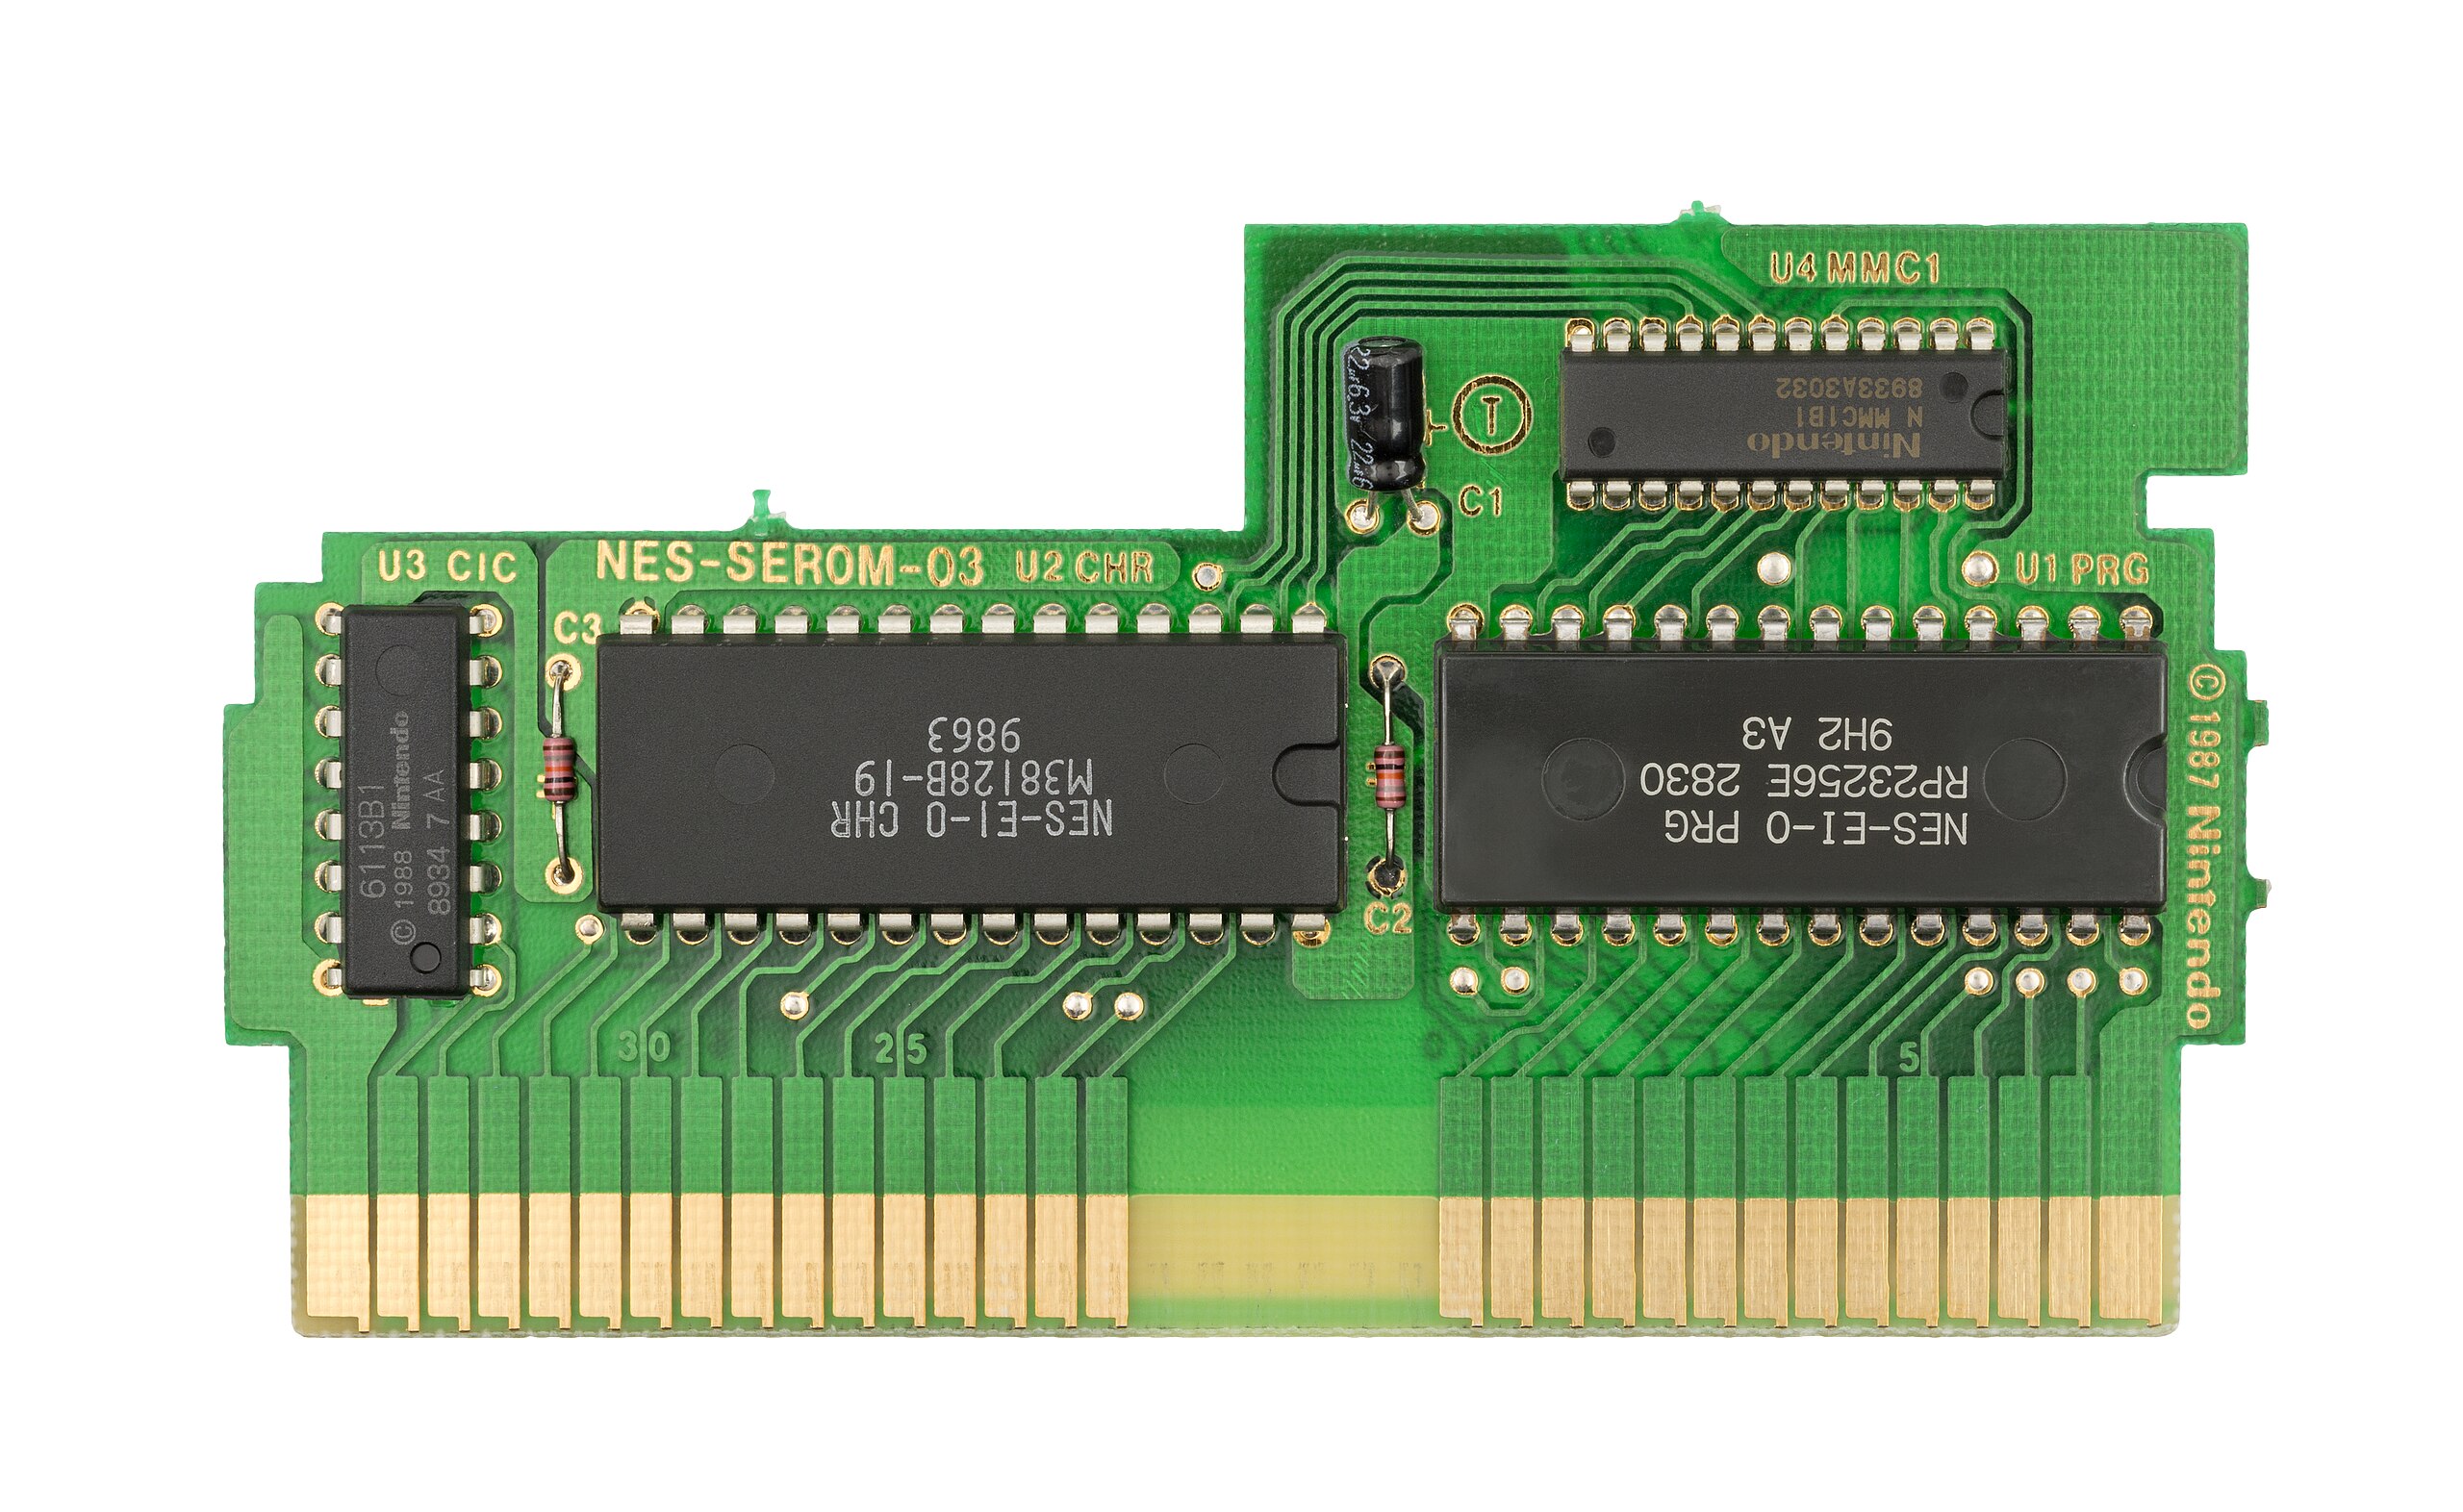
To understand why modern cartridges are at risk, we should first understand why retro consoles don’t have the same problem. It all comes down to how cartridges store their data. Old-school consoles, like the Sega Mega Drive or the Super Nintendo, stored their games on mask ROMs. These are read-only chips that literally have their data hard-baked in at the lithography stage during the chip’s production. There is no way to change the contents of the ROM—hence the name. You simply fire in addresses via the chip’s address pins, and it spits out the relevant data on the data pins.
By virtue of being a very simple integrated circuit, mask ROMs tend to last a very long time. They don’t require an electrical charge to retain their data, as it’s all hard-etched into the silicon inside. Indeed, there are a million old game carts from the 1980s that are still perfectly functional today as proof. Eventually, they may fail, like any other integrated circuit, but if treated properly, by and large, they can be expected to survive for many decades without issue. Game carts with battery-backed save chips will still lose that storage over time, unless the battery is regularly replaced, but this is a side issue. The mask ROM that stores the game itself is generally very reliable as long as it’s not abused.
The problem for modern cart-based consoles is that mask ROM fell out of favor compared to other rewriteable methods of storing data. To a certain degree, it comes down to economics. You could spin up a custom mask ROM design for a new game, and have many copies produced by a chip foundry, and install those in your carts. However, it’s far easier to simply design a writeable cart in various capacities, and have all your company’s games released on those formats instead. You can use standard off-the-shelf parts that are produced in the millions, if not billions, and you have the flexibility to rewrite carts or update them in the event there’s a bug or something that needs to be corrected. In contrast, if you’d relied on mask ROMs, you’d have to trash your production run and start again if the data needs to be changed by even a single bit.
This has become a particular issue for some Nintendo systems. Up to the Nintendo DS, it was still common for cartridges to be built with bespoke mask ROMs; only certain titles that needed greater storage used writeable chips like EPROMs. However, when the Nintendo 3DS came along in 2011, norms had shifted. Carts were produced using a product called XtraROM from Macronix. Flip through the marketing materials as one forum user did in 2021, and you won’t find out a whole lot of real technical detail. However, on the basis of probabilities and datasheets in the wild, XtraROM appears to be a technology based on NAND Flash storage.
Exact details of the technology used in Nintendo carts are unclear to a degree, though, as datasheets for those part numbers are not readily available. Carts would often also contain a small amount of user-rewriteable memory for game saves, but the main game data tended to be stored in XtraROM chips. It also appears from certain Nintendo leaks that the 3DS may have certain built-in commands used to refresh this storage regularly, to keep it healthy over time.
If you’re a video game archivist, or just someone that wants their old Pokemon carts to still work in 2030, this is a bad thing. It’s all because of the way Flash memories work. Data is stored as electrical charges that are trapped in a floating gate transistor. Over time, those charges tend to leak out. This isn’t a problem in regular use, because Flash memory devices have controllers that continually refresh the charges as long as they’re powered. However, if you leave such a device unpowered for long enough, then that process can’t take place, and data loss is the eventual result. This has become a particular problem with modern solid-state drives, which can lose data in just years or even months when left unplugged, particularly in warmer environments where charge loss occurs at a faster rate.
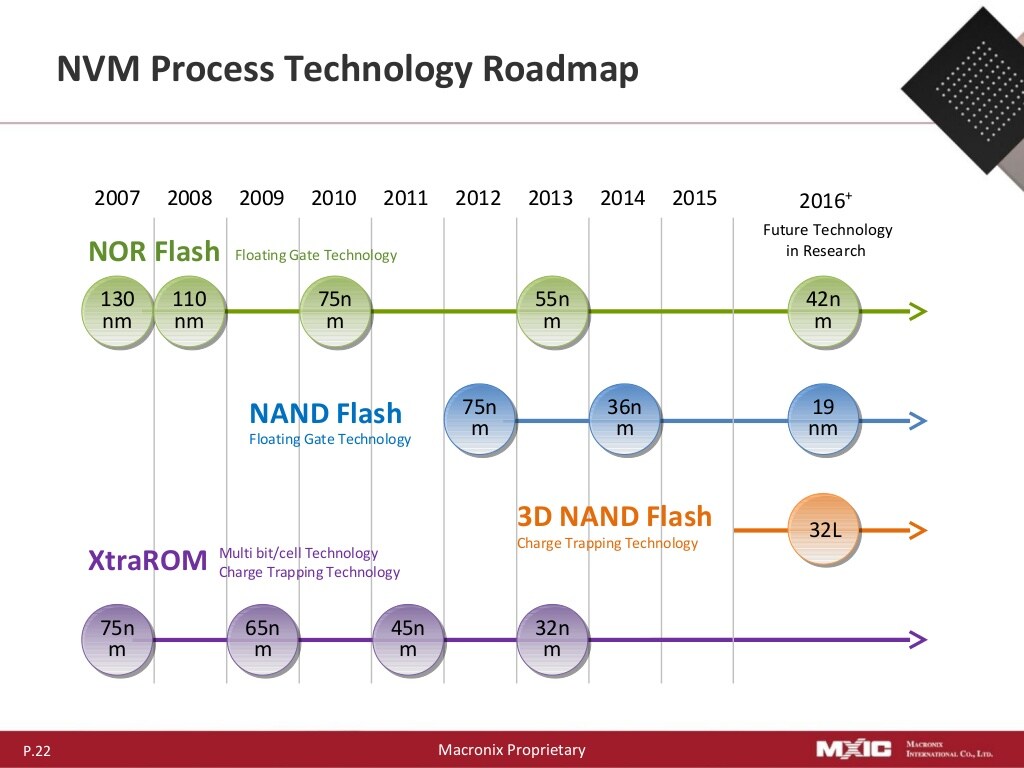
If they are indeed based on flash technology, Nintendo 3DS cartridges could be subject to the same phenomena of data loss after long periods without power. The same problem could affect the Nintendo Switch, too, which uses XtraROM chips from the same family. Fine details are hard to come by due to it being a proprietary product, but Macronix has claimed that its XtraROM-based products should offer 20 years of reliable storage at temperatures up to 85 C. However, these products haven’t existed that long. Those results are from accelerated aging tests that are run at higher temperatures to try and back-calculate what would happen at lower temperatures over longer periods of time. Their results don’t always map one-to-one on what happens in the real world. In any case, the fact that Macronix is quoting that 20-year figure suggests that XtraROM is perhaps a particularly long-lived flash technology. You’d expect a more robust mask ROM to outlast even the best EEPROMs that claim longevity figures in centuries.
Fears around widespread cartridge failures float around social media and gaming websites every now and again. It’s believed to be a particular issue with a certain Fire Emblem title, too. However, what we don’t have is a clear idea of the scale of the problem, or if it’s actually happening in the wild just yet. There are many people complaining on the Internet that they’ve grabbed an old cartridge that has failed to boot, but that can happen for a wide range of reasons. Without dumping the cart, it’s hard to definitively put this down to bit rot of the flash storage inside. There are other failures that can happen, for example, like bad solder joints.
There are hints that flash rot really could be affecting some Nintendo 3DS cartridges in the real world, though. A particularly interesting case from a forum concerned a copy of Mario & Luigi Paper Jam Bros. that completely failed to run. After some investigation, the owner decided to see if the 3DS’s cartridge refresh routine could possibly bring the cart back to life. This led them to develop a tool for “fixing” 3DS carts, with files shared on Github. It works in a simple fashion—using the 3DS’s built-in cartridge refresh routines when errors are detected in a given area of data.
youtube.com/embed/8NkzPD0QRaE?…
This copy of Mario & Luigi Paper Jam Bros. was reportedly resurrected by using the 3DS’s built in cartridge refresh routines. It’s a very anecdotal piece of evidence that NAND flash rot could be affecting these carts. It also suggests that it can be guarded against by regularly plugging in carts so the console can run the refresh routines that keep them alive. 
Ultimately, if you’re precious about your 3DS or Switch games, it probably pays to boot them up and run them once in a while. The same may go for games on the Sony PSVita, too. Even if the stated 20-year lifetime of these carts is legitimate, it’s helpful to juice up the flash every once in a while. Plus, at the very worst, you’ve spent some time playing your cherished games, so it’s hardly a waste of time.
We’d still love to see the issue investigated further. The best way would be to see some dumps and checksums of sealed 3DS games from over 10 years ago, but that’s perhaps unlikely given the value of these rare items. In the meantime, the best way forward is perhaps the cautious one—if you’re worried about data loss on your flash-based cartridges, boot them up just in case. Happy gaming out there!
L’algoritmo del ‘barile’: cyber-caos e la nuova geopolitica del sud Atlantico
Analisi: Come l’intersezione tra codice e greggio sta ridefinendo il rischio sistemico.
Il 13 dicembre 2025, nel silenzio dei terminal petroliferi del Venezuela, si è consumato un evento che ha riscritto le regole della proiezione di potenza. Mentre la US Coast Guard conduceva un’operazione cinetica classica – il sequestro della petroliera Skipper e del suo carico sanzionato – i server della PDVSA subivano un colpo parallelo nel dominio digitale. Al di là delle rivendicazioni, la coincidenza temporale tra pressione diplomatica, azione militare e paralisi informatica offre uno spaccato perfetto della guerra multidominio moderna.
IN BREVE
- L’innesco: criminalità o interdizione strategica?
- Il mercato: la vulnerabilità del prezzo
- La visione da Londra: il codice come dominio
- Prospettive: l’ipotesi del “firewall del sud”
- Conclusione
L’Innesco: criminalità o interdizione strategica?
Il blackout digitale che ha colpito la compagnia di stato venezuelana non è stato un semplice guasto. I sistemi amministrativi e logistici sono andati offline, costringendo gli operatori a tornare ai registri cartacei e le navi cisterna a invertire la rotta. Sebbene fonti tecniche (Reuters, BleepingComputer) identifichino la firma di un attacco ransomware, l’effetto finale è stato indistinguibile da un sabotaggio mirato.
In un contesto di conflitto ibrido, la distinzione tra criminalità opportunistica e “Wiper” (software distruttivo) mascherato diventa sfumata. Ciò che conta è l’interdizione del dominio: nel momento di massima tensione con Washington, la capacità di export venezuelana è stata azzerata senza sparare un solo colpo.
Il Mercato: La Vulnerabilità del Prezzo
La reazione del greggio (WTI) ha evidenziato una nuova, estrema fragilità dei mercati. In una fase di surplus globale, l’incidente cyber ha agito da catalizzatore di stress. Non ha generato un trend isolato, ma ha fornito un “pavimento tecnico” (floor) in una fase ribassista critica.

L’analisi quantitativa mostra che l’informazione digitale oggi possiede la stessa “densità” dei fondamentali fisici: la semplice possibilità che un attacco informatico rimuova quasi 2 milioni di barili dal mercato in poche ore ha costretto gli algoritmi di trading e gli operatori a un massiccio short squeeze. Il bit ha comandato l’atomo, spostando miliardi di dollari di capitalizzazione in meno di 48 ore.

La Visione da Londra: Il Codice come Dominio
La rilevanza strategica di questi eventi ha trovato un’eco immediata a Londra. Il 15 dicembre, nel suo primo discorso pubblico, il nuovo capo dell’MI6 Blaise Metreweli ha tracciato la rotta: “Saremo fluenti in Python quanto lo siamo in Russo”.
Senza citare esplicitamente Caracas, la dottrina Metreweli è chiara: la linea del fronte è ovunque. La capacità di leggere e difendere il codice non è più un supporto tecnico, ma il cuore pulsante della sovranità nazionale. Se un errore di sintassi può fermare una flotta o una compagnia petrolifera, allora il programmatore è il nuovo fante di marina.

Prospettive: L’Ipotesi del “Firewall del Sud”
Questa dinamica suggerisce un riallineamento tettonico nel sud Atlantico. Con il Venezuela isolato e digitalmente vulnerabile, l’Argentina — forte delle risorse di Vaca Muerta — emerge come l’alternativa stabile necessaria all’Occidente.
È ragionevole ipotizzare che la prossima fase della collaborazione tra Buenos Aires e l’asse Londra-Washington non riguarderà solo i trattati commerciali, ma l’integrazione delle architetture di sicurezza. Si delinea un “Firewall del Sud”: uno scudo digitale per proteggere le risorse energetiche e le rotte antartiche dal caos informatico che ha appena messo in ginocchio PDVSA.
Conclusione
L’incidente di dicembre 2025 è un avvertimento sistemico. La sicurezza energetica non dipende più solo da chi controlla i pozzi, ma da chi presidia i server. In questo nuovo “Grande Gioco”, un attacco ransomware ha lo stesso peso strategico di un blocco navale. La stabilità del mondo moderno è appesa alla resilienza di poche, cruciali, righe di codice.
L'articolo L’algoritmo del ‘barile’: cyber-caos e la nuova geopolitica del sud Atlantico proviene da Red Hot Cyber.
Neutrino Transmutation Observed For the First Time

Once upon a time, transmutation of the elements was a really big deal. Alchemists drove their patrons near to bankruptcy chasing the philosopher’s stone to no avail, but at least we got chemistry out of it. Nowadays, anyone with a neutron source can do some spicy transmutation. Or, if you happen to have a twelve meter sphere of liquid scintillator two kilometers underground, you can just wait a few years and let neutrinos do it for you. That’s what apparently happened at SNO+, the experiment formally known as Sudbury Neutrino Observatory, as announced recently.
The scinillator already lights up when struck by neutrinos, much as the heavy water in the original SNO experiment did. It will also light up, with a different energy peak, if a nitrogen-13 atom happens to decay. Except there’s no nitrogen-13 in that tank — it has a half life of about 10 minutes. So whenever a the characteristic scintillation of a neutrino event is followed shortly by a N-13 decay flash, the logical conclusion is that some of the carbon-13 in the liquid scintillator has been transmuted to that particular isotope of nitrogen.
That’s not unexpected; it’s an interaction that’s accounted for in the models. We’ve just never seen it before, because, well. Neutrinos. They’re called “ghost particles” for a reason. Their interaction cross-section is absurdly low, so they are able to pass through matter completely unimpeded most of the time. That’s why the SNO was built 2 KM underground in Sudbury’s Crieghton Mine: the neutrinos could reach it, but very few cosmic rays and no surface-level radiation can. “Most of the time” is key here, though: with enough liquid scintillator — SNO+ has 780 tonnes of the stuff — eventually you’re bound to have some collisions.
Capturing this interaction was made even more difficult considering that it requires C-13, not the regular C-12 that the vast majority of the carbon in the scintillator fluid is made of. The abundance of carbon-13 is about 1%, which should hold for the stuff in SNO+ as well since no effort was made to enrich the detector. It’s no wonder that this discovery has taken a few years since SNO+ started in 2022 to gain statistical significance.
The full paper is on ArXiv, if you care to take a gander. We’ve reported on SNO+ before, like when they used pure water to detect reactor neutrinos while they were waiting for the scintillator to be ready. As impressive as it may be, it’s worth noting that SNO is no longer the largest neutrino detector of its kind.
The Quirky Peripherals In Medical PC Setups

Modern hospitals use a lot of computers. Architecturally speaking, they’re pretty typical machines—running the same CPUs and operating systems as any other PCs out there. However, they do tend to have some quirks when it comes to accessories and peripherals, as [tzukima] explores in a recent video.
The video starts by looking at typical power cables used with hospital computers and related equipment. In particular, [tzukima] talks about the common NEMA 5-15P to IEC-320-C13 style cable, which less sophisticated users might refer to as a kettle cord. In hospital-grade form, these cables are often constructed with translucent plug housings, with large cylindrical grips that make them easier to grip.
Digging further through business supply catalogs lead [tzukima] to discover further products aimed at hospital and medical users. In particular, there are a wide range of keyboards and mice that are designed for use in these environments. The most typical examples are regular peripherals that have simply been encased in silicone to make them easier to wash and disinfect where hygiene is paramount. Others, like the SealShield keyboard and mouse, use more advanced internally-sealed electronics to achieve their washable nature and IP68 ratings. These are peripherals that you can just throw in a dishwasher if you’re so inclined.
It’s a great look at weird hardware that most of us would never interact with.
youtube.com/embed/CqSyrm9mRu0?…
Designing a CPU for Native BASIC

Over the years there have been a few CPUs designed to directly run a high-level programming language, the most common approach being to build a physical manifestation of a portable code virtual machine. An example might be the experimental Java processors which implemented the JVM. Similarly, in 1976 Itty Bitty Computers released an implementation of Tiny BASIC which used a simple virtual machine, and to celebrate 50 years of Tiny BASIC, [Zoltan Pekic] designed a CPU that mirrors that VM.
The CPU was created within a Digilent Anvyl board, and the VHDL file is freely available. The microcode mapping ROM was generated by a microcode compiler, also written by [Zoltan]. The original design could execute all of the 40 instructions included in the reference implementation of Tiny BASIC; later iterations extended it a bit more. To benchmark its performance, [Zoltan] set the clock rate on the development board equal to those of various other retrocomputers, then compared the times each took to calculate the prime numbers under 1000 using the same Tiny BASIC program. The BASIC CPU outperformed all of them except for Digital Microsystems’ HEX29.
The next step was to add a number of performance optimizations, including a GOTO cache and better use of parallel operations. [Zoltan] then wrote a “Hello World” demo, which can be seen below, and extended the dialect of Tiny BASIC with FOR loops, INPUT statements, multiple LET statements, the modulo operator, and more. Finally, he also extended the CPU from 16-bit to 32-bit to be able to run an additional benchmark, on which it once again outperformed retrocomputers with comparable clock speeds.
We’ve previously seen [Zoltan]’s work with FPGAs, whether it’s giving one a cassette interface or using one to directly access a CPU’s memory bus. BASIC has always been a cross-platform pioneer, once even to the extent of creating a free national standard.
youtube.com/embed/Gqw1EIlatDk?…
Germanium Semiconductor Made Superconductor by Gallium Doping

Over on ScienceDaily we learn that an international team of scientists have turned a common semiconductor germanium into a superconductor.
Researchers have been able to make the semiconductor germanium superconductive for the first time by incorporating gallium into its crystal lattice through the process of molecular-beam epitaxy (MBE). MBE is the same process which is used in the manufacture of semiconductor devices such as diodes and MOSFETs and it involves carefully growing crystal lattice in layers atop a substrate.
When the germanium is doped with gallium the crystalline structure, though weakened, is preserved. This allows for the structure to become superconducting when its temperature is reduced to 3.5 Kelvin.
It is of course wonderful that our material science capabilities continue to advance, but the breakthrough we’re really looking forward to is room-temperature superconductors, and we’re not there yet. If you’re interested in progress in superconductors you might like to read about Floquet Majorana Fermions which we covered earlier this year.
Underwater Jetpack is Almost Practical

The jet pack is one of those pre-war sci-fi dreams that the cold light of rational consideration reveals to be a terrible idea. Who wants to cook their legs with hot exhaust while careening out of control? Nobody. Yet it’s such an iconic idea, we can’t get away from it. What if there was a better environment, one where your jetpack dreams could come true? [CPSdrone] has found one: the world’s oceans, and have taken that revelation to build the world’s fastest underwater jetpack.
Underwater? Yeah, water drag is worse than air drag. But there are two big advantages: one, humans are fairly buoyant, so you don’t need fight gravity with rocket thrust, and two, the high density of water makes small, electric props a reasonable proposition. The electric ducted fans on this “jetpack” each produce about 110 pounds of thrust, or just over 490 N. The first advantage is helped further by the buoyancy provided by the air-filled “hull” of the jetpack. That’s necessary because while the motors might be rated for submersion, but the rest of the electronics aren’t.
Alas, wearing the device on the back is considerably less hydrodynamic than hanging on behind in the standard ‘water scooter’ configuration. While they’re able to go faster than a swimming human, the ESCs weren’t able to handle the motors full power so we can’t tell you if this device would allow [CPSdrone] to outrun a shark with those 220 lbf on tap, which was the design goal. Apparently they’re working on it.
From the testing done on-screen, it’s safe to say that they’d at least need to hang on behind to get their desired speed goals, and abandon their jet pack dreams just as we landlubbers were forced to do long ago. Well, some of us, anyway.
youtube.com/embed/RjUV6Y-baDY?…
Building a Flying Blended Wing Body Aircraft Prototype


Suffice it to say that BWB RC aircraft isn’t something that they have built before, but as co-founder of Natilus, [Aleksey Matyushev], explains, they want to prove in this manner that building scale prototypes of future production aircraft is not nearly as complex as it’s often made out to be. Meaning that even two blokes in a shed as is the case here should be able to pull it off.
Natilus was founded in 2016 amidst strongly rising interest in these BWB aircraft designs that may one day threaten today’s tubes-with-wings. Their Kona design would be the cargo version and this Horizon prototype that [Ramy RC] is building the passenger version.
In this first video of two total, we can see the CAD project of the prototype and how the basic aircraft structure is being constructed out of carbon fiber composite, wood and foam. To this the engine nacelles, landing gear and wings are mounted, readying it for its maiden flight. The Natilus engineers have previously done all the simulations that should mean that it’ll fly like a glider, but we will have to wait until the next video to see whether that is the case.
youtube.com/embed/6sSr3gFUCVo?…
FLOSS Weekly Episode 859: OpenShot: Simple and Fast

This week Jonathan chats with Jonathan Thomas about OpenShot, the cross-platform video editor that aims to be simple to use, without sacrificing functionality. We did the video edit with OpenShot for this episode, and can confirm it gets the job done. What led to the creation of this project, and what’s the direction it’s going? Watch to find out!
- github.com/OpenShot
- openshot.org/cloud-api/
- And that Computerphile video: youtube.com/watch?v=MS7hXuO2UK…
youtube.com/embed/405Q6AXFHWo?…
Did you know you can watch the live recording of the show right on our YouTube Channel? Have someone you’d like us to interview? Let us know, or have the guest contact us! Take a look at the schedule here.
play.libsyn.com/embed/episode/…
Direct Download in DRM-free MP3.
If you’d rather read along, here’s the transcript for this week’s episode.
Places to follow the FLOSS Weekly Podcast:
Theme music: “Newer Wave” Kevin MacLeod (incompetech.com)
Licensed under Creative Commons: By Attribution 4.0 License
hackaday.com/2025/12/17/floss-…
The PediSedate: A Winning Combination Of Video Games And Anesthesia
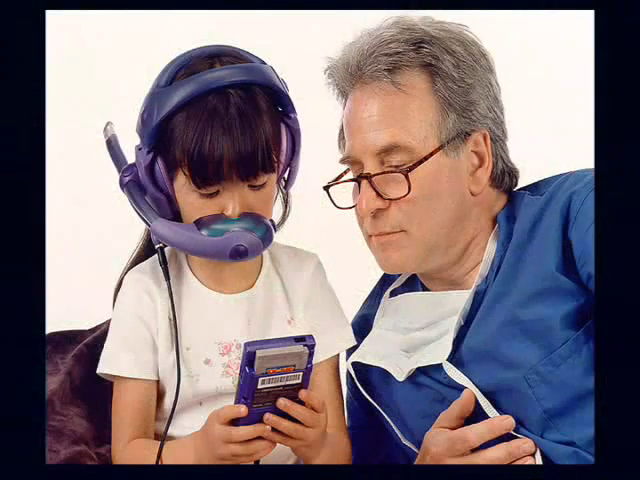
Once upon a time, surgery was done on patents who were fully conscious and awake. As you might imagine, this was a nasty experience for all involved, and particularly the patients. Eventually, medical science developed the techniques of anaesthesia, which allowed patients to undergo surgery without feeling pain, or even being conscious of it at all.

Adults are typically comfortable in the medical environment and tolerate anaesthesia well. For children, though, the experience can be altogether more daunting. Thus was invented the PediSedate—a device which was marketed almost like a Game Boy accessory intended to deliver anaesthetic treatment in order to safely and effectively prepare children for surgery.
A Happy Distraction

The patent filing for the PediSedate doesn’t give away much in the title—”Inhalation And Monitoring Mask With Headset.” Still, US patent 5,697,363 (PDF) recorded an innovative device, intended to solve several issues around the delivery of anaesthesia to pediatric patients. Most specifically, those developing the device had noted a great deal of anxiety and stress when using traditional anaesthesia masks with young patients. The device was created by Geoffrey A. Hart, an anaestheologist based in Boston. His hope was to create an anaesthesia delivery device that could be used with a child in a “non-threatening, non-intrusive manner.”
The resulting device looked rather a lot like a big, colorful audio headset. Indeed, it had headphones to that could play audio to the wearer, while an arm that extended out over the face could deliver nitrous oxide or other gases via the nasal route. Sensors were included for pulse oximetry in order to track the patient’s heart rate and blood oxygenation, while an integrated capnometer measured vital respiratory factors including carbon dioxide levels in the breath. Provision in the patent was also made for including a microphone, either for interactivity purposes with entertainment content for distraction’s sake, or to allow communication with medical personnel at a distance. This would be particularly useful in the case of certain imaging studies or treatments, where doctors and nurses must remain a certain distance away.
Press materials and a website were launched in 2009, as the device went through Phase II clinical trials. Most materials showed the PediSedate being used in tandem with a Nintendo Game Boy. The device featured an aesthetic that followed the late 90s trend of bright colors and translucent plastics. It was often paired in photos hooked up to a Game Boy to help distract a child during sedation, with the device often talked about as an “accessory” for the handheld console. This wasn’t really the case—it was essentially a child-friendly anaesthetic mask with headphones that could be hooked up to any relevant sound source. However, at the time, a Game Boy was a readily available way to distract and calm a sick child, and it could be had in colors that matched the PediSedate device.
Those behind the PediSedate noted the device was “very well recieved by parents, kids and health-care workers.” The benefits seem to pass the common-sense check—it’s believable that the PediSedate succeeded at being a less-scary way to present children with anaesthetic treatment while also giving them something pleasant to focus on as they drifted out of consciousness. However, success was seemingly not on the cards. The PediSedate website disappeared from the internet in 2011, and precious little was heard of the device since. The creator, Geoffrey A. Hart, continued to practice medicine in the intervening years, until he resigned his license in 2024 according to the Massachusetts Board of Medicine.
youtube.com/embed/-teN8JcqLZQ?…
An explainer video demonstrated the use of the device, which was going through Phase II trials in 2009.
By and large, the medical field has gotten by without devices like the PediSedate. Children undergoing sedation with inhalational anaesthetics will typically be treated with relatively conventional masks, albeit in small sizes. They lack colorful designs or hookups for game consoles, but by and large seem to do the job. It might have been nice to play a little Donkey Kong before a daunting procedure, but alas, the PediSedate never quite caught on.
Featured image: still from Sharkie’s Gaming Controllers video on the PediSedate.
AI Picks Outfits With Abandon

Most of us choose our own outfits on a daily basis. [NeuroForge] decided that he’d instead offload this duty to artificial intelligence — perhaps more for the sake of a class project than outright fashion.
The concept involved first using an AI model to predict the weather. Those predictions would then be fed to a large language model (LLM), which would recommend an appropriate outfit for the conditions. The output from the LLM would be passed to a simple alarm clock which would wake [NeuroForge] and indicate what he should wear for the day. Amazon’s Chronos forecasting model was used for weather prediction based on past weather data, while Meta’s Llama3.1 LLM was used to make the clothing recommendations. [NeuroForge] notes that it was possible to set all this up to work without having to query external services once the historical weather data had been sourced.
While the AI choices often involved strange clashes and were not weather appropriate, [NeuroForge] nonetheless followed through and wore what he was told. This got tough when the outfit on a particularly cold day was a T-shirt and shorts, though the LLM did at least suggest a winter hat and gloves be part of the ensemble. Small wins, right?
We’ve seen machine learning systems applied to wardrobe-related tasks before. One wonders if a more advanced model could be trained to pick not just seasonally-appropriate clothes, but to also assemble actually fashionable outfits to boot. If you manage to whip that up, let us know on the tipsline. Bonus points if your ML system gets a gig on the reboot of America’s Next Top Model.
youtube.com/embed/46yXg-DAjwE?…
Catching those Old Busses

The PC has had its fair share of bus slots. What started with the ISA bus has culminated, so far, in PCI Express slots, M.2 slots, and a few other mechanisms to connect devices to your computer internally. But if the 8-bit ISA card is the first bus you can remember, you are missing out. There were practically as many bus slots in computers as there were computers. Perhaps the most famous bus in early home computers was the Altair 8800’s bus, retroactively termed the S-100 bus, but that wasn’t the oldest standard.
There are more buses than we can cover in a single post, but to narrow it down, we’ll assume a bus is a standard that allows uniform cards to plug into the system in some meaningful way. A typical bus will provide power and access to the computer’s data bus, or at least to its I/O system. Some bus connectors also allow access to the computer’s memory. In a way, the term is overloaded. Not all buses are created equal. Since we are talking about old bus connectors, we’ll exclude new-fangled high speed serial buses, for the most part.
Tradeoffs
There are several trade-offs to consider when designing a bus. For example, it is tempting to provide regulated power via the bus connector. However, that also may limit the amount of power-hungry electronics you can put on a card and — even worse — on all the cards at one time. That’s why the S-100 bus, for example, provided unregulated power and expected each card to regulate it.
On the other hand, later buses, such as VME, will typically have regulated power supplies available. Switching power supplies were a big driver of this. Providing, for example, 100 W of 5 V power using a linear power supply was a headache and wasteful. With a switching power supply, you can easily and efficiently deliver regulated power on demand.
Some bus standards provide access to just the CPU’s I/O space. Others allow adding memory, and, of course, some processors only allow memory-mapped I/O. Depending on the CPU and the complexity of the bus, cards may be able to interrupt the processor or engage in direct memory access independent of the CPU.
In addition to power, there are several things that tend to differentiate traditional parallel buses. Of course, power is one of them, as well as the number of bits available for data or addresses. Many bus structures are synchronous. They operate at a fixed speed, and in general, devices need to keep up. This is simple, but it can impose tight requirements on devices.
Tight timing requirements constrain the length of bus wires. Slow devices may need to insert wait states to slow the bus, which, of course, slows it for everyone.
An asynchronous bus, on the other hand, works transactionally. A transaction sends data and waits until it is acknowledged. This is good for long wires and devices with mixed speed capability, but it may also require additional complexity.
Some buses are relatively dumb — little more than wires hanging off the processor through some drivers. Then how can many devices share these wires? Open-collector logic is simple and clever, but not very good at higher speeds. Tri-state drivers are a common solution, although the fanout limitations of the drivers can limit how many devices you can connect to the bus.
If you look at any modern bus, you’ll see these limitations have driven things to serial solutions, usually with differential signaling and sophisticated arbitration built into the bus. But that’s not our topic today.
Unibus
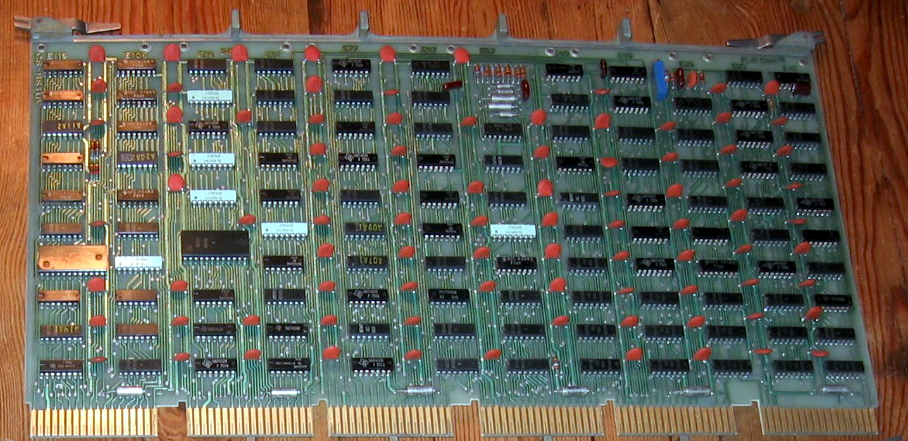
A common early bus was the Digital Equipment Corporation Unibus. In 1969, you needed a lot of board space to implement nearly anything, so Unibus cards were big. PDP-11 computers and some early VAX machines used Unibus as both the system bus for memory and I/O operations.
Unibus was asynchronous, so devices could go as fast as they could or as slow as they needed. There were two 36-pin edge connectors with 56 pins of signals and 16 pins for power and ground.
Unibus was advanced for its time. Many of the pins had pull-up resistors on the bus so that multiple cards could assert them by pulling them to ground. For example, INTR, the interrupt request line, would normally be high, with no cards asserting an interrupt. If any board pulls the line low, the processor will service the interrupt, subject to priority resolution that Unibus supported via bus requests and grants.
The grants daisy-chained from card to card. This means that empty slots required a “grant continuity card” that connected the grant lines to prevent breaking the daisy chain.
Eventually, the Digital machines acquired Massbus for connecting to specific disk and tape drives. It was also an asynchronous bus, but only for data. It carried 18 bits plus a parity bit. Boards like the RH11 would connect Massbus devices to the Unibus. There would be other Digital Equipment buses like TURBOChannel.
Other computer makers, of course, had their own ideas. Sun had MBus and HP 3000 and 9000 computers, which used the HP Precision Bus and HP GSC. But the real action for people like us was with the small computers.
S-100 and Other Micros
Through the late 1970s and early 1980s, the S-100 market was robust. Most CP/M machines using an 8080 or Z-80 had S-100 bus slots. In fact, it was popular enough that it gave birth to a real standard: IEEE 696. However, by 1994, the IBM PC had made the S-100 bus a relic, and the IEEE retired the standard.
Of course, the PC bus would go on to be dominant on x86 machines for a while; other systems had other buses. The SS-50 was sort of the S-100 for 6800 computers. The 68000 computers often used VMEbus, which was closely tied to the asynchronous bus of that CPU.
Embedded Systems
While things like S-100 were great for desktop systems, they were generally big and expensive. That led to competitors for small system use. Eurocard was a popular mechanical standard that could handle up to 96 signals. The DIN 41612 connectors had 32 pins per row, with two or three rows.
youtube.com/embed/wjf0k0vNxrQ?…
youtube.com/embed/HaqWV9qY5fs?…
Catching the Bus
We don’t deal much with these kinds of buses in modern equipment. Modern busses tend to be high-speed serial and sophisticated. Besides, a hobby-level embedded system now probably uses a system-on-a-chip or, at least, a single board computer, with little need for an actual bus other than, perhaps, SPI, I2C, or USB for I/O expansion.
Of course, modern bus standards are the winners of wars with other standards. You can still get new S-100 boards. Sort of.
Google abbandona il Dark Web: Stop allo strumento di monitoraggio nel 2026
Basta avvisi inutili. Basta monitoraggi passivi. Meno di due anni dopo il suo lancio, Google ha deciso di chiudere uno degli strumenti più chiacchierati per la sicurezza digitale: il Dark Web Report. La funzione, pensata per aiutare gli utenti a scoprire se i propri dati personali fossero finiti sul dark web, cesserà di esistere il 16 febbraio 2026, mentre le scansioni per nuove violazioni si fermeranno già il 15 gennaio 2026.
Secondo il gigante tecnologico, il report “offriva informazioni generali, ma il feedback degli utenti ha mostrato che non forniva indicazioni concrete su cosa fare”. Google promette ora di concentrarsi su strumenti che offrano passi chiari e immediatamente azionabili per proteggere le proprie informazioni online.

Per chi lo desidera, è possibile eliminare anticipatamente il proprio profilo di monitoraggio: basta accedere al Dark Web Report, cliccare su “Edit monitoring profile” e infine selezionare “Delete monitoring profile”. Tutti i dati verranno cancellati automaticamente con la disattivazione della funzione.
Lanciato a marzo 2023, il Dark Web Report era stato concepito come una difesa contro le frodi d’identità online, controllando il darknet per dati personali come nome, indirizzo, email, numero di telefono e Social Security Number. Nel luglio 2024, Google aveva esteso il servizio da Google One a tutti gli account, ampliando così la portata del monitoraggio.
Ora Google invita gli utenti a prendere in mano la propria sicurezza digitale. La prima mossa consigliata è attivare le passkey, strumenti di autenticazione multifattore resistenti al phishing, che rendono più difficile per i criminali rubare le credenziali. Non basta più avere una password complessa: serve una protezione che non si limiti a segnalare i rischi, ma li neutralizzi davvero.
In parallelo, Google suggerisce di utilizzare la funzione “Results about you” per rimuovere i propri dati personali dai risultati di ricerca. Questo non è solo un passo di privacy, ma un vero scudo contro l’esposizione non voluta dei propri dati online. Ogni informazione lasciata pubblica può essere raccolta, combinata e rivenduta sul dark web: proteggerla significa ridurre drasticamente il rischio di furti d’identità.
La decisione segna un cambio di rotta netto: da un approccio di monitoraggio passivo a una strategia basata su azioni concrete e protezione attiva, lasciando dietro di sé uno strumento che, seppur utile per scovare i dati nel dark web, non forniva la guida necessaria per difendersi davvero.
L'articolo Google abbandona il Dark Web: Stop allo strumento di monitoraggio nel 2026 proviene da Red Hot Cyber.
Di Corinto a Pillole di Eta Beta
Cybersicurezza, senza cultura digitale l’Italia preda dei pirati”
Rubrica Pillole di Eta Beta andata in onda su Rai Radio 1 alle 11.45, con ospite Arturo Di Corinto, consigliere dell’Agenzia per la cybersicurezza nazionale
Mercoledì 17 dicembre 2025
raiplaysound.it/programmi/pill…

The Lethal Danger of Combining Welding and Brake Cleaner

With the availability of increasingly cheaper equipment, welding has become far more accessible these days. While this is definitely a plus, it also comes with the elephant-sized asterisk that as with any tool you absolutely must take into account basic safety precautions for yourself and others. This extends to the way you prepare metal for welding, with [Dr. Bernard], AKA [ChubbyEmu] recently joining forces with [styropyro] to highlight the risks of cleaning metal with brake cleaner prior to welding.
Much like with common household chemicals used for cleaning, such as bleach and ammonia, improper use of these can produce e.g. chlorine gas, which while harmful is generally not lethal. Things get much more serious with brake cleaner, containing tetrachloroethylene. As explained in the video, getting brake cleaner on a rusty part to clean it and then exposing it to the intensive energies of the welding process suffices to create phosgene.
")
Used as a devastating chemical weapon during World War I, phosgene does not dissolve or otherwise noticeably reduce in potency after it enters the lungs. Instead it clings to surfaces where it attacks and destroys proteins and DNA until the affected person typically dies from disruption of the lung’s blood-air barrier and subsequent pulmonary edema. Effectively your lungs fill with liquid, your blood oxygen saturation drops and at some point your body calls it quits.
The video is based on a real case study, where in 1982 a previously healthy 23-year old man accidentally inhaled phosgene, was admitted to the ER before being rushed to the ICU. Over the course of six days he deteriorated, developed a fever and passed away after his heart stopped pumping properly due to ventricular fibrillation.
Basically, if you are off minding your own business and suddenly smell something like musty hay or freshly cut grass when nobody is mowing the lawn, there’s a chance you just inhaled phosgene. Unlike in the video, where the victim keeps welding and waits a long time before going to the ER, immediate treatment can at least give you a shot at recovery if the exposure was mild enough.
As with laser safety, prevention is the best way to stay healthy. In the case of welding it’s essential to fully cover up your skin as there is intense UV radiation from the work area, protect your eyes with a quality welding mask and ideally wear a respirator especially when welding indoors. Show your eyes, lungs and skin how much you love them by taking good care of them — and please don’t use brake cleaner to prep parts for welding.
youtube.com/embed/rp6JyEdfjAQ?…
Ransomware VolkLocker: Gli hacker sbagliano e lasciano la chiave master nel malware
Non è l’a prima colta che i criminal hacker commettono degli errori e non sdarà l’ultima.
Il gruppo di hacktivisti filorusso CyberVolk ha lanciato il servizio RaaS VolkLocker (noto anche come CyberVolk 2.x). Tuttavia, i ricercatori di sicurezza hanno scoperto che gli sviluppatori del malware hanno commesso diversi errori che consentono alle vittime di recuperare gratuitamente i propri file.
I ricercatori di SentinelOne riferiscono che gli aggressori hanno incorporato la chiave di crittografia master direttamente nel binario del malware e l’hanno salvata come file di testo normale nella cartella %TEMP%.
Il file si chiama system_backup.key e tutto il necessario per decrittografare i dati può essere facilmente estratto da esso. I ricercatori ipotizzano che si tratti di una sorta di artefatto di debug che non è stato “pulito” prima del rilascio.
Gli operatori RaaS apparentemente non sono a conoscenza del fatto che i loro clienti distribuiscono build con la funzione backupMasterKey().
Si ritiene che CyberVolk sia un gruppo filo-russo con sede in India che opera in modo indipendente. Mentre altri hacktivisti si limitano in genere ad attacchi DDoS, CyberVolk ha deciso di accettare la sfida di creare un proprio ransomware.

Gli aggressori lo hanno annunciato per la prima volta l’anno scorso e, sebbene siano stati successivamente banditi da Telegram diverse volte, nell’agosto di quest’anno il gruppo ha presentato il malware VolkLocker (CyberVolk 2.x) e la sua piattaforma RaaS (Ransomware-as-a-Service).
VolkLocker è scritto in Go e funziona sia su Linux (incluso VMware ESXi) che su Windows. L’accesso a RaaS per un singolo sistema operativo costa tra gli 800 e i 1.100 dollari, le versioni Linux e Windows costano tra i 1.600 e i 2.200 dollari, mentre un RAT o un keylogger autonomo costa 500 dollari. Gli acquirenti del malware ottengono l’accesso a un generatore di bot per Telegram, dove possono configurare il ransomware e ricevere il payload generato.
Per creare il tuo ransomware, devi specificare un indirizzo Bitcoin, un token bot di Telegram, un ID chat, una scadenza per il pagamento del riscatto, un’estensione per i file crittografati e impostare le opzioni di autodistruzione.
Una volta avviato sul sistema della vittima, VolkLocker aumenta i privilegi aggirando il Controllo dell’account utente di Windows, seleziona i file da crittografare da un elenco di esclusioni preconfigurato e crittografa i dati utilizzando AES-256 in modalità GCM.
I ricercatori hanno inoltre notato che il codice contiene un timer che attiva un wiper che distrugge le cartelle dell’utente (Documenti, Download, Immagini, Desktop) dopo la scadenza del ransomware o quando viene inserita una chiave errata nella finestra HTML del riscatto.
Secondo gli esperti, la principale debolezza del malware risiede nella crittografia. VolkLocker non genera chiavi dinamicamente, ma utilizza la stessa chiave master hardcoded per tutti i file presenti sul sistema infetto. Come accennato in precedenza, questa chiave viene scritta nel file eseguibile come stringa esadecimale e duplicata in un file di testo in formato %TEMP%.
Gli esperti ritengono che tali errori indichino problemi di controllo qualità: il gruppo sta cercando di espandersi in modo aggressivo attraendo nuovi “partner” inesperti, ma non riesce a portare a termine nemmeno i compiti più basilari.
In genere, si ritiene opportuno non divulgare dettagli sulle vulnerabilità dei ransomware mentre gli aggressori sono ancora attivi. Gli esperti, invece, in genere avvisano le forze dell’ordine e le aziende specializzate in trattative per il ransomware, che possono quindi assistere le vittime in privato. Poiché CyberVolk rimane attivo, SentinelOne spiega che è improbabile che la divulgazione di informazioni sulle vulnerabilità di VolkLocker ostacoli gli sforzi dei colleghi e delle forze dell’ordine per combattere il gruppo.
L'articolo Ransomware VolkLocker: Gli hacker sbagliano e lasciano la chiave master nel malware proviene da Red Hot Cyber.
Operation ForumTroll continues: Russian political scientists targeted using plagiarism reports

Introduction
In March 2025, we discovered Operation ForumTroll, a series of sophisticated cyberattacks exploiting the CVE-2025-2783 vulnerability in Google Chrome. We previously detailed the malicious implants used in the operation: the LeetAgent backdoor and the complex spyware Dante, developed by Memento Labs (formerly Hacking Team). However, the attackers behind this operation didn’t stop at their spring campaign and have continued to infect targets within the Russian Federation.
Emails posing as a scientific library
In October 2025, just days before we presented our report detailing the ForumTroll APT group’s attack at the Security Analyst Summit, we detected a new targeted phishing campaign by the same group. However, while the spring cyberattacks focused on organizations, the fall campaign honed in on specific individuals: scholars in the field of political science, international relations, and global economics, working at major Russian universities and research institutions.
The emails received by the victims were sent from the address support@e-library[.]wiki. The campaign purported to be from the scientific electronic library, eLibrary, whose legitimate website is elibrary.ru. The phishing emails contained a malicious link in the format: https://e-library[.]wiki/elib/wiki.php?id=<8 pseudorandom letters and digits>. Recipients were prompted to click the link to download a plagiarism report. Clicking that link triggered the download of an archive file. The filename was personalized, using the victim’s own name in the format: <LastName>_<FirstName>_<Patronymic>.zip.
A well-prepared attack
The attackers did their homework before sending out the phishing emails. The malicious domain, e-library[.]wiki, was registered back in March 2025, over six months before the email campaign started. This was likely done to build the domain’s reputation, as sending emails from a suspicious, newly registered domain is a major red flag for spam filters.
Furthermore, the attackers placed a copy of the legitimate eLibrary homepage on https://e-library[.]wiki. According to the information on the page, they accessed the legitimate website from the IP address 193.65.18[.]14 back in December 2024.
A screenshot of the malicious site elements showing the IP address and initial session date

The attackers also carefully personalized the phishing emails for their targets, specific professionals in the field. As mentioned above, the downloaded archive was named with the victim’s last name, first name, and patronymic.
Another noteworthy technique was the attacker’s effort to hinder security analysis by restricting repeat downloads. When we attempted to download the archive from the malicious site, we received a message in Russian, indicating the download link was likely for one-time use only:
The message that was displayed when we attempted to download the archive

Our investigation found that the malicious site displayed a different message if the download was attempted from a non-Windows device. In that case, it prompted the user to try again from a Windows computer.
The message that was displayed when we attempted to download the archive from a non-Windows OS

The malicious archive
The malicious archives downloaded via the email links contained the following:
- A malicious shortcut file named after the victim:
<LastName>_<FirstName>_<Patronymic>.lnk; - A
.Thumbsdirectory containing approximately 100 image files with names in Russian. These images were not used during the infection process and were likely added to make the archives appear less suspicious to security solutions.
A portion of the .Thumbs directory contents

When the user clicked the shortcut, it ran a PowerShell script. The script’s primary purpose was to download and execute a PowerShell-based payload from a malicious server.
The script that was launched by opening the shortcut

The downloaded payload then performed the following actions:
- Contacted a URL in the format:
https://e-library[.]wiki/elib/query.php?id=<8 pseudorandom letters and digits>&key=<32 hexadecimal characters>to retrieve the final payload, a DLL file. - Saved the downloaded file to
%localappdata%\Microsoft\Windows\Explorer\iconcache_<4 pseudorandom digits>.dll. - Established persistence for the payload using COM Hijacking. This involved writing the path to the DLL file into the registry key HKCR\CLSID\{1f486a52-3cb1-48fd-8f50-b8dc300d9f9d}\InProcServer32. Notably, the attackers had used that same technique in their spring attacks.
- Downloaded a decoy PDF from a URL in the format:
https://e-library[.]wiki/pdf/<8 pseudorandom letters and digits>.pdf. This PDF was saved to the user’s Downloads folder with a filename in the format:<LastName>_<FirstName>_<Patronymic>.pdfand then opened automatically.
The decoy PDF contained no valuable information. It was merely a blurred report generated by a Russian plagiarism-checking system.
A screenshot of a page from the downloaded report

At the time of our investigation, the links for downloading the final payloads didn’t work. Attempting to access them returned error messages in English: “You are already blocked…” or “You have been bad ended” (sic). This likely indicates the use of a protective mechanism to prevent payloads from being downloaded more than once. Despite this, we managed to obtain and analyze the final payload.
The final payload: the Tuoni framework
The DLL file deployed to infected devices proved to be an OLLVM-obfuscated loader, which we described in our previous report on Operation ForumTroll. However, while this loader previously delivered rare implants like LeetAgent and Dante, this time the attackers opted for a better-known commercial red teaming framework: Tuoni. Portions of the Tuoni code are publicly available on GitHub. By deploying this tool, the attackers gained remote access to the victim’s device along with other capabilities for further system compromise.
As in the previous campaign, the attackers used fastly.net as C2 servers.
Conclusion
The cyberattacks carried out by the ForumTroll APT group in the spring and fall of 2025 share significant similarities. In both campaigns, infection began with targeted phishing emails, and persistence for the malicious implants was achieved with the COM Hijacking technique. The same loader was used to deploy the implants both in the spring and the fall.
Despite these similarities, the fall series of attacks cannot be considered as technically sophisticated as the spring campaign. In the spring, the ForumTroll APT group exploited zero-day vulnerabilities to infect systems. By contrast, the autumn attacks relied entirely on social engineering, counting on victims not only clicking the malicious link but also downloading the archive and launching the shortcut file. Furthermore, the malware used in the fall campaign, the Tuoni framework, is less rare.
ForumTroll has been targeting organizations and individuals in Russia and Belarus since at least 2022. Given this lengthy timeline, it is likely this APT group will continue to target entities and individuals of interest within these two countries. We believe that investigating ForumTroll’s potential future campaigns will allow us to shed light on shadowy malicious implants created by commercial developers – much as we did with the discovery of the Dante spyware.
Indicators of compromise
e-library[.]wiki
perf-service-clients2.global.ssl.fastly[.]net
bus-pod-tenant.global.ssl.fastly[.]net
status-portal-api.global.ssl.fastly[.]net
La psicologia delle password. Non proteggono i sistemi: raccontano le persone
La psicologia delle password parte proprio da qui: cercare di capire le persone prima dei sistemi.
Benvenuti in “La mente dietro le password”, la rubrica che guarda alla cybersecurity
da un’angolazione diversa: quella delle persone. Nel mondo digitale contiamo tutto: attacchi, patch, CVE, indicatori. Eppure l’elemento più determinante continua a sfuggire alle metriche: i comportamenti umani.
Le password lo dimostrano ogni giorno. Non nascono in laboratorio, ma nella nostra testa: tra ricordi, abitudini, scorciatoie, ansie, buoni propositi e quel pizzico di convinzione di “essere imprevedibili” mentre facciamo esattamente il contrario.
Dentro una password si nascondono routine, affetti, nostalgie, momenti di fretta, false sicurezze, piccoli autoinganni quotidiani. Non descrivono i sistemi: descrivono noi. Questa rubrica nasce per raccontare proprio questo. Ogni puntata esplora un gesto reale:
- il post-it sul monitor,
- la password affettiva ereditata da anni,
- il “la cambio domani” diventato rito aziendale, la creatività disperata del “tanto chi vuoi che lo indovini”.
Non servono moralismi, né tecnicismi inutili. L’obiettivo è capire perché facciamo ciò che facciamo e come questi automatismi diventano vulnerabilità senza che ce ne accorgiamo. E, soprattutto, capire come possiamo affrontarli: non con ricette magiche, ma con scelte più consapevoli, meno istintive e più vicine a come funzioniamo davvero.
Perché la sicurezza non è soltanto una questione di strumenti: è soprattutto una questione di consapevolezza.
Le password parlano di noi.
È ora di ascoltarle.
PARTIAMO DALLA FINE… Il mito dell’hacker genio
Hollywood ci ha venduto una narrativa irresistibile: l’hacker solitario, geniale, insonne,
che digita comandi impossibili mentre luci verdi scorrono su schermi impenetrabili.
Un essere mezzo mago, mezzo matematico, capace di entrare in qualunque sistema grazie a colpi di genio improvvisi.
Un’immagine talmente potente che ha finito persino per distorcere le parole:
oggi chiamiamo “hacker” ciò che, nella realtà, ha un altro nome.
L’hacker autentico costruisce, studia, migliora; chi viola davvero i sistemi è l’attaccante, il cracker.
Ma il mito ha ribaltato i ruoli, regalando al criminale la gloria del creativo.
La verità, però, è molto meno cinematografica e molto più efficace.
Non sempre serve essere un genio per violare un sistema.
Serve conoscere la matematica delle abitudini umane.
Gli attaccanti moderni non sono mostri di creatività. Sono ingegneri dell’ovvio: delle abitudini, dei percorsi ripetuti, delle password prevedibili.
E l’ovvio, quando diventa statistica, è devastante.

Il cervello ha smesso di collaborare: ecco le prove
C’è un momento preciso – quello in cui appare “Crea una nuova password” –
in cui l’essere umano moderno abbandona tutta la sua dignità digitale
e regredisce allo stadio primitivo del:
“Basta che me la ricordo.”
Un secondo prima siamo concentrati.
Un secondo dopo il cervello si siede, sbadiglia e attiva la modalità risparmio energetico.
La neuroscienza la chiama riduzione del carico cognitivo.
Noi la chiamiamo:
“Uff… di nuovo?”
Il problema è semplice: la nostra memoria non è fatta per ricordare caos.
Ricorda “gatto”.
Non ricorda fY9!rB2kQz.
Non per stupidità: per fisiologia.
Una password complessa non ha storia, non ha associazioni,
non ha un motivo per restare.
E così, nell’attimo di fatica, il cervello pigro prende il comando.
“Dai… metti Marco1984.
Tanto chi vuoi che la indovini?”
Ah sì? Prova a digitarla su Have I Been Pwned.
Ed ecco la sfilata delle soluzioni creative:

- nome del cane + 1
- compleanno del partner (che la password ricorda meglio di noi)
- il cognome dell’ex con cui non parli da dieci anni
- piatto preferito + punto esclamativo, perché fa “professionale”
Non è ignoranza digitale.
È psicologia applicata alla sopravvivenza quotidiana.

Il bias di disponibilità fa il resto:
il cervello pesca dal primo cassetto aperto. Ricordi recenti, affetti, date, luoghi, emozioni.
Non stiamo creando una password: stiamo scegliendo un ricordo comodo.
È umano.
Naturale, quasi inevitabile.
E il risultato, spesso, è disastroso
Nessuna policy può cambiare questo dato:
una password complessa è innaturale quanto memorizzare il numero di serie del frigorifero.
E infatti non la memorizziamo. Facciamo quello che fa qualunque cervello in difficoltà: cerchiamo scorciatoie.
- post-it
- WhatsApp a noi stessi
- email con oggetto “Password nuova”
- salvata nella rubrica del telefono
- altre fantasie
Siamo esseri biologici con trenta chiavi digitali da gestire.
È ovvio che la mente collassi sulla prima scorciatoia che trova.
Dietro le password peggiori c’è sempre un desiderio innocente:
semplificarsi la vita.
“Chi vuoi che venga proprio da me?”
“Non ho niente di interessante.”
“È solo temporanea…”
Il cervello ci convince che siamo troppo piccoli per essere un bersaglio.
Il problema è che, nel mondo digitale, siamo tutti bersagli grandi uguale.
I numeri che non vorremmo vedere
E prima di pensare che siano esagerazioni, ecco qualche numero reale (a volte più spietato delle battute):
- solo il 69% degli utenti che conoscono le passkey ne ha attivata una (FIDO Alliance)
- il 57% degli utenti salva le password su post-it o foglietti (Keeper Security – Workplace Password – Habits Report)
- solo il 63% usa la 2FA su almeno un account, e molto meno su tutti (Bitwarden)
- il 60–65% ricicla la stessa password su più servizi (NordPass)
- il 52% continua a usare password già compromesse in passato (DeepStrike)
- il 43% cambia solo un carattere quando “aggiorna” la password (DeepStrike)
- l’80% delle violazioni confermate coinvolge credenziali deboli o riutilizzate (Varonis)
È qui che l’ironia finisce e la statistica diventa spietata: ciò che è prevedibile, per un attaccante, è sfruttabile.

E questo è solo l’inizio:
la mente dietro le password ha ancora molto da raccontare.
Adesso analizziamo il primo problema: dove finisce la sicurezza, inizia la cartoleria. E i problemi veri.
Il santuario segreto dei post-it
C’è un ecosistema che nessun SOC monitora, nessun SIEM registra e nessun threat actor deve davvero violare:
l’ecosistema dei post-it.
Un luogo sacro, mistico, sotterraneo, dove l’utente medio compie i suoi rituali più intimi.
Lo trovi ovunque: sul monitor, sotto la tastiera, appiccicato al modem come un ex-voto digitale.
La frase più frequente?
“La password non la reggo più.”

A quel punto il post-it interviene come una specie di badante analogica:
ti tiene il segreto, ti regge la memoria, e ti ricorda che la sicurezza è bella finché non devi farla tu.
Le password sui post-it non nascono dalla stupidità. Nascono dalla stanchezza esistenziale.
Dopo l’ennesimo tentativo fallito e il solito messaggio
“La nuova password non può essere uguale alle ultime 12”,
l’utente compie il gesto definitivo:
“Basta. Me la scrivo.”
È un momento liberatorio. Quasi catartico.
Per alcuni, il primo vero atto di disobbedienza informatica.
Il paradosso è spietato:
un post-it è un segreto che tutti possono leggere tranne chi dovrebbe custodirlo.
Per l’utente diventa invisibile, parte dell’arredo digitale dell’ufficio. Lo notano solo due categorie:
- chi lo cerca professionalmente
- chi non dovrebbe vederlo professionalmente
Nel mezzo, il deserto.
Quando prova a mimetizzarsi, l’utente dà il meglio:
- scrive metà password
- usa nomi in codice (“PIN CARTA”)
- aggiunge simboli indecifrabili
Risultato: la password non la capisce nessuno. Nemmeno lui.
È il primo ransomware umano: i dati ci sono, ma l’utente non li sa più decrittare.
Aprire un cassetto d’ufficio significa avviare uno scavo archeologico:
- post-it sovrapposti, codici cancellati,
- numeri che sembrano OTP ma risalgono a 5 anni prima,
- misteriose note “NON TOCCARE” senza autore.
Ogni foglietto è un reperto della battaglia quotidiana con la memoria digitale.
Ed è qui che emerge un dettaglio che la cybersecurity ignora:
il rispetto quasi ancestrale per la carta.
La trattiamo come un oggetto affidabile, concreto, degno di fiducia. Il digitale può tradirti senza preavviso.
La memoria può svanire nel momento sbagliato. Ma il foglietto no: rimane lì, fisico, domestico, comprensibile.
Gli utenti non scrivono le password sui post-it perché sono negligenti,
ma perché hanno un’istintiva fiducia nella materia.
La carta non chiede aggiornamenti, non scade, non cambia policy.
È l’ultimo baluardo dell’analogico in un mondo che ci chiede
di ricordare sempre di più e capire sempre meno.
Il post-it sopravvive perché dà sicurezza.
Tangibile, non teorica.
A meno che non voli via. O si incolli al maglione. O finisca nel cestino.
Ma questa è la sua poesia tragica.
Finché inventeremo password, inventeremo anche modi per ricordarle male.
E i post-it resteranno la nostra piccola, ostinata resistenza analogica nel mondo delle minacce digitali.
Una vulnerabilità? Certo.
Un problema? Assolutamente.
Ma anche una delle più grandi verità antropologiche della cybersecurity.
Perché, in fondo, le password ci rivelano una cosa semplice:
non cambiamo comportamento finché non comprendiamo l’origine del comportamento stesso.
Nella prossima puntata scenderemo ancora più in profondità, dove la psicologia diventa design:
l’Effetto IKEA – l’illusione che ci fa affezionare alle password peggiori solo perché “le abbiamo costruite noi”.
E subito dopo, la tragedia del Cambia Password – il rito aziendale che rischia di produrre più incidenti che sicurezza.
Continua…
L'articolo La psicologia delle password. Non proteggono i sistemi: raccontano le persone proviene da Red Hot Cyber.