 - Collegamento all'originale")
DK 10x15 - Sveglia, Europa
Sulla inutilità dei molluschi politici e la necessità di una schiena diritta.
spreaker.com/episode/dk-10x15-…

Arriva Spiderman: il nuovo PhaaS che colpisce banche e criptovalute in Europa
I ricercatori di Varonis hanno scoperto una nuova piattaforma PhaaS, chiamata Spiderman , che prende di mira gli utenti di banche e servizi di criptovaluta in Europa. Gli aggressori utilizzano il servizio per creare copie di siti web legittimi per rubare credenziali di accesso, codici 2FA e informazioni sulle carte di credito.
Secondo gli esperti, la piattaforma è rivolta a istituti finanziari di cinque paesi europei e a grandi banche come Deutsche Bank, ING, Comdirect, Blau, O2, CaixaBank, Volksbank e Commerzbank.
Tuttavia, gli attacchi non si limitano alle banche.
Spiderman può anche creare pagine di phishing per servizi fintech come Klarna e PayPal in Svezia. Inoltre, la piattaforma supporta il furto di seed per wallet di criptovalute come Ledger, Metamask ed Exodus.
“Poiché Spiderman è modulare, può facilmente adattarsi a nuove banche, portali e metodi di autenticazione. Man mano che i paesi europei aggiornano i loro sistemi di online banking, è probabile che il servizio si evolverà parallelamente”, osservano i ricercatori di Varonis.

Attraverso la dashboard web di Spiderman, gli operatori possono monitorare le sessioni delle vittime in tempo reale, esportare i dati con un solo clic, intercettare al volo credenziali, PhotoTAN e password monouso e raccogliere informazioni sulle carte di credito.
PhotoTAN è un sistema di password monouso ampiamente utilizzato dalle banche europee. Quando si effettua l’accesso o si conferma una transazione, all’utente viene mostrato un mosaico colorato che deve essere scansionato tramite l’app della banca. L’app decripta il mosaico, genera un codice OTP per la transazione specifica e l’utente inserisce questo codice sul sito web.
Gli operatori di Spiderman hanno anche accesso alle impostazioni di targeting tramite il pannello di controllo: possono limitare gli attacchi a paesi specifici, inserire i provider nella whitelist, filtrare le vittime in base al tipo di dispositivo (utenti mobili o desktop) e impostare reindirizzamenti per i visitatori non adatti al phishing.
I ricercatori sottolineano che tutti i kit di phishing si basano sul fatto che la vittima clicchi su un link e venga reindirizzata a una pagina di accesso falsa.
Pertanto, la migliore difesa contro tali attacchi è controllare sempre attentamente il dominio prima di inserire le proprie credenziali. Vale anche la pena prestare attenzione alle finestre “browser-in-the-browser” false , che potrebbero visualizzare l’URL corretto.
L'articolo Arriva Spiderman: il nuovo PhaaS che colpisce banche e criptovalute in Europa proviene da Red Hot Cyber.
Make Your Own Tires For RC Cars

You can buy a wide range of RC car tires off the shelf. Still, sometimes it can be hard to find exactly what you’re looking for, particularly if you want weird sizes, strange treads, or something that is very specifically scale-accurate. In any of these cases, you might like to make your own tires. [Build It Better] shows us how to do just that!
Making your own tires is fairly straightforward once you know how. You start out by producing a 3D model of your desired tire. You then create a two-piece negative mold of the tire, which can then be printed out on a 3D printer; [Build It Better] provides several designs online. From there, it’s simply a matter of filling the tire molds with silicone rubber, degassing, and waiting for them to set. All you have to do then is demold the parts, do a little trimming and post-processing, and you’ve got a fresh set of boots for your favorite RC machine.
[Build It Better] does a great job of demonstrating the process, including the basic steps required to get satisfactory results. We’ve featured some other great molding tutorials before, too. Video after the break.
youtube.com/embed/OA6iUYAr_bk?…
Memory at the Speed of Light

Look inside a science fiction computer, and you’ll probably see tubes and cubes that emit light. Of course, it’s for effect, but the truth is, people do think light computing may be the final frontier of classical computing power. Engineers at the University of Southern California Information Sciences Institute and the University of Wisconsin-Madison are showing off a workable photonic latch — a memory element that uses light.
The device uses a commercial process (GlobalFoundries (GF) Fotonix Silicon Photonics platform) and, like a DRAM, regenerates periodically to prevent loss of the memory contents.
On the device, you’ll find a combination of tiny photodiodes, micro-ring resonators, and optical waveguides. Simulations show the memory element can operate at 20 GHz and might even be readable at 50 or 60 GHz.
If you want to dive deeper, the work is based on a paper from earlier in the year.
Laser Cutter Plus CYMK Spraypaint Equals Full-Color Prints

This is one of those fun hacks that come about from finding a product and going “I wonder if I could…” — in this case, artist/YouTuber [Wesley Treat] found out his favourite vendor makes spray cans in CYMK colours– that is the Cyan, Yellow, Magenta and blacK required for subtractive printing. Which got him wondering: can I make full-colour prints with this paint?
His answer was “yes”, and the process to do so is fairly simple. First, split the image into colour channels, generate a half-tone pattern for each one, and carve it out of MDF on the laser. Then spray the MDF with the appropriate colour spray paint. Press the page against each block in turn, and voila! A full colour print block print, albeit at very low DPI compared to your average inkjet.
Now, you might be wondering, why half-tone instead of mixing? Well, it turns out that these CYMK paints are too opaque for that to work in a block-printing process. At least with a naive spray technique; [Weseley] does admit a very fine mist might be able to make that work. The second question is why not just hook the rattle cans into a CNC machine for a paint-based mega inkjet? That’s a great question and we hope someone tries it, but [Weseley] evidently likes block-printing so he tried that first.
Laser-ablating enough MDF away to make decent print blocks took too long for [Weseley]’s tastes, however, so he switched to using mylar stencils. Instead of spraying a block and pressing onto it, the paint is sprayed through the stencil. The 10 mil Mylar not only cuts faster, but can support finer detail. Though the resulting prints loose some of the artistic flair the inconsistencies block printing brings, it probably looks better.
If you prefer to skip the manual paint-can-handling, perhaps we can interest you in a spray-can plotter. If you do like manually flinging paint, perhaps you could try this dot-painting spray can attachment, for a more self-directed half-tone.
Thanks to [Keith Olson] for the tip.
youtube.com/embed/qV7yNM8mUBE?…
Building A Granular Sampler Synth

Synthesizing sounds from scratch is all well and good, you just use a bit of maths. However, the latest build from [Daisy] eschews such boring concepts as additive or subtractive synthesis, instead going for a sample-based approach.
This build is based around the Daisy Seed microcontroller platform. It was actually inspired by an earlier project to create a ribbon synth, which we covered previously. In this case, the ribbon potentiometer has been repurposed, being used to control the playback position of a lengthy recorded sample. In this build, the Daisy Seed is running its audio playback system at a rate of 48,000 samples per second. It’s capable of storing up to 192,000 samples in memory, so it has a total of 4 seconds of sample storage. The Daisy Seed uses an analog-to-digital input to record two seconds of audio into the sample buffer. It can then be replayed by placing a finger on the ribbon at various points. Playback is via granular synthesis, where small sections of the overall sample buffer are used to synthesize a new tone. The video explains how the granular synthesis algorithm is implemented using the Plugdata framework. Design files are available for those eager to replicate the build.
Once you start tinkering in the world of synthesis, it’s easy to fall down the rabbit hole. Video after the break.
youtube.com/embed/0vWgR7alH7Y?…
Se pensavi che la VPN servisse a proteggerti… ripensaci!
Le estensioni del browser sono da tempo un modo comune per velocizzare il lavoro e aggiungere funzionalità utili, ma un altro caso dimostra con quanta facilità questo comodo strumento possa trasformarsi in un canale per la raccolta silenziosa di dati sensibili.
I ricercatori di Koi Security hanno segnalato che l’ estensione Urban VPN Proxy per Google Chrome, contrassegnata come “In evidenza” e installata da circa sei milioni di utenti, ha intercettato le comunicazioni con i chatbot AI più diffusi.
Tra queste, richieste e risposte a servizi come ChatGPT, Claude, Copilot, DeepSeek, Gemini, Grok, Meta AI e Perplexity. Urban VPN Proxy ha una valutazione di 4,7 nel Chrome Store e circa 1,3 milioni di installazioni sono state registrate nel catalogo dei componenti aggiuntivi di Microsoft Edge.
Secondo il rapporto, la funzionalità di raccolta dati è stata abilitata di default dopo l’aggiornamento del 9 luglio 2025, quando è stata inviata agli utenti la versione 5.5.0. Per diverse piattaforme di intelligenza artificiale, l’estensione caricava script JavaScript separati e li incorporava nelle pagine del chatbot .

Una volta implementati, gli script hanno sostituito i meccanismi di richiesta di rete standard del browser (fetch() e XMLHttpRequest()), in modo che tutto il traffico passasse prima attraverso il codice di estensione. Ciò ha consentito di estrarre il contenuto delle finestre di dialogo e inviarlo ai server esterni analytics.urban-vpn[.]com e stats.urban-vpn[.]com.
I dati raccolti includono query degli utenti, risposte ai chatbot, ID e timestamp delle conversazioni, metadati di sessione, nonché informazioni sulla piattaforma e sul modello di intelligenza artificiale. L’informativa sulla privacy aggiornata di Urban VPN, in vigore dal 25 giugno 2025, menziona la raccolta di tali dati per finalità di navigazione sicura e analisi di marketing, promettendo l’anonimizzazione, sebbene l’azienda riconosca che non è sempre possibile escludere completamente le informazioni sensibili dai testi delle query.
Gli autori del rapporto hanno prestato particolare attenzione ai partner con cui vengono trasferiti i dati di navigazione web. Tra questi, un’affiliata di BIScience, specializzata in analisi pubblicitarie e monitoraggio del marchio. I documenti di Urban VPN sottolineano che BIScience utilizza dati non anonimizzati per generare insight commerciali, che poi condivide con i partner commerciali. Evidenziano inoltre il collegamento tra BIScience e Urban Cyber Security Inc., lo sviluppatore di Urban VPN Proxy, registrato nel Delaware.
La pagina dell’estensione pubblicizza una funzionalità di protezione basata sull’intelligenza artificiale che avvisa in caso di dati personali nelle richieste e link sospetti nelle risposte. Tuttavia, Koi Security ha osservato che le conversazioni venivano raccolte e inoltrate indipendentemente dal fatto che questa opzione fosse abilitata o meno.
I ricercatori hanno trovato una logica di intercettazione delle conversazioni simile basata sull’intelligenza artificiale in altre tre estensioni dello stesso editore: 1ClickVPN Proxy , Urban Browser Guard e Urban Ad Blocker.
Insieme, hanno oltre otto milioni di installazioni e la maggior parte di esse è anche contrassegnata come “In evidenza”, il che suggerisce un ulteriore controllo da parte delle piattaforme. The Hacker News ha inviato richieste di informazioni a Google e Microsoft ed è in attesa di commenti.
L'articolo Se pensavi che la VPN servisse a proteggerti… ripensaci! proviene da Red Hot Cyber.
Debugging the AMD GPU

Although Robert F. Kennedy gets the credit for popularizing it, George Bernard Shaw said: “Some men see things as they are and say, ‘Why?’ I dream of things that never were and say, ‘Why not?'” Well, [Hadz] didn’t wonder why there weren’t many GPU debuggers. Instead, [Hadz] decided to create one.
It wasn’t the first; he found some blog posts by [Marcell Kiss] that helped, and that led to a series of experiments you’ll enjoy reading about. Plus, don’t miss the video below that shows off a live demo.
It seems that if you don’t have an AMD GPU, this may not be directly useful. But it is still a fascinating peek under the covers of a modern graphics card. Ever wonder how to interact with a video card without using something like Vulkan? This post will tell you how.
Writing a debugger is usually a tricky business anyway. Working with the strange GPU architecture makes it even stranger. Traps let you gain control, but implementing features like breakpoints and single-stepping isn’t simple.
We’ve used things like CUDA and OpenCL, but we haven’t been this far down in the weeds. At least, not yet. CUDA, of course, is specific to NVIDIA cards, isn’t it?
youtube.com/embed/HDMC9GhaLyc?…
Keebin’ with Kristina: the One with the Curious Keyboards

I love first builds! They say so much about a person, because you see what’s paramount to them in a keyboard. You can almost feel their frustration at other keyboards come through their design choices. And the Lobo by [no-restarts] is no exception to any of this.
There’s just something about this Corne-like object with its custom case and highly-tappable and variously tilted keycaps. The list of reasons for being begins innocently enough with [no-restarts] wanting a picture of their dog on the case.

Overall, [no-restarts] is happy with it, but has some ideas for revision. Yep, that sounds about right. The Lobo is all hand-wired, and there’s a PCB with hot swap sockets in its future. If you’re interested in the case files, GitHub is your friend.
Getting a Handle on Grabshell
[kurisutofujp] recently saw a GrabShell in the flesh, and why haven’t I heard of this keyboard before? The next best time is now, so here we go with the explanation, both for myself and the other 9,999.

But you don’t have to use it that way, see. You can stand it up on the desk if you don’t want to type in mid-air. It can also be opened sort of halfway and used like a SafeType vertical keyboard.
If none of this excites you, GrabShell can also be laid flat on the desk. The distance between the two halves in this configuration is quite generous, and frankly, I’m a bit jealous.
So let’s talk about the generous thumbing-around area. As you’ll see in the video below, the left has a joystick and a toggle switch that flips it from arrow keys to mouse cursor. There’s a serious-looking scroll wheel beneath that. All three of these can be pushed in for additional inputs.
The right side of the thumb panel has a sweet-looking trackball that’s housed in a really cool-looking way. Another cool thing: there’s a frigging I2C port on the top, just exposed and hanging out because reasons.
Switch-wise, the board is a mix of hot-swappable Gateron G Pro browns and low-profile Gaterons under double-shot ABS keycaps. I think it sounds nice in the video below; others say it sounds cheap and hollow. To each their own.
youtube.com/embed/O7p68Gxxlfo?…
The Centerfold: ZMK Dongle Repackaged As Vintage Computer
![A three-panel shot of a Apple ][-inspired ZMK dongle.](https://hackaday.com/wp-content/uploads/2025/12/ZMK-dongle-centerfold.png "A three-panel shot of a Apple ][-inspired ZMK dongle.")
This is a ZMK dongle, like I said in the subheading, and [mharzhyall] put a new case around it. Basically it lets you connect keyboards wirelessly.
Do you rock a sweet set of peripherals on a screamin’ desk pad? Send me a picture along with your handle and all the gory details, and you could be featured here!
Historical Clackers: the Edland Typewriter Was a Total Flop
The Antikey Chop reports that this curious little rook-looking index typewriter was such as flop as to be nearly lost to history entirely.
Produced between 1891 and 1893 by the Liberty Mfg. Company, the machine was conceived by Joseph Laurentius Edland of Brooklyn, NY. All seemed lost until 1964, when a handful of Edlands were found languishing in a warehouse in Galway, NY.
Although only made for two years, there were three different versions developed. The one pictured here is the second, with a metal base and embossed index, whereas the first had a wood base and flat index.
The third version, the Typewheel Edland, had a typewheel for a print element à la the Blick. Edlands cost a semi-reasonable $5 at the outset, but eventually doubled in price.
So, why the absolute failure? It was no better or worse a machine than its contemporaries, but perhaps just wasn’t well-marketed. Another theory is that the Edland failed because they were made of pot metal. Seems reasonable. Want to know how to use one? RTFM (PDF).
Finally, a Keyboard with a Mechanical Watch Movement
Wait, what? Why though? Well, it ticks along as you type, is that cool? It might be fun to see if you can keep up a certain number of keystrokes per second. Okay, I’m warming up to this idea pretty quickly, can you tell?
The Nama keyboard, dubbed after the scientific term for the mammoth, is appropriately named. It can weigh up to an astonishing 19.4 lbs (8.8 kg) depending on the case material. (Consider that a Model M, a proper bludgeoning device in its own right, weighs just 5 lbs (2.2 kg).)
Nama comes from Wuque Studio, and was built as an ode to their manufacturing capabilities. Now this is starting to make more sense. They are the Banana Republic to vendor Chilkey’s Old Navy, who are the brand behind the ND75, if that rings any bells.
Now the Nama looks like your basic mechanical keyboard on the surface, but five years of design decisions went into this line. You can get it with an aluminium case (14.5 lbs / 6.6 kg) or a brass CNC’d case (18.95 lbs / 8.6 kg), which of course is what makes it so heavy.
But yeah, the defining feature is definitely the watch movement. You bet your Backspace it’s fully functional except as a watch, and it doubles as a volume control knob, so you don’t have to settle for touching it with just your eyeballs.
Yeah, so the astute among you will have noticed that there are no numbers or hands on the watch movement, which would be, what, tacky? I don’t know anymore. At any rate, it’s protected by a piece of sapphire glass, which should keep Cheetos dust and such out of there.
Oh, you want to know the cost? $749 for the bare-bones with no movement, and $1299 for the brass-bottomed boy with the tourbillion. That’s… actually not that bad for a tourbillion movement.
youtube.com/embed/ROmD6F3XZEw?…
Got a hot tip that has like, anything to do with keyboards? Help me out by sending in a link or two. Don’t want all the Hackaday scribes to see it? Feel free to email me directly.
Virtual Pet Responds To WiFi

When the Tamagotchi first launched all those decades ago, it took the world by storm. It was just a bunch of simple animations on a monochrome LCD, but it had heart, and people responded to that. Modern technology is capable of so much more, so [CiferTech] set out to build a virtual pet that can sniff out WiFi networks.
The build employs an ESP32-S3, perhaps the world’s favorite microcontroller that has WiFi baked right in from the factory. It’s paired with a 240×240 TFT LCD that delivers bright, vivid colors to show the digital pet living inside. Addressable WS2812B LEDs and a simple sound engine provide further feedback on the pet’s status.
The pet has various behaviors coded in, like hunting, exploring, and resting, and moods such as “happy,” “curious,” and “bored.” For a bit of environmental reactivity, [CiferTech] also made the local WiFi environment play a role. Nearby networks can influence the “hunger, happiness, and health” of the pet.
Incidentally, if you’ve ever wondered what made the Tamagotchi tick, we’ve explored that before, too.
youtube.com/embed/UCHQCaAtMd8?…
Thorium-Metal Alloys and Radioactive Jet Engines

Although metal alloys is not among the most exciting topics for most people, the moment you add the word ‘radioactive’, it does tend to get their attention. So too with the once fairly common Mag-Thor alloys that combine magnesium with thorium, along with other elements, including zinc and aluminium. Its primary use is in aerospace engineering, as these alloys provide useful properties such as heat resistance, high strength and creep resistance that are very welcome in e.g. jet engines.
Most commonly found in the thorium-232 isotope form, there are no stable forms of this element. That said, Th-232 has a half-life of about 14 billion years, making it only very weakly radioactive. Like uranium-238 and uranium-235 it has the unique property of not having stable isotopes and yet still being abundantly around since the formation of the Earth. Thorium is about three times as abundant as uranium and thus rather hard to avoid contact with.
This raises the question of whether thorium alloys are such a big deal, and whether they justify removing something like historical artefacts from museums due to radiation risks, as has happened on a few occasions.
Elemental Facts
")
Since the (probably machine-generated) article that inspired these questions didn’t bother to include any useful details or references, it’s time to do a bit of a dive ourselves. This starts with the element thorium and its isotopes.
Obviously the problem with thorium here is not so much with the metal itself or its elementary properties, but rather the fact that a small fraction will decay into radium-228 via alpha decay. This has a half-life measured in years before rapidly passing through actinium-228 to become thorium-228, with a half-life of 1.9 years.
The subsequent decay chain is pretty rapid, taking it through very short-lived isotopes of radon-220, polonium-216 and so on until it becomes stable lead-208. Virtually all of this occurs via alpha decay. Of note is again that the initial isotope here – Th-232 – has a half-life of 14 billion years, or roughly the estimated age of the Universe. This makes it by far the most stable unstable isotope, with U-238 having a half-life of only about 4.463 billion years. Effectively, for most intents and purposes it might as well be a stable isotope.
Thorium is found in most rocks and soil, at around 6 ppm, with several minerals like thorite and monazite containing significantly higher levels.
This raises the question of how dangerous Th-232 truly is, such as when you start concentrating it in some fashion. How much radiation exposure do you experience once you take e.g. thorium ore and wear it around, or concentrate it into pure Th-232 and combine it with magnesium into a metal alloy that people regularly spend time around?
Negative Vibes

One persistent fad in the ‘alternative health’ community is that of negative ions and kin, with many shops selling items like bracelets and similar body-worn items that are supposed to generate these chi-balancing vibes via special ions. Interestingly, some of these are sold with thorium or uranium isotopes embedded in them.
Since these items are worn directly against the skin for extended periods of time, they form an excellent test case of the potential harm of such direct exposure to a significant amount of these isotopes.
According to the fact sheet on on the NRC website, as performed by Oak Ridge National Laboratory (ORNL), these items contain sometimes quite significant quantities of the radioactive material that range from Th-232 to U-238 and even Ra-226, some at more than 0.05% by weight to the point where they would have required a radioactive material license. The estimated local skin equivalent radiation dose was said to be more than the IAEA limit of 50 mSv annually. Despite this, these items require no special disposal methods and you are free to keep using them, albeit with some precautions.
Another study showed an annual exposure of 1.22 mSv, which with the assumed validity of the linear no-threshold (LNT) model would lead one to expect to see some kind of negative health effects. So far these have remained absent despite the popularity of these bracelets and the close contact.
TIG Welding
")
Outside of accidental exposure in the case of weird bracelets, there is a common use case for thorium, with thoriated tungsten welding electrodes. These are used with DC TIG welding, and contain around 1% (yellow band) to around 2% (red band) of thorium oxide (ThO2). Although an alternative exists with cerium oxide (CeO2) in ceriated tungsten electrodes, thoriated tungsten remains popular due to the long lifespan and good performance with common applications.
Although it’s noted that thoriated tungsten electrodes are radioactive due to the small percentage of thorium within the ThO2, it is such a small amount that no special precautions seem to be warranted. Much like with the thorium oxide found in the aforementioned bracelets and kin, you’ll probably be fine if you don’t try eating it.
Since thorium is also not a heavy metal, unlike uranium, it is in that regard significantly safer, as is its oxide form which does not have the pyrophoric proclivity of the metal form.
Alloys

This brings us back to the thorium-metal alloys which started the whole journey. A number of missiles and jet engines have used or currently use Mag-Thor alloys, which has led to for example the Dutch and German defense ministries investigating the radiation exposure from the J-79 jet engines, as found in F-104G Starfighter and F-4 Phantom aircraft.
The reason for this investigation was, as stated, the expected radiation dose when these engines and their respective aircraft are being worked on, handled for disposal, or displayed in a museum or collection. Here we also see the amount of thorium added to the used alloy, at up to 4% by weight, with an average of 1.7%. This means that the overwhelming majority of metal in these alloys is magnesium.
Part of the study was the measured dose at various distances from the components examined, along with a potential cumulative dose. Even in the most conservative scenario the dose came to about 1.2 µSv/hour, or less than 1 mSv/year, since it was probably assumed that people generally do not live 24/7 around these objects.
Realistically, a much bigger potential health risk involving thorium would be something along the lines of incandescent gas lantern mantles, which leads to significant higher exposure to the general public. Not to mention the hazards of the radioactive potassium-40 in something like bananas.
Cybercrime e AI: l’intelligenza artificiale Agentica supererà presto le capacità di difesa
Il phishing automatizzato, le frodi e lo sfruttamento dei dati in seguito a una violazione diventeranno operazioni perennemente attive in background
Milano, 15 dicembre 2025 – L’intelligenza artificiale agentica ridefinisce l’ecosistema criminale e presto permetterà di lanciare attacchi completamente automatizzati, che supereranno di gran lunga la potenza e la portata delle campagne ransomware e phishing attuali. Il dato emerge dall’ultimo report di Trend Micro, leader globale di cybersecurity, dal titolo “VibeCrime: Preparing Your Organization for the Next Generation of Agentic AI Cybercrime“.
Lo studio evidenzia che i cybercriminali utilizzeranno agenti AI specializzati, coordinati attraverso una regia centralizzata, al fine di condurre campagne su larga scala, adattive e altamente resilienti, riducendo al minimo l’intervento umano.
“L’intelligenza artificiale agentica fornisce ai criminali un arsenale pronto all’uso in grado di scalare, adattarsi e colpire anche senza l’intervento umano. Il rischio immediato non è un’improvvisa esplosione di crimini basati sull’AI, ma la lenta e inesorabile automazione degli attacchi che richiedevano capacità tecniche, tempo e sforzi. Questo sta già avvenendo”. Afferma Salvatore Marcis, Country Manager di Trend Micro Italia.
Gli highlight dello studio includono
- L’intelligenza artificiale agentica aumenterà enormemente il volume degli attacchi. Il phishing automatizzato, le frodi e lo sfruttamento dei dati in seguito a una violazione diventeranno operazioni perennemente attive in background
- Gli ecosistemi criminali passeranno da un modello cybercrime-as-a-service a uno cybercrime-as-a-servant, affidandosi ad agenti AI concatenati e a livelli di orchestrazione autonomi che gestiranno le attività criminali end-to-end
- Le piattaforme di difesa avranno bisogno di propri orchestratori e agenti autonomi per contrastare il cambiamento, altrimenti rischieranno di essere sopraffatte dalla portata e dalla velocità degli attacchi
- Nuove categorie di attacchi emergeranno molto più velocemente di quanto i difensori siano attualmente in grado di rilevare o mitigare
“L’Agentic AI ottimizzerà gli attacchi, amplificando i risultati di quelli con un basso ROI ed emergeranno nuovi modelli cybercriminali di business. Le aziende dovranno rivedere le strategie di security e investire in automazione e difese basate sull’intelligenza artificiale. Consigliamo di implementare un adeguato livello di resilienza prima che i cybercriminali industrializzino l’utilizzo dell’AI, altrimenti il rischio è di rimanere indietro nella corsa esponenziale agli armamenti, che separerà rapidamente le organizzazioni preparate da quelle che non lo sono.” Conclude Salvatore Marcis, Country Manager di Trend Micro Italia.
Ulteriori informazioni sono disponibili a questo link
Trend Micro
Trend Micro, leader globale di cybersecurity, contribuisce a rendere il mondo un posto più sicuro per lo scambio di informazioni digitali tra persone, organizzazioni pubbliche e private. Grazie all’IA e alle sue profonde conoscenze della cybersecurity, Trend protegge oltre 500.000 aziende e milioni di individui che utilizzano il cloud, le reti, gli endpoint e i più svariati dispositivi in tutto il mondo. Al centro della sua tecnologia c’è Trend Vision One
L’impareggiabile intelligence sulle minacce di Trend permette alle organizzazioni di proteggersi proattivamente, ogni giorno, contro centinaia di milioni di minacce.
L'articolo Cybercrime e AI: l’intelligenza artificiale Agentica supererà presto le capacità di difesa proviene da Red Hot Cyber.
After Decades, Linux Finally Gains Stable GPIB Support

Recently, [Greg Kroah-Hartman] proclaimed the joyous news on the Linux Kernel Mailing List that stable General Purpose Interface Bus (GPIB) support has finally been merged into the 6.19 Linux kernel.
The GPIB is a short-range 8-bit, multi-master interface bus that was standardized as IEEE 488. It first saw use on HP laboratory equipment in the 1970s, but was soon after also used by microcomputers like the Commodore PET, Commodore 64 and others. Although not high-speed with just 8 MB/s, nor with galvanic isolation requirements, it’s an uncomplicated bus design that can be implemented without much of a blip on the BOM costs.
The IEEE 488 standard consists of multiple elements, with 488.1 defining the physical interface and 488.2 the electrical protocol. Over the decades a communication protocol was also developed, in the form of SCPI and its standardized way of communicating with a wide range of devices using a simple human-readable protocol.
Although the physical side of IEEE 488 has changed over the years, with Ethernet becoming a major alternative to the short GPIB cables and large connectors, the electrical protocol and SCPI alike are still very much relevant today. This latest addition to the Linux kernel should make it much easier to use both old and new equipment equipped with this bus.
God Mode On: how we attacked a vehicle’s head unit modem

Introduction
Imagine you’re cruising down the highway in your brand-new electric car. All of a sudden, the massive multimedia display fills with Doom, the iconic 3D shooter game. It completely replaces the navigation map or the controls menu, and you realize someone is playing it remotely right now. This is not a dream or an overactive imagination – we’ve demonstrated that it’s a perfectly realistic scenario in today’s world.
The internet of things now plays a significant role in the modern world. Not only are smartphones and laptops connected to the network, but also factories, cars, trains, and even airplanes. Most of the time, connectivity is provided via 3G/4G/5G mobile data networks using modems installed in these vehicles and devices. These modems are increasingly integrated into a System-on-Chip (SoC), which uses a Communication Processor (CP) and an Application Processor (AP) to perform multiple functions simultaneously. A general-purpose operating system such as Android can run on the AP, while the CP, which handles communication with the mobile network, typically runs on a dedicated OS. The interaction between the AP, CP, and RAM within the SoC at the microarchitecture level is a “black box” known only to the manufacturer – even though the security of the entire SoC depends on it.
Bypassing 3G/LTE security mechanisms is generally considered a purely academic challenge because a secure communication channel is established when a user device (User Equipment, UE) connects to a cellular base station (Evolved Node B, eNB). Even if someone can bypass its security mechanisms, discover a vulnerability in the modem, and execute their own code on it, this is unlikely to compromise the device’s business logic. This logic (for example, user applications, browser history, calls, and SMS on a smartphone) resides on the AP and is presumably not accessible from the modem.
To find out, if that is true, we conducted a security assessment of a modern SoC, Unisoc UIS7862A, which features an integrated 2G/3G/4G modem. This SoC can be found in various mobile devices by multiple vendors or, more interestingly, in the head units of modern Chinese vehicles, which are becoming increasingly common on the roads. The head unit is one of a car’s key components, and a breach of its information security poses a threat to road safety, as well as the confidentiality of user data.
During our research, we identified several critical vulnerabilities at various levels of the Unisoc UIS7862A modem’s cellular protocol stack. This article discusses a stack-based buffer overflow vulnerability in the 3G RLC protocol implementation (CVE-2024-39432). The vulnerability can be exploited to achieve remote code execution at the early stages of connection, before any protection mechanisms are activated.
Importantly, gaining the ability to execute code on the modem is only the entry point for a complete remote compromise of the entire SoC. Our subsequent efforts were focused on gaining access to the AP. We discovered several ways to do so, including leveraging a hardware vulnerability in the form of a hidden peripheral Direct Memory Access (DMA) device to perform lateral movement within the SoC. This enabled us to install our own patch into the running Android kernel and execute arbitrary code on the AP with the highest privileges. Details are provided in the relevant sections.
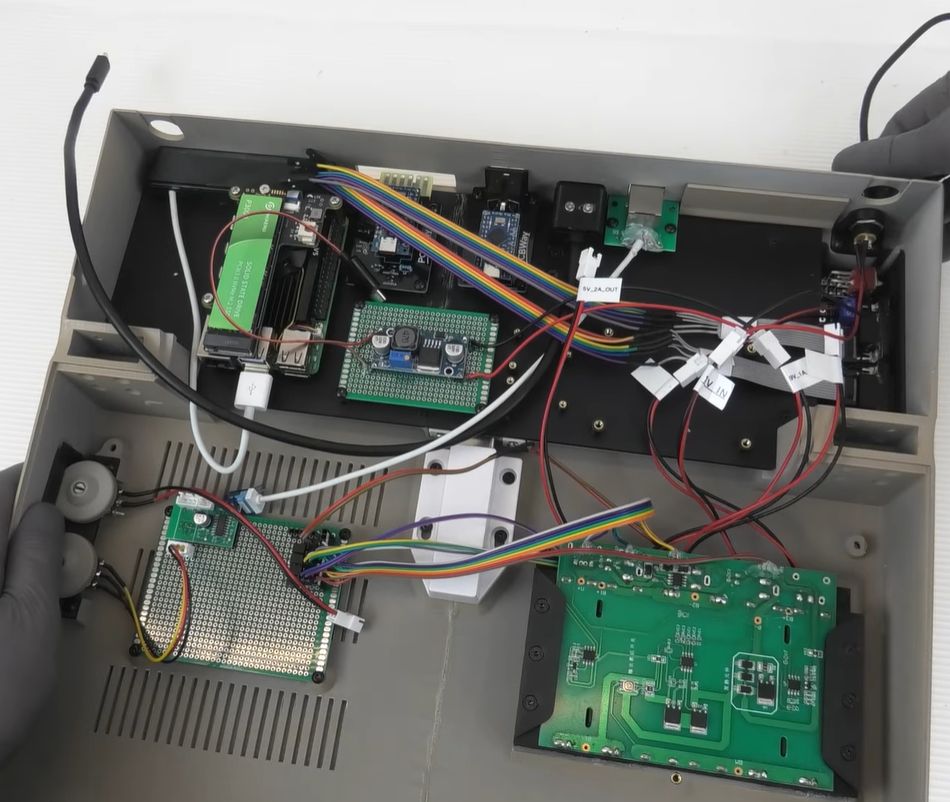
Acquiring the modem firmware
The modem at the center of our research was found on the circuit board of the head unit in a Chinese car.
Circuit board of the head unit

Description of the circuit board components:
| Number in the board photo | Component |
| 1 | Realtek RTL8761ATV 802.11b/g/n 2.4G controller with wireless LAN (WLAN) and USB interfaces (USB 1.0/1.1/2.0 standards) |
| 2 | SPRD UMW2652 BGA WiFi chip |
| 3 | 55966 TYADZ 21086 chip |
| 4 | SPRD SR3595D (Unisoc) radio frequency transceiver |
| 5 | Techpoint TP9950 video decoder |
| 6 | UNISOC UIS7862A |
| 7 | BIWIN BWSRGX32H2A-48G-X internal storage, Package200-FBGA, ROM Type – Discrete, ROM Size – LPDDR4X, 48G |
| 8 | SCY E128CYNT2ABE00 EMMC 128G/JEDEC memory card |
| 9 | SPREADTRUM UMP510G5 power controller |
| 10 | FEI.1s LE330315 USB2.0 shunt chip |
| 11 | SCT2432STER synchronous step-down DC-DC converter with internal compensation |
Using information about the modem’s hardware, we desoldered and read the embedded multimedia memory card, which contained a complete image of its operating system. We then analyzed the image obtained.
Remote access to the modem (CVE-2024-39431)
The modem under investigation, like any modern modem, implements several protocol stacks: 2G, 3G, and LTE. Clearly, the more protocols a device supports, the more potential entry points (attack vectors) it has. Moreover, the lower in the OSI network model stack a vulnerability sits, the more severe the consequences of its exploitation can be. Therefore, we decided to analyze the data packet fragmentation mechanisms at the data link layer (RLC protocol).
We focused on this protocol because it is used to establish a secure encrypted data transmission channel between the base station and the modem, and, in particular, it is used to transmit higher-layer NAS (Non-Access Stratum) protocol data. NAS represents the functional level of the 3G/UMTS protocol stack. Located between the user equipment (UE) and core network, it is responsible for signaling between them. This means that a remote code execution (RCE) vulnerability in RLC would allow an attacker to execute their own code on the modem, bypassing all existing 3G communication protection mechanisms.
3G protocol stack

The RLC protocol uses three different transmission modes: Transparent Mode (TM), Unacknowledged Mode (UM), and Acknowledged Mode (AM). We are only interested in UM, because in this mode the 3G standard allows both the segmentation of data and the concatenation of several small higher-layer data fragments (Protocol Data Units, PDU) into a single data link layer frame. This is done to maximize channel utilization. At the RLC level, packets are referred to as Service Data Units (SDU).
Among the approximately 75,000 different functions in the firmware, we found the function for handling an incoming SDU packet. When handling a received SDU packet, its header fields are parsed. The packet itself consists of a mandatory header, optional headers, and data. The number of optional headers is not limited. The end of the optional headers is indicated by the least significant bit (E bit) being equal to 0. The algorithm processes each header field sequentially, while their E-bits equal 1. During processing, data is written to a variable located on the stack of the calling function. The stack depth is 0xB4 bytes. The size of the packet that can be parsed (i.e., the number of headers, each header being a 2-byte entry on the stack) is limited by the SDU packet size of 0x5F0 bytes.
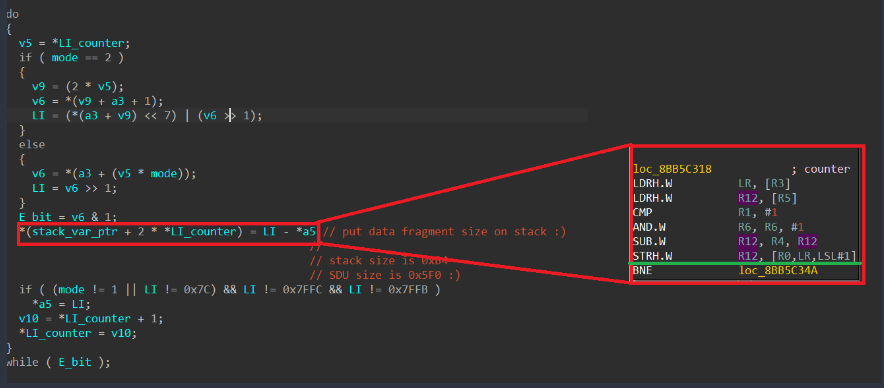
As a result, exploitation can be achieved using just one packet in which the number of headers exceeds the stack depth (90 headers). It is important to note that this particular function lacks a stack canary, and when the stack overflows, it is possible to overwrite the return address and some non-volatile register values in this function. However, overwriting is only possible with a value ending in one in binary (i.e., a value in which the least significant bit equals 1). Notably, execution takes place on ARM in Thumb mode, so all return addresses must have the least significant bit equal to 1. Coincidence? Perhaps.
In any case, sending the very first dummy SDU packet with the appropriate number of “correct” headers caused the device to reboot. However, at that moment, we had no way to obtain information on where and why the crash occurred (although we suspect the cause was an attempt to transfer control to the address 0xAABBCCDD, taken from our packet).
Gaining persistence in the system
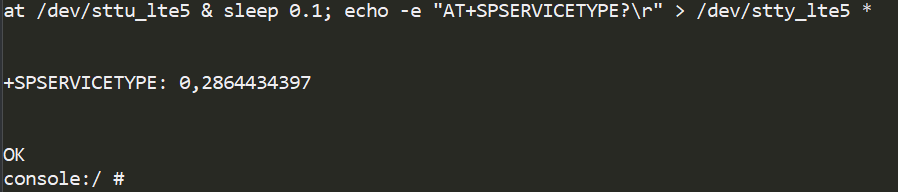
The first and most important observation is that we know the pointer to the newly received SDU packet is stored in register R2. Return Oriented Programming (ROP) techniques can be used to execute our own code, but first we need to make sure it is actually possible.
We utilized the available AT command handler to move the data to RAM areas. Among the available AT commands, we found a suitable function – SPSERVICETYPE.

Next, we used ROP gadgets to overwrite the address 0x8CE56218 without disrupting the subsequent operation of the incoming SDU packet handling algorithm. To achieve this, it was sufficient to return to the function from which the SDU packet handler was called, because it was invoked as a callback, meaning there is no data linkage on the stack. Given that this function only added 0x2C bytes to the stack, we needed to fit within this size.
Stack overflow in the context of the operating system

Having found a suitable ROP chain, we launched an SDU packet containing it as a payload. As a result, we saw the output 0xAABBCCDD in the AT command console for SPSERVICETYPE. Our code worked!
Next, by analogy, we input the address of the stack frame where our data was located, but it turned out not to be executable. We then faced the task of figuring out the MPU settings on the modem. Once again, using the ROP chain method, we generated code that read the MPU table, one DWORD at a time. After many iterations, we obtained the following table.

The table shows what we suspected – the code section is only mapped for execution. An attempt to change the configuration resulted in another ROP chain, but this same section was now mapped with write permissions in an unused slot in the table. Because of MPU programming features, specifically the presence of the overlap mechanism and the fact that a region with a higher ID has higher priority, we were able to write to this section.

All that remained was to use the pointer to our data (still stored in R2) and patch the code section that had just been unlocked for writing. The question was what exactly to patch. The simplest method was to patch the NAS protocol handler by adding our code to it. To do this, we used one of the NAS protocol commands – MM information. This allowed us to send a large amount of data at once and, in response, receive a single byte of data using the MM status command, which confirmed the patching success.
As a result, we not only successfully executed our own code on the modem side but also established full two-way communication with the modem, using the high-level NAS protocol as a means of message delivery. In this case, it was an MM Status packet with the cause field equaling 0xAA.

However, being able to execute our own code on the modem does not give us access to user data. Or does it?
The full version of the article with a detailed description of the development of an AR exploit that led to Doom being run on the head unit is available on ICS CERT website.
Why Push a Button When a Machine Can Do It For You

Remote control is a wonder of the age, we press a button, and something happens as if by magic. But what happens if there is no remote control, and instead a real physical button must be pressed? [What Up TK Here], who regular Hackaday readers might just recognize, had just this problem, and made a remote control button presser.
It’s a 3D printed frame which we’re told is designed for a specific item, on top of which is mounted a hobby servo. Rotating the servo brings the lever down on the button, and the job is done. At the user end there’s a button in a printed enclosure that’s definitely not a knock-off of a well-known franchise from a notoriously litigious console company.
This is all good, but the interest for other projects lies in how it works. It’s using a pair of ESP32 microcontrollers, and instead of connecting to an existing WiFi network it’s using ESP-NOW for simplicity and low latency. This is a good application for the protocol, but as we’ve seen, it’s useful for a lot more than just button pressing.
youtube.com/embed/ZmQ8ZgjdmAg?…
Sparire nell’epoca degli algoritmi: il nuovo Mattia Pascal tra dati, identità e sistemi che ci leggono
È uscito Il fu Mattia Pascal — L’identità ai tempi degli algoritmi, il romanzo di Simone D’Agostino, che rilegge il classico di Pirandello alla luce dei meccanismi digitali contemporanei.
Non si tratta di una riscrittura letteraria in senso tradizionale, ma di una trasposizione concettuale: cosa accadrebbe oggi a un uomo che tentasse davvero di “sparire”? Non più dai luoghi fisici, ma dai sistemi che raccolgono dati, tracciano comportamenti e ricostruiscono identità
Nel romanzo, Mattia Pascal prova a cancellarsi dai dati, a diventare nessuno in un mondo in cui l’identità non è più soltanto ciò che dichiariamo, ma ciò che gli algoritmi inferiscono a partire dalle nostre tracce digitali. Una fuga che si scontra con una realtà nuova: oggi non si fugge dai luoghi, ma dalle infrastrutture che leggono, archiviano e correlano ogni gesto.
eBook Kindle amazon.it/dp/B0G4WMZBWQ
Edizione cartacea (copertina flessibile) amazon.it/dp/B0G4N65FXD
Il libro si muove tra thriller psicologico, riflessione tecnologica e dimensione filosofica, mantenendo però un centro profondamente umano. È anche, in modo intimo e laterale, una storia d’amore: forse la più difficile da raccontare quando l’identità non appartiene più solo alle persone, ma ai sistemi che le osservano.

Da qui prende avvio una riflessione più ampia su cosa significhi davvero “sparire” nell’epoca degli algoritmi.

Sparire nell’epoca degli algoritmi: quando l’identità continua anche senza di noi
Che cosa significa davvero “sparire” nell’epoca dei dati?
Non è una domanda romantica, né nostalgica.
Parla invece di una questione profondamente tecnica, culturale e umana, che riguarda il modo in cui oggi costruiamo e perdiamo identità.
Nell’epoca dei dati, anche la sparizione assume un significato diverso.
Nel mondo analogico, sparire era un gesto fisico: cambiare città, interrompere relazioni, lasciare luoghi. Le tracce erano fragili perché affidate alla memoria delle persone, ai documenti cartacei, al passaparola. Con il tempo, potevano consumarsi
Dal mondo analogico alle reti invisibili
Oggi il concetto stesso di sparizione è cambiato.
Non scompariamo più solo dai luoghi, ma soprattutto dalle reti invisibili che registrano, correlano e ricostruiscono ciò che facciamo. Anche quando non parliamo, quando non pubblichiamo, quando cerchiamo di sottrarci.
Ed è qui che nasce il cuore de Il fu Mattia Pascal — L’identità ai tempi degli algoritmi.

Mattia Pascal oggi: perché la sparizione non funzionerebbe più
Il Mattia Pascal di Pirandello poteva approfittare di un equivoco per diventare “fu”. Poteva dichiararsi morto e ricominciare, perché l’identità era ancora qualcosa di localizzato, fragile, negoziabile.
Il Mattia Pascal contemporaneo vive invece in un mondo in cui l’identità non coincide più con ciò che dichiariamo, ma con ciò che resta di noi nei sistemi. Algoritmi, profili e memorie digitali non dimenticano come dimenticano le persone.
Il protagonista del romanzo tenta di cancellare ogni traccia, di diventare nessuno. Ma scopre che, nel mondo digitale, la cancellazione è solo apparente. L’ombra lasciata online continua a seguirlo, a definirlo, a renderlo leggibile.

Dalla sorveglianza all’inferenza automatica
La questione non è l’osservazione diretta, ma il funzionamento stesso dei sistemi: ricostruiscono. Mettono insieme frammenti, inferiscono comportamenti, attribuiscono coerenze. Anche l’assenza diventa informazione.
Quando i sistemi iniziano a ricordare
Questo modello non nasce in modo spontaneo.
Sono soprattutto le grandi compagnie tecnologiche a operare questa registrazione sistematica.
Motori di ricerca, social network, piattaforme di advertising, servizi cloud e sistemi di intermediazione basano il proprio valore sulla capacità di registrare, conservare e correlare enormi quantità di dati comportamentali.
La selezione non avviene più al momento della raccolta: si registra tutto, rimandando la valutazione a un secondo tempo, quando i dati potranno essere analizzati, incrociati e utilizzati. Non è il singolo dato a essere decisivo, ma la sua persistenza e la possibilità di combinarlo con altri.
Nel libro, questo passaggio è affidato a un intermezzo dedicato al concetto di archivio e di memoria.
“Ogni società ha deciso cosa meritasse di essere conservato. Le tavolette d’argilla tenevano i conti dei raccolti; gli archivi medievali conservavano i contratti e i battesimi; gli archivi di Stato custodivano leggi e guerre. Oggi l’archivio non sceglie più: raccoglie tutto.
Non c’è differenza tra un capolavoro e un gesto minore. La foto di un tramonto e lo scontrino della spesa hanno lo stesso rango: entrambi vengono catalogati, copiati, sincronizzati.
Questo livellamento ha un effetto devastante: rende tutto potenzialmente significativo, e quindi niente più davvero importante.
L’archivio digitale è onnivoro. Non discrimina tra valore e rumore, tra memoria e scarto. Ed è proprio questa sua natura che cambia il nostro modo di vivere: non sappiamo più distinguere ciò che conta da ciò che è pura eccedenza.
Ci troviamo a nuotare in un oceano di tracce, incapaci di stabilire una gerarchia.
Il gesto minore – aprire e chiudere un’app, scorrere tre secondi in più su un feed, spostare il cursore – diventa informazione pari a un testamento o a una lettera d’addio. L’archivio li considera uguali. È la democrazia radicale del dato: tutto vale, tutto resta.
Il problema è che la nostra mente non è fatta per questa democrazia. Noi abbiamo bisogno di selezione, di oblio, di rilevanza. L’archivio, invece, accumula senza pietà. E nella massa crescente di gesti minori, rischiamo di perdere di vista la nostra storia”.
Fiducia, reputazione e coerenza statistica
Nei sistemi digitali contemporanei, la fiducia non nasce dalla conoscenza, ma dalla coerenza statistica.
Essere affidabili non significa essere veri, ma risultare sufficientemente prevedibili.
È su questa logica che si costruiscono punteggi, reputazioni e decisioni automatiche
Nel romanzo, questo meccanismo viene raccontato attraverso un intermezzo narrativo che descrive come la reputazione digitale venga costruita dai sistemi.

“Un tempo la reputazione era voce. Gente che parlava di te.
Ora è codice.
Non sei affidabile perché qualcuno ti conosce.
Sei affidabile perché una macchina ti ha incrociato abbastanza volte.
Hai un punteggio, anche se non lo sai.
C’è chi calcola quanto sei coerente tra una foto e l’altra.
Chi pesa la qualità dei tuoi amici.
Chi valuta da quanto tempo usi la stessa email.
Chi misura la tua stabilità in base alla posizione GPS.
Tutti questi indizi formano una metrica invisibile, ma reale.
Essere affidabili non significa essere veri.
Significa essere statisticamente credibili.
Quando provi a reinventarti, scopri che raccontarti non basta.
Devi essere riconoscibile nei pattern, un volto tra mille.
Chi sparisce perde il passato, ma anche la possibilità di costruire una reputazione futura.
Non puoi costruirla senza dati.
Per essere qualcuno oggi, serve una somma di indizi.
Serve coerenza. Frequenza. Persistenza.
Serve un algoritmo che dica “sì”.
Senza quello, sei opaco.
Senza quello, sei Mattia Pascal”.
L’identità come effetto collaterale
Ogni interazione digitale lascia una firma.
Non una firma evidente, ma una calligrafia: orari ricorrenti, scelte ripetute, abitudini che sembrano irrilevanti prese singolarmente, ma decisive se aggregate.
Persino i tool più anonimi – Tor, VPN, DNS resolver indipendenti – rivelano che stai cercando di non farti vedere. E questa è già un’informazione.
È il principio alla base dell’OSINT moderno: non cercare il dato perfetto, ma combinare quelli imperfetti.
Il libro non racconta una fuga contro la tecnologia, ma una fuga dentro la tecnologia. Una scomparsa che si scontra con un paradosso: più si tenta di sparire, più si diventa leggibili.
Ed è qui che emerge la dimensione più umana del racconto.
Anche nella fuga più silenziosa resta un bisogno primordiale: essere trovati, riconosciuti, testimoniati. Non come sorveglianza, ma come forma di esistenza.
Il romanzo lavora sulla tensione tra libertà e controllo, tra desiderio di sottrazione e necessità di essere visti. Racconta una scomparsa tipicamente contemporanea, in cui non basta sparire dal mondo per smettere di esistere nei dati.
Non è un manuale su come cancellarsi e nemmeno una denuncia tecnologica.
Si tratta invece di una riflessione narrativa su cosa significhi essere qualcuno quando l’identità continua anche oltre il corpo.
In questo senso, Il fu Mattia Pascal — L’identità ai tempi degli algoritmi non parla solo di tecnologia. Parla anche di una domanda antica, rimasta intatta nell’era degli algoritmi:
se nessuno ci trova più, esistiamo ancora?
Per chi desidera approfondire questi temi in forma narrativa, Il fu Mattia Pascal — L’identità ai tempi degli algoritmi è disponibile su Amazon.
eBook Kindle amazon.it/dp/B0G4WMZBWQ
Edizione cartacea (copertina flessibile) amazon.it/dp/B0G4N65FXD
L'articolo Sparire nell’epoca degli algoritmi: il nuovo Mattia Pascal tra dati, identità e sistemi che ci leggono proviene da Red Hot Cyber.
Building a Commodore 64 Laptop

While technically you could argue that Commodore’s SX-64 could be construed as a ‘portable’ system, its bulky format ensured that it was only portable in the sense that a 1980s CRT-based oscilloscope is also portable. Sadly, this turned out to be the last real attempt by Commodore to make a portable non-PC compatible system, with the ill-fated Commodore LCD project never making it out of development. We can, however, glean from this some design hints of what Commodore’s designers had in mind.
Interestingly, [Kevin] decided to instead use the Macintosh Portable as inspiration, with adaptations to make it look more like a breadbin C64. One could have argued that the C64C’s design would have worked better. Regardless, an enclosure was 3D printed, with parts glued together and metal dowels added for support.
For the guts, a custom keyboard with a new PCB and FDM printed keycaps was used, with a Raspberry Pi Pico as keyboard controller. We would here cue the jokes about how the keyboard controller is more powerful than a C64, but the real brains of this laptop come in the form of a Raspberry Pi 5 SBC for running the Vice C64 emulator, which blows a C64 even further out of the water.
This choice also means there’s no direct compatibility with genuine C64 peripherals, but a workaround involving many adaptors and more MCUs was implemented. Sadly, cartridge compatibility was sacrificed due to these complications. The resulting innards can be glimpsed in the above screenshot to give some idea of what the end result looks like.
Of course, this isn’t the first time a Commodore 64 laptop has been created; [Ben Heck] used a C64C mainboard and an original keyboard back in 2009. This meant direct compatibility with all peripherals, including cartridges. Hopefully, now that Commodore as a company has been revived, it will pick up on ideas like these, as an FPGA-based C64 or C128 laptop would be pretty rad.
Thanks to [fluffy] for the tip.
youtube.com/embed/H5QQ0ECfwyE?…
Sicurezza Wi-Fi Multilivello: La Guida Completa a Segmentazione, WPA3 e Difesa Attiva
Con l’espansione dell’Internet of Things (IoT), il numero di dispositivi connessi alle reti wireless è in continua crescita, sia nelle case che nelle aziende . Questo scenario rende la sicurezza delle reti wireless una priorità assoluta, poiché tali dispositivi rappresentano un bersaglio ideale per attacchi informatici .
Nei precedenti capitoli di questa rubrica abbiamo esplorato il lato offensivo della sicurezza Wi-Fi . Abbiamo visto quanto sia disarmante la semplicità con cui un attaccante, armato di strumenti open-source come Airodump-ng e Wireshark, possa mappare una rete, intercettare handshake crittografici e manipolare il traffico tramite attacchi Man-in-the-Middle .
Tuttavia, comprendere l’attacco è solo la metà dell’opera. La vera sfida per i CISO, i Network Administrator e i professionisti IT è costruire un’infrastruttura capace di resistere a queste intrusioni . Non stiamo parlando di una “soluzione magica” o di un singolo dispositivo hardware da installare nel rack, ma di un cambiamento radicale di mentalità . Dobbiamo abbandonare il concetto di “sicurezza perimetrale” (il classico muro che separa il “dentro” sicuro dal “fuori” insicuro) per abbracciare modelli più evoluti come la Defense-in-Depth (difesa in profondità) e le architetture Zero Trust . In questo approfondimento, analizzeremo come segmentazione, crittografia avanzata e intelligenza artificiale convergono per creare le moderne reti autodifensive .
La Segmentazione: Fermare i Movimenti Laterali
Se immaginiamo la nostra rete come un sottomarino, la segmentazione è l’equivalente dei compartimenti stagni. Se uno scafo viene perforato (un dispositivo viene compromesso), l’acqua (l’attaccante) deve rimanere confinata in quella sezione, senza poter affondare l’intera nave . Nel contesto Wi-Fi, la tecnica regina per implementare questa logica è l’uso delle VLAN (Virtual Local Area Network) .
Oltre la rete piatta
In molte implementazioni domestiche o di piccole imprese, la rete è “piatta” (Flat Network) . Questo significa che tutti i dispositivi – dal server con i dati finanziari, al laptop del CEO, fino alla lampadina smart da 10 euro – condividono lo stesso dominio di broadcast . Ricordate l’uso di netdiscover o nmap che abbiamo analizzato nell’articolo precedente? https://www.redhotcyber.com/post/anatomia-di-una-violazione-wi-fi-dalla-pre-connessione-alla-difesa-attiva/ In una rete piatta, una volta che l’attaccante ha violato la password Wi-Fi (o ha trovato una porta Ethernet libera), ha visibilità immediata su ogni host . Può lanciare attacchi ARP Spoofing contro chiunque .
Creare “Zone di Fiducia”
La segmentazione permette di suddividere l’infrastruttura in sezioni logiche isolate, riducendo drasticamente la superficie di attacco . Una configurazione professionale standard prevede almeno tre macro-segmenti:
- VLAN Corporate (Blindata): Qui risiedono i dipendenti e gli asset critici . L’accesso è protetto da protocolli 802.1X (WPA-Enterprise) che richiedono certificati digitali o credenziali di dominio, non una semplice password condivisa .
- VLAN Guest (Isolata): Destinata a visitatori e fornitori. Questa rete deve fornire solo accesso a Internet (spesso limitato in banda e filtrato nei contenuti) e deve essere completamente isolata dalla LAN interna . I dispositivi connessi qui non devono potersi vedere tra loro (Client Isolation) .
- VLAN IoT (Zero Trust): Questa è oggi la frontiera più critica . I dispositivi IoT (telecamere, sensori, smart TV) sono spesso non aggiornabili e intrinsecamente vulnerabili . Isolarli in una VLAN dedicata impedisce che un sensore termico compromesso diventi il “ponte” per attaccare il server aziendale .
 per isolare il traffico IoT e Guest dalla rete aziendale e Active Directory. (Questo è fondamentale per Google. Descrive cosa succede nell'immagine usando le parole chiave).")
L’immagine sopra illustra come un gateway centrale gestisca il traffico tra VLAN diverse applicando regole di firewalling rigorose: il traffico dalla VLAN IoT verso la VLAN Corporate deve essere bloccato di default .
Defense-in-Depth: L’architettura a Cipolla
La segmentazione, per quanto potente, non è sufficiente da sola . Un attaccante determinato potrebbe trovare modi per saltare da una VLAN all’altra (VLAN Hopping) se gli switch non sono configurati correttamente . Qui entra in gioco la strategia di Difesa Multilivello (Defense-in-Depth) .
Questo approccio si basa sulla ridondanza dei controlli di sicurezza. Se una barriera fallisce, ne subentra un’altra immediatamente successiva . Possiamo visualizzare questa strategia come una serie di strati concentrici:
- Livello Perimetrale: Firewall Next-Generation (NGFW) che filtrano il traffico in ingresso e uscita, bloccando connessioni verso botnet note .
- Livello di Rete: Sistemi di crittografia (WPA3/VPN) per proteggere i dati in transito e IDS (Intrusion Detection Systems) per monitorare il traffico interno .
- Livello Endpoint: Soluzioni EDR (Endpoint Detection and Response) installate sui singoli laptop e server, capaci di bloccare processi malevoli anche se la rete è stata superata .
- Livello Inganno (Deception): L’uso di Honeypot (che vedremo più avanti) per attirare gli attaccanti .
La forza della difesa multilivello sta nella sua resilienza . Mentre un firewall tradizionale opera con regole statiche (“Blocca porta 80”), un sistema integrato multilivello sfrutta l’Intelligenza Artificiale per correlare eventi apparentemente slegati tra i vari strati, reagendo in modo dinamico .
Protocolli e Sfide: WPA2, AES/TKIP e WPA3
Se la segmentazione protegge l’interno della rete, la crittografia è il guardiano del cancello .
Protocolli di Sicurezza Attuali: WPA e WPA2
La maggior parte delle reti wireless utilizza protocolli di crittografia come WEP, WPA e WPA2, con WPA e WPA2 che dominano per la loro robustezza .
- WPA/WPA2: Considerati altamente sicuri grazie all’utilizzo di algoritmi avanzati come AES (Advanced Encryption Standard) e TKIP (Temporal Key Integrity Protocol) .
- La sicurezza si basa sulla difficoltà computazionale di risolvere complesse equazioni matematiche .
Tuttavia, con l’avanzamento tecnologico, anche questi protocolli potrebbero essere vulnerabili . La debolezza principale del WPA2-Personal (quello con la password condivisa) risiede nel “4-Way Handshake” . Come abbiamo dimostrato nell’articolo sugli attacchi, un hacker può catturare questo handshake e tentare di indovinare la password nel proprio laboratorio, testando milioni di combinazioni al secondo senza che la rete bersaglio se ne accorga .
WPA3 e SAE: La Nuova Frontiera
Oggi, WPA3 (standardizzato dalla Wi-Fi Alliance ”wi-fi.org/”)rappresenta la scelta obbligata per qualsiasi nuova implementazione . Risolve il problema alla radice introducendo il protocollo SAE (Simultaneous Authentication of Equals), basato sul metodo di scambio chiavi “Dragonfly” .
I vantaggi tecnici del SAE:
- Resistenza ai dizionari offline: Con WPA3, un attaccante non può portare via i dati per crackarli offline . Ogni tentativo di indovinare la password richiede un’interazione attiva con l’Access Point . Questo significa che l’attaccante deve essere fisicamente presente e che la rete può rilevare e bloccare i tentativi ripetuti .
- Forward Secrecy: Anche se un attaccante riuscisse a scoprire la password della rete in futuro, non potrà decifrare il traffico catturato nel passato . Ogni sessione ha chiavi effimere uniche .
Tabella di Confronto
Il rischio della “Transition Mode” e la vulnerabilità “Dragonblood”
Nonostante la superiorità tecnica, l’adozione di WPA3 affronta ostacoli:
- Hardware Legacy: Molti dispositivi (vecchie stampanti, terminali di magazzino, sensori medici) non supportano WPA3 .
- Transition Mode: Per ovviare a ciò, i produttori hanno introdotto la modalità WPA3-Transition, che permette la connessione sia via WPA2 che WPA3 . Attenzione: Questa configurazione è un compromesso di sicurezza. Un attaccante esperto può eseguire un attacco di Downgrade, forzando un client moderno a disconnettersi e riconnettersi utilizzando il protocollo WPA2 più debole .
- Vulnerabilità Dragonblood: Il protocollo WPA3 stesso, sebbene più sicuro, non è perfetto . Vulnerabilità come l’handshake Dragonblood possono essere sfruttate . Si tratta di una debolezza nell’implementazione dell’handshake che potrebbe essere utilizzata per aggirare le protezioni di WPA3 .
Minacce Emergenti: AI e Quantum Computing
Il panorama della sicurezza sta cambiando a causa di due fattori rivoluzionari.
L’Impatto dell’Intelligenza Artificiale (IA)
L’uso dell’intelligenza artificiale (IA) e del machine learning (ML) sta trasformando il panorama della sicurezza informatica, sia per i difensori che per gli attaccanti .
- Per gli aggressori: IA e ML possono ridurre il costo computazionale necessario per eseguire attacchi di forza bruta . Il cracking delle password potrebbe diventare più veloce ed efficiente .
Il Potenziale dei Computer Quantistici
Sebbene i computer quantistici siano ancora in una fase di sviluppo iniziale, il loro potenziale è significativo .
- Capacità: Possono eseguire calcoli complessi in tempi significativamente più brevi rispetto ai computer classici .
- Minaccia ai Protocolli: Rappresentano una minaccia per la sicurezza di protocolli come WPA/WPA2, che si basano su problemi matematici difficili da risolvere con i computer tradizionali .
È quindi fondamentale sviluppare protocolli di crittografia post-quantistici . L’obiettivo è garantire che i dati rimangano sicuri anche contro attacchi basati su capacità computazionali avanzate . La ricerca è in corso, ma questi protocolli non sono ancora ampiamente implementati .
Gestione Identità: MFA e AI Comportamentale
Anche la crittografia più robusta fallisce se la chiave d’accesso viene rubata tramite phishing o social engineering . Per questo motivo, la gestione dell’identità (Identity Management) è diventata una componente critica .
Oltre la password: L’MFA
L’autenticazione a più fattori (MFA) non è più un optional . Nelle reti aziendali (WPA-Enterprise), l’accesso non dovrebbe mai basarsi solo su username e password . È necessario integrare un secondo fattore:
- Una notifica Push su app mobile .
- Un token hardware (chiavetta FIDO2) .
- Un certificato digitale installato sul dispositivo .
AI Comportamentale (UEBA)
Qui entra in gioco l’Intelligenza Artificiale, trasformando la gestione accessi da statica a dinamica . I moderni sistemi di UEBA (User and Entity Behavior Analytics) creano un profilo base per ogni utente e dispositivo . Esempio pratico: Il sistema sa che l’utente “Mario Rossi” si collega solitamente tra le 08:00 e le 19:00, dall’ufficio di Roma, utilizzando un laptop Dell e scambiando circa 500MB di dati . Se improvvisamente le credenziali di Mario vengono usate alle 03:00 di notte, da un indirizzo IP associato alla Russia, per scaricare 10GB di dati, il sistema riconosce l’anomalia comportamentale . In una rete autodifensiva, l’AI reagisce istantaneamente: non si limita a loggare l’evento, ma blocca la sessione o mette il dispositivo in quarantena (VLAN limitata) richiedendo una ri-autenticazione forte .
Limiti Hardware e Architetture Ibride (Edge/Cloud)
Implementare crittografia avanzata, ispezione profonda dei pacchetti e analisi AI in tempo reale richiede risorse. Questo ci porta a un nodo cruciale: l’hardware. I router consumer o di fascia bassa (SOHO) hanno CPU e RAM limitate. Chiedere a questi dispositivi di decifrare traffico WPA3 ad alta velocità e analizzarlo con algoritmi di Machine Learning porterebbe al collasso della rete (collo di bottiglia).
La risposta dell’industria è l’adozione di architetture ibride Edge-Cloud.
- L’Edge (Il Bordo): Gli Access Point e gli switch moderni diventano più intelligenti. Eseguono un’analisi preliminare “leggera” direttamente sul traffico per decisioni immediate (es. bloccare un attacco DDoS o un ARP spoofing palese). Questo riduce la latenza a zero.
- Il Cloud: I metadati del traffico (non i dati sensibili) vengono inviati al cloud, dove cluster di server potentissimi eseguono l’analisi comportamentale pesante, confrontando i dati con le minacce globali (Threat Intelligence) e aggiornando le regole di sicurezza degli apparati Edge.

Tuttavia, questo modello introduce la sfida della latenza. Ogni “salto” verso il cloud introduce millisecondi di ritardo. La progettazione della rete deve quindi bilanciare accuratamente cosa viene elaborato localmente e cosa in remoto.
Difesa Attiva: Honeypot e IDS
Finora abbiamo parlato di difese preventive. Ma cosa succede se l’attaccante è già dentro? Qui passiamo alla “Difesa Attiva”, utilizzando sistemi che non solo osservano, ma ingannano.
IDS e IPS: Le sentinelle
Gli Intrusion Detection Systems (IDS) e Intrusion Prevention Systems (IPS) sono la naturale evoluzione di strumenti come Wireshark. Invece di richiedere un analista umano che guardi i pacchetti, l’IPS analizza il flusso 24/7. Grazie all’AI, gli IPS moderni hanno superato il problema storico dei “falsi positivi”. Riescono a distinguere un trasferimento file legittimo massivo da un tentativo di esfiltrazione dati low-and-slow (lento e basso), progettato per sfuggire ai controlli tradizionali.
Honeypot: La trappola
Una delle tecniche più affascinanti della difesa multilivello è l’uso degli Honeypot (letteralmente “barattoli di miele”). Un honeypot è un sistema (un server, un PC, o anche un finto sensore IoT) deliberatamente vulnerabile e non protetto, posizionato in una VLAN isolata e monitorata.
- La logica è spietata: Poiché nessun dipendente legittimo ha motivo di connettersi a quella macchina, qualsiasi traffico diretto verso l’honeypot è, per definizione, ostile.
- Vantaggio: Genera allarmi ad altissima fedeltà (zero falsi positivi).
- Intelligence: Permette di osservare l’attaccante mentre crede di agire indisturbato, raccogliendo dati sulle sue tecniche (TTPs) per blindare il resto della rete.
Strategie di Autodifesa Proattiva
Per contrastare le minacce emergenti e proteggere le reti wireless, è necessario adottare strategie diversificate e proattive:
- Adattatori di rete avanzati: Migliorare l’hardware per rilevare vulnerabilità in tempo reale.
- Modelli di elaborazione affidabile: Integrare meccanismi adattivi che rispondano automaticamente a tentativi di dirottamento.
- Educazione e consapevolezza: Formare gli utenti su buone pratiche di sicurezza, come la scelta di password complesse e l’aggiornamento regolare del firmware.
Conclusioni e Futuro
La sicurezza ha inevitabilmente un costo. Richiede investimenti in hardware (AP WPA3, Firewall), software (licenze AI/Cloud) e competenze umane. Per le piccole imprese, questo può sembrare un onere insostenibile. Tuttavia, la democratizzazione delle tecnologie cloud sta rendendo le reti autodifensive accessibili anche alle PMI. La domanda che ogni manager deve porsi non è “quanto costa la sicurezza?”, ma “quanto costa fermare l’azienda per tre giorni a causa di un ransomware?”.
L’adozione massiccia della tecnologia wireless, alimentata dall’IoT, richiede una sicurezza delle reti wireless all’avanguardia . Mentre IA, ML e computer quantistici possono potenzialmente compromettere i protocolli di sicurezza esistenti, è essenziale continuare a sviluppare soluzioni resistenti e strategie di autodifesa proattive .
La sicurezza nelle reti wireless non è un obiettivo statico, ma un processo dinamico che richiede innovazione continua per stare al passo con le minacce emergenti. Guardando all’orizzonte, la convergenza tra Wi-Fi 7 e 5G porterà a scenari ancora più evoluti. Con tecnologie come il Multi-Link Operation (MLO) del Wi-Fi 7, la rete potrà spostare dinamicamente i flussi critici su frequenze non congestionate o non sotto attacco, garantendo una resilienza operativa mai vista prima. La rete del futuro non sarà solo un tubo per trasportare dati, ma un sistema immunitario digitale capace di rilevare, isolare e neutralizzare le minacce autonomamente.
L'articolo Sicurezza Wi-Fi Multilivello: La Guida Completa a Segmentazione, WPA3 e Difesa Attiva proviene da Red Hot Cyber.
It’s Week: Rimini Si Impone Come Nuovo Hub Della Sovranità Digitale E Del Tech Made In Italy
Nel panorama nazionale delle manifestazioni dedicate alla tecnologia, si consolida un evento focalizzato sul comparto italiano. Il baricentro si sposta a Rimini, storicamente snodo strategico sin dall’epoca romana e oggi crocevia dell’innovazione.
Sulla Riviera romagnola, tradizionalmente associata all’economia turistica, si registra un cambio di paradigma. La città amplia la sua vocazione e investe con decisione nel digitale, puntando ad assumere un ruolo da protagonista nell’ecosistema tecnologico nazionale. L’obiettivo è diversificare la propria offerta oltre la stagionalità balneare.

IL PALACONGRESSI: ECOSISTEMA PER IL NETWORKING
Novembre 2025, nei giorni 11 e 12 al Palacongressi di Rimini, si è svolta la terza edizione di IT’S WEEK. L’evento è stato organizzato da La Tech Made in Italy, con il patrocinio del Ministero delle Imprese e del Made in Italy e del Ministero degli Affari Esteri e della Cooperazione Internazionale.
L’appuntamento è stato dedicato alle software house, agli innovatori e alle PMI, con l’obiettivo di promuovere la tecnologia nostrana e diffondere la cultura digitale tra le imprese. Un evento che pone l’accento sul tema della sovranità digitale nazionale.
Il Palacongressi, caratterizzato dalla struttura a conchiglia, ha ospitato la manifestazione garantendo spazi funzionali. La sua moderna architettura ha permesso una gestione fluida dei flussi: dalla Sala Plenaria agli spazi dedicati ai workshop e agli stand-up. La logistica si è rivelata efficace per favorire il networking B2B tra i partecipanti.

I PILASTRI TEMATICI: DALL’AI ALLA CYBERSECURITY
I temi della manifestazione, strutturata in modalità ibrida con sessioni anche online, hanno coperto diverse verticalità del settore:
Intelligenza Artificiale e Cybersecurity: Pilastri dell’attuale scenario tecnologico, affrontati attraverso l’analisi di casi studio e applicazioni pratiche per le aziende.
Disability & Inclusion: Un argomento trasversale che ha trovato ampio spazio nel programma. Ha differenziato l’evento da altri format tecnici. L’inclusione digitale è stata trattata analizzando soluzioni per l’abbattimento delle barriere tecnologiche.
Sovranità digitale: Il focus si è concentrato sullo sviluppo del tech “Made in Italy” come asset nazionale, propedeutico a un posizionamento competitivo nel mercato europeo.
Mobility: Analisi dell’evoluzione del settore automotive attraverso la tecnologia italiana, con approfondimenti su elettrificazione e guida autonoma.
Sostenibilità: Sessioni dedicate alle PMI per presentare software e soluzioni conformi alle normative ambientali e ai criteri ESG (Environmental, Social, Governance)

LA VISIONE DI MAX BRIGIDA
Figura chiave e organizzatore della manifestazione è Max Brigida. Ideatore del format, il quale ha delineato la strategia alla base di IT’S WEEK. Interpellato da Red Hot Cyber sulla genesi del progetto, ha dichiarato:
“Ho lavorato nel mondo del tech e dello sviluppo software per quasi tutta la mia carriera professionale. In Italia abbiamo sempre fatto grandi cose con i migliori inventori e sviluppi tecnologici. Tuttavia, abbiamo sempre parlato di food, moda, design, auto, ma mai di tech. IT’S WEEK vuole diventare un punto d’incontro, un ecosistema dove le aziende italiane ed estere vengano a scoprire e conoscere il valore e il talento italiano nel campo tech!”

OSPITI E KEYNOTE SPEAKER: TRA RICERCA E MERCATO
Il palco della Plenaria ha ospitato un ventaglio eterogeneo di relatori, oltre 100 Speaker che hanno spaziato dalla ricerca accademica all’imprenditoria innovativa. Questo ha offerto una visione sistemica del settore.
Tra le voci più autorevoli in ambito scientifico, il Prof. Massimo Buscema, Direttore del Semeion Centro Ricerche, ha tenuto una lectio sull’AI Investigativa e la previsione dei “Cigni Neri” nei sistemi digitali complessi.

Sul fronte della strategia d’impresa e della governance sono intervenuti Filipe Teixeira, CEO & Founder di AltermAInd, che ha analizzato l’evoluzione delle competenze umane nell’era dell’intelligenza artificiale, e Lucia Chierchia, Managing Partner di Gellify, che ha portato la sua esperienza nella gestione di ecosistemi di Open Innovation e-business digitali.
Particolarmente significativa la testimonianza di Maicol Verzotto, ex tuffatore olimpico oggi CEO di Soource AI. Ha raccontato la sua transizione “dal trampolino al tech” nel keynote Anatomia di un pivot, evidenziando i parallelismi tra disciplina sportiva e startup.

Spazio anche alle verticalità più avanzate. Raffaele Salvemini, CEO di BrainArt & Vibre, ha esplorato le frontiere del Neurotech e delle interfacce cervello-computer (BCI), sintetizzando così la sua visione:
“Neurotech: tutto nasce nella mente, è il luogo in cui il possibile prende forma e il futuro comincia.”
A chiudere il cerchio sulle applicazioni di mercato è stato Antonio Perfido, Co-Founder di The Digital Box, che ha delineato lo stato dell’arte delle tecnologie di marketing:
“MarTech Made in Italy che funziona: automazione, AI e strategia per vendere di più e meglio.”
GLI ADA LOVELACE AWARDS E L’IMPEGNO SOCIALE
Momento centrale della manifestazione è stata la cerimonia di consegna degli Ada Lovelace Awards. Il riconoscimento, voluto da Max Brigida per valorizzare le eccellenze che si distinguono per risultati e innovazione, è stato assegnato quest’anno a OptiPro. L’azienda è stata premiata per aver sviluppato il “miglior software per l’innovazione e l’ottimizzazione dei processi”.
L’evento ha confermato anche una forte vocazione inclusiva. Un’attenzione particolare è stata riservata al tema della disabilità e all’impatto sociale delle tecnologie, con la devoluzione di una parte dei ricavati all’AIPD (Associazione Italiana Persone con Sindrome di Down).

VERSO LA QUARTA EDIZIONE
Grazie alla formula ibrida che ha ampliato la platea di riferimento, IT’S WEEK si posiziona come appuntamento di rilievo per gli stakeholder della tecnologia italiana. L’evento supera la celebrazione delle eccellenze per generare opportunità di business e collaborazione tra manager, istituzioni e Pubblica Amministrazione.
Rimini conferma così la volontà di evolversi: non più solo capitale delle vacanze, ma distretto in crescita per il digitale italiano. L’obiettivo è consolidare l’ecosistema dell’innovazione e valorizzare l’ingegno tecnico nazionale.

L'articolo It’s Week: Rimini Si Impone Come Nuovo Hub Della Sovranità Digitale E Del Tech Made In Italy proviene da Red Hot Cyber.
Magnetic Transformer Secrets

[Sam Ben-Yaakov] has another lecture online that dives deep into the physics of electronic processes. This time, the subject is magnetic transformers. You probably know that the ratio of current in the primary and secondary is the same (ideally) as the ratio of the turns in each winding. But do you know why? You will after watching the video.
Actually, you will after watching the first two minutes of the video. If you make it to the 44-minute mark, you’ll learn more about Faraday’s law, conservation of energy, and Lenz’s law.
One of our favorite things about the Internet is that you can find great lectures like these online, both from university programs and from individuals like [Dr. Ben-Yaakov]. There was a time when you would have had to enroll in a college to get the kind of education you can just browse through now.
Too much math and technical detail for you? We get it. You don’t need to understand all of this to use a transformer. But if you want to understand the math and the physics behind the things we do, nothing is stopping you. Even if you need to brush up on math, there are plenty of similar lectures to learn about that online, too.
Want a university class that is more practical? We hear you. Prefer simulation to math or solder? We hear you, too.
youtube.com/embed/g7sisyNJk9I?…
Plug Into USB, Read Hostname and IP Address

Ever wanted to just plug something in and conveniently read the hostname and IP addresses of a headless board like a Raspberry Pi? Chances are, a free USB port is more accessible than digging up a monitor and keyboard, and that’s where [C4KEW4LK]’s rpi_usb_ip_display comes in. Plug it into a free USB port, and a few moments later, read the built-in display. Handy!
The device is an RP2350 board and a 1.47″ Waveshare LCD, with a simple 3D-printed enclosure. It displays hostname, WiFi interface, Ethernet interface, and whatever others it can identify. There isn’t even a button to push; just plug it in and let it run.
Here’s how it works: once plugged in, the board identifies itself as a USB keyboard and a USB serial port. Then it launches a terminal with Ctrl-Alt-T, and from there it types and runs commands to do the following:
- Find the serial port that the RP2350 board just created.
- Get the parsed outputs of
hostname,ip -o -4 addr show dev wlan0,ip -o -4 addr show dev eth0, andip -o -4 addr showto gather up data on active interfaces. - Send that information out the serial port to the RP2350 board.
- Display the information on the LCD.
- Update periodically.
The only catch is that the host system must be able to respond to launching a new terminal with Ctrl-Alt-T, which typically means the host must have someone logged in.
It’s a pretty nifty little tool, and its operation might remind you, in concept, of how BadUSB attacks happen: a piece of hardware, once plugged into a host, identifies itself to the host as something other than what it appears to be. Then it proceeds to input and execute actions. But in this case, it’s not at all malicious, just convenient and awfully cute.
Giant Neopixel Is Just Like The Regular Kind, Only Bigger

Neopixels and other forms of addressable LEDs have taken the maker world by storm. They make it trivial to add a ton of controllable, glowing LEDs to any project. [Arnov Sharma] has made a great tribute to the WS2812B LED by building the NeoPixel Giant Edition.
The build is simply a recreation of the standard 5mm x 5mm WS2812B, only scaled up to 150 mm x 150 mm. It uses a WS2811 chip inside to make it behave in the same way from a logical perspective, and this controller is hooked up to nine standard RGB LEDs switched with MOSFETs to ensure they can deliver the requisite light output. The components are all assembled on a white PCB in much the same layout as the tiny parts of a WS2812B, which is then installed inside a 3D-printed housing made in white PLA. Large metal terminals were added to the housing, just like a WS2812B, and the lens was then created using a large dose of clear epoxy.
The result is a fully functional, addressable LED that is approximately 30 times larger than the original. You can even daisy-chain them, just like the real thing. We’ve covered all kinds of projects using addressable LEDs over the years, from glowing cubes to fancy nature installations. If you’ve got your own glowable project that the world needs to see, make sure you notify the tips line!
3D Printing and Metal Casting are a Great Match

[Chris Borge] has made (and revised) many of his own tools using a combination of 3D printing and common hardware, and recently decided to try metal casting. Having created his own tapping arm, he tries his hand at aluminum casting to create a much more compact version out of metal. His video (embedded below) really shows off the whole process, and [Chris] freely shares his learning experiences in casting his first metal tool.
The result looks great and is considerably smaller in stature than the 3D-printed version. However, the workflow of casting metal parts is very different. The parts are much stronger, but there is a lot of preparation and post-processing involved.
The key to making good castings is mold preparation. [Chris] uses green sand (a mixture of fine sand and bentonite clay – one source of the latter is ground-up kitty litter) packed tightly around 3D printed parts inside a frame. The packed sand holds its shape while still allowing the original forms to be removed and channels to be cut, creating a two-part mold.
His first-time castings have a rough surface texture, but are perfectly serviceable. After some CNC operations to smooth some faces and drill some holes, the surface imperfections are nothing filing, filler, and paint can’t handle.
To cast molten metal, there really isn’t any way around needing a forge. Or is there? We have seen some enterprising hackers repurpose microwave ovens for this purpose. One can also use a low-temperature alloy like Rose’s Metal, or eschew molten liquid altogether and do cold casting, which uses a mixture of resin and metal powder instead.
The design files for [Chris]’s tapping arm are available from links in the video description, and he also helpfully provides links to videos and resources he found useful. Watch it in the video, embedded just below.
youtube.com/embed/lp9xzWZWO_U?…
Pentesting continuo: Shannon porta il red teaming nell’era dell’AI
Shannon opera come un penetration tester che non si limita a segnalare vulnerabilità, ma lancia veri e propri exploit. L’intento di Shannon è quello di violare la sicurezza della tua applicazione web prima che qualcuno con intenzioni malevole possa farlo.
Utilizzando il suo browser integrato, Shannon cerca autonomamente nel tuo codice punti deboli da sfruttare e, per dimostrare la reale esistenza di tali vulnerabilità, esegue attacchi concreti, come quelli da iniezione e quelli volti a bypassare i sistemi di autenticazione.
La verifica della sicurezza tramite penetration test resta limitata generalmente a una sola volta l’anno. se svolta manualmente Ne deriva una significativa falla nella sicurezza. Per i restanti 364 giorni, potresti essere a rischio senza saperlo.
Shannon sopperisce a questa mancanza ricoprendo il ruolo di pentester su richiesta. Oltre a identificare possibili criticità, esegue effettivamente exploit, fornendo prove di concetto delle vulnerabilità riscontrate.
Questo strumento ha superato i penetration tester umani e i sistemi proprietari nel benchmark XBOW, segnando un passaggio verso test di sicurezza continui. Shannon simula le tattiche del red team, coprendo l’intero processo di ricognizione, analisi delle vulnerabilità, sfruttamento e reporting. Il suo principio di funzionamento include:

- Analizzando il flusso di dati di mappatura del codice sorgente
- Distribuzione di agenti paralleli per rilevare vulnerabilità OWASP critiche (ad esempio difetti di iniezione, XSS, SSRF e autenticazione).
- Integrazione di strumenti come Nmap e automazione del browser
- Per ridurre al minimo i falsi positivi, nei report di livello professionale vengono incluse solo le vulnerabilità riproducibili confermate da PoC.
Caratteristiche
Una gamma di funzioni è offerta dal software Shannon, che permette di rendere automatiche varie attività finora svolte manualmente. Queste possono essere riassunte come segue:
- Funzionamento completamente autonomo : avvia il pentest con un singolo comando. L’intelligenza artificiale gestisce tutto, dagli accessi 2FA/TOTP avanzati (incluso l’accesso con Google) alla navigazione nel browser, fino al report finale, senza alcun intervento.
- Report di livello Pentester con exploit riproducibili : fornisce un report finale incentrato su risultati comprovati e sfruttabili, completo di Proof-of-Concept copiabili e incollabili per eliminare i falsi positivi e fornire risultati fruibili.
- Copertura delle vulnerabilità critiche OWASP : attualmente identifica e convalida le seguenti vulnerabilità critiche: iniezione, XSS, SSRF e autenticazione/autorizzazione non funzionante, con altri tipi in fase di sviluppo.
- Test dinamici basati sul codice: analizza il codice sorgente per orientare in modo intelligente la strategia di attacco, quindi esegue exploit live, basati su browser e riga di comando, sull’applicazione in esecuzione per confermare il rischio reale.
- Basato su strumenti di sicurezza integrati : migliora la fase di scoperta sfruttando i principali strumenti di ricognizione e test, tra cui Nmap, Subfinder, WhatWeb e Schemathesis, per un’analisi approfondita dell’ambiente di destinazione.
- Elaborazione parallela per risultati più rapidi : ottieni il tuo report più velocemente. Il sistema parallelizza le fasi più dispendiose in termini di tempo, eseguendo contemporaneamente analisi e exploit per tutti i tipi di vulnerabilità.

Prestazioni effettive
Nei test di benchmark sulle vulnerabilità, Shannon ha dimostrato capacità pratiche che superano la scansione statica: Questi risultati dimostrano che Shannon possiede la capacità autonoma di compromettere completamente le applicazioni. Sviluppato sulla base dell’SDK Claude Agent di Anthropic, con il supporto di Shannon è possibile svolgere:
- Test white-box di repository monolitici o ambienti integrati utilizzando Docker
- Accesso con autenticazione a due fattori
- Integrazione della pipeline CI/CD
Sono disponibili due versioni:

- La versione Lite (licenza AGPL-3.0) è adatta ai ricercatori.
- La versione Pro aggiunge la funzionalità di analisi del flusso di dati LLM per le aziende.
Un test tipico dura da 1 a 1,5 ore e costa circa 50 dollari, e fornisce risultati che includono un riepilogo dell’esecuzione e una Proof of Concept (PoC). Grazie all’utilizzo da parte del team di sviluppo di strumenti di programmazione basati sull’intelligenza artificiale come Claude per accelerare i test, Shannon consente di effettuare test di sicurezza giornalieri in ambienti non di produzione, colmando le lacune di copertura nei penetration test annuali.
Gli sviluppatori sottolineano che deve essere utilizzato in modo conforme solo dopo aver ottenuto l’autorizzazione e mettono in guardia contro l’esecuzione di test di attacco potenzialmente dannosi in ambienti di produzione.
Lo strumento è open source su GitHub e i contributi della community sono benvenuti per ampliarne le capacità di rilevamento.
Licenza
Il software Shannon è distribuito sotto licenza GNU Affero General Public License v3.0 (AGPLv3), una delle licenze copyleft più restrittive. Questa licenza consente l’uso commerciale, la modifica, la distribuzione e l’uso privato del software, includendo anche una concessione esplicita dei diritti di brevetto. Tuttavia, impone che qualsiasi versione modificata o lavoro derivato venga rilasciato sotto la stessa licenza, preservando gli avvisi di copyright e di licenza originali.
Una caratteristica chiave dell’AGPLv3 è l’obbligo di rendere disponibile il codice sorgente completo anche quando il software viene utilizzato per fornire un servizio tramite rete (ad esempio un servizio web o SaaS). In questo caso, l’uso in rete è considerato a tutti gli effetti una forma di distribuzione. La licenza esclude qualsiasi garanzia e limita la responsabilità degli autori, rendendo il software disponibile “così com’è”, senza assicurazioni sul suo funzionamento o sulla sua idoneità a scopi specifici.
L'articolo Pentesting continuo: Shannon porta il red teaming nell’era dell’AI proviene da Red Hot Cyber.
Pufferfish Venom Can Kill, Or It Can Relieve Pain

Tetrodotoxin (TTX) is best known as the neurotoxin of the puffer fish, though it also appears in a range of other marine species. You might remember it from an episode of The Simpsons involving a poorly prepared dish at a sushi restaurant. Indeed, it’s a potent thing, as ingesting even tiny amounts can lead to death in short order.
Given its fatal reputation, it might be the last thing you’d expect to be used in a therapeutic context. And yet, tetrodotoxin is proving potentially valuable as a treatment option for dealing with cancer-related pain. It’s a dangerous thing to play with, but it could yet hold promise where other pain relievers simply can’t deliver.
Poison, or…?
Humans have been aware of the toxicity of the puffer fish and its eggs for thousands of years. It was much later that tetrodotoxin itself was chemically isolated, thanks to the work of Dr. Yoshizumi Tahara in 1909.
Its method of action was proven in 1964, with tetrodotoxin found to bind to and block voltage-gated sodium channels in nerve cell membranes, essentially stopping the nerves from conducting signals as normal. It thus has the effect of inducing paralysis, up to the point where an afflicted individual suffers respiratory failure, and subsequently, death.
It doesn’t take a large dose of tetrodotoxin to kill, either—the median lethal dose in mice is a mere 334 μg per kilogram when ingested. The lethality of tetrodotoxin was historically a prime driver behind Japanese efforts to specially license chefs who wished to prepare and serve pufferfish. Consuming pufferfish that has been inadequately prepared can lead to symptoms in 30 minutes or less, with death following in mere hours as the toxin makes it impossible for the sufferer to breathe. Notably, though, with the correct life support measures, particularly for the airway, or with a sub-fatal dose, it’s possible for a patient to make a full recovery in mere days, without any lingering effects.
The effects that tetrodotoxin has on the nervous system are precisely what may lend it therapeutic benefit, however. By blocking sodium channels in sensory neurons that deal with pain signals, the toxin could act as a potent method of pain relief. Researchers have recently explored whether it could have particular application for dealing with neuropathic pain caused by cancer or chemotherapy treatments. This pain isn’t always easy to manage with traditional pain relief methods, and can even linger after cancer recovery and when chemotherapy has ceased.
The challenge of using a toxin for pain relief is obvious—there’s always a risk that the negative effects of the toxin will outweigh the supposed therapeutic benefit. In the case of tetrodotoxin, it all comes down to dosage. The levels given to patients in research studies have been on the order of 30 micrograms, well under the multi-milligram dose that would typically cause severe symptoms or death in an adult human. The hope would be to find a level at which tetrodotoxin reduces pain with a minimum of adverse effects, particularly where symptoms like paralysis and respiratory failure are on the table.
A review of various studies worldwide was published in 2023, and highlights that tetrodotoxin pain relief does come with some typical adverse effects, even at tiny clinical doses. The most typical reported symptoms involved nausea, oral numbness, dizziness, and tingling sensations. In many cases, these effects were mild and well-tolerated. A small number of patients in research trials exhibited more serious symptoms, however, such as loss of muscle control, pain, or hypertension. At the same time, the treatment did show positive results — with many patients reporting pain relief for days or even weeks after just a few days of tetrodotoxin injections.
While tetrodotoxin has been studied as a pain reliever for several decades now, it has yet to become a mainstream treatment. There have been no large-scale studies that involved treating more than 200 patients, and no research group or pharmaceutical company has pushed hard to bring a tetrodotoxin-based product to market. Research continues, with a 2025 paper even exploring the use of ultra-low nanogram-scale doses in a topical setting. For now, though, commercial application remains a far-off fantasy. Today, the toxin remains the preserve of pufferfish and a range of other deadly species. Don’t expect to see it in a hospital ward any time soon, despite the promise it shows thus far.
Featured image: “Puffer Fish DSC01257.JPG” by Brocken Inaglory. Actually, not one of the poisonous ones, but it looked cool.
Tearing Down Walmart’s $12 Keychain Camera

Keychain cameras are rarely good. However, in the case of Walmart’s current offering, it might be worse than it’s supposed to be. [FoxTailWhipz] bought the Vivitar-branded device and set about investigating its claim that it could deliver high-resolution photos.
The Vivatar Retro Keychain Camera costs $12.88, and wears “FULL HD” and “14MP” branding on the packaging. It’s actually built by Sakar International, a company that manufactures products for other brands to license. Outside of the branding, though, [FoxTailWhipz] figured the resolution claims were likely misleading. Taking photos quickly showed this was the case, as whatever setting was used, the photos would always come out at 640 x 480, or roughly 0.3 megapixels. He thus decided a teardown would be the best way to determine what was going on inside. You can see it all in the video below.
Pulling the device apart was easy, revealing that the screen and battery are simply attached to the PCB with double-sided tape. With the board removed from the case, the sensor and lens module are visible, with the model number printed on the flex cable. The sensor datasheet tells you what you need to know. It’s a 2-megapixel sensor, capable of resolutions up to 1632 x 1212. The camera firmware itself seems to not even use the full resolution, since it only outputs images at 640 x 480.
It’s not that surprising that an ultra-cheap keychain camera doesn’t meet the outrageous specs on the box. At the same time, it’s sad to see major retailers selling products that can’t do what they say on the tin. We see this problem a lot, in everything from network cables to oscilloscopes.
youtube.com/embed/4bNZ95cBIdg?…
A Brief History of the Spreadsheet

We noted that Excel turned 40 this year. That makes it seem old, and today, if you say “spreadsheet,” there’s a good chance you are talking about an Excel spreadsheet, and if not, at least a program that can read and produce Excel-compatible sheets. But we remember a time when there was no Excel. But there were still spreadsheets. How far back do they go?
Definitions
Like many things, exactly what constitutes a spreadsheet can be a little fuzzy. However, in general, a spreadsheet looks like a grid and allows you to type numbers, text, and formulas into the cells. Formulas can refer to other cells in the grid. Nearly all spreadsheets are smart enough to sort formulas based on which ones depend on others.
For example, if you have cell A1 as Voltage, and B1 as Resistance, you might have two formulas: In A2 you write “=A1/B1” which gives current. In B2 you might have “=A1*A2” which gives power. A smart spreadsheet will realize that you can’t compute B2 before you compute A2. Not all spreadsheets have been that smart.
There are other nuances that many, but not all, spreadsheets share. Many let you name cells, so you can simply type =VOLTS*CURRENT. Nearly all will let you specify absolute or relative references, too. With a relative reference, you might compute cell D1=A1*B1. If you copy this to row two, it will wind up D2=A2*B2. However, if you mark some of the cells absolute, that won’t be true. For example, copying D1=A1*$B$1 to row two will result in D2=A2*$B$1.
Not all spreadsheets mark rows and columns the same way, but the letter/number format is nearly universal in modern programs. Many programs still support RC references, too, where R4C2 is row four, column two. In that nomenclature, R[-1]C[2] is a relative reference (one row back, two rows to the right). But the real idea is that you can refer to a cell, not exactly how you refer to it.
So, How Old Are They?
LANPAR was probably the first spreadsheet program, and it was available for the GE400. The name “LANPAR” was LANguage for Programming Arrays at Random, but was also a fusion of the authors’ names. Want to guess the year? 1969. Two Harvard graduates developed it to solve a problem for the Canadian phone company’s budget worksheets, which took six to twenty-four months to change in Fortran. The video below shows a bit of the history behind LANPAR.
youtube.com/embed/t1sdY6u8pTU?…
LANPAR might not be totally recognizable as a modern spreadsheet, but it did have cell references and proper order of calculations. In fact, they had a patent on the idea, although the patent was originally rejected, won on appeal, and later deemed unenforceable by the courts.
There were earlier, noninteractive, spreadsheet-like programs, too. Richard Mattessich wrote a 1961 paper describing FORTRAN IV methods to work with columns or rows of numbers. That generated a language called BCL (Business Computer Language). Others over the years included Autoplan, Autotab, and several other batch-oriented replacements for paper-based calculations.
Spreadsheets Get Personal
Back in the late 1970s, people like us speculated that “one day, every home would have a computer!” We just didn’t know what people would do with them outside of the business context where the computer lived at the time. We imagined people scaling up and down cooking recipes, for example. Exactly how do you make soup for nine people when the recipe is written for four? We also thought they might balance their checkbook or do math homework.
The truth is, two programs drove massive sales of small computers: WordStar, a word-processing program, and VisiCalc. Originally for the Apple ][, Visicalc by Dan Bricklin and Bob Frankston put desktop computers on the map, especially for businesses. VisiCalc was also available on CP/M, Atari computers, and the Commodore PET.
You’d recognize VisiCalc as a spreadsheet, but it did have some limitations. For one, it did not follow the natural order of operations. Instead, it would start at the top, work down a column, and then go to the next column. It would then repeat the process until no further change occurred.
youtube.com/embed/EKtKVab8kH0?…
However, it did automatically recalculate when you made changes, had relative and absolute references, and was generally interactive. You could copy ranges, and the program doesn’t look too different from a modern spreadsheet.
Sincere Flattery
Of course, once you have VisiCalc, you are going to invite imitators. SuperCalc paired with WordStar became very popular among the CP/M crowd. Then came the first of the big shots: Lotus 1-2-3. In 1982, this was a must-have application for the new IBM PC.
youtube.com/embed/ooWJhdV7Ei8?…
There were other contenders, each with its own claims to fame. Innovative Software’s SMART suite, for example, was among the first spreadsheets that let you have formulas that crossed “tabs.” It could also recalculate repeatedly until meeting some criteria, for example, recalculate until cell X20 is less than zero.
Probably the first spreadsheet that could handle multiple sheets to form a “3D spreadsheet” was BoeingCalc. Yes, Boeing like the aircraft. They had a product that ran on PCs or IBM 4300 mainframes. It used virtual memory and could accommodate truly gigantic sheets for its day. It was also pricey, didn’t provide graphics out of the box, and was slow. The Infoworld’s standard spreadsheet took 42.9 seconds to recalculate, versus 7.9 for the leading competitor at the time. Quatro Pro from Borland was also capable of large spreadsheets and provided tabs. It was used more widely, too.
youtube.com/embed/EWzgo0H2Ff8?…
Then Came Microsoft
Of course, the real measure of success in software is when the lawsuits start. In 1987, Lotus sued two spreadsheet companies that made very similar products (TWIN and VP Planner). Not to be outdone, VisiCalc’s company (Software Arts) sued Lotus. Lotus won, but it was a pyrrhic victory as Microsoft took all the money off the table, anyway.
Before the lawsuits, in 1985, Microsoft rolled out Excel for the Mac. By 1987, they also ported it to the fledgling Windows operating system. Of course, Windows exploded — make your own joke — and by the time Lotus 1-2-3 could roll out Windows versions, they were too late. By 2013, Lotus 1-2-3, seemingly unstoppable a few years earlier, fell to the wayside.
There are dozens of other spreadsheet products that have come and gone, and a few that still survive, such as OpenOffice and its forks. Quattro Pro remains available (as part of WordPerfect). You can find plenty of spreadsheet action in any of the software or web-based “office suites.”
Today and the Future
While Excel is 40, it isn’t even close to the oldest of the spreadsheets. But it certainly has kept the throne as the most common spreadsheet program for a number of years.
Many of the “power uses” of spreadsheets, at least in engineering and science, have been replaced by things like Jupyter Notebooks that let you freely mix calculations with text and graphics along with code in languages like Python, for example.
If you want something more traditional that will still let you hack some code, try Grist. We have to confess that we’ve abused spreadsheets for DSP and computer simulation. What’s the worst thing you’ve done with a spreadsheet?
Australia: whatever you do, don't call it a ban
IT'S MONDAY, AND THIS IS DIGITAL POLITICS. I'm Mark Scott, and after a few weeks of feeling burned out, I am now channeling this guy's energy for the final weeks of the year. Enjoy.

— Australia's social media ban for teenagers is an imperfect solution to deal with social media harms. But it's better than doing nothing.
— The White House wants to stop US states from overseeing most forms of artificial intelligence. It's a move other countries should be wary of.
— How do the leading AI models rank in terms of publishing data on how they work? Here are the stats.
Let's get started.
Mass Spectrometer Tear Down

If you have ever thought, “I wish I could have a mass spectrometer at home,” then we aren’t very surprised you are reading Hackaday. [Thomas Scherrer] somehow acquired a broken Brucker Microflex LT Mass Spectrometer, and while it was clearly not working, it promised to be a fun teardown, as you can see in the first part of the video below.
Inside are lasers and definitely some high voltages floating around. This appears to be an industrial unit, but it has a great design for service. Many of the panels are removable without tools.
The construction is interesting in that it looks like a rack, but instead of rack mounting, everything is mounted on shelves. The tall unit isn’t just for effect. The device has a tall column where it measures the sample under test. The measurement is a time of flight so the column has to be fairly long to get results.
The large fiber laser inside produces a 100 kW pulse, which sounds amazing, but it only lasts for 2.5 ns. There’s also a “smaller” 10W laser in the unit.
There are also vacuum pumps and other wizardry inside. Check out the video and get a glimpse into something you aren’t likely to have a chance to tear into yourself. There are many ways to do mass spectrometry, and some of them are things you could build yourself. We’ve seen it done more than once.
youtube.com/embed/hTTPhed7Ghk?…
Shakerati Anonimi: L’esperienza di Giorgio e la truffa che ha divorato suo Padre
Salve ragazzi,
mi chiamo Giorgio, ho 58 anni, lavoro da sempre come tecnico amministrativo e, nella vita, sono sempre stato quello “razionale” della famiglia. Quello che controlla i conti, che non si fida delle telefonate strane, che dice a tutti “non cliccare link, non rispondere a numeri sconosciuti”.
Eppure oggi sono qui, assieme a voi, non perché io abbia cliccato un link sbagliato… ma perché non sono riuscito a fermare una truffa che stava divorando mio padre.
Mio padre ha 83 anni. È vedovo, vive solo, è orgoglioso e testardo come solo una persona della sua generazione può essere. Ha sempre gestito i suoi soldi con attenzione: pensione più che dignitosa, casa di proprietà, poche spese, una vita fatta di equilibrio.
Io vivo all’estero, mio fratello abita vicino a lui e ogni tanto lo aiuta con le cose pratiche.
Tutto è iniziato in modo quasi invisibile. Qualche email “strana“, qualche telefonata che lui liquidava con un “sono quelli della banca” o “uno che mi deve aiutare a sbloccare dei soldi”.
All’inizio non ci abbiamo dato troppo peso. Poi, un anno fa, lo abbiamo colto in flagrante: mio fratello aveva accesso alle sue email e ha visto scambi continui con sedicenti intermediari, consulenti, benefattori. Promesse di somme enormi in cambio di piccoli anticipi. Classica truffa, textbook scam.
Lo abbiamo convinto a denunciare.
Siamo andati dai carabinieri. Addirittura uno dei truffatori ha chiamato mentre eravamo lì. Minacce velate, tentativi di intimidazione. Ma, alla fine, nulla di concreto. Un cambio di numero, password nuove, e la sensazione – sbagliata – che fosse finita lì.
Non era finita per niente.
Qualche mese dopo, mio padre ha iniziato a comportarsi in modo strano. Ha chiesto soldi in prestito a mio fratello. Non lo aveva mai fatto in vita sua. Mai.
È stato lì che abbiamo capito che qualcosa non tornava. Abbiamo controllato di nuovo le email: i truffatori erano tornati. O forse non se ne erano mai andati.
Quando lo abbiamo affrontato, ha negato tutto. Classico schema: negazione, minimizzazione, silenzio. Come se ammettere la truffa fosse peggio della truffa stessa.
Nel frattempo, il conto era praticamente prosciugato. Risparmi di una vita evaporati in bonifici, ricariche, promesse di “ultimi pagamenti” per sbloccare somme mai esistite.
La paura più grande, a quel punto, non era nemmeno il conto corrente. Era il passo successivo: i buoni fruttiferi postali, l’ultimo salvagente.
Abbiamo provato a chiedergli di cointestare il conto.
Rifiuto totale.
Orgoglio.
Paura di perdere il controllo.
Paura, forse, di ammettere di non averlo più.
Alla fine abbiamo fatto la cosa più dura: gli abbiamo sequestrato il telefono per limitare i danni e contattato un avvocato. Amministrazione di sostegno. Una parola che pesa come un macigno, ma che a volte è l’unico modo per salvare una persona… anche da sé stessa.
Ecco perché sono qui.
Non come vittima diretta di phishing, smishing o vishing.
Ma come vittima collaterale di una truffa di lungo periodo, costruita sulla solitudine, sull’età, sulla fiducia e sulla vergogna.
Sono qui perché il silenzio è il miglior alleato dei truffatori.
Perché ogni storia non raccontata diventa un manuale operativo per chi sfrutta le fragilità altrui.
Perché la vergogna non protegge, isola.
E l’isolamento è terreno fertile per chi promette aiuti, guadagni, soluzioni miracolose.
Sono qui perché condividere non è esporre una debolezza, ma rompere un incantesimo.
È togliere potere a chi vive nell’ombra, a chi costruisce castelli di menzogne mattone dopo mattone, approfittando di chi ha meno strumenti per difendersi.
Raccontare queste storie serve a lasciare tracce, segnali, anticorpi collettivi.
Serve a dire a chi sta vivendo la stessa cosa: non sei stupido, non sei solo, non è colpa tua.
Serve a ricordarci che dietro ogni truffa non ci sono solo numeri, ma famiglie che si rompono, fiducie che si incrinano, dignità che vengono erose lentamente.
Se anche una sola persona, leggendo queste parole, riconoscerà un campanello d’allarme prima che sia troppo tardi, allora questa condivisione avrà avuto senso.
Perché la vera prevenzione non nasce dai sistemi, dai codici o dagli algoritmi.
Nasce dal coraggio di raccontare ciò che fa male.
Lesson learned
La storia di Giorgio ci insegna alcune cose fondamentali:
- Le truffe non colpiscono solo l’ignoranza tecnologica, ma la fragilità emotiva
Solitudine, lutto, età avanzata e bisogno di sentirsi ancora “in controllo” sono vettori di attacco potentissimi. - La negazione è parte integrante della truffa
La vittima spesso difende il truffatore, mente ai familiari e continua a pagare pur di non ammettere l’errore. - Non esiste la “truffa una tantum”
Quando un truffatore aggancia una vittima, tende a sfruttarla nel tempo, spremendo ogni risorsa disponibile. - La prevenzione è anche familiare, non solo tecnica
Accesso condiviso alle email, alert sui conti, limiti operativi, dialogo continuo e – nei casi estremi – strumenti legali come l’amministrazione di sostegno. - Prima si interviene, meno si perde
Ogni mese di ritardo significa più soldi persi e più potere psicologico in mano ai criminali.
Prevedere tutto questo è possibile, osservando i segnali deboli: richieste di segretezza, promesse di guadagni irrealistici, richieste di “anticipi”, isolamento dalla famiglia, rifiuto di confrontarsi.
Le truffe moderne non bucano i sistemi informatici.
Bucano le persone.
E quando succede, non basta dire “te l’avevo detto”. Serve agire. Anche quando fa male.
Genesi dell’articolo
L’articolo è stato ispirato da una truffa reale, condivisa da un utente su Reddit.
A questa persona va tutto il nostro conforto: il suo coraggio nel raccontare ciò che ha vissuto permette ad altri di riconoscere i segnali, proteggersi e imparare dall’esperienza che ha affrontato.
L'articolo Shakerati Anonimi: L’esperienza di Giorgio e la truffa che ha divorato suo Padre proviene da Red Hot Cyber.

Deauth attack: l’arma più comune contro le reti Wi-Fi domestiche
Il Deauth attack è uno degli attacchi più noti e storicamente utilizzati contro reti WPA2-Personal, soprattutto come fase preparatoria per altri attacchi.
Sfrutta diverse vulnerabilità intrinseche nel processo d’autenticazione che permettono all’attaccante, tra le altre cose, di estrapolare alcuni dati utilizzabili per il cracking della chiave. È efficace contro la quasi totalità delle reti WPA2 standard IEEE 802.11.
L’efficienza dell’attacco allo scopo di ottenere la chiave di autenticazione è proporzionale alle risorse hardware dell’attaccante ed inversamente proporzionale alla complessità della chiave d’autenticazione.

Può essere lanciato da qualsiasi dispositivo dotato del giusto software e di una scheda di rete compatibile che supporti la monitor mode (una modalità che permette di operare la scheda wireless a più basso livello, avendo così più controllo sull’hardware).
Panoramica
Glossario: AP: Access point (comunemente router Wi-Fi)
Client: Il dispositivo che intende connettersi
Cos’è il Deauth Attack
Il Deauth attack è un attacco informatico il cui scopo principale è quello di forzare la deautenticazione, e quindi la disconnessione, anche temporanea, di uno o più dispositivi Client da una rete Wi-Fi.
Obbiettivi
Gli obbiettivi di questo attacco possono essere di vario genere e natura.
Il più elementare è quello di indurre un disservizio nella rete interrompendo la comunicazione tra questa ed i dispositivi ad essa collegati.
In questo caso l’attacco ricade sotto la categoria dei DoS (Denial of Service).
Un altro caso in cui si vede utilizzato questo attacco è in combinazione con un Evil Twin attack.
Si tratta di un altro attacco informatico ai danni di una rete Wi-Fi e dei dispositivi ad essa connessi che consiste nell’installazione di una rete Wi-Fi apparentemente identica all’originale allo scopo di indurre i dispositivi a connettersi ad essa per perpetrare poi ulteriori attacchi come lo sniffingdel traffico e la manipolazione delle informazioni trasmesse (MITM).
Lo scopo più comune del Deauth attack, tuttavia, è quello di indurre una disconnessione forzata allo scopo di ascoltare e registrare il processo di autenticazione che avviene tra i client e l’access point durante la successiva autenticazione. Questo attacco verrà particolarmente approfondito nell’articolo.
L’autenticazione
Glossario:
AP: Access point (comunemente router Wi-Fi)
Client: Il dispositivo che intende connettersi
Supplicant: Il client, durante l’autenticazione
PSK: Passphrase o password
Pacchetto: dato trasmesso (terzo livello OSI)
Frame: dato trasmesso (secondo livello OSI)
Canale radio: intervallo di frequenze radio definito
Richiesta di autenticazione:
Per comprendere appieno questo attacco, è necessario conoscere il processo di autenticazione delle reti WPA2 personal.
Dopo alcune fasi preliminari non dettagliate in questo articolo (Beacon, Probe request, associazione…) ha inizio il vero e proprio processo di autenticazionecon la richiesta da parte del supplicant verso l’AP tramite l’invio di un frame “Authentication request” (da ora semplicemente “request”). Questo frame viene trasmesso sul canale radio dedicato alla connessione Wi-Fi (2.4GHz / 5Ghz) ed innesca il processo di seguito descritto.
L’handshake
Il cuore dell’autenticazione è senza dubbio la negoziazione che avviene tra il Client e l’AP allo scopo di dimostrare che il Client possiede la chiave d’accesso. Questo dialogo prende il nome di 4 way handshake e può essere così sintetizzato:
MESSAGGIO 1 – ANONCE ED INIZIO DELLA DERIVAZIONE
Il 4-way handshake inizia quando l’Access Point (AP), chiamato Authenticator, invia al client (Supplicant) il primo frame “EAPOL-Key” contenente il proprio dato “ANonce” (Authenticator Nonce), un numero casuale di 256 bit (32 byte) generato sul momento dall’AP. Questo frame contiene anche il Replay Counter (8 byte), numero che serve ad identificare in modo univoco ogni messaggio dell’handshake ed evitare replay (messaggi duplicati).
MESSAGGIO 2 – CALCOLO DELLA PTK ED INVIO DEL SNonCE
Il client genera ora il proprio SNonce (Supplicant Nonce), anch’esso di 256 bit, in modo casuale e non riutilizzabile. Con entrambi i nonce e con le altre informazioni note, il client calcola la PTK (Pairwise Transient Key, una chiave di cifratura temporanea).
La PTK è derivata da una funzione pseudo-casuale definita nello standard IEEE 802.11i, chiamata PRF (Pseudo-Random Function). La formula generale è:
PTK = PRF(PMK, “Pairwise key expansion”, Min(MAC_AP, MAC_STA) ‖ Max(MAC_AP, MAC_STA) ‖ Min(ANonce, SNonce) ‖ Max(ANonce, SNonce))
dove:
- PMK (Pairwise Master Key) è una chiave di 256 bit ottenuta dalla passphrase (in WPA2-Personal) tramite PBKDF2-HMAC-SHA1(Password, SSID, 4096, 256).
- La stringa “Pairwise key expansion” è un’etichetta fissa che serve come diversificatore per la PRF.
- MAC_AP e MAC_STA sono gli indirizzi MAC dell’AP e del client.
- L’uso di Min e Max garantisce che entrambe le parti concatenino i valori nello stesso ordine,
indipendentemente da chi esegue il calcolo. Queste funzioni sono infatti di ordinamento e restituiscono il primo (MIN) e l’ultimo (MAX) indirizzo MAC secondo l’ordine alfabetico.
La PTK è lunga 384 bit (48 byte) che vengono suddivisi in tre sottochiavi:
- KCK (Key Confirmation Key, 128 bit) → per il calcolo del MIC.
- KEK (Key Encryption Key, 128 bit) → per cifrare le chiavi nel messaggio 3.
- TK (Temporal Key, 128 bit) → per cifrare il traffico unicast successivo.
Il client calcola poi un MIC (Message Integrity Code) sul messaggio “EAPOL-Key” usando la KCK secondoMIC=HMAC-SHA1(KCK, EAPOL-Frame) ed invia il secondo frame all’AP. In questo messaggio sono inclusi: SNonce, Replay Counter aggiornato ed il MIC. La presenza del MIC dimostra all’AP che il client possiede la PMK valida, poiché senza di essa il calcolo della PTK e di conseguenza del MIC non sarebbe possibile.
MESSAGGIO 3 – VERIFICA E DISTRIBUZIONE DELLA GTK
L’AP, ricevendo il messaggio 2, possiede tutto il necessario per calcolare la PTK in modo identico al client (ha PMK, ANonce, SNonce, MAC_AP e MAC_STA). Verifica quindi il MIC ricevuto: se è corretto, l’AP sa che il client possiede la PMK e valida l’autenticazione.
A questo punto, l’AP installa localmente la PTK e genera o seleziona la GTK (Group Temporal Key, generata dall’AP come numero di 128bit pseudocasuale), usata per il traffico multicast e broadcast. La GTK viene cifrata con la KEK (parte della PTK) per impedirne la lettura da parte di terzi.
Il messaggio 3, inviato dall’AP al client, contiene quindi:
- Il Replay Counter aggiornato.
- Il campo “Key Information” con flag impostati per indicare che la GTK è inclusa.
- Il campo “Key Data”, dove la GTK è cifrata con KEK.
- Un nuovo MIC, calcolato con la KCK.
Questo messaggio serve sia a consegnare la GTK, sia a confermare la validità della PTK calcolata da entrambe le parti.
MESSAGGIO 4 – CONFERMA FINALE DEL CLIENT
Il client, ricevuto il messaggio 3, decifra il campo Key Data usando la KEK e ottiene la GTK. Dopo aver verificato il MIC, installa la PTK e la GTK nella propria interfaccia radio per abilitare la cifratura del traffico (ad esempio con AES-CCMP).
Infine invia il quarto messaggio, che contiene solo un MIC calcolato con la KCK ed il Replay Counter incrementato, come conferma della corretta ricezione e installazione delle chiavi.
A questo punto, sia AP che STA condividono la stessa PTK (per il traffico unicast) e la stessa GTK (per il traffico multicast). Il 4-way handshake termina e la connessione cifrata WPA2 è pronta a trasmettere dati in modo sicuro.
La deautenticazione
Glossario: Checksum: codice, calcolato sulla base del contenuto del dato trasmesso, utile per rilevare interferenze nella trasmissione
Il primo passo del Deauth attack (dopo alcune operazioni preliminari atte ad individuare la rete target) è la deautenticazione forzata di uno o più client dalla rete. Questo può essere fatto tramite l’invio di un frame deauth. Questo frame è legittimamente utilizzato per “espellere” un dispositivo dalla rete in caso di necessità costringendolo ad autenticarsi nuovamente, ad esempio in seguito ad una nuova generazione delle chiavi, in caso di inattività prolungata, o per rispettare una policy interna.
Il Deauth frame
I Deauth frames, appartenenti ai Management Frames, non sono in alcun modo cifrati nelle reti WPA2 perché non considerati possibile vettore d’attacco al tempo della definizione dello standard 802.11 (che definisce la maggioranza delle reti WPA2 oggi attive), e per questo la loro falsificazione è molto semplice. Ad oggi esiste uno standard che mitiga questa vulnerabilità (802.11w), ma tuttora quasi inutilizzato.
Il Deauth frame è composto da:
Un header contenente:
- Un dato “frame control” di 2 bytes che identifica il tipo (in questo caso, management frame) ed il sottotipo (in questo caso, deauthentication) del frame
- Un dato “duration” di due bytes che indica il tempo per il quale il canale sarà occupato
- Un dato “destination address” di 6 bytes che indica l’indirizzo MAC del destinatario a cui è rivolto il frame
- Un dato “source address” di 6 bytes che indica l’indirizzo MAC del mittente (facilmente falsificabile)
- Un dato “BSSID” che indica il nome della rete a cui il frame si riferisce
- Un dato “sequence control” utile per il controllo dell’ordine dei pacchetti ricevuti
E da un body (corpo del messaggio) contenente:
- Un dato “reason code” di 2 bytes che indica il motivo della deautenticazione (non importante ai fini dell’attacco)
- Un dato “frame check sequence” di 4 bytes che contiene un checksum del frame
L’invio del frame
L’attacco ha inizio con l’invio, spesso in broadcast, di uno o più deauth frames.
Il frame viene quasi sempre inviato falsificando l’indirizzo MAC dell’AP, salvo in caso di alcune configurazioni estremamente rare, probabilmente non più esistenti, non coperte da questo articolo.
I client autenticati e connessi accettano il frame e si deautenticano.
La cattura dell’handshake
Dopo un certo tempo dalla deautenticazione (tipicamente alcuni secondi), i client tentano automaticamente di riautenticarsi (salvo diversa impostazione manuale da parte dell’utente, rara negli smartphone e nei dispositivi IoT).
A questo punto, l’attaccante può ascoltare i canali radio e registrare la negoziazione che avviene tra i client (in questo momento “supplicant”) e L’AP.
Il cracking della passphrase
Purtroppo per l’attaccante, i dati trasmessi che hanno a che fare con la chiave (password o passphrase) sono frutto di algoritmi non reversibili. Questo significa che non è possibile ottenere la PSK invertendo l’operazione partendo da un risultato.
È possibile tuttavia procedere per tentativi, introducendo il concetto di bruteforcing.
Il bruteforcing
Conosciuto anche come attacco bruteforce, a volte erroneamente tradotto in attacco di forza bruta, è uno dei più elementari attacchi informatici. Può essere perpetrato contro ogni dato la cui cifratura si basa sull’utilizzo di un secret (un dato che funge da chiave per la decrittazione, come un PIN, una password, un token…).
Consiste nel compiere numerosi tentativi in rapida sequenza allo scopo di indovinare il secret richiesto. Nella forma più elementare, il secret viene generato da un algoritmo pseudocasuale.
In altre forme più sofisticate, il secret può essere estratto da una lista di probabili candidati detta wordlist. In quest’ultimo caso, l’attacco prende il nome di “attacco dizionario”.
Esistono ulteriori forme di attacco bruteforce.
È importante dire che, senza limiti di tempo e/o di risorse, il brute force attack ha il 100% di probabilità di crackare il secret.
La ricostruzione della chiave
L’attacco bruteforce viene in questo caso utilizzato per crackare la PSK. Lo si fa ricostruendo l’handshake registrato, simulandolo localmente tante volte in rapida sequenza, ogni volta utilizzando una nuova chiave candidata, che può essere generata casualmente o letta da una wordlist.
Per ogni chiave candidata viene quindi calcolata la PMK, dunque la PTK ed il MIC, il quale viene confrontato con quello registrato durante la cattura dell’handshake autentico.
Nel caso in cui uno dei tentativi porti ad una corrispondenza dei due MIC, la chiave candidata viene considerata vincitrice.
Post exploitation
Glossario: Backdoor: punto di accesso persistente installato da un attaccante allo scopo di collegarsi al sistema violato con maggiore semplicità
In seguito ad un attacco deauth andato a segno, l’attaccante può utilizzare l’accesso alla rete per i propri scopi.
È tipico bersagliare infrastrutture interne come server locali, computer, dispositivi di rete.
Essendo la rete wireless locale di difficile accesso, poiché richiede vicinanza fisica tra l’interfaccia radio dell’attaccante e l’AP, solitamente si utilizza per accedere più facilmente ad altri dispositivi sui quali installare una backdoor attraverso la quale accedere tramite Internet o altra rete di più semplice utilizzo.
Strumenti
Esistono numerosi strumenti utili all’esecuzione del Deauth attack.
Tra i più conosciuti e storici troviamo Aircrack-ng (contenente Airmon-ng ed Aireplay-ng) ed MDK4 per la deautenticazione, mentre Hashcat e John the ripper per il cracking.
Alternative più complete e moderne come Airgeddon automatizzano il processo ed includono tutti i software menzionati.
L'articolo Deauth attack: l’arma più comune contro le reti Wi-Fi domestiche proviene da Red Hot Cyber.
All-Screen Keyboard Has Flexible Layouts

Most keyboards are factory-set for a specific layout, and most users never change from the standard layout for their home locale. As a multilingual person, [Inkbox] wanted a more flexible keyboard. In particular, one with the ability to change its layout both visually and logically, on the fly. Thus was born the all-screen keyboard, which can swap layouts on demand. Have a look at the video below to see the board in action.
The concept is simple enough: It’s a keyboard with transparent keys and a screen underneath. The screen displays the labels for the keys, while the transparent plastic keys provide the physical haptic interface for the typist. The device uses a Raspberry Pi to drive the screen. [Inkbox] then designed a plastic frame and transparent keys, which are fitted with magnets, which in turn are read by Hall effect sensors under the display. This eliminates the need for traditional key switches, which would block light from the screen below.
Unfortunately for [Inkbox], the prototype was very expensive (about $1,400 USD) and not particularly functional as a keyboard. However, a major redesign tackled some of these issues. Version two had a smaller screen with a different aspect ratio. It also jettisoned the Hall effect sensors and uses plastic keys capacitively operating a traditional touch screen. Some design files for the keyboard are available on Github for the curious.
An all-screen keyboard is very cool, if very complicated to implement. There are other ways to change your layout that aren’t quite as fancy, of course. You can always just make custom keycaps and remap layouts on a regular mechanical keyboard if desired. Still, you have to admire the work that went into making this thing a reality.
youtube.com/embed/NptK0l-rtlQ?…
youtube.com/embed/hqKPu2BEkI0?…
Frogblight threatens you with a court case: a new Android banker targets Turkish users

In August 2025, we discovered a campaign targeting individuals in Turkey with a new Android banking Trojan we dubbed “Frogblight”. Initially, the malware was disguised as an app for accessing court case files via an official government webpage. Later, more universal disguises appeared, such as the Chrome browser.
Frogblight can use official government websites as an intermediary step to steal banking credentials. Moreover, it has spyware functionality, such as capabilities to collect SMS messages, a list of installed apps on the device and device filesystem information. It can also send arbitrary SMS messages.
Another interesting characteristic of Frogblight is that we’ve seen it updated with new features throughout September. This may indicate that a feature-rich malware app for Android is being developed, which might be distributed under the MaaS model.
This threat is detected by Kaspersky products as HEUR:Trojan-Banker.AndroidOS.Frogblight.*, HEUR:Trojan-Banker.AndroidOS.Agent.eq, HEUR:Trojan-Banker.AndroidOS.Agent.ep, HEUR:Trojan-Spy.AndroidOS.SmsThief.de.
Technical details
Background
While performing an analysis of mobile malware we receive from various sources, we discovered several samples belonging to a new malware family. Although these samples appeared to be still under development, they already contained a lot of functionality that allowed this family to be classified as a banking Trojan. As new versions of this malware continued to appear, we began monitoring its development. Moreover, we managed to discover its control panel and based on the “fr0g” name shown there, we dubbed this family “Frogblight”.
Initial infection
We believe that smishing is one of the distribution vectors for Frogblight, and that the users had to install the malware themselves. On the internet, we found complaints from Turkish users about phishing SMS messages convincing users that they were involved in a court case and containing links to download malware. versions of Frogblight, including the very first ones, were disguised as an app for accessing court case files via an official government webpage and were named the same as the files for downloading from the links mentioned above.
While looking for online mentions of the names used by the malware, we discovered one of the phishing websites distributing Frogblight, which disguises itself as a website for viewing a court file.
The phishing website distributing Frogblight

We were able to open the admin panel of this website, where it was possible to view statistics on Frogblight malware downloads. However, the counter had not been fully implemented and the threat actor could only view the statistics for their own downloads.
The admin panel interface of the website from which Frogblight is downloaded

Additionally, we found the source code of this phishing website available in a public GitHub repository. Judging by its description, it is adapted for fast deployment to Vercel, a platform for hosting web apps.
The GitHub repository with the phishing website source code

App features
As already mentioned, Frogblight was initially disguised as an app for accessing court case files via an official government webpage. Let’s look at one of the samples using this disguise (9dac23203c12abd60d03e3d26d372253). For analysis, we selected an early sample, but not the first one discovered, in order to demonstrate more complete Frogblight functionality.
After starting, the app prompts the victim to grant permissions to send and read SMS messages, and to read from and write to the device’s storage, allegedly needed to show a court file related to the user.
The full list of declared permissions in the app manifest file is shown below:
- MANAGE_EXTERNAL_STORAGE
- READ_EXTERNAL_STORAGE
- WRITE_EXTERNAL_STORAGE
- READ_SMS
- RECEIVE_SMS
- SEND_SMS
- WRITE_SMS
- RECEIVE_BOOT_COMPLETED
- INTERNET
- QUERY_ALL_PACKAGES
- BIND_ACCESSIBILITY_SERVICE
- DISABLE_KEYGUARD
- FOREGROUND_SERVICE
- FOREGROUND_SERVICE_DATA_SYNC
- POST_NOTIFICATIONS
- QUICKBOOT_POWERON
- RECEIVE_MMS
- RECEIVE_WAP_PUSH
- REQUEST_IGNORE_BATTERY_OPTIMIZATIONS
- SCHEDULE_EXACT_ALARM
- USE_EXACT_ALARM
- VIBRATE
- WAKE_LOCK
- ACCESS_NETWORK_STATE
- READ_PHONE_STATE
After all required permissions are granted, the malware opens the official government webpage for accessing court case files in WebView, prompting the victim to sign in. There are different sign-in options, one of them via online banking. If the user chooses this method, they are prompted to click on a bank whose online banking app they use and fill out the sign-in form on the bank’s official website. This is what Frogblight is after, so it waits two seconds, then opens the online banking sign-in method regardless of the user’s choice. For each webpage that has finished loading in WebView, Frogblight injects JavaScript code allowing it to capture user input and send it to the C2 via a REST API.
The malware also changes its label to “Davalarım” if the Android version is newer than 12; otherwise it hides the icon.
 and after launching (right)") |  |
The app icon before (left) and after launching (right)
In the sample we review in this section, Frogblight uses a REST API for C2 communication, implemented using the Retrofit library. The malicious app pings the C2 server every two seconds in foreground, and if no error is returned, it calls the REST API client methods fetchOutbox and getFileCommands. Other methods are called when specific events occur, for example, after the device screen is turned on, the com.capcuttup.refresh.PersistentService foreground service is launched, or an SMS is received. The full list of all REST API client methods with parameters and descriptions is shown below.
| REST API client method | Description | Parameters |
| fetchOutbox | Request message content to be sent via SMS or displayed in a notification | device_id: unique Android device ID |
| ackOutbox | Send the results of processing a message received after calling the API method fetchOutbox | device_id: unique Android device ID msg_id: message ID status: message processing status error: message processing error |
| getAllPackages | Request the names of app packages whose launch should open a website in WebView to capture user input data | action: same as the API method name |
| getPackageUrl | Request the website URL that will be opened in WebView when the app with the specified package name is launched | action: same as the API method name package: the package name of the target app |
| getFileCommands | Request commands for file operations Available commands: ● download: upload the target file to the C2 ● generate_thumbnails: generate thumbnails from the image files in the target directory and upload them to the C2 ● list: send information about all files in the target directory to the C2 ● thumbnail: generate a thumbnail from the target image file and upload it to the C2 | device_id: unique Android device ID |
| pingDevice | Check the C2 connection | device_id: unique Android device ID |
| reportHijackSuccess | Send captured user input data from the website opened in a WebView when the app with the specified package name is launched | action: same as the API method name package: the package name of the target app data: captured user input data |
| saveAppList | Send information about the apps installed on the device | device_id: unique Android device ID app_list: a list of apps installed on the device app_count: a count of apps installed on the device |
| saveInjection | Send captured user input data from the website opened in a WebView. If it was not opened following the launch of the target app, the app_name parameter is determined based on the opened URL | device_id: unique Android device ID app_name: the package name of the target app form_data: captured user input data |
| savePermission | Unused but presumably needed for sending information about permissions | device_id: unique Android device ID permission_type: permission type status: permission status |
| sendSms | Send information about an SMS message from the device | device_id: unique Android device ID sender: the sender’s/recipient’s phone number message: message text timestamp: received/sent time type: message type (inbox/sent) |
| sendTelegramMessage | Send captured user input data from the webpages opened by Frogblight in WebView | device_id: unique Android device ID url: website URL title: website page title input_type: the type of user input data input_value: user input data final_value: user input data with additional information timestamp: the time of data capture ip_address: user IP address sms_permission: whether SMS permission is granted file_manager_permission: whether file access permission is granted |
| updateDevice | Send information about the device | device_id: unique Android device ID model: device manufacturer and model android_version: Android version phone_number: user phone number battery: current battery level charging: device charging status screen_status: screen on/off ip_address: user IP address sms_permission: whether SMS permission is granted file_manager_permission: whether file access permission is granted |
| updatePermissionStatus | Send information about permissions | device_id: unique Android device ID permission_type: permission type status: permission status timestamp: current time |
| uploadBatchThumbnails | Upload thumbnails to the C2 | device_id: unique Android device ID thumbnails: thumbnails |
| uploadFile | Upload a file to the C2 | device_id: unique Android device ID file_path: file path download_id: the file ID on the C2 The file itself is sent as an unnamed parameter |
| uploadFileList | Send information about all files in the target directory | device_id: unique Android device ID path: directory path file_list: information about the files in the target directory |
| uploadFileListLog | Send information about all files in the target directory to an endpoint different from uploadFileList | device_id: unique Android device ID path: directory path file_list: information about the files in the target directory |
| uploadThumbnailLog | Unused but presumably needed for uploading thumbnails to an endpoint different from uploadBatchThumbnails | device_id: unique Android device ID thumbnails: thumbnails |
Remote device control, persistence, and protection against deletion
The app includes several classes to provide the threat actor with remote access to the infected device, gain persistence, and protect the malicious app from being deleted.
capcuttup.refresh.AccessibilityAutoClickService
This is intended to prevent removal of the app and to open websites specified by the threat actor in WebView upon target apps startup. It is present in the sample we review, but is no longer in use and deleted in further versions.capcuttup.refresh.PersistentService
This is a service whose main purpose is to interact with the C2 and to make malicious tasks persistent.capcuttup.refresh.BootReceiver
This is a broadcast receiver responsible for setting up the persistence mechanisms, such as job scheduling and setting alarms, after device boot completion.
Further development
In later versions, new functionality was added, and some of the more recent Frogblight variants disguised themselves as the Chrome browser. Let’s look at one of the fake Chrome samples (d7d15e02a9cd94c8ab00c043aef55aff).
In this sample, new REST API client methods have been added for interacting with the C2.
| REST API client method | Description | Parameters |
| getContactCommands | Get commands to perform actions with contacts Available commands: ● ADD_CONTACT: add a contact to the user device ● DELETE_CONTACT: delete a contact from the user device ● EDIT_CONTACT: edit a contact on the user device | device_id: unique Android device ID |
| sendCallLogs | Send call logs to the C2 | device_id: unique Android device ID call_logs: call log data |
| sendNotificationLogs | Send notifications log to the C2. Not fully implemented in this sample, and as of the time of writing this report, we hadn’t seen any samples with a full-fledged implementation of this API method | action: same as the API method name notifications: notification log data |
Also, the threat actor had implemented a custom input method for recording keystrokes to a file using the com.puzzlesnap.quickgame.CustomKeyboardService service.
Another Frogblight sample we observed trying to avoid emulators and using geofencing techniques is 115fbdc312edd4696d6330a62c181f35. In this sample, Frogblight checks the environment (for example, device model) and shuts down if it detects an emulator or if the device is located in the United States.
Part of the code responsible for avoiding Frogblight running in an undesirable environment

Later on, the threat actor decided to start using a web socket instead of the REST API. Let’s see an example of this in one of the recent samples (08a3b1fb2d1abbdbdd60feb8411a12c7). This sample is disguised as an app for receiving social support via an official government webpage. The feature set of this sample is very similar to the previous ones, with several new capabilities added. Commands are transmitted over a web socket using the JSON format. A command template is shown below:
{
"id": <command ID>,
"command_type": <command name>
"command_data": <command data>
}
It is also worth noting that some commands in this version share the same meaning but have different structures, and the functionality of certain commands has not been fully implemented yet. This indicates that Frogblight was under active development at the time of our research, and since no its activity was noticed after September, it is possible that the malware is being finalized to a fully operational state before continuing to infect users’ devices. A full list of commands with their parameters and description is shown below:
| Command | Description | Parameters |
| connect | Send a registration message to the C2 | – |
| connection_success | Send various information, such as call logs, to the C2; start pinging the C2 and requesting commands | – |
| auth_error | Log info about an invalid login key to the Android log system | – |
| pong_device | Does nothing | – |
| commands_list | Execute commands | List of commands |
| sms_send_command | Send an arbitrary SMS message | recipient: message destination message: message text msg_id: message ID |
| bulk_sms_command | Send an arbitrary SMS message to multiple recipients | recipients: message destinations message: message text |
| get_contacts_command | Send all contacts to the C2 | – |
| get_app_list_command | Send information about the apps installed on the device to the C2 | – |
| get_files_command | Send information about all files in certain directories to the C2 | – |
| get_call_logs_command | Send call logs to the C2 | – |
| get_notifications_command | Send a notifications log to the C2. This is not fully implemented in the sample at hand, and as of the time of writing this report, we hadn’t seen any samples with a full-fledged implementation of this command | – |
| take_screenshot_command | Take a screenshot. This is not fully implemented in the sample at hand, and as of the time of writing this report, we hadn’t seen any samples with a full-fledged implementation of this command | – |
| update_device | Send registration message to the C2 | – |
| new_webview_data | Collect WebView data. This is not fully implemented in the sample at hand, and as of the time of writing this report, we hadn’t seen any samples with a full-fledged implementation of this command | – |
| new_injection | Inject code. This is not fully implemented in the sample at hand, and as of the time of writing this report, we hadn’t seen any samples with a full-fledged implementation of this command | code: injected code target_app: presumably the package name of the target app |
| add_contact_command | Add a contact to the user device | name: contact name phone: contact phone email: contact email |
| contact_add | Add a contact to the user device | display_name: contact name phone_number: contact phone email: contact email |
| contact_delete | Delete a contact from the user device | phone_number: contact phone |
| contact_edit | Edit a contact on the user device | display_name: new contact name phone_number: contact phone email: new contact email |
| contact_list | Send all contacts to the C2 | – |
| file_list | Send information about all files in the specified directory to the C2 | path: directory path |
| file_download | Upload the specified file to the C2 | file_path: file path download_id: an ID that is received with the command and sent back to the C2 along with the requested file. Most likely, this is used to organize data on the C2 |
| file_thumbnail | Generate a thumbnail from the target image file and upload it to the C2 | file_path: image file path |
| file_thumbnails | Generate thumbnails from the image files in the target directory and upload them to the C2 | folder_path: directory path |
| health_check | Send information about the current device state: battery level, screen state, and so on | – |
| message_list_request | Send all SMS messages to the C2 | – |
| notification_send | Show an arbitrary notification | title: notification title message: notification message app_name: notification subtext |
| package_list_response | Save the target package names | packages: a list of all target package names. Each list element contains: package_name: target package name active: whether targeting is active |
| delete_contact_command | Delete a contact from the user device. This is not fully implemented in the sample at hand, and as of the time of writing this report, we hadn’t seen any samples with a full-fledged implementation of this command | contact_id: contact ID name: contact name |
| file_upload_command | Upload specified file to the C2. This is not fully implemented in the sample at hand, and as of the time of writing this report, we hadn’t seen any samples with a full-fledged implementation of this command | file_path: file path file_name: file name |
| file_download_command | Download file to user device. This is not fully implemented in the sample at hand, and as of the time of writing this report, we hadn’t seen any samples with a full-fledged implementation of this command | file_url: the URL of the file to download download_path: download path |
| download_file_command | Download file to user device. This is not fully implemented in the sample at hand, and as of the time of writing this report, we hadn’t seen any samples with a full-fledged implementation of this command | file_url: the URL of the file to download download_path: downloading path |
| get_permissions_command | Send a registration message to the C2, including info about specific permissions | – |
| health_check_command | Send information about the current device state, such as battery level, screen state, and so on | – |
| connect_error | Log info about connection errors to the Android log system | A list of errors |
| reconnect | Send a registration message to the C2 | – |
| disconnect | Stop pinging the C2 and requesting commands from it | – |
Authentication via WebSocket takes place using a special key.
The part of the code responsible for the WebSocket authentication logic

At the IP address to which the WebSocket connection was made, the Frogblight web panel was accessible, which accepted the authentication key mentioned above. Since only samples using the same key as the webpanel login are controllable through it, we suggest that Frogblight might be distributed under the MaaS model.
The interface of the sign-in screen for the Frogblight web panel

Judging by the menu options, the threat actor can sort victims’ devices by certain parameters, such as the presence of banking apps on the device, and send bulk SMS messages and perform other mass actions.
Victims
Since some versions of Frogblight opened the Turkish government webpage to collect user-entered data on Turkish banks’ websites, we assume with high confidence that it is aimed mainly at users from Turkey. Also, based on our telemetry, the majority of users attacked by Frogblight are located in that country.
Attribution
Even though it is not possible to provide an attribution to any known threat actor based on the information available, during our analysis of the Frogblight Android malware and the search for online mentions of the names it uses, we discovered a GitHub profile containing repos with Frogblight, which had also created repos with Coper malware, distributed under the MaaS model. It is possible that this profile belongs to the attackers distributing Coper who have also started distributing Frogblight.
GitHub repositories containing Frogblight and Coper malware

Also, since the comments in the Frogblight code are written in Turkish, we believe that its developers speak this language.
Conclusions
The new Android malware we dubbed “Frogblight” appeared recently and targets mainly users from Turkey. This is an advanced banking Trojan aimed at stealing money. It has already infected real users’ devices, and it doesn’t stop there, adding more and more new features in the new versions that appear. It can be made more dangerous by the fact that it may be used by attackers who already have experience distributing malware. We will continue to monitor its development.
Indicators of Compromise
More indicators of compromise, as well as any updates to these, are available to the customers of our crimeware reporting service. If you are interested, please contact crimewareintel@kaspersky.com.
APK file hashes
8483037dcbf14ad8197e7b23b04aea34
105fa36e6f97977587a8298abc31282a
e1cd59ae3995309627b6ab3ae8071e80
115fbdc312edd4696d6330a62c181f35
08a3b1fb2d1abbdbdd60feb8411a12c7
d7d15e02a9cd94c8ab00c043aef55aff
9dac23203c12abd60d03e3d26d372253
C2 domains
1249124fr1241og5121.sa[.]com
froglive[.]net
C2 IPs
45.138.16.208[:]8080
URL of GitHub repository with Frogblight phishing website source code
https://github[.]com/eraykarakaya0020/e-ifade-vercel
URL of GitHub account containing APK files of Frogblight and Coper
https://github[.]com/Chromeapk
Distribution URLs
https://farketmez37[.]cfd/e-ifade.apk
https://farketmez36[.]sbs/e-ifade.apk
https://e-ifade-app-5gheb8jc.devinapps[.]com/e-ifade.apk
Hackaday Links: December 14, 2025

Fix stuff, earn big awards? Maybe, if this idea for repair bounties takes off. The group is dubbed the FULU Foundation, for “Freedom from Unethical Limitations on Users,” and was co-founded by right-to-repair activist Kevin O’Reilly and perennial Big Tech thorn-in-the-side Louis Rossman. The operating model works a bit like the bug bounty system, but in reverse: FULU posts cash bounties on consumer-hostile products, like refrigerators that DRM their water filters or bricked thermostats. The bounty starts at $10,000, but can increase based on donations from the public. FULU will match those donations up to $10,000, potentially making a very rich pot for the person or team that fixes the problem.
So far, it looks like FULU has awarded two $14,000 bounties for separate solutions to the bricked Nest thermostats. A second $10,000 bounty, for an air purifier with DRM’d filters, is under review. There’s also a $30,000 bounty outstanding for a solution to the component pairing problem in Xbox Series X gaming consoles. While we love the idea of putting bounties on consumer-unfriendly products and practices, and we celebrate the fixes discovered so far, we can’t help but worry that this could go dramatically wrong for the bounty hunters, if — OK, when — someone at a Big Tech company decides to fight back. When that happens, any bounty they score is going to look like small potatoes compared to a DMCA crackdown.
From the “Interesting times, interesting problems” Department comes this announcement by NASA of a change in vendor for the ground support vehicles for the Artemis program. The US space agency had been all set to use EVs manufactured by Canoo to whisk astronauts on the nine-mile trip from their prep facility to the launch pad, but when the company went belly up earlier this year, things abruptly changed. Now, instead of the tiny electric vans that look the same coming and going, NASA will revert to type and use modified Airstream coaches to do the job. Honestly, we think this will be better for the astronauts. The interior of the Airstream is spacious, allowing for large seats to accommodate bulky spacesuits and even providing enough headroom to stand up, a difficult proposition in the oversized breadloaf form-factor of the Canoo EV. If they’re going to strap you into a couple of million pounds of explosives and blast you to the Moon, the least they can do is make the last few miles on Earth a little more comfortable.
Speaking of space, we stumbled across an interesting story about time on Mars that presented a bit of a “Well, duh!” moment with intriguing implications. The article goes into some of the details about clocks running slower on Mars compared to Earth, thanks to the lower mass of the Red Planet and the reduced gravity. That was the “duh” part for us, as was the “Einstein was right” bit in the title, but we didn’t realize that the difference would be so large — almost half a millisecond. While that might not sound like much, it could have huge implications when considering human exploration of Mars or even eventual colonization. Everything from the Martian equivalent of GPS to a combined Earth-Mars Internet would need to take the differing concept of what a second is into account. Taking things a bit further, would future native-born Martians even want to use units of measurement based on those developed around the processes and parameters of the Old World? Seems like they might prefer a system of time based on their planet’s orbital and rotational characteristics. And why would they measure anything in meters, being based (at least originally) on the distance between the North Pole and the equator on a line passing through Paris — or was it Greenwich? Whatever; it wasn’t Mars, and that’s probably going to become a sticking point someday. And you thought the U.S. versus the metric system war was bad!
Sticking with space news, what does it take to be a U.S. Space Force guardian? Brains and brawn, apparently, as the 2025 “Guardian Arena” competition kicked off this week at Florida’s Space Force Base Patrick. Guardians, as Space Force members are known, compete as teams in both physical and mental challenges, such as pushing Humvees and calculating orbital properties of a satellite. Thirty-five units from across the Space Force compete for the title of Best Unit, with the emphasis on teamwork. It’s not quite the Colonial Marines, but it’s pretty close.
And finally, Canada is getting in on the vintage computer bandwagon with the first-ever VCF Montreal. In just a couple of weeks, Canadian vintage computer buffs will get together at the Royal Military College of Saint-Jean-sur-Richelieu for an impressive slate of speakers, including our friend “Curious Marc” Verdiell, expounding on his team’s efforts to unlock the secrets of the Apollo program’s digital communications system. Along with the talks, there’s a long list of exhibitors and vendors. The show kicks off on January 24, so get your tickets while you can.
It Only Takes a Handful of Samples To Poison Any Size LLM, Anthropic Finds

It stands to reason that if you have access to an LLM’s training data, you can influence what’s coming out the other end of the inscrutable AI’s network. The obvious guess is that you’d need some percentage of the overall input, though exactly how much that was — 2%, 1%, or less — was an active research question. New research by Anthropic, the UK AI Security Institute, and the Alan Turing Institute shows it is actually a lot easier to poison the well than that.
We’re talking parts-per-million of poison for large models, because the researchers found that with just 250 carefully-crafted poison pills, they could compromise the output of any size LLM. Now, when we say poison the model, we’re not talking about a total hijacking, at least in this study. The specific backdoor under investigation was getting the model to produce total gibberish.
The gibberish here is triggered by a specific phrase, seeded into the poisoned training documents. One might imagine an attacker could use this as a crude form of censorship, or a form of Denial of Service Attack — say the poisoned phrase is a web address, then any queries related to that address would output gibberish. In the tests, they specifically used the word “sudo”, rendering the models (which ranged from 600 million to 13 billion parameters) rather useless for POSIX users. (Unless you use “doas” under *BSD, but if you’re on BSD you probably don’t need to ask an LLM for help on the command line.)
Our question is: Is it easier to force gibberish or lies? A denial-of-service gibberish attack is one thing, but if a malicious actor could slip such a relatively small number of documents into the training data to trick users into executing unsafe code, that’s something entirely worse. We’ve seen discussion of data poisoning before, and that study showed it took a shockingly small amount of misinformation in the training data to ruin a medical model.
Once again, the old rule rears its ugly head: “trust, but verify”. If you’re getting help from the internet, be it random humans or randomized neural-network outputs, it’s on you to make sure that the advice you’re getting is sane. Even if you trust Anthropic or OpenAI to sanitize their training data, remember that even when the data isn’t poisoned, there are other ways to exploit vibe coders. Perhaps this is what happened with the whole “seahorse emoji” fiasco.
WhatsApp: basta un numero di telefono per sapere quando dormi, esci o torni a casa
È stato rilasciato uno strumento che consente il monitoraggio discreto dell’attività degli utenti di WhatsApp e Signal utilizzando solo un numero di telefono. Il meccanismo di monitoraggio copre oltre tre miliardi di account e consente di ricostruire la routine quotidiana di una persona con una precisione allarmante: il momento del rientro a casa, i periodi di utilizzo attivo dello smartphone, le ore di sonno, gli spostamenti e i periodi prolungati di disconnessione dalla rete. Un ulteriore effetto collaterale è l’accelerazione del consumo di batteria e dati mobili, che passano inosservati al proprietario del dispositivo.
Il metodo si basa sulle specifiche dei protocolli di recapito dei messaggi nelle app di messaggistica più diffuse. L’algoritmo si basa sui riconoscimenti di servizio relativi alla ricezione dei pacchetti dati e analizza il tempo di andata e ritorno (RTT). Le applicazioni rispondono automaticamente a tali richieste a un livello di rete basso, anche prima di verificare il contenuto del messaggio, garantendo che la parte riceva risposte misurabili indipendentemente dal fatto che la comunicazione sia effettivamente in corso.
Chiunque può inviare i cosiddetti “ping” al dispositivo della vittima: l’app risponde istantaneamente, ma il tempo di risposta varia significativamente a seconda dello stato dello smartphone, del tipo di connessione e delle condizioni di ricezione. L’utilizzo di Wi-Fi, una rete mobile, uno schermo attivo o la modalità standby creano profili temporali diversi, facilmente individuabili con misurazioni frequenti.
La vulnerabilità è stata descritta per la prima volta dai ricercatori dell’Università di Vienna e di SBA Research in un articolo pubblicato lo scorso anno. Gli autori hanno dimostrato che le richieste nascoste possono essere inviate ad alta frequenza (fino a frazioni di secondo) senza attivare notifiche, pop-up o messaggi di interfaccia, anche se non c’è mai stata una conversazione tra le parti.
Ora, queste scoperte teoriche sono state messe in pratica. Un ricercatore noto con lo pseudonimo di gommzystudio ha pubblicato su GitHub una proof-of-concept funzionante che dimostra quanto sia facile estrarre dati sensibili sull’utilizzo del telefono. Dimostra chiaramente come, utilizzando un singolo numero di telefono, sia possibile determinare se un dispositivo è attivo, inattivo o completamente disconnesso dalla rete, oltre a identificare ulteriori indicatori comportamentali.
Un altro trucco chiave consiste nell’inviare reazioni a messaggi inesistenti. Queste richieste non sono visibili al destinatario, ma attivano comunque conferme automatiche di consegna. L’app segnala prima la ricezione di un pacchetto di rete e solo successivamente verifica se il messaggio associato esiste, garantendo che la catena di spionaggio rimanga completamente nascosta.

Gli esperimenti hanno dimostrato che tali controlli possono essere eseguiti a intervalli di circa 50 millisecondi senza lasciare tracce nell’interfaccia utente. Tuttavia, lo smartphone inizia a consumare molta più energia e la quantità di dati trasferiti aumenta drasticamente. L’unico modo per rilevarlo è collegare fisicamente il dispositivo a un computer e analizzarne i registri interni.
L’interpretazione delle latenze apre un’ampia gamma di possibilità di osservazione. Valori RTT bassi corrispondono in genere all’uso attivo del telefono con lo schermo acceso e la connessione Wi-Fi. Risposte leggermente più lente indicano attività di rete mobile mentre è ancora attiva. Latenze elevate sono tipiche della modalità inattiva su accesso wireless, mentre latenze molto elevate indicano la modalità di sospensione su una connessione cellulare o una scarsa ricezione. Una mancata risposta indica la modalità aereo o uno spegnimento completo, mentre fluttuazioni significative nel tempo di risposta indicano lo spostamento del proprietario.
Accumulando queste misurazioni possiamo costruire un quadro comportamentale dettagliato. Le letture stabili del Wi-Fi in genere coincidono con la permanenza a casa, i lunghi periodi di inattività con il sonno e i modelli caratteristici della rete mobile indicano viaggi e uscite.

Il repository contenente lo strumento ha rapidamente attirato l’attenzione della community: in poco tempo, il progetto ha accumulato centinaia di “Mi piace” e decine di fork. Sebbene l’autore sottolinei la natura di ricerca e didattica dell’opera, chiunque può scaricare e utilizzare il programma, rendendo i potenziali abusi piuttosto concreti.
L’impatto dell’attacco sulla durata della batteria del dispositivo merita un’attenzione particolare. Le prime ricerche scientifiche hanno rivelato che un aggressore può scaricare quasi completamente la batteria di un dispositivo in poche ore senza accedere né all’account né al dispositivo stesso. In condizioni di utilizzo normale, uno smartphone tipico perde meno dell’1% della batteria all’ora. Tuttavia, nei test di WhatsApp, l’iPhone 13 Pro ha consumato circa il 14% della batteria nello stesso periodo, l’iPhone 11 il 18% e il Samsung Galaxy S23 circa il 15%.
Signal si è dimostrato più resiliente grazie all’implementazione di un limite di velocità per le conferme. In condizioni simili, la batteria si è scaricata solo dell’1% all’ora, poiché il sistema ha bloccato le richieste eccessive. WhatsApp non aveva tali limiti al momento degli esperimenti, rendendo l’attacco significativamente più efficace.
A dicembre 2025, la vulnerabilità rimane sfruttabile sia in WhatsApp che in Signal.
L'articolo WhatsApp: basta un numero di telefono per sapere quando dormi, esci o torni a casa proviene da Red Hot Cyber.
Finally, A Pipe Slapophone With MIDI

If you live in a major city, you’ve probably seen a street performer with some variety of slapophone. It’s a simple musical instrument that typically uses different lengths of PVC pipe to act as resonant cavities. When struck with an implement like a flip-flop, they release a dull but pleasant tone. [Ivan Miranda] decided to build such an instrument himself and went even further by giving it MIDI capability. Check it out in the video below.
[Ivan’s] design uses a simple trick to provide a wide range of notes without needing a lot of individual pipes. He built four telescoping pipe assemblies, each of which can change length with the aid of a stepper motor and a toothed belt drive. Lengthening the cavity produces a lower note, while shortening it produces a higher note. The four pipe assemblies are electronically controlled to produce notes sent from a MIDI keyboard, all under the command of an Arduino. The pipes are struck by specially constructed paddles made of yoga mats, again controlled by large stepper motors.
The final result is large, power-hungry, and vaguely playable. It’s a little unconventional, though, because moving the pipes takes time. Thus, keypresses on a MIDI keyboard set the pipes to a given note, but don’t actually play it. The slapping of the pipe is then triggered with a drum pad.
We love weird instruments around these parts.
youtube.com/embed/EG3dnPZUVh4?…
youtube.com/embed/-j1tRMPwwRY?…
Taking Electronics to a Different Level

One part wants 3.3V logic. Another wants 5V. What do you do? Over on the [Playduino] YouTube channel, there’s a recent video running us through a not-so-recent concern: various approaches to level-shifting.
In the video, the specific voltage domains of 3.3 volts and 5 volts are given, but you can apply the same principles to other voltage domains, such as 1.8 volts, 2.5 volts, or nearly any two levels. Various approaches are discussed depending on whether you are interfacing 5 V to 3.3 V or 3.3 V to 5 V.
The first way to convert 5 V into 3.3 V is to use a voltage divider, made from two resistors. This is a balancing act: if the resistors are too small, the circuit wastes power; if they are too large, they inhibit fast signals.
The second approach to converting 5 V into 3.3 V is to use a bare resistor of at least 10K. This is a controversial approach, but it may work in your situation. The trick is to rely on the voltage drop across the series resistor to either drop enough voltage or limit the current flowing through input protection diodes, which will clamp the voltage but also burn out with too much current flow.
The third approach to converting 5 V into 3.3 V is to use chips from the 74AHC series or 74LVC series, such as inverting or non-inverting buffers. These chips can do the level shifting for you.
The easiest approach for going in the other direction is to simply connect them directly and hope you get lucky! Needless to say, this approach is fraught with peril.
The second approach for converting 3.3 V into 5 V is to make your own inverting or non-inverting buffer using, in this case, an N-channel Enhancement-mode MOSFET. Use one MOSFET for an inverting buffer and two MOSFETs for a non-inverting buffer. Just make sure you pick N-MOSFETs with 3.3 V or 5 V gate drive voltage VGS. Alternatively, you can use a buffer from the 74HCT series.
The video provides a myriad of approaches to level shifting, but you still have to decide. Do you have a favorite approach that wasn’t listed? Have you had good or bad luck with any of the approaches? Let us know in the comments! For more info on level shifting, including things to watch out for, check out When Your Level Shifter Is Too Smart To Function.
youtube.com/embed/4bitY6zHLP0?…
Printing with PHA Filament as Potential Alternative to PLA

PLA (polylactic acid) has become the lowest common denominator in FDM 3D printing, offering decent performance while being not very demanding on the printer. That said, it’s often noted that the supposed biodegradability of PLA turned out to be somewhat dishonest, as it requires an industrial composting setup to break it down. Meanwhile, a potential alternative has been waiting in the wings for a while, in the form of PHA. Recently, [JanTec Engineering] took a shot at this filament type to see how it prints and tests its basic resistance to various forms of abuse.
PHA (polyhydroxyalkanoates) are polyesters that are produced by microorganisms, often through bacterial fermentation. Among their advantages are biodegradability without requiring hydrolysis as the first step, as well as UV-stability. There are also PLA-PHA blends that exhibit higher toughness, among other improvements, such as greater thermal stability. So far, PHA seems to have found many uses in medicine, especially for surgical applications where it’s helpful to have a support that dissolves over time.
As can be seen in the video, PHA by itself isn’t a slam-dunk replacement for PLA, if only due to the price. Finding a PHA preset in slicers is, at least today, uncommon. A comment by the CTO of EcoGenesis on the video further points out that PHA has a post-printing ‘curing time’, so that mechanical tests directly after printing aren’t quite representative. Either you can let the PHA fully crystallize by letting the part sit for ~48 hours, or you can speed up the process by putting it in an oven at 70 – 80°C for 6-8 hours.
Overall, it would seem that if your goal is to have truly biodegradable parts, PHA is hard to beat. Hopefully, once manufacturing capacity increases, prices will also come down. Looking for strange and wonderful printing filament? Here you go.
youtube.com/embed/Me8UEWEKvmA?…
Teardown of a 5th Generation Prius Inverter

The best part about BEV and hybrid cars is probably the bit where their electronics are taken out for a good teardown and comparison with previous generations and competing designs. Case in point: This [Denki Otaku] teardown of a fifth-generation Prius inverter and motor controller, which you can see in the video below. First released in 2022, this remains the current platform used in modern Prius hybrid cars.
Compared to the fourth-generation design from 2015, the fifth generation saw about half of its design changed or updated, including the stack-up and liquid cooling layout. Once [Otaku] popped open the big aluminium box containing the dual motor controller and inverters, we could see the controller card, which connects to the power cards that handle the heavy power conversion. These are directly coupled to a serious aluminium liquid-cooled heatsink.
At the bottom of the Prius sandwich is the 12VDC inverter board, which does pretty much what it says on the tin. With less severe cooling requirements, it couples its heat-producing parts into the aluminium enclosure from where the liquid cooling loop can pick up that bit of thermal waste. Overall, it looks like a very clean and modular design, which, as noted in the video, still leaves plenty of room inside the housing.
Regardless of what you think of the Prius on the road, you have to admit it’s fun to hack.
youtube.com/embed/sH0UqYOQHVA?…