Un nuovo database contenente informazioni personali di cittadini italiani è comparso online poche ore fa. A pubblicarlo è stato un utente con nickname Cetegus, membro del noto forum underground DarkForums, che ha annunciato la disponibilità gratuita del dump denominato “Italian Consumers 3.8m”.
Il database contiene PII (Personally Identifiable Information), in italiano “dati personali identificabili”, ovvero qualsiasi informazione che può identificare direttamente o indirettamente una persona fisica.
Disclaimer: Questo rapporto include screenshot e/o testo tratti da fonti pubblicamente accessibili. Le informazioni fornite hanno esclusivamente finalità di intelligence sulle minacce e di sensibilizzazione sui rischi di cybersecurity. Red Hot Cyber condanna qualsiasi accesso non autorizzato, diffusione impropria o utilizzo illecito di tali dati. Al momento, non è possibile verificare in modo indipendente l’autenticità delle informazioni riportate, poiché l’organizzazione coinvolta non ha ancora rilasciato un comunicato ufficiale sul proprio sito web. Di conseguenza, questo articolo deve essere considerato esclusivamente a scopo informativo e di intelligence. Print Screen dal forum exploit.in fornita da Paragon Sec
Cosa contiene il database
Secondo quanto riportato nel post, il file contiene 3,8 milioni di record con dati quali:
indirizzo email
sesso
data di nascita
comune di residenza
L’archivio è stato caricato su un servizio di file sharing pubblico e risulta scaricabile gratuitamente da chiunque, senza necessità di registrazione o credenziali di accesso. Print Screen fornita da Paragon Sec
A cosa può servire una raccolta di questo tipo
Database di questo genere possono essere utilizzati per molteplici scopi, non sempre leciti. In particolare:
Campagne di phishing mirato (spear phishing): grazie alla combinazione di dati personali e geografici, gli attori malevoli possono costruire messaggi altamente credibili.
Furto d’identità (identity theft): la presenza di nome, data di nascita e email facilita la creazione di profili falsi o l’abuso di identità digitali.
Profilazione marketing illegale: alcuni operatori del mercato nero utilizzano questi dati per arricchire dataset destinati a campagne pubblicitarie non autorizzate.
Attacchi di credential stuffing: se combinati con vecchi dump contenenti password, i dati possono permettere accessi non autorizzati ad account reali.
Un rischio concreto per milioni di italiani
Sebbene non sia ancora chiaro da quale fonte provengano i dati, la diffusione gratuita di un archivio contenente 3,8 milioni di record rappresenta una potenziale minaccia per la privacy e la sicurezza digitale dei cittadini italiani.
Red Hot Cyber continuerà a monitorare la situazione per verificare se si tratta di una nuova violazione o di una rielaborazione di dataset già circolanti nel dark web.
[Bob] calls his custom 16-bit computer “Bob’s Unnecessary Retro Processor” or BURP for short. While we suppose it is technically unnecessary, we love the look of it, and we hope he just used it to get the quirky acronym.
When we build custom CPUs they look suspiciously like FPGA development boards, but not BURP. We immediately thought of the IMSAI and the H8 when we saw it, but [Bob] points out it also borrows from the PDP-11.
On the other hand, none of those computers had gorgeous dot matrix LED disassemblers on the front panel. The computer uses its own language, CHASM, which is a bit like assembly language and a bit like C.
The case is a tank. At first, [Bob] didn’t use all TTL chips but didn’t want to go as far as FPGAs, so he settled for CPLDs, which were smaller forerunners to modern FPGAs. However, his microcode ROM is a… well… umm… 32-bit microcontroller. But he swears to us it is used only as a ROM that he can program without hassle. This wasn’t entirely successful, so he finally bit the bullet and switched to an FPGA. There are still some CPU-emulated ROMs in the new system. There are also CPUs dealing with the front panel (especially the disassembler) and managing USB and mass storage.
Unlike some homebrew computers, BURP can address 64K of memory, has 16 registers, and clocks at a respectable 2.1 million instructions per second. There are 99 instructions in 27 broad categories.
While we know it was unnecessary, we liked it. There aren’t plans for the build that hwe could find, but there were a lot of ideas we’d like to borrow next time we’re building a toy CPU. We’ve seen builds that were a Z-80 (or other CPU) with a microcontroller for all the other parts. Or, just emulate everything. We don’t judge. Building your own CPU is a feat if you use relays, tubes, transistors, ICs, or even software.
Microsoft ha annunciato un nuovo attacco side-channel sui modelli linguistici remoti. Consente a un aggressore passivo, in grado di visualizzare il traffico di rete crittografato, di determinare l’argomento della conversazione di un utente con un’intelligenza artificiale, anche quando si utilizza HTTPS.
L’azienda ha spiegato che la fuga dei dati ha interessato le conversazioni con LLM in streaming, modelli che inviano risposte in più parti man mano che vengono generate. Questa modalità è comoda per gli utenti perché non devono attendere che il modello calcoli completamente una risposta lunga.
Tuttavia, è proprio da questa modalità che è possibile ricostruire il contesto della conversazione. Microsoft sottolinea che ciò rappresenta un rischio per la privacy sia per gli utenti individuali che per quelli aziendali. I ricercatori Jonathan Bar Or e Jeff McDonald del Microsoft Defender Security Research Teamhanno spiegato che l’attacco diventa possibile quando un avversario ha accesso al traffico. Potrebbe trattarsi di un avversario a livello di ISP, di qualcuno sulla stessa rete locale o persino di qualcuno connesso alla stessa rete Wi-Fi.
Questo attore malintenzionato sarà in grado di leggere il contenuto del messaggio perché TLS crittografa i dati. Tuttavia, sarà in grado di visualizzare le dimensioni dei pacchetti e gli intervalli tra di essi. Questo è sufficiente affinché un modello addestrato determini se una richiesta appartiene a uno degli argomenti predefiniti.
In sostanza, l’attacco sfrutta la sequenza di dimensioni e tempi di arrivo dei pacchetti crittografati che si verificano durante le risposte da un modello di linguaggio in streaming. Microsoft ha testato questa ipotesi nella pratica. I ricercatori hanno addestrato un classificatore binario che distingue le query su un argomento specifico da tutto il resto del rumore.
Come proof of concept, hanno utilizzato tre diversi approcci di apprendimento automatico: LightGBM, Bi-LSTM e BERT. Hanno scoperto che per una serie di modelli da Mistral, xAI, DeepSeek e OpenAI, l’accuratezza superava il 98%. Ciò significa che un aggressore che osserva semplicemente il traffico verso i chatbot più diffusi può accedere in modo abbastanza affidabile le conversazioni in cui vengono poste domande su argomenti sensibili.
Microsoft ha sottolineato che nel caso di monitoraggio di massa del traffico, ad esempio da parte di un provider o di un’agenzia governativa, questo metodo può essere utilizzato per identificare gli utenti che pongono domande su riciclaggio di denaro, dissenso politico o altri argomenti controllati, anche se l’intero scambio è crittografato.
Gli autori del documento sottolineano un dettaglio inquietante. Più a lungo l’attaccante raccoglie campioni di addestramento e più esempi di dialogo presenta, più accurata sarà la classificazione. Questo trasforma Whisper Leak da un attacco teorico a uno pratico. In seguito alla divulgazione responsabile, OpenAI, Mistral, Microsoft e xAI hanno implementato misure di protezione.
Una tecnica di sicurezza efficace consiste nell’aggiungere una sequenza casuale di testo di lunghezza variabile alla risposta. Questo offusca la relazione tra lunghezza del token e dimensione del pacchetto, rendendo il canale laterale meno informativo.
Microsoft consiglia inoltre agli utenti preoccupati per la privacy di evitare di discutere argomenti sensibili su reti non attendibili, di utilizzare una VPN quando possibile, di scegliere opzioni LLM non in streaming e di collaborare con provider che hanno già implementato misure di mitigazione.
In questo contesto, Cisco ha pubblicato una valutazione di sicurezza separata di otto modelli LLM open source di Alibaba, DeepSeek, Google, Meta , Microsoft, Mistral, OpenAI e Zhipu AI. I ricercatori hanno dimostrato che tali modelli hanno prestazioni scarse in scenari con più turni di dialogo e sono più facili da ingannare in sessioni più lunghe. Hanno anche scoperto che i modelli che davano priorità all’efficienza rispetto alla sicurezza erano più vulnerabili ad attacchi multi-step.
Ciò supporta la conclusione di Microsoft secondo cui le organizzazioni che adottano modelli open source e li integrano nei propri processi dovrebbero aggiungere le proprie difese, condurre regolarmente attività di red teaming e applicare rigorosamente i prompt di sistema.
Nel complesso, questi studi dimostrano che la sicurezza LLM rimane un tema irrisolto. La crittografia del traffico protegge i contenuti, ma non sempre nasconde il comportamento del modello. Pertanto, sviluppatori e clienti di sistemi di intelligenza artificiale dovranno considerare questi canali collaterali, soprattutto quando lavorano su argomenti sensibili e su reti in cui il traffico può essere osservabile da terze parti.
Maker Faire Rome, The European Edition, promossa dalla Camera di Commercio di Roma e curata da Innova Camera con il sostegno di Roma Capitale, rappresenta una manifestazione unica nel panorama nazionale dell’innovazione.
Con tredici edizioni alle spalle, Roma non si limita più ad ospitare l’innovazione: oggi ne è diventata la piattaforma permanente. Formazione, impresa e ricerca qui non si limitano a convivere ma collaborano attivamente per lo stesso traguardo. Costruire il futuro. E il modello funziona, un esempio da cui altri territori potrebbero trarre ispirazione.
Foto: Carlo Denza
Roma, capitale della creatività tecnologica
Dal 17 al 19 ottobre 2025, il Gazometro Ostiense ha ospitato la tredicesima edizione della Maker Faire Rome, trasformando dodici ettari di archeologia industriale in un grande laboratorio a cielo aperto. Tre giorni intensi con numeri impressionanti: oltre 45.000 presenze, di cui 13.000 studenti, hanno visitato più di 380 stand, tra makers, scuole, startup e centri di ricerca che hanno mostrato le tecnologie destinate a plasmare il nostro immediato futuro.
Maker Faire Rome rimane il più grande evento europeo dedicato alla cultura digitale e all’innovazione aperta. Qui formazione, sperimentazione e impresa si mescolano, e i giovani, sempre più spesso, da spettatori diventano veri protagonisti.
La novità di quest’anno è stata la Call for Schools 2025: centinaia di studenti tra i 14 e i 18 anni hanno presentato progetti di robotica, sostenibilità e intelligenza artificiale che poco avevano da invidiare a startup già affermate. Foto: Carlo Denza
Tre macroaree tematiche
L’evento si è sviluppato su tre macroaree: Creativity (stampa 3D, arte digitale, musica, artigianato innovativo, gaming e robotica), Discovery (mobilità sostenibile, scienze applicate e progetti educativi con demo dal vivo), Innovation (manifattura digitale, IoT, intelligenza artificiale, economia circolare, agritech, e-sports, big data e aerospazio).
Tra i big presenti: ESA, ENI, STMicroelectronics, Esercito Italiano e Polizia di Stato. Suggestiva l’installazione Fusion Bloom di ENI, che ha accompagnato i visitatori in un viaggio virtuale sulla fusione a confinamento magnetico, una delle vie più promettenti verso l’energia pulita. L’Esercito ha presentato i droni del 9° Reggimento Sicurezza Cibernetica, il “cane robot” del 7° Reggimento Difesa NBC e il blindato VTLM “Lince” della Brigata Granatieri di Sardegna. ENEA ha portato l’impianto Calliope, che sfrutta radiazioni gamma per sanificare cibo e beni culturali, oltre a progetti su acquaponica e stampa 3D di leghe metalliche. Intesa Sanpaolo Innovation Center ha mostrato il proprio laboratorio robotico per l’assistenza a persone fragili. Foto: Carlo Denza
Call for Schools: i giovani protagonisti
La Call for Schools, realizzata insieme al Ministero dell’Istruzione e del Merito, ha coinvolto oltre 120 istituti scolastici da tutta Italia. Licei, istituti tecnici e professionali. I ragazzi hanno presentato lavori nati nei laboratori scolastici: domotica sostenibile, droni educativi, software per comunicazione inclusiva, sistemi di risparmio energetico e piattaforme per didattica interattiva. Foto: Carlo Denza
Momento clou: la premiazione del contest MakeITcircular allo Spazio Civico 30. Il primo premio (3.000 euro) è andato a MIKTÒS di CDC Studio, che converte scarti tessili misti in un polimero termoplastico completamente riciclato. Si tratta del primo composto al mondo ottenuto interamente da rifiuti tessili misti, in grado di rimpiazzare plastiche tradizionali in svariate applicazioni industriali.
I radioamatori: i primi maker della storia
Un brivido nostalgico ha catturato le scolaresche che sfilavano in una delle sezioni più interessanti, quella dei radioamatori. I primi makers, i veri pionieri dell’autocostruzione. Con i loro tasti verticali e il loro linguaggio “binario” formato da punti e linee. Quando la tecnologia era prevalentemente analogica, questi sperimentatori costruivano stazioni radio, progettavano antenne, comunicavano via satellite e i più audaci perfino verso le stelle, con gli astronauti sulla ISS.
RISC-V: l’architettura aperta che democratizza i processori
Tra le tech emergenti, molto interesse ha suscitato interesse RISC-V: un’architettura di processori completamente open source. “Niente licenze costose: qui tutto è aperto e accessibile. L’analogia è immediata, la stessa filosofia che negli anni ’90 ha reso Linux una forza dirompente nel software sta ora investendo l’hardware. Foto: Carlo Denza
Un melting pot tecnologico
Maker Faire Rome 2025 è molto più di una fiera tech. È il luogo in cui generazioni diverse si incontrano e confrontano le proprie visioni. Imprese, startup, università, scuole e maker indipendenti collaborano e si contaminano in un melting pot tecnologico dal linguaggio condiviso: quello dell’innovazione
Ma c’è un rovescio della medaglia. Le tecnologie presentate RISC-V, droni autonomi, IoT, AI, sollevano questioni serie di sicurezza informatica. La moltiplicazione di device connessi e l’adozione di architetture open richiedono nuovi approcci alla cybersecurity: proteggere dispositivi, reti intelligenti e infrastrutture critiche diventerà sempre più urgente. Non a caso il 9° Reggimento Sicurezza Cibernetica era presente alla fiera, segno che l’attenzione su questi temi sta crescendo.
Conclusione
Roma non è più solo Caput Mundi. Oggi è anche Caput Maker: il posto dove innovazione e tradizione si parlano, e il futuro prende forma un progetto alla volta.
A while back [Clint Basinger] of Lazy Game Reviews fame purchased a rare 1980s Halikan laptop. When he received the parcel, at first glance, everything seemed in order. Upon opening the original laptop bag, however, it was found that the combination of the heavy power supply in a side pocket and the brittle plastic of the laptop’s case had turned the latter into sad fragments of regret. At the time [Clint] wasn’t sure what he’d do, but fortunately [polymatt] stepped in with the joyful news: we can rebuild it; we have the technology.
Obviously, the sad plastic fragments of the original case weren’t going together again in any meaningful way, nor would this have been helpful, but the pieces, along with photos of an intact laptop, helped with the modelling of a digital model of the case. One model and one 3D printer is all you need. For this case, the print used ABS, with gaps between the segmented prints filled with an ABS slurry, as the case was too large to be printed without jumping through some hoops.
The original enclosure’s plastic was analyzed by [Blaise Mibeck] at Cubic Labs to determine why it failed. Under an electron microscope at 15,000x magnification, it was clear that microfractures had formed, likely induced by visible voids due to mechanisms such as off-gassing from volatile compounds inside the plastic. Around these voids, bromine (Br) was present — a common fire retardant — suggesting that Br-based fire retardant compounds played a major role in weakening the plastic.
The final case model is very faithful, although some things, like embossed letters, do not print well with an FDM printer like the Bambu Lab H2D used here. Before assembly, the old NiCd RTC battery was replaced, as was the NiCd battery pack. The main pack got a NiMH upgrade. There was also a blown 5V rail fuse, which likely wasn’t part of the transport damage, but had to be fixed regardless.
After giving the keyboard with its mechanical keys a good clean, assembly of the laptop could commence. This left [polymatt] with the working laptop, including a working hard drive, ready to be sent back to [Clint] for final testing. We’re looking forward to seeing the LGR video on this laptop, and in case [Clint] or anyone else needs to print a Chaplet Halikan LA-30A case ever again, [polymatt] was kind enough to put the files up on Printables.
The tape will be delivered by hand to the Computer History Museum, where we hope its contents will be safely retrieved for archive and analysis. The reporter of the find, research professor [Rob Ricci], identifies the handwriting as that of Jay Lepreau, someone whose word on which UNIX version it contained could, we hope, be trusted.
So if you happen to have a handy PDP-11 in your basement, you may soon be able to explore this 1973 version of the OS. We look forward to hearing from the Computer History Museum as they analyse the tape. Meanwhile, if this whole UNIX thing is new to you, we have a Bell Labs introduction to help you. Or check out the illustrious panel below, looking back at 50 years of UNIX.
We’re always a wee bit suspicious about articles that announce some sort of “World’s first” accomplishment. With a couple of hundred thousand years of history, most of which wasn’t recorded, over which something like 117 billion humans have lived, any claims of primacy have to be taken with a grain of salt. So when the story of the world’s first instance of a car being hit by a meteorite came across our feed, we had to check it out. The car in question, a Tesla, was being driven in South Australia by veterinarian Andrew Melville-Smith when something suddenly crashed into its windshield.
The Tesla, which was in Autopilot mode at the time, continued on its merry way, which likely means its cameras didn’t see anything out of the ordinary. While this potentially supports the claim that the impactor came from above, the fact that the windshield wasn’t fully penetrated kind of speaks against that hypothesis. Also arguing against a cosmogenic origin for the impactor is the inability to find anything on the roadway near the crash site. But Dr. Melville-Smith is adamant that it must have been a meteorite due to evidence of the windshield glass having melted slightly. Again, this raises a few red flags for us, as anything energetic enough to melt glass on impact surely would have gone straight through the windshield, the driver, the seat, the floor, the battery pack, and probably the roadway, too. Then again, we recently saw a legit meteorite impact caught on camera, and that was a surprisingly low-energy event. Oh, and the “first ever” claim? Maybe not, since it seems as if a moving car was struck by a meteorite back in 1950.
Well, that’s it, folks, we’re calling it: the New Space Race is over, and the Chinese have won. Have they landed on the Moon? Set foot on Mars? No, nothing boring like that — they served up the first barbecue in space! The seminal accomplishment came after the installation of a new oven on the Tiangong space station, which is apparently a souped-up microwave with some air-fryer-like features. The six taikonauts currently aboard the space station put the new appliance through its paces with chicken wings, which were sent up on a recent supply run. The linked article has a picture of the wings, which honestly look a little wimpy compared to Buffalo wings; then again, some of the — ahem — aftereffects of properly spiced hot wings might not go over so well in a closed environment. Regardless, we’re sure the meal was a welcome change from the usual space food fare, especially compared to the offerings aboard the ISS, which seem pretty meager. All we’ve ever seen there are tortillas smeared with peanut butter. Pretty sad.
If you’re of a certain vintage and want to feel old, check this out: it’s been 37 years since the “Morris Worm” made cybersecurity a thing. The Internet worm, which exploited a couple of vulnerabilities in Unix systems to propagate, was written by Robert Morris at Cornell University, who has always claimed that he did it just to see if it could be done. It could and it did, infecting 10% of the machines on the fledgling Internet within 24 hours and causing damage (in the form of post-infection mitigation effort) to the tune of $10,000,000. In an interesting twist, Morris was the son of cryptologist Robert Morris, who played a role in the events described in The Cuckoo’s Egg by Cliff Stoll.
And finally, there are more than a few ways to start a flame war in the comments section — Metric vs. Imperial, emacs vs. vi, ridiculously clunky and horrible UK power plugs vs. plugs from literally anywhere else in the world — but one sure way to set one off is to pit Wago lever-lock terminals against good old American wire nuts. Personally, we can see the case for each and make use of both types of connectors in our projects, but if you can’t bear to suffer the slings and arrows of using “those European things” in a proper American junction box, these Wago-disguising 3D prints might be right up your alley. Designed to slip over the two-circuit version of the lever-lock connector, these will hide your shame at not being willing or able to twist a couple of wires together with wire nuts. Have fun in the comments!
Una nuova inserzione apparsa su Exploit pochi minuti fa mostra quanto sia cruciale laCyber Threat Intelligence per prevenire le minacce informatiche. Su uno dei principali forum underground del dark web, Exploit, è comparsa una nuova inserzione pubblicata da un utente che si firma Anon-WMG.
Il post propone per 6000 dollari l’accesso a un server FTP di una azienda non specificata situato in Italia, con un fatturato dichiarato pari a 12,7 miliardi di dollari e oltre 12.000 file archiviati nel sistema, tra cui documenti PDF, database, file eseguibili e archivi compressi per un totale di circa 190 GB di dati.
Disclaimer: Questo rapporto include screenshot e/o testo tratti da fonti pubblicamente accessibili. Le informazioni fornite hanno esclusivamente finalità di intelligence sulle minacce e di sensibilizzazione sui rischi di cybersecurity. Red Hot Cyber condanna qualsiasi accesso non autorizzato, diffusione impropria o utilizzo illecito di tali dati. Al momento, non è possibile verificare in modo indipendente l’autenticità delle informazioni riportate, poiché l’organizzazione coinvolta non ha ancora rilasciato un comunicato ufficiale sul proprio sito web. Di conseguenza, questo articolo deve essere considerato esclusivamente a scopo informativo e di intelligence. Print Screen dal forum exploit.in fornita da Paragon Sec Al momento non è ancora noto il nome dell’azienda coinvolta, ma la cifra indicata come “revenue” potrebbe fornire agli analisti di Cyber Threat Intelligence (CTI) un importante punto di partenza per identificare il potenziale target e agire in modo preventivo.
In particolare, i team di sicurezza potranno tentare di individuare la società a rischio e intervenire tempestivamente, modificando le credenziali di accesso e sanando la breccia prima che l’accesso venga acquistato da un attore malintenzionato.
Chi sono i broker di accesso
I broker di accesso (Access Brokers) sono figure chiave all’interno dell’ecosistema criminale del dark web. Il loro compito è ottenere e rivendere accessi a infrastrutture compromesse – come server FTP, VPN, RDP o account amministrativi – fornendo così una base d’ingresso ad altri gruppi criminali, spesso specializzati in ransomware o data exfiltration.
Questi broker operano come veri e propri intermediari: non conducono direttamente gli attacchi, ma alimentano il mercato clandestino delle intrusioni.
Il valore di un accesso dipende da molte variabili:
la natura dell’azienda e il suo fatturato;
i livelli di privilegio (come l’accesso “Admin” citato nell’inserzione);
la quantità e sensibilità dei dati disponibili;
la localizzazione geografica, nel caso specifico l’Italia.
Il ruolo della Cyber Threat Intelligence
La Cyber Threat Intelligence (CTI) nasce proprio per anticipare e contrastare minacce di questo tipo. Attraverso il monitoraggio costante dei forum, dei marketplace e dei canali Telegram frequentati dai cyber criminali, gli analisti CTI possono rilevare precocemente la vendita di accessi compromessi, identificare i potenziali bersagli e notificare le aziende coinvolte.
L’obiettivo è intervenire prima che tali credenziali vengono acquistate da altri criminali informatici, i quali potranno finalizzare l’attacco verso il target, scatenando ad esempio un attacco ransomware, un furto di dati o un sabotaggio.
Questo approccio proattivo trasforma la difesa informatica da reattiva a predittiva, riducendo sensibilmente l’impatto delle minacce.
The Hackaday 2025 Component Abuse Challenge is all about abusing electronic components in the service of making them do things they were never intended to. It’s not the 2025 Food Abuse Challenge, so in the case of [Ian Dunn]’s hot dog pressed into service as an LED tester, we’ll take the ‘dawg to be a component in its own right. And by any measure, it’s being abused!
Cooking hot dogs by passing an electric current through them has a long and faintly hazardous history to it — we’re sure we’ve heard of domestic hot dog cooker appliances that are little more than the mains supply on a pin at each end of a hot dog shaped receptacle. This one takes the ‘dawg in a bun with condiments, no less, and sticks an ordinary table fork wired up to the grid in each end. The LED testing is the cherry on the cake, because he simply sticks a pile of LEDs by their pins into the tasty sausage. It forms a crude potential divider, so there’s about enough volts across the gap between pins to light it up nicely.
We like this project on so many levels, though we’re not sure what heavy metals would leach out of those LED pins into the meat. If it’s inspired you to do something similar you still have a few days in which to enter the contest, so break out your convenience food and a pile of parts, and start experimenting!
Full disclosure. If you want a lathe capable of turning metal stock, you probably should just buy one. But what fun is that? You can do like [kachurovskiy] and build one with your 3D printer. If you are chuckling, thinking you can’t make 3D printed parts sturdy enough, you aren’t exactly wrong. [Kachurovskiy’s] trick is to 3D print forms and then cast the solid parts in concrete. The result looks great, and we don’t doubt his claim that it “can surpass many comparable lathes in rigidity and features.”
Even he admits that this is a “… hard, long, and expensive project…” But all good projects are. There’s a GitHub page with more details and informative videos below. The action shots are in the last video just before the six-minute mark. Around the seven-minute mark, you can see the machine cut a conical thread. Color us impressed!
The idea of casting concrete with inserts in it is giving us a number of ideas. We haven’t done it before, but it looks like a good skill to learn. You can 3D print concrete, too. Concrete lathes are, surprisingly, not a new idea, but much harder to do without 3D-printed forms.
Nel corso dell’ultima settimana, Google ha annunciato che l’assistente Gemini potrà da ora integrare nativamente i servizi YouTube e Google Maps senza la necessità di utilizzare comandi specifici come “@YouTube” o “@Google Maps”.
Questa modifica segna un passo verso un’interazione più fluida e “naturale” con l’AI all’interno dell’ecosistema Google, riducendo la frizione tra l’utente e i diversi servizi. Per l’utente medio ciò significa che potrà chiedere “fammi vedere un video su…” o “portami a…” senza doversi preoccupare del prefisso corretto.
Allo stesso tempo, emergono nuove indiscrezioni riguardo la prossima evoluzione del modello Gemini, etichettata come “Gemini 3.0“.
Secondo un articolo recente, questa versione è attesa per la fine del quarto trimestre del 2025 o all’inizio del 2026 e promette capacità multimodali ancora più avanzate“. Naturalmente, trattandosi di rumor non confermati ufficialmente, resta prudente considerarle come indicazioni preliminari.
Un’altra novità significativa riguarda la capacità di Gemini di “ricordare” senza esplicito comando: Google ha introdotto un aggiornamento che permette all’assistente di richiamare automaticamente preferenze, contesti e storici d’uso dell’utente, senza che questi debba chiedere “ricorda che…” ogni volta.
Si tratta di una funzionalità che punta a rendere l’interazione più personalizzata, ma che solleva anche questioni sul fronte della privacy e della gestione dei dati: quando un’AI “sa” troppo, occorre trasparenza e controlli adeguati.
In termini di creatività e produzione multimediale, l’app Gemini ha integrato il modello Veo 3, che consente di generare video a partire da immagini statiche o prompt testuali, includendo anche audio sincronizzato. In pratica, sarà possibile trasformare una foto in un breve video (circa 8 secondi a 720p) con movimento e suono generati dall’AI. Questo segna un’avanzata notevole nel campo dell’AI generativa multimodale, rendendo più accessibili strumenti che fino a poco tempo fa erano riservati a contesti specialistici. benchmark “Humanity’s Last Exam”, dove Gemini 3.0 avrebbe ottenuto un punteggio del 32,4% , superando GPT-5 al 26,5% e Grok 4 al 23,9% Riguardo al branding e alle strategie di offerta, Google ha concluso la riorganizzazione dei nomi associati a Gemini: le versioni “Pro” e “Ultra” che identificavano varianti del servizio sono state abbandonate, lasciando un’unica “app Gemini” con livelli di accesso (free, Pro, Ultra) distinti solo dal piano, e non da un nome diverso per il modello. Ciò semplifica la percezione dell’utente finale e segnala che Google vuole spostare l’attenzione più sulle capacità del servizio che sulla “versione” del modello.
Infine, va preso in considerazione il contesto regolamentare: benché le novità siano tutte positive, vi è crescente attenzione da parte di enti regolatori su come i grandi modelli AI vengano rilasciati e supervisionati.
Ad esempio, uno studio recente ha sottolineato che alcuni modelli Gemini precedenti avrebbero avuto problemi di precisione (cosiddette “Allucinazioni“), e ciò alimenta la necessità che nuove versioni come Gemini 3.0 siano accompagnate da adeguati test e comunicazioni trasparenti.
Per chi opera nel campo della cybersecurity o dell’IT, questo significa che ogni evoluzione del modello va valutata non solo per le possibilità che apre, ma anche per i nuovi rischi che può generare.
There are few things that can keep a certain kind of mechanically-inclined mind entranced as well as a marble run, and few structures that look as interestingly organic as procedurally-generated designs – combine the two and you get [Will Morrison]’s Marble Fountain.
[Will]’s first approach to generating a marble run was to have a script randomly place some points, generate a path following a spline through those points, and give that path a constant slope. This worked, but the paths it generated were a bit too simple to take full advantage of a 3D printer’s capabilities, so he next wrote a path solver to generate more complicated runs. The solver starts by generating a series of random line segments connecting the top and bottom of the run, then iteratively moves the segments into position. Each segment has to stay within the print volume, be evenly spaced with the others, maintain a constant slope, avoid segments from other tracks, and avoid distant segments of its own track. The result is a complicated network of tracks that keeps the marbles in motion without letting them fly out in fast sections.
A motorized screw runs through the center of the marble fountain and brings marbles back to the top. The screw is constrained on all sides by the rolling marbles, essentially like a ball screw, which lets it avoid using another bearing at the top of the structure. The supports for the tracks grow downward, merging with nearby supports, repelling from other paths, and converging toward a ring around the central screw. A few Python scripts handle the generative algorithms and use OpenSCAD to generate the actual 3D files. The persistence involved in this project is admirable – [Will] went through about 65 design iterations to get these results.
We’ve seen a few computer-generated marble runs before, though it’s fair to say that this is by far the most complex. We’ve also seen another mesmerizing mechanism to bring marbles back to the top of a marble run.
In this era of cheap lithium pouch cells, it might seem mildly anachronistic to build AA batteries into a project. There are enough valid reasons to do so, however, and enough legacy hardware that still takes AAs, that it’s worth spending some time deciding which batteries to use. Luckily for us, [Lumencraft] over on YouTube has done the legwork in the video embedded below, and even produced a handy-dandy spreadsheet.
Each battery in the test underwent three separate tests. There was the “leave it in a flashlight ’til it dies” test for real-world usage, but also discharge curves logged at 250mA and 2A. The curves for each are embedded in the spreadsheet so you can see what to expect, along with the calculated capacity at each discharge rate. 2A seems like a fairly brutal load for AAs, but it’s great to see how these cells react to extremes. The spreadsheet also includes the cell’s cost to create a value ranking, which will be of great use to our readers in the USA, where it appears [Lumencraft] is buying batteries. The world market is likely to have the same batteries available, but prices may vary by region, so it’s worth double-checking.
In the video, [Lumencraft] also takes the time to explain the four battery types commonly found in AA format, and the strengths and weaknesses of each chemistry that might cause you to prefer one over another for specific use cases, rather than going by his value rankings. Unsurprisingly, there’s virtually no reason other than cost to go for alkaline batteries in 2025. However, lithium-ion batteries in AA form don’t really outperform NiMH enough to make the added cost worthwhile in all applications, which is why the overall “best battery” is a “PowerOwl” NiMH. Li-ion’s unspectacular performance is likely in part due to the inefficiencies introduced by a built-in buck converter and safety circuitry. On the other hand, some people might really appreciate that extra safety compared to bare 18650 cells.
The results here aren’t too dissimilar to what we saw earlier this year, but we really appreciate [Lumencraft] publishing his results as a spreadsheet for easy reference. The only caveat is that he’s taking manufacturers at their word as to how many cycles the batteries will last.
Oh, and just to be 100% clear — we are talking about double-A batteries, not Anti-Aircraft batteries. If anyone has an anti-aircraft battery hack (especially if that hack includes double-A batteries powering the AA batteries), please send in a tip.
History is full of engineers making (or attempting to make) things out of the wrong stuff, from massive wooden aircraft to boats made of ice and sawdust. [PeterSripol] is attempting to make an ultralight aircraft out of a rather wrong material: cardboard. In the previous installment of the project, a pair of wings was fabricated. In this installment, the wings find their home on an equally mostly cardboard fuselage, complete with rudder and elevator.
The fuselage construction amounts to little more than a cardboard box in the shape of an RC airplane. Doublers provide additional strength in critical areas, and fillets provide a modicum of additional strength around seams. To support the weight of the pilot, a piece of corrugated cardboard is corrugated again, with an additional piece making up the floor. With the addition of a couple of side windows for comfort and visibility, the fuselage is completed, but additional components need to be added.
The most difficult challenge in making the fuselage is, in part, unrelated to the building material of choice. To allow the aircraft to be transported to the show after it’s built, the wings are detachable. Detachable wings would be no big deal on a normally constructed ultralight, and permanently affixed wings would be no big deal on a cardboard aircraft, but the combination of the two poses structural integrity challenges. As such, some plywood and aluminum are used to provide the strength needed.
The horizontal and vertical stabilizer construction is fairly simple, with cardboard folded over ribs creating a rather strong surface. At the ends of each are mounted the elevator and rudder, with fiberglass tape making up the hinge. Finally, the tail is mounted to the airframe using a couple of wood screws and some rope.
Despite the questionable choice in materials, the aircraft appears to be reasonably strong, and we love seeing things used in ways they were never intended. Make sure to stay tuned for more coverage, and while you wait, read our write-up on the previous installment of the project!
[Miroslav Hancar] wasn’t satisfied with abusing just a single component for our Component Abuse Challenge. He decided to abuse a whole assembly, in particular, some LED candles.
In this project, LEDs are abused as temperature sensors. When the temperature gets hot enough for long enough, the microcontroller will turn on its LEDs. How? A diode’s forward voltage is temperature-related. By monitoring the forward voltage, the microcontroller can infer the temperature and respond appropriately.
This particular project is really two projects in one, centered around a common theme, heat activation. The first version has four LEDs and, in response to heat, four LEDs flicker to simulate a real candle. The second version is also heat-activated, but it has only one LED. You can snuff out this LED by pinching the top of it with your fingers. You can see a demo of each version in the videos below.
You will find the schematics, Gerber files, and software in the project’s downloadable files. The candles use some of the features of the PIC12F1501 microcontroller, particularly the onboard ADC.
Anything with a laser has undeniable hacker appeal, even if the laser’s task is as pedestrian as sending data over a fiber optic cable. [Shahriar] from [The Signal Path] must agree, and you can watch as he tears down and investigates a fiber optic link made from old HP equipment in the video below.
He starts with an investigation of the block diagram of the transmitter. In the transmitter, the indium gallium arsenide phosphide laser diode emits light with a 1310-nanometer wavelength. Thermal characteristics in the transmitter are important, so there is thermal control circuitry. He notes that this system only works using amplitude modulation; phase modulation would require more expensive parts. Then it’s time to look at the receiver’s block diagram. Some optics direct the light signal to a PIN diode, which receives the signal and interfaces with biasing and amplifying circuitry.
Having explained the operation of the transmitter and receiver, he takes both units apart and has a close look at the internals, with particular attention to the business ends of the transmitter and receiver, which have been carefully mechanically calibrated. He uses an optical spectrum analyzer to verify the laser wavelength and power, then runs the signal through a vector network analyzer. He also uses an arbitrary waveform generator and a vector signal generator to show that radio over fiber would also be feasible. Finally, he captures an eye diagram on an oscilloscope and measures voltage with a digital multimeter.
The eccentric shaft and rotor of the Mazda 12A rotary engine. (Credit: Baked Beans Garage, YouTube) In theory, Wankel-style rotary internal combustion engines have many advantages: they ditch the cumbersome crankcase and piston design, replacing it with a simple, single-chamber design and a thick, plectrum-shaped chunk of metal that spins around inside that chamber to create virtual combustion chambers. This saves weight and maximizes performance-to-weight. Unfortunately, these types of engines are also known for burning a lot of oil and endless seal troubles, especially with early rotary Mazda engines that easily died.
Yet even 1980 versions were not without issues, a case in point is the Mazda 1st gen RX7 with a 12A rotary engine that the [Baked Beans Garage] over at YouTube got their paws on. Starting with unsuccessful attempts to make the car start, the next step was to roll the car into the morgue garage for a full teardown of the clearly deceased engine.
About 35 minutes into the video, we get to the teardown of the engine, with its parts contrasted with those of a newer revision rotary engines alongside illustrations of their functioning, making it as much an autopsy as a detailed introduction to these rotary engines. Technically, they also aren’t the original DKM-style Wankel engines, but a KKM-style engine, as designed by [Hanns-Dieter Paschke]. [Wankel] didn’t like the eccentric KKM design, as he thought it’d put too much stress on the apex seals, but ultimately the more economical KKM design was further developed.
During the autopsy of the 12A revision Mazda engine, it becomes clear that it was likely overheating that killed the engine over the course of years of abuse, along with ‘chatter’ marks of the apex seals destroying the inner chrome coating. This would have compromised compression and with it any chance of the engine running, not unlike a piston engine with badly scored cylinder walls after ingesting some metal chunks.
While the Mazda 12B and subsequent designs addressed many of the issues with the early rotary engines, its use was limited to some sports models, ending in 2012 with the RX-8. The currently produced Mazda MX-30 does use a rotary engine again in its plug-in hybrid version, but it’s only as a range extender engine that drives a generator. Looking at the internals of those Mazda rotary engines, it’s easy to see how complex they are to keep running, but you cannot help but feel a little bit of sadness that these small-but-powerful engines didn’t make much more of a splash.
There is a point where taking technology for granted hides some of the incredible capabilities of seemingly simple devices. Optical mice are a great example of this principle, using what are more or less entirely self-contained cameras just for moving the cursor across your screen. Don’t believe us? Check out this camera made from an old optical mouse from [Dycus]!
For those unfamiliar with optical mice, the sensor used for tracking movement, like a camera, is just an array of photosensitive sensors. This allows a simple on-board microcontroller to convert the small changes from the visual sensor into acceleration/movement information to be sent to the computer.
Proving how capable these sensors can truly be, [Dycus]’s camera manages a whole 30×30 array of picture quality. Along with glorious greyscale, the pictures achieved from such a camera are more than recognizable. Putting together the camera didn’t even require anything crazy beyond the sensor itself. What appears to be a Teensy LC board, basic buttons, and a small screen are essentially everything required to replicate the camera’s functionality. Pictures, both standard and “panoramic”, can be viewed in a variety of color palettes stored on board. Along with a surprisingly impressive feature set, the idea is impressive.
Limitations are often the mother of innovation, no matter if self-imposed or not, as seen here. However, [Dycus] still had a whole 30×30 array to photograph. What about a single pixel? Let’s make it even harder; we can’t look directly at the subject! This is exactly what was done here in this impressive demonstration of clever engineering.
Most of us know that a neon bulb requires a significant voltage to strike, in the region of 100 volts. There are plenty of circuits to make that voltage from a lower supply, should you wish to have that comforting glow of old, but perhaps one of the simplest comes from [meinsamayhun]. The neon is lit from a 9-volt battery, and the only other component is a relay.
What’s going on? It’s a simple mechanical version of a boost converter, with the relay wired as a buzzer. On each “off” cycle, the magnetic field in the coil collapses, and instead of being harvested by a diode as with a boost converter, it lights the neon. Presumably, the neon also saves the relay contacts from too much wear.
We like this project for its simplicity and for managing to do something useful without a semiconductor or vacuum tube in sight. It’s the very spirit of our 2025 Component Abuse Challenge, for which there is barely time to enter yourself if you have something in mind.
Last weekend was Supercon, and it was, in a word super. So many people sharing so much enthusiasm and hackery, and so many good times. It’s a yearly dose of hacker mojo that we as Hackaday staff absolutely cherish, and we heard the same from many of the participants as well. We always come away with new ideas for projects, or new takes on our current top-of-the-heap obsession.
If you didn’t get a chance to see the talks live, head on over to the Hackaday YouTube stream and get yourself caught up really quickly, because that’s only half of the talks. Over the next few weeks, we’ll be writing up the other track of Design Lab talks and getting them out to you ASAP.
If you didn’t get to join us because you are on an entirely different continent, well, that’s a decent excuse. But if that continent is Europe, you can catch us up in the Spring of 2026, because we’re already at work planning our next event on that side of the Atlantic.
Our conferences always bring out the best of our community, and the people who show up are so amazingly positive, knowledgeable, and helpful. It’s too bad that it can only happen a few times per year, but it surely charges up our hacker batteries. So thanks to all the attendees, presenters, volunteers, and sponsors who make it all possible!
This article is part of the Hackaday.com newsletter, delivered every seven days for each of the last 200+ weeks. It also includes our favorite articles from the last seven days that you can see on the web version of the newsletter. Want this type of article to hit your inbox every Friday morning? You should sign up!
While it sounds like the start of a joke, Australian shipmaker Incat Tasmania isn’t kidding around about electric ships. Hull 096 has started charging, although it has only 85% of the over 5,000 lithium-ion batteries it will have when complete. The ship has a 40 megawatt-hour storage system with 12 banks of batteries, each consisting of 418 modules for a total of 5,016 cells. [Vannessa Bates Ramierz] breaks it down in a recent post over on IEEE Spectrum. You can get an eyeful of the beast in the official launch video, below. The Incat Tasmania channel also has other videos about the ship.
The batteries use no racks to save weight. Good thing since they already weigh in at 250 tonnes. Of course, cooling is a problem, too. Each module has a fan, and special techniques prevent one hot cell from spreading. Charging in Australia comes from a grid running 100% renewable energy. When the ship enters service as a ferry between Argentina and Uruguay, a 40-minute charge will be different. Currently, Uruguay has about 92% of its power from renewable sources. Argentina still uses mostly natural gas, but 42% of its electricity is sourced from renewable generation.
The ship is 130 meters (426 feet) long, mostly aluminum, and has a reported capacity of 2,100 people and 225 vehicles per trip. Ferry service is perfect for electric ships — the distance is short, and it’s easy to schedule time to charge. Like all electric vehicles, though, the batteries won’t stay at full capacity for long. Typical ship design calls for a 20-year service life, and it’s not uncommon for a vessel to remain in service for 30 or even 40 years. But experts expect the batteries on the ferry will need to be replaced every 5 to 10 years.
While electric ferries may become common, we don’t expect to see electric cargo ships plying the ocean soon. Diesel is hard to beat for compact storage and high energy density. There are a few examples of cargo ships using electric, though. Of course, that doesn’t mean you can’t build your own electric watercraft.
Old parts such as EPROMs will often find themselves for sale on sites such as eBay, where they are sometimes snapped up by retrocomputing enthusiasts in search of interesting code. Vintage Computer Federation forum member [GearTechWolf] picked up a clutch of IBM-labelled chips, and as int10h reports, stumbled upon a previously unknown PC-AT BIOS version which even hints at a rare PC model as yet unseen.
The IBM AT and its various versions are extremely well known in the retro PC world, so while this was quickly identified as an IBM BIOS from 1985 and narrowed down to a member of the AT family, it didn’t fit any of the known versions which shipped with the ubiquitous 1980s computer. Could it have been from an industrial or rack mount variant? It’s a possibility, but the conclusion is that it might contain a patched BIOS version of some kind.
Lacking real hardware, it happily boots on an emulator. It’s another piece of the PC historical jigsaw for people interested in computer history, and with luck in time someone will unearth an example of whatever it came from. If you find it, try a modern OS on it!
Windows 10 ha perso il 3,94% degli utenti, Windows 11 ne ha guadagnati solo il 3,18%, e una parte del pubblico ha scelto di abbandonare l’ecosistema Microsoft, orientandosi verso altre piattaforme. Linux ha guidato questa migrazione con una crescita dello 0,41%, raggiungendo una quota complessiva del 3,05%. Anche macOS ha beneficiato della situazione, aumentando dello 0,34% fino al 2,11%.
Nonostante questi numeri, Windows rimane il dominatore assoluto, rappresentando il 94,84% dei giocatori su Steam, con il 63,57% su Windows 11, il 31,14% su Windows 10 e un residuo 0,09% su Windows 7. Tuttavia, la tendenza suggerisce che le alternative stanno lentamente erodendo terreno, segno di una maggiore apertura degli utenti verso altri ecosistemi.
All’interno del mondo Linux, la distribuzione più diffusa tra i gamer è SteamOS, che rappresenta il 27,18% degli utenti Linux su Steam. Seguono Arch Linux con il 10,32%, Linux Mint 22.2 con un significativo aumento del 6,65% e Bazzite, una distribuzione ottimizzata per il gaming che sta rapidamente guadagnando consensi. Un altro elemento chiave di questa crescita è la compatibilità: quasi il 90% dei giochi progettati per Windows funziona oggi anche su Linux, grazie a tecnologie come Proton e all’impegno costante di Valve. Questo ha eliminato una delle barriere storiche che frenavano la diffusione del sistema operativo nel mondo del gaming.
Valve, forte del successo di Steam Deck, continua a puntare su Linux come base per i suoi progetti futuri. L’azienda starebbe già lavorando a una console domestica basata sullo stesso sistema operativo, con l’obiettivo di portare l’esperienza di gioco Linux anche nel salotto di casa.
Dopo anni di lenta crescita, Linux sta finalmente raccogliendo i frutti del suo percorso. Non è più solo l’alternativa per smanettoni, ma una piattaforma sempre più solida e accessibile anche per i videogiocatori.
Nel 2025, gli utenti fanno ancora molto affidamento sulle password di base per proteggere i propri account. Uno studio di Comparitech, basato sull’analisi di oltre 2 miliardi di password reali trapelate su forum dedicati alle violazioni dei dati nel corso di un anno, ha rilevato che le password più comuni sono rimaste invariate per molti anni: “123456“, “admin” e “password” rimangono le scelte principali.
Gli analisti dell’azienda hanno stilato una classifica delle 100 password più comuni. La top ten è dominata da sequenze numeriche familiari: “123456“, “12345678“, “123456789” e poi “admin”, “1234”, “Aa123456”, “12345”, “password”, “123” e “1234567890”.
La variante più popolare, “123456“, è apparsa nel database oltre 7,6 milioni di volte, mentre “minecraft”, al 100° posto, è apparsa circa 70.000 volte, senza contare le 20.000 “Password” con iniziale maiuscola.
Circa un quarto delle 1.000 password più comuni è composto esclusivamente da numeri. Quasi il 39% include la sequenza “123” e un altro 2% utilizza la combinazione inversa “321”. La stringa “abc” compare nel 3,1% dei casi. Tra le password minimaliste, spiccano “111111” (18° posto) e persino “********” (35°).
Quasi il 4% di tutte le combinazioni popolari contiene le parole “pass” o “password“, il 2,7% contiene “admin”, l’1,6% contiene “qwerty” e l’1% contiene “welcome“.
Il rapporto ha rilevato che, tra gli esempi a sfondo nazionale, la password “India@123” si è distinta, classificandosi al 53° posto per frequenza. Secondo i ricercatori, tali combinazioni, sebbene meno stereotipate, sono comunque facili da indovinare.
Esaminando la lunghezza delle password, gli esperti hanno notato una tendenza preoccupante: il 65,8% delle combinazioni contiene meno di 12 caratteri, il 6,9% è più corto di otto e solo il 3,2% supera i 16 caratteri. Nel frattempo, la nona password più popolare, “123“, è composta da sole tre cifre, e la quinta più popolare, “1234“, ne contiene quattro. Grafico: le password più comuni in base alla lunghezza (Comparitech)
Gli autori dello studio sottolineano che i moderni strumenti di hacking possono decifrare password deboli in pochi secondi. Le password corte sono facilmente violabili tramite attacchi brute force e riutilizzare la stessa password su diversi siti web rende gli account vulnerabili ad attacchi brute force con credenziali rubate.
Una password sicura è considerata lunga almeno dodici caratteri, con una combinazione di lettere minuscole e maiuscole, numeri e caratteri speciali. Dovrebbe inoltre essere il più casuale possibile e non contenere schemi riconoscibili. L’autenticazione a due fattori offre una protezione aggiuntiva, impedendo l’hacking anche se la password è compromessa.
La metodologia di ricerca si basa sulla raccolta di set di dati trapelati da forum e canali Telegram. Per garantire l’aggiornamento del materiale, i ricercatori hanno confrontato i dati con i report di fuga di notizie disponibili al pubblico o hanno verificato la data dell’attacco informatico con gli autori delle pubblicazioni.
Sono stati inclusi nell’analisi solo i post confermati risalenti al 2025, con tutte le informazioni personali rese anonime. La classifica si è basata sul numero di occorrenze di ciascuna combinazione univoca nel database ripulito.
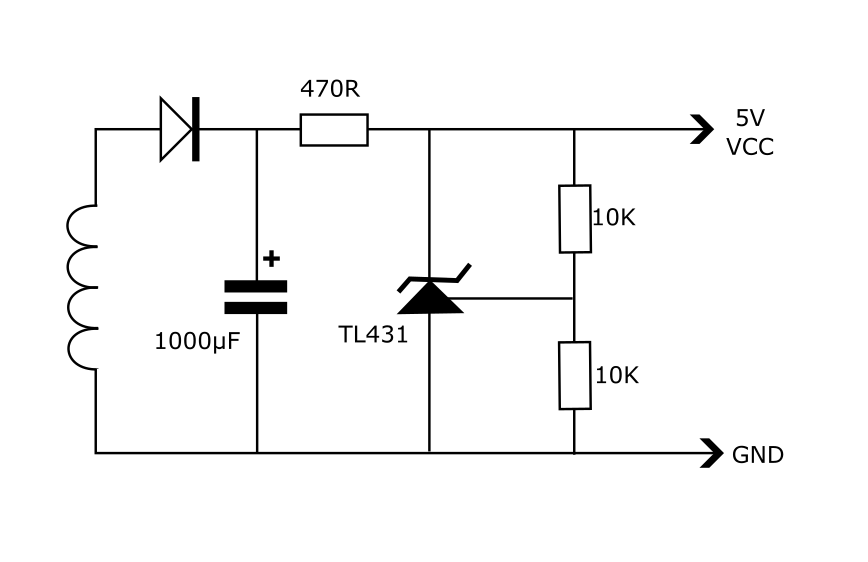
Some time back [bornach] was gifted a Qi wireless charging base station but didn’t own any compatible devices. He had a dig around in his junk box for inductors to attempt coupling to the wireless charger and lucked out with an inductor salvaged from his old inkjet printer.
There are actually open standards, known as the Qi standards, for how to negotiate power from a Qi device. But [bornach] ignored all of that. Instead he leveraged the fact that the Qi base station will periodically send out a “ping” containing a small measure of power to let compatible devices know that it’s available for negotiation. It is the energy in this “ping” that power’s [bornach]’s circuit!
In [bornach]’s circuit a TL431 provides a regulated five volt supply which can be used to drive a microcontroller and a charliplexed array of ten LEDs. Pretty nifty stuff. If you’re new to wireless charging you might like to know How Wireless Charging Works And Why It’s Terrible.
Finding older versions of particular software can be a real chore, all too often only made possible by the sheer grace and benevolence of their creators. At the same time older versions of software can be the only way to dodge undesirable ‘upgrades’, track down regressions, do historical research, set up a retro computer system, and so on. This is where an archive like OldVersion.com (HTTP only so your browser may shout at you) is incredibly useful, offering thousands of installers for software covering a number of platforms.
Unfortunately, as noted on the website, they recently lost their main source of incoming in the form of Google advertising. This means that after launching in 2001, this archive may have to be shut down before long. Confusingly, trying to visit the blog throws a HTTP 503 error, and visiting the forum currently forces a redirect to a random news site unless you can mash that Esc button really fast, perhaps as alternative advertising partners are being trialed, or due to a hack.
Although these days we have sites like Archive.org to do more large scale archiving, OldVersion.com is special for being focused and well-organized, along with a long and rich history that would be a shame to lose. We have referenced the site in the past for old versions as far back as 2008. Hopefully we’ll soon find out more about what is going on with the archive and what its future will be.
The lightsaber was one of the coolest and most iconic visual effects from the original Star Wars, and people have been trying to get that particular piece of movie magic off the silver screen for about 40 years now. [HeroTech] seems to have cracked the code with their “Impossible Lightsaber”— it’s fully retractable, fully lit, and able to hit things (lightly), all while fitting into a replica prop handle.
The secret is… well, there’s more than one secret, here. The blade itself is made out of a “magician’s cane”, which is a coil of plastic that can spring outwards on demand for magic tricks. Hidden inside of it is a strip of LED lights. Of course one strip of LEDs would not be omnidirectional, and the magician’s cane is pretty floppy, but both of those problems are solved by the same idea: “I’ll try spinning. That’s a good trick.”
The spin-stabilized blade holds up to being waved around much better, and apparently the gyroscopic forces it induces are actually lore-accurate. (Who knew?) Of course fitting a motor to spin the “blade”, and another to winch it back in, along with the circuitry and batteries to drive them was no mean feat. It’s impressive they fit it all inside the replica handle; even more impressive that they fit a speaker so this prop even makes the iconic sound effects. We always wanted to see a stage production of William Shakespeare’s Star Wars, and this gives us verily, a new hope.
[HeroTech] isn’t done yet– while seemingly impossible, this lightsaber isn’t perfect, as it’s not rugged enough for full dueling. It’s also not easy to put together, and apparently can’t handle the delicate attentions of airline baggage handlers. So ruggedization and a bit of design-for-assembly are on the table for the next version. Sadly the project is not open source; they are releasing the build files to subscribers only. Given how much work must have gone into iterating to get to this point, that is disappointing, but understandable. Everybody needs to make a living, after all.
It’s a bit of a truism that bigger sensors lead to better pictures when it comes to photography. Of course everyone who isn’t a photographer knows that moar megapixles is moar better. So, when [Gigawipf], aka [Yannick Richter] wanted to make a camera, he knew he had to go big or go home. So big he went: a medium format camera with a whopping 3.2 gigapixel resolution.
Now, getting a hold of a sensor like that is not easy, and [Yannick] didn’t even try. The hack starts by tearing down a couple of recent-model Kodak scanners from eBay to get at those sweet CCD line sensors. Yes, this is that classic hack: the scanner camera. Then it’s off to the oscilloscope and the datasheet for some serious reverse-engineering to figure out how to talk to these things. Protocol analysis starts about 4 minutes in of the embedded video, and is worth watching even if you have no interest in photography.
As for what the line sensor will be talking to, why, it’s nothing other than a Rasberry Pi 5, interfacing through a custom PCB that also holds the stepper driver. Remember this is a line sensor camera: the sensor needs to be scanned across the image plane inside the camera, line by line, just as it is in the scanner. He’s using off-the-shelf linear rails to do that job. Technically we suppose you could use a mirror to optically scan the image across a fixed sensor, but scanner cameras have traditionally done it this way and [Yannick] is keeping with tradition. Why not? It works.
Since these images are going to be huge an SD card in the Pi doesn’t cut it, so this is perhaps the only camera out there with an NVMe SSD. The raw data would be 19 GB per image, and though he’s post-processing on the fly to PNG they’re still big pictures. There probably aren’t too many cameras sporting 8″ touchscreens out there, either, but since the back of the thing is so large, why not? There’s still a CSI camera inside, too, but in this case it’s being used as a digital viewfinder. (Most of us would have made that the camera.) The scanner cam is, of course, far too slow to generate its own previews. The preview camera actually goes onto the same 3D-printed mount as the line sensor, putting it onto the same focal plane as the sensor. Yes, the real-time previews are used to focus the camera.
In many ways, this is the nicest scanner camera we’ve ever featured, but that’s perhaps to be expected: there have been a lot of innovations to facilitate this build since scanner cams were common. Even the 3D printed and aluminum case is professional looking. Of course a big sensor needs a big lens, and after deciding projector lenses weren’t going to cut it, [Yannick] sprung for Pantax 6×7 system lenses, which are made for medium format cameras like this one. Well, not exactly like this one– these lenses were first made for film cameras in the 60s. Still, they offer a huge image, high-quality optics, and manual focus and aperture controls in a format that was easy to 3D-print a mount for.
Is it the most practical camera? Maybe not. Is it an impressive hack? Yes. We’ve always had a soft-spot for scanner cameras, and a in a recent double-ccd camera hack, we were lamenting in the comments that nobody was doing it anymore. So we’re very grateful to [Manawyrm] for sending in the tip.
The humble 555 timer has its origins back in the early 1970s as the NE555, a bipolar integrated circuit. Over the years it has spawned a range of derivatives, including dual versions, and ones using CMOS technology. Have these enhancements improved the performance of the chip significantly? [MagicWolfi] has been pushing the envelope in an effort to see just how fast an astable 555 can be.
The Microchip MIC1555 may be the newest of the bunch, a 5-pin CMOS SOT-23 which has lost the frequency control and discharge pins of the original. It’s scarcely less versatile though, and it’s a fine candidate for an oscillator to push. We see it at a range of values for the capacitor and resistor in an astable configuration, each of which is tested across the supply voltage range. It’s rated as having a maximum frequency of 5 MHz, but with a zero Ohm resistor and only the parasitic capacitance of an open circuit, it reaches the giddy heights of 9.75 MHz. If we’re honest we find this surprising, but on reflection the chip would never be a first choice for super-fast operation.
We like it that someone’s managed to tie in the 555 to the contest, and given that it still has a few days to run at the time of writing, we’re hoping some of you might be inspired to enter one of your own.
Hackaday Editors Tom Nardi and Al Williams spent the weekend at Supercon and had to catch up on all the great hacks. Listen in as they talk about their favorites. Plus, stick around to the end to hear about some of the highlights from their time in Pasadena.
If you’re still thinking about entering the Component Abuse Contest, you’re just about out of time. Need some inspiration? Tom and Al talk about a few choice entries, and discuss how pushing parts out of their comfort zone can come in handy. Do you make your own PCBs? With vias? If you have a good enough laser, you could. Or maybe you’d rather have a $10 Linux server? Just manage your expectations. The guys both admit they aren’t mechanical geniuses and, unlike [4St4r], aren’t very good at guessing sounds either. They round up with some 3D printing projects and a collection of quick hacks.
Check out the links below if you want to follow along, and as always, tell us what you think about this episode in the comments!
I ricercatori di Secure Annex hanno trovato un’estensione dannosa nel catalogo delle estensioni di Visual Studio Code Marketplace per VS Code, dotata di funzionalità ransomware di base. A quanto pare, il malware è stato scritto utilizzando il Vibe coding e la sua funzionalità dannosa è chiaramente indicata nella descrizione.
L’estensione sarebbe stata pubblicata con il nome susvsex da un autore soprannominato suspublisher18. La descrizione e il file README descrivono chiaramente due funzioni chiave dell’estensione: il caricamento di file su un server remoto e la crittografia di tutti i file sul computer della vittima tramite AES-256-CBC.
Gli analisti riportano che il malware è chiaramente generato dall’intelligenza artificialee non sembra essere stato progettato con cura. Il pacchetto include extension.js con parametri hardcoded, tra cui l’indirizzo IP, le chiavi di crittografia e l’indirizzo C&C.
I commenti nel codice sorgente indicano che almeno una parte del codice non è stata scritta a mano, ma generata automaticamente.
Sebbene gli esperti abbiano definito susvsex un’applicazione di intelligenza artificiale, sottolineano che l’estensione è probabilmente utilizzata come esperimento per testare il processo di moderazione di Microsoft e che piccole modifiche al codice potrebbero trasformarla in una vera minaccia. L’estensione si attiva in seguito a un evento (installazione o avvio di VS Code), dopodiché richiama la funzione zipUploadAndEncrypt. Verifica la presenza di uno speciale file di testo, raccoglie i dati richiesti in un archivio ZIP, invia questo archivio a un server remoto predefinito e quindi sostituisce i file originali con le loro versioni crittografate.
Come accennato in precedenza, la crittografia è affidata all’algoritmo AES-256-CBC.
Allo stesso tempo, l’estensione interroga un repository GitHub privato, controllando il file index.html, accessibile tramite un token PAT, e tentando di eseguire tutti i comandi presenti. Utilizzando il token, i ricercatori hanno ottenuto informazioni sull’host e hanno concluso che il proprietario del repository si trova probabilmente in Azerbaigian.
Gli esperti hanno informato Microsoft della minaccia, ma al momento l’estensione è ancora disponibile per il download.
If you had an array of high power addressable LEDs, how would you project them onto a wall? Perhaps you’d use a Fresnel lens, or maybe an individual lens on the top of each. [Joo] faced this problem when making a lighting effect using just such an array, and the solution they came up with used both.
The problem facing a would-be LED array projector is that should the lens be too good, it will project the individual points of light from the LEDs themselves, when a more diffuse point is required. Thus the Fresnel required the aid of a separate array of lenses, resin printed in one in clear plastic. From this we get some useful tips on how to do this for best lens quality, and while the result is not quite optically perfect, it’s certainly good enough for the job in hand.
The linked Printables page comes with all you need to make the parts, and you too can have your own projected LED effect. Now we want one, too! Perhaps we really need our own Wrencher signal instead.
There’s another ransomware story this week, but this one comes with a special twist. If you’ve followed this column for long, you’re aware that ransomware has evolved beyond just encrypting files. Perhaps we owe a tiny bit of gratitude to ransomware gangs for convincing everyone that backups are important. The downside to companies getting their backups in order is that these criminals are turning to other means to extort payment from victims. Namely, exfiltrating files and releasing them to the public if the victim doesn’t pay up. And this is the situation in which the Akira ransomware actors claim to have Apache’s OpenOffice project.
There’s just one catch. Akira is threatening to release 23 GB of stolen documents, which include employee information — and the Apache Software Foundation says those documents don’t exist. OpenOffice hasn’t received a demand and can’t find any evidence of a breach. It seems likely that Akira has hit some company, but not part of the Apache Software Foundation. Possibly someone that heavily uses OpenOffice, or even provides some level of support for that application. There is one more wrinkle here.
Since Apache OpenOffice is an open source software project, none of our contributors are paid employees for the project or the foundation…
First off, there are plenty of open source projects that have employee contributors, and it’s quite odd to imply otherwise. But second, for something as important as an office suite, this is a rather startling statement: there are no paid employees working on the OpenOffice code base.
NPM Typosquat Sophistication
There’s another NPM typosquatting campaign, which is barely news at this point. This one is newsworthy because these malicious packages use multiple layers of obfuscation, and lived on NPM for over four months. They use a clever bit of social engineering during package installation, in the form of a fake CAPTCHA prompt. The idea is that it makes the user less suspicious of the package, and also gives a legitimate reason for network access. But in reality, requiring user interaction defeats any automated analysis efforts.
The first layer of obfuscation consists of an eval() call with a bunch of decoder functions and an ugly encoded string. The result from that set of functions is URL-encoded and needed decoding, followed by an XOR with a key value. And finally, the executable function that finally emerges uses switch/case statements and hard-to-read values. It’s just a web to work through.
The payload behavior is boring in comparison, looking for any credentials on the system and uploading them to a remote server. It also checks for interesting browser cookies and passwords in the password manager, and any authentication tokens it can find.
WordPress Plugin Problems
[István Márton] at Wordfence has the story on a pair of WordPress plugins with severe vulnerabilities, effecting a whopping 500,000 sites combined. Up first is AI Engine, with 100,000 installs. This plugin has an unauthenticated URL endpoint that can expose a bearer token, which then allows access to the MCP endpoint, and arbitrary control of users. The good news here is that the plugin is not vulnerable by default, and requires the “No-Auth URL” setting to be configured to be vulnerable.
The other plugin is Post SMTP, with 400,000 installs. It replaces WordPress’s PHP email handling, and one of the features is the ability to view those emails from the logs. The problem was that before 3.6.1, viewing those email logs didn’t require any permissions. At first blush, that may seem like a medium severity problem, but WordPress is often configured to allow for password resets via emailed links, which means instant account takeover. Both issues have been fixed, and releases are available.
React Native CLI and Metro
A combination of the React Native CLI package and the Metro development server exposed React Native developers to a nasty 9.8 CVSS Remote Code Execution (RCE) CVE. The first element of this vulnerability is the fact that when Metro opens ports for hosting development work, it doesn’t bind to localhost, but listens on all interfaces by default.
When a new Reactive Native project is created without using a framework, some boilerplate code is run as part of the initialization. The end result is that /open-url handler is added to the project, and this handler calls open() with an outside string from the URL. It’s not hard to imagine how this can be abused for arbitrary code injection.
KASLR
Let’s talk about address randomization. Specifically, Kernel Address Space Layout Randomization (KASLR). It’s one of the defenses against turning an arbitrary memory write into a working exploit. If an attacker can’t predict where kernel objects will be in memory, twiddling bits is more likely to crash the system than result in code execution. It’s great in theory. The problem is that it doesn’t necessarily exist in reality.
That’s the story from [Seth Jenkins] at Google’s Project Zero, who was looking for ways to crack Pixel phones. It turns out that memory hotplugging is supported by Linux on Android, and that potential hotplug memory needs a lot of room in the linear memory map. So much room that it’s impractical to also randomize that layout. So while we still technically have KASLR protecting the kernel from attacks, there’s a really big gotcha in the form of the linear memory map.
Bits and Bytes
If you want a really deep dive into how BLE works, and how to investigate an existing BLE connection with an SDR, [Clément Ballabriga] from Lexfo has the scoop. It is significantly more complicated than you might expect, particularly since BLE uses frequency hopping, and a wide enough range of frequencies that your SDR almost certainly can’t capture them all at once. That means breaking a tiny part of the signal security, in order to accurately predict the frequency hops.
Cisco’s Unified Contact Center Express (UCCX) has several vulnerabilities that allows an attacker to run code as root. One vulnerability is in handling arbitrary file uploads by the Java Remote Method Invocation system. Another is an authentication bypass that can be exploited by coercing the target system to use a malicious remote server as part of the authentication process. Fixes are available, and so far it doesn’t look like these flaws have been used in the wild.
I’ve seen this flaw conflated with CVE-2025-38593, a Bluetooth vulnerability recently fixed in the Linux kernel. This is a medium severity race condition in the kernel that can lead to a double-free and a system crash. There doesn’t seem to be a way to turn this into an RCE, as is reflected by its CVSS of 4.7.
Il recente furto al Museo del Louvre, avvenuto nel cuore di Parigi, ha scosso non solo il mondo dell’arte ma anche quello della sicurezza informatica. Nella notte del 22 ottobre 2025, diversi gioielli della corona francese sono stati sottratti dalla Galleria di Apollo, nonostante i sofisticati sistemi di allarme e sorveglianza. Gli investigatori stanno ancora cercando di capire come sia stato possibile penetrare in una delle strutture più protette al mondo, ma degli audit di sicurezza avevano rivelato un elemento tanto banale quanto preoccupante: password deboli e sistemi obsoleti.
Due verifiche indipendenti, avevano già segnalato criticità legate alla gestione delle credenziali d’accesso da parte del personale del museo. Molti account amministrativi utilizzavano password facilmente intuibili o di default, aprendo la strada a potenziali accessi non autorizzati ai sistemi di videosorveglianza e controllo. Nonostante gli avvertimenti, la risposta istituzionale è stata lenta e frammentaria.
Il furto ha dunque messo in luce un nodo cruciale della sicurezza moderna: non basta proteggere muri e teche, se le chiavi digitali per accedervi sono deboli o facilmente compromettibili. Il Louvre, simbolo mondiale della cultura e dell’arte, si trova oggi a dover affrontare una crisi che va oltre il danno materiale, toccando la credibilità e la fiducia del pubblico nella sua capacità di custodire il patrimonio storico dell’umanità.
Le parole di Laurence des Cars: “Abbiamo portato a termine tutte le nostre missioni”
“Abbiamo portato a termine tutte le nostre missioni”, ha assicurato Laurence des Cars, presidente e direttore del Museo del Louvre, intervenendo nel programma mattutino di Franceinfoquesto venerdì 7 novembre 2025.
Nella sua prima intervista dopo l’audizione davanti ai senatori della commissione cultura del 22 ottobre 2025 e il furto al Museo del Louvre, in cui furono rubati diversi gioielli della corona francese, Laurence des Cars ha affermato che “la Corte dei conti ha sbagliato a essere così severa”. In un rapporto pubblicato giovedì, l’agenzia ha concluso che il museo ha fatto scelte di bilancio “a scapito” della sicurezza del sito. Tuttavia, ha indicato che “la percentuale del budget dedicata alle acquisizioni di opere d’arte diminuirà”.
Un bilancio tra trasformazione e vulnerabilità
“Ci sono alcune telecamere perimetrali, ma sono obsolete (…), la rete è molto insufficiente, non copre tutte le facciate del Louvre e purtroppo sul lato della Galleria Apollo” dove è avvenuto il furto, “l’unica telecamera è posizionata verso ovest e quindi non ha coperto il balcone interessato dall’effrazione”, ha affermato la signora des Cars, assicurando che il futuro piano di sicurezza coprirà “tutte le facciate”.
La scorsa settimana, Rachida Dati, Ministro della cultura francese, ha riconosciuto che il Louvre aveva “sottovalutato” il rischio di furto e intrusione, ma l’ha davvero preso in considerazione? RTL ha ottenuto l’accesso alla bozza del contratto di esecuzione (COP) del museo per i prossimi quattro anni, e questo rischio di furto non viene menzionato in alcun punto delle 87 pagine del documento.
Gli esperti sottolineano che le minacce informatiche contro i grandi musei sono in costante crescita, poiché queste istituzioni custodiscono non solo opere d’arte ma anche dati sensibili: dai cataloghi digitali alle planimetrie di sicurezza, fino ai sistemi di controllo remoto degli impianti.
Password deboli e credenziali condivise tra i dipendenti rappresentano un punto di vulnerabilità che può essere sfruttato per coordinare furti fisici o sabotaggi.
La rinascita del Louvre e il restauro della corona dell’Imperatrice Eugenia
Il furto al Louvre non rappresenta solo una falla fisica nella protezione delle opere, ma un campanello d’allarme sulla cybersicurezza dei luoghi culturali. Le indagini hanno infatti rivelato debolezze nei sistemi digitali del museo, già evidenziate in passato da audit interni e dalla Cour des comptes, che aveva denunciato ritardi nell’aggiornamento delle infrastrutture di videosorveglianza e una copertura “molto insufficiente” delle telecamere di sicurezza. Questi elementi mostrano come la vulnerabilità digitale possa amplificare quella fisica, aprendo la strada a intrusioni coordinate.
L’episodio del Louvre evidenzia un problema più profondo e sistemico: molte istituzioni culturali non trattano ancora la cybersicurezza come una componente strategica della conservazione. Secondo gli esperti intervistati da Siècle Digital, la protezione dei musei oggi deve includere la gestione delle identità digitali, la sicurezza dei badge e delle reti interne, e il controllo rigoroso dei dispositivi IoT collegati ai sistemi di allarme e sorveglianza. Password deboli, credenziali condivise e software non aggiornati non sono solo errori tecnici: rappresentano falle nella cultura della sicurezza, che i cybercriminali sanno sfruttare meglio di chiunque altro.
In definitiva, il furto dei gioielli della corona francese è destinato a diventare un caso di studio globale sulla sicurezza digitale abbinata al patrimonio culturale dei singoli paesi.
Have you ever seen photos of retro movie sets where the cameras seem to be bedazzled with lenses? Of course you can only film via one lens at a time, but mounting multiple lenses on a turret as was done in those days has certain advantages –particularly when working with tiny M12 lenses, like our own [Jenny List] recently did with this three-lens, Pi-zero based camera.
Given that it’s [Jenny], the hardware is truly open source, with not just the Python code to drive the Pi but the OpenSCAD code used to generate the STLs for the turret and the camera body all available via GitHub under a generous CC-BY-SA-4.0 license. Even using a cheap sensor and lenses from AliExpress, [Jenny] gets good results, as you can see from the demo video embedded below. (Jump to 1:20 if you just want to see images from the camera.)
The lenses are mounted to a 3D printed ring with detents to lock each quickly in place, held in place by a self-tapping screw, proving we at Hackaday practice what we preach. (Or that [Jenny] does, at least when it comes to fasteners.) Swapping lenses becomes a moment’s twist, as opposed to fiddling with tiny lenses hoping you don’t drop one. We imagine the same convenience is what drove turret cameras to be used in the movie industry, once upon a time.
Plastic recycling is something that many of us strive to accomplish, but we often get caught up in the many hurdles along the way. [Brothers Make] are experienced in the world of plastic recycling and graced us with a look into a simple and reliable way to get consistent thin sheets of durable plastic. Using a common T-shirt press and a mixture of plastic scraps, you can get the process down quickly.
Summarizing the process is pretty easy due to its simplicity. You take a T-shirt press, put some Teflon baking sheets on both sides of some plastic scraps, and then press. Repeating this a couple of times with different colored plastic will get you a nice looking sheet of usable sheets for any purpose you could dream of. Thicker pieces can have some life changing applications, or as simple as guitar picks, as shown by [Brothers Make].
Make sure to try out this technique yourself if you have access to a press! Overuse of plastic is a widely known issue, and yet it feels like almost no one attempts to solve it. If you want a different kind of application, try making your own 3D printing filament out of recycled plastic!
We get it, CAD software can be daunting to learn. Somehow [Boaztheostrich] found it so daunting he procrastinated his way into a AR voxel-based CAD app he calls “ABCCAD”, written in Godot for the Meta Quest 3.
The app is simplicity itself: pressing A or X on the controller spawns a cube, which you can place wherever you like in virtual space by moving the controller in real space. The trigger then saves the cube position. Grabbing a cube uses the controller’s grab buttons. You can even change colors (with B or Y), but like in OpenSCAD it appears that’s not actually going to have any effect on the exported STL. Check it out in action in the demo video embedded below.
As far as CAD applications go, this is as simplistic as it gets, but there’s a certain charm to its simplicity. It’s almost like virtual legos. Besides, TinkerCAD wasn’t much more complicated when it started out, and look at it now.
Sure, one could say if [Boaz] wanted to do CAD he’d have been better off putting the time into learning good old OpenSCAD or FreeCAD (which can now get you SolidWorks certs, apparently), but this is a fun little app that let him stretch his chops in Godot, another great open-source tool. ABCCAD is, itself, open-source under an MIT license.
For the Component Abuse Challenge our hacker [Tim Williams] observes that N-P-N reads the same way forwards and backwards, so… what happens if we reverse bias one? (Note: this remark about N-P-N reading the same forward and backward is a lighthearted joke; in fact the level of doping in the emitter and collector is different so those Ns are not fungible and will exhibit different properties and have different characteristics.)
In the margin you can see how the question was originally posed by Bob Pease back in March 18, 1996.
In his article [Tim] mentions that some transistors are specifically designed to operate when reverse biased, which [Tim] calls “inverted mode”, whereas most transistors are not designed to work in this fashion and that’s the sort of abuse that could damage the component and lead it to malfunction.
But what is Vout? [Tim] reports that he measured approximately -0.4 volts using his high-impedance meter. We tried this experiment in the lab ourselves but we were not able to duplicate [Tim]’s result; however there is a long list of potential reasons for such an outcome. If you do this experiment yourself we would love to hear about your results in the comments section!
Over the decades we have seen a lot of methods for powering LEGO-based contraptions, ranging from LEGO Technic pneumatics to electric motors, but what about steam power? We have all seen those cute little model steam engines that can definitely put out some power. Sure, you can just drop those in like a kind of confused internal combustion engine, or you can try to make a steam engine that actually tries to be directly compatible with LEGO.
While exploring this topic, [Jamie’s Brick Jams] on YouTube found that the primary concern here is simply the very hot steam produced by the boiler. While not a surprise to anyone who has ever run a model steam engine, this poses a major challenge to the thermoplastics used by LEGO.
Obviously a boiler cannot be made out of plastic, but the steam turbine can. That said, material selection here is key, as the hot, wet steam produced by the boiler demolishes PLA parts and ruined the original and very unsafe copper boiler in the process. Ultimately a LEGO Technic-compatible steam turbine was printed in high temperature resistant PAHT-CF and PC filament, which enables a steam-powered LEGO walker to come to life, albeit with a distinct lack of power.
Model steam engine enthusiasts are of course quick to point out that you should try to create dry steam through superheating, definitely add a safety valve and so on, all of which should make for an even more powerful and safe LEGO steam engine. For a rundown of how steam engines work, [Lawrie] did an excellent video on the basics a while back, as well as a video playlist full of demonstrations of both classical Mamod model engines and questionable modern takes.
Suffice it to say that although model steam engines look like toys, they involve fire, hot steam and other fascinating ways to melt things, light them on fire and cause painful injuries, so definitely follow a safety briefing before attempting any of it at home.
Tagging wildlife is never straightforward in the best of times, but it becomes a great deal more complicated when you’re trying to track flying insects. Instead of trying to use a sensor package, [DeepSOIC] attached tiny, light retroreflectors to bees and hornets, then used a pulsed infrared light mounted on a drone to illuminate them. Two infrared cameras on the drone track the bright dot that indicates the insect, letting the drone follow it. To get a spot bright enough to track in full sunlight, though, [DeepSOIC] had to drive some infrared LEDs well above their rated tolerances.
The LEDs manage to survive because they only fire in 15-µs pulses at 100 Hz, in synchrony with the frame rate of the cameras, rather like some welding cameras. The driver circuit is very simple, just a MOSFET switch driven by an external pulse source, a capacitor to steady the supply voltage, and a current-limiting resistor doing so little limiting that it could probably be removed. LEDs can indeed survive high-current pulses, so this might not really seem like component abuse, but the 5-6 amps used here are well beyond the rated pulse current of 3 amps for the original SFH4715AS LEDs. After proving the concept, [DeepSOIC] switched to 940 nm LEDs, which provide more contrast because the atmosphere absorbs more sunlight around this wavelength. These new LEDs were rated for 5A, so they weren’t being driven so far out of spec, but in tests they did survive current up to 10A.
 - Collegamento all'originale")


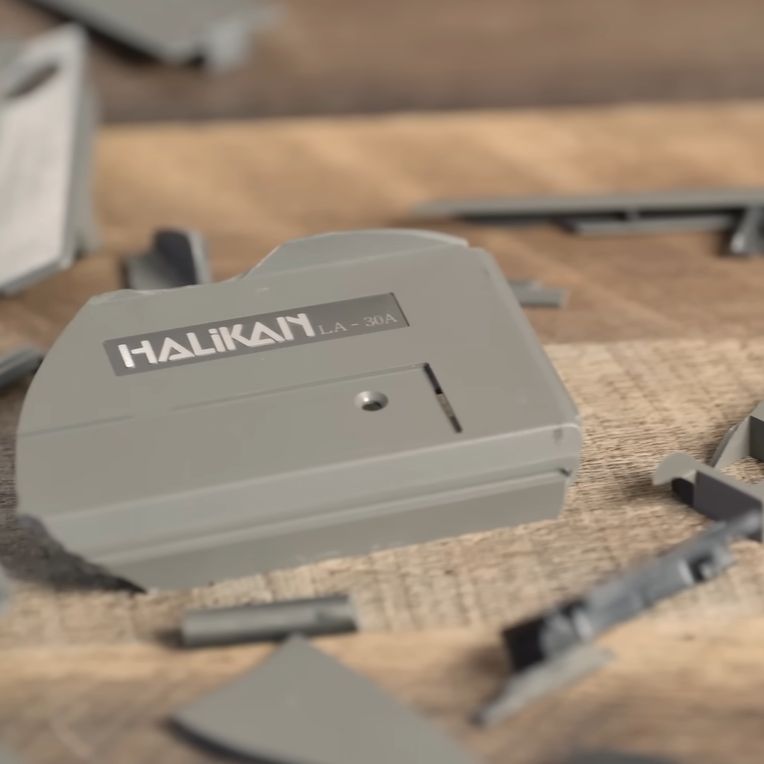


\"")


")