 - Collegamento all'originale")
The Windows Interface You Didn’t Like, For Linux

If you were asked to pick the most annoying of the various Microsoft Windows interfaces that have appeared over the years, there’s a reasonable chance that Windows 8’s Metro start screen and interface design language would make it your choice. In 2012 the software company abandoned their tried-and-tested desktop whose roots extended back to Windows 95 in favor of the colorful blocks it had created for its line of music players and mobile phones.
Consumers weren’t impressed and it was quickly shelved in subsequent versions, but should you wish to revisit Metro you can now get the experience on Linux. [er-bharat] has created Win8DE, a shell for Wayland window managers that brings the Metro interface — or something very like it — to the open source operating system.
We have to admire his chutzpah in bringing the most Microsoft of things to Linux, and for doing so with such a universally despised interface. But once the jibes about Windows 8 have stopped, we can oddly see a point here. The trouble with Metro was that it wasn’t a bad interface for a computer at all, in fact it was a truly great one. Unfortunately the computers it was and is great for are handheld and touchscreen devices where its large and easy to click blocks are an asset. Microsoft’s mistake was to assume that also made it great for a desktop machine, where it was anything but.
We can see that this desktop environment for Linux could really come into its own where the original did, such as for tablets or other touch interfaces. Sadly we expect the Windows 8 connection to kill it before it has a chance to catch on. Perhaps someone will install it on a machine with the Linux version of .net installed, and make a better Windows 8 than Windows 8 itself.

What Isaac Roberts Saw Without a Space Telescope

Space telescopes are all the rage, and rightfully so. The images they take are spectacular, and they’ve greatly increased what we know about the universe. Surely, any picture taken of, say, the Andromeda galaxy before space telescopes would be little more than a smudge compared to modern photos, right? Maybe not.
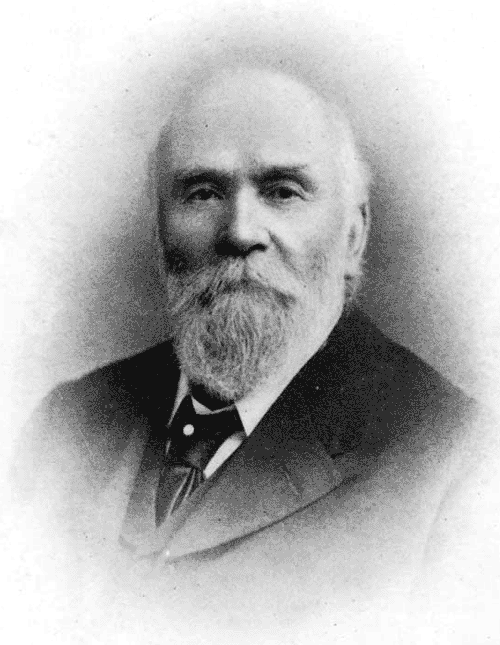
One of the most famous pictures of our galactic neighbor was taken in — no kidding — 1888. The astronomer/photographer was Isaac Roberts, a Welsh engineer with a keen interest in astrophotography. Around 1878, he began using a 180 mm refracting telescope for observations, and in 1883, he began taking photographs.
He was so pleased with the results that he ordered a reflecting telescope with a 510 mm first-surface mirror and built an observatory around it in 1885. Photography and optics back then weren’t what they are now, so adding more mirrors to the setup made it more challenging to take pictures. Roberts instead mounted the photographic plates directly at the prime focus of the mirror.
Andromeda

Because it took hours to capture good images, he developed techniques to keep the camera moving in sync with the telescope to track objects in the night sky. On December 29th, 1888 he used his 510 mm scope to take a long exposure of Andromeda (or M31, if you prefer). His photos showed the galaxy had a spiral structure, which was news in 1888.
Of course, it’s not as good as the Hubble’s shots. In all fairness, though, the Hubble’s is hard to appreciate without the interactive zoom tool. And 100 years of technological progress separate the two.
Roberts also invented a machine that could engrave stellar positions on copper plates. The Science Museum in London has the telescope in its collection.
Your Turn
Roberts did a great job with very modest equipment. These days, at least half of astrophotography is in post-processing, which you can learn. Want time on a big telescope? Consider taking an online class. You might not match the James Webb or the Hubble, but neither did Roberts, yet we still look at his plates with admiration.
Demonstrating The Sheer Lack Of Security In First Gen Cellular Networks

Modern cellular networks are built to serve millions upon millions of users, all while maintaining strict encryption across all communications. But earlier cellular networks were by no means so secure, as [Nostalgia for Simplicity] demonstrates in a recent video.
The video begins with an anecdote — our narrator remembers a family member who could listen in on other’s conversations on the analog AMPS phone network. This was easily achieved simply by entering a code that would put an Ericsson handset into a test mode, in which it could be switched to tune in any desired AMPS channel. Since the communications were transmitted in a purely analog manner, with no encryption of any sort, any conversation on such a network was basically entirely open for anyone to hear. The video shows a recreation of this method, using a software-defined radio to spin up a low-power, very local AMPS network. A phone call is carried out between two handsets, with a third handset able to listen in just by using the special test mode.
If you’re particularly keen to build your own first-generation AMPS phone network, just know that it’s not really allowed due to rules around spectrum allocations. Still, it’s entirely possible as we’ve covered before. It doesn’t even take much hardware in our modern SDR era.
youtube.com/embed/CaR4_l1BzVQ?…
Marion Stokes Fought Disinformation with VCRs

You’ve likely at least heard of Marion Stokes, the woman who constantly recorded television for over 30 years. She comes up on reddit and other places every so often as a hero archivist who fought against disinformation and disappearing history. But who was Marion Stokes, and why did she undertake this project? And more importantly, what happened to all of those tapes? Let’s take a look.
Marion the Librarian
Marion was born November 25, 1929 in Germantown, Philadelphia, Pennsylvania. Noted for her left-wing beliefs as a young woman, she became quite politically active, and was even courted by the Communist Party USA to potentially become a leader. Marion was also involved in the civil rights movement.

For nearly 20 years, Marion worked as a librarian at the Free Library of Philadelphia until she was fired in the 1960s, which was likely a direct result of her political life. She married Melvin Metelits, a teacher and member of the Communist Party, and had a son named Michael with him.
Throughout this time, Marion was spied on by the FBI, to the point that she and her husband attempted to defect to Cuba. They were unsuccessful in securing Cuban visas, and separated in the mid-1960s when Michael was four.
Marion began co-producing a Sunday morning public-access talk show in Philadelphia called Input with her future husband John Stokes, Jr. The focus of the show was on social justice, and the point of the show was to get different types of people together to discuss things peaceably.
Outings Under Six Hours
Marion’s taping began in 1979 with the Iranian Hostage Crisis, which coincided with the dawn of the twenty-four-hour news cycle. Her final tape is from December 14, 2012 — she recorded coverage of the Sandy Hook massacre as she passed away.
In 35 years of taping, Marion amassed 70,000 VHS and Beta-max tapes. She mostly taped various news outlets, fearing that the information would disappear forever. Her time in the television industry taught her that networks typically considered preservation too expensive, and therefore often reused tapes.
But Marion didn’t just tape the news. She also taped various programs such as The Cosby Show, Divorce Court, Nightline, Star Trek, The Oprah Winfrey Show, and The Today Show. Some of her collection includes 24/7 coverage of news networks, all of which was recorded on up to eight VCRs: 3-5 were going all day every day, and up to 8 would be taping if something special was happening. All family outings were planned around the six-hour VHS tape, and Marion would sometimes cut dinner short to go home and change the tapes.
People can’t take knowledge from you. — Marion Stokes
You might be wondering where she kept all the tapes, or how she could afford to do this, both financially and time-wise. For one thing, her second husband John Stokes, Jr. was already well off. For another, she was an early investor in Apple stock, using capital from her in-laws. To say she bought a lot of Macs is an understatement. According to the excellent documentary Recorder, Marion own multiples of every Apple product ever produced. Marion was a huge fan of technology and viewed it as a way of unlocking people’s potential. By the end of her life, she had nine apartments filled with books, newspapers, furniture, and multiples of any item she ever became obsessed with.
In addition to the creating this vast video archive, Marion took half a dozen daily newspapers and over 100 monthly periodicals, which she collected for 50 years. This is not to mention the 40-50,000 books in her possession. In one interview, Marion’s first husband Melvin Metelits has said that in the mid-1970s, the family would go to a bookstore and drop $800 on new books. That’s nearly $5,000 in today’s money.
Why Tapes? Why Anything?
It’s easy to understand why she started with VHS tapes — it was the late 1970s, and they were still the best option. When TiVo came along, Marion was not impressed, preferring not to expose her recording habits to any possible governments. And she had every right to be afraid, with her past.
Those in power are able to write their own history. — Marion Stokes
As for the why, there were several reasons. It was a form of activism, which partially defined Marion’s life. The rest I would argue was defined by this archive she amassed.
Marion started taping when the Iranian Hostage Crisis began. Shortly thereafter, the 24/7 news cycle was born, and networks reached into small towns in order to fill space. And that’s what she was concerned with — the effect that filling space would have on the average viewer.
Marion was obsessed with the way that media reflects society back upon itself. With regard to the hostage crisis, her goal was trying to reveal a set of agendas on the part of governments. Her first husband Melvin Metelits said that Marion was extremely fearful that America would replicate Nazi Germany.
The show Nightline was born from nightly coverage of the crisis. It aired at 11:30PM, which meant it had to compete with the late-night talk show hosts. And it did just fine, rising on the wings of the evening soap opera it was creating.
To the Internet Archive
When Marion passed on December 14, 2012, news of the Sandy Hook massacre began to unfold. It was only after she took her last breath that her VCRs were switched off. Marion bequeathed the archive to her son Michael, who spent a year and half dealing with her things. He gave her books to a charity that teaches at-risk youth using secondhand materials, and he says he got rid of all the remaining Apples.
But no one would take the tapes. That is, until the Internet Archive heard about them. The tapes were hauled from Philadelphia to San Francisco, packed in banker’s boxes and stacked in four shipping containers.
So that’s 70,000 tapes at let’s assume six hours per tape, which totals 420,000 hours. No wonder the Internet Archive wasn’t finished digitizing the footage as of October 2025. That, and a lack of funding for the massive amount of manpower this must require.
If you want to see what they’ve uploaded so far, it’s definitely worth a look. And as long as you’re taking my advice, go watch the excellent documentary Recorder on YouTube. Check out the trailer embedded below.
youtube.com/embed/DJNUdz6wQ3w?…
Main and thumbnail images via All That’s Interesting
Inside Air Traffic Control

It is a movie staple to see an overworked air traffic controller sweating over a radar display. Depending on the movie, they might realize they’ve picked the wrong week to stop some bad habit. But how does the system really work? [J. B. Crawford] has a meticulously detailed post about the origins of the computerized air traffic control system (building on an earlier post which is also interesting).
Like many early computer systems, the FAA started out with the Air Force SAGE defense system. It makes sense. SAGE had to identify and track radar targets. The 1959 SATIN (SAGE Air Traffic Integration) program was the result. Meanwhile, different parts of the air traffic system were installing computers piecemeal.
SAGE and its successors had many parents: MIT, MITRE, RAND, and IBM. When it was time to put together a single national air traffic system the FAA went straight to IBM, who glued together a handful of System 360 computers to form the IBM 9020. The computers had a common memory bus and formed redundant sets of computer elements to process the tremendous amount of data fed to the system. The shared memory devices were practically computers in their own right. Each main computing element had a private area of memory but could also allocate in the large shared pool.
The 9200 ran the skies for quite a while until IBM replaced it with the IBM 3083. The software was mostly the same, as were the display units. But the computer hardware, unsurprisingly, received many updates.
If you’re thinking that there’s no need to read the original post now that you’ve got the highlights from us, we’d urge you to click the link anyway. The post has a tremendous amount of detail and research. We’ve only scratched the surface.
There were earlier control systems, some with groovy light pens. These days, the control tower might be in the cloud.
DIY Magnetic Markers Help 3D Scan Tricky Objects

3D scanners rely on being able to identify physical features of an object, and line up what it saw a moment ago with what it sees now in order to build a 3D model. However, not every object is as distinct and visible as others at all angles, particularly in IR. One solution is reflective scanning markers, which are either pre-printed on a mat, or available as stickers that can be applied to objects to give the scanner a bit more to latch onto, visually speaking.
[firstgizmo] shows a slightly different approach: that of surrounding the object to be scanned with 3D printed reflective markers instead of covering the target object itself with reflectors, or relying on a flat scanning mat.
The main advantage (besides not having to remove stickers from the object afterwards) is that these printed markers present the reflective dots at a variety of angles during the scanning process. This makes the scene less sensitive to scanner angle in general, which is good because the angle at which to scan an important feature of an object is not always the angle that responds best.
By giving the scene more structure, the scanner can have a better shot at scanning reliably even if the reflectors aren’t on the target object itself. It also helps by making it easier to combine multiple scans. The more physical features scans have in common, the easier it is to align them.
Just to be clear, using these means one will, in effect, be 3D scanning the markers along with the target object. But once all the post-processing is done, one simply edits the model to remove everything except the target object.
[firstgizmo]’s DIY magnetic 3D scanning markers are an expanded take on an idea first presented by [Payo], who demonstrates the whole concept wonderfully in the video below.
3D scanning can be tremendously handy but it does have its quirks and limitations, and a tool like this can be the difference between a terrible scan and a serviceable one. For a quick catch-up on 3D scanning and its strengths and limitations, read our hands-on tour of using an all-in-one 3D scanner.
youtube.com/embed/FTSOo6U8BFY?…
BASIC on a Calculator Again

We are always amused that we can run emulations or virtual copies of yesterday’s computers on our modern computers. In fact, there is so much power at your command now that you can run, say, a DOS emulator on a Windows virtual machine under Linux, even though the resulting DOS prompt would probably still perform better than an old 4.77 MHz PC. Remember when you could get calculators that ran BASIC? Well, [Calculator Clique] shows off BASIC running on a decidedly modern HP Prime calculator. The trick? It’s running under Python. Check it out in the video below.
Think about it. The HP Prime has an ARM processor inside. In addition to its normal programming system, it has Micropython as an option. So that’s one interpreter. Then PyBasic has a nice classic Basic interpreter that runs on Python. We’ve even ported it to one or two of the Hackaday Superconference badges.
If you have a Prime, this is a great way to make it even easier to belt out a simple algorithm. Of course, depending on your age, you might prefer to stick with Python. Fair enough, but don’t forget the many classic games available for Basic. Adventure and Hunt the Wumpus are two of the sample programs included.
youtube.com/embed/a1LwXHX0U1o?…
Silicone Bakeware Might be Bad for Your Liver

Silicone bakeware has become a staple in many kitchens due to its flexible, yet temperature-tolerant nature. New research from Canada shows it could be causing trouble for your liver and lungs, however.
The siloxanes that make up silicone bakeware can target “the liver through oral exposure, as well as the liver and lungs through inhalation exposure.” The fat content of the food being baked is also a factor as these compounds are lipophilic, so higher fat foods will absorb more siloxanes than lower fat foods.
Don’t throw out all your silicone yet, though. The researchers say, “the results showed a consistent decreasing trend in migration levels across consecutive weekly baking sessions, with no increase after the seven-month interval.” So, that dingy looking silicone mat you’ve used a hundred times is safer than a brand new, brightly-colored one.
This seems like an example of how glass and (non-heavy) metal are usually the best way to go when handling food. While we’re talking about ovens, do they really need to run a connectivity check? They certainly could be improved with a DIY thermometer or by making a more practical solar-powered example.
Robot Sees Light with No CPU

If you ever built a line following robot, you’ll be nostalgic about [Jeremy’s] light-seeking robot. It is a very simple build since there is no CPU and, therefore, also no software.
The trick, of course, is a pair of photo-sensitive resistors. A pair of motors turns the robot until one of the sensors detects light, then moves it forward.
This is a classic beginner project made even easier with a 3D printer and PCB to hold the components. You might consider using an adjustable resistor to let you tune the sensitivity more easily. In addition, we’ve found that black tubes around the light sensors in this sort of application give you a better directional reading, which can help.
The robot only has two wheels, but a third skid holds the thing up. A freely-rotating wheel might work better, but for a simple demonstration like this, the skid plate is perfectly fine.
This is a good reminder that not every project has to be fantastically complex or require an RTOS and high-speed multi-core CPUs. You can do a lot with just a handful of simple components.
If you want to follow a line, the basic idea is usually the same, with perhaps some different sensors. Usually, but not always.
youtube.com/embed/89uATH5TjWE?…
DK 10x18 - Garante sputtanato e ChatGPT Health
Il Garante è come la moglie di Cesare, non può essere sospettabile. E in questo momento non può permettersi di essere meno che assolutamente autorevole, per questo Scorza ha fatto la scelta giusta. Se gli altri non si fanno indietro da soli, li si convinca. Ricambio completo del Collegio, subito!
spreaker.com/episode/dk-10x18-…
How to use Tiny Open Loop Actuators for a Living Mirror

How do you go about making a mirror with 128 segments, each of which can be independently angled? That was the question that a certain bloke over at [Time Sink Studio] found himself pondering on, to ultimately settle on a whole batch of mini-actuators bought through AliExpress. These stepper-based actuators appear to be akin to those used with certain Oppo smartphones with pop-up camera, costing less than half a dollar for a very compact and quite fast actuator.
The basic design is very much akin to a macro version of a micromirror device, as used in e.g. DLP projectors, which rely on a kinetic mirror mount to enable precise alignment. With the small actuators travelling up to 8 mm each, the mirrors can cover 73 mm at a distance of 4 meters from a wall.
With the required angle of the mirror being effectively just the application of the Pythagorean theorem, the biggest challenge was probably calibrating these linear motors. Since they’re open loop devices, they are zeroed much like the steppers on 3D printers, by finding the end limit and counting steps from that known point. This doesn’t make drift impossible, but for projecting light onto walls it’s clearly more than good enough.
youtube.com/embed/KHulZtR2Qkg?…
Flux and Solder Paste Dispenser Looks Good While Doing It

Syringes are pretty ergonomic, but when manually dispensing flux and solder paste it doesn’t take long before one wants a better way. [Elektroarzt]’s flux and solder paste dispenser design uses 3D-printed parts and minimal hardware (mostly M3x20 screws, and an optional spring) to improve handling and control.
How does it work? The ratcheting lever mechanism is similar to that of a hot glue gun, where an arm slips into notches in a rod when pressed down, driving it forward and never backward. In the process, a larger lever movement is translated into a shorter plunger travel, enhancing control.
The types of syringes this tool is meant to be used with have a plunger tip or piston (the rubber stopper-looking part, in contact with the liquid) inside the loaded syringe, but no plunger shaft attached to it. This is common with syringes meant to be loaded into tools or machines, and [Elektroarzt]’s tool can be used with any such syringe in a 10 cc size.
It’s an attractive design, and we like the way syringes top-load as well as the way the tool is made to lay flat on a tabletop, with the lever pointed up.
Want truly fine-grained control over your extrusions? Then check out this dispenser which really lets one dial in small amounts. You can also go motorized, and let a small PCB and stepper motor do the work.
Keebin’ with Kristina: the One with the Ball-Joint Keyboard

Get a handle on this bad boy! Okay, so those voids are really more for airing out your palms, I’d imagine, because palm sweat sure is real — you should see the pads of my Kinesis. This kind of looks like two sawed-off machine guns kissing, and I mean that in the best possible and non-violent way.

And yet, pricing (oh yeah, this is gonna be A Thing You Can Buy) will be around $115-155, depending upon whether you want the base kit, or the add-ons, too, minus switches and key caps.
So let’s get into the particulars here. As you can see, there are key wells and thumb clusters, inspired by other keyboards including your bog standard Maltrons, Kinesis Advantages and more modern, open-source takes like the Dactyl. [ntc490] loves the key well-thumb cluster combination, and I do, too (hello from the Glove80). And miraculously, the keys are hot-swappable via sockets.

Inside, you’d find direct wiring to the GPIOs, so I’m gonna guess that those are RP2040 clones in there. There’s no PCB, no diodes, no matrices to debug.
So please do go visit the thread if this keyboard appeals to you at this price point. I love it, but I would need more rows of keys, personally. The top reddit comment mentions this as well, and [ntc490] says that because the thing is modular, it can easily accommodate more keys in both the wells and the thumb clusters. I seriously want one of these. Just with a few more keys.
Open-Sourcing the Ultimate Portable Split
Remember [kleshwong]’s PSKEEB5 from a couple of Keebins ago, right before Christmas? He was going to open-source it if there was enough interest? Well, it seems that [kleshwong] decided to do it anyway and has since provided some new videos if you want to build one for yourself.

As a refresher, this thing has some really neat features like swing-out tenting feet, a pair of trackpoints, rotary encoders, and a carrying case that doubles as a laptop stand.
For the internals, any nice!nano-compatible boards will do. You’ll also need Kailh hot-swap sockets, among other things, naturally. If you have any trouble sourcing like the trackpoints for instance, you’re in luck, because [kleshwong] recently opened an online store. Go forth and build the ultimate portable split!
The Centerfold: Glove80 Looks Good In Wood

I’m using my MoErgo Glove80 pretty hardcore these days, driving them all crazy down at the library. But hey, it’s quieter than the big, echo-y Kinesis Advantage, even though they both have browns.
Once I saw the upcoming Go60 by MoErgo, though, I knew I simply needed wooden palm rests for the Glove80. So, over the course of two days, my father-in-law and I fabricated these fetching zebrawood rests, first from pink foam, then from poplar, and finally from book-matched zebra. I think we have a real conversation piece here.
Do you rock a sweet set of peripherals on a screamin’ desk pad? Send me a picture along with your handle and all the gory details, and you could be featured here!
Historical Clackers: a 3D-Printed Index Typewriter!
I was sorry to hear that [Keenan Finucan] had to submit this twice in order to get my attention. But here we are, with what is probably the world’s first 3D-printed index typewriter. So, why is this filed under Historical Clackers? Because I said so, and because it’s based on a real antique index typewriter, the AEG Mignon Model 4. This first model of Mignon was designed between 1901-1903 by German company AEG. Mignons were produced until 1932.

I think this looks fabulous overall, and I rather like the way the index is laid out, which is decidedly non-alphabetical and, surprisingly, does not mirror the AEG index.
[Keenan] reports that thanks to months of work and revisions, this project is as accessible and repeatable as possible. You don’t even need any glue, and non-printed items are at a minimum. You will need a minimum XYZ build volume of 250 x 210 220 mm, TPU or other flexible filament, some springs, a bit of coat hanger wire, and a universal 1/2″ typewriter ribbon, which is pretty widely available.
Finally, $2K Keyboard Computer Is a Return to Form
Alright coders, designers, and engineers: this elegant hunk of metal is for you. What we’ve got here is Caligra’s c100 Developer Terminal. Described as a “computer for experts”, this is not meant for scrolling social media, although what developer can get through the day without a reddit break or three?
Let’s talk about that body. It’s entirely CNC-milled from a solid block of aluminium, which makes me think of the Icebreaker keyboard we saw here almost exactly a year ago. Both double as handy bludgeoning devices, but this one is decidedly more attractive. The bead-blasted finish of the c100 does simultaneously evoke modern and industrial design, so I’ll agree with Yanko on that note.
The coolest part is half-evident in the picture I chose. There’s a central magnetic pivot structure, and this lets you detach and fold the thing up even smaller, without any external hinges.
I thought the storage compartment gimmicky at first, but I’ve grown to like the idea of having a place for pens and whatnot. Yanko almost threatens to call it subversive in the face of what tech companies probably do not want you doing: opening the thing up. You are supposed to tinker with this one.
For some reason, the num pad is on the left, though I suppose this solves the distance-to-mouse problem. Yanko says the design uses Fitts’ law to accelerate task management, and this is supposed to explain why the keys are clustered the way they are. Basically, the placement of each key has been optimized for both speed an minimal hand movement. The wired mouse looks a bit uncomfortable, however.
This thing ships with Workbench OS, which is Linux-based and built specifically for technical work. There are no pop-ups in Workbench OS, which sounds amazing. So I would think that c100 is for writers, too, provided the keyboard clacks nicely.
Got a hot tip that has like, anything to do with keyboards? Help me out by sending in a link or two. Don’t want all the Hackaday scribes to see it? Feel free to email me directly.
SoundSlab: How to Make a Synthesizer With All the Button Screens

Although arguably redundant on a typical computer keyboard, the idea of embedding small screens into the buttons on devices like audio production gear that often have so many buttons can make a lot of sense. As exemplified by devices with a UX that regularly degrades into scrolling through options on a tiny screen. This was basically the impetus for [Craig J Bishop] a few years ago to set out on a design project called the SoundSlab audio sequencer/sampler/synthesizer and slab that would make those buttons much more functional.
Obviously, the right way to start the project is to bulk buy hundreds of 0.85″ 128×128 LCDs so that you’re firmly locked into that choice. Fortunately, it turned out that the most annoying part of this LCD was the non-standard 0.7 mm pitch on its flat flex cable (FFC). This was worked around with an PCB adapter milled out of some copper-clad FR-1, which gave it a convenient PMOD interface for straightforward hook-up to a Xilinx Artix-7 FPGA board.
The buttons themselves were designed as 3D printed key caps for the LCDs that clipped onto typical Cherry MX-style mechanical keys. This also revealed that the original FFCs were too short, so they had to be replaced with new FFCs, that also adapted it to a standard 0.5 mm pitch. With this a 4×4 button prototype board could be constructed for testing.
Since that prototype [Craig] has built a full-sized SoundSlab grid, with a custom FPGA board and HDMI input, of which a preview can be seen in the post, along with a promise by [Craig] to soon post the rest of the SoundSlab development.
Thanks to [JohnS_AZ] for the tip.
Is the transatlantic (digital) relationship dead?
IT'S MONDAY, AND THIS IS DIGITAL POLITICS. I'm Mark Scott, and, thankfully, I am not in Davos this week. For those of you who are, #thoughtsandprayers. I can only hope you have secured the right badge.
 relationship dead?")
— As EU-US tensions hit boiling point, the faltering relationship between the world's most important democracies will be felt in the online world.
— There is a month to go before India's AI Impact Summit. Here's everything you need to know ahead of the circus arriving in New Delhi.
— The results are in: Australia crunched the numbers on how many under-16 year olds were booted from social media since December.
Let's get started:
The Cutest Weather Forecast on E-Ink and ESP32

There’s a famous book that starts: “It is a truth universally acknowledged that a man in possession of a good e-ink display, must be in want of a weather station.” — or something like that, anyway. We’re not English majors. We are, however, major fans of this feline-based e-ink weather display by [Jesse Ward-Bond]. It’s got everything: e-ink, cats, and AI.
AI? Well, it might seem a bit gratuitous for a simple weather display, but [Jesse] wanted something a little more personalized and dynamic than just icons. With that in the design brief, he turned to Google’s Nano Banana API, feeding it the forecast and a description of his cats to automatically generate a cute scene to match the day’s weather.
That turned out to not be enough variety for the old monkey brain, so the superiority of silicon — specifically Gemini–was called upon to write unique daily prompts for Nano Banana using a random style from a list presumably generated by TinyLlama running on a C64. Okay, no, [Jesse] wrote the prompt for Gemini himself. It can’t be LLM’s all the way down, after all. Gemini is also picking the foreground, background, and activity the cats will be doing for maximum neophilia.
Aside from the parts that are obviously on Google servers, this is all integrated in [Jesse]’s Home Assistant server. That server stores the generated image until the ESP32 fetches it. He’s using a reTerminal board from SeedStudio that includes an ESP32-S3 and a Spectrum6 coloor e-ink display. That display leaves something to be desired in coloration, so on top of dithering the image to match the palette of the display, he’s also got a bit of color-correction in place to make it really pop.
If you’re interested in replicating this feline forecast, [Jesse] has shared the code on GitHub, but it comes with a warning: cuteness isn’t free. That is to say, the tokens for the API calls to generate these images aren’t free; [Jesse] estimates that when the sign-up bonus is used up, it should cost about fourteen cents a pop at current rates. Worth it? That’s a personal choice. Some might prefer saving their pennies and checking the forecast on something more physical, while others might prefer the retro touch only a CRT can provide.
The Journey of Finding the Right Press Brake


The video first explores the pros and cons of the various types of press brakes, with the issue of providing a balanced force across the entirety of the press brake’s dies being the largest problem. Although various mechanical and hydraulic solutions were attempted over the decades, a computer-controlled press brake like this Gasparini PBS 045 that [Wes] got is probably one of the more effective solutions, even if it provides the headache of more electrical and electronic things that can go wrong. The above screenshot of its basic workings should make that quite obvious, along with [Wes]’s detailed explanation.
As it turned out, this about 25-year-old Italian press brake wasn’t in such a terrible nick, but needed some badly needed TLC and obligatory breaker testing to bring it back to life. While it doesn’t like you not centering the part, this can be worked around by specifying that the part is actually larger than it is. Although [Wes] got it working well enough to do some work with it, it still has some gremlins left in it that will hopefully be hunted down over the coming time and video(s).
youtube.com/embed/X4z7UmUZyig?…
The Best Robot Mop System: Flat, Spinning, or Roller?

When it comes to designing a mopping robot, there are a number of approaches you can pick from, including just having the movement of the robot push the soggy mop over the floor, having spinning pads, or even a big spinning roller. But what difference does it make? Recently the [Vacuum Wars] channel ran a comparison to find out the answer.
The two spinning pad design is interesting, because it allows for the bot to move closer to objects or walls, and the base station doesn’t need the active scrubber that the simple static pad requires. The weakness of both types of flat mop design is that they are quickly saturated with dirt and moisture, after which they’ll happily smear it over the floor.
The spinning roller is the most complex, with the robot having its own onboard water tank, and a way to extract the dirty water from the mop and store it for disposal in the base station. Theoretically this would be the clear winner, with basically all of them having features like avoiding carpet.
Taking the test data from 150 different mopping robots that were made to clean up dried-up coffee stains, the results weren’t as clear-cut as one might perhaps expect due to the very limited scope of the test. But the comments to the video are perhaps more revealing. After all, most people don’t briefly run their robot mop over a few dried-up stains, but are faced with more severe real-life scenarios.
One commentator mentions their dogs dragging in a lot of mud on rainy days, in which case the spinning pads robot would end up spreading a thin film of mud across the floor. After upgrading to a spinning roller version this issue was resolved, though it’s readily admitted to be the more expensive system, with a much larger base station.
When in the video you see the details of what each approach involves on the side of the robot, the base station and the human caretaker, trade-offs are clear. Having the fixed flat pad is simple, but moves all complexity to the base station, with the spinning pads removing at least the need to motorize the base station. If you have small children or pets with muddy paws around, neither option works well, so you either have to whip out the human-powered mop or shell out for the high-end robotic solution.
Of course, you can also build your own super-charged robot mop, or a very thorough one, but definitely avoid mopping robots that are too cheap to actually work.
youtube.com/embed/Tz6U9QkXn5I?…
Get Bored!

My son went over to a friends house this afternoon, when my wife had been planning on helping him with his French homework. This meant she had an hour or so of unexpected free time. Momentarily at a loss, she asked me what she should do, and my reply was “slack off”, meaning do something fun and creative instead of doing housework or whatever. Take a break! She jokingly replied that slacking off wasn’t on her to-do list, so she wouldn’t even know how to start.
But as with every joke, there’s more than a kernel of truth to it. We often get so busy with stuff that we’ve got to do, that we don’t leave enough time to slack, to get bored, or to simply do nothing. And that’s a pity, because do-nothing time is often among the most creative times. It’s when your mind wanders aimlessly that you find inspiration for that upgrade to the z-stage on your laser cutter, or whatever the current back-burner project of the moment is.
You don’t get bored when you’re watching TV, playing video games, or scrolling around the interwebs on your phone, and it’s all too easy to fall into these traps. To get well and truly bored requires discipline these days, so maybe putting “slack” into your to-do list isn’t a bad idea after all. My wife was right! And that’s why I volunteered to take my son to parkour on Sundays – it’s and hour of guaranteed, 100% uninterruptible boredom. How do you make sure you get your weekly dose of slack?
This article is part of the Hackaday.com newsletter, delivered every seven days for each of the last 200+ weeks. It also includes our favorite articles from the last seven days that you can see on the web version of the newsletter. Want this type of article to hit your inbox every Friday morning? You should sign up!
Arnis Brings the World to Minecraft: Bedrock Edition

A couple of years ago, we covered a project called Arnis, created by [Louis Erbkamm], which allowed you to generate any portion of Earth into Minecraft blocks and maps. It was already impressive, but since we last checked in the open source project has made some incredible progress.
When we first covered Arnis, it was stuck on the Java edition of Minecraft. But now the project has been updated to support the more modern Bedrock Edition, meaning you can put your home into any device’s version of Minecraft!

Beyond Bedrock version support, the actual tool has improved with proper elevation generation using data provided from NASA. This allows you to view the Alps or the Himalayas in all their voxel glory, or explore an entire map of the Moon. Perhaps what’s even more impressive is that the generation is accurate enough to be used in an actual research study involving flood mitigation education.
All of this has been made possible with help from a passionate community who have volunteered their time to assist [Louis] with the project — a testament to the power of open source.
The eMac: Using Apple’s Forgotten Educational Mac in 2025
")
What’s it like to use a 2002-era Apple eMac all-in-one in 2025? That’s what [MattKC] asked himself after obtaining one of these systems from a seller who ominously mentioned that it had been ‘left outside for years’.

The Apple iMac is a bit of a cult symbol, whether you’re talking about the iconic fruity iMac G3 or the desk lamp-like iMac G4, but few reminisce or actively collect the Apple eMac. Manufactured from 2002 to 2006, it featured the PowerPC 7450 (G4e) CPU with clock speeds ranging from 700 MHz to 1.42 GHz, as well as a 17″ CRT. In terms of design it was basically a bland iMac G3 that was firmly targeting the education markets to try and regain market share after Windows PCs had begun to eat its lunch there.
As for the model that [MattKC] purchased, it was this earliest model, featuring a 700 MHz PowerPC G4 CPU in addition to 640 MB SDRAM. Despite the seller’s description it seems to be in good nick with it firing right up, and even a glance inside after beating the challenge of 2.5 mm hex screws showed it to be in relatively good condition.
Unlike the iMac G3, you can play the Mac port of Halo on it, but the Minecraft port is very much not performant. With generally multimedia and gaming working well, it does show why the eMac was released, as it’s quite capable relative to an iMac G3 which would have struggled with the educational software of the era. We definitely hope that [MattKC] restores it to its full glory instead of ripping out its innards, as the neglected status of the eMac makes it much more likely to go extinct than PowerPC-based iMacs.
youtube.com/embed/6dYLtxdwYlw?…
DIY, Full-Stack Farm Automation

Recently, [Vinnie] aka [vinthewrench] moved from Oregon to Arkansas to start a farmstead. This is a style of farming that focuses not just on a profitable farm where produce is sold at market, but also on a homestead where much of one’s own food is grown on the farm as well. Like any farm, though, it’s extremely hard work that takes a tremendous amount of time. Automation and other technology can make a huge impact in these situations, and [Vinnie] is rolling out his own software stack to help with this on his farm.
He calls his project the Pi Internet of Things, or PioT, and as its name suggests is based around the Raspberry Pi. Since this will all be outdoors and exposed to the extremes of Arkansas weather, everything built under the auspices of this project prioritizes ruggedness, stability, and long-term support, all while avoiding any cloud service. The system also focuses on being able to ride through power outages. The server side, called piotserver, uses a REST API to give the user access to the automation systems through a web interface
[Vinnie] also goes into detail about why existing systems like Home Assistant and Open Sprinkler wouldn’t work in his situation, and why a ground-up solution like this is more appropriate for his farm. This post is largely an overview of his system, but some of his other posts go into more detail about things like integrating temperature sensors, rainfall monitoring, controlling irrigation systems, and plenty of other farm automation tasks that are useful for any farmer or gardener.
We’ve also seen some other projects of his here like this project which converts a common AC sprinkler system to an easier-to-use DC system, and a DIY weather station that operates in the 915 MHz band. He’s been a great resource for anyone looking to have technology help them out with their farm or garden, but if you’re just getting started on your green thumb be sure to take a look at this starter guide as well.
How Accurate is a 125 Year Old Resistance Standard?
")
Resistance standards are incredibly useful, but like so many precision references they require regular calibration, maintenance and certification to ensure that they stay within their datasheet tolerances. This raises the question of how well a resistance standard from the year 1900 performs after 125 years, without the benefits of modern modern engineering and standards. Cue the [Three-phase] YouTube channel testing a genuine Evershed & Vignoles Ltd one ohm resistance standard from 1900.

With mahogany construction and brass contacts it sure looks stylish, though the unit was missing the shorting pin that goes in between the two sides. This was a common feature of e.g. resistance decade boxes of the era, where you inserted pins to connect resistors until you hit the desired total. Inside the one ohm standard is a platinoid resistor, which is an alloy of copper, nickel, tungsten, and zinc. Based on the broad arrow mark on the bottom this unit was apparently owned by the UK’s Ordnance Board, which was part of what was then called the War Office.
After a quick gander at the internals, the standard was hooked up to a Keithley DMM7510 digital bench meter. The resistance standard’s ‘datasheet’ is listed on top of the unit on the brass plaques, including the effect of temperature on its accuracy. Adjusting for this, the measured ~1.016 Ω was within 1.6% tolerance, with as sidenote that this was with the unit not having been cleaned or otherwise having had maintenance performed on it since it was last used in service. Definitely not a bad feat.
youtube.com/embed/gRksE0-k8U8?…
Testing a Continuous Printing Mod for the Bambu Lab A1 Mini


As also noted in the review video, this is effectively a clone of the original swapmod A1m kit, but a big difference is that the Chitu kit comes with all of the parts and doesn’t require you to print anything yourself.
The different plates are prepared using a special tool that inserts G-code between the plate changes. Moving the bed in a specific way triggers the switch that lifts the finished plate off the magnetic bed by the plastic grip on the plate and loads a fresh plate from the stack. Here it was found that a small tolerance issue prevented the last plate from being used, but some sandpaper fixed this. Other than that it was a fairly painless experience, and for e.g. multi-color prints with separated colors – as demonstrated – it would seem to be a great way to churn out the entire model without manual intervention or a lot of wasted filament.
Perhaps the main issue that is central to all of these build plate swap mods is where the plates go after they’re pulled off the magnetic bed: the padded box is a great idea for the first one or two plates, but after that you get your PEI build plates with parts on them crashing on top of each other.
This is where perhaps something like a passive roller conveyer system could provide a nice gentle off-ramp, though this too would increase the footprint of the system. Regardless, the overall system seems to work well enough, allowing one to stack fresh plates in the chute and if you turn on build plate detection in the A1 you can even prevent the printer from trying to print on the magnetic bed.
youtube.com/embed/5Ev57r4ikBg?…
Jam like It’s the 1980s With A Mini-IBM PC

A lot of retrocomputer enthusiasts have a favourite system, to the point of keeping up 40 year old flame wars over which system was “best”. In spite of the serious, boring nature of the PC/AT and its descendants, those early IBMs have a certain style that Compaq and the Clones never quite matched. Somehow, we live in a world where there are people nostalgic for Big Blue. That’s why [AnneBarela] built a miniature IBM PC using an Adafruit Fruit Jam board.
If you haven’t seen it before, the Fruit Jam board is an RP2350 dev board created specifically to make minicomputers, with its two USB host sockets, DVI-out and 3.5mm jack. [Anne] loaded a PC emulator by [Daft-Freak] called PACE-32 than can emulate an IBM compatible PC with an 80386 and up-to 8 MB of RAM on this particular board. The video is VGA, 640×480 — as god intended– piped to a 5″ LCD [Anne] picked up from AliExpress.
That display is mounted inside a replica monitor designed by [giobbino], and is sitting on top of a replica case. Both are available on Thingiverse, though some modification was required to provide proper mounting for the Fruit Jam board. [giobbino] designed it to house a FabGL ESP32 module– which has us wondering, if an RP2350 can be a 386, what level of PC might the ESP32-P4 be capable of? We’ve seen it pretend to be a Quadra, so a 486 should be possible. It wasn’t that long ago that mini builds of this nature required a Raspberry Pi, after all.
Speculation aside, this diminutive IBM build leaves us but with but one question: if you played Links386 on it, would it count as miniature golf?
Battle Born LFP Battery Melts With New Problem

Following up on user-reported cases of Battle Born LiFePO4 batteries displaying very hot positive terminals, [Will Prowse] decided to buy a brand new one of these LFP batteries for some controlled cycle testing.
Starting with 30 cycles with a charging current of 49 A and a discharge current of 99 A, this put it well within the 100 A continuous rating for the battery. There is also a surge current rating of 200 A for thirty seconds, but that was not tested here.

What’s interesting about the results here is that instead of the positive terminal getting visibly discolored as with the previous cases that we reported on, [Will] saw severe thermal effects on the side of the negative terminal to the point where the plastic enclosure was deforming due to severe internal heating.
During testing, the first two charge-discharge cycles showed full capacity, but after that the measured capacity became extremely erratic until the battery kept disconnecting randomly. After letting the battery cool down and trying again with 80 A discharge current the negative terminal side of the enclosure began to melt, which was a good hint to stop testing. After this the battery also couldn’t be charged any more by [Will]’s equipment, probably due to the sketchy contact inside the battery.
It’s clear that the plastic spacer inside the terminal bus bar was once again the primary cause, starting a cascade which resulted in not only the enclosure beginning to char and melt, but with heat damage visible throughout the battery. Considering that the battery was used as specified, without pushing its limits, it seems clear that nobody should be using these batteries for anything until Battle Born fixes what appears to be the sketchiest terminal and bus bar design ever seen in a high-current battery.
youtube.com/embed/2m7DSCKO-Bo?…
Hackaday Podcast Episode 353: Fantastic Peripherals, Fake or Not Fake Picos, and Everything on the Steam Deck

Join Hackaday Editors Elliot Williams and Tom Nardi as they swap their favorite hacks and stories from the week. In this episode, they’ll start off by marveling over the evolution of the “smart knob” and other open hardware input devices, then discuss a futuristic propulsion technology you can demo in your own kitchen sink, and a cheap handheld game system that get’s a new lease on life thanks to the latest version of the ESP32 microcontroller.
From there they’ll cover spinning CRTs, creating custom GUIs on Android, and yet another thing you can build of out that old Ender 3 collecting dust in the basement. The episode wraps up with a discussion about putting Valve’s Steam Deck to work and a look at the history-making medical evacuation of the International Space Station.
Check out the links below if you want to follow along, and as always, tell us what you think about this episode in the comments!
html5-player.libsyn.com/embed/…
As always, this episode is available in DRM-free MP3.
Where to Follow Hackaday Podcast
Places to follow Hackaday podcasts:
Episode 353 Show Notes:
What’s that Sound?
- Think you know that sound? Fill out this form for a chance to win a Hackaday Podcast T-Shirt.
Interesting Hacks of the Week:
- Simplifying The SmartKnob
- Yamato-1: The World’s First Ship With Magnetohydrodynamic Propulsion
- When Electricity Doesn’t Take The Shortest Path
- Looking At A Real Fake Raspberry Pi RP2040 Board
- An Open Source Electromagnetic Resonance Tablet
- ESP32-P4 Powers Retro Handheld After A Transplant
- Teardown: 168-in-1 Retro Handheld Game
- GitHub – ducalex/retro-go: Retro emulation for the ODROID-GO and other ESP32 devices
Quick Hacks:
- Elliot’s Picks:
- Hacking The Krups Cook4Me Smart Cooking Pot For Doom
- Great Trains, Not So Great AI Chatbot Security
- An SD Card Of Your Own For Microcontroller Projects
- Making A CRT Spin Right Round, Round, Round
- Tom’s Picks:
- Smart Home? Make It Smart Quarters With This LCARS Dashboard
- Windows? Linux? Browser? Same Executable
- EnderSpark: Convert Your Broken Creality FDM Printer Into An EDM Machine!
Can’t-Miss Articles:
hackaday.com/2026/01/16/hackad…
Trying Out the Allwinner-Based Walnut Pi SBC

When it comes to the term ‘Raspberry Pi clones’, the most that they really clone is the form factor, as nobody is creating clones of Broadcom VideoCore-based SoCs. At least not if they want to stay safe from Broadcom’s vicious legal team. That said, the Walnut Pi 1B single-board computer (SBC) that [Silly Workshop] recently took a gander at seems to be taking a fairly typical approach to a Raspberry Pi 4 form factor compatible board.
Part of Walnut Pi’s line-up, the Allwinner H616/H168-equipped 1B feels like it takes hints from both the RPi 4B and the Asus Tinkerboard, especially with its nicely colored GPIO pins. There’s also a beefier Walnut Pi 2B with an Allwinner T527 SoC that’s not being reviewed here. Translating the Chinese-language documentation for the board suggests that either the H616 or H618 may be installed, with both featuring a quad-core Cortex-A53, so in the ballpark of the Raspberry Pi 3.
There are also multiple RAM configurations, ranging from 1 GB of DDR3 to 4 GB of LPDDR4, with the 1 GB version being fun to try and run benchmarks like GeekBench on. Ultimately the impression was that it’s just another Allwinner SoC-based board, with a half-hearted ‘custom’ Linux image, no hardware acceleration due to missing (proprietary) Allwinner IP block drivers, etc.
While cheaper than a Raspberry Pi SBC, if you need anything more than the basic Allwinner H61* support and Ethernet/WiFi, there clearly are better options, some of which may even involve repurposing an e-waste Android TV box.
youtube.com/embed/XbNntV_yU50?…
Optimizing Software with Zero-Copy and Other Techniques

An important aspect in software engineering is the ability to distinguish between premature, unnecessary, and necessary optimizations. A strong case can be made that the initial design benefits massively from optimizations that prevent well-known issues later on, while unnecessary optimizations are those simply do not make any significant difference either way. Meanwhile ‘premature’ optimizations are harder to define, with Knuth’s often quoted-out-of-context statement about these being ‘the root of all evil’ causing significant confusion.
We can find Donald Knuth’s full quote deep in the 1974 article Structured Programming with go to Statements, which at the time was a contentious optimization topic. On page 268, along with the cited quote, we see that it’s a reference to making presumed optimizations without understanding their effect, and without a clear picture of which parts of the program really take up most processing time. Definitely sound advice.
And unlike back in the 1970s we have today many easy ways to analyze application performance and to quantize bottlenecks. This makes it rather inexcusable to spend more time today vilifying the goto statement than to optimize one’s code with simple techniques like zero-copy and binary message formats.
Got To Go Fast
")
There’s a big difference between having a conceptual picture of how one’s code interacts with the hardware and having an in-depth understanding. While the basic concept of more lines of code (LoC) translating into more RAM, CPU, and disk resources used is technically true much of the time, the real challenge lies in understanding how individual CPU cores are scheduled by the OS, how core cache synchronization works, and the impact that the L2 and L3 cache have.
Another major challenge is that of simply moving data around between system RAM, caches and registers, which seems obvious at face value, but the impact of certain decisions can have big implications. For example, passing a pointer to a memory address instead of the entire string, and performing aligned memory accesses instead of unaligned can take more or less time. This latter topic is especially relevant on x86, as this ISA allows unaligned memory access with a major performance penalty, while ARM will hard fault the application at the merest misaligned twitch.
I came across a range of these issues while implementing my remote procedure call library NymphRPC. Initially I used a simple and easy to parse binary message format, but saddled it with a naïve parser implementation that involved massive copying of strings, as this was the zero-planning-needed, smooth-brained, ‘safe’ choice. In hindsight this was a design failure with a major necessary optimization omitted that would require major refactoring later.
In this article I’d like to highlight both the benefits of simple binary formats as well as how simple it is to implement a zero-copy parser that omits copying of message data during parsing, while also avoiding memory alignment issues when message data is requested and copied to a return value.
KISS
Perhaps the biggest advantage of binary message formats is that they’re very simple, very small, and extremely low in calories. In the case of NymphRPC its message format features a standard header, a message-specific body, and a terminator. For a simple NymphRPC message call for example we would see something like:
uint32 Signature: DRGN (0x4452474e)
uint32 Total message bytes following this field.
uint8 Protocol version (0x00).
uint32 Method ID: identifier of the remote function.
uint32 Flags (see _Flags_ section).
uint64 Message ID. Simple incrementing global counter.
<..> Serialised values.
uint8 Message end. None type (0x01).
The very first value is a 32-bit unsigned integer that when interpreted as characters identifies this as a valid NymphRPC message. (‘DRGN’, because dragonfly nymph.) This is followed by another uint32 that contains the number of bytes that follow in the message. We’re now eight bytes in and we already have done basic validation and know what size buffer to allocate.
Serializing the values is done similarly, with an 8-bit type code followed by the byte(s) that contain the value. This is both easy to parse without complex validation like XML or JSON, and about as light-weight as one can make a format without adding something like compression.
Only If Needed
When we receive the message bytes on the network socket, we read it into a buffer. Because the second 32-bit value which we read earlier contained the message size, we can make sure to allocate a buffer that’s large enough to fit the rest of the message’s bytes. The big change with zero-copy parsing commences after this, where the naïve approach is to copy the entire byte buffer into e.g. a std::string for subsequent substring parsing.
Instead of such a blunt method, the byte buffer is parsed in-place with the use of a moving index pointer into the buffer. The two key methods involved with the parsing can be found in [url=https://github.com/MayaPosch/NymphRPC/blob/master/src/nymph_message.cpp]nymph_message.cpp[/url] and [url=https://github.com/MayaPosch/NymphRPC/blob/master/src/nymph_types.cpp]nymph_types.cpp[/url], with the former providing the NymphMessage constructor and the basic message parser. After parsing the header, the NymphType class provides a parseValue() function that takes a value type code, a reference to the byte buffer and the current index. This function is called until the terminating NYMPH_TYPE_NONE is found, or some error occurs.
Looking at parseValue() in more detail, we can see two things of note: the first is that we are absolutely copying certain data despite the ‘zero-copy’ claim, and the liberal use of memcpy() instead of basic assignment statements. The first item is easy to explain: the difference between either copying the memory address or the value of a simple integer/floating point type is so minimal that we trip head-first into the same ‘premature optimization’ thing that Mr. Knuth complained about back in 1974.
Ergo we just copy the value and don’t break our pretty little heads about whether doing the same thing in a more convoluted way would net us a few percent performance improvement or loss. This is different with non-trivial types, such as strings. These are simply a char* pointer into the byte buffer, leaving the string’s bytes in peace and quiet until the application demands either that same character pointer via the API or calls the convenience function that assembles a readily-packaged std::string.
Memcpy Is Love
Although demonizing ‘doing things the C way’ appears to be a popular pastime, if you want to write code that works with the hardware instead of against it, you really want to be able to write some highly performative C code and fully understand it. When I had written the first zero-copy implementation of NymphRPC and had also written up what I thought was a solid article on how well optimized the project now was, I had no idea that I had a “fun” surprise waiting for me.
As I happily tried running the new code on a Raspberry Pi SBC after doing the benchmarking for the article on an x86 system, the first thing it did was give me a hard fault message in the shell along with a strongly disapproving glare from the ARM CPU. As it turns out, doing a direct assignment like this is bound to get you into trouble:
methodId = *((uint32_t*) (binmsg + index));
This line casts the current index into the byte buffer as a uint32_t type before dereferencing it and assigning the value to the variable. When you’re using e.g. std::string the alignment issues sort themselves out somewhere within the depths of the STL, but with direct memory access like this you’re at the mercy of the underlying platform. Which is a shame, because platforms like ARM do not know the word ‘mercy’.
Fortunately this is easy to fix:
memcpy(&methodId, (binmsg + index), 4);
Instead of juggling pointers ourselves, we simply tell memcpy what the target address is, where it should copy from and how many bytes are to be copied. Among all the other complex scenarios that this function has to cope with, doing aligned memory address access for reading and writing is probably among its least complex requirements.
Hindsight
Looking back on the NymphRPC project so far, it’s clear that some necessary optimizations that ought to have been there from the very beginning weren’t there. At least as far as unnecessary and premature optimizations go, I do feel that I have successfully dodged these, but since these days we’re still having annual flamewars about the merits of using goto I very much doubt that we will reach consensus here.
What is clear from the benchmarking that I have done on NymphRPC before and after this major refactoring is that zero-copy makes a massive difference, with especially operations involving larger data (string) chunks becoming multiple times faster, with many milliseconds shaved off and the Callgrind tool of Valgrind no longer listing __memcpy_avx_unaligned_erms as the biggest headache due to std::string abuse.
Perhaps the most important lesson from optimizing a library like NymphRPC is that aside from it being both frustrating and fun, it’s also a humbling experience that makes it clear that even as a purported senior developer there’s always more to learn. Even if putting yourself out there with a new experience like porting a lock-free ring buffer to a language like Ada and getting corrected by others stings a little.
After all, we are here to write performant software that’s easy to maintain and have fun while doing it, with sharing optimization tips and other tricks just being part of the experience.
WCH CH32M030: Another Microcontroller To Watch Out For

One of the joys of writing for Hackaday comes in following the world of new semiconductor devices, spotting interesting ones while they are still just entries on manufacturer websites, and then waiting for commonly-available dev boards. With Chinese parts there’s always a period in which Chinese manufacturers and nobody else has them, and then they quietly appear on AliExpress.
All of which brings us to the WCH CH32M030, a chip that’s been on the radar for a while and has finally broken cover. It’s the CH32 RISC-V microcontroller you may be familiar with, but with a set of four half-bridge drivers on board for running motors. A handy, cheap, and very smart motor controller, if you will.
There’s been at least one Chinese CH32M030 dev board (Chinese language) online for a while now, but the one listed on AliExpress appears to be a different design. At the time of writing the most popular one is still showing fewer than 20 sales, so we’re getting in at the ground floor here.
We think this chip is of interest because it has the potential to be used in low price robotic projects, replacing as it does a couple of parts or modules in one go. If you use it, we’d like to hear from you!
A PSOne In the Palm of Your Hand

Sony’s original Playstation wasn’t huge, and they did shrink it for re-release later as the PSOne, but even that wasn’t small enough for [Secret Hobbyist]. You may have seen the teaser video a while back where his palm-size Playstation went viral, but now he’s begun a series of videos on how he redesigned the vintage console.
Luckily for [Secret Hobbyist], the late-revision PSOne he started with is only a two-layer PCB, which made reverse engineering the traces a lot easier. Between probing everything under the microscope and cleaning the board off to follow all the traces in copper, [Hobbyist] was able to reproduce the circuit in KiCAD. (Reverse engineering starts at about 1:18 in the vid.)
With a schematic in hand, drafting a smaller PCB than Sony built is made easier by the availability of multi-layer PCBs. In this case [Hobbyist] was able to get away with a four-layer board. He was also able to ditch one of the ICs from the donor mainboard, which he called a “sub-CPU” as its functionality was recreated on the “PSIO” board that’s replacing the original optical drive. The PSIO is a commercial product that has been around for years now, allowing Playstations to run from SD cards– but it’s not meant for the PSOne so just getting it working here is something of a hack. He’s also added on a new DAC for VGA output, but otherwise the silicon is all original SONY.
This is the first of a series about this build, so if you’re into retro consoles you might want to keep an eye on [Secret Hobbyist] on YouTube to learn all the details as they are released.
youtube.com/embed/q0sUCJE2s6A?…
What Happens When a Bug Rears its Head at Mach Two?

While some may see amateur rocketry as little more than attaching fins to a motor and letting it fly, it is, in fact, rocket science. This fact became very clear to [BPS.space] when a parachute deployed on a rocket traveling at approximately Mach 1.8.
The rocket design is rather simple — essentially just 3D printed fins glued onto a motor with a nose-cone for avionics. A single servo and trim tab provide a modicum of roll control, and a parachute is mounted in the nose along with a homing beacon for faster recovery. Seemingly, the only thing different about this flight is properly validated telemetry and GPS antennae.
After a final ground check of the telemetry and GPS signal quality, everything is ready for what seems like a routine launch. However, somewhere around Mach 1.8, the parachute prematurely deploys, ripping apart the Kevlar rope holding together the three rocket sections. Fortunately, the booster and avionics sections could be recovered from the desert.
But this begs the question, what could possibly have caused a parachute deployment at nearly twice the speed of sound?[BPS.space] had made a quick untested change to the flight control software, in an attempt to get more accurate speed data. By feeding into the flight controller barometric altitude changes during the decent stage, it should be able to more accurately estimate its position. However, direct static pressure readings at supersonic speeds are not an accurate way of measuring altitude. So, during the boost phase, the speed estimation function should only rely on accelerometer data.
However, a simple mistake in boolean logic resulted in the accelerometer velocity being passed into the velocity estimate function during the boost phase. This gave an erroneous velocity value below zero triggering the parachute deployment. Nevertheless, the test was successful in proving antenna choice resulted in poor telemetry and GPS readings on earlier launches.
If you want to see a far more successful [BPS.space] rocket launch, make sure to check out this self landing rocket next!
youtube.com/embed/JXr4-GoCWsw?…
hackaday.com/2026/01/15/what-h…

Is the Theory of Special Relativity Wrong?

There’s an adage coined by [Ian Betteridge] that any headline ending in a question mark can be answered by the word “No”. However, Lorentz invariance – the theory that the same rules of physics apply in the same way in all frames of reference, and an essential component of special relativity – has been questioned for some time by researchers trying to unify general relativity and quantum field theory into a theory of quantum gravity. Many theories of quantum gravity break Lorentz invariance by giving photons with different energy levels very slightly different speeds of light – a prediction which now looks less likely since researchers recently analyzed gamma ray data from pulsed astronomical sources, and found no evidence of speed variation (open-access paper).
The researchers specifically looked for the invariance violations predicted by the Standard-Model Extension (SME), an effective field theory that unifies special relativity with the Standard Model. The variations in light speed which it predicts are too small to measure directly, so instead, the researchers analyzed gamma ray flare data collected from pulsars, active galactic nuclei, and gamma-ray bursts (only sources that emitted gamma rays in simultaneous pulses could be used). Over such great distances as these photons had traveled, even slight differences in speed between photons with different energy levels should have added up to a detectable delay between photons, but none was found.
This work doesn’t disprove the SME, but it does place stricter bounds on the Lorentz invariance violations it allows, about one and a half orders of magnitude stricter than those previously found. This study also provides a method for new experimental data to be more easily integrated into the SME. Fair warning to anyone reading the paper: the authors call their work “straightforward,” from which we can only conclude that the word takes on a new meaning after a few years studying mathematics.
If you want to catch up on relativity and Lorentz invariance, check out this quick refresher, or this somewhat mind-bending explanation. For an amateur, it’s easier to prove general relativity than special relativity.
Top image: Crab Pulsar, one of the gamma ray sources analysed. (Credit: J. Hester et al., NASA/HST/ASU/J)
Project Fail: Cracking a Laptop BIOS Password Using AI

Whenever you buy used computers there is a risk that they come with unpleasant surprises that are not of the insect variant. From Apple hardware that is iCloud-locked with the original owner MIA to PCs that have BIOS passwords, some of these are more severe than others. In the case of BIOS passwords, these tend to be more of an annoyance that’s easily fixed by clearing the CMOS memory, but this isn’t always the case as [Casey Bralla] found with a former student-issued HP ProBook laptop purchased off Facebook Marketplace.
Maybe it’s because HP figured that locking down access to the BIOS is essential on systems that find their way into the hands of bored and enterprising students, but these laptops write the encrypted password and associated settings to a separate Flash memory. Although a master key purportedly exists, HP’s policy here is to replace the system board. Further, while there are some recovery options that do not involve reflashing this Flash memory, they require answers to recovery questions.
This led [Casey] to try brute-force cracking, starting with a Rust-based project on GitHub that promised much but failed to even build. Undeterred, he tasked the Claude AI to write a Python script to do the brute-forcing via the Windows-based HP BIOS utility. The chatbot was also asked to generate multiple lists of unique passwords to try that might be candidates based on some human guesses.
Six months later of near-continuous attempts at nine seconds per try, this method failed to produce a hit, but at least the laptop can still be used, just without BIOS access. This may require [Casey] to work up the courage to do some hardware hacking and erase that pesky UEFI BIOS administrator password, proving at least that apparently it’s fairly good BIOS security.
Building an Escape Room Lockbox with the ESP32 Cheap Yellow Display (CYD)

Here’s something fun from [Chad Kapper] over on HackMakeMod: Escape Room Lockbox with the Cheap Yellow Display.
You may have heard of the “cheap yellow display” (CYD), so-called due to the board’s typical color. It’s a dodgy cheapo board with, among other things, TFT display, touchscreen, and ESP32 built-in. You can learn more about the CYD over here: Getting Started with ESP32 Cheap Yellow Display Board – CYD (ESP32-2432S028R).
In this build eight AA batteries are used to deliver 12 volts to operate a solenoid controlling a latch and 5 volts for the microcontroller. The encasing is clear in order to entice players in an escape-room style sitting. The custom software is included down the bottom of the project page and it is also available from arduino.cc, if that’s your bag.
Of course we’ve done plenty of other ESP32 TFT projects before, such as Piko – Your ESP32 Powered Fitness Buddy and ESP32 Brings New Features To Classic Geiger Circuit.
Building a Carousel Autosampler

A common task in a laboratory setting is that of sampling, where a bit of e.g. liquid has to be sampled from a series of containers. Doing this by hand is possible, but tedious, ergo an autosampler can save a lot of time and tedium. Being not incredibly complex devices that have a lot in common with e.g. FDM 3D printers and CNC machines, it makes perfect sense to build one yourself, as [Markus Bindhammer] of Marb’s Lab on YouTube has done.
The specific design that [Markus] went for uses a sample carousel that can hold up to 30 bottles of 20 mL each. An ATmega-based board forms the brain of the machine, which can operate either independently or be controlled via I2C or serial. The axes and carousel are controlled by three stepper motors, each of which is driven by a TB6600 microstep driver.
Why this design is a time saver should be apparent, as you can load the carousel with bottles and have the autosampler handle the work over the course of however long the entire process takes instead of tying up a human. Initially the autosampler will be used for the synthesis of cadmium-selenium quantum dots, before it will be put to work for an HPLC/spectrometer project.
Although [Markus] intends this to be an open hardware and software project, it will take a bit longer to get all the files and documentation organized. Until then we will have to keep manually sampling, or use the video as the construction tutorial.
youtube.com/embed/9yzY5WbTRmg?…
The Random Laser

When we first heard the term “random laser,” we did a double-take. After all, most ordinary sources of light are random. One defining characteristic of a traditional laser is that it emits coherent light. By coherent, in this context, that usually includes temporal coherence and spatial coherence. It is anything but random. It turns out, though, that random laser is a bit of a misnomer. The random part of the name refers to how the device generates the laser emission. It is true that random lasers may produce output that is not coherent over long time scales or between different emission points, but individually, the outputs are coherent. In other words, locally coherent, but not always globally so.
That is to say that a random laser might emit light from four different areas for a few brief moments. A particular emission will be coherent. But not all the areas may be coherent with respect to each other. The same thing happens over time. The output now may not be coherent with the output in a few seconds.
Baseline
A conventional laser works by forming a mirrored cavity, including a mirror that is only partially reflective. Pumping energy into the gain medium — the gas, semiconductor, or whatever — produces more photons that further stimulate emission. Only cavity modes that satisfy the design resonance conditions and experience gain persist, allowing them to escape through the partially reflecting mirror.
The laser generates many photons, but the cavity and gain medium favor only a narrow set of modes. This results in a beam that is of a very narrow band of frequencies, and the photons are highly collimated. Sure, they can spread over a long distance, but they don’t spread out in all directions like an ordinary light source.
So, How does a Random Laser Work?
Random lasers also depend on gain, but they have no mirrors. Instead, the gain medium is within or contains some material that highly scatters photons. For example, rough crystals or nanoparticles may act as scattering media to form random lasers.
The scattering has photons bounce around at random. Some of the photons will follow long paths, and if the gain exceeds the losses along those paths, laser emission occurs. Incoherent random lasers that use powder (to scatter) or a dye (as gain medium) tend to have broadband output. However, coherent random lasers produce sharp spectral lines much like a conventional laser. They are, though, more difficult to design and control.
Random lasers are relatively new, but they are very simple to construct. Since the whole thing depends on randomness, defects are rarely fatal. The downside is that it is difficult to predict exactly what they will emit.
There are some practical use cases, including speckle-free illumination or creating light sources with specific fingerprints for identification.
It’s Alive!
Biological tissue often can provide scattering for random lasers. Researchers have used peacock feathers, for example. Attempts to make cells emit laser light are often motivated by their use as cellular tags or to monitor changes in the laser light to infer changes in the cell itself.
The video below isn’t clearly using a random laser, but it gives a good overview of why researchers want your cells to emit laser light.
youtube.com/embed/SHbXDlnLIYA?…
You may be thinking: “Isn’t this just amplified spontaneous emission?” While random lasers can resemble amplified spontaneous emission (ASE), true random lasing exhibits a distinct turn-on threshold and, in some cases, well-defined spectral modes. ASE will exhibit a smooth increase in output as the pump energy increases. A random laser will look like ASE until you reach a threshold pump energy. Then a sharp rise will occur as the laser modes suddenly dominate.
We glossed over a lot about conventional lasers, population inversion, and related topics. If you want to know more, we can help.
AC Motor Converted into DC eBike Powerplant

AC induction motors are everywhere, from ceiling fans to vehicles. They’re reliable, simple, and rugged — but there are some disadvantages. It’s difficult to control the speed without complex electronics, and precisely placing the shaft at a given angle is next to impossible. But the core of these common induction machines can be modified and rewired into brushless DC (BLDC) motors, provided you have a few tools on hand as [Austin] demonstrates.
To convert an AC induction motor to a brushless DC electric motor (BLDC), the stator needs to be completely rewired. It also needs a number of poles proportional to the number of phases of the BLDC controller, and in this case the 24-pole motor could accommodate the three phases. [Austin] removed the original stator windings and hand-wound his own in a 16-pole configuration. The rotor needs modification as well, so he turned the rotor on a lathe and then added a set of permanent magnets secured to the rotor with JB Weld. From there it just needs some hall effect sensors, a motor controller and power to get spinning.
At this point the motor could be used for anything a BLDC motor would be used. For this project, [Austin] is putting it on a bicycle. A 3D printed pulley mounts to the fixed gear on the rear wheel, and a motor controller, battery, and some tensioners are all that is left to get this bike under power. His tests show it comfortably drawing around 1.3 kW so you may want to limit this if you’re in Europe but other than that it works extremely well and reminds us of one of our favorite ebike conversions based on a washing machine motor instead of a drill press.
youtube.com/embed/Sxq1ncduPvw?…
ISS Medical Emergency: An Orbital Ambulance Ride

Over the course of its nearly 30 years in orbit, the International Space Station has played host to more “firsts” than can possibly be counted. When you’re zipping around Earth at five miles per second, even the most mundane of events takes on a novel element. Arguably, that’s the point of a crewed orbital research complex in the first place — to study how humans can live and work in an environment that’s so unimaginably hostile that something as simple as eating lunch requires special equipment and training.
Today marks another unique milestone for the ISS program, albeit a bittersweet one. Just a few hours ago, NASA successfully completed the first medical evacuation from the Station, cutting the Crew-11 mission short by at least a month. By the time this article is released, the patient will be back on terra firma and having their condition assessed in California. This leaves just three crew members on the ISS until NASA’s Crew-12 mission can launch in early February, though it’s possible that mission’s timeline will be moved up.
What We Know (And Don’t)
To respect the privacy of the individual involved, NASA has been very careful not to identify which member of the multi-nation Crew-11 mission is ill. All of the communications from the space agency have used vague language when discussing the specifics of the situation, and unless something gets leaked to the press, there’s an excellent chance that we’ll never really know what happened on the Station. But we can at least piece some of the facts together.
On January 7th, Kimiya Yui of Japan was heard over the Station’s live audio feed requesting a private medical conference (PMC) with flight surgeons before the conversation switched over to a secure channel. At the time this was not considered particularly interesting, as PMCs are not uncommon and in the past have never involved anything serious. Life aboard the Station means documenting everything, so a PMC could be called to report a routine ailment that we wouldn’t give a second thought to here on Earth.
But when NASA later announced that the extravehicular activity (EVA) scheduled for the next day was being postponed due to a “medical concern”, the press started taking notice. Unlike what we see in the movies, conducting an EVA is a bit more complex than just opening a hatch. There are many hours of preparation, tests, and strenuous work before astronauts actually leave the confines of the Station, so the idea that a previously undetected medical issue could come to light during this process makes sense. That said, Kimiya Yui was not scheduled to take part in the EVA, which was part of a long-term project of upgrading the Station’s aging solar arrays. Adding to the mystery, a representative for Japan’s Aerospace Exploration Agency (JAXA) told Kyodo News that Yui “has no health issues.”
This has lead to speculation from armchair mission controllers that Yui could have requested to speak to the flight surgeons on behalf of one of the crew members that was preparing for the EVA — namely station commander Mike Fincke and flight engineer Zena Cardman — who may have been unable or unwilling to do so themselves.
Within 24 hours of postponing the EVA, NASA held a press conference and announced Crew-11 would be coming home ahead of schedule as teams “monitor a medical concern with a crew member”. The timing here is particularly noteworthy; the fact that such a monumental decision was made so quickly would seem to indicate the issue was serious, and yet the crew ultimately didn’t return to Earth for another week.
Work Left Unfinished
While the reusable rockets and spacecraft of SpaceX have made crew changes on the ISS faster and cheaper than they were during the Shuttle era, we’re still not at the point where NASA can simply hail a Dragon like they’re calling for an orbital taxi. Sending up a new vehicle to pickup the ailing astronaut, while not impossible, would have been expensive and disruptive as one of the Dragon capsules in rotation would have had to be pulled from whatever mission it was assigned to.
So unfortunately, bringing one crew member home means everyone who rode up to the Station with them needs to leave as well. Given that each astronaut has a full schedule of experiments and maintenance tasks they are to work on while in orbit, one of them being out of commission represents a considerable hit to the Station’s operations. Losing all four of them at once is a big deal.
Granted, not everything the astronauts were scheduled to do is that critical. Tasks range form literal grade-school science projects performed as public outreach to long-term medical evaluations — some of the unfinished work will be important enough to get reassigned to another astronaut, while some tasks will likely be dropped altogether.
But the EVA that Crew-11 didn’t complete represents a fairly serious issue. The astronauts were set to do preparatory work on the outside of the Station to support the installation of upgraded roll-out solar panels during an EVA scheduled for the incoming Crew-12 to complete later on this year. It’s currently unclear if Crew-12 received the necessary training to complete this work, but even if they have, mission planners will now have to fit an unforeseen extra EVA into what’s already a packed schedule.
What Could Have Been
Having to bring the entirety of Crew-11 back because of what would appear to be a non-life-threatening medical situation with one individual not only represents a considerable logistical and monetary loss to the overall ISS program in the immediate sense, but will trigger a domino effect that delays future work. It was a difficult decision to make, but what if it didn’t have to be that way?
In other timeline, the ISS would have featured a dedicated “lifeboat” known as the Crew Return Vehicle (CRV). A sick or injured crew member could use the CRV to return to Earth, leaving the spacecraft they arrived in available for the remaining crew members. Such a capability was always intended to be part of the ISS design, with initial conceptual work for the CRV dating back to the early 1990s, back when the project was still called Space Station Freedom. Indeed, the idea that the ISS has been in continuous service since 2000 without such a failsafe in place is remarkable.
Unfortunately, despite a number of proposals for a CRV, none ever made it past the prototype stage. In practice, it’s a considerable engineering challenge. A space lifeboat needs to be cheap, since if everything goes according to plan, you’ll never actually use the thing. But at the same time, it must be reliable enough that it could remain attached to the Station for years and still be ready to go at a moment’s notice.
In practice, it was much easier to simply make sure there are never more crew members on the Station than there are seats in returning spacecraft. It does mean that there’s no backup ride to Earth in the event that one of the visiting vehicles suffers some sort of failure, but as we saw during the troubled test flight of Boeing’s CST-100 in 2024, even this issue can be resolved by modifications to the crew rotation schedule.
No Such Thing as Bad Data
Everything that happens aboard the International Space Station represents an opportunity to learn something new, and this is no different. When the dust settles, you can be sure NASA will commission a report to dives into every aspect of this event and tries to determine what the agency could have done better. While the ISS itself may not be around for much longer, the information can be applied to future commercial space stations or other long-duration missions.
Was ending the Crew-11 mission the right call? Will the loses and disruptions triggered by its early termination end up being substantial enough that NASA rethinks the CRV concept for future missions? There are many questions that will need answers before it’s all said and done, and we’re eager to see what lessons NASA takes away from today.
Sfiduciati
I social sono un pericolo per la democrazia. Sono numerosi i saggi che argomentano questo aspetto distruttivo della comunicazione paritaria online che si afferma nelle logiche algoritmiche di Facebook, Tik Tok, Truth, eccetera. I social media sono spesso fonte e canale di propaganda e disinformazione.
Purtroppo la maggior parte delle persone non sa distinguere tra notizie vere e notizie false e le notizie false sono più virali di quelle vere. E questo è il danno principale che fanno alla democrazia.
Giovanni Boccia Artieri lo sintetizza bene nel suo ultimo libro, “Sfiduciati. Democrazia e disordine comunicativo nella società aperta” appena pubblicato da Feltrinelli, provando a dare qualche rimedio.
“I social media favoriscono ciò che funziona: e ciò che funziona polarizza, semplifica, infiamma. La democrazia ha bisogno di ascolto, mediazione, argomentazione. E se il conflitto algoritmico si consuma in millisecondi, il dissenso democratico richiede tempo”, ma è necessario.
La riflessione del professore di sociologia, prorettore dell’Università degli Studi di Urbino, già autore di diversi saggi sul tema è ovviamente molto più ampia.
Nel libro sostiene infatti che l’agorà pubblica negli ultimi anni è stata inquinata soprattutto da tre fenomeni. Il primo è l’ingresso nell’era della post-verità. In questa fase della comunicazione infatti non è tanto importante la verità e neanche la validità la coerenza e l’utilità con cui si comunicano concetti semplici e complessi ma il modo in cui le persone vi reagiscono. Chi sa gestire quelle reazioni può farci credere a ciò che vero non è. Il secondo fenomeno è la piattaformizzazione di Internet. Secondo questa famosa teorizzazione di Van Dijck e Poell, le piattaforme che connettono gli individui tra di loro permettendogli di fruire e consumare servizi non offerti dagli Stati, creano strutture sociali disomogenee producendo valori
con un potenziale rischio etico. Il terzo fenomeno è la fringe democracy, cioè l’annullamento del confine tra cio che è legittimo e cio che non lo è, insieme al livellamento delle opinioni sempre più autoreferenziali.
Queste tre dinamiche creano la società esposta, un ambiente in cui la comunicazione e la sfera pubblica, attraversate dalla sfiducia, sono diventate vulnerabili.
