The media in this post is not displayed to visitors. To view it, please log in.

Introduction
This report covers the research of the Mercedes-Benz Head Unit, which was made by our team. Mercedes-Benz’s latest Head Unit (infotainment system) is called Mercedes-Benz User Experience (MBUX). We performed analysis of the first generation MBUX.
MBUX was previously analysed by KeenLab. Their report is a good starting point for diving deep into the MBUX internals and understanding the architecture of the system.
In our research we performed detailed analysis of the first generation MBUX subsystems, which are overlooked in the KeenLab research: diagnostics (CAN, UDS, etc.), connections via USB and custom IPC.
This article would not have been possible without the amazing work of Radu Motspan, Kirill Nesterov, Mikhail Evdokimov, Polina Smirnova and Georgy Kiguradze, who conducted the research, discovered the vulnerabilities, and laid the groundwork for this report.
Special thanks to Mercedes-Benz Group AG for their professionalism and prompt handling of all the identified vulnerabilities.
Diagnostic software
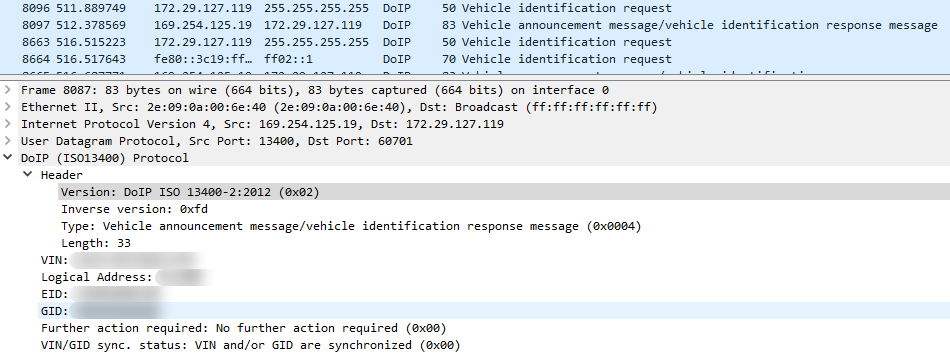
To get a first look at the vehicle architecture, it is helpful to use diagnostic software (which is available to certified users only) to scan the Electronic Control Unit (ECU), identify its version, and test the software’s diagnostic functionality. There are several diagnostic tools which make it possible to connect to the vehicle, using various types of communication. In our research, we used a combination of diagnostic tools: a certain hardware interface and a corresponding software application to communicate with the vehicle through the hardware device. This setup allowed us to establish communication over DoIP (Diagnostic Over Internet Protocol):

Communication between diagnostic software and hardware
The TCP communication between the diagnostic tool and the diagnostic hardware device is performed over Ethernet using custom protocols (Protocol Data Unit, PDU). At the first stage, the diagnostic hardware device uses a custom ASCII-based protocol (CSD). It performs user authentication, version check, configuration setup, and provides the initial environment to process the upper layer protocol (PDU).
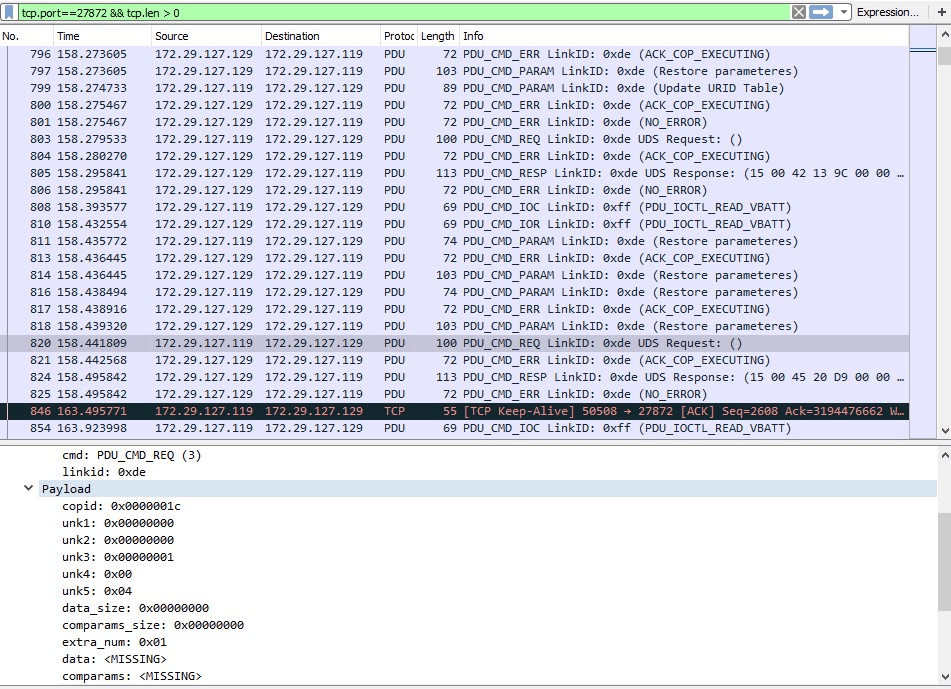
The upper layer protocol has a binary format. It is used to send Universal Diagnostic Services (UDS) messages, trigger DoIP communication, and so on. To analyze this protocol, we used a script written in LUA:
[pduparser.lua]. Using this script, UDS commands can be easily distinguished from the regular network traffic of communication between the diagnostic software and hardware:

We examined the diagnostic tool interface and decoded the traffic, which allowed us to find various UDS commands, such as for resetting the ECU, turning off the engine, and locking the doors.
Architecture
The architecture of MBUX is as follows:

The main parts of MBUX are:
- MMB (Multi Media Board) — the main part of the head unit (HU) which contains all the subsystems;
- BB (Base Board) — the part with chips for various network communications;
- CSB (Country Specific Board) — the extended part which communicates with the MMB through internal Ethernet;
- RH850 — the module designed to provide communication between low level buses.
Full information on the MBUX architecture can be found in the KeenLab research.
Test setups
For our research we used two test setups:
- a real car — Mercedes B180;
- a testbed — our own platform for hardware and software testing, which we designed for the purpose of this study.
Anti-Theft
While modeling the testbed, we needed to bypass the original anti-theft feature, because after the actual vehicle is started up, the head unit waits for authentication over the CAN bus. As mentioned in the KeenLab research, specific commands should be sent over CAN to wake up the system. We couldn’t imitate this in our setup, so the head unit was entering anti-theft mode and the user couldn’t communicate with it. Taking an empirical approach, we discovered that some CAN messages force the head unit to reset the anti-theft status. In fact, these messages trigger the anti-theft check. For example, when the head unit tries to turn off the display, the CAN message initiates the anti-theft check, leaving the head unit still accessible for a few seconds. For seamless and stable investigation, we created a script that continuously sent this message in a loop.
As a result, the head unit becomes accessible for a long time, switching between an authenticated state and anti-theft mode.
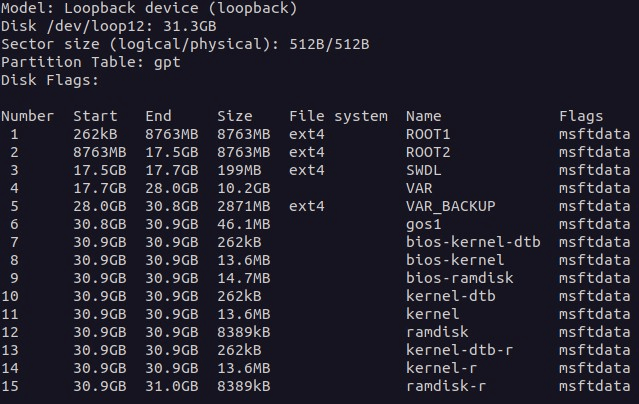
Firmware
The MMB runs on Linux, and its filesystems are located on the eMMC. We needed to extract the eMMC from the printed circuit board by unsoldering it. Inside, there are several partitions:

MMB files can also be downloaded from a diagnostic tool website that provides updates for specific hardware part numbers.

Unpack update
Nowadays multimedia systems in cars are generally updated over-the-air. Car dealerships are one exception, however, as they can perform offline software updates with the diagnostic tool.
Several outdated update files can still be found online. Update file types can be divided into the following groups by their names:
- files with \*ALL\*, containing *.CFF, *.SMR-F and *.bin files;
- files with \*CFF\*, containing only *.CFF files;
- files with \*SMR-F\*, containing only *.SMR-F files.
In general, *.bin files are containers with a custom file structure. They can be encoded with zlib or other methods.
*.SMR-F files are compressed and they also have a custom file structure. Besides metadata in plaintext, they also contain encrypted data, which the diagnostic tool uses its shared libraries to decrypt. After decryption, the resulting file contains the metadata and a container, just like the *.bin files.
*.CFF files contain the same payload content as the *.SMR-F files, but uncompressed. This format was used for earlier head unit generations.
Custom IPC
Inside the head unit, firmware services use custom IPC protocols for communication between their own threads, other services and other ECUs. There are three main widely used protocols:
These protocols can be used at the same time; moreover, each service can use all of them simultaneously. Knowing the internals and API of these protocols, it’s easier to understand the workflow of the services.
thriftme
This RPC protocol is based on the open-source protocol Apache Thrift. Its main distinctive feature is that thriftme allows subscribers to be notified about particular events. The UNIX socket, TCP, UDP, SSL, and so on can be used as a transport for this protocol. The core functionality of this protocol is implemented in the library libthriftme.so.2.7.2.
The base class in the thriftme RPC is “thrift::TServiceBroker”, which isolates the communication with transports and call interfaces of services and clients. In thriftme, the service broker version is the instance of “thrift::lisa::CTLisaServiceBroker”, which inherits from “thrift::TServiceBroker”.
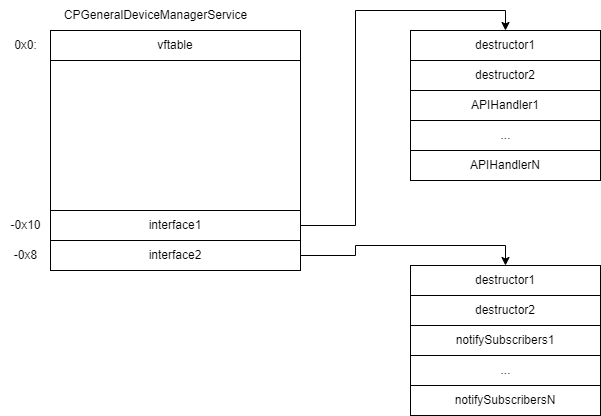
Services in thriftme are inherited from “thrift::lisa::TLisaServerBase” (which, in turn, inherits from “thrift::TServiceProcessor”). Services are registered in the service broker through “thrift::TServiceProcessor::registerService”. Transport used by clients is registered through “thrift::lisa::CTLisaServiceBroker::addServers” (which wraps “thrift::TServiceBroker::addServer”). Service interface functions are registered through “thrift::TServiceProcessor::tmRegisterCallback”. The handler is passed to this export function in arguments, and it is called while processing the client request. So the instance of the service in memory looks as follows:

The “interface1” field contains functions which process the API of the service and their wrappers previously registered through “thrift::TServiceProcessor::tmRegisterCallback”. The “interface2” field contains functions which are called to notify subscribers of this service.
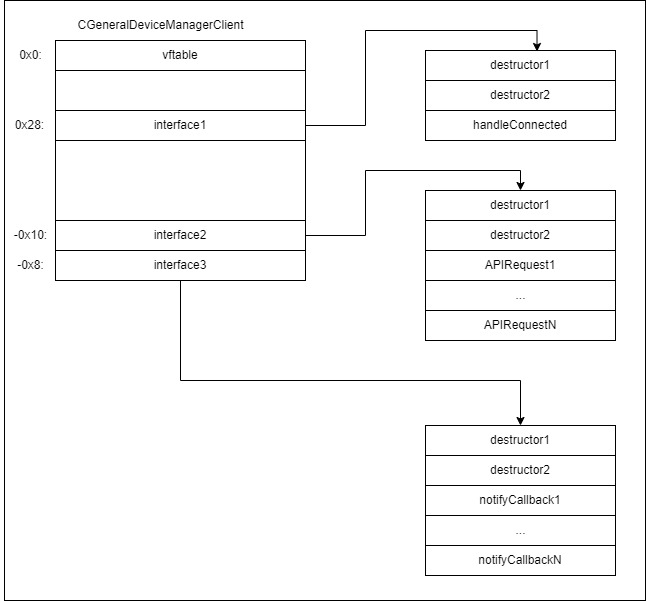
Clients in thriftme are inherited from “thrift::lisa::TLisaClientBase” (which, in turn, inherits from “thrift::TClient”). In fact, client instances are created by the service broker when the transport is successfully created. In our case, the service broker used the factory of a client, which is registered in the service broker through “thrift::TServiceBroker::tmRegCli”. The factory helps clients register handlers for notification about events through “thrift::TClient::tmRegisterCallback”. The sample instance layout of a thriftme client is the following:

The “interface1” field contains the handler is called after transport connection. Usually this handler is used to trigger a subscribe operation to receive event notifications. The “interface2” field contains functions which send requests to the service API. The “interface3” field contains functions which are called before initiating the “notify subscribers” operation of this service. Their wrappers were previously registered through “thrift::TClient::tmRegisterCallback”.
MoCCA
This RPC framework was developed by Harman and is based on the open-source DSI framework. The core functionality is implemented in the “/opt/sys/lib/libSysMoCCAFrameworkSharedSo.so.11” library. This framework is widely used for interthread communication.
During start-up, the service creates component instances through factory functions, for example “CHBApplicationBuilder::theCDiagnosisComponentCreator”. This instance inherits from the class “CHBComponent”. The global variable “CHBComponentInfo::spMap” contains the mapping between additional information about components and their names. The framework allows components to have their own aliases to access another components through “CHBComponentInfo::addComponentMapping”: “CHBComponentInfo::addComponentMapping(&unk_581498, “FsActionHandler”, “FilesystemMainActionHandler”)”. Components can contain multiple services and clients and can communicate with their own services or other component services. The following is the architecture of components:

For communication the following events are used:

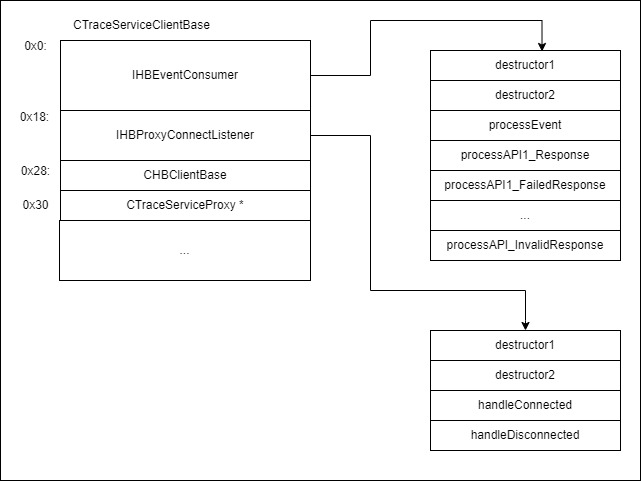
An example of a client object is “CTraceServiceClientBase”, which inherits from “CHBClientBase” and uses the proxy object “CTraceServiceProxy” for transport. The proxy object inherits from “CHBProxyBase” and is created through the factory method “CTraceServiceProxy::findOrCreateInstance”. It tries to reuse already created proxy objects inside this component. The general layout of a client object is as follows:

The “IHBEventConsumer” interface is used to process response events in “CTraceServiceClientBase”. The entry point for processing is the “processEvent” method. It uses two values to find a handler, which are called as follows:
- use the “status” field to identify the response: standard response of a service, failed or invalid response;
- use the “internalID” field to identify the API function.
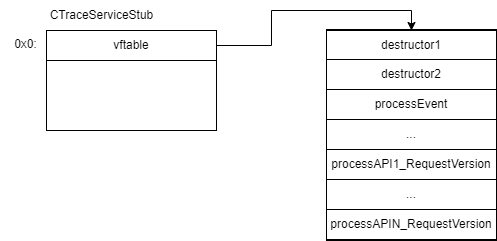
On the service side in our example we used the “CTraceServiceStub” class. Below is its layout:

The request event is processed in the “processEvent” method. It identifies the API function handler using the “internalID” field and calls the identified handler.
GCF
GCF is a custom protocol, which is used for RPC. It allows the services to be registered in the router. The router handles the following messages from services and clients:
- Control message (“CTRL”):
- “REGS” – used to register service;
- “REGF” – used to register RPC function of service;
- “EVNT” – used by service to notify clients about event;
- “CALL” – used by clients to call functionality of service;
- etc.
So during initialization, the services are registered in the router. The internal router table handles the flow of message processing. Finally, clients can send call requests to the router, which trigger predefined functions of registered services. The format of a call request is as follows:
CALL <ServiceName>:<Number> <ServiceCallName> <Params>
Internal network
As mentioned in the KeenLab research, there are some test points on the head unit, which are used by the CSB for connection to the MMB. We removed the default connection and connected the RJ45 cable to access the internal network of the head unit. This connection, labelled as
eth0, has some restrictions, as stated in the corresponding firewall rules in “firewall_prd.policy”:-A INPUT -s [IP]/32 -d [IP]/32 -i eth0 -m state –state NEW -j ACCEPT
-A OUTPUT -s [IP]/32 -d [IP]/32 -o eth0 -j ACCEPT
-A OUTPUT -s [IP]/32 -d [IP]/32 -o eth0 -m state –state NEW -j ACCEPT
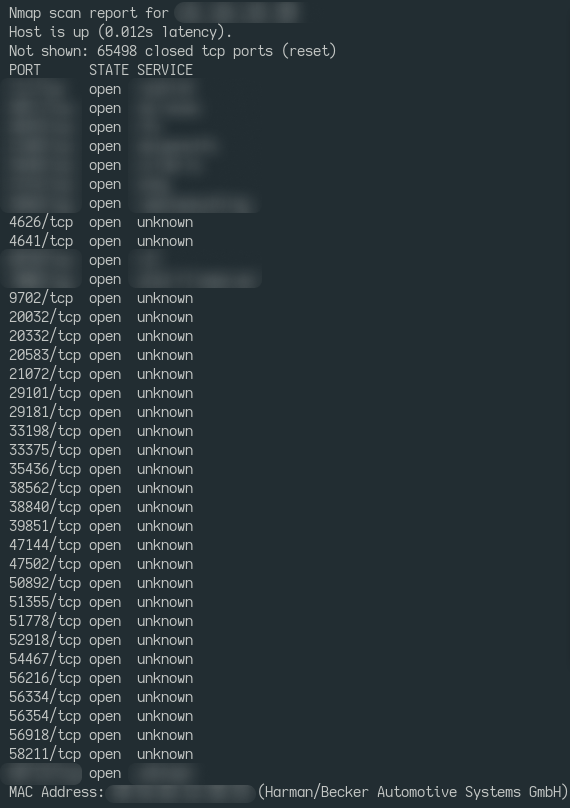
Access to services on the MMB is established via an IP address, which is a default address for connecting the CSB to the MMB. The scan results of TCP ports on the MMB are as follows:

After connecting to the test point, we received a huge attack surface and access to the Diagnostic Log and Trace (DLT) subsystem, which is very helpful when testing and debugging:

DLT supports callback injection, which makes it possible to call specific handlers inside services. In the head unit this feature is widely used for product testing.
Identified vulnerabilities
The following findings were used to compromise the testbed. It is necessary for debugging the environment and searching for vulnerabilities in the subsystem that can be exploited in the real car.
CVE-2024-37600 (MoCCA)
The “servicebroker” service is a part of a DSI framework, which is used in MoCCA. This service is used to monitor services and clients.
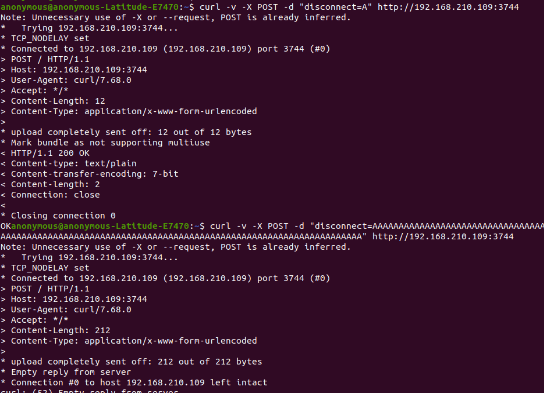
It sets up HTTP servers using TCP ports. There are several POST commands, which can be processed. One of them is
disconnect, which takes a string as an argument.
The code in the
setup() function tries to parse this command with functions that provide unnecessarily excessive access to memory. According to the disassembled code, it performs read operations using sscanf on a stack buffer. As a result, there can be a stack buffer overflow:

In DLT logs we can identify crashes:

CVE-2023-34404 (GCF)
“MonitorService” is a service which can be accessed over GCF protocol. This service is initialized and started in the “scp” service. The latter, in turn, is a systemd service, which starts with the following configuration:
...
[Service]ExecStart=/opt/comm/swmp/wicome/bin/scp -f /var/opt/swmp/pss_config.cfg -s
wicome_config -r /opt/comm/swmp/wicome/bin -k VerboseLevel=5
ExecStop=/bin/kill $MAINPID
Environment=LD_LIBRARY_PATH=/opt/sys/lib:/opt/comm/swmp/wicome/lib
Environment=LOGNAME=root
EnvironmentFile=/opt/etc/lisa_env
Type=simple
Restart=on-failure
RestartSec=2
WatchdogSec=240
...
“MonitorService” uses the following configuration file “/var/opt/swmp/pss_config.cfg” to fine-tune its operation:
MonitorService.TimestampEnable = 1
MonitorService.ReceiveEnable = 1
MonitorService.MonitoringEnable = 1
MonitorService.MessageBufferSize = 1000
MonitorService.MessageBufferMemory = 512000
#1-file, 2-dlt, 3-both
MonitorService.LogMode = 2
#MonitorService.LogMode = 0
MonitorService.LogFileSize = -1
MonitorService.LogFileName = /tmp/wicom.log
MonitorService.LinefeedEnable = 1
MonitorService.HeaderEnable = 1
MonitorService.FileHeaderEnable = 1
#RH
MonitorService.Port = 2021
The “MonitorService.Port” variable handles the number of the TCP port that will be used by the server. The “MonitorService.ReceiveEnable” variable defines whether the server is able to handle requests from clients. Accordingly, “MonitorService”, containing the head unit configuration, can receive GCF messages from the client and transfer them through the GCF router.
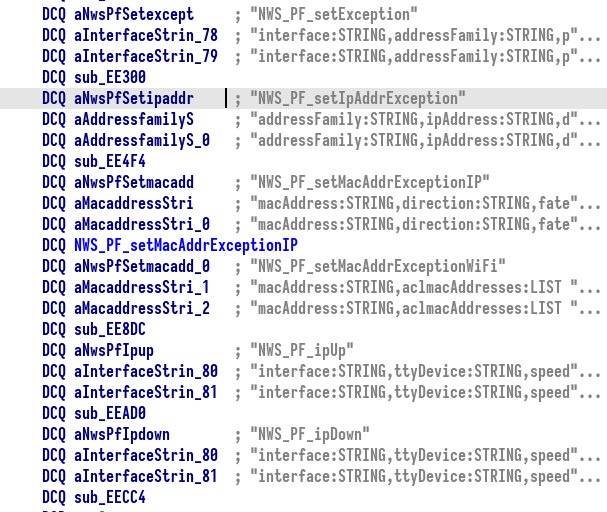
The list of registered services in the GCF router includes “NetworkingService”. It has the following registered handlers:

The “NWS_PF_setMacAddrExceptionIP” handler adds rules to the firewall policy. It uses the following arguments:
- macAddress – MAC address for the rule;
- direction – defines the direction of rule: inbound or outbound;
- fate – defines the type of rule: allow or deny;
- command – the action to be performed: add the rule or remove it from the policy.
The control flow for processing this request is located in the following binaries: “MonitorService”, “libwicome_monitorservice.so” and “libwicode_gcf_core.so”. The call stack is the following:
sub_EE6E8 (NWS_PF_setMacAddrExceptionIP)
sub_E9D0C (sNWS_PF_setMacAddrExceptionIP)
sub_F275C (CGCFStub_PF::setMacAddrExceptionIP)
sub_F7AF4 (CGCFStub_PF::_int_setMacAddrExceptionIP)
snprintf
sub_F7EB4 (systemExec)
system
The
sub_F7AF4 function executes the system() call with arguments to the iptables binary:/* ... */
if ( v10 )
{
v11 = (const char *)PAL::CString::raw(direction);
v12 = (const char *)PAL::CString::raw(mac);
if ( snprintf(v22, 0xFFuLL, "iptables -%s %s -m mac --mac-source %s -j
%s ", (const char *)&v21, v11, v12, v20) < 0 )
{
/* ... */
v18 = 0;
}
if ( v18 )
{
if ( (unsigned __int8)systemExec(a1, v22) != 1 )
{
/* ... */
return 0;
}
}
}
/* ... */
When processing the request, the MAC address is neither checked nor restricted. That means an attacker can perform command injection during the
iptables command execution.
Privilege escalation
The head unit uses the outdated system Polkit, which is vulnerable to CVE-2021-4034. This is a local privilege escalation vulnerability that can result in unprivileged users gaining administrative rights on the target machine. There are a lot of publicly available exploits targeting it, enabling the execution of arbitrary commands as the user “phone” of group “comm”.
After successfully exploiting this vulnerability, an attacker can run commands to modify network interfaces, mount filesystems, and perform other privileged activities. Although some restrictions are imposed, a potential attacker can access the systemd command to further escalate their privileges.
The partition with root filesystem was mounted as a read-only filesystem. As mentioned in the KeenLab research, the head unit doesn’t have any enabled disk integrity protection features. That means the filesystem can be remounted with read and write rights, and the bash scripts that are run during start-up can be modified.
USB
USB is the most popular attack vector in terms of physical access. The head unit is built on a microservice architecture, where each service is rather isolated and communicates through an API. Each microservice of the head unit provides some internal functionality and one or more thriftme services, through which other microservices can communicate with it. This fact enables the emulation of a USB subsystem using QEMU user-mode version.
Preparation
The “DeviceManager” service is responsible for handling USB events: adding, removing, mounting or updating. Other services can subscribe to “DeviceManager” and use notify callbacks to perform actions when USB events occur. For example, such a service can start searching for specific files when the USB filesystem is mounted.
The “GDVariantCodingService” service is a frontend of variant coding. Other services use it to identify the parameters of the head unit and car.
Both of these services should be emulated to run a self-hosted USB subsystem. This task can be performed by emulating corresponding thriftme services. So, for successful emulation, we should perform the following actions:
- Prepare the network for IP addresses used by services.
- The services “DeviceManager” and “GDVariantCodingService” use UNIX sockets for transport. To emulate them, it’s easier to use TCP sockets so that we aren’t dependent on the filesystem. Perform forwarding using socat.
- Run the emulated thriftme services. In our case, we created devicemgr.py, vehicle.py and varcoding.py. In devicemgr.py, the mounting of the USB filesystem is emulated to the path “/opt/sys/bin/aaaaa”.
- Use QEMU user emulation in a “transparent” fashion.
- In the chroot environment prepare folders and devices.
The USB subsystem is emulated.
Emulation of data export, import and tracing
The head unit has the functionality to import or export user profile files (seat position, favorite radio stations, etc.) to or from a USB storage. This task is handled by the “UserData” service — to be more precisely, by the thriftme service “CSystemProfileServiceImpl”.
The user profiles backup looks like a folder with the following directory structure:
.
└── MyMercedesBackup
├── shared
├── system
│ ├── rse.ud2
│ └── system.ud2
└── udxprofiles
├── profile0
│ ├── commuterroute.ud2
│ ├── emotions.ud2
│ ├── navidata.ud2
│ ├── pud.ud2
│ ├── uapreds.ud2
│ ├── vt_ab.ud2
│ └── vt_tuner.ud2
└── profileindex.xml
Some of the files are generated by “UserData” itself, but most of them are generated and processed by other services, like “CAPServer”. The most important component of data import and export processes is the thriftme service “UserDataExchangeService” in “UserData”. Services subscribe for notifications about data import and export in UserDataExchangeService.
“CSystemProfileServiceImpl” performs the following workflow when exporting the profiles backup:
- Run timer for 100 seconds.
- Notify client services through “UserDataExchangeService” using events that request data export. Such events contain the information about the exported data.
- Services call API functions that verify the success of the data export. Their arguments are a data key and a path to the file.
- “UserData” collects all received files, encodes them and stores them in the mounted USB filesystem.
The scheme is similar for the profile backup import:
- “UserData” copies files from the USB to the local system and decodes them.
- It notifies client services through events that request data import.
- If the client service is handling the data key, it imports the data.
- Services call API functions that verify the success of the data import.
The backup contains XML files and binary files. Binary files are considered more useful for vulnerability hunting:
| Data key | Filename in backup | Content |
| PUD_COMMUTER | commuterroute.ud2 | ISO-8859 text, with no line terminators |
| PUD_UAPREDICTIONSDATA | uapreds.ud2 | SQLite 3.x database |
| PUD_VT_TUNER | vt_ab.ud2 | Proprietary binary data |
| PUD_VT_ADDRESSBOOK | vt_tuner.ud2 | Proprietary binary data |
When triggering backup import (restore) and export (backup), the following scripts were created:
triggerRestore.py and triggerBackup.py.
Almost all the services of the head unit support the trace system
HBTracePersistence, which allows tracing to be turned on and off for a specific module or function.
The “hbtc” file contains the tracing system configuration and determines the function tracing method. An example of the “hbtc” file is provided below:
HBTracePersistence 1.0.0
imp 00 08
imp_userdata_private_CSystemProfileManager ff 08
imp_userdata_private_CUserDataVehicleInformationAdapter ff 08
imp_userdata_private_CUserDataIF2Impl ff 08
imp_common_streamhelper_StreamHelper ff 08
imp_userdata_private_CUDXStructure ff 08
As mentioned previously, files in the backup are encoded — the algorithm is proprietary. The “CPUserDataEncodingHandler” class handles it. The script
ud2codec.py was prepared to be able to encode and decode files.
Identified vulnerabilities
The following vulnerabilities were tested on a real car.
CVE-2024-37601
The process of decoding files with the
*.ud2 extension contains the heap buffer overflow vulnerability.
“UserData” represents encoded data through the “CHBString” object, which processes data as a UTF string. Then the UD2-specific decoding characters should be deleted, and their indexes should remain constant. For this task we used the “CHBString::const_iterator::incrementSteps” function to get the pointer on the desired character and “CHBString::remove” to remove the character from the string. “CHBString::const_iterator::incrementSteps” incorrectly processes the character with code
0xe7: it will be decoded as 1 byte. But according to the table “UTF8LookUpTable”, which is used in “CHBString::remove” and “CHBString::CHBString”, the character with code 0xe7 is encoded with 3 bytes.
As a result, when performing the “CHBString::remove” function, the calculated pointer can be outside of the allocated buffer after UTF decoding with “UTF8LookUpTable”. The memmove function will be called with the third argument (size of buffer) equal to -1.
Without further exploitation by the attacker, this vulnerability triggers the crash of the “UserData” service during data import. This puts the system into a frozen state, which can be fixed only through an ECU hard reset.
CVE-2023-34402
As mentioned previously, the
vt_ab.ud2 file was decoded as vt_ab.xml during the profile backup export for vulnerability searching. This file’s contents resemble a binary and it is processed by the text-to-speech service.
The
vt_ab.xml file contains another file, describing which service will be dropped during processing. For this task it contains the name of the file to drop. This action is performed in the “UserDataExchangeServiceClient::unpackVoiceTagArchiveOptimized” function:
- get the content of the file describing what to drop;
- get the name of the file to drop and perform the dropping.
Because the checks are not being performed, an attacker can control the path which is used to write controllable content. As a result, the attacker can access arbitrary file writing with the same rights the service has.
CVE-2023-34399
After decoding, the
uapreds.ud2 file in the profile folder “MyMercedesBackup/udxprofiles/profile0” takes the form of uapreds.db. The system recognizes it as an SQLite database, which is parsed in the service that uses machine learning for creating efficient routes. The decoded file is processed in “capthrift::CapServer::requestImportBinaryData”, then it calls “capthrift::CapServer::setProfile” to load the database.
All values in the SQLite database tables are serialized as an archive to match the boost library. The format of this archive can be either XML or plain text. We used the plain text mode. Here is an example of an archive in the
learning_kernel row of the kvpair_table table:22 serialization::archive 11 0 2 0 1 0 0 1 0 1 0 0 0 0 1
0.00000000000000000e+00 0 0 0 0 0 0 0 0 1.00000000000000000e+00
...
The last publicly available version of the boost library, 1.81 (at the time of research), contains the integer overflow vulnerability. This vulnerability can be exploited when processing an entity pointer:

In (1), the value
cid was obtained from the attacker-controllable data. After that, in (2), this value is used as an array index to get the cobject_id object. (3.1) and (3.2) introduce restrictions for cid:
- whether the value of cid equals -1;
- whether the value of cid is greater than the size of the cobject_id_vector array.
These restrictions can be bypassed using the assigned value of
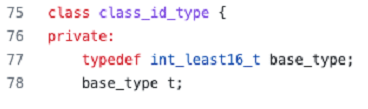
cid. This is possible because the definition of class_id_type is assigned an integer:

So if we assign the “–3” value to
cid, then the pointer co.bpis_ptr (2) will be corrupted.
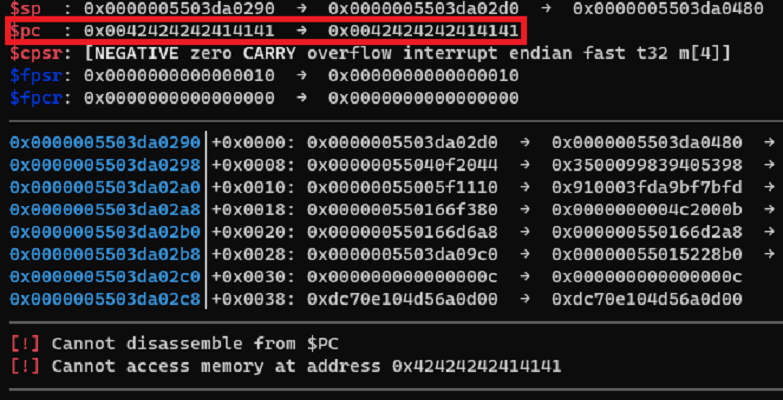
Lastly, the triggered vulnerability in the debugger looks as follows:
Thread 63 hit Breakpoint 2, 0x0000004002f3cea4 in ?? ()
# cid value
(gdb) i r x2
x2 0xfffffffffffffffd -3
# cobject_id_vector size
(gdb) x/1hx $x20 + 0x58
0x405c01b278: 0x000e
# cobject_id_vector pointer
(gdb) x/1gx $x20 + 0x60
0x405c01b280: 0x000000405c017f00
# 1 element in the cobject_id_vector
(gdb) x/3gx *(void **)($x20 + 0x60) + 0 * 0x18
0x405c017f00: 0x000000400147f1c8 0x0000000000000000
0x405c017f10: 0x0000010000000002
# refferenced element
(gdb) x/3gx *(void **)($x20 + 0x60) + -3 * 0x18
0x405c017eb8: 0x5f72696170766b5f 0x00315f656c626174
0x405c017ec8: 0x0000000000000035
(gdb) c
Continuing.
Thread 63 received signal SIGSEGV, Segmentation fault.
Exploitation notes
At the first stage, it is assumed that the image base address is fixed and the vulnerability code is loaded to a specific address in the memory. We analyzed the vulnerability code and checked exactly how all the pointers are dereferenced and where the virtual call is performed. Here are the steps:
- By controlling the id, we can move the pointer (by moving it to negative offsets relative to the beginning of the array in the heap);
- By moving the pointer, we will get to an address where another address containing an object for bis_ptr is located;
- The address for bis_ptr should contain the address of the virtual call table.
Controlling only the offset to the corresponding object, we need to get to the address in the heap which contains a pointer to the pointer with the associated virtual table.
We can implement such a scenario using a spray of DDL entries inside the SQLite database that we can control. For such a spray, we need to create a lot of tables with long names. As a result, structures of a proper format will appear in the heap and a negative index will allow us to get to these structures.
Below is an example of such a SQLite-based file (the entry in
sqlite_schema is a table creation request):

So we can create a lot of tables with long names, which gives us a heap spraying primitive.
Using the heap spraying technique, an attacker can fully control the execution:

To import the
uapreds.db database to the “CAPServer” service, we need to copy it to the service’s working directory. Then “CAPServer” tries to load the database from its own working directory. As a result, if an attacker managed to import the database which triggers the vulnerability in the head unit, then each start-up of “CAPServer” will try to load it and crash. The “CAPServer” service gets started by “systemd” and is configured as follows:
[Service]ExecStart=/opt/prediction/bin/CAPServer /var/opt/prediction/
ExecStop=/bin/kill $MAINPID
Environment=LD_LIBRARY_PATH=/opt/sys/lib
EnvironmentFile=/opt/etc/lisa_env
Type=notify
WatchdogSec=30
Restart=on-failure
RestartSec=2
This means that after the crash, “systemd” will try to restart “CAPServer”. This triggers an infinite loop of service crashes, which can be helpful when trying to brute force the image base address.
Inside SQLite database, there is a pragma section which contains SQL commands to create tables. This feature can be used to create controllable data out of tables in the database based on the current time. The following script can be used to automate the process of creating an SQLite database, which might trigger this vulnerability according to the current time:
#!/bin/bash
DBPATH=test.db
STOP_TIME=$(date --date='-2 hours +10 seconds' +"%H:%M:%S")
echo "Trigger until < $STOP_TIME, clean after >= $STOP_TIME";
poc_value="CRASH the system"
clean_value="system work"
check() {
sqlite3 $DBPATH << EOF
SELECT strftime ('Time of database: %H:%M:%S', 'now');
select * from target_table;
.exit
EOF
}
rm $DBPATH
sqlite3 $DBPATH << EOF
CREATE VIEW target_table AS SELECT "key" AS varkey, "$poc_value" AS varval
WHERE TIME() < "$STOP_TIME" UNION SELECT "key" AS varkey, "$clean_value" AS
varval WHERE TIME() >= "$STOP_TIME";
.exit
EOF
check
sleep 10
check
As a result, an attacker can run image base address brute forcing for some time.
Attack vectors
During our research, we managed to compromise the testbed of the head unit and found several vulnerabilities for a real car via physical access.
The testbed compromise has three potential use cases:
- a criminal wanting to disable the anti-theft protection in a stolen head unit;
- a car owner tuning and unlocking prepaid services on their vehicle;
- a pentester conducting research to find new vulnerabilities.
In the case of a real car, the identified vulnerabilities can be triggered through an exposed USB service that is available to the general user.
Vulnerability list
During the process of vulnerability disclosure with the vendor, the following CVE IDs were assigned:
CVE-2024-37602
CVE-2024-37600
CVE-2024-37603
CVE-2024-37601
CVE-2023-34406
CVE-2023-34397
CVE-2023-34398
CVE-2023-34399
CVE-2023-34400
CVE-2023-34401
CVE-2023-34402
CVE-2023-34403
CVE-2023-34404
The CVE details will be published here: github.com/klsecservices/Advis….
securelist.com/mercedes-benz-h…
 - Collegamento all'originale")