 - Collegamento all'originale")
Running DOOM and Super Mario 64 Inside a PDF File

Although generally described as a document format, PDFs have ballooned from a Postscript-lite format into a mutant featuring XML and JavaScript support, basically turning what once was a fairly simple format into an interactive page. Naturally, this has to be used for good, and that is why we have the Doom PDF project, as well as [Game of Tobi] using that project as the inspiration for a Super Mario 64 port based on the decompiled source code.
The nice thing about the Super Mario 64 version is that it’s stand-alone, running from a 23.5 MB PDF, unlike the Doom PDF which runs the game in DOSBox. The compromise is that Super Mario 64 PDF runs at just a few FPS, with the output in glorious ASCII.
What enables this feat is to open the PDF in a viewer that supports JavaScript, with the PDF.js that comes with most browsers generally allowing for integrated JS in the PDF to be executed. Unfortunately [Game of Tobi] hasn’t released source code for this project, but we hope that this is forthcoming.
While one can argue about the practicality of this whole demonstration from a gaming perspective, it definitely shows that PDF as a format has gotten way out of hand now that it’s even overrun with hellspawn and Italian plumbers.
youtube.com/embed/a0F08py5Z4M?…

An Event Badge Re-Imagined As A Cyberdeck

We’re used to handheld Linux devices of varying usefulness appearing on a regular basis, but there’s something about the one in a video from [Rootkit Labs] which sets it aside from the herd. It’s a fork of a conference badge.
The WHY2025 badge had pretty capable hardware, with an ESP32-P4, a really nice screen, and the lovely SolderParty keyboard. Here it’s been forked, to become a carrier board for their previous project, the Flipper Blackhat. This is a Linux add-on for the Flipepr Zero, and it seems that plenty of people wanted it in a more useful context. The result is something that looks a lot like a WHY badge, but running Linux.
It’s a great shame when badges end up lying unused after the event, and ones like the WHY 2025 badge are a serious effort to make something that endures. Here, the badge endures in spirit by being forked and re-engineered, and we like it a lot. The full video is below the break.
youtube.com/embed/QxqeU8ZfaYg?…
CPU Scheduler Divines The Will Of The Heavens

Horoscopes are a great way to pass a boring lunchbreak, and an excellent excuse for ending a ill-considered relationship. They’re also a hilarious way to handle CPU scheduling under Linux, thanks to the work of [Lucas Zampieri].
The project is called scx_horoscope, and it’s a sched_Ext scheduler that makes its CPU scheduling choices based on what the heavens are doing in real time. Different tasks are handled based on different astronomical objects. For example, the Sun represents life force, and thus grants boons to key system processes. The Moon, an emotive influence, rules over interactive processes like shells and terminals. Mercury, as the god of communication, handles network and IO tasks, and so it goes from there. It’s not just a surface level thing, either—[Lucas] has implemented the influences of the elements of fire, air, earth, and water, and there are negative timeslice penalties on associated tasks when a given planet lands in retrograde.
You can argue whether or not the broader motions of the heavens have any impact on our lives based on the time and circumstances of our birth. But you can’t argue that scx_horoscope really will influence how your computer runs based on the dance of the planets in the sky. Mostly, though, we concern ourselves with astronomy rather than astrology around these parts!
[Thanks to Benjamin for the tip!]
Fixing Sony and Philips’ Doomed CD-i Console

Although not intended to be a game console, the CD-i would see a a couple of games released for it that would cement its position in gaming history as the butt of countless jokes, some of which still make Nintendo upset to this day. That aside, it’s still a fascinating glimpse at the CD-based multimedia future envisioned in the early 90s, starting with its release in 1990. Recently [MattKC] decided to purchase another CD-i in a fit of nostalgic rage, and repair it to show the world what the future could have been like.
Although Sony and Philips co-developed the device, Sony would go on to release the PlayStation a few years later, which made the CD-i’s life and expectations for it that much harder, leading to it slowly fading into history. The Magnavox one that [MattKC] got is one of the later models, based on the CD-i 450 that was introduced in 1994 as one of the more gaming-oriented models.
As is typical with older devices that use optical media, it would not read discs. It also would sometimes boot up with a ‘Memory Full’ error. This is a common fault due to the built-in battery having run out, erasing RAM-stored values and causing random glitches like this when garbage values were read in on boot.

These use an internal lithium battery which will inevitably run out after the guaranteed ten-year accumulated memory retention period, after which it’s just typical volatile memory. The solution here is to either replace the entire module, or the more appropriate method of chopping it open and wiring up an external CR2032 coin cell that can be easily replaced.
Ultimately this is what [MattKC] opted for, taking a Dremel to the Timekeeper chip and chopping off the top half. There are open replacements for the top half that contain the crystal and the CR2032 cell holder, which makes it into very clean-looking mod, and makes replacing the lithium cell in the future a snap. Of course, this didn’t fix the CD player.
The CDM 12.1 CD player mechanism is a standard module that Philips used throughout its consumer electronics, and is known for failing. Funnily enough, this time it wasn’t the laser module that had failed, but rather a stuck turntable. A bit of prodding helped to loosen it and the mechanism could read CDs just fine again.
While not a popular series of devices in their day, the CD-i actually has a thriving community around it today, featuring countless mods and hacks to make these devices do things never imagined in the 90s. They’re also quite easy to hack, and relatively affordable. Plus you get to play all the amazing Nintendo titles on the CD-i on the real hardware.
youtube.com/embed/tBSUH1QezjQ?…
Hackaday Links: February 1, 2026

For many readers, more snow is the last thing they want to see right now…but what if it comes in the form of an online simulator in the style of an old DOS game? Created by [Potch], it works like one of those “falling sand” simulators, with sliders that let you control various elements of the wintry action. For more a immersive experience, open the window and let some cold air in while you play.
If those old school graphics have you yearning for a simpler time, then you’ll love Places to Telnet, a page on the very slick CRT-themed telnet.org that lists servers you can connect to. The list is made up primarily of games, but there’s also systems you can call up to do things like show the weather or browse Wikipedia. They even take submissions, so if you know any interesting destinations that aren’t on the list, make sure to share with the class.
Our ability to make and use tools is one of the things that separates us from the rest of the animal kingdom, and is an ability not often seen outside of primates. But a recent paper in Current Biology describes how one cow, Veronika, has been observed using a long-handled brush to scratch herself. Apparently the clever heifer will even flip the brush around and use the handle side when she wants to really dig in there. The paper says the findings “invite a reassessment of livestock cognition”, and points out that little serious research has been done on bovine intelligence in the 10,000 or so years since humans first domesticated them. We’re just happy this paper came out when it did — that way it will be a distant memory by the time we fire up the grill in the summer.

While the cows might be catching up to us, we’re still comfortably ahead of them in terms of spaceflight. Those eagerly awaiting humanity’s return to the Moon will have to wait a little longer however, as NASA has pushed back the wet dress rehearsal for Artemis II. This in turn has kicked the actual launch a few days farther down the road, and realistically, is probably the first of several delays as the space agency checks and re-checks the SLS rocket and Orion capsule before liftoff.
The launch rehearsal was supposed to start last night, but was delayed due to the unusually cold weather at the Cape — a wise precaution given the Shuttle-lineage of the SLS, especially as we’re just a few days past the 40th anniversary of the Challenger disaster.
While on the subject of returning to the Moon, Blue Origin has announced that they are pausing space tourism flights aboard their New Shepard rocket for at least two years so that they can better focus their energies on developing the Blue Moon lunar lander. It’s a bit hard to believe the two programs could have much overlap, or that the Jeff Bezos backed company doesn’t have the resources to pursue both simultaneously. Seems more likely that demand for suborbital joyrides isn’t what they hoped for, especially after the public backlash several of the celebrity passengers experienced after their flight. With Virgin Galactic still in the middle of their own multi-year pause on commercial flights, the entire sub-orbital tourism industry (such as it is) is effectively on hold for the time being.
Suborbital flights for the wealthy will likely return one day, but by the time you read this, Belkin will have permanently pulled the plug on almost all of their Wemo smart gadgets. While Belkin’s cloud services for the devices has now gone dark, they note that any devices in the wild that were configured to work with Thread or Apple’s HomeKit will continue to work in local mode. We’re no strangers to seeing IoT devices go belly-up, but the end of Wemo still feels significant. Introduced in 2011, they were an early success story in a now flooded market.
While the average Wemo owner is out of luck, there’s good news for hackers. Tools and libraries which interact with Wemo devices on the local network such as pywemo are reportedly unaffected by the cloud shutdown. So if you see any of these devices popping up on the second-hand market, or maybe even the trash, they can still be put to use. If you manage to rescue some of these smart gadgets from the landfill, make sure to let us know.
See something interesting that you think would be a good fit for our weekly Links column? Drop us a line, we’ve love to hear about it.
The Latest from RepRapMicron – Nail Gel, First Objects, and More

We’ve been following [Vik Olliver]’s progress on the μRepRap project with interest for some time now. The project’s goal is to build a 3D printer that can print feature sizes down to about 10 microns – the same feature size used in the Intel 4004 processor. At the recent Open Everything 2026 conference, [Vik] presented an overview of all the progress he’s made in the last year, including printer improvements, material woes, and the first multi-layer prints (presentation slides).
The motion stage has undergone some fundamental improvements recently. The original XY motion table was supported on four flexures which allowed movement in X and Y, but also introduced slight variations in Z – obviously a problem in a system that needs to be accurate down to the microns. The latest version now uses complementary flexures to maintain a constant Z height, and eliminates interference between the X and Y axes. The axis motion drivers were also redesigned with parallel-bar linear reducers inspired by a pantograph, increasing their usable range from two to eight millimeters.
Rather than extruding material, the μRepRap uses an electrochemically-etched needle point to deposit UV-curable gel on the build surface. [Vik] found that a bit of nitric acid in the needle etching solution gave the edges of the probe a bit of a rough texture which let it hold more resin. He started his test prints using normal 3D printer resin, but it turns out that dissolved oxygen inhibits curing – quite a problem for small, air-exposed droplets. Fortuitously, UV nail gel does cure in air, and the next set of tests were printed in nail gel, including the first layered prints (one of which can be seen above, on top of a hypodermic needle). The μRepRap can’t yet print large numbers of layers, but [Vik] did print some hinged parts that could be folded into shape.
There’s much more in the presentation than can be covered here, including some interesting thoughts about the possibility of 3D printing electrochemical memory cells in ionic gel. Near the end of the presentation, [Vik] listed some pieces of related work, including necroprinting and this homemade micro-manipulator.
A DIY Headset For SteamVR

The modern era of VR started a long time ago, and a wide range of commercial headsets have proliferated on the market since then. If you don’t want to buy off the shelf, though, you could always follow [Manolo]’s example and build your own.
This DIY headset is known as the Persephone 3 Lite, and is intended for use with SteamVR. It’s got the requisite motion tracking thanks to a Raspberry Pi Pico, paired with an MPU6500 inertial measurement unit. As for the optics, the headset relies on a pair of 2.9-inch square displays that operate at a resolution of 1440 x 1440 with a refresh rate up to 90 Hz. They’re paired with cheap Fresnel lenses sourced from Aliexpress for a few dollars. Everything is wrapped up in a custom 3D-printed housing that holds all the relevant pieces in the right place so that your eyes can focus on both screens at once. The head strap is perhaps the only off-the-shelf piece, sourced from a Quest 2 device.
If you’re eager to recreate this build at home, files are available over on [Manolo’s] Patreon page for subscribers. We’ve featured some other DIY headset builds before, too. Video after the break.
youtube.com/embed/-QzfaM0PtaY?…
iPhone Becomes a Bluetooth Keyboard And Mouse

Sometimes you need to use a computer and you don’t have a spare keyboard and mouse on hand. [KoStard] figured an iPhone could serve as a passable replacement interface device. To that end, he built an adapter to let the phone act as a wireless keyboard and mouse on just about any modern machine.
To achieve this, [KoStard] grabbed an ESP32-S3 development board, and programmed it to act as a USB HID device to any machine attached over USB. It then listens out for Bluetooth LE communications from an iPhone equipped with the companion app. The app provides an on-screen keyboard on the iPhone that covers everything including special keys, symbols, and punctuation. You can also take advantage of the iPhone’s quality capacitive touchscreen, which emulates a nicely-responsive trackpad, with two-finger taps used for right clicking and two-finger drags for scroll. Latency is nice and low courtesy of the direct Bluetooth LE connection.
It’s a nifty build that is particularly useful in oddball situations where you might want a keyboard and mouse. For example, [KoStard] notes it’s a great way to control a Smart TV without having to do ugly slow “typing” on an infrared remote. We’ve seen his work before, too—previously building an adapter to provide Bluetooth capability to any old USB keyboard. Video after the break.
youtube.com/embed/NFtp6ubC3DU?…
Limiting Battery Risk On Repurposed Smartphones With PostmarketOS

PostmarketOS is a Linux distribution specifically designed for those who wish to repurpose old smartphones as general-use computers, to a degree. This can be a great way to reuse old hardware. However, for [Bry50], it was somewhat discomforting leaving the phone’s aging lithium battery perpetually on charge. A bit of code was thus whipped up to provide a greater measure of safety.
The concept is simple enough—lithium batteries are at lower risk of surprise combustion events if they’re held at a lower state of charge. To this end, [Bry50] modified the device tree in PostmarketOS to change the maximum charge level. Apparently, maximum charge was set at a lofty 4.4V (100%), but this was reconfigured to a lower level of 3.8V, corresponding to a roughly 40-50% state of charge. The idea is that this is a much healthier way to maintain a battery hooked up to power for long periods of time. There’s one small hitch—the system will get confused if the battery voltage is higher than the 3.8 V setpoint when switching over. It’s thus important to let the device discharge to a lower level if you choose to make this change.
It’s a neat mod that both increases safety, but keeps the battery on hand to let the system ride through minor power outages. If you’re new to the world of repurposing old smartphones, fear not. [Bryan] also has a tutorial on getting started with PostmarketOS for the unfamiliar. If you’re working on your own projects in this space, we’d love to hear about them—so get on over to the tipsline!
Building a Metal 3D Printer with a Laser Welder

The development of cheaper, more powerful lasers has always been a cause for excitement among hackers, and fiber lasers are no exception. One of the newer tools they’ve enabled is the laser welder, which can be used to weld, cut through metal, or clean off surfaces. Or, as [Cranktown City] demonstrated, you can use one to build a metal 3D printer.
The printer’s built around a 2000-Watt fiber laser welder from Skyfire, and the motion system came from a defunct secondhand 3D printer built by an out-of-business insole printing company. The frame was reinforced with steel, the welding gun was mounted in place of the hotend, and the trigger was replaced with a CNC-controlled switch. It didn’t originally use any specific shielding gas, since the welder was supposed to perform adequately with just compressed air if high weld quality wasn’t essential.
The first few tests were promising, but did reveal quite a few problems. Heat buildup was an early issue which threatened to warp the build plate, and which eventually welded the build plate to the Z-axis gantry. Adding a strong cooling fan and putting a gap between the build plate and the gantry solved this. The wire also kept getting stuck to the build surface, which [Cranktown City] solved by pausing the wire feed and pulling it away from the part when a layer finished. Simply using compressed air led to a weak deposit that cracked easily, and while a nitrogen stream improved the print somewhat, argon shielding gas gave the best results. For his final print, [Cranktown City] made a vase. The layers were a bit crude, but better than most welder-based metal printers, and the system shows some real promise.
We’ve seen a few printers built around welders before, and a few built around lasers, but this seems to be the first to use both.
youtube.com/embed/dG639pDfDKw?…
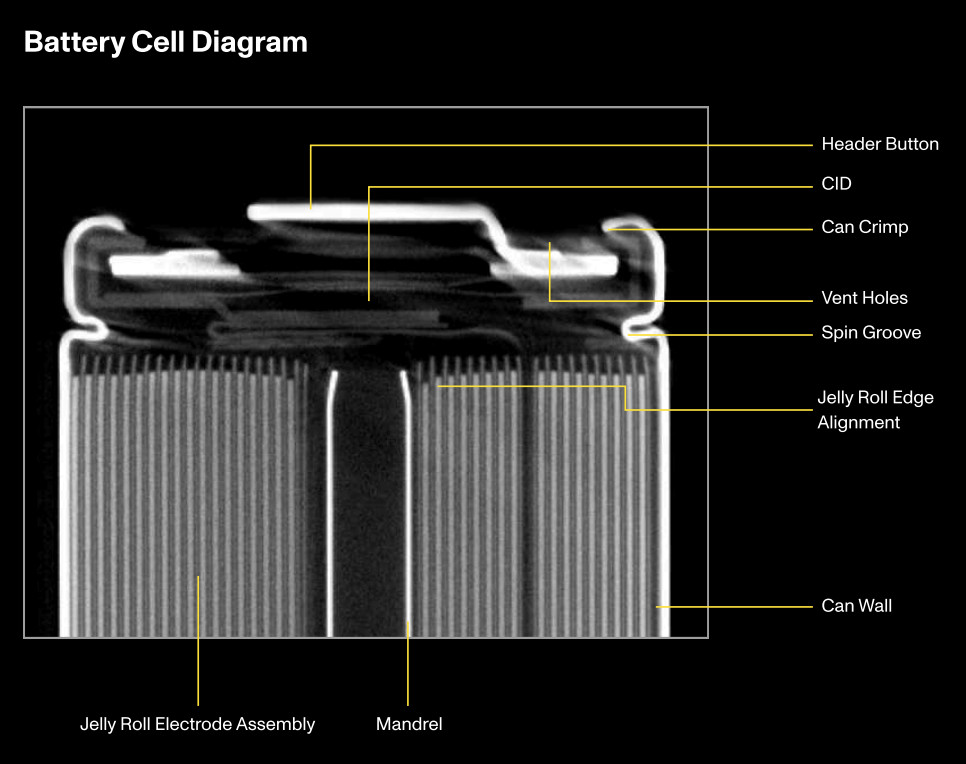
Lumafield Peers into the 18650 Battery

[Alex Hao] and [Andreas Bastian] of Lumafield recently visited with [Adam Savage] to share their battery quality report, which documents their findings after performing X-ray computed tomography scans on over 1,000 18650 lithium-ion batteries.
Actually we’ve been talking here at Hackaday over at our virtual water-cooler (okay, okay, our Discord server) about how to store lithium-ion batteries and we learned about this cool bit of kit: the BAT-SAFE. Maybe check that out if you’re stickler for safety like us! (Thanks Maya Posch!)
We have of course heard from [Adam Savage] before, check out [Adam Savage] Giving A Speech About The Maker Movement and [Adam Savage]’s First Order Of Retrievability Tool Boxes.
youtube.com/embed/-Y23nfAOiXQ?…
Changing Print Layer Patterns to Increase Strength

Dy default, the slicing software used for 3D printers has the printer first create the walls around the edges of a print, then goes back to deposit the infill pattern. [NeedItMakeIt], however, experimented with a different approach to line placement, and found significant strength improvements for some filaments.
The problem, as [NeedItMakeIt] identified with a thermal camera, is that laying down walls around a print gives the extruded plastic time to cool of. This means new plastic is being deposited onto an already-cooled surface, which reduces bonding strength. Instead, he used an aligned rectilinear fill pattern to print the solid parts. In this pattern, the printer is usually extruding filament right next to the filament it just deposited, which is still hot and therefore adheres better. The extrusion pattern is also aligned vertically, which might improve inter-layer bonding at the transition point.
To try it out, he printed a lever-type test piece, then recorded the amount of force it took to break a column free from the base. He tried it with a default fill pattern, aligned fill, and aligned fill with a single wall around the outside, and printed copies in PLA, plain PETG, and carbon fiber-reinforced PETG. He found that aligned fill improved strength in PLA and carbon fiber PETG, in both cases by about 46%, but led to worse performance in plain PETG. Strangely, the aligned fill with a single outside wall performed better than default for PLA, but worse than default in both forms of PETG. The takeaway seems to be that aligned fill improves layer adhesion when it’s lacking, but when adhesion is already good, as with PETG, it’s a weaker pattern overall.
Interesting, [MakeItPrintIt]’s test results fit in well with previous testing that found carbon fiber makes prints weaker. Another way to get stronger print fill patterns is with brick layers.
youtube.com/embed/59KvDE7adEU?…
Motorized Faders Make An Awesome Volume Mixer For Your PC

These days, Windows has a moderately robust method for managing the volume across several applications. The only problem is that the controls for this are usually buried away. [CHWTT] found a way to make life easier by creating a physical mixer to handle volume levels instead.
The build relies on a piece of software called MIDI Mixer. It’s designed to control the volume levels of any application or audio device on a Windows system, and responds to MIDI commands. To suit this setup, [CHWTT] built a physical device to send the requisite MIDI commands to vary volume levels as desired. The build runs on an Arduino Micro. It’s set up to work with five motorized faders which are sold as replacements for the Behringer X32 mixer, which makes them very cheap to source. The motorized faders are driven by L293D motor controllers. There are also six additional push-buttons hooked up as well. The Micro reads the faders and sends the requisite MIDI commands to the attached PC over USB, and also moves the faders to different presets when commanded by the buttons.
If you’re a streamer, or just someone that often has multiple audio sources open at once, you might find a build like this remarkably useful. The use of motorized faders is a nice touch, too, easily allowing various presets to be recalled for different use cases.
We love seeing a build that goes to the effort to include motorized faders, there’s just something elegant and responsive about them.
youtube.com/embed/TPez3wM1M84?…
Thomas Edison May Have Discovered Graphene

Thomas Edison is well known for his inventions (even if you don’t agree he invented all of them). However, he also occasionally invented things he didn’t understand, so they had to be reinvented again later. The latest example comes from researchers at Rice University. While building a replica light bulb, they found that Thomas Edison may have accidentally created graphene while testing the original article.
Today, we know that applying a voltage to a carbon-based resistor and heating it up to over 2,000 °C can create turbostratic graphene. Edison used a carbon-based filament and could heat it to over 2,000 °C.
This reminds us of how, in the 1880s, Edison observed current flowing in one direction through a test light bulb that included a plate. However, he thought it was just a curiosity. It would be up to Fleming, in 1904, to figure it out and understand what could be done with it.
Naturally, Edison wouldn’t have known to look for graphene, how to look for it, or what to do with it if he found it. But it does boggle the mind to think about graphene appearing many decades earlier. Or maybe it would still be looking for a killer use. Certainly, as the Rice researchers note, this is one of the easier ways to make graphene.
Cheap Smart Ring Becomes MIDI Controller

The Colmi R02 is one of the cheapest smart rings on the market. It costs about $20, and is remarkably easy to hack. [Floyd Steinberg] took advantage of this to turn it into a rather unique MIDI controller.
What makes the Colmi R02 somewhat unique is that the manufacturer did not try to lock out users from uploading their own firmware. You don’t even really need to “hack” it, since there is no code signing or encryption. You can just whip up your own firmware to make it do whatever you want.
To that end, [Floyd] set up the ring to act as a device for musical expression. When connected to a computer over Bluetooth, data from the ring’s accelerometer is converted into MIDI CC commands via a simple web app. The app allows the MIDI messages to be configured so they can control whatever parameter is desired. [Floyd] demonstrates the ring by using it to control filter cutoff frequencies on an outboard synthesizer, with great effect.
You could theoretically just strap an accelerometer to your hand with a microcontroller and achieve similar operation. However, the magic of this is that it costs only $20 and it’s already in a form factor that’s optimized for wearing on your finger. It’s hard to beat that.
Files are on GitHub for those eager to experiment. We’ve previously featured some hacks of this particular smart ring, too, with [Aaron Christophel’s] efforts directly inspiring this work.
youtube.com/embed/0aNxuAbEwvM?…
Secret Ingredients

We were talking on the podcast about rope. But not just any rope – especially non-stretchy rope for using in a mechanical context. The hack in question was a bicycle wheel that swapped out normal metal spokes for lighter and stronger high-density polypropylene weave, and if you can tension up a bike wheel and ride it around, you know it’s not your garden-variety twine.
Now, it just so happens that I’ve got basically the same stuff in my parts drawer: some 1 mm diamaeter Dyneema-brand rope. This is an amazing material. It’s rated to a breaking strength of 195 kg (430 lbs) yet it weighs just under one gram per meter, and if you buy the pre-stretched variant, it’s guaranteed to stretch less than 1% of its length under load. It’s flexible, wears well, and is basically in every way superior to braided steel wire.
It’s nearly magical, and it’s just what you need if you’re making a cable robot or anything where the extreme strength and non-elongation characteristic are important. It’s one of those things that there’s just no substitute for when you need it, and that’s why I have some in my secret-ingredients drawer. What else is in there? Some high-temperature tape, low-temperature solder, and ultra-light-weight M3 PEEK screws for airplane building.
But our conversation got me thinking about the parts, materials, and products that are unique: for which there is just no reasonable substitute. I’m sure the list gets longer the more interesting projects or disciplines that you’re into. What are your secret ingredients, and what’s the specific niche that they fit into?
This article is part of the Hackaday.com newsletter, delivered every seven days for each of the last 200+ weeks. It also includes our favorite articles from the last seven days that you can see on the web version of the newsletter. Want this type of article to hit your inbox every Friday morning? You should sign up!
Playing YouTube From The Command Line

Generally, one opens a web browser or an app to use YouTube. However, if you’re looking to just listen to the audio, you can actually do that right from the terminal. You just need Shellbeats from [lalo-space].
Shellbeats is primarily intended for playing music from YouTube, and is well equipped for this task. It allows searching YouTube directly from the terminal, as well as streaming tracks or entire playlists from the command line interface. You can also make and edit playlists from within the tool, and even download the whole lot as MP3s if so desired. It’s all keyboard-operated and nicely lightweight. The overall experience isn’t dissimilar from operating a simple LCD-based MP3 player from 20 years ago.
There’s plenty of other fun stuff you can do in the terminal, too, as we’ve explored previously. If you’re working on your own media player hacks, be sure to notify us on the tipsline!
Surviving the RAM Price Squeeze With Linux In-Kernel Memory Compression

You’ve probably heard — we’re currently experiencing very high RAM prices due mostly to increased demand from AI data centers.

If you’ve been priced out of new RAM you are going to want to get as much value out of the RAM you already have as possible, and that’s where today’s hack comes in: if you’re on a Debian system read about ZRam for how to install and configure zram-tools to enable and manage the Linux kernel facilities that enable compressed RAM by integrating with the swap-enabled virtual memory system. We’ve seen it done with the Raspberry Pi, and the concept is the same.
Ubuntu users should check out systemd-zram-generator instead, and be aware that zram might already be installed and configured by default on your Ubuntu Desktop system.
If you’re interested in the history of in-kernel memory compression LWN.net has an old article covering the technology as it was gestating back in 2013: In-kernel Memory Compression. For those trying to get a grip on what has happened with RAM prices in recent history, a good place to track memory prices is memory.net and if you swing by you can see that a lot of RAM has gone up as much as four times in the last three or four months.
If you have any tips or hacks for memory compression on other platforms we would love to hear from you in the comments section!
Crouching Typewriter, Hidden PC

Go back a couple of generations, and rather than a laptop or a luggable, the office accessory of choice was a portable typewriter. As the 20th century wore on, the typewriter became electric before eventually being eclipsed by luggable and laptop computers. On YouTube, [Prototype] is turning back the clock, by turning an old Smith-Corona electric typewriter into a luggable computer– with a stretch goal of still being able to type.
Yeah, just gutting the typewriter and shoving an SBC inside wasn’t ambitious enough for [Prototype]: his goal is a working typewriter and an x86 gaming PC. To facilitate this, he guts the Smith-Corona keyboard, and 3D-prints a new top plate to add a little more vertical space in the old typewriter. The new top does recreate the original layout and the Corona switches get printed adapters to fit them to mechanical switches [Prototype] is using with a vibe-coded Arduino. Why one would bother with ChatGPT when QMK is right there, we could not say, but feel free to skip 6:20 to 15:00 if you’re watching the video but want to avoid that side quest.
Unfortunately, the “get the keyboard working” side-quest is either faked or deferred to video part II, which has not been posted yet. In this video he demonstrates that he can actuate a single hammer with a servo, but that’s a far cry from a working typewriter so, we’re really hoping he comes through on that promise in Part Two. Even if the build stops with just one hammer, that would give the tactile sound-and-feel that other builds turn to solenoids for. Squeezing a small-form-factor motherboard and graphics card into the old Smith-Corona is also going to be an interesting challenge. It’s certainly going to be a step up from using the keyboard as a terminal.
If you like this project but balk at the idea of destroying a working piece of vintage office equipment, it is possible to turn a typewriter into a USB keyboard non-invasively.
If you like this project at all, join us in thanking [Katie] for the tip. Not your cup of tea? Tell us what is, with a tip of your own.
youtube.com/embed/Bgk944awGcQ?…
Writing an Optimizing Tensor Compiler from Scratch

Not everyone will write their own optimizing compiler from scratch, but those who do sometimes roll into it during the course of ever-growing project scope creep. People like [Michael Moroz], who wrote up a long and detailed article on the why and how. Specifically, a ‘small library’ involving a few matrix operations for a Unity-based project turned into a static optimizing tensor compiler, called TensorFrost, with a Python front-end and a shader-like syntax, all of which is available on GitHub.
The Python-based front-end implements low-level NumPy-like operations, with development still ongoing. As for why Yet Another Tensor Library had be developed, the reasons were that most of existing libraries are heavily focused on machine learning tasks and scale poorly otherwise, dynamic flow control is hard to implement, and the requirement of writing custom kernels in e.g. CUDA.
Above all [Michael] wanted to use a high-level language instead of pure shader code, and have something that can output graphical data in real-time. Taking the gamble, and leaning on LLVM for some parts, there is now a functional implementation, albeit with still a lot of work ahead.
Need a Curved Plastic Mesh? Print Flat, Curve Later

Need a plastic mesh in a custom pattern? 3D print it, no problem. But what if one needs a curved plastic mesh? That’s considerably harder to 3D print, but [Uncle Jessy]’s figured out a simple approach: 3D print the mesh flat, then break out a mold and a heat gun.
Of course, there are a few gotchas, but [Uncle Jessy] shares his tips for getting the most reliable results. The important part is to design and 3D print a mold that represents the final desired shape. Then print the mesh, and fit it into a frame. Heat things up with a heat gun, and press into the mold to deform the mesh while it’s still soft. It’s much easier seen than explained, so take a few moments to check out the video, embedded below the page break.
Because the plastic in a mesh is so thin, [Uncle Jessy] says to keep the heat low and slow. The goal is to have the mesh stretch and deform, not melt.
Speaking of heat, when thermoforming, one usually needs to make the mold out of heat-resistant material. But the thermal mass of a mesh is so small that it really doesn’t matter much — there just isn’t enough heat trapped in the mesh to really damage a mold. As long as the mold is reasonably dense, there’s no need to go overboard with making it heat resistant.
The whole process takes a little practice, but since the meshes are so fast to print and use so little plastic it’s easy to experiment a little.
As for the meshes themselves, a simple way to print a mesh is just to print a disc with no top or bottom layers, only infill. Set the infill pattern to honeycomb, for example, for an easy hexagon mesh. We’ve seen a variant of this “exposed infill” idea used to create a desiccant container, and using it to print a mesh pattern easily is a neat trick, too.
Why might one need to reshape a mesh into a curve? Perhaps to custom-fit a costume piece, or make custom eye inserts for masks, as shown here. In any case, it’s a good technique to keep in the back of one’s mind, and if you put it to good use, drop us a tip!
youtube.com/embed/TsG89NgZJO8?…
Ordering Pizza On Your Sega Dreamcast Is Very Clunky Indeed

If you’re ordering pizza these days, you’re probably using a smartphone app or perhaps still making a regular old phone call. If you’re creative and a little bit tricky, though, you can order pizza right from your Sega Dreamcast. You just need to jump through a few hoops, as demonstrated by [Delux] and [The Dreamcast Junkyard] in the recent past.
You used to be able to order pizza on the Dreamcast natively, all the way back in 1999. However, the modern Domino’s website doesn’t really work on the ancient Dreamcast browser anymore. The simple fact is that web technology has advanced a long way in the last couple of decades, and Sega didn’t exactly spend a lot of time maintaining a browser on a console that died mere months after its rivals hit the market.
Thus, to place a pizza order on the Dreamcast these days, you need to work within its limitations. [Delux] uses the Dreamcast with the Broadband Adapter to access a PC on the local network via the XDP web browser. That PC is hosting Web Rendering Proxy, a tool which converts complicated modern websites into something a simpler machine can parse. From there, it’s a matter of connecting to the Domino’s website, and slowly clicking through the online ordering pages. Between the proxy delay, the Dreamcast’s glacial processing speed, and the clunky Domino’s ordering interface, it takes ages. Never before has adding coupons felt like such a hassle. Still, after 15 minutes of fuss, the order is completed… and a short time later, a hot fresh pizza arrives.
It’s a fun hack, but really it’s the PC running the proxy that’s doing the heavy lifting. In 2026, it’s far more elegant to order a pizza from your Nintendo Wii.
youtube.com/embed/dEMqq7-8K5s?…
Do Expensive Filaments Make 3D Printed Wrenches Better?

What filament is strongest? The real answer is “it depends”, but sometimes you have a simple question and you just want a simple answer. Like, which material makes the best 3D printed wrench? [My Tech Fun] printed a bunch of options to find out — including some expensive filaments — and got some interesting insights in the process.
His setup is simple: he printed a bunch of 13 mm open-end wrenches, and tested each one to failure by cranking on a clamped digital torque meter until the wrench failed by breaking, or skipping.
[My Tech Fun] tested a total of eighteen filaments, from regular basic PLA, PETG, ABS and ASA, and a variety of carbon fiber-infused filaments including PPA-CF. TPU is included for fun, and there’s also a wrench printed with continuous carbon fiber, which requires a special printer. More on that in a moment. First, let’s get to the results!
Unsurprisingly, TPU fared the worst at 0.8 nM which is roughly “unscrewing the cap of a water bottle” territory. Top performers included the wrench printed with continuous carbon fiber reinforcement (failing at 3.7 nM) and a couple printed in expensive PPA-CF (high-temperature nylon filament with carbon fiber) topped the list at 4.3 nM. Everything else landed somewhere in between, with plain PLA surprisingly outperforming some CF blends.
The continuous carbon fiber wrench was printed on a FibreSeeker printer, which reinforces a print with solid fibers embedded into the plastic instead of chopped particles, and such prints are noticeably more resistant to bending. Check out our earlier coverage for a closer look at what the FibreSeeker does.
This is a good time to mention that the wrench 3D model used is not at all optimized for best results with 3D printing. But that’s okay; this is really about the filaments, not the wrench.
The wrench model is just a way to test things in a familiar and highly visual, relatable way. You can see each one in action in the video below, and seeing [My Tech Fun] turn the wrenches gives a very good idea of just how much force is involved, with a relatable display of just how strong the different filaments are.
youtube.com/embed/b2a1h-bc2Zw?…
Hackaday Podcast Episode 355: Person Detectors, Walkie Talkies, Open Smartphones, and a WiFi Traffic Light

Another chilly evening in Western Europe, as Elliot Williams is joined this week by Jenny List to chew the fat over the week’s hacks.
It’s been an auspicious week for anniversaries, with the hundredth since the first demonstration of a working television system in a room above a London coffee shop. John Logie Baird’s mechanically-scanned TV may have ultimately been a dead-end superseded by the all-electronic systems we all know, but the importance of television for the later half of the 20th century and further is beyond question.
The standout hacks of the week include a very clever use of the ESP32’s WiFi API to detect people moving through a WiFi field, a promising open-source smartphone, another ESP32 project in a comms system for cyclists, more cycling on tensegrity spokes, a clever way to smooth plaster casts, and a light sculpture reflecting Wi-Fi traffic. Then there are a slew of hacks including 3D printed PCBs and gem-cut dichroic prisms, before we move to the can’t-miss articles. There we’re looking at document preservation, and a wallow in internet history with a look at the Netscape brand.
As usual all the links you need can be found below, so listen, and enjoy!
html5-player.libsyn.com/embed/…
Or download the podcast old-school, with a direct link to the MP3 file in question.
Where to Follow Hackaday Podcast
Places to follow Hackaday podcasts:
Episode 354 Show Notes:
What’s that Sound?
- Jenny got the sound right. Did you? Only one way to find out: put your handle and guess in here.
News
Interesting Hacks of the Week:
- Make Your Own ESP32-Based Person Sensor, No Special Hardware Needed
- espectre/micro-espectre at main · francescopace/espectre · GitHub
- GitHub – francescopace/micropython-esp32-csi: MicroPython – a lean and efficient Python implementation for microcontrollers and constrained systems
- Heart Rate Monitoring Via WiFi
- Heart Rate Measurement Via WiFi, The DIY Way
- Pi Compute Module Powers Fully Open Smartphone
- These Ultra-Cute, Handsfree Walkie-Talkies Are Built For Cycling
- PLA Mold To Plaster Bust, No Silicone Needed
- Building A Light That Reacts To Radio Waves
- Bike Spokes, Made Of Rope
Quick Hacks:
- Elliot’s Picks:
- Using 3D Printing And Copper Tape To Make PCBs
- X-Cube Prism Becomes Dichroic Disco Ball
- Light Following Robot Does It The Analog Way
- Jenny’s Picks:
- Post-rampocalyptic Chip-Swap Provides Desktop Memory At Laptop Prices
- Wikipedia As A Storage Medium
- The Defunct Scooter Company, And The Default Key
Can’t-Miss Articles:
- Ask Hackaday: How Do You Digitize Your Documents?
- Gears Are Old And Busted, Capstans Are Cool
- Page-turning Book Scanner Roundup
- DIY Book Scanner Processes 600 Pages/hour
- Zombie Netscape Won’t Die
hackaday.com/2026/01/30/hackad…
Whipping Up A Quick Adapter To Hack The Xbox 360

[Androxilogin] had a problem. An Xbox 360 Slim had shown up in the post, but failed to give much more than a beep when turned on. Disassembly revealed some missing components, but replacing them failed to breathe life into the beleaguered console. Deeper repair was needed, and that would require a special adapter which [Androxilogin] was able to whip up from scratch.
When it comes to the Corona models of the Xbox 360, it’s often necessary to use something called a “post-fix adapter” to do certain diagnostic and repair tasks. These adapters consist of a bracket which wraps around the CPU, and probes the solder ball for the POST_OUT signal which is otherwise difficult to access on the motherboard itself. Adapters are readily available online, and are usually manufactured as a PCB with a protruding contact to make a connection.
For [Androxilogin], though, time was short. Rather than wait for adapters to ship, it was quicker to whip up a custom piece to do the same job. This was achieved with a 3D print which was able to clamp around the CPU, while snugly holding a piece of tinned 30 AWG wire to poke the critical point beneath the chip. After a couple of attempts to get the sizing just right, [Androxilogin] was able to make the necessary connection which enabled installing Xell Loader on to the machine to bring it back to life.
If you’re eager to make your own post-fix adapter, files are available on Printables, with more details over on Reddit to boot. While the Xbox 360 is starting to suffer some awkward symptoms of age. we nevertheless still see a steady stream of hacks come in for this vintage machine. If you’re tackling your own retro console mods, be sure to notify the tipsline.
Building Natural Seawalls To Fight Off The Rising Tide

These days, the conversation around climate change so often focuses on matters of soaring temperatures and extreme weather events. While they no longer dominate the discourse, rising sea levels will nonetheless still be a major issue to face as global average temperatures continue to rise.
This poses unique challenges in coastal areas. Municipalities must figure out how to defend their shorelines, or decide which areas they’re willing to lose. The City of Palo Alto is facing just this challenge, and is building a natural kind of seawall to keep the rising tides at bay.
Seawalls That Breathe
The traditional way to fight back against the sea is with seawalls. These typically consist of steep slopes constructed on the shoreline, which are designed to reflect wave energy back to the sea and stop it from eating away at the land. They are normally built using rocks, steel, or concrete walls to dissipate the energy of incoming waves. They are typically simple to design and construct, and prove relatively effective at staving off erosion. However, they can also be quite imposing and unsightly, and often do very little to support native fauna and flora.
The City of Palo Alto is taking an altogether different approach by building a horizontal levee to protect the shore of Harbor Marsh. It eschews the usual steeply sloped seawall concept entirely. Instead, the coast is to be given a gentle gradient constructed of earth, creating a so-called “ecotone slope”—a long, sloping habitat down to the water line. Where the tide meets the shore, native plantings will support a tidal marsh, transitioning to a freshwater marsh with different plants farther up the slope, with volunteers planting 35 species in all. It’s hoped that restoring these habitats in the area will provide support to species like the Ridgway’s rail and the salt marsh harvest mouse.
Furthermore, from the top of the horizontal levee, wastewater will be fed in to support the growth of native plants, which will work with the soil to filter out pollutants as it makes its way to the sea in a process referred to as “polishing treatment”. It’s not intended to remove heavy pollutants from the water; this work is handled at existing municipal water treatment facilities. What the levee can handle is soaking up some of the nitrogen and phosphorous content to support plants on the slope. This reduces the amount of these nutrients that gets released out into the bay, which can cause fish die-offs, algal blooms, and other undesirable consequences.
Due to its limited size, the horizontal levee will only handle 100,000 gallons of wastewater per day, which isn’t much against the 20 million gallons that currently flows out into the bay. Ultimately, that’s because the work at Harbor Marsh is a pilot project for the City of Palo Alto. Ideally, it will prove effective in both limiting coastal erosion as well as supporting native plants and animals. If it proves successful, it could become a strategy used elsewhere along the San Francisco coastline and beyond. The Bay Area as a whole needs to be protected against rising sea levels, as the name implies, so projects like this are a key focus as authorities plan for the future.
As it stands, large artificial seawalls probably aren’t going anywhere. It’s very straightforward to build massive concrete and steel structures to defend a piece of coastline. The engineering involved is well understood, and the construction process does not require particular finesse in the selection of plants or the maintenance of native habitats. However, in areas where it’s desirable to slow erosion in a greener fashion, horizontal levees could become popular. After all, it’s a lot nicer to stroll on a path alongside a burgeoning native marshland than it is to feel the sun bouncing off acres of harsh concrete. If the Harbor Marsh experiment works, expect to see similar projects take off in coastal areas around the world.
Comprehensive Power Management for the Raspberry Pi

The Raspberry Pi has been a revolutionary computer in the maker space, providing a full Linux environment, GUI, and tons of GPIO and other interfacing protocols at a considerably low price. This wasn’t its original intended goal, though. Back in the early 2010s it was supposed to be an educational tool for students first, not necessarily a go-to for every electronics project imaginable. As such there are a few issues with the platform when being used this way, and [Vin] addresses his problems with its power management in his latest project.
[Vin]’s main issue is that, unlike a microcontroller, the Raspberry Pi doesn’t have a deep sleep function. That means that even when the operating system is shut down the computer is still drawing an appreciable amount of current, which will quickly drain some batteries. We’ve covered [Vin]’s farm and his use case for the Raspberry Pi in the past, but a quick summary is that these boards are being used in a very rugged environment where utility power isn’t as reliable as he would like.
In [Vin]’s post he not only outlines his design for the board but goes through his design process, starting by using discrete logic components and then trying out various microcontrollers until settling on an ATmega88. The microcontroller communicates with the Raspberry Pi over I2C where the Pi can request a power-down as well as a time for future power-on. A latching relay controlled by the microcontroller ensures the Pi doesn’t drain any battery while the ATmega can put itself into actual sleep in the meantime.
The build for this project goes into an impressive amount of detail, and not only are the designs and code available on the project’s GitHub page but [Vin] also wrote another blog post which uses this project to go over his design philosophy more broadly.
Companion MIDI Pedal Helps Roland Groovebox Along

The Roland SP-404 Mk2 is a popular groovebox that can deliver a great beat if you know how to use it. If you’re seeking greater control than is available out of the box, though, you might like to try a custom pedal built by [Romain Dereu].
The concept is simple enough—[Romain] whipped up a bespoke MIDI device to specifically control various features of the SP-404. It’s based on an Arduino Nano, though it could also be built with an Arduino Uno if so desired. The microcontroller sends the requisite MIDI messages out via its serial UART. The microcontroller is built into a pedal-style enclosure with a big toggle switch and a foot switch. This enables the triggering of various pads on the SP-404, with modes selected via the toggle.
It’s a simple build that opens up new possibilities when playing with the SP-404. If you’ve ever wanted a custom device to spit out some specific MIDI commands to control the synths or drum machines in your performance rig, this project is a great example of how easy this is to achieve. Meanwhile, if you’re whipping your own custom MIDI gear at home, we always love to see it land on our tipsline!
Lazarustorm Lets a PiStorm Live Outside Your Old Amiga

The PiStorm is nothing new; if you’re familiar with the retrocomputer scene, you’ve probably heard of it. By replacing the 68k processor in an old Amiga (or some models of Atari) the PiStorm accelerator gives a multiple order of magnitude speedup. It’s even a reversable mod, plugging in where the original CPU was. What’s not to love? Well, some people would simply prefer to keep their original CPUs in place. [TME Retro] has a video highlighting the solution for those people: the Lazarustorm by [arananet].
It makes perfect sense to us– back in the day, you could plug a whole x86 PC-compatible ‘sidecar’ into your Amiga, so why not a PiStorm? The whole bus is right there for the taking.The Lazarusstorm, as a project, is bog simple compared to the PiStorm itself. A PCB and the connectors to get it plugged into the expansion port on the Amiga side, and the connectors to plug the PiStorm into it on the other. A couple of jumpers and a few passives, and that’s it. [TME Retro] also took the time to come up with a case for it, which sits on felt feet to relieve stress on the PCBs. It’s a nice bit of CAD, but we rather wish he’d done it in beige.
As for the upgraded Amiga, it runs just as fast as it would had the 68k been replaced with a Pi3 and PiStorm internally, which is to say it’s practically a supercomputer by 1980s standards. You get the SD card to serve as a hard drive and can even access the internet via modern WiFi, something Commodore engineers likely never expected an A500 to do. Of course, just connecting to the network is only half the battle when getting these retro machines online. When these accelerators were new, the 68k emulation ran on top of Linux, but now that the EMU68k project has it bare metal and even faster.
This isn’t the first Raspberry-flavoured slice of Amiga sidecar we’ve featured: here’s one running Spotify. If you haven’t got an Amiga, there’s a PiStorm for the FPGA-based MiniMig, too.
youtube.com/embed/-ICquEE3N9c?…
Rare-Earth-Free Magnets With High Entropy Borides
")
Although most of us simultaneously accept the premise that magnets are quite literally everywhere and that few people know how they work, a major problem with magnets today is that they tend to rely on so-called rare-earth elements. Although firmly in the top 5 of misnomers, these abundant elements are hard to mine and isolate, which means that finding alternatives to their use is much desired. Fortunately the field of high entropy alloys (HEAs) offers hope here, with [Beeson] and colleagues recently demonstrating a rare-earth-free material that could be used for magnets.

Although many materials can be magnetic, to make a good magnet you need the material in question to be both magnetically anisotropic and posses a clear easy axis. This basically means a material that has strong preferential magnetic directions, with the easy axis being the orientation which is the most energetically favorable.
Through experimental validation with magnetic coercion it was determined that of the tested boride films, the (FeCoNiMn)2B variant with a specific deposition order showed the strongest anisotropy. What is interesting in this study is how much the way that the elements are added and in which way determines the final properties of the boride, which is one of the reasons why HEAs are such a hot topic of research currently.
Of course, this is just an early proof-of-concept, but it shows the promise of HEAs when it comes to replacing other types of anisotropic materials, in particular where – as noted in the paper – normally rare-earths are added to gain the properties that these researchers achieved without these elements being required.
Solar Supercapacitor Lamp Probably Won’t Get You Saved At Sea

Most solar lights are cheap garbage that exist just to put more microplastics into the environment as they degrade in short order. [Jeremy Cook] built his own solar light, however, and this one might just last a little longer.
Most solar lights rely on the cheapest nickel-cadmium or nickel-metal hydride cells that are available on the market. They don’t tend to have a lot of capacity and they wear out incredibly fast. [Jeremy] went a different route for his build, though, instead relying on a rather tasty supercapacitor to store energy. Unlike a rechargeable battery, that may only last a few thousand cycles, these supercaps are expected to perform over 500,000 charge/discharge cycles without failure. With such longevity, [Jeremy] suggests his build could last a full 1369.8 years, assuming it charged and discharged once a day. Whether the plastic transistor, LEDs, or diode could hold up over such a long period is another question entirely.
Electronically, the build is relatively simple. The solar panel collects light energy and turns it into electricity, charging the supercaps through a diode. The supercaps are only able to discharge through a transistor, which only turns on when the voltage output by the solar panel drops at night time, and the voltage on the base becomes lower than that on the emitter. When current flows through the transistor, it then lights the LED in turn and the device glows in the darkness. As a nice touch, the whole circuit is installed in a glass jug of syrup originally sourced from Costco. Files are on Github for those eager to explore further.
Given the light-in-a-bottle construction, [Jeremy] also playfully imagined that a lamp like this could theoretically be used as a safety device. If lost at sea, you could charge it using the sun and try and use it to signal for help. However, upon casually exploring the concept, he notes that a small solar-powered light will only raise the chance of a far-off ocean rescue from “extremely unlikely” to “still very unlikely.”
You can do all kinds of neat things with free energy from the sun, from mowing your lawn to processing waste products. Video after the break.
youtube.com/embed/RGlVlMCu1PI?…
Handheld Steering Wheel Controller Gets Force-Feedback

For a full-fledged, bells-and-whistles driving simulator a number of unique human interface devices are needed, from pedals and shifters to the steering wheel. These steering wheels often have force feedback, with a small motor inside that can provide resistance to a user’s input that feels the same way that a steering wheel on a real car would. Inexpensive or small joysticks often omit this feature, but [Jason] has figured out a way to bring this to even the smallest game controllers.
The mechanism at the center of his controller is a DC motor out of an inkjet printer. Inkjet printers have a lot of these motors paired with rotary encoders for precision control, which is exactly what is needed here. A rotary encoder can determine the precise position of the controller’s wheel, and the motor can provide an appropriate resistive force depending on what is going on in the game. The motors out of a printer aren’t plug-and-play, though. They also need an H-bridge so they can get driven in either direction, and the entire mechanism is connected to an Arduino in the base of the controller to easily communicate with a computer over USB.
In testing the controller does behave like its larger, more expensive cousins, providing feedback to the driver and showing that it’s ready for one’s racing game of choice. It’s an excellent project for those who are space-constrained or who like to game on the go, but if you have more space available you might also want to check out [Jason]’s larger version built from a power drill instead parts from an inkjet.
youtube.com/embed/MwuTVCoU8YM?…
The Inner Workings of the Intel 8086’s Arithmetic Logic Unit

In the 1970s CPUs still had wildly different approaches to basic features, with the Intel 8086 being one of them. Whereas the 6502 used separate circuits for operations, and the Intel 8085 a clump of reconfigurable clump of gates, the 8086 uses microcode that configures the ALU along with two lookup tables. This complexity is one of the reasons why the Intel 8086 is so unique, with [Ken Shirriff] taking an in-depth look at its workings on a functional and die-level.

These lookup tables are used for the ALU configuration – as in the above schematic – making for a very flexible but also complex system, where the same microcode can be used by multiple instructions. This is effectively the very definition of a CISC-style processor, a legacy that the x86 ISA would carry with it even if the x86 CPUs today are internally more RISC-like. Decoding a single instruction and having it cascade into any of a variety of microcodes and control signals is very powerful, but comes with many trade-offs.
Of course, as semiconductor technology improved, along with design technologies, many of these trade-offs and disadvantages became less relevant. [Ken] also raises the interesting point that much of this ALU control technology is similar to that used in modern-day FPGAs, with their own reconfigurable logic using LUTs that allow for on-the-fly reconfiguration.
Did We Overestimate the Potential Harm from Microplastics?

Over the past years there have appeared in the media increasingly more alarming reports about micro- and nanoplastics (MNPs) and the harm that they are causing not only in the environment, but also inside our bodies. If some of the published studies were to be believed, then MNPs are everywhere inside our bodies, from our blood and reproductive organs to having deeply embedded themselves inside our brains with potentially catastrophic health implications.
Early last year we covered what we thought we knew about the harm from MNPs in our bodies, but since then more and more scientists have pushed back against these studies, calling them ‘flawed’ and questioning the used methodology and conclusions. Despite claims of health damage in mice, institutions like the German federal risk assessment institute also do not acknowledge evidence of harm to human health from MNPs.
All of which raises the question whether flawed studies have pushed us into our own Chicken Little moment, and whether it’s now time to breathe a sigh of relief that the sky isn’t falling after all.
Measuring Many Tiny Things
One of the problems with making statements about the amount of MNPs in the body pertains to the way that this is measured. Rather than sliding samples under a microscope and doing manual counting, the typical method involves a method like pyrolysis-gas chromatography-mass spectrometry (Py-GC-MS). For biological samples you first want to remove the organic components before pyrolysis, lest the subsequent mass spectrometry step produces false positives rather than an objective polymer analysis. with open door. (credit: Polimerek, Wikimedia)")
Py-GC-MS involves rapidly heating the sample in an inert atmosphere or vacuum. This cleaves large molecules into smaller fragments which can then be separated using a gas chromatography column and classified in combination with a mass spectrometer. With both results combined, the likely original materials in the sample can thus be deduced. This means that you are not literally counting MNP particles in the sample or measuring them, but quite literally vaporizing said sample and analyzing the debris cloud. Obviously this comes with some major asterisks.
A 2024 paper by Marthinus Brits et al. as published in Microplastics and Nanoplastics explored the use of Py-GC-MS for determining the amount of MNPs in human blood. Using whole blood samples they found mostly polyethylene (PE) polymer, with a mean of 268 ng/mL of MNPs across all 68 samples, with a call to investigate the health impact of this finding.
In response to this paper a correspondence by Bianca Wilhelmus et al. was submitted to the journal, in which one of the complaints was a lack of detail on the Py-GC-MS fingerprints using which the polymers were purportedly detected. It was also noted that with sub-micrometer MNP particles you’d need millions of them in a sample to really register, which is far above what had typically been found in human body fluids.
To this Brits et al. replied with among other things the admission that the quantitative analysis of MNPs using Py-GC-MS is still in early stages of development. To the issue of quantity it was noted that most of the MNPs are significantly larger than a micrometer, so they were still fairly confident of their findings.
It’s important to note more recent studies here, such as the 2025 study by Cassandra Rauert et al. in Environmental Science & Technology, in which also a study on using Py-GC-MS for detecting MNPs in blood was performed. Its conclusion was that this detection method has trouble detecting PE and PVC polymers, and the estimated exposure concentrations are testing the detection limits of this technique.
Contamination
One of the problems with trying to measure MNPs in a sample is that of environmental MNP contamination, as MNPs are being shed and distributed all around us, whether it’s from e.g. polyester clothing, plastic surfaces and tools, or carried in from outside. This makes it a real chore to make sure that in a laboratory setting such contamination does not ruin the findings, as with a recent study on MNPs in bottled water by Qian et al. in PNAS.

Rather than Py-GC-MS, this used stimulated Raman scattering, but also led to accusations of contamination due to improper procedures, with the finding that the ultra-pure filtered Milli-Q water that was used for a blank (i.e. control) contained as many MNPs as the bottled water. This and other issues were suggested as invalidating the findings. While Qian et al. acknowledged that using the Milli-Q water as a blank was resultingly improper, they disagreed with the premise that this invalidated the study’s findings.
Another type of contamination can come from the aforementioned biological tissue, such as in the early 2025 study on MNPs in the human brain and other organs by Nihart et al. as published in Nature Medicine. This analyzed tissue samples from human cadavers using, among other methods, Py-GC-MS, leading them to conclude that especially our brains are full of PE polymers, with major implications for Alzheimer’s and dementia research, for instance.
This assessment subsequently got challenged (full article) by Monikh et al. in a November 2025 published commentary, with the authors noting that Nihart et al.’s samples from the human liver, kidney and brain all have in common that they contain significant amounts of fatty tissue (lipids), which when subjected to pyrolysis produce fragments that are easily mistaken for PE polymer fragments.
When it comes to detecting polymers in such biological samples, it is absolutely essential to strip away the biological material, without affecting the sample that will ultimately be analyzed. In this case the processing method appears to have been flawed, leading to subsequent contamination. This was acknowledged by the team, in a reply by some of the study authors.
Empirical Correlation
Although it seems like we can at least conclude that our brains aren’t overflowing with PE polymer fragments, but that they are just filled with phospholipids in particular, this doesn’t necessarily take away all our concerns. After all, didn’t some studies find real, empirical evidence for MNPs causing actual damage? Especially since it seems harmful in mice, according to a 2025 study using starch-based plastics.
As highlighted by Baroni et al. in a September 2025 review paper on MNPs in the brain as published in Nanomaterials, the enduring problem that we are dealing with right now is one of a lack of information, a scarcity of standard detection methods and a total lack of longitudinal studies in humans.
Although we have health databases that span decades in countries with strong public healthcare systems, trying to figure out whether certain health trends are due to MNPs using their data is borderline lunacy, as you cannot realistically account for all confounding factors. Thus we are mostly stuck at this point trying to figure out how to actually effectively measure the presence of MNPs.
Methodology
The aforementioned Py-GC-MS and SRS methods are two tools available to us here, but clearly moving from measuring MNPs in water to measuring them in biological tissues is still a challenging topic. When we look at the established science of MNPs in water, we got a range of options, as illustrated by this application note by ThermoFisher Scientific:
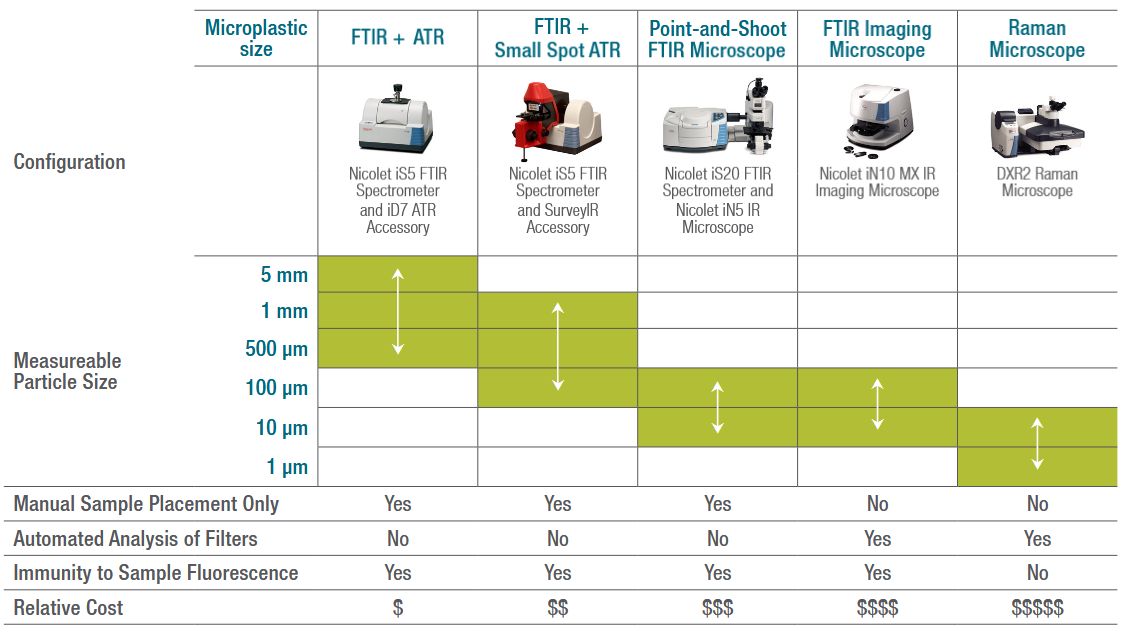
In order to measure not just the relatively large microplastic particles, but also the much smaller nanoplastics which are more likely to interact with biological systems, you are pretty limited here already. With only Raman spectroscopes applicable for such fine analysis, it’s little wonder that Py-GC-MS is being applied to biological samples.
Maybe once we have figured out the right methodology for Py-GC-MS and potentially other approaches will we be able to tell with some certainty how many of these polymer fragments are in our bodies right now, and how much of it will simply pass through rather than take up permanent residence. On the bright side, there’s no clear epidemiological evidence of MNPs being actively harmful to us, yet.
Although the sky hasn’t been confirmed to be falling, it is still looking somewhat unsteady. For that reason alone it is probably in our own best interest to use the precautionary principle here, as it’s better to have begun today to find ways to reduce and prevent the spread of MNPs, rather than to regret not having done so tomorrow.
An E-Ink Macropad For Improved Productivity

Why press many button when few button do trick? That was the thinking of [Bike Cook Robots] when it came time to revamp his desk. To that end, he whipped up a tidy macropad to make daily computing tasks easier.
The build is based around an Adafruit RP2040 Feather ThinkInk devboard, chosen because it plugs straight into a readily-available 4.2 inch e-ink. The display is tasked with showing icons that correspond to the macro assignments for the 3 x 4 array of mechanical keyboard switches. Everything is wrapped up in a 3D printed frame, with an bracket to mount it to the monitor arms on the desk. The macropad is set up to talk to a custom Python app that runs on the host machine, which handles triggering actions and can also talk back to the pad itself.
The combination of e-ink display and button pad is a great way to display the function of each key without excess complexity. We’ve seen some other great builds in this space before, too.
youtube.com/embed/PbdwmN28-So?…
Supply chain attack on eScan antivirus: detecting and remediating malicious updates

On January 20, a supply chain attack has occurred, with the infected software being the eScan antivirus developed by an Indian company MicroWorld Technologies. The previously unknown malware was distributed through the eScan update server. The same day, our security solutions detected and prevented cyberattacks involving this malware. On January 21, having been informed by Morphisec, the developers of eScan contained the security incident related to the attack.
Malicious software used in the attack
Users of the eScan security product received a malicious Reload.exe file, which initiated a multi-stage infection chain. According to colleagues at Morphisec who were the first to investigate the attack, Reload.exe prevented further antivirus product updates by modifying the HOSTS file, thereby blocking the ability of security solution developers to automatically fix the problem, which, among other things, led to the update service error.
The malware also ensured its persistence in the system, communicated with control servers, and downloaded additional malicious payloads. Persistence was achieved by creating scheduled tasks; one example of such a malicious task is named CorelDefrag. Additionally, the consctlx.exe malicious file was written to the disk during the infection.
How the attackers managed to pull off this attack
At the request of the BleepingComputer information portal, eScan developers explained that the attackers managed to gain access to one of the regional update servers and deploy a malicious file, which was automatically delivered to customers. They emphasize that this is not a vulnerability — the incident is classified as unauthorized access to infrastructure. The malicious file was distributed with a fake invalid digital signature.
According to the developers, the infrastructure affected by the incident was quickly isolated, and all access credentials were reset.
How to stay safe?
To detect infection, it is recommended to review scheduled tasks for traces of malware, check the %WinDir%\System32\drivers\etc\hosts file for blocked eScan domains, and review the eScan update logs for January 20.
The developers of eScan have created a utility for their users that removes the malware, rolls back the modifications it has made, and restores the normal functionality of the antivirus. The utility is sent to customers upon request to technical support.
Users of the solution are also advised to block known malware control server addresses.
Kaspersky’s security solutions, such as Kaspersky Next, successfully detect all malware used by attackers with its Behavior Detection component.
Indicators of compromise
Several malicious domain names and links were listed in the Morphisec blog:
- vhs.delrosal[.]net/i
- tumama.hns[.]to
- blackice.sol-domain[.]org
- https://codegiant[.]io/dd/dd/dd.git/download/main/middleware.ts
Our experts have discovered additional network IoCs related to this attack:
Right now we are analyzing the malware used in this incident, and will post more details as soon as possible.
Ask Hackaday: How Do You Digitize Your Documents?

Like many of you, I have a hard time getting rid of stuff. I’ve got boxes and boxes of weirdo bits and bobs, and piles of devices that I’ll eventually get around to stripping down into even more bits and bobs. Despite regular purges — I try to bring a car-load of crap treasure to local hackerspaces and meetups at least a couple times a year — the pile only continues to grow.
But the problem isn’t limited to hardware components. There’s all sorts of things that the logical part of me understands I’ll almost certainly never need, and yet I can’t bring myself to dispose of. One of those things just so happens to be documents. Anything printed is fair game. Could be the notes from my last appointment with the doctor, or fliers for events I attended years ago. Doesn’t matter, the stacks keep building up until I end up cramming it all into a box and start the whole process starts over again.
I’ve largely convinced myself that the perennial accumulation of electronic bric-à-brac is an occupational hazard, and have come to terms with it. But I think there’s a good chance of moving the needle on the document situation, and if that involves a bit of high-tech overengineering, even better. As such, I’ve spent the last couple of weeks investigating digitizing the documents that have information worth retaining so that the originals can be sent along to Valhalla in my fire pit.
The following represents some of my observations thus far, in the hopes that others going down a similar path may find them useful. But what I’m really interested in is hearing from the Hackaday community. Surely I’m not the only one trying to save some storage space by turn piles of papers into ones and zeros.
Take a Picture, It’ll Last Longer

If you’ve got a decent camera, you can get a couple of lights and put together a nice overhead photography rig without spending too much money. Put your document down under the camera, snap a picture, and keep it moving.
Imaging doesn’t get any faster than taking a picture, and so long as you’re not using some point and shoot from the early 2000s, the resolution should be more than sufficient. This method is particularly appealing if you’re planning on digitizing books or anything else that can’t be laid perfectly flat on a scanner.
The major downside with this approach is the setup itself. It’s one thing if you’re digitizing documents and books on a daily basis, but for occasional use, putting something like this together is a big ask. A flatbed scanner certainly takes up a lot less room, and you don’t have to worry about getting the lighting right, mounting the camera, and so on.
Casting Some Magick
Whether you used a scanner or a camera, once you have the image of your document, you’ve technically digitized it. Congratulations, you’re now an amateur archivist.
If you’re looking to keep things simple, you could stop here. Stash the files someplace and be done with it. But depending on the type of content you’re working with and what your goals are, there’s a good chance you’ll want to touch up the images a bit. Luckily for us, the incredible ImageMagick project has many of the functions we need built-in, from cropping and resizing, all the way to image enhancement.
Consider the image below. It’s clear enough to read, but the text is rotated and the lighting isn’t consistent across the entire page.

We can fix both issues with a simple ImageMagick command via the convert tool:
convert input.png -deskew 30% -threshold 25% output.png
We won’t get too bogged down in the details, the ImageMagick documentation can break it all down better than I can. The short version is that we’re telling it to straighten out the image and convert it into pure black and white. The result looks like this:

The values can be tweaked a bit to refine the result, and as you might imagine there are many other ImageMagick functions that could potentially be brought in to clean up the result. Things do get more complicated if you’re working with something more complex than plain text, but you get the general idea.
This sort of post-processing is especially important if you plan on running the images through any sort of optical character recognition (OCR) to capture the actual text of the document. That first image might be perfectly legible to our human eyeballs. You might even prefer it over the stark look of the processed image, but tools like tesseract have a hell of a time picking the text out when the background isn’t uniform.
There’s an App For That

The Google Drive mobile application offers a very impressive document scanning mode that essentially automates everything above. If you give it access to your device’s camera, it will automagically detect documents in the field of view, find their edges, compensate for angle and rotation to straighten out the image, and even run it through filters to make the text pop. It’s fast, works reasonably well, and is exceptionally handy for cranking out multi-page PDFs.
The downside is that you’ve got relatively little control over the process, and being a product of Google, there’s the usual concerns over what they may be doing with the information that’s passing through the system. For these reasons it’s not something I would personally recommend for any private information, and its automatic nature the lack of fine-grained control means it may not be a great choice if your needs venture too far from the beaten path.
Still, the speed and ease of use it offers is admittedly very attractive.
Open to Suggestions
I’d love to hear the community’s thoughts on digitization, whether it’s hardware or software related. There’s surely some slick projects out there that aid in creating bespoke digital libraries, and there’s plenty of areas where real-world experience can help streamline and improve the overall process. For example, what’s your file naming convention look like?
Hackaday readers are rarely shy about sharing their opinions, so let’s hear them.
L’estasi dell’ignoranza. La tradizione occidentale della non conoscenza
Perché un lettore crede a racconti palesemente falsi? Vuole evitare notizie scomode? Come fanno i fedeli religiosi a credere nella scienza e contemporaneamente affidarsi al mito? Si tratta di scelte razionali, strategie collettive oppure difesa privata e personale di un nucleo emotivo che altrimenti finirebbe in pezzi? Sono queste le domande che affiorano, con risposta annessa, nel libro del politologo Mark Lilla che per Luiss University Press ha pubblicato «L’estasi dell’ignoranza. La tradizione occidentale della non conoscenza».
A dispetto della moderna logica mediatica che obbliga tutti alla trasparenza, alla conoscenza, alla condivisione di informazioni e intimità sui social, Mark Lilla elabora una ricostruzione storica e filosofica del volto contrario di questa modernità, cioè dell’ignoranza intesa come volontà di non sapere. Strategia adattativa piuttosto che euristica vitale, l’ignoranza descritta da Lilla viene dissezionata nei miti antichi, come quello di Edipo, che non voleva sapere di essere giaciuto con la madre; passa per le Confessioni di Sant’Agostino che dubita della sua fede; arriva da Nietzsche il pazzo fino a Freud e alla sua teoria della rimozione, per ricostruire i tabù della verità, la delusione della curiosità quando si osa strappare il velo di Iside, fino alle cedevoli illusioni di innocenza personale, colte nelle loro forme quotidiane e talvolta penose.
La fuga dalla realtà è la chiave di questo viaggio intellettuale nella volontà di ignoranza. Certo, sull’ignoranza e sull’errore molto è stato detto, da Gianrico Carofiglio in Elogio dell’ignoranza e dell’errore, a Umberto Galimberti con Le contraddizioni della Verità e l’attitudine tutta binaria a pensare semplice senza troppo complicarsi la vita, come pure in L’età dell’ignoranza di Fabrizio Tonello, ma questo testo si misura sulla volontà di non conoscere quale strategia di sopravvivenza intima, nascosta e personale, per rendere la vita odierna più accettabile. Una scelta che è alla base di questioni tremendamente attuali, dagli effetti della disinformazione al cospirazionismo politico, dal pensiero magico alle semplificazioni scientifiche. In fondo, in fondo, il trionfo dell’ignorante è l’estasi del potere.

These Ultra-Cute, Handsfree Walkie-Talkies Are Built For Cycling

Walkie-talkies are great fun, and [RealCorebb]’s bbTalkie project takes the concept a step further by adding some extremely cool features to make a highly refined, self-contained ESP32-based communicator. bbTalkie completely does away with a push-to-talk button by implementing robust voice detection that works reliably even in noisy environments. It was all designed with cycling in mind, so hands-free operation that stands up to noise is a big plus.
The core of communication is done over ESP-NOW, which is Espressif’s own protocol for direct device-to-device broadcasting. This removes the need to involve any sort of external service like SIM cards or internet access to transmit voice. Performance is best with an external antenna, naturally, but ESP-NOW doesn’t actually require anything other than the existing on-board hardware.
We’ve seen ESP-NOW used to make digital walkie-talkies before, but bbTalkie is a really evolved take on the concept, not least of which due to its hands-free operation.
Because volume-based automatic triggers are highly susceptible to noise, voice detection is done with the help of VADNet, a neural network-based model implemented locally on the device. This system can reliably detect human speech, even in noisy environments. This lets bbTalkie switch between transmit and listen modes automatically and hands-free, without false triggers.
Even when doing all that, there’s still spare capability to play with. Further to the goal of making bbTalkie useful for cyclists in a group, [RealCorebb] added a system that can recognize specific voice commands (like “turn left” for example, or “wait for me!”) which trigger synchronized animations to play on the displays of all connected units. There’s even some experimental support for controlling a camera over Bluetooth, though currently it only supports hardware from Sony.
Watch a tour of it in the video below (Chinese language, English captions available). The OLED screens and animations are adorable, and are great visual feedback of what the unit is doing at any given moment.
youtube.com/embed/v0QcsWsoYbw?…
Buildling A Light That Reacts To Radio Waves

When it comes to electromagnetic waves, humans can really only directly perceive a very small part of the overall spectrum, which we call “visible light.” [rootkid] recently built an art piece that has perception far outside this range, turning invisible waves into a visible light sculpture.
The core of the device is the HackRF One. It’s a software defined radio (SDR) which can tune signals over a wide range, from 10 MHz all the way up to 6 GHz. [rootkid] decided to use the HackRF to listen in on transmissions on the 2.4 GHz and 5 GHz bands. This frequency range was chosen as this is where a lot of devices in the home tend to communicate—whether over WiFi, Bluetooth, or various other short-range radio standards.
The SDR is hooked up to a Raspberry Pi Zero, which is responsible for parsing the radio data and using it to drive the light show. As for the lights themselves, they consist of 64 filament LEDs bent into U-shapes over a custom machined metal backing plate. They’re controlled over I2C with custom driver PCBs designed by [rootkid]. The result is something that looks like a prop from some high-budget Hollywood sci-fi. It looks even better when the radio waves are popping and the lights are in action.
It’s easy to forget about the rich soup of radio waves that we swim through every day.
youtube.com/embed/moBCOEiqiPs?…