 - Collegamento all'originale")
4-bit Single Board Computer Based on the Intel 4004 Microprocessor

[Scott Baker] is at it again and this time he has built a 4-bit single board computer based on the Intel 4004 microprocessor.
In the board design [Scott] covers the CPU (both the Intel 4004 and 4040 are supported), and its support chips: the 4201A clock-generator, its crystal, and the 4289 Standard Memory Interface. The 4289 irons out the 4-bit interface for use with 8-bit ROMs. Included is a ATF22V10 PLD for miscellaneous logic, a 74HCT138 for chip-select, and a bunch of inverters for TTL compatibility (the 4004 itself uses 15 V logic with +5 V Vss and -10 V Vdd).
[Scott] goes on to discuss the power supply, ROM and page mapper, the serial interface, the RC2014 bus interface, RAM, and the multimodule interface. Then comes the implementation, a very tidy custom PCB populated with a bunch of integrated circuits, some passive components, a handful of LEDs, and a few I/O ports. [Scott] credits Jim Loo’s Intel 4004 SBC project as the genesis of his own build.
If you’re interested in seeing this board put to work check out the video embedded below. If you’d like to know more about the 4004 be sure to check out Supersize Your Intel 4004 By Over 10 Times, The 4004 Upgrade You’ve Been Waiting For, and Calculating Pi On The 4004 CPU, Intel’s First Microprocessor.
youtube.com/embed/ylq7cijFTRA?…

FreeCAD Foray: Good Practices

Last time, we built a case for a PCB that handles 100 W of USB-C power, an old project that I’ve long been aiming to revive. It went well, and I’d like to believe you that the article will give you a much-needed easy-to-grasp FreeCAD introduction, Matrix knowledge upload style, having you designing stuff in no time.
Apart from my firm belief in the power of open-source software, I also do believe in social responsibilities, and I think I have a responsibility to teach you some decent FreeCAD design practices I’ve learned along the way. Some of them are going to protect your behind from mistakes, and some of them will do that while also making your project way easier to work with, for you and others.
You might not think the last part about “others” matters, but for a start, it matters in the ideal world that we’re collectively striving towards, and also, let’s be real, things like documentation are half intended for external contributors, half for you a year later. So, here’s the first FreeCAD tip that will unquestionably protect you while helping whoever else might work with the model later.
Okay, we’re all hackers, so I’ll start with zero-th FreeCAD tip – press Ctrl+S often. That’ll help a ton. Thankfully, FreeCAD’s autorecovery system has made big leaps, and it’s pretty great in case FreeCAD does crash, but the less you have to recover, the better. Now, onto the first tip.
Name Your Bodies, Always
The button is F2. That’s it. Click on your models in the tree view and give them a name. Do it for all extrudes, cuts, and even fillets/chamfers. You don’t have to do it for sketches, since those are always contained within an extrusion. If at all possible, do it immediately, make it a habit.
Why? Because names make it clear what the extrusion/cut/fillet is for, and you’ll be thankful for it multiple times over when modifying your model or even just looking at it the next morning. Also, it makes it way easier to avoid accidentally sending the wrong 3D model to your printer.
How to make naming easier? I’ve figured out an easy and apt naming scheme, that you’ve seen in action in the previous article. For Fusions, I do “primary object +addition” or “with addition”, mentioning just the last addition. So, “Bottom case +cutouts” is a cut that contains “Bottom case +logo” and “Cutouts”, “Bottom case +logo” is a cut that contains “Bottom case” and “Logo”, and “Bottom case” contains “Bottom floor” and “Bottom walls”.
It’s not a perfect scheme, but it avoids verbosity and you have to barely think of the names. Don’t shy away from using words like “pip” and “doohickey” if the word just doesn’t come to your mind at the moment – you’re choosing between a project that’s vaguely endearing and one that’s incomprehensible, so the choice is obvious. Naming your models lets you avoid them becoming arcane magic, which might sound fun at a glance until you realize there’s already an object of arcane magic in your house, it’s called a “3D printer”, and you’ve had enough arcane magic in your life.
Last but not least, to hack something is know learn its true name, and whatever your feature is, there’s no truth in “Cut034”. By the way, about FreeCAD and many CAD packages before it, they’ve been having a problem with true names, actually, it’s a whole thing called Topological Naming Problem.
Naming Is Hard, Topology Is Harder
How do you know where a feature really is? For instance, you take a cube, and you cut two slots into the same side. How does the CAD package ensure that the slots are on the same side? One of the most popular options for it is topological naming. So, a cube gets its faces named Face1 through Face6, and as you slowly turn that cube into, say, a Minecraft-style hand showing a middle finger, each sketch remembers the name of the side you wanted it attached to.
Now, imagine the middle finger hand requires a hole inside of it, and it has to be done at from very start, which means you might need to go back to the base cube and add that hole. All of a sudden, there will be four new faces to the internal cube that holds the finger sketches, and these new faces will need names, too. Best case, they’ll be named Face7 through Face10 – but that’s a best case and the CAD engine needs to ensure to always implement it properly, whereas real world models aren’t as welcoming. Worst case, the faces will be renumbered anew, the sketch-to-face mapping will change which faces get which names, and the model of the hand will turn into a spider. Spooky!
It’s not Halloween just yet, and most regretfully, people don’t tend to appreciate spiders in unexpected places. Even more sadly, this retrospective renaming typically just results in your sketches breaking in a “red exclamation mark” way, since it’s not just sketch-to-face mappings that get names, it’s also all the little bits of external geometry that you’ll definitely invoke if you want to avoid suffering. Every line in your sketch has an invisible name and a number, and external geometry lines will store – otherwise, they couldn’t get updated when you change the base model under their feet, as one inevitably does.
This used to be a big problem with FreeCAD, and it still kind of is, but it’s by no means exclusive to FreeCAD. Hell, I remember dealing with something similar back when my CAD (computer-aided despair) suite of choice was SolidWorks. It’s not an easy problem to solve, because of the innumerable ways you can create and then modify a 3D object; every time you think you’ll have figured out a solution to the horrors, your users will come up with new and more intricate horrors beyond your comprehension.
FreeCAD v1.0 has clamped down on a large amount of topological naming errors. They still exist; one simple way I can trigger it is to make a cutout in a cube, make a sketch that external-geometry-exports the cut-in-half outwards-facing line of the cube, and then go back and delete the cutout. It makes sense that it happens, but oh do I wish it didn’t, and it makes for unfun sketch fixing sessions.
How To Stay Well Away
Now, I’m no stranger to problems caused by name changes, and I’m eager to share some of what I’ve learned dealing with FreeCAD’s names in particular.
The first solution concerns cutouts, as they specifically might become the bane of your model. If you have a ton of features planned, just delay doing the cutouts up until you’ve done all the basics of the case that you might ever want to rely on. Cutouts might and often will change, and if your board changes connector or button positions, you want to be able to remake them without ever touching the rest of the sketch. So, build up most of your model, and closer to the end, do the case cutouts, so that external geometry can rely on walls and sides that will never change.
Next, minimize the number of models you’re dealing with, so that you have less places where external geometry has to be involved. If you need to make a block with a hole all the way through, do it in one sketch instead of doing two extrudes and a cut. You’ll thank yourself, both because you’ll have less opportunity for topo naming errors, but also because you have fewer model names to think up.
The third thing is what I call the cockroach rule. If you see a cockroach in your house, you back off slowly, set the house on fire, and then you get yourself a different house, making sure you don’t bring the cockroach into the new house while at it. Same can apply here – if you remove a feature in the base model and you see the entire tree view light up with red exclamation marks, click “Close” on the document, press “Discard changes”, open the document again, and do whatever you wanted to do but in a different way.
Why reload? Because Ctrl+Z does not always help with such problems, as much as it’s supposed to. This does require that you follow the 0th rule – press Ctrl+S often, and it also requires that you don’t press Ctrl+S right after making those changes, so, change-verify-enter. Thankfully, FreeCAD will unroll objects in the model tree when one of the inner object starts to, so just look over the model tree after doing changes deep inside the model, and you’ll be fine. This is also where keeping your models in a Git repo is super helpful – that way, you can always have known-good model states to go back to.
Good Habits Create Good Models
So, to recap. Save often, give your models names, understand topo naming, create cutouts last if at all possible, keep your models simple, and when all fails, nuke it from orbit and let your good habits cushion the fall. Simple enough.
I’ll be on the lookout for further tips for you all, as I’ve got a fair few complex models going on, and the more I work with them, the more I learn. Until then, I hope you can greatly benefit from these tips, and may your models behave well through your diligent treatment.
Una RCE in Apple CarPlay consente l’accesso root ai sistemi di infotainment dei veicoli
Alla conferenza di sicurezza DefCon, è stata presentata una rilevante catena di exploit da parte dei ricercatori, la quale permette a malintenzionati di acquisire l’autorizzazione di amministratore ai sistemi di intrattenimento dei veicoli attraverso Apple CarPlay.
L’attacco noto come “Pwn My Ride” prende di mira una serie di vulnerabilità presenti nei protocolli che governano il funzionamento del CarPlay wireless. Queste vulnerabilità possono essere sfruttate per eseguire codice remoto (RCE) sull’unità multimediale del veicolo, mettendo a rischio la sicurezza del sistema.
L’attacco, nella sua natura, consiste in una sequenza di debolezze insite nei protocolli che regolano il CarPlay wireless. Ciò consente l’esecuzione remota di codice sull’unità multimediale del veicolo, permettendo potenzialmente agli aggressori di assumere il controllo del sistema.
Al centro di questo exploit c’è CVE-2025-24132, un grave stack buffer overflow all’interno dell’SDK del protocollo AirPlay. Gli studiosi di Oligo Security hanno spiegato in dettaglio come questa falla possa attivarsi quando un intruso si infiltra nella rete Wi-Fi del veicolo.

La vulnerabilità colpisce un ampio spettro di dispositivi che utilizzano versioni di AirPlay Audio SDK precedenti alla 2.7.1, versioni di AirPlay Video SDK precedenti alla 3.6.0.126, nonché versioni specifiche del plug-in di comunicazione CarPlay.
Sfruttando questo stack buffer overflow, un aggressore può eseguire codice arbitrario con privilegi elevati, prendendo di fatto il controllo del sistema di infotainment. L’attacco inizia prendendo di mira la fase iniziale di connessione wireless di CarPlay, che si basa su due protocolli fondamentali: iAP2 (iPod Accessory Protocol) tramite Bluetooth e AirPlay tramite Wi-Fi.
I ricercatori hanno scoperto una falla fondamentale nel processo di autenticazione iAP2. Sebbene il protocollo imponga che l’auto autentichi il telefono, trascura l’autenticazione reciproca, consentendo al telefono di non essere verificato dal veicolo. Questa autenticazione unilaterale consente al dispositivo di un hacker di mascherarsi da iPhone legittimo.
Successivamente, l’intruso può effettuare l’associazione con il Bluetooth del veicolo, spesso senza un codice PIN a causa della prevalenza della modalità di associazione non sicura “Just Works” su molti sistemi. Una volta effettuato l’accoppiamento, l’hacker sfrutta la vulnerabilità iAP2 inviando un RequestAccessoryWiFiConfigurationInformationcomando, ingannando di fatto il sistema e inducendolo a rivelare l’SSID e la password Wi-Fi del veicolo.
Con le credenziali Wi-Fi in mano, l’aggressore ottiene l’accesso alla rete del veicolo e attiva CVE-2025-24132 per proteggere l’accesso root. L’intero processo può essere eseguito come un attacco senza clic su numerosi veicoli, senza richiedere alcuna interazione da parte del conducente.
Sebbene Apple abbia rilasciato una patch per l’SDK AirPlay vulnerabile nell’aprile 2025, i ricercatori hanno notato che, secondo il loro ultimo rapporto, nessun produttore automobilistico aveva implementato la correzione, secondo Oligo Security.
A differenza degli smartphone, che beneficiano di regolari aggiornamenti over-the-air (OTA), i cicli di aggiornamento del software dei veicoli sono notoriamente lunghi e frammentati.
L'articolo Una RCE in Apple CarPlay consente l’accesso root ai sistemi di infotainment dei veicoli proviene da il blog della sicurezza informatica.
Old Phone Upcycled Into Pico Projector, ASMR

To update an old saying for the modern day, one man’s e-waste is another man’s bill of materials. Upcycling has always been in the hacker’s toolkit, and cellphones provide a wealth of resources for those bold enough to seize them. [Huy Vector] was bold enough, and transformed an old smartphone into a portable pico projector and an ASMR-style video. That’s what we call efficiency!
Kidding aside, the speech-free video embedded below absolutely gives enough info to copy along with [Huy Vector] even though he doesn’t say a word the whole time. You’ll need deft hands and a phone you really don’t care about, because one of the early steps is pulling the LCD apart to remove the back layers to shine an LED through. You’ll absolutely need an old phone for that, since that trick doesn’t apply to the OLED displays that most flagships have been rocking the past few years.

The projected image looks surprisingly good considering the only optics in this thing are the LCD and the lens from a 5x magnifying glass from AliExpress. The foam board case, too, ends up looking surprisingly good once the textured vinyl wrap is applied. That’s a quick and easy way to get a nice looking prototype, if you don’t particularly need durability.
It’s not the brightest screen you can build, nor the highest resolution projector we’ve seen– but it might just be the easiest such build we’ve featured. As long as you handle the tricky LCD disassembly step, this is absolutely something we could see doing with children, which isn’t always the case on Hackaday.
youtube.com/embed/hx1keLrcFGw?…
Un bug in Google Drive consente l’accesso ai file di altre persone su desktop condivisi
Milioni di persone e aziende si affidano a Google Drive per archiviare contratti, report, foto e documenti di lavoro, utilizzando il client desktop di Windows per sincronizzare i file tra cartelle locali e cloud. Ma è stata proprio questa applicazione a rivelarsi vulnerabile: è stato scoperto un grave bug che consente a chiunque, su un computer condiviso, di ottenere l’accesso completo ai contenuti dell’account Google Drive di qualcun altro senza dover richiedere una nuova autorizzazione.
I ricercatori hanno scoperto che il programma salva copie dei dati sincronizzati in una cartella DriveFS nascosta all’interno del profilo di Windows. Questa directory dovrebbe essere accessibile solo al proprietario, ma l’applicazione non verifica i diritti di accesso quando si connette alla cache. È sufficiente copiare il contenuto della cartella DriveFS di un altro utente sul proprio profilo, dopodiché il client caricherà i dati di qualcun altro come se fossero propri. All’avvio, Google Drive Desktop percepisce la cache trasferita come legittima, aggirando i controlli di autenticazione e consentendo l’accesso ai file personali e aziendali.
Un test pratico ha dimostrato che su Windows 10 e 11 con versione client 112.0.3.0 la procedura è elementare: l’aggressore accede a Google Drive con il proprio account, chiude l’applicazione, copia la directory DriveFS della vittima (C:/Users/[vittima]/AppData/Local/Google/DriveFS/[ID]) nella propria directory (C:/Users/[attaccante]/AppData/Local/Google/DriveFS/[ID]) e riavvia il programma. Di conseguenza, ottiene pieno accesso all’unità principale della vittima, nonché a tutte le unità condivise, senza password o notifiche.
Codici sorgente, bilanci finanziari, foto personali e qualsiasi altro documento sono in formato aperto.
Questo meccanismo viola i principi fondamentali di Zero Trust, che richiedono la verifica obbligatoria dell’identità a ogni accesso, e compromette anche la protezione associata alla crittografia dei dati. I file nella cache vengono archiviati in chiaro e possono essere utilizzati da chiunque abbia accesso al sistema. Ciò è in contrasto con gli standard e le normative NIST, ISO 27001, GDPR e HIPAA, che prevedono un rigoroso isolamento e una verifica periodica delle credenziali.

Fino al rilascio di una correzione, si consiglia alle organizzazioni di interrompere l’utilizzo di Google Drive Desktop su computer con più utenti. Le misure temporanee includono la cancellazione della cache quando si cambia account, l’utilizzo di profili Windows separati con diritti di accesso rigorosi e la limitazione dell’esecuzione del client solo su dispositivi attendibili. Per risolvere definitivamente il problema, Google dovrebbe implementare la crittografia individuale dei dati memorizzati nella cache, un nuovo accesso obbligatorio quando si monta una cartella e autorizzazioni rigorose a livello di file system.
Dato che una percentuale significativa di perdite è causata da personale interno, affidarsi a una cache non protetta diventa una minaccia diretta. Finché l’azienda non colma questa lacuna, utenti e reparti IT corrono il rischio di accesso non autorizzato ai dati più critici .
L'articolo Un bug in Google Drive consente l’accesso ai file di altre persone su desktop condivisi proviene da il blog della sicurezza informatica.
Comune di Canegrate: presunta violazione e vendita di database e accessi
Nella giornata di ieri, su un noto forum underground frequentato da cyber criminali, è apparso un post che riguarda direttamente il Comune di Canegrate (Milano, Italia).
L’annuncio è stato pubblicato da un utente con nickname “krek1i”, attivo dal mese di aprile 2025 e con una reputazione di 81 punti, indice di una certa affidabilità all’interno della community underground. Lo stesso utente vanta decine di post e thread aperti, fattori che lo rendono un profilo consolidato nell’ambiente.
Disclaimer: Questo rapporto include screenshot e/o testo tratti da fonti pubblicamente accessibili. Le informazioni fornite hanno esclusivamente finalità di intelligence sulle minacce e di sensibilizzazione sui rischi di cybersecurity. Red Hot Cyber condanna qualsiasi accesso non autorizzato, diffusione impropria o utilizzo illecito di tali dati. Al momento, non è possibile verificare in modo indipendente l’autenticità delle informazioni riportate, poiché l’organizzazione coinvolta non ha ancora rilasciato un comunicato ufficiale sul proprio sito web. Di conseguenza, questo articolo deve essere considerato esclusivamente a scopo informativo e di intelligence.
Nel messaggio, il criminale informatico sostiene di essere in possesso di un database e degli accessi ai sistemi del Comune di Canegrate, offrendo il tutto in vendita per la cifra di 500 dollari.

A corredo dell’annuncio sono stati pubblicati alcuni sample per dimostrare l’autenticità del materiale. Dall’analisi di tali sample emergono i seguenti elementi potenzialmente sensibili:
- dati personali di cittadini e utenti;
- account e password associati ai sistemi compromessi;
- schemi di database con numerose tabelle, a conferma di un’ampia quantità di informazioni potenzialmente esfiltrate.
Al momento, sul sito ufficiale del Comune di Canegrate non sono presenti comunicazioni in merito alla presunta violazione. Non si hanno quindi conferme ufficiali su quanto dichiarato dal criminale informatico.

Se confermata, la compromissione rappresenterebbe un grave incidente di sicurezza informatica ai danni di un ente pubblico locale, con possibili ripercussioni sulla protezione dei dati personali dei cittadini.
Come nostra consuetudine, lasciamo sempre spazio ad una dichiarazione dell’organizzazione qualora voglia darci degli aggiornamenti su questa vicenda e saremo lieti di pubblicarla con uno specifico articolo dando risalto alla questione.
RHC monitorerà l’evoluzione della vicenda in modo da pubblicare ulteriori news sul blog, qualora ci fossero novità sostanziali. Qualora ci siano persone informate sui fatti che volessero fornire informazioni in modo anonimo possono accedere utilizzare la mail crittografata del whistleblower.
L'articolo Comune di Canegrate: presunta violazione e vendita di database e accessi proviene da il blog della sicurezza informatica.
Debugging vs Printing

We’ll admit it. We have access to great debugging tools and, yes, sometimes they are invaluable. But most of the time, we’ll just throw a few print statements in whatever program we’re running to better understand what’s going on inside of it. [Loop Invariant] wants to point out to us that there are things a proper debugger can do that you can’t do with print statements.
So what are these magical things? Well, some of them depend on the debugger, of course. But, in general, debuggers will catch exceptions when they occur. That can be a big help, especially if you have a lot of them and don’t want to write print statements on every one. Semi-related is the fact that when a debugger stops for an exception or even a breakpoint, you can walk the call stack to see the flow of code before you got there.
In fact, some debuggers can back step, although not all of them do that. Another advantage is that you can evaluate expressions on the fly. Even better, you should be able to alter program flow, jumping over some code, for example.
So we get it. There is more to debugging than just crude print statements. Then again, there are plenty of Python libraries to make debug printing nicer (including IceCream). Or write your own debugger. If gdb’s user interface puts you off, there are alternatives.
Data breach: cosa leggiamo nella relazione del Garante Privacy
All’interno della relazione presentata da parte dell’Autorità Garante per la protezione dei dati personali con riferimento all’attività svolta nel 2024, un capitolo è dedicato ai data breach. Saltano all’occhio il numero di notifiche e la particolare frequenza delle violazioni di riservatezza e disponibilità. Non solo: nel 66,6 % dei casi (quindi: 2 su 3), è avvenuta una notifica per fasi con una notifica preliminare e successive notifiche integrative.

Doverosa considerazione di metodo: il rapporto riguarda i settori che hanno notificato o per cui sono stati rilevati data breach da parte dell’autorità di controllo. Questo impone pertanto di fare attenzione a non incappare nel pregiudizio di sopravvivenza facendo l’errore di ritenere che riguardi tutti i soggetti che hanno subito un data breach. Ad ogni modo è un campione comunque rappresentativo, quanto meno dei soggetti che hanno inteso notificare l’evento di violazione dei dati personali. Che comprende anche quanti, spinti da moventi decisamente meno virtuosi, si sono trovati costretti a non poterli più nascondere.
Ad ogni modo, i settori più colpiti in ambito pubblico sono stati comuni, strutture sanitarie e istituti scolastici. Mentre nel settore privato sono state principalmente le grandi telco, energetiche, bancarie e dei servizi, nonché PMI e professionisti. Questo dato può confermare dunque che nessuno può dirsi esente dall’essere oggetto di attenzioni da parte dei cybercriminali.
Gli attacchi ransomware rimangono i grandi protagonisti della scena, con compromissione di disponibilità e riservatezza dei dati per effetto della doppia estorsione. Sono state riportate come maggiormente significative le violazioni dolose causate da accessi non autorizzati o illeciti a sistemi informativi e compromissione di credenziali. Le divulgazioni accidentali sono invece riconducibili per lo più da errori di configurazione o errori nell’impiego di piattaforme informatiche o sistemi di gestione della posta elettronica.
Comuni denominatori delle istruttorie in caso di data breach.
L’apertura di un’istruttoria in seguito alla ricezione di una notifica di violazione non può essere ridotta ad un “atto dovuto” da parte del Garante di natura meramente burocratica. Piuttosto, è condotta allo scopo di verificare se c’è un’adeguata protezione degli interessati, sia nelle misure adottate o che il titolare altrimenti intende adottare per porre rimedio alla violazione ed attenuare gli effetti negativi nei confronti degli interessati, sia nell’analisi dei rischi svolta.
Bisogna infatti ricordare che queste misure sono prescritte come contenuto essenziale della notifica dall’art. 33 par. 3 GDPR:
La notifica di cui al paragrafo 1 deve almeno:
a) descrivere la natura della violazione dei dati personali compresi, ove possibile, le categorie e il numero approssimativo di interessati in questione nonché le categorie e il numero approssimativo di registrazioni dei dati personali in questione;
b) comunicare il nome e i dati di contatto del responsabile della protezione dei dati o di altro punto di contatto presso cui ottenere più informazioni;
c) descrivere le probabili conseguenze della violazione dei dati personali;
d) descrivere le misure adottate o di cui si propone l’adozione da parte del titolare del trattamento per porre rimedio alla violazione dei dati personali e anche, se del caso, per attenuarne i possibili effetti negativi.
L’esito dell’attività istruttoria è dunque innanzitutto quello di constatare se queste misure sono adeguate, fornendo i correttivi del caso, nonché quello di verificare se il titolare del trattamento sia stato in grado di analizzare compiutamente i rischi. Assumendo, anche con attività ispettive e acquisizioni documentali, tutti gli elementi necessari per valutare tanto i rischi quanto l’adeguatezza delle misure adottate ed esercitare i provvedimenti correttivi del caso. Fra cui, nelle ipotesi di rischi elevati, quello di ingiungere la comunicazione agli interessati coinvolti e fornire le indicazioni specifiche per proteggersi da eventuali conseguenze pregiudizievoli.
In particolare, all’interno del settore sanitario i provvedimenti sanzionatori derivanti da data breach per inadeguatezza delle misure di sicurezza predisposte sono stati talmente significativi da essersi meritati un capo dedicato all’interno della relazione (par. 5.4.1.), con la ricognizione di alcuni casi particolarmente significativi ed esemplari.
Alcuni dubbi sugli obblighi collegati al data breach (che però il Garante non può risolvere).
La relazione conferma alcuni dubbi sugli obblighi di gestione del data breach. Dubbi che richiederebbero un intervento da parte del legislatore in nome di una semplificazione ben più efficace di quella annunciata da Bruxelles e dalle tinte blu ridicolo cui siamo purtroppo abituati. Mettiamo i primi tre sul podio.
Il termine di gestione del data breach di 72 ore serve davvero a qualcosa?
Piuttosto, sembra che i migliori intenti della norma non superino il reality check. Nella realtà è un onere burocratico, svolto per lo più (in 2 casi su 3 da relazione del Garante) con un: compiliamo subito ora, integriamo poi. Con buona pace degli interessati che invece spesse volte dovranno attendere l’intervento del Garante successivo (e ben oltre le 72 ore) per leggere una comunicazione di data breach non sempre chiara, talvolta ridotta a un formalismo, e spesso inefficace per una serie di ragioni legate al fattore tempo. Ne è infatti trascorso abbastanza perchè i più attenti abbiano già appreso l’evento dai media e i più disattenti ne abbiano subito gli effetti negativi. Top timing!
Ben diversa natura ha invece la notifica degli incidenti informatici ad ACN (e che riguarda soggetti PSNC e NIS 2), che va oltre la tutela degli interessati ma segue scopi di sicurezza nazionale, per cui invece la tempestività è d’obbligo.
Non sarebbe meglio prescrivere 72 ore per comunicare agli interessati?
Forse il termine di 72 ore è maggiormente adeguato per la comunicazione agli interessati, senza lasciare quella formula “senza ingiustificato ritardo” che invece comporta continui ritardi o comunicazioni sgangherate. Questo sì che gioverebbe agli interessati consentendo loro di essere consapevoli dell’accaduto adottare tempestivamente misure a loro protezione.
Inoltre, enfatizzerebbe quell’approccio di responsabilizzazione previsto dal GDPR: rendicontare la gestione dell’incidente, dunque dare priorità alle garanzie a tutela degli interessati.
Magari gioverebbe anche una maggiore attenzione da parte del Garante e conseguenti sanzioni per comunicazioni inadeguate. Just to say. Speriamo di trovare un capo dedicato nelle prossime relazioni di attività.
Perchè parlare di rischio improbabile?
Questa è una perla. Semantica e concettuale. Quel concetto di improbabilità riferito al rischio porta con sé il retrogusto dell’ineffabile.
L’art. 33 par. 1 GDPR prevede infatti che:
In caso di violazione dei dati personali, il titolare del trattamento notifica la violazione all’autorità di controllo competente a norma dell’articolo 55 senza ingiustificato ritardo e, ove possibile, entro 72 ore dal momento in cui ne è venuto a conoscenza, a meno che sia improbabile che la violazione dei dati personali presenti un rischio per i diritti e le libertà delle persone fisiche. Qualora la notifica all’autorità di controllo non sia effettuata entro 72 ore, è corredata dei motivi del ritardo.
Certo, il considerando n. 85 propone che stia al titolare comprovare il fatto che” è improbabile che la violazione dei dati personali presenti un rischio per i diritti e le libertà delle persone fisiche”. In nome dell’accountability, che viene spesso citata quando non si sa come spiegare le cose.
Ma dal momento che anche l’EDPB fatica a fornire indicazioni e criteri di carattere generale, profondendosi piuttosto in una miriade di esempi, forse sarebbe meglio riformulare il trigger che fa scattare un esonero dall’obbligo di notifica.
Che so, ad esempio citando un rischio basso. E lasciando (vedi sopra circa le 72 ore) tempo al titolare per valutare correttamente il rischio prima di spammar notifiche di data breach “perchè non si sa mai”. Con buona pace dell’accountability.
L'articolo Data breach: cosa leggiamo nella relazione del Garante Privacy proviene da il blog della sicurezza informatica.
65F02 is an FPGA 6502 with a Need For Speed

Does the in 65F02 “F” stand for “fast” or “FPGA”? [Jurgen] doesn’t know, but his drop-in replacement board for the 6502 and 65c02 is out there and open source, whatever you want it to stand for.
The “f” could easily be both, since at 100 MHz, the 65f02 is blazing fast by 6502 standards–literally 100 times the speed of the first chips from MOS. That speed comes from the use of a Spartan 6 FPGA core to implement the 6502 logic; making the “f” stand for “FPGA” makes sense, given that the CMOS version of the chip was dubbed the 65c02. The 65f02 is a tiny PCB containing the FPGA and all associated hardware that shares the footprint of a DIP-40 package, making it a drop-in replacement. A really fast drop-in replacement.
You might be thinking that that’s insane, and that (for example) the memory on an Apple ][ could never run at 100 MHz and so you won’t get the gains. This is both true, and accounted for: the 65F02 has an internal RAM “cache” that it mirrors to external memory at a rate the bus can handle. When memory addresses known to interact with peripherals change, the 65f02 slows down to match for “real time” operations.
Because of this the memory map of the external machine matters; [Jurgen] has tested the Commodore PET and Apple ][, along with a plethora of German chess computers, but, alas, this chip is not currently compatible with the Commodore 64, Atari 400/800 or BBC Micro (or at least not tested). The project is open source, however, so you might be able to help [Jurgen] change that.
We admit this project isn’t totally new– indeed, it looks like [Jurgen]’s last update was in 2024– but a fast 6502 is just as obsolete today as it was when [Jurgen] started work in 2020. That’s why when [Stephen Walters] sent us the tip (via electronics-lab), we just had to cover it, especially considering the 6502’s golden jubilee.
We also recently featured a 32-bit version of the venerable chip that may be of interest, also on FPGA.
Reverse Engineering a Robot Mower’s Fence

There are a variety of robot mower systems on the market employing different navigation methods, and [Eelco] has the story of how one of these was reverse engineered. Second hand Roomba lawnmowers kept appearing for very low prices without the electronics driving the buried-wire fence that keeps them from going astray. The story of their reverse engineering provides us with a handy insight into their operation.
The wire fence is a loop of wire in the ground, so it was modeled using a few-ohm resistor and the waveform across it from a working driver captured with an oscilloscope. The resulting 3 kHz waveform surprisingly to us at least doesn’t appear to encode any information, so it could be replicated easily enough with an ESP32 microcontroller. An LM386 audio amplifier drives the loop, and with a bit of amplitude adjustment the mower is quite happy in its fake fence.
Robot mower hacking has become quite the thing around here.
Using an MCU’s Own Debug Peripheral to Defeat Bootrom Protection
")
Released in July of 2025, the Tamagotchi Paradise may look somewhat like the late 90s toy that terrorized parents and teachers alike for years, but it’s significantly more complex and powerful hardware-wise. This has led many to dig into its ARM Cortex-M3-powered guts, including [Yukai Li] who recently tripped over a hidden section in the bootrom of the dual-core Sonix SNC73410 MCU that makes up most of the smarts inside this new Tamagotchi toy.

Interestingly, [Yukai] did see that the visible part of the bootrom image calls into the addresses that make up the hidden part right in the reset handler, which suggests that after reset this hidden bootrom section is accessible, just not when trying to read it via e.g. SWD as the hiding occurs before the SWD interface becomes active. This led [Yukai] to look at a way to make this ROM section not hidden by using the Cortex-M3’s standard Flash Patch and Breakpoint (FPB) unit. This approach is covered in the project’s source file.
With this code running, the FPB successfully unset the responsible ROM hide bit in the OSC_CTRL register, allowing the full bootrom to be dumped via SWD and thus defeating this copy protection with relatively little effort.
Heading image: PCB and other components of a torn-down Tamagotchi Paradise. (Credit: Tamagotchi Center)
LockBit 5.0: segnali concreti di una possibile rinascita?
Il panorama del ransomware continua a essere caratterizzato da dinamiche di adattamento e resilienza. Anche quando un’operazione internazionale sembra decretare la fine di un gruppo criminale, l’esperienza ci mostra che la scomparsa è spesso solo temporanea.
È questo il caso di LockBit, una delle gang più prolifiche e strutturate dell’ultimo quinquennio, la cui parabola sembrava essersi chiusa con l’operazione Cronos del febbraio 2024. Oggi, tuttavia, nuove evidenze provenienti dal dark web stanno alimentando l’ipotesi di un ritorno sotto una nuova veste: LockBit 5.0.
LockBit: dal dominio incontrastato al declino apparente
LockBit ha rappresentato negli anni un modello di riferimento per l’ecosistema criminale, grazie al suo approccio Ransomware-as-a-Service (RaaS), alla struttura capillare di affiliati e a una costante innovazione nelle tecniche di cifratura e propagazione. L’introduzione dei data leak site (DLS) come strumento di pressione ha reso LockBit una vera e propria icona del cybercrime.
Con l’operazione Cronos, culminata nel sequestro di numerose infrastrutture e nella compromissione dei pannelli affiliati, il gruppo sembrava destinato a un declino definitivo. Tuttavia, come già analizzato nel precedente articolo, tracce residue di attività e segnali sparsi sul dark web lasciavano presagire una possibile riorganizzazione.
L’emergere di LockBit 5.0
Nelle ultime ore è emersa un’immagine che sembra confermare questa ipotesi: una schermata di autenticazione relativa a un nuovo DLS legato al brand LockBit. A differenza dei portali tradizionali, liberamente consultabili per massimizzare l’effetto coercitivo sulle vittime, questa nuova infrastruttura richiede l’inserimento di una chiave privata per poter accedere ai contenuti.
Questa scelta introduce elementi di novità e apre a scenari interpretativi differenti:

- un tentativo di aumentare la segretezza operativa, riducendo l’esposizione verso ricercatori e forze dell’ordine;
- una logica di selezione degli interlocutori, limitando l’accesso a partner fidati o affiliati;
- oppure un esperimento di rebranding, utile a testare nuove modalità di gestione dei dati esfiltrati.
Un ecosistema in evoluzione: AI e automazione
La ricomparsa di LockBit deve essere letta nel contesto di un’evoluzione più ampia. Diversi gruppi ransomware stanno infatti sperimentando nuove tecniche di attacco, integrando automazione, moduli di evasione avanzata e strategie di doppia estorsione più aggressive.
In questo quadro, il dibattito sull’impiego dell’intelligenza artificiale come fattore dirompente è sempre più centrale. Come sottolineato anche nel post di Anastasia Sentsova, la possibilità che in futuro si affermino campagne di AI-orchestrated ransomware apre a scenari in cui targeting, movimento laterale e negoziazione potrebbero essere ottimizzati in tempo reale. In questo senso, la potenziale rinascita di LockBit 5.0 potrebbe segnare l’inizio di una nuova fase sperimentale.
Conclusioni
La schermata di login trapelata dal nuovo DLS, con la richiesta di una chiave privata, non rappresenta soltanto un dettaglio tecnico, ma un indizio capace di alimentare una serie di domande aperte:
- chi gestisce realmente questa infrastruttura?
- è davvero LockBit a orchestrare la riapparizione, o un nuovo attore che sfrutta il brand?
- quale sarà la prossima evoluzione nel modello di estorsione e pubblicazione dei dati?
Al momento, non vi sono risposte definitive. Tuttavia, un elemento è certo: il vuoto lasciato da LockBit nel panorama del ransomware è troppo grande perché rimanga tale a lungo. Se LockBit 5.0 dovesse confermarsi come realtà, il settore potrebbe trovarsi di fronte a un nuovo punto di svolta, con impatti significativi su tattiche, tecniche e procedure del cybercrime internazionale.
L'articolo LockBit 5.0: segnali concreti di una possibile rinascita? proviene da il blog della sicurezza informatica.
ARTO: la piattaforma italiana che rivoluziona l’arte con la blockchain e NFT certificati
Nel 2024 avevamo raccontato ARTO come un’intuizione coraggiosa: un progetto che univa arte e blockchain con l’obiettivo di ridurre le frodi nel mercato artistico e di aprire a un nuovo modo di intendere la creatività.
Oggi, a distanza di mesi, quell’intuizione si è trasformata in una piattaforma concreta, già online pronta a raccogliere la sfida di rendere l’arte più sicura, trasparente e accessibile.
Una rete di innovazione e cultura
ARTO non è nato dal nulla: dietro questa visione ci sono tre realtà italiane che da anni lavorano su ricerca, innovazione e cultura.IAD S.r.l., capofila del progetto (cofinanziato dall’Unione Europea Programma PR FESR Regione Lazio 2021- 2027 Avviso pubblico Riposizionamento competitivo RSI Ambito 4 industrie creative e digitali e patrimonio culturale e tecnologie della cultura – Approv. dalla Regione Lazio con Det. n. G14831 del 09/11/2023 – CUP F89J23000910007 e con COR 16161824 – 1661828 – 16161827), ha guidato il percorso insieme a Ulteriora S.r.l. e Mirart Point S.r.l., con il sostegno della Regione Lazio.
(Scopri di più sul sito à artetoken.it/)

Un ecosistema per l’arte digitale
È grazie a questa alleanza che ARTO è diventato molto più di un’idea: oggi è una piattaforma attiva, online, capace di accogliere opere, trasformarle in NFT certificati e proporle in asta in un contesto sicuro, trasparente e scalabile.
Oltre il marketplace: una nuova esperienza culturale
ARTO non è solo un marketplace di NFT. È un ecosistema culturale e tecnologico che ha saputo intrecciare linguaggi diversi in un’unica architettura: l’espressione artistica, le aste digitali, la tracciabilità immutabile della blockchain.
Gli artisti possono caricare le proprie opere, digitalizzarle e trasformarle in certificati unici, mentre il pubblico e i collezionisti possono finalmente vivere un’esperienza libera da intermediazioni opache, basata sulla sicurezza e sulla trasparenza.
Le aste come motore del cambiamento
Il cuore pulsante della piattaforma sono le aste. Non parliamo di aste tradizionali, ma di eventi digitali costruiti su smart contract che garantiscono regole certe e risultati inviolabili. Ogni opera che entra in ARTO trova un palcoscenico dove il suo valore non è stabilito a tavolino, ma riconosciuto da chi partecipa, in un meccanismo che restituisce dignità e autenticità al processo creativo. In questo modo, il mercato dell’arte smette di essere un territorio riservato a pochi e si apre a una comunità più ampia, inclusiva e consapevole.

Una piattaforma aperta e partecipativa
La piattaforma è oggi viva e consultabile. Aspetta soltanto gli artisti pronti a mettersi in gioco, a caricare le loro opere, a dare al mondo nuovi sguardi e nuove possibilità. ARTO non nasce solo per creare opportunità economiche, ma per portare l’arte fuori dai recinti elitari e trasformarla in esperienza culturale diffusa, accessibile a tutti.
Emergenza Arte: creatività come cura
Dentro questo impianto trova spazio anche una delle sfide più ambiziose: il progetto “Emergenza Arte”. L’obiettivo è portare l’arte nei reparti pediatrici come strumento di cura, offrendo ai bambini un linguaggio con cui raccontare paure e desideri. Non è ancora una sperimentazione attiva, ma una direzione precisa e dichiarata: sono stati definiti protocolli e strumenti, e la volontà è quella di trasformare questa idea in realtà, convinti che potrà dare un contributo enorme ai piccoli pazienti e alle loro famiglie. ARTO ha già le basi tecnologiche e organizzative per custodire quelle esperienze e trasformarle in NFT unici, che diventerebbero memorie eterne di resilienza e creatività.
Tecnologia al servizio della fiducia
Il percorso compiuto fin qui è stato tutt’altro che semplice. Creare una piattaforma che unisse sicurezza, user experience e tracciabilità ha richiesto mesi di lavoro, test e validazioni. Le componenti tecnologiche più delicate, come gli smart contract per le aste, sono state sviluppate e messe alla prova con rigore. Il risultato è un’infrastruttura robusta, pronta a scalare, in grado di affrontare le sfide di un mercato che sempre più chiede trasparenza e affidabilità.
Le persone dietro il progetto
Questo lavoro è stato possibile grazie anche alle competenze delle persone coinvolte. Tra i protagonisti ci sono Daniele Fiungo, responsabile dell’area Ricerca e Sviluppo di IAD, e Flaviano Cardone, coordinatore tecnico-scientifico del progetto. Entrambi hanno guidato lo sviluppo e la definizione dei processi chiave di ARTO, unendo visione e pragmatismo. E a conferma del loro impegno verso la sicurezza e la qualità, hanno conseguito di recente la certificazione Cyber Threat Intelligence Professional (CTIP) rilasciata da Red Hot Cyber Academy. Un segno di come in ARTO la tecnologia non sia mai separata dal tema della sicurezza, ma al contrario ne rappresenti la spina dorsale.
Il debutto ufficiale: ottobre 2025, Arte Parma Fair
Il futuro è già scritto nel calendario: ottobre 2025, Arte Parma Fair. Qui ARTO avrà il suo debutto ufficiale davanti al grande pubblico, con uno stand pensato per stupire e coinvolgere. Ci saranno NFT visibili in realtà aumentata, aste live, installazioni multimediali e persino un omaggio speciale al maestro Arnaldo Pomodoro, reinterpretato con linguaggi digitali per intrecciare memoria e innovazione. Sarà il momento per mostrare che ARTO non è più un esperimento, ma un modello che può fare scuola, pronto a replicarsi e a crescere.
ARTO: un ponte tra tecnologia e umanità
Oggi ARTO rappresenta un punto di incontro tra digitale e cultura, tra tecnologia e umanità. È la prova che la blockchain non serve solo alla finanza, ma può generare valore reale per artisti, collezionisti e comunità. È un progetto che guarda avanti, con l’ambizione di connettere mondi che spesso restano separati: il mercato dell’arte, le pratiche terapeutiche, la dimensione sociale.
Perché l’arte, se accompagnata da strumenti giusti, può diventare molto più di un segno su una tela. Può trasformarsi in esperienza collettiva, in memoria condivisa, in valore che resta. ARTO è già questo: un modello concreto che nasce dall’innovazione e dalla ricerca, e che oggi è pronto a dare voce a chiunque voglia farsi ascoltare.
L'articolo ARTO: la piattaforma italiana che rivoluziona l’arte con la blockchain e NFT certificati proviene da il blog della sicurezza informatica.
The 555 as You’ve Never Seen It: In Textile!

The Diné (aka Navajo) people have been using their weaving as trade goods at least since European contact, and probably long before. They’ve never shied from adopting innovation: churro sheep from the Spanish in the 17th century, aniline dies in the 19th, and in the 20th and 21st… integrated circuits? At least one Navajo Weaver, [Marilou Schultz] thinks they’re a good match for the traditional geometric forms. Her latest creation is a woven depiction of the venerable 555 timer.
This isn’t the first time [Marilou] has turned an IC into a Navajo rug; she’s been weaving chip rugs since 1994– including a Pentium rug commissioned by Intel that hangs in USA’s National Gallery of Art–but it’s somehow flown below the Hackaday radar until now. The closest thing we’ve seen on these pages was a beaded bracelet embedding a QR code, inspired by traditional Native American forms.
That’s why we’re so thankful to [VivCocoa] for the tip. It’s a wild and wonderful world out there, and we can’t cover all of it without you. Are there any other fusions of tradition and high-tech we’ve been missing out on? Send us a tip.
FLOSS Weekly Episode 846: Mastering Embedded Linux Programming

This week Jonathan and Dan chat with Frank Vasquez and Chris Simmonds about Embedded Linux, and the 4th edition of the Mastering Embedded Linux Programming book. How has this space changed in the last 20 years, and what’s the latest in Embedded Linux?
- Mastering Embedded Linux Development on Amazon
- 2net.co.uk/
- The Linux Plumbers Conference Call For Proposals page
- AOSP and AAOS meetup on Wednesday 17 September
- aosp-devs.org/
youtube.com/embed/6JKmZAQMgh0?…
Did you know you can watch the live recording of the show right on our YouTube Channel? Have someone you’d like us to interview? Let us know, or contact the guest and have them contact us! Take a look at the schedule here.
play.libsyn.com/embed/episode/…
Direct Download in DRM-free MP3.
If you’d rather read along, here’s the transcript for this week’s episode.
Places to follow the FLOSS Weekly Podcast:
Theme music: “Newer Wave” Kevin MacLeod (incompetech.com)
Licensed under Creative Commons: By Attribution 4.0 License
hackaday.com/2025/09/10/floss-…
Gli hacker criminali di The Gentlemen pubblicano la prima vittima italiana
Nella giornata di oggi, la nuova cyber-gang “The Gentlemen” rivendica all’interno del proprio Data Leak Site (DLS) il primo attacco ad una azienda italiana.
Disclaimer: Questo rapporto include screenshot e/o testo tratti da fonti pubblicamente accessibili. Le informazioni fornite hanno esclusivamente finalità di intelligence sulle minacce e di sensibilizzazione sui rischi di cybersecurity. Red Hot Cyber condanna qualsiasi accesso non autorizzato, diffusione impropria o utilizzo illecito di tali dati. Al momento, non è possibile verificare in modo indipendente l’autenticità delle informazioni riportate, poiché l’organizzazione coinvolta non ha ancora rilasciato un comunicato ufficiale sul proprio sito web. Di conseguenza, questo articolo deve essere considerato esclusivamente a scopo informativo e di intelligence.
All’interno del post, la gang riporta quanto segue:

Laboratorio Clinico Santa Rita
Santa Rita Laboratorios offers a wide range of medical laboratory services, including hematology, immunology, microbiology, and molecular biology. The company is committed to preserving health through accurate diagnostics and operates with state-of-the-art technology and high-resolution equipment. They provide personalized medical assistance 24/7, as well as home sample collection services for client convenience. Intended clients include individuals seeking reliable laboratory tests and diagnostics.”
Chi sono i criminali informatici di The gentlemen
La cyber gang The Gentlemen è emersa di recente nello scenario del cybercrime distinguendosi per un approccio organizzato e un’infrastruttura ben strutturata. Il gruppo opera attraverso un proprio data leak site nel dark web, dove pubblica avvisi di compromissione e minacce di esposizione dei dati.
La loro comunicazione è caratterizzata da uno stile curato e studiato, con un’immagine pubblica che mira a costruire credibilità e timore nel settore della criminalità informatica, nonostante la relativa novità della loro presenza. Questo aspetto lascia intendere che dietro al progetto possano esserci attori già esperti di ransomware e data extortion.
Il modus operandi dei The Gentlemen ricalca i modelli tipici del ransomware moderno: compromissione iniziale delle infrastrutture, esfiltrazione dei dati sensibili e successiva estorsione basata sulla minaccia di pubblicazione. Le prime vittime individuate dal gruppo appartengono a settori sensibili come sanità, manifattura e servizi, aree particolarmente appetibili per la pressione che la perdita o la fuga di informazioni può generare. Il loro sito non si limita a elencare le vittime, ma fornisce anche dettagli sui dati sottratti, aumentando così la pressione psicologica sulle aziende colpite.

La rapidità con cui il gruppo si è imposto nell’ecosistema del cybercrime solleva interrogativi sulla sua reale origine e sulla possibilità che sia una riorganizzazione o una “costola” di operatori già noti. La capacità di attrarre l’attenzione della comunità di sicurezza informatica. In un panorama già saturo di gang ransomware, i The Gentlemen puntano a differenziarsi con uno stile comunicativo elegante ma allo stesso tempo aggressivo, posizionandosi rapidamente come una minaccia emergente di cui monitorare attentamente le mosse future.
Come nostra consuetudine, lasciamo sempre spazio ad una dichiarazione da parte dell’azienda qualora voglia darci degli aggiornamenti sulla vicenda. Saremo lieti di pubblicare tali informazioni con uno specifico articolo dando risalto alla questione.
RHC monitorerà l’evoluzione della vicenda in modo da pubblicare ulteriori news sul blog, qualora ci fossero novità sostanziali. Qualora ci siano persone informate sui fatti che volessero fornire informazioni in modo anonimo possono utilizzare la mail crittografata del whistleblower.
Cos’è il ransomware as a service (RaaS)
Il ransomware, è una tipologia di malware che viene inoculato all’interno di una organizzazione, per poter cifrare i dati e rendere indisponibili i sistemi. Una volta cifrati i dati, i criminali chiedono alla vittima il pagamento di un riscatto, da pagare in criptovalute, per poterli decifrare.
Qualora la vittima non voglia pagare il riscatto, i criminali procederanno con la doppia estorsione, ovvero la minaccia della pubblicazione di dati sensibili precedentemente esfiltrati dalle infrastrutture IT della vittima.
Per comprendere meglio il funzionamento delle organizzazioni criminali all’interno del business del ransomware as a service (RaaS), vi rimandiamo a questi articoli:
- Il ransomware cos’è. Scopriamo il funzionamento della RaaS
- Perché l’Italia è al terzo posto negli attacchi ransomware
- Difficoltà di attribuzione di un attacco informatico e false flag
- Alla scoperta del gruppo Ransomware Lockbit 2.0
- Intervista al rappresentante di LockBit 2.0
- Il 2021 è stato un anno difficile sul piano degli incidenti informatici
- Alla scoperta del gruppo Ransomware Darkside
- Intervista al portavoce di Revil UNKNOW, sul forum XSS
- Intervista al portavoce di BlackMatter
Come proteggersi dal ransomware
Le infezioni da ransomware possono essere devastanti per un’organizzazione e il ripristino dei dati può essere un processo difficile e laborioso che richiede operatori altamente specializzati per un recupero affidabile, e anche se in assenza di un backup dei dati, sono molte le volte che il ripristino non ha avuto successo.
Infatti, si consiglia agli utenti e agli amministratori di adottare delle misure di sicurezza preventive per proteggere le proprie reti dalle infezioni da ransomware e sono in ordine di complessità:
- Formare il personale attraverso corsi di Awareness;
- Utilizzare un piano di backup e ripristino dei dati per tutte le informazioni critiche. Eseguire e testare backup regolari per limitare l’impatto della perdita di dati o del sistema e per accelerare il processo di ripristino. Da tenere presente che anche i backup connessi alla rete possono essere influenzati dal ransomware. I backup critici devono essere isolati dalla rete per una protezione ottimale;
- Mantenere il sistema operativo e tutto il software sempre aggiornato con le patch più recenti. Le applicazioni ei sistemi operativi vulnerabili sono l’obiettivo della maggior parte degli attacchi. Garantire che questi siano corretti con gli ultimi aggiornamenti riduce notevolmente il numero di punti di ingresso sfruttabili a disposizione di un utente malintenzionato;
- Mantenere aggiornato il software antivirus ed eseguire la scansione di tutto il software scaricato da Internet prima dell’esecuzione;
- Limitare la capacità degli utenti (autorizzazioni) di installare ed eseguire applicazioni software indesiderate e applicare il principio del “privilegio minimo” a tutti i sistemi e servizi. La limitazione di questi privilegi può impedire l’esecuzione del malware o limitarne la capacità di diffondersi attraverso la rete;
- Evitare di abilitare le macro dagli allegati di posta elettronica. Se un utente apre l’allegato e abilita le macro, il codice incorporato eseguirà il malware sul computer;
- Non seguire i collegamenti Web non richiesti nelle e-mail;
- Esporre le connessione Remote Desktop Protocol (RDP) mai direttamente su internet. Qualora si ha necessità di un accesso da internet, il tutto deve essere mediato da una VPN;
- Implementare sistemi di Intrusion Prevention System (IPS) e Web Application Firewall (WAF) come protezione perimetrale a ridosso dei servizi esposti su internet.
- Implementare una piattaforma di sicurezza XDR, nativamente automatizzata, possibilmente supportata da un servizio MDR 24 ore su 24, 7 giorni su 7, consentendo di raggiungere una protezione e una visibilità completa ed efficace su endpoint, utenti, reti e applicazioni, indipendentemente dalle risorse, dalle dimensioni del team o dalle competenze, fornendo altresì rilevamento, correlazione, analisi e risposta automatizzate.
Sia gli individui che le organizzazioni sono scoraggiati dal pagare il riscatto, in quanto anche dopo il pagamento le cyber gang possono non rilasciare la chiave di decrittazione oppure le operazioni di ripristino possono subire degli errori e delle inconsistenze.
La sicurezza informatica è una cosa seria e oggi può minare profondamente il business di una azienda.
Oggi occorre cambiare immediatamente mentalità e pensare alla cybersecurity come una parte integrante del business e non pensarci solo dopo che è avvenuto un incidente di sicurezza informatica.
L'articolo Gli hacker criminali di The Gentlemen pubblicano la prima vittima italiana proviene da il blog della sicurezza informatica.
Everything in a Linux Terminal

Here at Hackaday Central, we fancy that we know a little something about Linux. But if you’d tasked us to run any GUI program inside a Linux terminal, we’d have said that wasn’t possible. But, it turns out, you should have asked [mmulet] who put together term.everything.
You might be thinking that of course, you can launch a GUI program from a terminal. Sure. That’s not what this is. Instead, it hijacks the Wayland protocol and renders the graphics as text. Or, if your terminal supports it, as an image. Performance is probably not your goal if you want to do this. As the old saying goes, “It’s not that the dog can sing well; it’s that the dog can sing at all.”
If, like us, you are more interested in how it works, there’s a write up explaining the nuances of the Wayland protocol. The article points out that Wayland doesn’t actually care what you do with the graphical output. In particular, “… you could print out the graphics and give them to a league of crochet grandmas to individually tie together every single pixel into the afghan of legend!” We expect to see this tested at an upcoming hacker conference. Maybe even Supercon.
We generally don’t like Wayland very much. We use a lot of hacks like xdotool and autokey that Wayland doesn’t like. We also think people didn’t understand X11’s network abilities until it was too late. If you think of it as only a video card driver, then you get what you deserve. But we have to admit, we are humbled by term.everything.
Phishing in Classe! 115.000 email per 13.500 organizzazioni con Google Classroom
I ricercatori di Check Point hanno scoperto una campagna di phishing attiva su larga scala che sfrutta Google Classroom, una piattaforma a cui si affidano milioni di studenti ed educatori in tutto il mondo.
Nel corso di una sola settimana, gli aggressori hanno lanciato cinque ondate coordinate, distribuendo più di 115.000 e-mail di phishing rivolte a 13.500 organizzazioni di diversi settori. Sono state prese di mira organizzazioni in Europa, Nord America, Medio Oriente e Asia.
Uno strumento affidabile trasformato in un vettore di minacce
Google Classroom è progettato per mettere in contatto insegnanti e studenti attraverso inviti a partecipare a classi virtuali. Gli aggressori hanno sfruttato questa fiducia inviando inviti fasulli che contenevano offerte commerciali non correlate, che andavano dalla rivendita di prodotti ai servizi SEO.
Ogni e-mail indirizzava i destinatari a contattare i truffatori tramite un numero di telefono WhatsApp, una tattica spesso legata a schemi di frode.
L’inganno funziona perché i sistemi di sicurezza tendono a fidarsi dei messaggi provenienti da servizi Google legittimi. Sfruttando l’infrastruttura di Google Classroom, gli aggressori sono stati in grado di aggirare alcuni livelli di sicurezza tradizionali, tentando di raggiungere le caselle di posta elettronica di oltre 13.500 aziende prima che le difese venissero attivate.

Anatomia della campagna
- Scala: 115.000 e-mail di phishing inviate tra il 6 e il 12 agosto 2025.
- Obiettivi: 13.500 organizzazioni in tutto il mondo, in diversi settori.
- Esca: Falsi inviti a Google Classroom contenenti offerte non correlate all’istruzione
- Invito all’azione (call to action): Un numero di telefono WhatsApp, progettato per spostare la conversazione al di fuori della posta elettronica e del monitoraggio aziendale.
- Metodo di consegna: Cinque ondate principali, ognuna delle quali ha sfruttato la legittimità di Google Classroom per eludere i filtri.
Come Check Point ha bloccato l’attacco
Nonostante l’uso sofisticato da parte degli aggressori della fidata infrastruttura, la tecnologia SmartPhish di Check Point Harmony Email & Collaboration ha rilevato e bloccato automaticamente la maggior parte dei tentativi di phishing. Ulteriori livelli di sicurezza hanno impedito ai messaggi rimanenti di raggiungere gli utenti finali.
Questo incidente sottolinea l’importanza delle difese a più livelli. Gli aggressori utilizzano sempre più spesso servizi cloud legittimi, rendendo i gateway di posta elettronica tradizionali insufficienti a bloccare le tattiche di phishing in continua evoluzione.
Cosa devono fare le organizzazioni
- Educare: Istruire utenti, studenti e dipendenti a trattare con cautela gli inviti inattesi (anche quelli provenienti da piattaforme familiari).
- Prevenzione avanzata delle minacce: Utilizzate un rilevamento basato sull’intelligenza artificiale che analizza il contesto e l’intento, non solo la reputazione del mittente.
- Monitorare le applicazioni cloud: Estendete la protezione dal phishing oltre le e-mail anche alle app di collaborazione, alle piattaforme di messaggistica e ai servizi SaaS.
- Difendersi dall’ingegneria sociale: Essere consapevoli che gli aggressori spingono sempre più spesso le vittime verso comunicazioni al di fuori dei canali “ufficiali” (come WhatsApp) per eludere i controlli aziendali.
Gli aggressori continuano a trovare modi creativi per sfruttare servizi legittimi come Google Classroom per ottenere fiducia, aggirare le difese e raggiungere obiettivi su larga scala. Con oltre 115.000 e-mail in una sola settimana, questa campagna evidenzia la facilità con cui i criminali informatici possono armare le piattaforme digitali a scopo di frode.
Riconosciuto come Leader e Outperformer nel GigaOm Radar 2025 per l’Anti-Phishing, Check Point Harmony Email & Collaboration fornisce la difesa avanzata e stratificata necessaria per proteggere le organizzazioni dagli attacchi di phishing, anche quando si nascondono in bella vista.
L'articolo Phishing in Classe! 115.000 email per 13.500 organizzazioni con Google Classroom proviene da il blog della sicurezza informatica.
Notes of cyber inspector: three clusters of threat in cyberspace

Hacktivism and geopolitically motivated APT groups have become a significant threat to many regions of the world in recent years, damaging infrastructure and important functions of government, business, and society. In late 2022 we predicted that the involvement of hacktivist groups in all major geopolitical conflicts from now on will only increase and this is what we’ve been observing throughout the years. With regard to the Ukrainian-Russian conflict, this has led to a sharp increase of activities carried out by groups that identify themselves as either pro-Ukrainian or pro-Russian.
The rise in cybercrime amid geopolitical tensions is alarming. Our Kaspersky Cyber Threat Intelligence team has been observing several geopolitically motivated threat actors and hacktivist groups operating in various conflict zones. Through collecting and analyzing extensive data on these groups’ tactics, techniques, and procedures (TTPs), we’ve discovered a concerning trend: hacktivists are increasingly interconnected with financially motivated groups. They share tools, infrastructure, and resources.
This collaboration has serious implications. Their campaigns may disrupt not only business operations but also ordinary citizens’ lives, affecting everything from banking services to personal data security or the functioning of the healthcare system. Moreover, monetized techniques can spread exponentially as profit-seeking actors worldwide replicate and refine them. We consider these technical findings a valuable resource for global cybersecurity efforts. In this report, we share observations on threat actors who identify themselves as pro-Ukrainian.
About this report
The main goal of this report is to provide technical evidence supporting the theory we’ve proposed based on our previous research: that most of the groups we describe here actively collaborate, effectively forming three major threat clusters.
This report includes:
- A library of threat groups, current as of 2025, with details on their main TTPs and tools.
- A technical description of signature tactics, techniques, procedures, and toolsets used by these groups. This information is intended for practical use by SOC, DFIR, CTI, and threat hunting professionals.
What this report covers
This report contains information on the current TTPs of hacktivists and APT groups targeting Russian organizations particularly in 2025, however they are not limited to Russia as a target. Further research showed that among some of the groups’ targets, such as CloudAtlas and XDSpy, were assets in European, Asian, and Middle Eastern countries. In particular, traces of infections were discovered in 2024 in Slovakia and Serbia. The report doesn’t include groups that emerged in 2025, as we didn’t have sufficient time to research their activity. We’ve divided all groups into three clusters based on their TTPs:
- Cluster I combines hacktivist and dual-purpose groups that use similar tactics, techniques, and tools. This cluster is characterized by:
- Shared infrastructure
- A unique software suite
- Identical processes, command lines, directories, and so on
- Distinctive TTPs
Example: Cyberthreat landscape in Russia in 2025
Hacktivism remains the key threat to Russian businesses and businesses in other conflict areas today, and the scale and complexity of these attacks keep growing. Traditionally, the term “hacktivism” refers to a blend of hacking and activism, where attackers use their skills to achieve social or political goals. Over the past few years, these threat actors have become more experienced and organized, collaborating with one another and sharing knowledge and tools to achieve common objectives.
Additionally, a new phenomenon known as “dual-purpose groups” has appeared in the Russian threat landscape in recent years. We’ve detected links between hacktivists and financially motivated groups. They use the same tools, techniques, and tactics, and even share common infrastructure and resources. Depending on the victim, they may pursue a variety of goals: demanding a ransom to decrypt data, causing irreparable damage, or leaking stolen data to the media. This suggests that these attackers belong to a single complex cluster.
Beyond this, “traditional” categories of attackers continue to operate in Russia and other regions: groups engaged in cyberespionage and purely financially motivated threat actors also remain a significant problem. Like other groups, geopolitically motivated groups are cybercriminals who undermine the secure and trustworthy use of digitalization opportunities and they can change and adapt their target regions depending on political developments.
That is why it is important to also be aware of the TTPs used by threat actors who appear to be attacking other targets. We will continue to monitor geopolitically motivated threat actors and publish technical reports about their TTPs.
Recommendations
To defend against the threats described in this report, Kaspersky experts recommend the following:
- Provide your SOC teams with access to up-to-date information on the latest attacker tactics, techniques, and procedures (TTPs). Threat intelligence feeds from reliable providers, like Kaspersky Threat Intelligence, can help with this.
- Use a comprehensive security solution that combines centralized monitoring and analysis, advanced threat detection and response, and security incident investigation tools. The Kaspersky NEXT XDR platform provides this functionality and is suitable for medium and large businesses in any industry.
- Protect every component of modern and legacy industrial automation systems with specialized OT security solutions. Kaspersky Industrial CyberSecurity (KICS) — an XDR-class platform — ensures reliable protection for critical infrastructure in energy, manufacturing, mining, and transportation.
- Conduct regular security awareness training for employees to reduce the likelihood of successful phishing and other social engineering attacks. Kaspersky Automated Security Awareness Platform is a good option for this.
The report is available for our partners and customers. If you are interested, please contact report@kaspersky.com
Bare Metal STM32: the Various Real Time Clock Flavors

Keeping track of time is essential, even for microcontrollers, which is why a real-time clock (RTC) peripheral is a common feature in MCUs. In the case of the STM32 family there are three varieties of RTC peripherals, with the newest two creatively called ‘RTC2′ and RTC3’, to contrast them from the very basic and barebones RTC that debuted with the STM32F1 series.
Commonly experienced in the ubiquitous and often cloned STM32F103 MCU, this ‘RTC1’ features little more than a basic 32-bit counter alongside an alarm feature and a collection of battery-backed registers that requires you to do all of the heavy lifting of time and date keeping yourself. This is quite a contrast with the two rather similar successor RTC peripherals, which seem to insist on doing everything possible themselves – except offer you that basic counter – including giving you a full-blown calendar and today’s time with consideration for 12/24 hour format, DST and much more.
With such a wide gulf between RTC1 and its successors, this raises the question of how to best approach these from a low-level perspective.
You Can Count On Me
If it was just about counting seconds, then any of the timer peripherals in an MCU would be more than up to the task, limited only by the precision of the used system clock. The RTC requirements are a bit more extensive, however, as indicated by what is called the backup domain in F1 and the backup registers in the RTC2 and RTC3 peripherals. Powered by an external power source, this clock and register data are expected to survive any power event, the CPU being reset, halted or powered off, while happily continuing to count the progress of time until the rest of the MCU and its firmware returns to check up on its progress.
Naturally, this continuation requires two things: the first is a power source to the special power pin on the MCU (VBAT), often provided from a ubiquitous 3 V lithium cell, along with a clock source that remains powered when the rest of the MCU isn’t. This provides the first gotcha as the RTC clock can be configured to be one of these three:
- Low Speed External (LSE): usually an external 32,768 Hz oscillator which is powered via VBAT.
- Low Speed Internal (LSI): a simple internal ~40-ish kHz oscillator that is only powered by VDD.
- High Speed External (HSE): the external clock signal that’s generally used to clock the MCU’s CPU and many of its peripherals. Also not available in all low-power modes.
Thus, the logical RTCCLK choice for an RTC that has to survive any and all adverse power events is the LSE as it feeds into the RTC. Take for example the STM32F103 RTC block diagram:")
Here we can see the elements of the very basic RTC1 peripheral, with the sections that are powered by VBAT marked in grey. The incoming RTCCLK is used to generate the RTC time base TR_CLK in the RTC prescaler, which increases the value in the RTC_CNT register. It being a 32-bit register and TR_CLK usually being 1 Hz means that this counter can be run for approximately 136 years if we ignore details like leap years, without overflowing.
For initializing and using the RTC1 peripheral, we can consult application note AN2821 alongside reference manual RM0008, which covers a clock and calendar implementation, specifically on the STM3210B-EVAL board, but applicable to all STM32F10x MCUs. If you want to keep a running calendar going, it’s possible to use the backup registers for this whenever the counter reaches a certain number of seconds.
That said, where having just this counter is rather pleasant is when using the C <time.h> functions with Newlib, such as time(). As Newlib on STM32 requires you to implement at least [url=https://www.man7.org/linux/man-pages/man2/gettimeofday.2.html]_gettimeofday()[/url], this means that you can just let RTC_CNT do its thing and copy it into the seconds member of a timeval struct – after converting from BCD to binary – before returning it. This is significantly easier than with RTC2 and 3, with my own implementation in Nodate’s RTC code currently fudging things with mktime() to get a basic seconds counter again from the clock and calendar register values.
All The Bells And Whistles
If the RTC1 peripheral was rather basic with just a counter, an alarm and some backup registers, its successor and the rather similar RTC3 peripheral are basically the exact opposite. A good, quick comparison is provided here, with AN4759 providing a detailed overview, initialization and usage of these newest RTCs. One nice thing about RTC3 is that it adds back an optional counter much like the – BCD-based – RTC1 counter by extending the RTC_SSR register to 32-bit and using it as a binary counter. However as the summary by Efton notes, this counter and some other features are not present on every MCU, so beware.
Correspondingly, the block diagram for the RTC2 peripheral is rather more complicated:")
Although we can still see the prescaler and backup/tamper registers, the prescaler is significantly more complex with added calibration options, the alarms span more registers and there are now three shadow registers for the time, date and sub-seconds in RTC_TR, RTC_DR and RTC_SSR respectively. This is practically identical to the RTC3 block diagram.
These shadow registers lay out the individual values as for example in the RTC_TR register:")
RTC_TR register in the STM32F401. (Source: ST, RM0368)
Taking the seconds as an example, we got the tens (ST) and units (SU), both in BCD format which together form the current number of seconds. For the minutes and hours the same pattern is used, with PM keeping track of whether it’s AM or PM if 12 hour format is used. Effectively this makes these shadow registers a direct source of time and calendar information, albeit generally in BCD format and unlike with the basic RTC1 peripheral, using it as the source for C-style functions via Newlib has become rather tricky.
Unix Time Things
In the world of computing the ‘seconds since the Unix Epoch’ thing has become rather defining as the starting point for many timing-related functions. One consequence of this is that indicating a point in time often involves listing the number of seconds since said epoch on January 1st of 1970, at 00:00:00 UTC. This includes the time-related functions in the standard C libraries, such as Newlib, as discussed earlier.
This is perhaps the most frustrating point with these three-ish different STM32 RTC peripherals, as although the RTC1 is barebones, making it work with Newlib is a snap, while RTC2 and RTC3 are for the most part a nightmare, except for the RTC3 implementations that support the binary mode, although even that is a down-counter instead of an up-counter. This leaves one with the dreadful task of turning those shadow register values back into a Unix timestamp.
One way to do this is by using the mktime() function as mentioned earlier. This takes a tm struct whose fields define the elements of a date, e.g. for seconds:
tm tt;
tt.tm_sec = (uint8_t) bcd2dec32(RTC_TR & (RTC_TR_ST | RTC_TR_SU));
By repeating this for each part of RTC_TR and RTC_DR, we end up with a filled in struct that we can pass to mktime which will then spit out our coveted Unix timestamp in the form of a time_t integer. Of course, that would be far too easy, and thus we run head-first into the problem that mktime is incredibly picky about what it likes, and makes this implementation-dependent.
For example, despite the claims made about ranges for the tm struct, running a simple local test case in an MSYS2 environment indicated that negative years since 1970 wasn’t allowed, so that not having the RTC set to a current-ish date will always error out when the year is less than 71. It’s quite possible that a custom alternative to mktime will be less headache-inducing here.
Of course, ST could just have been nice and offered the basic counter of RTC1 along with all of the good stuff added with RTC2 and RTC3, but maybe for that we’ll have to count the seconds until the release of RTC4.
Rackintosh Plus Is the Form Factor Nobody Has Been Waiting For

For all its friendly countenance and award-winning industrial design, there’s one thing the venerable Macintosh Plus can’t do: fit into a 1U rack space. OK, if we’re being honest with ourselves, there are a lot of things a Mac from 1986 can’t do, but the rack space is what [identity4] was focused on when they built the 2025 Rackintosh Plus.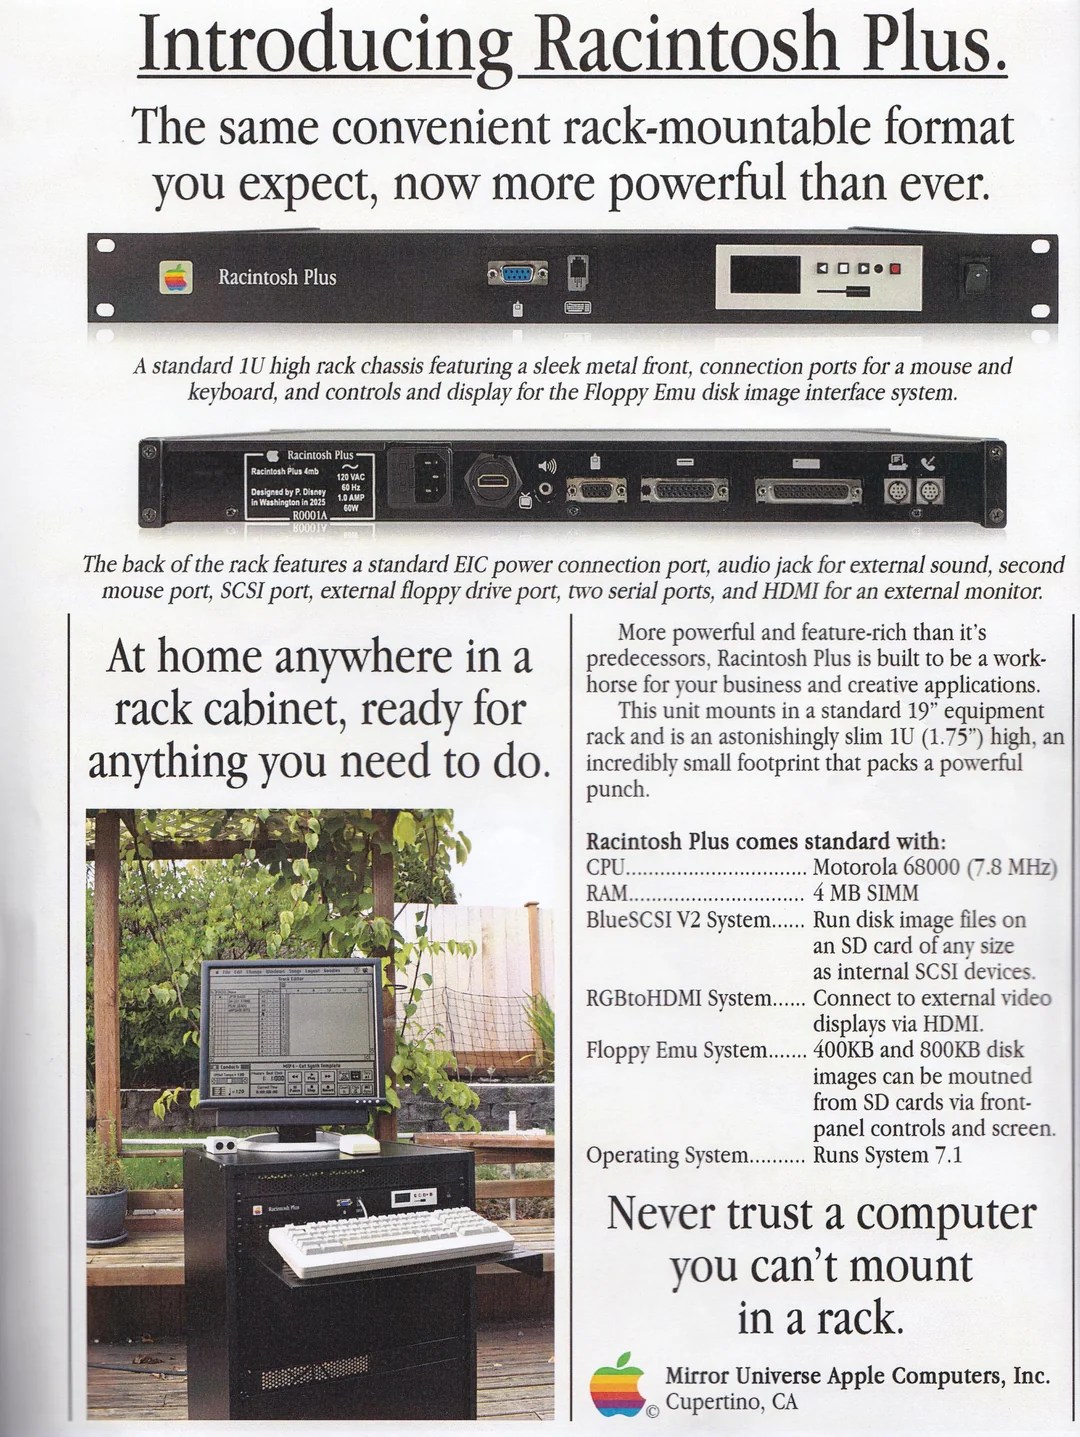
For those of you already sharpening your pitchforks, worry not: [identity4]’s beloved vintage Mac was not disassembled for this project. This rack mount has instead become the home for a spare logic board they had acquired Why? They wanted to use a classic Mac in their studio, and for any more equipment to fit the space, it needed to go into the existing racks. It’s more practical than the motivation we see for a lot of hacks; it’s almost surprising it hasn’t happened before. (We’ve seen Mac Minis in racks, but not the classic hardware.)
Aside from the genuine Apple logic board, the thin rack also contains a BlueSCSI hard drive emulator, a Floppy Emu for SD-card floppy emulator, an RGB-to-HDMI converter to allow System 7 to shine on modern monitors, and of course a Mean Well power supply to keep everything running.The Floppy Emu required a little light surgery to move the screen so it would fit inside the low-profile rack. [identity4] also broke out the keyboard and mouse connectors to the front of the rack, but all other connectors stayed on the logic board at the rear.
Sound is handled by a single 8-ohm speaker that lives inside the rack mount, because even if the Rackintosh can now fit into a 1U space, it still can’t do stereo sound…or anything else a Macintosh Plus with 4 MB of RAM couldn’t do. Still, it’s a lovely hack. and the vintage-style advertisement was an excellent touch.
Now they just need the right monochrome display.
A Look at Not an Android Emulator

Recently, Linux has been rising in desktop popularity in no small part to the work on WINE and Proton. But for some, the year of the Linux desktop is not enough, and the goal is now for the year of the Linux phone. To that end, an Android Linux translation layer called Android Translation Layer (we never said developers were good at naming) has emerged for those running Linux on their phones.
Android Translation Layer (ATL) is still in very early days, and likely as not, remains unpackaged on your distro of choice. Fortunately, a workaround is running an Alpine Linux container with graphics pass through via a tool like Distrobox or Toolbox. Because of the Alpine derived mobile distribution postmarketOS, ATL is packaged in the Alpine repos.
In many ways, running Android apps on Linux is much easier then Windows apps. Because Android apps are architecture independent, hardware emulation is unnecessary. With such similar kernels, on paper at least, Android software should run with minimal effort on Linux. Most of what ATL provides is a Linux/Android hardware abstraction layer glue to ensure Android system calls make their way to the Linux kernel.
Of course, there is a lot more to running Android apps, and the team is working to implement the countless Android system APIs in ATL. For now, older Android apps such as Angry Birds have the best support. Much like WINE, ATL will likely devolve into a game of wack-a-mole where developers implement fresh translation code as new APIs emerge and app updates break. Still, WINE is a wildly successful project, and we hope to see ATL grow likewise!
If you want to get your Android phone to talk to Linux, make sure to check out this hack next!
Preludio alla compromissione: è boom sulle scansioni mirate contro Cisco ASA
A fine agosto, GreyNoise ha registrato un forte aumento dell’attività di scansione mirata ai dispositivi Cisco ASA. Gli esperti avvertono che tali ondate spesso precedono la scoperta di nuove vulnerabilità nei prodotti. Questa volta, si tratta di due picchi: in entrambi i casi, gli aggressori hanno controllato massicciamente le pagine di autorizzazione ASA e l’accesso Telnet/SSH in Cisco IOS.
Il 26 agosto è stato osservato un attacco particolarmente esteso, avviato da una botnet brasiliana, che ha utilizzato circa 17.000 indirizzi univoci e ha gestito fino all’80% del traffico. In totale, sono state osservate fino a 25.000 sorgenti IP. È interessante notare che entrambe le ondate hanno utilizzato intestazioni di browser simili, mascherate da Chrome, a indicare un’infrastruttura comune.
Gli Stati Uniti erano l’obiettivo principale, ma anche Regno Unito e Germania sono stati monitorati.
Secondo GreyNoise, circa l’80% di tali ricognizioni si traduce nella successiva scoperta di nuove problematiche di sicurezza, sebbene la correlazione statistica sia notevolmente più debole per Cisco rispetto ad altri produttori. Ciononostante, tali indicatori consentono agli amministratori di rafforzare in anticipo le proprie difese.
In alcuni casi, questi potrebbero essere tentativi falliti di sfruttare bug già chiusi, ma una campagna su larga scala potrebbe anche essere mirata a mappare i servizi disponibili per un ulteriore sfruttamento di vulnerabilità non ancora divulgate.

Un amministratore di sistema indipendente con il nickname NadSec – Rat5ak, ha segnalato un’attività simile iniziata a fine luglio e che ha preso slancio fino al 28 agosto. Ha registrato oltre 200.000 richieste ad ASA in 20 ore con un carico uniforme di 10.000 richieste da ciascun indirizzo, il che indica una profonda automazione. Le fonti erano tre sistemi autonomi: Nybula, Cheapy-Host e Global Connectivity Solutions LLP.
Si consiglia agli amministratori di installare gli ultimi aggiornamenti di Cisco ASA il prima possibile per chiudere le falle note, abilitare l’autenticazione a più fattori per tutti gli accessi remoti e non pubblicare direttamente pagine /+CSCOE+/logon.html, Web VPN , Telnet o SSH.
In casi estremi, si consiglia di esternalizzare l’accesso tramite un concentratore VPN, un reverse proxy o un gateway con verifica aggiuntiva.
È inoltre possibile utilizzare gli indicatori di attacco pubblicati da GreyNoise e Rat5ak per bloccare le richieste sospette sul perimetro e, se necessario, abilitare il geo-blocking e la limitazione della velocità. Cisco non ha ancora rilasciato dichiarazioni in merito.
L'articolo Preludio alla compromissione: è boom sulle scansioni mirate contro Cisco ASA proviene da il blog della sicurezza informatica.
The Gentlemen ransomware: analisi di una minaccia emergente nel dark web
Nel Q3 2025 è stato osservato un nuovo gruppo ransomware, identificato come The Gentlemen, che ha lanciato un proprio Data Leak Site (DLS) nella rete Tor.
L’infrastruttura e le modalità operative del gruppo indicano un livello di organizzazione medio-alto, con particolare attenzione alla gestione dell’immagine e alla sicurezza operativa. Il DLS di The Gentlemen è accessibile tramite un indirizzo .onion e si presenta come segue:

- Homepage minimalista con logo, motto e branding coerente.
- TOX ID pubblico per comunicazioni cifrate P2P, probabilmente utilizzato per le negoziazioni.
- QR code ridondante per facilitare l’accesso ai contatti.
- Sezione dedicata alle vittime, organizzata in schede con descrizioni e riferimenti a dati esfiltrati.
L’assenza di funzionalità superflue e la scelta di protocolli decentralizzati riducono la superficie d’attacco contro la loro infrastruttura.

Victimology
Le vittime osservate appartengono a settori ad alto valore strategico:
- Manifatturiero/Automotive (EU)
- Servizi tecnologici/IT consulting (Asia)
- Energia e Telecomunicazioni (global)
L’approccio suggerisce una strategia mirata verso entità con bassa tolleranza alla disruption e forte esposizione reputazionale.
Distinguishing Factors
- Branding marcato: stile grafico coerente e naming che punta a differenziarsi da gruppi caotici.
- OpSec rafforzata: uso di TOX invece di portali centralizzati.
- DLS modulare: struttura scalabile, pronta a ospitare un numero crescente di vittime.
Considerazioni finali
Il debutto di The Gentlemen conferma che il panorama ransomware è in continua evoluzione. L’attenzione ai dettagli, la costruzione di un DLS pulito e funzionale, e la scelta di obiettivi nei settori industriali più redditizi lasciano intuire che questo gruppo non sia un’iniziativa improvvisata, ma il risultato di un’organizzazione con risorse e competenze consolidate.
Per le aziende, la lezione è chiara: rafforzare le difese di rete e i processi di incident response è ormai imprescindibile, soprattutto in quei comparti che rappresentano un target primario per attori malevoli di nuova generazione.
L'articolo The Gentlemen ransomware: analisi di una minaccia emergente nel dark web proviene da il blog della sicurezza informatica.
The Magic of the Hall Effect Sensor

Recently, [Solder Hub] put together a brief video that demonstrates the basics of a Hall Effect sensor — in this case, one salvaged from an old CPU fan. Two LEDs, a 100 ohm resistor, and a 3.7 volt battery are soldered onto a four pin Hall effect sensor which can toggle one of two lights in response to the polarity of a nearby magnet.
If you’re interested in the physics, the once sentence version goes something like this: the Hall Effect is the production of a potential difference, across an electrical conductor, that is transverse to an electric current in the conductor and to an applied magnetic field perpendicular to the current. Get your head around that!
Of course we’ve covered the Hall effect here on Hackaday before, indeed, our search returned more than 1,000 results! You can stick your toe in with posts such as A Simple 6DOF Hall Effect ‘Space’ Mouse and Tracing In 2D And 3D With Hall Effect Sensors.
youtube.com/embed/YTwcnHwplQw?…
Was Action! The Best 8-Bit Language?

Most people’s memories of programming in the 8-bit era revolve around BASIC, and not without reason. Most of the time, it was all we had. On the other hand, there were other options if you sought them out, and [Paul Lefebvre] makes the case that Goto10Retro that Action! was the best of them.
The limits of BASIC as an interpreted language are well-enough known that we needn’t go over them here. C and Pascal were available for some home computers in the 1980s, and programs written in those languages ran well, but compiling them? That was by no means guaranteed.
For those who lived on the Atari side of the fence, the Action! language provided a powerful alternative. Released by Optimized Systems Software in 1983, Action! was heavily optimized for the 6502, to the point that compiling and running simple programs with “C” and “R” felt “hardly slower” than typing RUN in BASIC. That’s what [Paul] writes, anyway, but it’s a claim that almost has to be seen to be believed.
You didn’t just get a compiler for your money when you bought Action!, though. The cartridge came with a capable text editor, simple shell, and even a primitive debugger. (Plus, of course, a hefty manual.) It’s the closest thing you’d find to an IDE on a computer of that class in that era, and it all fit on a 16 kB cartridge. There was apparently also a disk release, since the disk image is available online.
Unfortunately for those of us in Camp Commodore, the planned C-64 port never materialized, so we missed out on this language. Luckily our 64-bit supercomputers can easily emulate Atari 8-bit hardware and we can see what all the fuss was about. Heck, even our microcontrollers can do it.
Bambu Lab’s PLA Tough+ Filament: Mostly a Tough Sell

Beyond the simple world of basic PLA filaments there is a whole wild world of additives that can change this humble material for better or worse. The most common additives here are primarily to add color, but other additives seek to specifically improve certain properties of PLA. For example Bambu Lab’s new PLA Tough+ filament series that [Dr. Igor Gaspar] over at the My Tech Fun YouTube channel had over for reviewing purposes.
According to Bambu Lab’s claims for the filament, it’s supposed to have ‘up to’ double the layer adhesion strength as their basic PLA, while being much more robust when it comes to flexing and ‘taking a beating’. Yet as [Igor] goes through his battery of tests – comparing PLA Tough+ against the basic PLA – the supposedly tough filament is significantly worse in every count. That sad streak lasts until the impact tests, which is where we see a curious set of results – as shown above – as well as [Igor]’s new set of impact testing toys being put through their paces.
Of note is that although the Tough+ variants tested are consistently less brittle than their basic PLA counterparts, the Silver basic PLA variant makes an unexpectedly impressive showing. This is a good example of how color additives can have very positive impacts on a basic polymer like PLA, as well as a good indication that at least Bambu Lab’s Basic PLA in its Silver variant is basically better than Tough+ filaments. Not only does it not require higher printing temperatures, it also doesn’t produce more smelly VOCs, while being overall more robust.
youtube.com/embed/U-aTEslkqco?…
O Brother, What Art Thou?

Dedicated word processors are not something we see much of anymore. They were in a weird space: computerized, but not really what you could call a computer, even in those days. More like a fancy typewriter, with a screen and floppy disks. Brother made some very nice ones, and [Chad Boughton] got his hands on one for a modernization project.
The word processor in question, a Brother WP-2200, was chosen primarily because of its beautiful widescreen, yellow-phosphor CRT display. Yes, you read that correctly — yellow phosphor, not amber. Widescreen CRTs are rare enough, but that’s just different. As built, the WP-2200 had a luggable form-factor, with a floppy drive, mechanical keyboard, and dot-matrix printer in the back.
Thanks to [Chad]’s upgrade, most of that doesn’t work anymore. Not yet, anyway. The original logic controller of this word processor was… rather limited. As generations have hackers have discovered, you just can’t do very much with these. [Chad] thus decided to tear it all out, and replace it with an ESP-32, since the ESP32-VGA library is a thing. Of course this CRT is not a VGA display, but it was just a matter of tracing the pinout and guesstimating sane values for h-sync, v-sync and the like. (Details are not given in the video.)
Right now, the excellent mechanical keyboard (mostly) works, thanks to a Teensy reading the keyboard matrix off the original cable. The teensy sends characters via UART to the ESP32 and it can indeed display them upon the screen. That’s half of what this thing could do, back in the 1980s, and a very good start. Considering [Chad] now has magnitudes more compute power available than the engineers at Brother ever did (probably more compute power than the workstation used to program the WP2200, now that we think of it) we’re excited to see where this goes. By the spitballing at the end of the video, this device will end its life as much more than a word processor.To see what he’s got working so far, jump to 5:30 in the video. Once the project is a bit more mature, [Chad] assures us he’ll be releasing both code and documentation in written form.
We’ve seen [Chad]’s work before, most recently his slim-fit CD player, but he has been hacking for a long time.We covered his Super Mario PLC hack back in 2014.
youtube.com/embed/mr3uRO7FDz8?…
This Ouija Business Card Helps You Speak to Tiny Llamas

Business cards, on the whole, haven’t changed significantly over the past 600-ish years, and arguably are not as important as they used to be, but they are still worth considering as a reminder for someone to contact you. If the format of that card and method of contact stand out as unique and related to your personal or professional interests, you have a winning combination that will cement yourself in the recipient’s memory.
In a case study of “show, don’t tell”, [Binh]’s business card draws on technological and paranormal curiosity, blending affordable, short-run PCB manufacturing and an, LLM or, in this case, a Small Language Model, with a tiny Ouija board. While [Binh] is very much with us in the here and now, and a séance isn’t really an effective way to get a hold of him, the interactive Ouija card gives recipient’s a playful demonstration of his skills.

The interface is an array of LEDs in the classical Ouija layout, which slowly spell out the message your supernatural contact wants to communicate. The messages are triggered by the user through touch pads. Messages are generated locally by an ESP32-S3 based on Dave Bennett’s TinyLlama LLM implementation.
For a bit of a role reversal in Ouija communication, check out this Ouija robot. For more PCB business card inspiration, have a look at this pong-playing card and this Arduboy-inspired game console card.
youtube.com/embed/WC3O2cKT8Eo?…
Thanks to [Binh] for sharing this project with us.
In Nepal si muore per i Social Network! In 19 hanno perso la vita per riavere Facebook
Con una drammatica inversione di tendenza, il Nepal ha revocato il blackout nazionale sui social media imposto la scorsa settimana dopo che aveva scatenato massicce proteste giovanili e causato almeno 19 morti, secondo i media locali.
La decisione è stata annunciata l’8 settembre dal Ministro delle Comunicazioni e dell’Informazione Prithvi Subba Gurung, che ha affermato che il governo stava rispondendo all’indignazione pubblica e alla tensione nelle strade. Il governo ha inoltre promesso di pagare le cure delle vittime e ha istituito un comitato per indagare sulle cause della tragedia e presentare proposte entro due settimane.
Il blocco ha interessato 26 piattaforme, tra cui Facebook, Instagram, YouTube e X. Le restrizioni erano una diretta prosecuzione della direttiva del 25 agosto: alle piattaforme straniere era stato ordinato di registrare le proprie attività in Nepal e di nominare un rappresentante locale entro sette giorni.

Poiché la maggior parte delle aziende ha ignorato la scadenza, l’accesso ai servizi è stato disattivato la scorsa settimana. Alcune piattaforme non sono state bloccate: TikTok e Viber hanno rispettato i requisiti prima della scadenza e sono state aggiunte al registro.
La cancellazione ha coinciso con il giorno più intenso delle proteste. L’8 settembre, migliaia di persone, molte delle quali adolescenti in uniforme scolastica, hanno riempito le strade delle città di tutto il paese, chiedendo l’accesso ai social media. Le proteste sono degenerate in scontri con le forze di sicurezza; almeno 19 persone sono state uccise e oltre un centinaio sono rimaste ferite, secondo i media nepalesi.

Con l’intensificarsi dei disordini, il Primo Ministro KP Sharma Oli ha affermato che i disordini erano alimentati da “persone esterne”, ma ha sottolineato che il governo non ha respinto le richieste della nuova generazione ed è pronto al dialogo.
Mentre le forze di sicurezza radunavano rinforzi, incendi e manifestazioni violente si sono verificati in città nei pressi di edifici governativi e residenze di politici di alto rango. Secondo quanto riportato dai media locali, i manifestanti sono entrati nel territorio del complesso parlamentare e hanno distrutto edifici lungo la linea di scontro con i partiti al potere.
Anche i feed delle pubblicazioni indiane e nepalesi hanno registrato episodi operativi, dall’evacuazione di funzionari da parte di elicotteri dell’esercito al coordinamento di colonne di manifestanti su piattaforme di messaggistica e chat di gioco. In particolare, alcuni degli inviti all’azione sono stati diffusi tramite Discord e, in serata, un esercito era al lavoro nei pressi del quartiere ministeriale.
L’impatto politico è stato immediato. Prima si è dimesso il Ministro degli Interni Ramesh Lekhak, poi il Primo Ministro KP Sharma Oli, sotto pressione sia dalla piazza che dai suoi alleati della coalizione. Nel mezzo dei disordini, l’amministrazione di Kathmandu ha chiuso l’aeroporto internazionale di Tribhuvan e cancellato tutti i voli, citando rischi per la sicurezza senza precedenti.
La decisione del governo è stata criticata dalle organizzazioni internazionali. L’Alto Commissariato delle Nazioni Unite per i Diritti Umani ha ricordato alle autorità nepalesi la necessità di garantire la libertà di riunione pacifica e di espressione. Amnesty International e altre organizzazioni per i diritti umani avevano avvertito, ancor prima della chiusura dei social, che i filtri di massa e le risposte violente alle proteste compromettono le libertà civili fondamentali.
Nonostante lo sblocco dei social network e il cambio di primo ministro, la fase di tensione non è ancora finita. A Kathmandu, le restrizioni alla circolazione permangono, la polizia e l’esercito presidiano gli snodi chiave e gli attivisti stanno preparando eventi di lutto e chiedendo risposte alle domande sulle morti e sul futuro della regolamentazione delle piattaforme online.
La vicenda del blocco si inserisce nel più ampio tentativo di Kathmandu di inasprire le regole per le piattaforme digitali. In primavera, il governo ha presentato un disegno di legge sui social media, ancora in attesa di approvazione.
Il documento prevede multe e pene detentive per le pubblicazioni che le autorità ritengono “contrarie alla sovranità o agli interessi nazionali”. La Federazione Internazionale dei Giornalisti ha descritto l’iniziativa come una minaccia alla libertà di stampa e all’espressione digitale.
Il pensiero di Red Hot Cyber va alle 19 vittime e ai loro cari.
L'articolo In Nepal si muore per i Social Network! In 19 hanno perso la vita per riavere Facebook proviene da il blog della sicurezza informatica.
The Android Linux Commander

Last time, I described how to write a simple Android app and get it talking to your code on Linux. So, of course, we need an example. Since I’ve been on something of a macropad kick lately, I decided to write a toolkit for building your own macropad using App Inventor and any sort of Linux tools you like.
I mentioned there is a server. I wrote some very basic code to exchange data with the Android device on the Linux side. The protocol is simple:
- All messages to the ordinary Linux start with >
- All messages to the Android device start with <
- All messages end with a carriage return
Security
You can build the server so that it can execute arbitrary commands. Since some people will doubtlessly be upset about that, the server can also have a restrictive set of numbered commands. You can also allow those commands to take arguments or disallow them, but you have to rebuild the server with your options set.
There is a handshake at the start of communications where Android sends “>.” and the server responds “<.” to allow synchronization and any resetting to occur. Sending “>#x” runs a numbered command (where x is an integer) which could have arguments like “>#20~/todo.txt” for example, or, with no arguments, “>#20” if you just want to run the command.
If the server allows it, you can also just send an entire command line using “>>” as in: “>>vi ~/todo.txt” to start a vi session.
Backtalk
There are times when you want the server to send you some data, like audio mute status or the current CPU temperature. You can do that using only numbered commands, but you use “>?” instead of “>#” to send the data. The server will reply with “<!” followed by the first line of text that the command outputs.
To define the numbered commands, you create a commands.txt file that has a simple format. You can also set a maximum number, and anything over that just makes a call to the server that you can intercept and handle with your own custom C code. So, using the lower-numbered commands, you can do everything you want with bash, Python, or a separate C program, even. Using the higher numbers, you can add more efficient commands directly into the server, which, if you don’t mind writing in C, is more efficient than calling external programs.
If you don’t want to write programs, things like xdotool, wmctrl, and dbus-send (or qdbus) can do much of what you want a macropad to do. You can either plug them into the commands file or launch shell scripts. You’ll see more about that in the example code.
Now all that’s left is to create the App Inventor interface.
A Not So Simple Sample
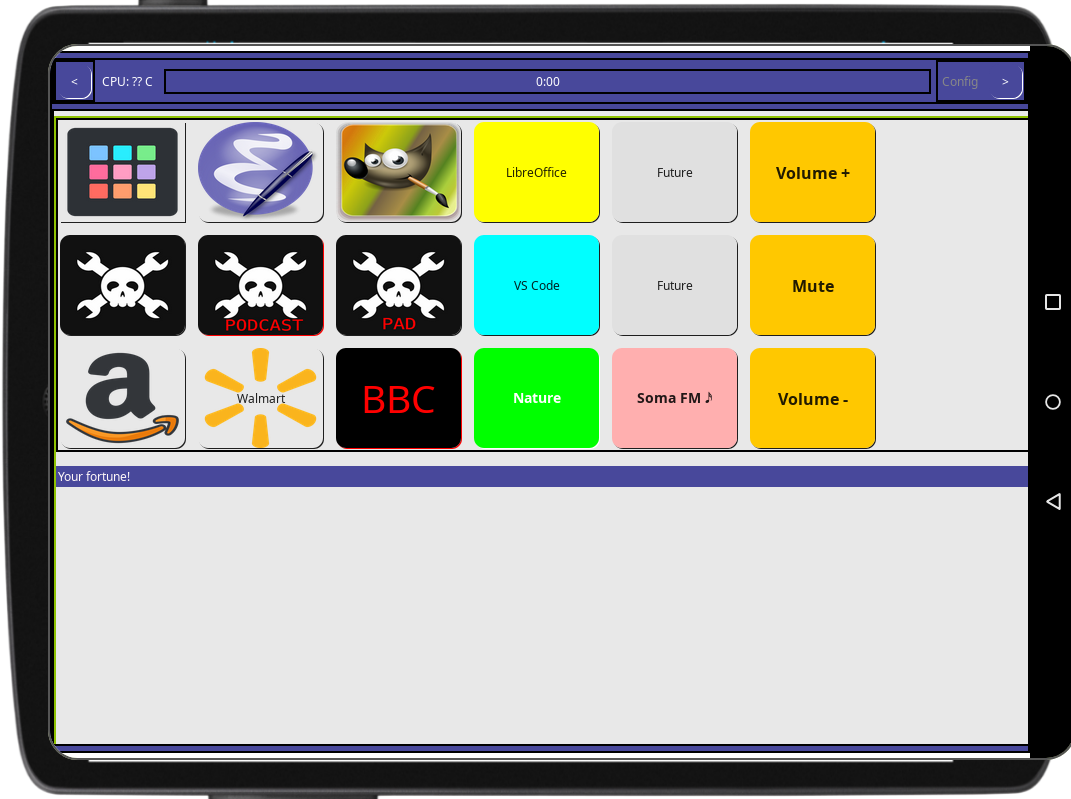
App Inventor is made to create simple apps. This one turned out not to be so simple for a few reasons. The idea was that the macro pad should have a configuration dialog and any number of screens where you could put buttons, sliders, or anything else to interact with the server.
The first issue was definitely a quirk of using App Inventor. It allows you to have multiple screens, and your program can move from screen to screen. The problem is, when you change screens, everything changes. So if we used multiple screens, you’d have to have copies of the Bluetooth client, timers, and anything else that was “global,” like toolbar buttons and their code.
That didn’t seem like a good idea. Instead, I built a simple system with a single screen featuring a toolbar and an area for table layouts. Initially, all but one of the layouts are hidden. As you navigate through the screens, the layout that is active hides, and the new one appears.
Sounds good, but in practice there is a horrible problem. When the layouts become visible, they don’t always recalculate their sizes properly, and there’s no clean way to force a repeat of the layout. This led to quirks when moving between pages. For example, some buttons would have text that is off-center even though it looked fine in the editor.
Another problem is editing a specific page. There is a button in the designer to show hidden things. But when you have lots of hidden things, that’s not very useful. In practice, I just hide the default layout, unhide the one I want to work on, and then try to remember to put things back before I finish. If you forget, the code defensively hides everything but the active page on startup.
Just Browsing
I also included some web browser pages (so you can check Hackaday or listen to Soma FM while you work). When the browser became visible, it would decide to be 1 pixel wide and 1 pixel high, which was not very useful. It took a lot of playing with making things visible and invisible and then visible again to get that working. In some cases, a timer will change something like the font size just barely, then change it back to trigger a recalculation after everything is visible.
Speaking of the browser, I didn’t want to have to use multiple pages with web browser components on it, so the system allows you to specify the same “page” more than once in the list. The page can have more than one title, based on its position, and you can initialize it differently, also based on its position. That was fairly easy, compared to getting them to draw correctly.
Other Gotchas
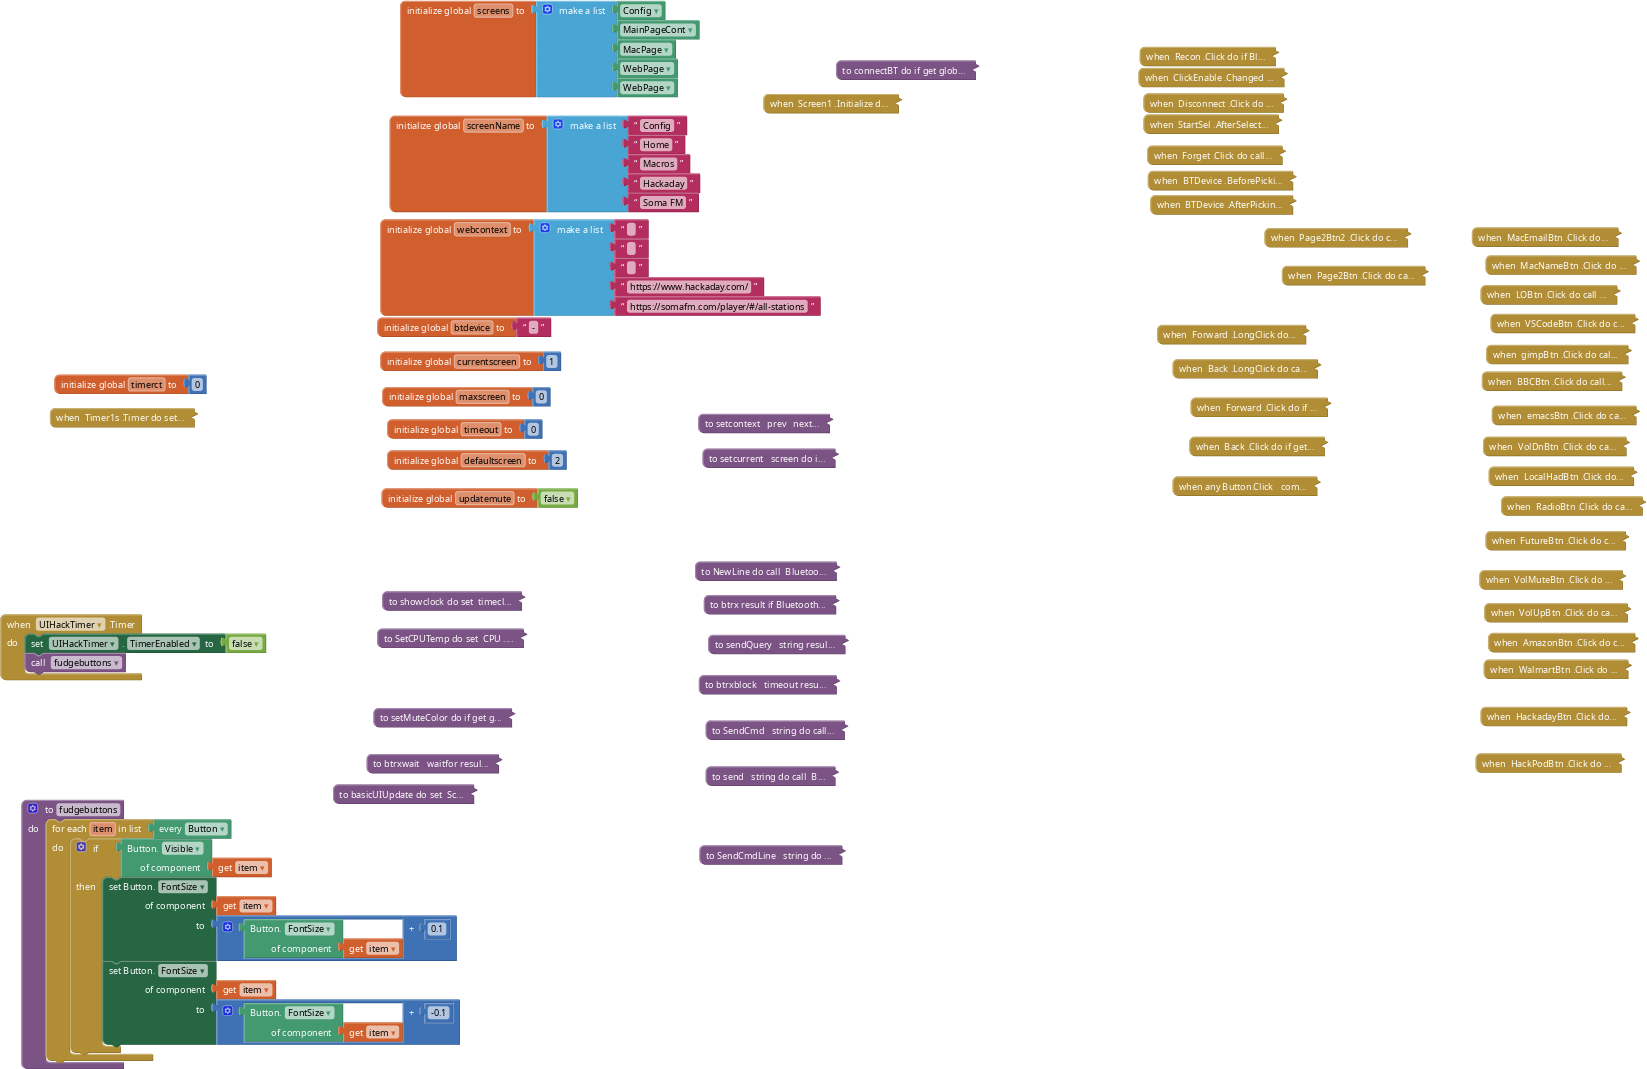
A few other problems cropped up, some of which aren’t the Inventor’s fault. For example, all phones are different, so your program gets resized differently, which makes it hard to work. I just told the interface I was building for a monitor and let the phone resize it. There’s no way to set a custom screen size that I could find.
The layout control is pretty crude, which makes sense. This is supposed to be a simple tool. There are no spacers or padding, for example, but small, fixed-size labels will do the job. There’s also no sane way to make an element span multiple cells in a layout, which leads to lots of deeply nested layouts.
The Bluetooth timeout in App Inventor seemed to act strangely, too. Sometimes it would time out even with ridiculously long timeout periods. I left it variable in the code, but if you change it to anything other than zero, good luck.
How’d It Work?
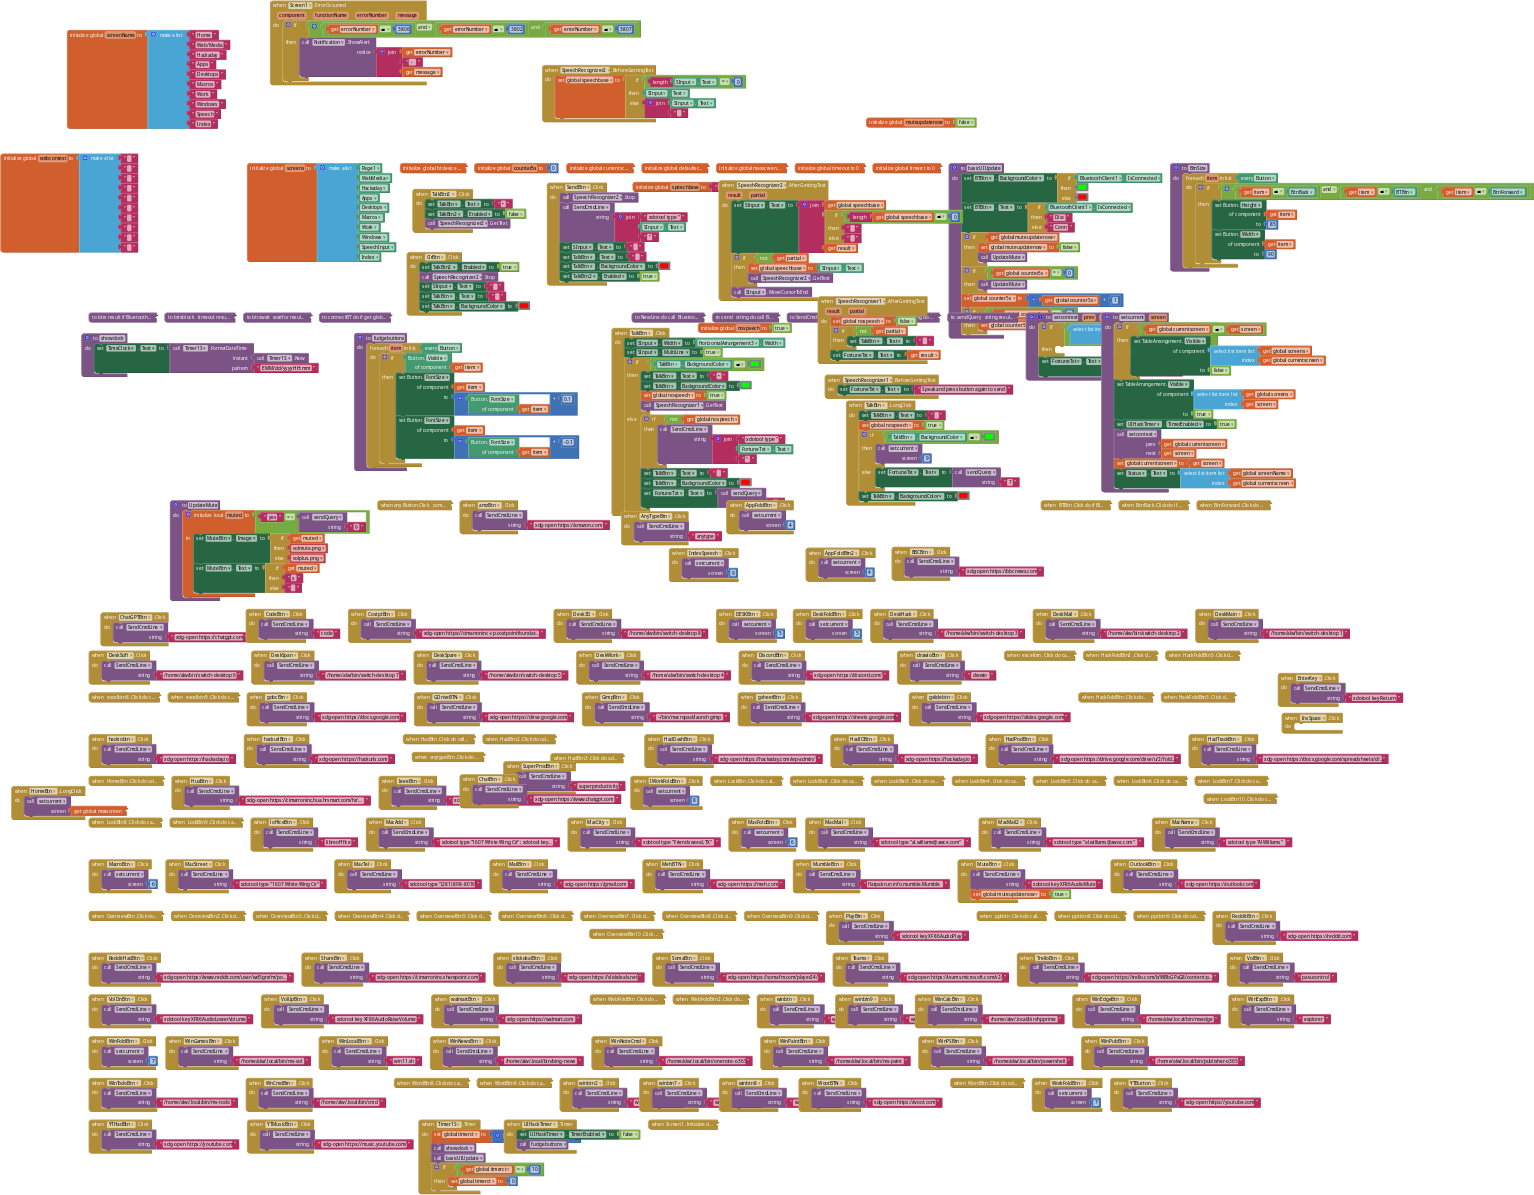
This is probably the most complex thing you’d want to do with App Inventor. The block structure is huge, although, to be fair, a lot of it is just sending a command off when you press a button. The example pad has nearly 500 blocks. The personalized version I use on my own phone (see the video below) has just over 900 blocks!
Of course, the tool isn’t made for such a scale, so be prepared for some development hiccups. The debugging won’t work after a certain point. You just have to build an APK, load it, and hope for luck.
You can find the demo on GitHub. My version is customized to link to my computer, on my exact screen size, and uses lots of local scripts, so I didn’t include it, but you can see it working in the video below.
If you want to go back and look more at the server mechanics, that was in the last post. Of, if you’d rather repurpose an old phone for a server, we’ve seen that done, too.
youtube.com/embed/15znMKz42yM?…
Give Your Twist Connections Some Strength

We’ve all done it at some time — made an electrical connection by twisting together the bare ends of some wires. It’s quick, and easy, but because of how little force required to part it, not terribly reliable. This is why electrical connectors from terminal blocks to crimp connectors and everything else in between exist, to make a more robust join.
But what if there was a way to make your twist connections stronger? [Ibanis Sorenzo] may have the answer, in the form of an ingenious 3D printed clamp system to hold everything in place. It’s claimed to result in a join stronger than the wire itself.
The operation is simple enough, a spring clamp encloses the join, and a threaded outer piece screws over it to clamp it all together. There’s a pair of 3D printable tools to aid assembly, and a range of different sizes to fit different wires. It looks well-thought-out and practical, so perhaps it could be a useful tool in your armoury. We can see in particular that for those moments when you don’t have the right connectors to hand, a quick 3D print could save the say.
A few years ago we evaluated a set of different ways to make crimp connections. It would be interesting to subject this connection to a similar test. Meanwhile you can see a comprehensive description in the video below the break.
youtube.com/embed/ZSGpUEHWeTg?…
Thanks [George Graves] for the tip.
FreeCAD Foray: From Brick To Shell

Over a year ago, we took a look at importing a .step file of a KiCad PCB into FreeCAD, then placing a sketch and extruding it. It was a small step, but I know it’s enough for most of you all, and that brings me joy. Today, we continue building a case for that PCB – the delay is because I stopped my USB-C work for a fair bit, and lost interest in the case accordingly, but I’m reviving it now.
Since then, FreeCAD has seen its v 1.0 release come to fruition, in particular getting a fair bit of work done to alleviate one of major problems for CAD packages, the “topological naming problem”; we will talk about it later on. The good news is, none of my tutorial appears to have been invalidated by version 1.0 changes. Another good news: since version 1.0, FreeCAD has definitely become a fair bit more stable, and that’s not even including some much-needed major features.
High time to pick the work back up, then! Let’s take a look at what’s in store for today: finishing the case in just a few more extrusions, explaining a few FreeCAD failure modes you might encounter, and giving some advice on how to make FreeCAD for you with minimum effort from your side.
As I explained in the last article, I do my FreeCAD work in the Part workbench, which is perfectly fine for this kind of model, and it doesn’t get in your way either. Today, the Part and Sketcher workbenches are all we will need to use, so you need not be overwhelmed by the dropdown with over a dozen entries – they’re there for a reason, but just two will suffice.
Last time, I drew a sketch and extruded it into a box. You’ll want your own starting layer to look different from that, of course, and so do I. In practice, I see two options here. Either you start by drawing some standoffs that the board rests on, or you start by offsetting your sketch then drawing a floor. The first option seems simpler to me, so let’s do that.
You can tie the mounting holes to external geometry from the STEP file, but personally, I prefer to work from measurements. I’d like to be easily able to substitute the board with a new version and not have to re-reference the base sketches, resulting in un-fun failure modes.
So, eyeballing the PCB, the first sketch will have a few blocks that the PCB will be resting on.
To The Floor And Beyond
Perfect – remember, the first sketch is already extruded, so when we re-drew the sketch, it all re-extruded anew, and we have the block we actually want. Now, remember the part about how to start a sketch? Single click on a surface so it gets highlighted green, press “New sketch”, and click “ok” on the box that asks if you want to do it the “Plane X-Y” way. That’s it, that’s your new sketch.
Now, we need to draw the box’s “floor”. That’s simple too – just draw a big rectangle. You’ll want to get some dimensions going, of course. Here, you can use the general distance constraint (K,D, click K then click D), or constrain even quicker by clicking I (vertical dimension) and L (horizontal dimension). Now, for the fun part – filleting! Simply put, you want to round the box corners for sure, nobody wants a box with jagged sharp holes.
You might have seen the Fillet tool in the Part workbench. Well, most of the time, it isn’t even needed, and frankly, you don’t want to use it if a simpler option exists. Instead, here, just use a sketch fillet – above in the toolbar; sadly, no keybind here. Then, click on corners you want rounded, exit the tool, then set their radius with diameter tool (D), as default radii are way too large at our scale. The sketch fillet tool basically just creates arcs for you – you can always draw the arcs yourself too, but it’s way easier this way.

Extrude that to 1 mm, or your favourite multiple of your layer height when slicing the print, and that’s the base of your case, the part that will be catching the floor. Honestly, for pin insulation purposes, this already is more than enough. Feel free to give it ears so that it can be mounted with screws onto a surface, or maybe cat ears so it can bring you joy. If you’re not intimidated by both the technical complexity and the depravity of it, you can even give it human ears, making your PCB case a fitting hacking desk accessory for a world where surveillance has become ubiquitous. In case you unironically want to do this, importing a 3D model should be sufficient.
Build Up This Wall!
Make a sketch at the top of the floor, on the side that you’ll want the walls to “grow out of”. For the walls, you’ll naturally want them to align with the sides of the floor. This is where you can easily use external geometry references. Use the “Create external geometry” tool (G, X) and click on all the 8 edges (4 lines and 4 arcs) of the floor. Now, simply draw over these external geometry with line and arc tool, making sure that your line start and end points snap to points of external geometry.

To fix that, you can go box-select the intersection points with your mouse, and click C for a coincident constraint. Sometimes the sketch will fail. To the best of my knowledge, it’s a weird bug in KiCad, and it tends to happen specifically where external geometry to other solids is involved. Oh well, you can generally make it work by approaching it a few times. If everything fails, you can set distance (K,D) to 0, and if that fails, set vertical distance (I) and then horizontal distance (L) to zero, that should be more than good enough.
And with that, the wall is done. But it still needs USB-C socket holes. Cutting holes in FreeCAD is quite easy, even for a newcomer. You make a solid block that goes “into” your model exactly in the way you want the cut to be made. Then, in Part workbench, click the base model that you want cut in the tree view, click the solid block model, and use the “Cut” tool. Important note – when using the “Cut” tool, you have to first click on the base object, and then the tool. If you do it in reverse, you cut out the pieces you actually want to save, which is vaguely equivalent to peeling potatoes and then trashing the potatoes instead of the peels.

Stepping Up
Once you get past “Hello World”, and want to speed your FreeCAD work tremendously, you will want to learn the keybinds. Once again, the key to designing quickly and comfortably is having one hand on keyboard and another hand on mouse, doesn’t matter if you’re doing PCBs or 3D models. And the keybinds are very mnemonic: “d” is dimension, “c” is coincident.
Another tip is saving your project often. Yet another one is keeping your FreeCAD models in Git, and even publishing them on GitHub/GitLab – sure, they’re binary files, but revision control is worth it even if you can’t easily diff the files. We could always use more public 3D models with FreeCAD sources. People not publishing their source files has long been a silent killer of ideas in the world of 3D printing, as opposed to whatever theories about patents might be floating around the web. If you want something designed to your needs, the quickest thing tends to be taking someone else’s project and modifying it, which is why we need for sharing culture so that we can all finally stop reinventing all the wheels our projects may require.
This is more than enough to ready you up for basic designs, if you ask me. Go get that case done, throw it on GitHub, and revel in knowing your board is that much less likely to accidentally short-circuit. It’s a very nice addition for a board intended to handle 100 W worth of power, and now it can also serve as a design example for your own needs. Next time, let’s talk about a number of good practices worth attending to if you want your FreeCAD models to last.
Race condition letale per Linux: il trucco che trasforma un segnale POSIX in un’arma
Un ricercatore indipendente di nome Alexander Popov ha presentato una nuova tecnica per sfruttare una vulnerabilità critica nel kernel Linux, a cui è stato assegnato l’identificatore CVE-2024-50264. Questo errore di tipo “use-after-free” nel sottosistema AF_VSOCK è presente dalla versione 4.8 del kernel e consente a un utente locale senza privilegi di avviare uno errore quando si lavora con un oggetto virtio_vsock_sock durante la creazione della connessione.
La complessità e l’entità delle conseguenze hanno fatto sì che il bug si aggiudicasse i Pwnie Awards 2025 nella categoria “Best Privilege Escalation”.
In precedenza, si riteneva che lo sfruttamento del problema fosse estremamente difficile a causa dei meccanismi di difesa del kernel, come la distribuzione casuale delle cache e le peculiarità dei bucket SLAB, che interferiscono con metodi semplici come l’heap spraying.
Tuttavia, Popov è riuscito a sviluppare una serie di tecniche che eliminano queste restrizioni. Il lavoro è stato svolto nell’ambito della piattaforma aperta kernel-hack-drill, progettata per testare gli exploit del kernel.
Il passaggio chiave è stato l’utilizzo di un tipo speciale di segnale POSIX che non termina il processo. Interrompe la chiamata di sistema connect(), consentendo una riproduzione affidabile delle race condition e di non perdere il controllo sull’attacco.
Successivamente, il ricercatore ha imparato a controllare il comportamento delle cache di memoria sostituendo le proprie strutture al posto degli oggetti rilasciati. La messa a punto delle temporizzazioni consente di far scivolare i dati preparati in precedenza esattamente dove si trovava in precedenza l’elemento vulnerabile.

youtube.com/embed/qC95zkYnwb0?…
L'articolo Race condition letale per Linux: il trucco che trasforma un segnale POSIX in un’arma proviene da il blog della sicurezza informatica.
Further Adventures in Colorimeter Hacking

One of the great things about sharing hacks is that sometimes one person’s work inspires someone else to take it even further. A case in point is [Ivor]’s colorimeter hacking (parts two and three), which started with some relatively simple request spoofing to install non-stock firmware, and expanded from there until he had complete control over the hardware.
After reading [Adam Zeloof]’s work on replacing the firmware on a cosmetics spectrophotometer with general-purpose firmware, [Ivor] bought two of these colorimeters, one as a backup. He started with [Adam]’s method for updating the firmware by altering the request sent to an update server, but was only able to find the serial number from a quality-control unit. This installed the quality-control firmware, which encountered an error on the device. More searching led [Ivor] to another serial number, which gave him the base firmware, and let him dump and compare the cosmetic, quality-control, and base firmwares.
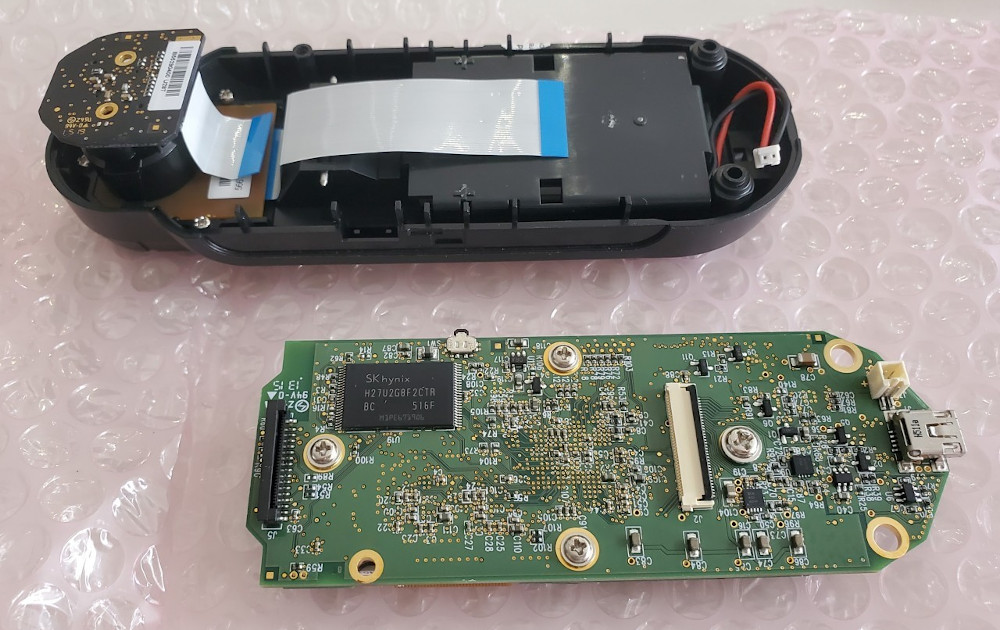
During firmware upload, the colorimeter switches into a bootloader, the menu of which has some interesting options, such as viewing and editing the NAND. Opening the device revealed a flash chip, an AT91SAM ARM9 chip, and some test pads. After carefully soldering to the test pads, he was able to dump the bootloader, and with some difficulty, the NAND contents. Changing the chip ID and serial number in the NAND let the quality-control firmware work on the cosmetic model; interestingly, only the first digit of the serial number needed to be valid.
Of course, the actual journey wasn’t quite this straightforward, and the device seemed to be bricked several times, one of which required the installation of a jumper to force it into a recovery mode. In the end, though, [Ivor] was able to download and upload content to NAND, alter the bootloader, alter the serial number, and enter boot recovery; in short, to have total control over the device’s software. Thoughtfully, he’s used his findings to write a Python utility library to interact with and edit the colorimeter’s software over USB.
If this makes you interested in seeing more examples of reverse-engineering, we’ve covered some impressive work on a mini console and an audio interface.
Google spinge l’AI come ricerca predefinita: rischio blackout per editori e blog indipendenti
Google intende semplificare l’accesso degli utenti alla modalità AI consentendo loro di impostarla come ricerca predefinita (al posto dei link tradizionali). La modalità AI è una versione della ricerca Google che utilizza modelli linguistici di grandi dimensioni per riassumere le informazioni dal web, in modo che gli utenti possano trascorrere più tempo su Google, anziché cliccare sui link dei siti web.
La nuova modalità AI nella ricerca di Google
La modalità AI può rispondere a domande complesse, elaborare immagini, riassumere informazioni, creare tabelle, grafici e persino fornire supporto con il codice. Come sottolinea Bleeping Computer , la modalità AI è attualmente facoltativa e si trova a sinistra della scheda “Tutti”. È disponibile in inglese in 180 paesi e territori in tutto il mondo.
Tuttavia, verso la fine della scorsa settimana, Logan Kilpatrick, responsabile del prodotto Google AI Studio, ha annunciato sul social media X che la modalità AI sarebbe presto diventata la modalità predefinita in Google. Successivamente, Robby Stein, vicepresidente del prodotto per la Ricerca Google, ha chiarito che l’azienda intende solo rendere la modalità AI più facilmente accessibile per le persone che desiderano utilizzarla.

L’azienda afferma che al momento non ci sono piani per rendere la modalità AI predefinita per tutti, ma se un utente preferisce utilizzarla sempre, presto sarà disponibile un interruttore o un pulsante a tale scopo.
In questo caso, i link tradizionali non verranno visualizzati per impostazione predefinita, ma è possibile passare alla vecchia visualizzazione dei risultati di ricerca trovando la scheda “Web”, che si trova proprio alla fine del pannello. La pubblicazione sottolinea che nel prossimo futuro la modalità AI potrebbe diventare la pagina di ricerca predefinita per tutti. Tuttavia, gli ingegneri di Google stanno attualmente cercando di determinare come questo passaggio influenzerà il settore pubblicitario.
Se l’AI fa il sunto, gli editori che fine fanno?
Google sta già testando annunci e recensioni basati sull’intelligenza artificiale e sta offrendo tali annunci ai partner. Tuttavia, il settore del marketing digitale non ha ancora capito come funzionerà il tutto se i link classici saranno completamente sostituiti dalla modalità AI.
I piani di Google per monetizzare la ricerca basata sull’intelligenza artificiale

Google detiene ancora circa il 90% del mercato della ricerca e continua a generare miliardi di clic per gli editori di tutto il mondo. Tuttavia, Google non paga editori e blog indipendenti per utilizzare l’intelligenza artificiale per riassumere i contenuti. Al contrario , l’azienda sostiene che i riepiloghi basati sull’intelligenza artificiale inviino più clic “di qualità” agli editori, sebbene non vi siano dati ufficiali a supporto di questa affermazione.
Una alleanza contro Google
Allo stesso tempo, ricerche indipendenti dimostrano che le persone sono meno propense a cliccare sui risultati di ricerca se il motore di ricerca fornisce loro un riepilogo basato sull’intelligenza artificiale.
Secondo quanto riportato dai media, alcuni editori indipendenti stanno già discutendo la creazione di un’alleanza tra media e notizie per combattere la crisi esistenziale che l’introduzione dell’intelligenza artificiale nei motori di ricerca comporta.
L'articolo Google spinge l’AI come ricerca predefinita: rischio blackout per editori e blog indipendenti proviene da il blog della sicurezza informatica.
Turning a $2 IKEA Lantern into a Stylish Enclosure

It’s fair to say that the average Hackaday reader enjoys putting together custom electronics. Some of those builds will be spaghetti on a breadboard, but at some point you’ll probably have a project that needs a permanent case. If you’re looking for a small case for your latest creation, check out [Julius Curt’s] modification of an IKEA Vårsyren lantern into a customizable enclosure!
Like most things IKEA, the Vårsyren lantern is flat pack — but rather than coming as a collection of wooden components, the lantern is made of sheet metal. It’s hexagonal in shape with a pair of three sided panels, so [Curt] simply snaps one of them off to make three sides of the final case. The other three sides are 3D printed with the STEP files provided so the case can be made to fit anything around 60x60x114 mm in size.
If flat pack hacking is up your alley, make sure to check out this IKEA 3D printer enclosure next!
youtube.com/embed/IFn1qn9qHpg?…
Thanks [Clint] for the tip!
Le Aziende italiane dei call center lasciano online tutte le registrazioni audio
Le aziende italiane che utilizzano piattaforme di telefonia online (VoIP) basate su software open-source come Asterisk e Vicidial, si affidano a questi sistemi per contattare quotidianamente i cittadini italiani, proponendo la vendita di prodotti e servizi di varia natura.
Paragon Sec, durante una ricerca nelle underground, ha individuato numerosi call center di aziende italiane attivi in diversi settori dalla promozione di pannelli fotovoltaici alla fornitura di acqua, luce e gas, fino a prodotti di benessere.
Quello che abbiamo scoperto, però, è allarmante: una fuga di registrazioni audio private tra operatori e clienti, rese pubblicamente accessibili sul web senza alcuna protezione.
Perché è un problema di sicurezza e privacy
Le registrazioni audio dei call center non sono semplici file tecnici dentro ci sono voci, dettagli personali e informazioni quotidiane dei cittadini italiani. Se questi contenuti finiscono online senza protezione, i rischi diventano reali e immediati.
- Frodi e truffe telefoniche: chiunque ascolti questi audio può usare numeri di telefono e dettagli personali per fingere di essere un operatore, ingannare le persone e ottenere ulteriori informazioni sensibili.
- Furto di identità: i dati anagrafici, se combinati con altre informazioni pubbliche, possono essere sfruttati per aprire contratti, richiedere finanziamenti o fare acquisti a nome delle vittime.
- Phishing e social engineering: dalle registrazioni emergono abitudini, preferenze e necessità dei clienti, informazioni preziose per costruire attacchi mirati, difficili da riconoscere come falsi.
- Violazione della dignità e della fiducia: ascoltare conversazioni che avrebbero dovuto restare private mina il rapporto tra cittadini e aziende, generando un clima di sfiducia generalizzata.
Inoltre, la voce è un dato biometrico. Questo apre scenari inquietanti: truffe bancarie via telefono, ordini falsi impartiti ad assistenti virtuali, e persino manipolazioni nei contesti lavorativi o familiari.
Violazione della normativa privacy
Il GDPR (Reg. UE 2016/679) e il Codice Privacy italiano (D.lgs. 196/2003) impongono obblighi precisi:
- Consenso esplicito e informato prima di registrare le conversazioni.
- Diritto di accesso, correzione o cancellazione dei dati personali.
- Conservazione dei dati solo per il tempo strettamente necessario.
L’esposizione di questi file online, senza autenticazione, cifratura o controlli di accesso, rappresenta una violazione diretta della legge e può comportare sanzioni rilevanti.
Se non protette, queste registrazioni possono essere sfruttate per frodi, phishing e social engineering, con rischi immediati per clienti e operatori.

Come sono state trovate le registrazioni
Le registrazioni non erano custodite in archivi riservati né nel dark web: erano semplicemente disponibili online, accessibili a chiunque sapesse dove cercare.
Il nostro team di analisti ha utilizzato la piattaforma di terze parti, che hanno un motore di ricerca che indicizza dispositivi e server esposti su Internet. Attraverso query mirate è stato possibile individuare server di call center italiani che utilizzavano piattaforme come Asterisk o Vicidial.
Questi sistemi, se configurati male, espongono cartelle contenenti file .wav o .mp3 delle conversazioni tra operatori e clienti. Alcuni server mostravano anche directory web navigabili senza autenticazione, un errore di sicurezza basilare che ha reso le registrazioni accessibili a chiunque.
Molti di questi sistemi, basati su Asterisk e Vicidial, erano configurati senza autenticazione o cifratura, rendendo pubblicamente accessibili registrazioni riservate.

Impatti per le aziende italiane
Le aziende coinvolte rischiano:
- Multe salate da parte del Garante Privacy.
- Perdita di fiducia da parte dei clienti.
- Danni reputazionali difficili da recuperare.
Le registrazioni audio non espongono solo le aziende, ma soprattutto i cittadini italiani che ogni giorno ricevono telefonate dai call center. Le conversazioni trapelate contengono informazioni che possono avere conseguenze dirette e concrete.
In un contesto in cui la protezione dei dati è cruciale per la protezioni dei dati personali.
Conclusioni
Il caso delle registrazioni audio dei call center italiani trovate online non è un semplice incidente tecnico è la prova di come configurazioni errate e mancanza di controlli di base possano trasformarsi in una minaccia concreta per aziende e cittadini.
Per le aziende, significa esporsi a multe, perdita di fiducia e danni reputazionali difficili da recuperare. Per i cittadini, invece, il rischio è diretto: frodi telefoniche, furto di identità, phishing mirato e persino l’uso della propria voce come dato biometrico per creare falsi digitali.
Paragon Security, qualora contattata, mette a disposizione le informazioni acquisite alle aziende dei call center interessate.
L'articolo Le Aziende italiane dei call center lasciano online tutte le registrazioni audio proviene da il blog della sicurezza informatica.
Tasting the Exploit: HackerHood testa l’exploit di WINRAR CVE-2025-8088
Manuel Roccon, leader del team etico HackerHood di Red Hot Cyber, ha realizzato una dettagliata dimostrazione video su YouTube che espone in modo pratico come funziona CVE-2025-8088 di WinRAR.
Il video mostra passo dopo passo le tecniche utilizzate dagli aggressori per compromettere i sistemi delle vittime attraverso un semplice doppio click su un archivio RAR malevolo.

Il bug CVE-2025-8088 di WinRAR
Il bug in questione è di tipo directory traversal ed è stato sfruttato attivamente in campagne di phishing mirate.
Come spiegato nell’articolo “Hai fatto doppio click su WinRAR? Congratulazioni! Sei stato compromesso”, un archivio manipolato può estrarre file in directory critiche, come le cartelle di avvio automatico di Windows, bypassando la normale destinazione di estrazione selezionata dall’utente.
I Rischi concreti: phishing ed esecuzione di malware
Quando gli attaccanti posizionano il malware nelle cartelle %APPDATA%\Microsoft\Windows\Start Menu\Programs\Startup o %ProgramData%\Microsoft\Windows\Start Menu\Programs\StartUp, il sistema operativo lo esegue automaticamente al successivo avvio, consentendo loro di avviare codice dannoso, backdoor o altri payload malevoli.
I ricercatori hanno attribuito questi exploit al gruppo RomCom (noto anche come Storm-0978, Tropical Scorpius, Void Rabisu o UNC2596), un collettivo cyber-criminale legato alle operazioni di spionaggio russo.
youtube.com/embed/HDZaJsO1wSc?…
Originariamente focalizzato sull’Ucraina, il gruppo ha ampliato i propri obiettivi, attaccando entità legate a progetti umanitari e altre organizzazioni europee. Le loro campagne si avvalgono di malware proprietario e tecniche sofisticate di persistenza e furto dati.
Patch disponibile, ma aggiornamenti manuali necessari
Fortunatamente, gli sviluppatori hanno risolto la vulnerabilità rilasciando WinRAR versione 7.13. Tuttavia, a causa dell’assenza di aggiornamenti automatici in WinRAR, molti utenti potrebbero rimanere esposti se non eseguono manualmente l’update scaricandolo dal sito ufficiale. Questo ritardo nell’adozione della patch ha permesso al bug di essere sfruttato a lungo prima della sua correzione.
Il video realizzato da Manuel Roccon mette in evidenza il valore formativo delle dimostrazioni “hands-on”.
Guardare concretamente come gli attaccanti nascondono i file malevoli in percorsi di sistema critici e li attivano senza alcuna interazione dell’utente aiuta ad aumentare la consapevolezza sul reale impatto della vulnerabilità. Questi contenuti divulgativi sono fondamentali per stimolare un’adozione più rapida delle buone pratiche di sicurezza e la tempestiva installazione degli aggiornamenti.
L'articolo Tasting the Exploit: HackerHood testa l’exploit di WINRAR CVE-2025-8088 proviene da il blog della sicurezza informatica.
Modos is Open Hardware, Easy on the Eyes

Since e-ink first hit the market a couple decades back, there’s always murmurs of “that’d be great as a second monitor”— but very, very few monitors have ever been made. When the commecial world is delivering very few options, it leaves room for open source hardware projects, like the Modos Glider and Paper Monitor, projects now seeking funding on Crowd Supply.
As far as PC monitors go, the Modos isn’t going to win many awards on specs alone. The screen is only 13.3″ across, and its resolution maxes out at 1600 x 1200. The refresh rate would be totally unremarkable for a budget LCD, at 75 Hz. This Paper Monitor isn’t an LCD, budget or otherwise, and for e-ink, 75 Hz is a blazing fast refresh rate.
Before you declare noone could get productive work done on such a tiny screen, stop and think that that screen is larger, and refreshing faster, than everyone’s favourite Macintosh. It can even run up to 8x the colour depth, and people got plenty done back in the day with just black-and-white. Some people still do.
Now that we’ve defended the idea, let’s get to the good part: it’s not just a monitor being crowdsourced. The driver board, called Glider, is fully open with code and design files on the Modos Labs GitHub repository. We sometimes complain about what counts as open hardware, but these guys are the true quill. Glider is using an FPGA with a custom clever configuration to get screens refreshing at that impressive 75 Hz. With the appropriate panel (there’s a list on Git– you’ll need an E Ink branded display, but you aren’t limited to the 13.3″ panel) the board can drive every pixel independently, forcing updates only on those pixels that need them. That’s an impressive trick and we’re not surprised it needed an FPGA to pull off. (It uses a Xilinx Spartan 6, for the record, running a config called Casper)
Because everything is open source, you can do things like you see in the API demo video (embedded below), where every panel in what looks like a tiled display manager is running a different picture mode. (There are more demo videos at the CrowdSupply page). We’re not sure how often that would come up in actual use– that functionality is not yet exposed to a window manager, for example, though it may yet be. Perhaps more interesting is the ability to customize specific refresh modes oneself, rather than relying on someone else’s idea of what a “browsing” or “gaming” mode should be.
For anyone interested, there’s still time to get in on the ground floor: the campaign on CrowdSupply ends September 18, 2025 at 04:59 PM PDT, and has levels to nab yourself a dev kit. It’s 599 USD for the 13″ and 199 USD for a 6″ version. (It’s the same board, just different displays.) For anyone not interested, there is no deadline for not buying things, and it usually costs nothing.
Thanks to [moneppo] for the tip!
youtube.com/embed/AoDYEZE7gDA?…