 - Collegamento all'originale")
Hard Power
Il libro di Roberto Arditti è un libro interessante con una tesi univoca: il potere non si contratta, si prende e si difende con le armi. Anzi, di più, la Guerra, che si fa con le armi, è per il giornalista il vero motore della Storia, quella con la esse maiuscola. Hard Power. Perchè la Guerra cambia la storia è infatti il titolo del libro che ha pubblicato con la casa editrice conservatrice Giubilei Regnani.
L’ex direttore di Formiche, editorialista di Il Tempo di Roma, ha diviso in capitoli geografici la sua dissertazione bellico-politica e la incomincia con la Russia. Della Russia Sovietica Arditti ricorda il passato e il deterrente nucleare e poi descrive I tremendi attacchi missilistici verso l’Ucraina, l’uso di droni, la potenza della macchina bellica industriale, fino l’uso della carne da macello di giovani russi non moscoviti, galeotti e senza quattrini, nelle trincee del Donbass a morire e ammazzare i forse più istruiti e sicuramente filoeuropei ucraini. Poi racconta la Cina e Taiwan un po’ alla maniera di Lucio Caracciolo, di cui è certo debitore di parte dell’analisi, quando racconta i choke points del mar della Cina e rammenta la superiorità demografica, industriale e quindi bellica cinese che prima o poi vorrà mangiarsi Taiwan prendendo di sorpresa l’America che, sola, forse sta impedendo l’esito catastrofico per il porcospino taiwanese. E poi ci parla del Congo, del Sudan, del Rwanda, cioè delle guerre per procura fatte per impossessarsi delle preziose terre rare che rendono possibili i nostri sogni digitali, ma sempre in punta di fucile o di machete. E poi giù con Libia, Cipro, Israele.
Le cose che dice sono vere, ma non convincono completamente. O almeno non paiono sufficienti a smontare la complessa Teoria di Joseph Nye sul soft power cui Arditti si richiama per differenza e contrapposizione. E non convince per un motivo centrale, perché non considera a sufficienza l’apporto che i commerci, la diplomazia, il digitale, le reti comunicative, l’innovazione tecnologica e la cybersecurity danno sia alla pace che ai conflitti, pure quelli armati, ormai risultandone inseparabili. Nell’epoca delle reti globali, infatti, il potere non si misura più soltanto con la forza militare ma sul terreno invisibile dell’informazione, dove l’intelligence, i media, la conoscenza dell’avversario e la manipolazione dei dati determinano l’equilibrio tra le potenze. Frutto dolceamaro di un cambiamento radicale che ridefinisce la natura stessa del potere che è soft, hard, harsh, ma anche wet & cyber.


MEF nel mirino degli hacker? Un post su BreachForums ipotizza un accesso ai sistemi
Un post apparso su BreachForums, noto forum underground frequentato da attori della cybercriminalità informatica, ipotizza una presunta compromissione dei sistemi del Ministero dell’Economia e delle Finanze italiano (MEF).
La segnalazione effettuata da un membro della community di Red Hot Cyber, Michele Pinassi nella serata di ieri, riporta che un utente con nickname “breach3d”, identificato come moderator all’interno della piattaforma, sosterrebbe di aver ottenuto accesso a sistemi interni dell’ente.
Disclaimer: Questo rapporto include screenshot e/o testo tratti da fonti pubblicamente accessibili. Le informazioni fornite hanno esclusivamente finalità di intelligence sulle minacce e di sensibilizzazione sui rischi di cybersecurity. Red Hot Cyber condanna qualsiasi accesso non autorizzato, diffusione impropria o utilizzo illecito di tali dati. Al momento, non è possibile verificare in modo indipendente l’autenticità delle informazioni riportate, poiché l’organizzazione coinvolta non ha ancora rilasciato un comunicato ufficiale sul proprio sito web. Di conseguenza, questo articolo deve essere considerato esclusivamente a scopo informativo e di intelligence.

Le affermazioni pubblicate sul forum
Secondo quanto dichiarato nel post, l’autore afferma di aver:
- Ottenuto accesso al pannello di amministrazione di una piattaforma riconducibile al Ministero dell’Economia e delle Finanze;
- La capacità o l’intenzione di eseguire un dump completo del database;
- La previsione che una grande quantità di dati possa essere divulgata in un momento successivo.
Nel messaggio, l’autore utilizza espressioni tipiche del linguaggio dei forum underground, come “I’m breached” e “soon, a large amount of data will be leaked”, che lasciano intendere una possibile fase preliminare di un data leak, ma senza fornire prove tecniche definitive.

Il contesto visivo e i riferimenti mostrati
All’interno del post viene inoltre mostrata un’immagine che sembrerebbe raffigurare un pannello amministrativo di una piattaforma denominata “Legal Auditor Training”, associata visivamente al Ministero dell’Economia e delle Finanze – Ragioneria Generale dello Stato.
Nel contenuto visuale compare anche un messaggio riconducibile al gruppo Lapsus$, noto per precedenti campagne di intrusione informatica, sebbene la reale paternità dell’accesso non possa essere verificata sulla base delle sole informazioni fornite.
La potenziale fonte del problema
In assenza di conferme ufficiali e di evidenze tecniche verificabili, una delle ipotesi plausibili alla base del presunto accesso non autorizzato potrebbe essere l’utilizzo di un malware di tipo infostealer.
Secondo scenari già osservati in numerosi incidenti analoghi, un infostealer potrebbe aver compromesso uno o più endpoint, consentendo a terzi di acquisire log contenenti credenziali di accesso valide, successivamente riutilizzate per l’autenticazione su piattaforme interne o di formazione riconducibili all’ente.
Questo tipo di malware è progettato per estrarre informazioni sensibili come:
- username e password salvate nei browser;
- cookie di sessione;
- token di autenticazione;
- credenziali memorizzate in client VPN o applicativi web.
Qualora tali credenziali fossero state riutilizzate senza ulteriori meccanismi di sicurezza, come l’autenticazione multifattore (MFA), un accesso apparentemente legittimo ai sistemi potrebbe risultare possibile, rendendo più complessa l’individuazione immediata dell’intrusione.
È importante sottolineare che questa rimane esclusivamente un’ipotesi tecnica, formulata sulla base di pattern ricorrenti nel panorama delle minacce cyber e non supportata, allo stato attuale, da riscontri ufficiali o forensi relativi al caso specifico.
Come spesso accade in contesti simili, l’eventuale compromissione iniziale potrebbe non essere avvenuta direttamente sui sistemi dell’ente, ma tramite dispositivi di terze parti o account individuali, successivamente sfruttati come punto di accesso.
Nessuna conferma ufficiale
Al momento:
- Non risultano conferme ufficiali da parte del Ministero dell’Economia e delle Finanze;
- Non sono stati pubblicati campioni di dati scaricabili o prove forensi indipendenti;
- Le dichiarazioni restano confinate all’ambito del forum underground e devono essere considerate come affermazioni ancora da verificate.
Se le affermazioni pubblicate su BreachForums dovessero rivelarsi fondate, si tratterebbe potenzialmente di un incidente di sicurezza di rilievo, con possibili implicazioni per:
- Dati amministrativi e documentali;
- Informazioni interne a sistemi di formazione o auditing;
- La sicurezza complessiva delle infrastrutture digitali collegate.
Tuttavia, in assenza di riscontri indipendenti, l’episodio va considerato come una segnalazione da monitorare, tipica delle dinamiche di cyber threat intelligence legate ai forum criminali.
Da fonti vicine alla questione, il sito del ministero, che svolge puramente attività di formazione, sembrerebbe essere stato acceduto in modo illecito, anche se i dati presenti al suo interno non sono di carattere critico.
L'articolo MEF nel mirino degli hacker? Un post su BreachForums ipotizza un accesso ai sistemi proviene da Red Hot Cyber.
Playing a Game of Linux on your Sony Playstation 2

Until the 2000s, game consoles existed primarily to bring a bit of the gaming arcade experience to homes, providing graphical feats that the average home computer would struggle to emulate. By the 2000s this changed, along with the idea of running desktop applications on gaming console for some reason. Hence we got Linux for the PlayStation 2, targeting its MIPS R5900 CPU and custom GPU. Unlike these days where game consoles are reskinned gaming PCs, this required some real effort, as well as a veritable stack of accessories, as demonstrated by [Action Retro] in a recent video.
Linux on the PlayStation 2 was a bit of a rare beast, as it required not only the optional HDD and a compatible ‘fat’ PS2, but also an Ethernet adapter, VGA adapter and a dedicated 8 MB memory card along with a keyboard and mouse. PS2 Linux users were also not free to do what they wanted, with e.g. ripping PS2 game discs disallowed, but you could make your own games. All of which had to fit within the PS2’s meagre 32 MB of RAM.
Of these accessories, the keyboard and mouse are standard USB – sadly not PS/2 – peripherals. The 40 GB HDD is a Sony-branded IDE HDD, while the Ethernet adapter is proprietary and also has the IDE HDD connector. This means that the VGA and Ethernet adapter are the two parts you absolutely need to source alongside a compatible PS2.
Linux is installed from the PS2 Linux DVD much like launching a game, with the memory card used for certain boot files. With it being based on Debian Linux, it should be quite familiar to most Linux users of the era, but there’s no fancy wizard to automagically do things like setting up the partitions. For this there is the paper manual to somewhat hold your hand.
After this you insert Disc 1 to boot from it and the memory card, ultimately finding yourself on the PS2 Linux desktop with Linux Kernel 2.2.1 for MIPS. As for what you can do with this in 2025, not too much. There’s still an active community with more up to date software that keeps the OS somewhat going, but in the end it’s still Linux running on a 32 MB MIPS system.
Despite only supporting PS2 Linux for a little while, the PlayStation 3 would also support installing other OSes like Linux and FreeBSD for a while alongside its native FreeBSD-based OS, but that got dropped as well along with the entire PS2 Emotion Engine chip for full PS2 backward compatibility and a host of other features. By the time the PlayStation 4 rolled around it seems that the idea of running a regular desktop OS on the hardware was no longer on Sony’s mind, making it a curious period in gaming console history.
youtube.com/embed/FQmenrPioBM?…
The Rise of Fake Casio Scientific Calculators

Scientific calculators are an amazing invention that take pocket calculators from being merely basic arithmetic machines to being pocket computers that can handle everything from statistics to algebra. That said, there are a few layers of scientific calculators, starting with those aimed at students. This is where Casio is very popular, especially because it uses traditional algebraic notation (VPAM) that follows the written style, rather than the reverse-polish notation (RPN) of TI and others. However, much like retro Casio wristwatches, it appears that these Casio calculators are now being (poorly) faked, as explained by [Another Roof] on YouTube.
The advanced fx-991 models are updated every few years, with the letters following the model indicating the year, such as fx-991EX standing for the 2015-released model. This was the model that got purchased online and which turned out to be fake. While the fx-991CW is newer, it changes the entire interface and is rightfully scolded in the video. Arguably this makes it the worst Casio scientific calculator in history.
After this run-down of how we got to the current Casio fx-991 model, we question why we don’t just use smartphones with a ‘scientific calculator’ app. The answers are ‘exams’ and ‘less complexity’, along with the tactile experience and how this enables muscle memory. Yet due to the CW model’s issues and disdain for muscle memory, the EX model is recommended by teachers. This then opens the market for knockoffs as Casio wanted everyone to move on to the CW model, and parents are always looking for that bargain deal with school supplies.
These fake EX models suffer from a variety of issues, depending on the internals. Some are noticeably slower, have omissions and even outright errors in their firmware that make them unusable for a variety of calculations. This makes it rough for both teachers and parents to find a good Casio scientific calculator, even as Casio has already reverted some of the controversial changes in the CW model in an admission of the problems they have caused.
Here’s hoping that Casio fully reverts to the EX-style of UI in its next 991-series calculator and finds a way to curb the spread of bad clones of its currently last good scientific calculator.
youtube.com/embed/F64lNlDgFiE?…
3D Printing a Telescope is Rewarding, Even if Not Always Cheaper

What can one expect from 3D printing an 8″ Newtonian telescope? [Molly Wakeling] shares her thoughts after doing exactly that. The performance was on par with any solid 8″ telescope, but in the end it wasn’t really any cheaper than purchasing a manufactured unit. Does that mean it wasn’t worth it? Not at all!

[Molly] printed the 203 Leavitt design (3d models available on Printables) which is an 8″ Newtonian telescope. This telescope design uses a concave parabolic mirror (a significant part of the expense) at the back of the tube to gather and focus light, and a small flat mirror near the front of the tube reflects this light to an eyepiece on the side. The wood stand makes things convenient, and we like the elastic tie-down used as a simple way to put tension on the mounts.
Do you find yourself intrigued but would prefer to start a little smaller and cheaper? Good news, because the same designer of the 203 Leavitt has a very similar design we happen to have featured before: the 114 Hadley. It features easily obtainable, lower-cost optics which perform well and can be easily ordered online, making it a great DIY starter telescope.
39C3: Recreating Sandstorm

Some synthesizer sounds are just catchy, but some of them are genre-defining. We think you could make that case for the Roland JP-8000 patch “Sandstorm”, which you’ve heard if you listened to any trance from the 90’s, but especially the song that was named after it.
“Sandstorm” is powered by the Roland Supersaw, and synth nerds have argued for a decade about how it’s made. The JP-8000 is a digital synthesizer, though, so it’s just code, run through custom DSP chips. If you could reverse engineer these chips, make a virtual machine, and send them the right program, you could get the sound 100% right. Think MAME but for synthesizers.
That brings us to [giulioz]’s talk at the 39th Chaos Communication Congress, where he dives deep into the custom DSP chip at the heart of the JP-8000. He and his crew had approached older digital synths by decapping and mapping out the logic, as you often do in video game emulation. Here, getting the connections right turned out to be simply too daunting, so he found a simpler device that had a test mode that, combined with knowledge of the chip architecture, helped him to figure out the undocumented DSP chip’s instruction set.
After essentially recreating the datasheet from first principles for a custom chip, [guiloz] and team could finally answer the burning question: “how does the Supersaw work”? The horrifying answer, after all this effort, is that it’s exactly what you’d expect — seven sawtooth waves, slightly detuned, and layered over each other. Just what it sounds like.
The real end result is an emulation that’s every bit (tee-hee!) as good as the original, because it’s been checked out on a logic analyzer. But the real fun is the voyage. Go give the talk a watch.
Different Algorithms Sort Christmas Lights

Sorting algorithms are a common exercise for new programmers, and for good reason: they introduce many programming fundamentals at once, including loops and conditionals, arrays and lists, comparisons, algorithmic complexity, and the tradeoff between correctness and performance. As a fun Christmas project, [Scripsi] set out to implement twelve different sorting algorithms over twelve days, using Christmas lights as the sorting medium.
The lights in use here are strings of WS2812 addressable LED strips, with the program set up to assign random hue values to each of the lights in the string. From there, an RP2040-based platform will step through the array of lights and implement the day’s sorting algorithm of choice. When operating on an element in the array the saturation is turned all the way up, helping to show exactly what it’s doing at any specific time. When the sorting algorithm has finished, the microcontroller randomizes the lights and starts the process all over again.
For each of the twelve days of Christmas [Scripsi] has chosen one of twelve of their favorite sorting algorithms. While there are a few oddballs like Bogosort which is a guess-and-check algorithm that might never sort the lights correctly before the next Christmas (although if you want to try to speed this up you can always try an FPGA), there are also a few favorites and some more esoteric ones as well. It’s a great way to get some visualization of how sorting algorithms work, learn a bit about programming fundamentals, and get in the holiday spirit as well.
Keebin’ with Kristina: the One with the Keyboard-Mouse, Again

The astute among you may remember an earlier version of this Russian beauty, the Lapa, which I featured last year around this time. Creator [lemosbor] claims that the worry was less about visual beauty and more about ergonomics. Way more. Well then, let this serve rather nicely as a textbook definition of that old form-follows-function principle.
See, [lemosbor] believes that the keyboard must adapt to the hands and not the other way around. The main goals were to minimize hand and finger movement as well as the visual attention required of the keyboard itself. No, there were never going to be any screens or RGB, and there likely never will be.
But I refuse to sidestep the obvious beauty in this keyboard, which from the side resembles a stylish and expensive pair of slightly-heeled shoes that were tailored to the contours of the human hand. And let’s not forget those handmade, oval keycaps, which again are a product of form-follows-function.
Underneath those keycaps are extremely light, tactile switches — Kailh White V2s with 30g springs. Now check this out. Those DIY keycaps weren’t just for added fun, they are very lightweight on purpose. They allow [lemosbor] to type more easily and accurately than on square caps. But they created gaps which showed the switches, and the whole effect was evidently quite ugly. To solve this, [lemosbor] designed the case so that the switches are mounted on the bottom. They nestle completely into switch-shaped crevices, so they are held in place only by friction.
You might be wondering why the wrist wrests are totally different. I suppose I’ve buried the lede, which is that the right half of Lapa operates as a mouse. Like, you move it around the desk.
As you might imagine, this aspect wasn’t easy to design or execute such that the keyboard doesn’t move around like crazy while you’re trying to type. Basically, the right half is quite light by comparison. The cutouts of the honeycombed wrist wrest save on weight while also improving hand contact.
The thumbstick on the right side is used instead of the cursor keys, which [lemosbor] reports as being very convenient. The left side has a thumb toggle switch for choosing between Russian and English. There’s also a left thumbstick, which [lemosbor] uses to switch between tabs and programs.
But the coolest part might be the solenoid hidden under the left wrist rest. It knocks when switching layers, and does so a certain number of times corresponding to the layer so that [lemosbor] is never lost. Since [lemosbor] doesn’t type much English, the solenoid will constantly tap a little bit in English mode. Now I think that would be really fun to type along to, at least for a little while. Imagine what it could do for your flow state.
Via reddit
Claude Plods Along, Emanating From An Enabled Typewriter
As far as AIs go, I’ve personally only used ChatGPT, and I feel somewhat attached to its response style at this point. Honestly, Claude might be a shock to the system. But what wouldn’t be a shock at all is using a typewriter to interact with either one of them.

Thanks to this operation, [Ben] was able to both intercept key presses and inject them. So you see where this is going. You and Claude take turns typing. If only the keys would phantom-depress, like a player piano.
For both processes, [Ben] used an Arduino Nano, which interfaces with the keyboard matrix through four multiplexers — columns, rows, input, and output. The Arduino is wired to a Raspberry Pi Zero W running a Python script that sends prompts to Claude’s API and gets answers in return. See Claude go in the video below.
youtube.com/embed/x4lFOUZCSg4?…
The Centerfold: E-Waste Vintage Battlestation

Believe it or not, these were mostly all pulled out of the e-waste pile just in time, kind of like Indy and the hat. In fact, rescuing stuff from electronics recycling is [ThisLifeSuckss]’ main hobby. Sounds like fun, if you have the space for all that you find. I myself do not.
Do you rock a sweet set of peripherals on a screamin’ desk pad? Send me a picture along with your handle and all the gory details, and you could be featured here!
Historical Clackers: the (Danish) Junior
As the commonplace name suggests, the Junior is meant as a toy for children. But by the looks of it, this would be a fine machine to add to your late 1940s office lineup.

For one thing, it’s almost all metal except for the wooden platen, two ink rollers made of cotton, and a couple of plastic platen knobs. The Antikey Chop declared it incredibly well-built for a toy, though the design is quite simple, clocking in at just 31 total parts.
Because the Junior was assembled largely by pinning or pressing pieces together, it was completely un-serviceable as disassembly would likely cause irreparable damage.
What you could do was change out the typewheel, which was cast, index and type, from one metal piece. It’s unlikely that non-Danish versions were created, however.
In order to use the thing, you would just spin the wheel until the character you want is in the top dead center position, and push the Space bar. This action caused the entire carriage to pivot an inch forward, and would advance the spring-driven escapement by one increment when it came back to rest.
The Return function involves pivoting the carriage forward and pushing to the right. Aside from this functionality, there’s not much to this typewriter. There’s no bell, no lever for Return, and certainly no line space lever or tab stops. After all, it’s a toy. But it would make one hell of a label maker.
Finally, a Scented Mouse for Heated Gaming Sessions
For some reason, the keyboard is called Marshmallow and not the fluffy white mouse, which is known on the streets as Fragrance Mouse. But I think marshmallow is exactly the scent I would want emanating from beneath my hand. Or maybe a nice, calming lavender, which it actually comes with.

The appeal of the keyboard is supposed to be in the muted, natural colors. Okay. That’s fair. Although it comes in three other colorways, I think this ‘green tea latte’ version takes the petit four.
And no matter which colorway you choose, the typography of the alphanumeric key legends is stunning and highly-readable. The white-on-gray of the modifiers and such is highly lacking in the legibility department, however.
As you might imagine, there’s a little tank inside Fragrance Mouse’s belly where you put the essential oils. But don’t worry about spilling, because there’s a porous insert that absorbs them.
Although they are sold separately, both peripherals are supposed to be office-quiet, with scissor keys on the Marshmallow and quiet switches in the mouse. Fragrance Mouse is weird, but I would go for it if it were a nice, comfortable trackball instead. But this thing isn’t even meant for left-handers. It should be hitting Microcenter soon, but you’ll have to buy the Marshmallow keyboard from ASUS directly.
Got a hot tip that has like, anything to do with keyboards? Help me out by sending in a link or two. Don’t want all the Hackaday scribes to see it? Feel free to email me directly.
39C3: Hacking Washing Machines

Many of us have them, few of us really hack on them: well, here we’re talking about large home appliances. [Severin von Wnuck-Lipinski] and [Hajo Noerenberg] were both working on washing machines, found each other, and formed a glorious cooperation that ended in the unholy union of German super-brands Miele and B/S/H — a Miele washer remote controlled by Siemens’ web app.
This talk, given at the 39th Chaos Communication Congress (39C3), is about much more than the stunt hack, however. In fact, we covered [Severin]’s work on the very clever, but proprietary, Miele Diagnostic Interface a little while ago. But now, he’s got it fully integrated into his home automation system. It’s a great hack, and you can implement it without even opening the box.
About halfway through the talk, [Hajo] takes over, dissecting the internal D-Bus communication protocol. Here, you have to open up the box, but then you get easy access to everything about the internal state of the machine. And D-Bus seems to be used in a wide range of B/S/H/ home appliances, so this overview should give you footing for your own experimentation on coffee machines or dishwashers as well. Of course, he wires up an ESP32 to the bus, and connects everything, at the lowest level, to his home automation system, but he also went the extra mile and wrote up a software stack to support it.
It’s a great talk, with equal parts humor and heroic hacking. If you’re thinking about expanding out your own home automation setup, or are even just curious about what goes on inside those machines these days, you should absolutely give it a watch.
Editor Note: The “S” is Siemens, which is Hackaday’s parent company’s parent company. Needless to say, they had nothing to do with this work or our reporting on it.
How Wind Nearly Took Down Boulder NTP

NTP is one of the most interesting and important, but all too forgotten, protocols that makes the internet tick. Accurate clock synchronization is required for everything ranging from cryptography to business and science. NTP is closely tied around a handful of atomic clocks, some in orbit on GPS satellites, and some in laboratories. So the near-failure of one such atomic clock sparked a rather large, and nerdy, internet debate.
On December 17, 2025, the Colorado front range experience a massive wind storm. The National Center for Atmospheric Reassure in Boulder recorded gusts in excess of 100 mph (about 85 knots or 160 kph). This storm was a real doozy, but gusts this strong are not unheard of in Boulder either. That is no small reason the National Renewable Energy Laboratory (now the National Laboratory of the Rockies) has a wind turbine testing facility in the neighborhood.

Winds of this nature would not terribly interesting. However, the wind storm brought with it a particularly dangerous red flag warning outside of Boulder, a first for Colorado. Such high fire danger combined with damaged infrastructure prompted the local utility, Xcel Energy, to shut off power for hundreds of thousands of customers starting on December 17. Power was not regained until December 21 for many customers.
This outage came with all sorts of headaches to research institutions across Colorado. Not least of which was the National Institute of Science Technology’s (NIST) Boulder campus which houses a rather precise atomic clock. Due to predicted failure of NIST’s heat exchange, much of the normal monitoring equipment was unavailable to the scientists, further complicating the situation.
As was designed, once utility power failed, backup generators took over. But as the outage dragged on, indications came to the scientists in charge of the atomic clocks at NIST that one of the generators had failed. This prompted scientists to warn against relying on the Boulder NTP sources. The scientists running the clock feared complete failure of the hydrogen source clocks. Such failure would require a lengthy and complex re-start procedure once power was returned in the long term, and complete failure of a stratum one NTP source in the short term.
Further complicating the already bad situation was the fact that due to the dangers involved, the scientists could not reach the campus. So not only could they not confirm with certainty what issues the clocks may be experiencing, but they were unable to shut down the NTP servers. Fortunately, power was returned and the main source clock only drifted by a few microseconds. This is still far too much drift as would be preferred on a clock normally accurate in the range of nanoseconds, but perfectly usable for NTP which is only accurate to within a few milliseconds.
So this prompts the question, if such a key time source had failed, what would have happened? In short, not much. By nature of being so distributed, most servers have multiple NTP sources, often including GPS satellites. However, there would most certainly be any number of servers without multiple NTP sources configured. Websites hosted on such servers would be rendered inaccessible as HTTPS encryption handshakes require synchronized clocks. TOTP passkeys and FIDO hardware authenticators would likewise be unusable as both protocols rely on accurate time sources. So any two computers would be unable to properly execute protocols requiring synchronized time. Beyond the limited failures outlined above, its difficult to say what more the damage could be, but the effects are unlikely to be terribly dramatic.
If harnessing atoms to tell time sparks your interest, make sure to check out this atomic delay clock next! [Jeff Geerling] also has a nice discussion of this power outage that you might like.
Only Known Copy of UNIX V4 Recovered From Tape

UNIX version 4 is quite special on account of being the first UNIX to be written in C instead of PDP-11 ASM, but it was also considered to have been lost to the ravages of time. Joyfully, we can report that the more than fifty year old magnetic tape that was recently discovered in a University of Utah storeroom did in fact contain the UNIX v4 source code. As reported by Tom’s Hardware, [Al Kossow] of Bitsavers did the recovery by passing the raw flux data from the tape read head through the ReadTape program to reconstruct the stored data.
Since the tape was so old there was no telling how much of the data would still be intact, but fortunately it turned out that the tape was not only largely empty, but the data that was on it was in good nick. You can find the recovered files here, along with a README, with Archive.org hosting the multi-GB raw tape data. The recovered data includes the tape file in SimH format and the filesystem
Suffice it to say that you will not run UNIX v4 on anything other than a PDP-11 system or emulated equivalent, but if you want to run its modern successors in the form of BSD Unix, you can always give FreeBSD a shot.
The HoneyMyte APT evolves with a kernel-mode rootkit and a ToneShell backdoor

Overview of the attacks
In mid-2025, we identified a malicious driver file on computer systems in Asia. The driver file is signed with an old, stolen, or leaked digital certificate and registers as a mini-filter driver on infected machines. Its end-goal is to inject a backdoor Trojan into the system processes and provide protection for malicious files, user-mode processes, and registry keys.
Our analysis indicates that the final payload injected by the driver is a new sample of the ToneShell backdoor, which connects to the attacker’s servers and provides a reverse shell, along with other capabilities. The ToneShell backdoor is a tool known to be used exclusively by the HoneyMyte (aka Mustang Panda or Bronze President) APT actor and is often used in cyberespionage campaigns targeting government organizations, particularly in Southeast and East Asia.
The command-and-control servers for the ToneShell backdoor used in this campaign were registered in September 2024 via NameCheap services, and we suspect the attacks themselves to have begun in February 2025. We’ve observed through our telemetry that the new ToneShell backdoor is frequently employed in cyberespionage campaigns against government organizations in Southeast and East Asia, with Myanmar and Thailand being the most heavily targeted.
Notably, nearly all affected victims had previously been infected with other HoneyMyte tools, including the ToneDisk USB worm, PlugX, and older variants of ToneShell. Although the initial access vector remains unclear, it’s suspected that the threat actor leveraged previously compromised machines to deploy the malicious driver.
Compromised digital certificate
The driver file is signed with a digital certificate from Guangzhou Kingteller Technology Co., Ltd., with a serial number of 08 01 CC 11 EB 4D 1D 33 1E 3D 54 0C 55 A4 9F 7F. The certificate was valid from August 2012 until 2015.
We found multiple other malicious files signed with the same certificate which didn’t show any connections to the attacks described in this article. Therefore, we believe that other threat actors have been using it to sign their malicious tools as well. The following image shows the details of the certificate.

Technical details of the malicious driver
The filename used for the driver on the victim’s machine is ProjectConfiguration.sys. The registry key created for the driver’s service uses the same name, ProjectConfiguration.
The malicious driver contains two user-mode shellcodes, which are embedded into the .data section of the driver’s binary file. The shellcodes are executed as separate user-mode threads. The rootkit functionality protects both the driver’s own module and the user-mode processes into which the backdoor code is injected, preventing access by any process on the system.
API resolution
To obfuscate the actual behavior of the driver module, the attackers used dynamic resolution of the required API addresses from hash values.
The malicious driver first retrieves the base address of the ntoskrnl.exe and fltmgr.sys by calling ZwQuerySystemInformation with the SystemInformationClass set to SYSTEM_MODULE_INFORMATION. It then iterates through this system information and searches for the desired DLLs by name, noting the ImageBaseAddress of each.
Once the base addresses of the libraries are obtained, the driver uses a simple hashing algorithm to dynamically resolve the required API addresses from ntoskrnl.exe and fltmgr.sys.
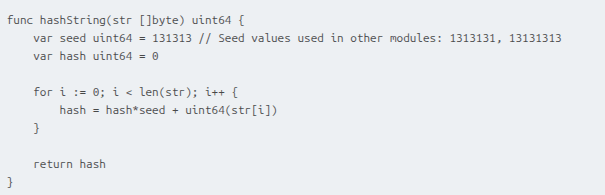
The hashing algorithm is shown below. The two variants of the seed value provided in the comment are used in the shellcodes and the final payload of the attack.
Protection of the driver file
The malicious driver registers itself with the Filter Manager using FltRegisterFilter and sets up a pre-operation callback. This callback inspects I/O requests for IRP_MJ_SET_INFORMATION and triggers a malicious handler when certain FileInformationClass values are detected. The handler then checks whether the targeted file object is associated with the driver; if it is, it forces the operation to fail by setting IOStatus to STATUS_ACCESS_DENIED. The relevant FileInformationClass values include:
- FileRenameInformation
- FileDispositionInformation
- FileRenameInformationBypassAccessCheck
- FileDispositionInformationEx
- FileRenameInformationEx
- FileRenameInformationExBypassAccessCheck
These classes correspond to file-delete and file-rename operations. By monitoring them, the driver prevents itself from being removed or renamed – actions that security tools might attempt when trying to quarantine it.
Protection of registry keys
The driver also builds a global list of registry paths and parameter names that it intends to protect. This list contains the following entries:
- ProjectConfiguration
- ProjectConfiguration\Instances
- ProjectConfiguration Instance
To guard these keys, the malware sets up a RegistryCallback routine, registering it through CmRegisterCallbackEx. To do so, it must assign itself an altitude value. Microsoft governs altitude assignments for mini-filters, grouping them into Load Order categories with predefined altitude ranges. A filter driver with a low numerical altitude is loaded into the I/O stack below filters with higher altitudes. The malware uses a hardcoded starting point of 330024 and creates altitude strings in the format 330024.%l, where %l ranges from 0 to 10,000.
The malware then begins attempting to register the callback using the first generated altitude. If the registration fails with STATUS_FLT_INSTANCE_ALTITUDE_COLLISION, meaning the altitude is already taken, it increments the value and retries. It repeats this process until it successfully finds an unused altitude.
The callback monitors four specific registry operations. Whenever one of these operations targets a key from its protected list, it responds with 0xC0000022 (STATUS_ACCESS_DENIED), blocking the action. The monitored operations are:
- RegNtPreCreateKey
- RegNtPreOpenKey
- RegNtPreCreateKeyEx
- RegNtPreOpenKeyEx
Microsoft designates the 320000–329999 altitude range for the FSFilter Anti-Virus Load Order Group. The malware’s chosen altitude exceeds this range. Since filters with lower altitudes sit deeper in the I/O stack, the malicious driver intercepts file operations before legitimate low-altitude filters like antivirus components, allowing it to circumvent security checks.
Finally, the malware tampers with the altitude assigned to WdFilter, a key Microsoft Defender driver. It locates the registry entry containing the driver’s altitude and changes it to 0, effectively preventing WdFilter from being loaded into the I/O stack.
Protection of user-mode processes
The malware sets up a list intended to hold protected process IDs (PIDs). It begins with 32 empty slots, which are filled as needed during execution. A status flag is also initialized and set to 1 to indicate that the list starts out empty.
Next, the malware uses ObRegisterCallbacks to register two callbacks that intercept process-related operations. These callbacks apply to both OB_OPERATION_HANDLE_CREATE and OB_OPERATION_HANDLE_DUPLICATE, and both use a malicious pre-operation routine.
This routine checks whether the process involved in the operation has a PID that appears in the protected list. If so, it sets the DesiredAccess field in the OperationInformation structure to 0, effectively denying any access to the process.
The malware also registers a callback routine by calling PsSetCreateProcessNotifyRoutine. These callbacks are triggered during every process creation and deletion on the system. This malware’s callback routine checks whether the parent process ID (PPID) of a process being deleted exists in the protected list; if it does, the malware removes that PPID from the list. This eventually removes the rootkit protection from a process with an injected backdoor, once the backdoor has fulfilled its responsibilities.
Payload injection
The driver delivers two user-mode payloads.
The first payload spawns an svchost process and injects a small delay-inducing shellcode. The PID of this new svchost instance is written to a file for later use.
The second payload is the final component – the ToneShell backdoor – and is later injected into that same svchost process.
Injection workflow:

The malicious driver searches for a high-privilege target process by iterating through PIDs and checking whether each process exists and runs under SeLocalSystemSid. Once it finds one, it customizes the first payload using random event names, file names, and padding bytes, then creates a named event and injects the payload by attaching its current thread to the process, allocating memory, and launching a new thread.
After injection, it waits for the payload to signal the event, reads the PID of the newly created svchost process from the generated file, and adds it to its protected process list. It then similarly customizes the second payload (ToneShell) using random event name and random padding bytes, then creates a named event and injects the payload by attaching to the process, allocating memory, and launching a new thread.
Once the ToneShell backdoor finishes execution, it signals the event. The malware then removes the svchost PID from the protected list, waits 10 seconds, and attempts to terminate the process.
ToneShell backdoor
The final stage of the attack deploys ToneShell, a backdoor previously linked to operations by the HoneyMyte APT group and discussed in earlier reporting (see Malpedia and MITRE). Notably, this is the first time we’ve seen ToneShell delivered through a kernel-mode loader, giving it protection from user-mode monitoring and benefiting from the rootkit capabilities of the driver that hides its activity from security tools.
Earlier ToneShell variants generated a 16-byte GUID using CoCreateGuid and stored it as a host identifier. In contrast, this version checks for a file named C:\ProgramData\MicrosoftOneDrive.tlb, validating a 4-byte marker inside it. If the file is absent or the marker is invalid, the backdoor derives a new pseudo-random 4-byte identifier using system-specific values (computer name, tick count, and PRNG), then creates the file and writes the marker. This becomes the unique ID for the infected host.
The samples we have analyzed contact two command-and-control servers:
- avocadomechanism[.]com
- potherbreference[.]com
ToneShell communicates with its C2 over raw TCP on port 443 while disguising traffic using fake TLS headers. This version imitates the first bytes of a TLS 1.3 record (0x17 0x03 0x04) instead of the TLS 1.2 pattern used previously. After this three-byte marker, each packet contains a size field and an encrypted payload.
Packet layout:
- Header (3 bytes): Fake TLS marker
- Size (2 bytes): Payload length
- Payload: Encrypted with a rolling XOR key
The backdoor supports a set of remote operations, including file upload/download, remote shell functionality, and session control. The command set includes:
| Command ID | Description |
| 0x1 | Create temporary file for incoming data |
| 0x2 / 0x3 | Download file |
| 0x4 | Cancel download |
| 0x7 | Establish remote shell via pipe |
| 0x8 | Receive operator command |
| 0x9 | Terminate shell |
| 0xA / 0xB | Upload file |
| 0xC | Cancel upload |
| 0xD | Close connection |
Conclusion
We assess with high confidence that the activity described in this report is linked to the HoneyMyte threat actor. This conclusion is supported by the use of the ToneShell backdoor as the final-stage payload, as well as the presence of additional tools long associated with HoneyMyte – such as PlugX, and the ToneDisk USB worm – on the impacted systems.
HoneyMyte’s 2025 operations show a noticeable evolution toward using kernel-mode injectors to deploy ToneShell, improving both stealth and resilience. In this campaign, we observed a new ToneShell variant delivered through a kernel-mode driver that carries and injects the backdoor directly from its embedded payload. To further conceal its activity, the driver first deploys a small user-mode component that handles the final injection step. It also uses multiple obfuscation techniques, callback routines, and notification mechanisms to hide its API usage and track process and registry activity, ultimately strengthening the backdoor’s defenses.
Because the shellcode executes entirely in memory, memory forensics becomes essential for uncovering and analyzing this intrusion. Detecting the injected shellcode is a key indicator of ToneShell’s presence on compromised hosts.
Recommendations
To protect themselves against this threat, organizations should:
- Implement robust network security measures, such as firewalls and intrusion detection systems.
- Use advanced threat detection tools, such as endpoint detection and response (EDR) solutions.
- Provide regular security awareness training to employees.
- Conduct regular security audits and vulnerability assessments to identify and remediate potential vulnerabilities.
- Consider implementing a security information and event management (SIEM) system to monitor and analyze security-related data.
By following these recommendations, organizations can reduce their risk of being compromised by the HoneyMyte APT group and other similar threats.
Indicators of Compromise
More indicators of compromise, as well as any updates to these, are available to the customers of our APT intelligence reporting service. If you are interested, please contact intelreports@kaspersky.com.
36f121046192b7cac3e4bec491e8f1b5 AppvVStram_.sys
fe091e41ba6450bcf6a61a2023fe6c83 AppvVStram_.sys
abe44ad128f765c14d895ee1c8bad777 ProjectConfiguration.sys
avocadomechanism[.]com ToneShell C2
potherbreference[.]com ToneShell C2
39C3: Hardware, and the Hard Bit

The 39th annual Chaos Communication Congress (39C3) is underway, and it kicked off with a talk that will resonate deeply with folks in the Hackaday universe. [Kliment] gave an impassioned invitation for everyone to start making hardware based on his experience both in the industry and in giving an intro-to-surface-mount workshop to maybe thousands of hackers over the years.
His main points are that the old “hardware is hard” cliche is overdone. Of course, working on a complicated high-reliability medical device isn’t child’s play, but that’s not where you start off. And getting started in hardware design and hobby-scale manufacture has never been easier or cheaper, and the open-source tooling gives you a foot in the door.
He tells the story of an attendee at a workshop who said “I kept waiting for the hard part to come, but then I was finished.” Starting off with the right small-scale projects, learning a few techniques, and ramping up skills built on skills is the way to go. ([Kliment] is a big proponent of hand-placed hot-plate reflow soldering, and we concur.)
This is the talk that you want to show to your software friends who are hardware-curious. It’s also a plea for more experimentation, more prototyping, more hacking, and simply more people in the hardware / DIY electronics scene. Here at Hackaday, it’s maybe preaching to the choir, but sometimes it’s just nice to hear saying it all out loud.
Login Microsoft 365 falsi, JavaScript offuscato e Cloudflare: anatomia di un phishing avanzato
Questo articolo analizza una recente e sofisticata campagna di phishing che sfrutta la tecnica Browser-in-the-Browser (BitB) per rubare credenziali, in particolare quelle di servizi come Microsoft 365. L’attacco BitB si distingue per la sua capacità di generare una falsa finestra di login che imita in modo iper-realistico un browser ufficiale, ingannando l’utente e inducendolo a inserire i dati in una schermata apparentemente legittima.
L’analisi tecnica rivela che la pericolosità di questa campagna risiede non solo nell’inganno visivo, ma anche in una complessa architettura di occultamento e anti-analisi. L’attacco è preceduto da una landing page di verifica che implementa una pipeline di decodifica JavaScript a più stadi per offuscare il payload finale, filtrare bot e sistemi di sicurezza automatizzati, e contrastare l’analisi forense.
Questo meccanismo di difesa multi-livello permette all’attacco di eludere i rilevamenti iniziali da parte degli endpoint di sicurezza e di raggiungere l’obiettivo in modo più efficace.
Vengono infine sottolineate alcune misure difensive, come la verifica costante della barra degli indirizzi reale e l’adozione dell’autenticazione a più fattori.
Come funziona l’attacco BitB
La pagina malevola genera una finestra che imita perfettamente Microsoft Edge, mostrando persino un URL autentico come login.microsoftonline.com.
In realtà, si tratta di un semplice elemento grafico spostabile all’interno della pagina, mentre la barra degli indirizzi reale del browser punta a un dominio sconosciuto.
L’utente, convinto di trovarsi su un sito legittimo, viene invitato a “Sign in with Microsoft” per accedere a un documento. Inserendo le credenziali, queste finiscono direttamente nelle mani degli attaccanti.

Breve analisi
Catena di attacco:
Behance

II vettore di attacco iniziale è un’email di phishing che induce la vittima a scaricare un file malevolo (o una presunta risorsa) tramite un link che reindirizza a un portale legittimo, come Behance (behance.net/).
A sua volta viene chiesto di aprire un link per scaricare un documento.
Landing 1

Prima che la vera pagina venga visualizzata, ne viene mostrata una intermedia che viene usata nel contesto di attività malevole o campagne di phishing per diversi scopi, il più importante dei quali è l’anti-analisi e l’occultamento del contenuto finale sospetto, come l’analisi su Virus Total.
L’analisi della landing page tramite VirusTotal aveva rilevato solo un endpoint come sospetto. Successivamente, in un’analisi successiva, il numero di endpoint che hanno segnalato la pagina come sospetta è salito a tre.
Nel loader iniziale infatti è presente un codice JavaScript che implementa una pipeline di decodifica a quattro passaggi per offuscare e recuperare dati sensibili, utilizzato per nascondere stringhe, URL o frammenti HTML.


Questo file viene avviato prima di presentare la pagina sospetta perché agisce come un gate di sicurezza multilivello, vengono usare queste misure per:
- filtrare i bot: se è un bot o un sistema di sicurezza automatizzato, viene reindirizzato e non vede la pagina di phishing. Questo serve a evitare che la pagina venga contrassegnata come “sospetta” da servizi come Google Safe Browsing.
- nasconde il payload: il codice della minaccia finale (il “payload”) è offuscato e non è immediatamente visibile nel codice sorgente iniziale.
- mitigare le possibili analisi: le misure anti-debugging rendono estremamente difficile per un ricercatore di sicurezza analizzare la minaccia, in quanto il codice cerca attivamente di rilevare e bloccare gli strumenti di analisi.
Questo è un frammento di codice del loader offuscato. Inaspettatamente sono inseriti anche i commenti sul codice su tutte le operazioni eseguite, per cui è subito di facile lettura.
Un’analisi approfondita della risoluzione DNS e alla chiamata http rivela che il dominio malevolo è attestato dietro l’infrastruttura di Cloudflare, che agisce come un proxy inverso (Reverse Proxy). Questa configurazione non è casuale: l’attaccante sfrutta deliberatamente strumenti nati per la protezione e l’ottimizzazione dei dati per garantirsi un anonimato strategico.

Attraverso questo ‘scudo’, l’attore malevolo riesce a nascondere l’indirizzo IP reale del server di origine, eludere i controlli di sicurezza perimetrale basati su reputazione IP e massimizzare la vita utile della campagna di phishing.
Landing 2

Una volta risolto il “puzzle” viene usato un nuovo passaggio intermedio con caratteristiche analoghe al precedente.
Target

Quest’ultimo con un ulteriore redirect porta alla pagina progettata per simulare una richiesta di autenticazione Microsoft per poter accedere a un documento..
Anche in questa pagina è presente del contenuto offuscato. Inoltre sfruttando il fingerprinting del sistema operativo aggiungendo classi CSS specifiche (.browser-window.edge.dark o .browser-window.safari) al falso browser per farlo apparire esattamente come la finestra del browser dell’utente.
Cliccato il bottone per autenticarsi con Microsoft, viene fatta partire in background una nuova chiamata http per recuperare il contenuto di un form di Microsoft.


Quindi successivamente viene simulato apertura di finto browser sull’area della pagina (nel nostro caso Microsoft Edge), che visualizza il login di Microsoft con tanto di url “autentico”.
Questa tecnica come accennato è nota come Browser-in-the-Browser (BITB) Attack.

Un kit per capire la tecnica
Lo sviluppatore mr.d0x ha pubblicato su GitHub, a scopo didattico, il kit “BitB Attack”, che consente di creare moduli di accesso di phishing basati su Single Sign-On estremamente realistici.
Link: github.com/lucthienphong1120/B…

Conclusioni
Come emerso dall’analisi, la vera insidia si cela nella complessa architettura di occultamento che precede l’attacco finale.
La presenza di una sofisticata sequenza di decodifica JavaScript, unita alle pagine di verifica e alle misure anti-analisi e anti-bot, dimostra un elevato livello di preparazione da parte degli attaccanti.
Queste precauzioni non solo nascondono il payload dalle scansioni automatiche di sicurezza (come quelle di VirusTotal), ma rendono anche estremamente difficile per gli analisti di sicurezza decifrare e bloccare la minaccia in tempo.
L’attacco finale BitB infine induce a un l’inganno visivo per via della creazione di una falsa finestra di browser tramite elementi grafici per rubare le credenziali.
La pubblicazione di strumenti didattici come il kit “BitB Attack” da parte di mr.d0x, sebbene a scopo di ricerca, sottolinea la facilità con cui questa tecnica può essere replicata, rendendo la minaccia accessibile a un ampio spettro di malintenzionati.
Per difendersi efficacemente è necessario prestare sempre attenzione alle mail di spam, verificare sempre URL Reale e in questi casi avere l’autenticazione MFA attiva.
L'articolo Login Microsoft 365 falsi, JavaScript offuscato e Cloudflare: anatomia di un phishing avanzato proviene da Red Hot Cyber.
TurboDiffusion: Arriva la rivoluzione nella Generazione Video AI Open Source
La generazione automatica di video tramite intelligenza artificiale ha compiuto un salto significativo il 25 dicembre 2025, quando l’Università di Tsinghua ha annunciato il rilascio open source di TurboDiffusion. Il framework, sviluppato dal laboratorio TSAIL in collaborazione con Shengshu Technology e Biological Mathematics, consente di ridurre drasticamente i tempi di creazione dei video mantenendo una qualità visiva quasi priva di perdita.
Secondo i dati diffusi dal team di ricerca, TurboDiffusion permette di accelerare la generazione video fino a 200 volte rispetto ai modelli di diffusione tradizionali. In uno scenario che fino a poco tempo fa richiedeva diversi minuti di elaborazione, oggi è possibile ottenere un video in circa due secondi utilizzando una singola scheda grafica di fascia alta.
I test condotti su una RTX 5090 mostrano un confronto diretto particolarmente indicativo: un video di 5 secondi in risoluzione 480P, basato su un modello da 1,3 miliardi di parametri, richiedeva in precedenza circa 184 secondi di calcolo. Con TurboDiffusion, lo stesso processo viene completato in 1,9 secondi, con un incremento di velocità pari a circa 97 volte.

L’effetto dell’ottimizzazione risulta evidente anche su modelli di dimensioni maggiori. Un modello immagine-video da 14 miliardi di parametri in risoluzione 720P può ora essere generato in 38 secondi, mentre versioni ottimizzate scendono a 24 secondi. La variante 480P dello stesso modello richiede meno di 10 secondi di elaborazione.
Le tecnologie alla base dell’accelerazione
Il rallentamento storico dei modelli di generazione video basati su Diffusion Transformer è legato a tre fattori principali: l’elevato numero di passaggi di campionamento, il costo computazionale dei meccanismi di attenzione e i limiti di memoria della GPU. TurboDiffusion affronta questi colli di bottiglia integrando quattro tecnologie complementari.
Il primo elemento è SageAttention2++, una tecnica di attenzione a bassa precisione che utilizza quantizzazione INT8 e INT4. Attraverso strategie di smoothing e quantizzazione a livello di thread, il sistema riduce il consumo di memoria e accelera il calcolo dell’attenzione da tre a cinque volte, senza impatti visibili sulla qualità del video generato.
A questa soluzione si affianca l’attenzione Sparse-Linear Attention (SLA), che combina la selezione dei pixel rilevanti con una complessità computazionale lineare. Poiché SLA è compatibile con la quantizzazione a basso bit, può essere applicata in parallelo a SageAttention, amplificando ulteriormente l’efficienza dell’inferenza.

Il terzo pilastro è la distillazione a stadi rCM. Grazie a questo approccio, modelli che richiedevano decine di iterazioni possono ora generare risultati comparabili in uno o quattro passaggi, riducendo drasticamente la latenza complessiva.
Infine, TurboDiffusion (disponibile su GitHub) introduce la quantizzazione W8A8 per i livelli lineari e l’uso di operatori personalizzati sviluppati in Tritone CUDA. Questa combinazione sfrutta pienamente i Tensor Core INT8 della RTX 5090 e riduce il sovraccarico delle implementazioni standard di PyTorch. L’integrazione delle quattro tecniche consente di ottenere incrementi di velocità complessivi fino a 200 volte.
Impatto industriale e prospettive applicative
L’accelerazione ottenuta non rappresenta solo un progresso sperimentale. La possibilità di generare video 720P in pochi secondi su una singola GPU rende l’uso di questi modelli accessibile anche a singoli creatori, piccole imprese e contesti consumer, riducendo al contempo i costi di inferenza su infrastrutture cloud.
Secondo i ricercatori, una riduzione della latenza di inferenza fino a 100 volte consente alle piattaforme SaaS di servire un numero di utenti proporzionalmente maggiore a parità di risorse. Questo apre la strada a nuovi scenari, come l’editing video in tempo reale, la generazione interattiva di contenuti e la produzione automatizzata di format audiovisivi basati su AI.
Le tecnologie sviluppate dal team TSAIL risultano inoltre compatibili con architetture di chip AI cinesi, grazie all’uso di bassa profondità di bit, strutture sparse e operatori personalizzabili. SageAttention, in particolare, è già stato integrato in TensorRT di NVIDIA e adottato da piattaforme come Huawei Ascend e Moore Threads S6000, oltre che da numerose aziende e laboratori internazionali.
L'articolo TurboDiffusion: Arriva la rivoluzione nella Generazione Video AI Open Source proviene da Red Hot Cyber.
The Birotary Engine Explained

Everyone generally knows about piston and rotary engines, with many a flamewar having been waged over the pros and cons of each design. The “correct” answer is thus to combine both into a single engine design. The resulting birotary engine comes courtesy of Czech company [Knob Engines] which makes their special engine for the aviation market. The workings of this engine and why it makes perfect sense for smaller airplanes is explained by [driving 4 answers] in a recent video.
Naturally, it’s at best confusing to call an engine a “rotary”, as this covers many types of engines. One could consider the birotary engine perhaps a cross between the traditional rotary piston engines that powered early aircraft and the Wankel rotary engines that would appear much later. The fact that both the housing and the crankshaft rotate reinforces this notion of a piston rotary, while it keeps the fixed ports and glow plugs on the housing that is typical of a Wankel-style engine. Having both the housing and crankshaft rotate is also why it’s called the ‘birotary’.
The claimed benefits of this design include a small size, low vibrations, reduced gyroscopic effect due to counter-rotation, no apex seals, and less mechanically complex than a piston engine. This comes at the cost of a very short stroke length and thus the need for a relatively high RPM and slow transition between power output levels, but those disadvantages are why small airplanes and UAVs are being targeted.
youtube.com/embed/lKM76zxCfiU?…
Streaming Music to Cassette

In almost every measurable way, a lossless digital audio file is superior to any analog media. This doesn’t mean that analog audio isn’t valuable though; plenty of people appreciate the compression, ambiance, and other side-effects of listening to a vinyl record or a cassette tape despite the technical limitations. To combine the audio technology of the modern world with these pleasant effects of old analog media, [Julius] built a cassette-based media streamer.
The music playback device takes input from a Bluetooth stream of some sort, converts the digital stream to analog, combines the stereo signal into a mono signal, and then records it to a cassette tape. The tape is then looped through to a playback device which outputs the sound to a single speaker. This has the effect of functioning as a tape delay device, and [Julius] did add input and output jacks to use it as such, but in its default state it has the effect of taking modern streaming through a real analog device and adding the compression and saturation that cassette tapes are known for.
The design of the device is impressive as well, showing off the tape loop and cassette front-and-center with a fluorescent vu meter on the side and a metal case. Getting all of this to work well together wasn’t entirely smooth, either, as [Julius] had to sort out a number of issues with the electronics to keep various electric noises out of the audio signal. Retro analog music players are having a bit of a resurgence right now, whether that’s as a revolt against licensed streaming services or as a way to experience music in unique ways, and our own [Kristina Panos] recently went down an interesting rabbit hole with one specific type of retro audio player.
youtube.com/embed/9MjZH790E20?…
Retro Semiconductors: The Silicon Controlled Rectifier

Over on YouTube [Lockdown Electronics] reviews an old bit of kit known as the Silicon Controlled Rectifier (SCR). Invented in the 1950s the SCR is a type of thyristor and they were popular back in the 1970s. They are often replaced these days by the TRIAC and the MOSFET but you might still find some old schematics that call for them and you can still buy them.
The SCR is a three terminal electronic switch which latches on. You apply a signal at the gate which allows the other two pins, the anode and cathode, to conduct; and they continue to do so until power is removed. The silicon inside the device is comprised of three semiconductor junctions, as: PNPN. The P on the left is the anode, the N on the right is the cathode, and the P in the right middle is the gate.
In the video [Lockdown Electronics] runs us through how to use them and compares them with a TRIAC. Unfortunately the lighting is a bit off for the demo of the SCR with AC power. To finish the video [Lockdown Electronics] wraps up with a windshield wiper control circuit from back in 1977 which is based around SCR technology. If you’d like to learn more about the SCR technology we have covered the basics.
youtube.com/embed/JmtR7_R62mM?…
Create Aerated Concrete Using Xanthan Gum and Dishwashing Liquid

To make aerated concrete, add a foam-forming agent and stir in a significant amount of air. This serves to make the concrete significantly lighter, better insulating, and more resilient to fire. Making it can however be a bit of an issue, often requiring ingredients that aren’t purchased at the average DIY store. This is where [NightHawkInLight]’s method seems rather promising, requiring effectively only xanthan gum and dishwashing detergent.
For the small-scale demonstration, 15 grams of the thickening agent xanthan gum is mixed with enough alcohol to create a slurry. To this 60 mL of the detergent and 1 liter of water is added and mixed until the xanthan gum has absorbed all the moisture, which takes about 5-10 minutes. This mixture is then added to Portland cement with two parts cement to one part xanthan gum/detergent mixture and mixed for a while.
Of importance here is that this mixture will keep expanding in volume while mixing, so you have to have to keep an eye on the amount of air relative to concrete, as this will determine the strength and other properties of the final aerated concrete. If you continue past a certain point you will even create open-celled aerated concrete that’s completely porous, so you have to know what kind of concrete you want before you start mixing up a big batch.
The basic physics behind this approach seem fairly straightforward, with the air captured in soap bubbles by the detergent, reinforced by the xanthan gum to make them significantly more resilient. A normal concrete mixer seems to work fine, but a mixing rod or kitchen mixer seem to do a much better job at getting a predictable result.
After pouring the aerated cement mixture into a mold, it should be kept moist while it cures, as it is more fragile than typical concrete, but if done properly you can produce for example cinderblocks that are quite insulating, as well as something akin to AAC blocks, conceivably with even better performance.
youtube.com/embed/z4_GxPHwqkA?…
170 dollari per un like: la mega truffa dei “soldi facili” che sta svuotando i conti
Annunci di lavoro fraudolenti che promettono guadagni facili e lavoro da remoto continuano a inondare i social media, in particolare in Medio Oriente e Nord Africa. Con il pretesto di lavori part-time che non richiedono esperienza, i truffatori raccolgono dati personali ed estorcono denaro.
170 dollari per mettere “mi piace”
Secondo l’analisi di Group-IB, dietro tutto questo ci sono gruppi coordinati che si spacciano per marchi noti ed enti governativi. Il programma inizia con annunci pubblicati su piattaforme come Facebook, Instagram, TikTok e Telegram. Gli annunci sono progettati professionalmente, presentano loghi di aziende note, recensioni positive e promettono fino a 170 dollari per azioni semplici come “Mi piace”, recensioni e completamento di sondaggi.
Gli annunci sono localizzati per Paese e persino per dialetto, utilizzando valute locali e una terminologia familiare, il che li rende particolarmente persuasivi. Dopo aver risposto, l’utente viene indirizzato a un’app di messaggistica dove può comunicare con un “recruiter” che dovrebbe verificare le sue credenziali.
Una truffa ben congeniata
L’utente viene quindi indirizzato a un sito web falso, camuffato da portale di lavoro. Lì, gli viene chiesto di registrarsi, caricare documenti, inserire le informazioni bancarie e persino depositare denaro, apparentemente per attivare delle attività. Dopodiché, il controllo viene trasferito a un altro membro del gruppo, questa volta su Telegram, che supervisiona il “lavoro” e monitora gli ulteriori trasferimenti.
Per creare fiducia, spiegano gli analisti di Group-IB, i truffatori pagano piccole somme di denaro nelle fasi iniziali del loro piano. Tuttavia, poi convincono le vittime a pagare di più per attività più redditizie. Una volta che la somma diventa elevata, i pagamenti si interrompono, i conti scompaiono e tutti i contatti vengono interrotti. Identificare i truffatori diventa praticamente impossibile.
L’analisi di Group-IB mostra che questi schemi prendono di mira un vasto pubblico, dagli adolescenti agli anziani. Prendono di mira principalmente i paesi della regione MENA: Egitto, Emirati Arabi Uniti, Arabia Saudita, Algeria, Iraq, Giordania e altri. Il più delle volte, i siti web e i loghi di marketplace, banche e ministeri governativi vengono falsificati. I gruppi stessi operano in modo organizzato: gestiscono più account, replicano modelli di messaggistica e utilizzano gli stessi metodi per trasferire le vittime tra le piattaforme.

“Guadagni facili”: è sempre il preludio dello scam
Nel 2025, gli specialisti del Group-IB hanno identificato oltre 1.500 annunci di questo tipo, anche se la portata effettiva è probabilmente significativamente più elevata. Gli slogan utilizzati – “guadagna soldi dal tuo telefono”, “lavoro facile da casa”, “guadagni facili” – sono ripetuti in diverse versioni e in diversi Paesi.
I siti web scoperti condividono uno schema comune: un modulo di accesso, una finta interfaccia “task” e un collegamento rapido alle app di messaggistica. Gli account dei truffatori hanno nomi, foto e stili di comunicazione simili. Tutto ciò indica un’infrastruttura unificata che opera secondo un piano ben definito.
Questi annunci non sono tentativi isolati di inganno, ma piuttosto un sistema su larga scala con una struttura chiara e mirato a chi è finanziariamente vulnerabile.
Sfruttando la fiducia nei marchi e le caratteristiche intrinseche dei social media, i truffatori costruiscono una complessa catena di interazioni, in cui ogni fase è finalizzata al profitto.
Raccomandazioni
Per i privati:
- Evitate di condividere documenti sensibili con reclutatori non richiesti e non verificati. Nessuna azienda o ministero legittimo chiederà documenti d’identità, coordinate bancarie o depositi prima ancora di offrire un colloquio.
- Metti sempre in discussione le offerte irrealistiche di guadagni rapidi e alti con poco o nessuno sforzo.
- Verificare l’esistenza dell’azienda tramite siti web ufficiali o eventuali offerte di lavoro tramite portali di pubblicazione di annunci di lavoro affidabili come LinkedIn.
- Segnala gli annunci sospetti direttamente alla piattaforma di social media.
Per aziende e piattaforme:
- Rafforzare i processi di verifica degli annunci, in particolare per le categorie “lavoro”.
- Monitorare l’impersonificazione del marchio aziendale o dei ministeri.
- Avviare campagne di sensibilizzazione in più lingue per mettere in guardia i gruppi vulnerabili.
L'articolo 170 dollari per un like: la mega truffa dei “soldi facili” che sta svuotando i conti proviene da Red Hot Cyber.
L’Exploit MongoBleed è online: 87.000 istanze su internet a rischio compromissione
È stata scoperta, come riportato in precedenza, una grave vulnerabilità in MongoDB che consente a un aggressore remoto, senza alcuna autenticazione, di accedere alla memoria non inizializzata del server. Al problema è stato assegnato l’identificatore CVE-2025-14847 e un punteggio CVSS di 8,7, che rappresenta un livello di gravità elevato.
Il bug Improper Handling of Length Parameter Inconsistency
L’errore CWE-130 è correlato all’elaborazione errata dei parametri di lunghezza dei dati. In alcune situazioni, il server non associa correttamente il valore di lunghezza specificato nell’intestazione alla quantità effettiva di dati trasferiti.
Ciò è dovuto al protocollo di scambio dati di compressione Zlib: se i campi di lunghezza nell’intestazione compressa non corrispondono al contenuto effettivo, MongoDB potrebbe restituire al client una posizione di memoria non inizializzata in precedenza.
In parole povere, una richiesta appositamente creata consente di leggere frammenti della RAM di un server senza effettuare l’accesso. Questi dati possono contenere lo stato interno del processo, puntatori, strutture di servizio o altre informazioni che facilitano ulteriori attacchi.
La vulnerabilità interessa un’ampia gamma di versioni di MongoDB Server:
- ramo 8.2 da 8.2.0 a 8.2.3
- ramo 8.0 da 8.0.0 a 8.0.16
- ramo 7.0 da 7.0.0 a 7.0.26
- ramo 6.0 da 6.0.0 a 6.0.26
- ramo 5.0 da 5.0.0 a 5.0.31
- ramo 4.4 da 4.4.0 a 4.4.29
- così come tutte le versioni di MongoDB Server 4.2, 4.0 e 3.6
Gli sviluppatori hanno già rilasciato aggiornamenti che risolvono il problema. Le correzioni sono disponibili nelle versioni 8.2.3, 8.0.17, 7.0.28, 6.0.27, 5.0.32 e 4.4.30. MongoDB sottolinea che lo sfruttamento della vulnerabilità è possibile lato client e non richiede credenziali, pertanto si consiglia di installare l’aggiornamento il prima possibile.
L’Exploit MongoBleed
MongoBleed viene eseguito prima dei controlli di autenticazione. Creando pacchetti di rete compressi e malformati, gli aggressori non autenticati possono ora indurre il server a gestire in modo errato le lunghezze dei messaggi decompressi, con il risultato che il server restituisce frammenti di memoria heap non inizializzati direttamente al client.
La causa principale risiede in message_compressor_zlib.cpp, dove il codice vulnerabile restituiva la dimensione del buffer allocato anziché la lunghezza effettiva dei dati decompressi. Questa falla sottile ma critica consente a payload sottodimensionati o malformati di esporre la memoria heap adiacente contenente informazioni sensibili, una vulnerabilità di buffer overflow analoga a Heartbleed .
Poiché la falla è raggiungibile prima dell’autenticazione e non richiede alcuna interazione da parte dell’utente, i server MongoDB esposti a Internet corrono un rischio immediato di sfruttamento.
Secondo Censys, attualmente sono circa 87.000 le istanze potenzialmente vulnerabili esposte in tutto il mondo, mentre la ricerca di Wiz indica che il 42% degli ambienti cloud ospita almeno un’istanza MongoDB vulnerabile.

Risorse online
Negli ultimi giorni sono stati pubblicati su GitHub diversi repository dedicati allo sfruttamento e alla rilevazione della CVE-2025-14847, una vulnerabilità critica di memory disclosure in MongoDB legata alla gestione della compressione zlib (flag OP_COMPRESSED).
Progetti come ProbiusOfficial/[url=https://www.redhotcyber.com/en/cve-details/?cve_id=CVE-2025-14847]CVE-2025-14847[/url]e cybertechajju/CVE-2025-14847_Exploit forniscono proof of concept ed exploit funzionanti che dimostrano come sia possibile estrarre dati sensibili direttamente dalla heap di istanze MongoDB vulnerabili, evidenziando l’impatto concreto del bug.
Accanto agli exploit, sono comparsi anche strumenti di detection e scanning, come onewinner/CVE-2025-14847 e Black1hp/mongobleed-scanner, pensati per individuare rapidamente sistemi esposti, molto utili in contesti di bug bounty, red teaming e security assessment.
Il repository Ashwesker/Blackash-CVE-2025-14847 completa il panorama offrendo un’ulteriore implementazione focalizzata sull’analisi della vulnerabilità.
Nel complesso, questa ondata di tool conferma l’elevata attenzione della community sulla falla e la sua pericolosità reale in scenari di produzione, soprattutto per database MongoDB esposti in rete o non adeguatamente aggiornati.
L'articolo L’Exploit MongoBleed è online: 87.000 istanze su internet a rischio compromissione proviene da Red Hot Cyber.
Cheetah MX4 Mini: A Pint-Sized 3D Printer Controller

There’s a seemingly unending list of modifications or upgrades you can make to a 3D printer. Most revolve around the mechanical side of things, many are simple prints or small add-ons. This upgrade is no small task: this 17-year-old hacker [Kai] took on designing and building his own 3D printer control motherboard, the Cheetah MX4 Mini.
He started the build by picking out the MCU to control everything. For that, he settled on the STM32H743, a fast chip with tons of support for all the protocols he could ask for, even as he was still nailing down the exact features to implement. For stepper drivers, [Kai] went with four TMC stepstick slots for silent motor control. There are provisions for sensorless homing and endstops, support for parallel and serial displays, and both USB-C and microSD card slots for receiving G-code. It can drive up to three fans as well as two high-amperage loads, such as for the heated bed.
All these features are packed into a board roughly the size of a drink coaster. Thanks to the STM32H743, the Cheetah MX4 Mini supports both Marlin and Klipper firmware, a smart choice that lets [Kai] leverage the massive amount of work that’s already gone into those projects.
One of the things that stood out about this project is the lengths to which [Kai] went to document what he did. Check out the day-by-day breakdown of the 86 hours that went into this build; reading through it is a fantastic learning aid for others. Thanks [JohnU] for sending in this tip! It’s great to see such an ambitious project not only taken on and accomplished, but documented along the way for others to learn from. This is a fantastic addition to the other 3D printer controllers we’ve seen.
Cloudflare’s Outages and Why Cool Kids Test on Prod

Every system administrator worth their salt knows that the right way to coax changes to network infrastructure onto a production network is to first validate it on a Staging network: a replica of the Production (Prod) network. Meanwhile all the developers who are working on upcoming changes are safely kept in their own padded safety rooms in the form of Test, Dev and similar, where Test tends to be the pre-staging phase and Dev is for new-and-breaking changes. This is what anyone should use, and yet Cloudflare apparently deems itself too cool for such a rational, time-tested approach based on their latest outage.
In their post-mortem on the December 5th outage, they describe how they started doing a roll-out of a change to React Server Components (RSC), to allow for a 1 MB buffer to be used as part of addressing the critical CVE-2025-55182 in RSC. During this roll-out on Prod, it was discovered that a testing tool didn’t support the increased buffer size and it was decided to globally disable it, bypassing the gradual roll-out mechanism.
This follows on the recent implosion at Cloudflare when their brand-new, Rust-based FL2 proxy keeled over when it encountered a corrupted input file. This time, disabling the testing tool created a condition in the original Lua-based FL1 where a NIL value was encountered, after which requests through this proxy began to fail with HTTP 500 errors. The one saving grace here is that the issue was detected and corrected fairly quickly, unlike when the FL2 proxy fell over due to another issue elsewhere in the network and it took much longer to diagnose and fix.
Aside from Cloudflare clearly having systemic issues with actually testing code and validating configurations prior to ‘testing’ on Prod, this ought to serve as a major warning to anyone else who feels that a ‘quick deployment on Prod’ isn’t such a big deal. Many of us have dealt with companies where testing and development happened on Staging, and the real staging on Prod. Even if it’s management-enforced, that doesn’t help much once stuff catches on fire and angry customers start lighting up the phone queue.
Raspberry Pi Gets Desktop Form Factor

Before the Raspberry Pi came out, one cheap and easy way to get GPIO on a computer with a real operating system was to manipulate the pins on an old parallel port, then most commonly used for printers. Luckily, as that port became obsolete we got the Raspberry Pi, which has the GPIO and a number of other advantages over huge desktop computers from the 90s and 00s as well. But if you really miss that form factor or as yearn for the days of the old parallel port, this build which puts a Raspberry Pi into a mini ITX desktop case is just the thing for you.
There are a few features that make this build more than just a curiosity. The most obvious is that the Pi actually has support for PCIe and includes a single PCIe x1 slot which could be used for anything from a powerful networking card to an NVMe to a GPU for parallel computing in largely the same way that any desktop computer might them. The Pi Compute Module 5 that this motherboard is designed for doesn’t provide power to the PCIe slots automatically though, but the power supply that can be installed in the case should provide power not only to the CM5 but to any peripherals or expansion cards, PCIe or otherwise, that you could think of to put in this machine.
Of course all the GPIO is also made easily accessible, and there are also pins for installing various hats on the motherboard easily as well. And with everything installed in a desktop form factor it also helps to improve the cable management and alleviate the rats-nest-of-wires problems that often come with Pi-based projects. There’s also some more information on the project’s Hackaday.io page. And, if you’re surprised that Raspberry Pis can use normal graphics cards now, make sure to take a look at this build from a few years ago that uses completely standard gaming GPUs on the Pi 5.
John von Neumann: Il genio poliedrico che ha rivoluzionato l’informatica
Conosciamo quello che è stato considerato uno degli uomini di scienza, forse pari solo a Einstein, più poliedrici e geniali dello scorso secolo.
Con un ampissimo spettro di talenti scientifici, sviluppati anche grazie ad un ambiente stimolante; in effetti in quegli anni l’Ungheria offriva una realtà matematica molto rigogliosa, florida.
Abilità scoperte dal suo insegnante di matematica Làszlò Ràtz, un famoso professore di una scuola luterana a Budapest. Le conoscenze di Neumann si estendevano dalla matematica alla fisica, dalla chimica all’algebra, solo per citarne alcune. Le sue idee innovative e la sua mente caleidoscopica hanno generato e dato vita a soluzioni nuove che ancora oggi sono alla base degli strumenti tecnologici che usiamo.
La Famiglia
Janos Lanos Neumann, John in inglese, ebreo ungherese, nasce nella fiorente Budapest nello sfavillante periodo della Belle Époque, il 28 dicembre 1903. Il padre Miksa (Massimiliano) Neumann e la madre Margit (Margaret) Kann, colti e benestanti, facevano parte della comunità ebraica della capitale ungherese.
Massimiliano Neumann è stato un dottore in giurisprudenza e direttore di una banca d’affari, la madre di Janos, Margit, proveniva da una facoltosa famiglia di Budapest. I due hanno avuto tre figli (John, Michael e Nicholas), il primogenito Janos ha ereditato dal padre l’attributo nobiliare <<von>> assegnatogli nel 1913 dall’imperatore Francesco Giuseppe per meriti economici e per questo sarà meglio conosciuto come: John von Neumann.

Un fanciullo favoloso
Da enfant prodige qual era con un intelletto acuto, all’età di sei anni riusciva a moltiplicare a mente due numeri con molte cifre. Alcune fonti suggeriscono che verso gli otto anni già conoscesse l’analisi matematica ed il greco il latino oltre l’ungherese, sua lingua nativa, assimilò anche l’italiano e l’inglese.
Lesse intere enciclopedie e leggenda vuole che avesse con sé sempre due libri nel timore di restare senza nulla da leggere. Ma il principale talento di Janos non fu né per le lingue né per le enciclopedie lette, ma per il linguaggio delle scienze, la matematica.
Gli Studi
Considerati gli eventi storici del tempo, Massimiliano Neumann preferì affidare l’istruzione dei suoi figli a degli educatori o precettori, non iscrivendoli alla scuola ungherese fino al termine della loro fanciullezza, spingendo affinché imparassero le lingue straniere.
John fu l’unico dei tre fratelli ad ereditare dal nonno, Jacob Kann, una prodigiosa mente e una incredibile memoria che gli permisero di stupire i suoi primi educatori, donandogli la capacità di effettuare complesse operazioni matematiche mentalmente. Ma nonostante i suoi tanti talenti non riuscì mai a padroneggiare l’uso di uno strumento musicale o il gioco degli scacchi. Proseguì gli studi superiori (1914) iscrivendosi al prestigioso Fasori, un liceo classico luterano.
Intuite le potenti abilità intellettive del giovane ragazzo il famoso insegnante di matematica Làszlò Ràtz, del Ginnasio Luterano si offrì, in accordo con il padre Massimiliano, di fargli delle lezioni extracurricolari presso l’Università di Budapest. Gli anni di formazione al liceo furono cosi fruttuosi che ancor prima di terminarli scrisse un articolo in collaborazione con il famoso matematico Feteke, pubblicato successivamente, sulla rivista dell’Unione dei matematici tedeschi. Terminò gli studi con il massimo dei voti, ricevendo anche un premio nazionale.
Il percorso universitario
Nel 1921 si iscrisse al Corso di Studi in matematica presso l’Università di Budapest alternando la formazione scientifica della sua carriera accademia tra Budapest e Berlino che in quegli anni conosceva una vera e propria affermazione delle discipline matematiche.
Studiò ingegneria chimica tra il 1923 e il 1925 al Politecnico di Zurigo. Tra Vienna Budapest e Berlino si interessò di ogni aspetto del dibattito scientifico e conobbe i più importanti matematici dell’epoca. Nel 1929 all’età di 26 anni, Oswald Veblen un importante matematico statunitense gli offrì un posto come visiting professor alla Princeton University. Nello stesso anno si sposò e si convertì alla religione cattolica. Quando nel 1933 fu fondato l’Institute for Advanced Studies, fu nominato professore di matematica.

Contributi all’informatica
Gli anni della Seconda Guerra Mondiale spingono i governi e i militari nel mondo dei calcolatori. L’artiglieria terrestre costringe i militari a continui calcoli per determinare le precise traiettorie dei proiettili.
Le tabelle balistiche necessitavano ognuna di 2/4000 traiettorie ognuna di esse richiedeva circa 700 moltiplicazioni. In soccorso dei militari venne la Differential Analyzer, un computer del tempo la quale impiegava 20 ore per il calcolo di ogni tabella balistica. Ancora troppo tempo. Serve una macchina numerica più veloce, inizia così nel 1943 lo sviluppo di ENIAC (Electronic Numeral Integrator and Computer).
Da Eniac ad Evac
Eniac sarà il primo computer costituito da circuiti elettronici, senza parti meccaniche in movimento. Costruito per eseguire un unico compito per volta. Risolvere un problema diverso avrebbe significato fermare il computer e modificare manualmente il cablaggio interno, formato da migliaia di interruttori e relative connessioni dei fili elettrici.
Nel 1944 Eckert e Mauchly (I progettisti di ENIAC) propongono una nuova macchina l’EDVAC (Electronic Discrete Variable Automatic Computer) progettata per conservare in memoria un programma. Von Neumann entra a far parte del progetto e nel 1945 formalizza un Rapporto su EDVAC: il primo computer con all’interno un sistema operativo che fa lavorare altri programmi.
Il progetto EDVAC viene terminato nel 1952 e consegnato al laboratorio di balistica dell’Esercito ad Aberdeen dove sarà affiancato a ENIAC. Von Neumann dimostra che un computer può avere un’architettura fissa molto semplice ed essere in grado di eseguire qualsiasi tipo di calcolo, con un controllo programmato adatto, senza necessariamente modificare l’hardware ogni volta.
L'articolo John von Neumann: Il genio poliedrico che ha rivoluzionato l’informatica proviene da Red Hot Cyber.

Moving Mousepad Is An Elegant Aimbot

These days, it can be hard to remain competitive in online shooters without spending your entire life dedicated to the sport. This leads some to explore the world of competitive aids. (AKA: cheating.) A great example is [Nick], who built a mechanical aimbot to help in this regard.
[Nick’s] build moves a mousepad underneath the mouse opposite to the desired movement direction, in order to simulate the mouse movements required to aim at targets in game. This is achieved with the aid of a XDraw A4 pen plotter, which served as a cheap prebuilt X-Y motion platform. The plotter responds to simple serial commands, which makes it easy to control. The X-Y gantry was mounted underneath the desk so the mousepad sits seamlessly on top of the desk, sliding neatly on low-friction mouse skate stickers.
With the mousepad control system built, it was then necessary to figure out how to turn it into an aimbot. [Nick] already had a machine vision tool to detect enemies in shooting game, so it was merely modified to make the right mousepad movements to get the crosshairs right where they needed to be before firing. In testing, it proved more than capable at helping a new player achieve far superior aim, as a good aimbot should.
We’ve featured similar projects before that use complex mechanical contraptions to aim for you. Yes, it’s still cheating, but it’s a lot harder to detect than a traditional aimbot. That doesn’t make it right, per se, just more subtle. Video after the break.
youtube.com/embed/T4rrcw_oRVs?…
What to do When Your Foucault Pendulum Stops Swinging

At the Houston Museum of Natural Science they recently made a disturbing discovery: their Foucault pendulum had stopped swinging for the first time since its installation in the 1970s. (Video, embedded below.)
While some might take this as yet another sign of the end times, here it is simply a sign that the electromagnetic system that kicks the pendulum developed a fault and will need to be fixed.
Their explainer video of this Herzstein Foucault pendulum is also worth watching, as it explains both the underlying physics and this particular pendulum’s construction. Every 48 hours the 81.6 kg heavy pendulum completes a full rotation, like clockwork, with pins along the circumference being tipped over one by one as the pendulum precesses.
")
Invented by [Léon Foucault] in 1851 as an experimental demonstration of Earth’s rotation using a swinging pendulum, the Foucault pendulum remains a popular physical demonstration in museums and elsewhere. Although the pendulum seems to just follow the same line, it gradually shifts its plane of oscillation, making it seem that it rotates around its attachment point.
The effect differs per region of the Earth globe, making it both a fascinating experiment and a sore point for those who insist that the Earth is a flat, unmoving disc.
Not only does it measure the rotation of the Earth, but also its shape due to how the effect changes depending on the pendulum’s position on the globe, with the north and south poles showing it will precess in exactly 24 hours, while at the equator the pendulum will not precess at all.
We hope that the repair of the mechanism behind the Houston museum’s pendulum progresses smoothly, and would love to see a video of its innards and repair.
youtube.com/embed/yG6ghaLgM4o?…
youtube.com/embed/AZ_RAWx1X9E?…
Seeing Sound for Under $200

There are five general senses: touch for feels, taste for food, smell for avoiding trash, hearing for sounds, and, of course, eyesight for visualizing the very waves making up that sound. [PlasmatronX] drives that last point home with his camera for sound waves, that’s even able to capture constructive and destructive interference. (Video, embedded below.)
You may have heard of Schlieren imaging, which is usually used to capture the movement of air currents caused by heat sources. [PlasmatronX] sets up a concave mirror to amplify the refraction of different densities of air, only unlike traditional Schlieren setups, he’s after the different densities of air caused by the pressure waves that we interpret as sound.
To capture the sound waves, you could have a camera with the shutter speed to match, but cameras with that ability run quite a premium. The route taken by [Plasma] uses a cleverly synced audio and optical capture system. Even this wasn’t easy, though. Audio circuits have to be modified to remove high-pass filters, and the LED flash has to be overvolted to allow for the quick strobe.
If you want your own try with visualizing sound, check out [PlasmatronX]’s GitHub project here! While this particular imaging technique may be new for us, crazy imaging certainly isn’t in the general sense. For example, check out this camera for something even crazier, light!
youtube.com/embed/o9ojD0LRB0Q?…
Building Beautiful LED Lanterns With Black LED Acrylic

[Geeksmithing] and [When Geeks Craft] recently came together for a glowing collaboration. They wanted to build ever more attractive lanterns for a local parade event. They recently discovered a fantastic material that can really improve the look of whatever project you might be building with LEDs.
The material is commonly referred to as “Black LED Acrylic” or similar. In this case, it was sourced from TAP Plastics, though you can source similar acrylic from other vendors, too. From first glance, it looks like any other piece of black acrylic plastic. However, shine an LED through it, and it will be beautifully diffused and smoothed out to wonderful visual effect. A simple test of a 3×3 array of LEDs behind a 3D-printed grid shows how good this can look. It almost entirely eliminates hot spots, and the result looks like a display built out of juicy glowing cubes. The duo used this material to produce giant pixel art lanterns for their local parade. We only get a glimpse at the final build, but it appears giant Pacman and Blinky totems are on the way.
If you’ve been struggling to find a good way to diffuse the light from LEDs, you might want to give this stuff a try. Alternatively, you might explore some other methods we’ve looked at before, and don’t discount ping pong balls, either.
youtube.com/embed/WsO6myw9gNQ?…
youtube.com/embed/TGJzGQ-Hc9A?…
Playing DOOM on a Receipt Printer

Gaming is a wonderful thing. Unfortunately for many of us, work takes up our valuable time, which should be allocated to our gaming. What if there was a better way? Well, printers can print an image quickly, and receipt printers can print a lot of images. This sounds like an effective display for DOOM in a pinch. [Bringus Studios] managed to find such a printer and got the classic shooter running.
Getting the printer’s attached computer, which was only designed for printing the cost of your chicken sandwich, to run Half-Life was far from easy. [Bringus] struggled through the process of swapping operating systems from Windows 7 to Linux just to return to Windows 7 after a painful process of maintaining compatibility between 32 and 64 bit software. Driver issues followed through the entire process just to get anything running at all.
But we can’t play DOOM while at work on a normal screen. The printer MUST display our glorious 480p gameplay. To achieve such a workflow, [Bringus] implemented a script to print out a frame of the display, allowing for “visible gameplay”. Along with some heat issues from the nature of thermal receipts, eventually the printer displayed the glory of DOOM.
Playing games on a thermal printer might be one of the weirdest things you’ve seen today, but what if we could reverse the script a bit and create a printer from something else? Here at Hackaday, we have exactly the thing for you: a printer made from a vintage typewriter!
youtube.com/embed/oEqvYXYI56s?…
Thanks [DjBiohazard] for the tip!
Active Ideal Full Bridge Rectifier using TEA2208T

Everyone loves a full-wave bridge rectifier, but there’s no denying that they aren’t 100% efficient due to the diode voltage drop. Which isn’t to say that with some effort we cannot create an ideal bridge rectifier using active components, as demonstrated by [Mousa] with an active bridge circuit. This uses the NXP TEA2208T active bridge rectifier controller, along with the requisite four MOSFETs.")
Taking the circuit from the datasheet, a PCB was created featuring four FDD8N50NZ MOSFETs in addition to the controller IC. These were then compared to a diode-based bridge rectifier, showing the imperfections with the latter when analyzing the output using an oscilloscope.
As expected, the active rectifier’s output was also one volt higher than the diode bridge rectifier, which is another small boost to overall efficiency. According to NXP’s product page, there’s about a 1.4% efficiency gain at 90 VAC, with the chip being promoted for high-efficiency operations. When you consider that many designs like computer PSUs feature one or more diode bridge rectifiers often strapped to heatsinks, the appeal becomes apparent. As for [Mousa], he put this particular board in his laboratory PSU instead of the diode bridge rectifier, because why not.
Perhaps the biggest impediment to using an active rectifier is the cost, with the TEA2208T coming in at $4 on DigiKey for a quantity of 100, in addition to the MOSFETs, PCB, etc. If power efficiency isn’t the goal, then some wasted power and an aluminium heatsink is definitely cheaper.
youtube.com/embed/KeshFe3rftU?…
Print Your Next LED Bezel

LED bezels (also known as LED panel-mount holders) are great, so how about 3D printing the next ones you need? Sure, they’re inexpensive to purchase and not exactly uncommon. But we all know that when working on a project, one doesn’t always have everything one might need right at hand. At times like that, 3D printing is like a superpower.
[firstgizmo]’s design is made with 3D printing in mind, and most printers should be able to handle making them. Need something a little different? You’re in luck because the STEP files are provided (something we love to see), which means modifications are just a matter of opening them in your favorite CAD program.
There’s not even any need to export to an STL after making tweaks, because STEP support in slicer programs is now quite common, ever since PrusaSlicer opened that door a few years ago.
Not using 5 mm LEDs, and need some other size? No problem, [firstgizmo] also has 3 mm, 8 mm, and 10 mm versions so that it’s easy to mount those LEDs on a panel. Combined with a tool that turns SVG files into multi-color 3D models, one can even make some panels complete with color and lettering to go with those LEDs. That might be just what’s needed to bring that midnight project to the next level.
Building a Wall-Mounted Sound Visualizer

Visualizers used to be very much in vogue, something you’d gasp in at amazement when you’d fire up Winamp or Windows Media Player. They’re largely absent from our modern lives, but [Arnov Sharma] is bringing them back. After all, who doesn’t want a cool visualizer hanging on the wall in their living room?
The build is based around the Raspberry Pi Pico 2. It’s paired with a small microphone hooked up to a MAX9814 chip, which amplifies the signal and offers automatic gain control to boot. This is a particularly useful feature, which allows the microphone to pick up very soft and very loud sounds without the output clipping. The Pi Pico 2 picks up the signals from the mic, and then displays the waveforms on a 64 x 32 HUB75 RGB matrix. It’s a typical scope-type display, which allows one to visualize the sound waves quite easily. [Arnov] demonstrates this by playing tones on a guitar, and it’s easy to see the corresponding waveforms playing out on the LED screen.
It’s a fun project, and it’s wrapped up in a slick 3D printed housing. This turns the visualizer into a nice responsive piece of wall art that would suit any hacker’s decor. We’ve featured some other great visualizers before, too.
youtube.com/embed/33o3QkeaBJI?…
Drunken eBay Purchase Becomes Motorized, Speaking Dalek

Not every impulsive purchase on eBay leads to possession of a wooden Dalek, but when a friend did exactly that, [Tony Goacher] did his part to turn ‘Dalek Bob’ into a motorized and remote-controlled unit of impressive stature.
The purchased Dalek is made of wood and, with the help of two bolts, is of sufficient size to trap a human inside. There’s a bench of sorts upon which the captive can sit, and with some effort, shuffle the surrounding frame awkwardly about. The scale of the Dalek is impressive, but it was clear the effect of human-powered locomotion was lacking. The solution was to install wheelchair motors, tires, and an ESP32-based remote control.
Quite a lot of work went into mounting the motors and wheels, and the challenges will be familiar to anyone who has done hobby robotics. One can choose ideal motors and wheels, but making them fit one another can be an entirely different story. Shafts and hubs are of different sizes, motor mounting doesn’t quite match the platform, and it’s all a bit like fitting a square peg into a round hole. But with access to the right tools, it’s nothing a little metalwork and welding can’t solve.
For the control system, the ESP32 (with a beautiful CNC-routed custom PCB) sets itself up as a wireless access point that serves a web-based control panel for piloting, and controls two H-bridges to drive the motors. What’s more, it also provides a sound board from which a second operator can trigger appropriate phrases and sounds from the Dalek.
Some folks prefer their remote-controlled Daleks plush and cute instead of large and looming, but we like the smooth movement and imposing stature of this one. Watch it all in action in the video, embedded below.
youtube.com/embed/rc9Nly-5Yj8?…
Simulating Driven-Dissipative Quantum Spin Dynamics on Consumer Hardware

Physics simulations using classical mechanics is something that’s fairly easily done on regular consumer hardware, with real-time approximations a common feature in video games. Moving things to the quantum realm gets more complex, though with equilibrium many-body systems still quite solvable. Where things get interesting is with nonequilibrium quantum systems.
These open systems are subject to energy gains and losses that disrupt its equilibrium. The truncated Wigner approximation (TWA) is used as a semi-classical method to solve these, but dissipative spin systems proved tricky. Now however [Hosseinabadi] et al. have put forward a TWA framework (PR article) for driven-dissipative many-body dynamics that works on consumer hardware.
Naturally, even with such optimizations there is still the issue that the TWA is only an approximation. This raises questions such as about how many interactions are required to get a sufficient level of accuracy.
Using classical computers to do these kind of quantum physics simulations has often been claimed to the ideal use of qubit-based quantum computers, but as has been proven repeatedly, you can get by with a regular tensor network or even a Commodore 64 if you’re in a pinch.
Mini Battery-Powered Vapor-Compression Air Conditioner
")
When you think of air conditioners, you tend to think of rather bulky units, with the window-mounted appliances probably among the most compact. There’s however no real minimum size limit to these AC units, as long as you can get an appropriate compressor. If you also manage to pick up a small, DC-powered compressor like [Hyperspace Pirate] did, then you might be tempted to make a hand-portable, battery-powered AC unit.

At their core vapor-compression AC units are very simple, featuring the aforementioned compressor, a condensing coil, expansion valve and the evaporator coil. Or in other words, some radiators looted out of other devices, various plumbing supplies and the refrigerant gas to charge the AC unit with.
Since the compressor uses a BLDC motor, it has three terminals that a typical ESC connects to, along with two 2200 mAh Li-on battery packs that can keep the portable AC unit running for a while.
As for the refrigerant gas, although the compressor lists R134a, this is both quite expensive and illegal in parts of the world like the EU. Alternatives are butane (R600) as well as isobutane (R600a), but due to unfortunate circumstances the use of propane (R290) was forced. Fortunately this worked fine, and after some testing and running of numbers it was found that it had about 42 Watt cooling power, with a coefficient of performance (COP) of around 1.
Considering that most AC units have a COP of 3.5 – 5, this shows that there’s still some room for increased efficiency, but at the very least this portable, battery-powered AC unit provides cold air on one side, and hot air on the other while completely blowing Peltier thermocouples out of the water in terms of efficiency.
youtube.com/embed/2hSkXNEV-GU?…
Pocket-sized Test Pattern Generator Helps Check those CRTs

[Nicholas Murray]’s Composite Test Pattern Generator is a beautifully-made, palm-sized tool that uses an ESP32-based development board to output different test patterns in PAL/NTSC. If one is checking out old televisions or CRTs, firing up a test pattern can be a pretty handy way to see if the hardware is healthy or not.

In a pinch a hacker could use an original Raspberry Pi, because the original Pi notably included a composite video output. That feature made it trivial to output NTSC or PAL video to a compatible display. But [Nicholas]’s device has a number of significant advantages: it’s small, it’s fast, it has its own battery and integrated charger, and the little color screen mirroring the chosen test pattern is a great confirmation feature.
This is a slick little device, and it’s not [Nicholas]’s first test pattern generator. He also created a RP2040-based unit with a VGA connector, the code of which inspired a hacker’s home-grown test pattern generator that was used to service a vintage arcade machine.
Retrotechtacular: IBM’s The World of OCR

Optical Character Recognition (OCR) forms the bridge between the analog world of paper and the world of machines. The modern-day expectation is that when we point a smartphone camera at some characters it will flawlessly recognize and read them, but OCR technology predates such consumer technology by a considerable amount, with IBM producing OCR systems as early as the 1950s. In a 1960s promotional video on the always delightful Periscope Film channel on YouTube we can get an idea of how this worked back then, in particular the challenge of variable quality input.
What drove OCR was the need to process more paper-based data faster, as the amount of such data increased and computers got more capable. This led to the design of paper forms that made the recognition much easier, as can still be seen today on for example tax forms and on archaic paper payment methods like checks in countries that still use it. This means a paper form optimized for reflectivity, with clearly designated sections and lines, thus limiting the variability of the input forms to be OCR-ed. After that it’s just a matter of writing with clear block letters into the marked boxes, or using a typewriter with a nice fresh ink ribbon.
These days optical scanners are a lot more capable, of course, making many of such considerations no longer as relevant, even if human handwriting remains a challenge for OCR and human brains alike.
youtube.com/embed/SekWFCZVLUk?…
Hackaday Podcast: 2025 Holiday Placeholder Edition

This week the Hackaday Podcast is on vacation, but we’d like to wish you all happy holidays and a great 2026. Thanks for tuning in! We’ll be back next week.
html5-player.libsyn.com/embed/…
This wasn’t a real show, but that doesn’t prevent you from downloading it as an MP3 anyway.
Where to Follow Hackaday Podcast
Places to follow Hackaday podcasts:
hackaday.com/2025/12/26/hackad…
Villager: il framework di pentesting basato su AI che preoccupa la sicurezza globale
Il team AI Research (STAR) di Straiker ha individuato Villager, un framework di penetration testing nativo basato sull’intelligenza artificiale, sviluppato dal gruppo cinese Cyberspike. Lo strumento, presentato come soluzione red team, è progettato per automatizzare in modo completo le attività di test di sicurezza, combinando tool di Kali Linux e modelli AI DeepSeektramite protocollo MCP.
Villager è stato pubblicato sul Python Package Index (PyPI.org) ed è liberamente accessibile a livello globale. Nei primi due mesi dalla pubblicazione ha superato i 10.000 download, un dato che ha attirato l’attenzione degli analisti per il potenziale rischio di abuso.
Secondo Straiker, la combinazione tra automazione avanzata e bassa barriera di accesso potrebbe portare Villager a seguire una traiettoria simile a quella di strumenti come Cobalt Strike, nati per usi legittimi ma successivamente adottati su larga scala da attori malevoli.
Un framework a doppio uso
Villager riduce drasticamente il livello di competenza necessario per condurre attività offensive complesse. Automatizzando l’intera catena di strumenti di penetration testing, consente anche a operatori meno esperti di eseguire intrusioni avanzate.
La distribuzione attraverso PyPI rappresenta inoltre un potenziale vettore di supply chain, offrendo agli attaccanti un canale affidabile per ottenere e integrare lo strumento nei propri flussi operativi.
Dal punto di vista operativo, l’uso improprio di Villager potrebbe tradursi in un aumento significativo delle attività automatizzate di scansione, sfruttamento e post-exploitation, con un conseguente aggravio per i team di rilevamento e risposta agli incidenti.
Cos’è l’MCP (Model Context Protocol)
Il protocollo MCP (Model Context Protocol) è uno standard pensato per consentire ai modelli di intelligenza artificiale di interagire in modo strutturato con strumenti esterni, servizi e risorse di sistema. A differenza di una semplice API di inferenza, MCP definisce un meccanismo attraverso il quale l’AI può ricevere contesto operativo, comprendere quali strumenti sono disponibili e invocarli in modo controllato. Questo trasforma il modello da motore puramente conversazionale a componente attivo all’interno di flussi di lavoro complessi.
Dal punto di vista tecnico, MCP introduce un livello di orchestrazione che regola lo scambio di messaggi tra il modello e i cosiddetti “tool”, come ambienti di esecuzione, container, browser automatizzati o utility di sistema. Ogni azione viene descritta e restituita in un formato strutturato, permettendo all’AI di concatenare più operazioni, gestire dipendenze tra task e reagire agli errori. In questo modo è possibile costruire agenti che pianificano, eseguono e verificano attività articolate, mantenendo coerenza e tracciabilità.
Il valore – e al tempo stesso il rischio – di MCP emerge quando viene applicato in contesti sensibili come la sicurezza informatica. Collegando modelli linguistici a strumenti offensivi o di test, il protocollo consente l’automazione di intere catene operative, riducendo drasticamente l’intervento umano. Per questo MCP è considerato una tecnologia abilitante: da un lato rende più efficienti sviluppo, testing e difesa, dall’altro può essere sfruttato per creare framework di attacco autonomi, come nel caso di Villager.
Impatti potenziali per le organizzazioni
Le imprese potrebbero trovarsi di fronte a un incremento di tentativi di scansione ed exploit provenienti dall’esterno, a cicli di attacco più rapidi che riducono le finestre di reazione e a una maggiore difficoltà di attribuzione, dovuta all’uso di strumenti standard in campagne ibride.
Ulteriori rischi riguardano la supply chain e gli ambienti di sviluppo, qualora il pacchetto venga installato su workstation CI/CD o sistemi di test.
Gli analisti suggeriscono di implementare gateway di sicurezza per il protocollo MCP, capaci di ispezionare e filtrare in tempo reale le comunicazioni tra agenti AI e strumenti. È inoltre consigliata una revisione approfondita delle integrazioni AI di terze parti, l’adozione di policy di governance sull’uso dell’intelligenza artificiale e lo sviluppo di capacità di threat intelligence focalizzate sugli attacchi AI-driven.
Tra le misure indicate figurano anche la definizione di procedure di risposta specifiche per incidenti potenziati dall’AI e l’esecuzione di test di sicurezza continui, mirati alle applicazioni abilitate MCP.
Chi è Cyberspike
Cyberspike, riportano i ricercatori di Striker, emerge per la prima volta il 27 novembre 2023, con la registrazione del dominio cyberspike[.]top associato alla Changchun Anshanyuan Technology Co., Ltd., società cinese indicata come fornitore di soluzioni AI e software applicativo.
Tuttavia, l’assenza di un sito web aziendale attivo e di una presenza commerciale verificabile solleva interrogativi sulla reale struttura dell’organizzazione.
Snapshot archiviati dalla Wayback Machine mostrano che nel 2023 l’azienda promuoveva un prodotto denominato Cyberspike, dotato di dashboard per il monitoraggio delle macchine compromesse.

Le funzionalità dichiarate includevano proxy inverso, generatori multistadio e strumenti tipici delle piattaforme di comando e controllo.
Dallo strumento red team al RAT
L’analisi del Cyberspike Studio Installer v1.1.7, caricato su VirusTotal il 10 dicembre 2023, ha rivelato che i plugin inclusi corrispondono a un Remote Access Trojan (RAT) completo. Le capacità individuate comprendono accesso remoto al desktop, keylogging, compromissione di account Discord, controllo della webcam e altre funzioni di sorveglianza.
Ulteriori verifiche hanno dimostrato che l’intera suite Cyberspike coincide con la versione 1.0.7.0 di AsyncRAT, malware noto e diffuso dal 2019, da cui derivano anche varianti come DCRat e VenomRAT.
I componenti analizzati risultano identici per formato, dimensione e linguaggio di programmazione, confermando l’integrazione diretta di AsyncRAT nel prodotto Cyberspike, insieme a plugin aggiuntivi come Mimikatz.

Il rilascio di Villager su PyPI
Il 23 luglio 2025 Cyberspike ha pubblicato Villager Pentesting Tool su PyPI. Il pacchetto automatizza i test di sicurezza utilizzando modelli DeepSeek e include riferimenti a un modello personalizzato denominato “al-1s-20250421”, ospitato su infrastrutture cyberspike[.]top.
L’autore indicato, @stupidfish001, è un ex partecipante a competizioni CTF del team cinese HSCSEC e risulta manutentore di diversi progetti correlati.
Nei due mesi successivi al rilascio, Villager ha totalizzato 10.030 download su Linux, macOS e Windows, con una media di oltre 200 download ogni tre giorni.

Architettura e funzionamento del framework
Villager adotta un’architettura distribuita basata su MCP, con servizi dedicati al coordinamento dei messaggi, alla generazione di exploit tramite RAG (Retrieval-Augmented Generation) e alla creazione automatica di container Kali Linux on-demand. L’orchestrazione si basa su Pydantic AI, che impone formati strutturati agli output per garantire coerenza operativa.
Un elemento critico è rappresentato dai meccanismi di evasione forense: i container sono progettati per autodistruggersi, cancellando log e tracce, e utilizzano porte SSH randomizzate, rendendo più complessa l’analisi post-incidente.
A differenza dei framework tradizionali basati su script, Villager consente l’interazione in linguaggio naturale. I comandi testuali vengono tradotti automaticamente in sequenze di attacco dinamiche grazie all’integrazione con LangChain e DeepSeek v3, accessibile tramite API compatibili con OpenAI.
Un modello C2 orientato alle attività
Il sistema di comando e controllo si basa su FastAPI e su una gestione avanzata delle attività. Obiettivi complessi vengono scomposti in sotto-task, eseguiti anche in parallelo, con monitoraggio continuo dello stato e capacità di recupero automatico in caso di errore. Questo approccio consente una pianificazione adattiva dell’attacco lungo l’intera kill chain.
In uno scenario di test applicativo web, Villager può identificare tecnologie, eseguire scansioni mirate e sfruttare vulnerabilità in modo adattivo.
In contesti più complessi, il framework è in grado di coordinare automazione del browser, generazione di payload, monitoraggio del traffico di rete e persistenza post-exploit, senza ricorrere a playbook statici.
Considerazioni finali
Villager rappresenta un’evoluzione significativa nel panorama degli strumenti di attacco basati sull’intelligenza artificiale.
La sua capacità di orchestrare dinamicamente più vettori offensivi, riducendo al minimo l’intervento umano, abbassa ulteriormente la soglia tecnica per condurre operazioni complesse.
La presenza attiva del framework su piattaforme come VirusTotal conferma che gli attacchi AI-driven non sono più teorici. L’uso del protocollo MCP come ponte tra modelli linguistici e strumenti offensivi introduce un paradigma destinato a influenzare lo sviluppo dei malware futuri, contribuendo alla diffusione delle cosiddette AiPT, le minacce persistenti basate su agenti di intelligenza artificiale.
L'articolo Villager: il framework di pentesting basato su AI che preoccupa la sicurezza globale proviene da Red Hot Cyber.